Waversasystems W NAS3 User manual

W NAS3
All In One Network Attached Storage Server
Owner’s Manual

SAFETY!!
Disconnect power cords by pulling the plug, not the cable.
Do not attempt any repairs. Do not remove the unit’s chassis cover without
specific authorization from Waversa Systems Inc.
Keep all cables away from heat sources.
Ensure there is plenty of free space around and above the unit.
Keep the unit away from liquids –do not allow any liquid to enter the interior of
the unit.
When the unit is moved from a cold to a warm environment, allow sufficient time
for any condensation to evaporate before plugging the NAS3 into an AC
connection.
CLEANING
Chassis:
Use only a soft, lint-free cloth dampened slightly with water only to clean the
faceplate and chassis. Any ammonia or alcohol based cleaners may stain or mar
the polished aluminum surface of the NAS3.
Connectors:
You may use any good quality contact cleaner recommended for such
applications to clean the contacts from time to time, as you deem appropriate.
W NAS3 Owner’s Manual 01

CONTENTS
§KEY FEATURES OF W NAS3
§FRONT&REAR PANEL
§INPUT SOURCE
§DISPLAY
§MENU
§QUICK SETTING/ STORAGE
§NETWORK CONNECTION
§W NAS3
W NAS3 Owner’s Manual 02

W NAS3 KEY FEATURES
•NETWORK AUDIO
•DLNA, Roon, AirPlay
•USB
•UAC 2.0 COMPATIBLE
•DIGITAL OUTPUT
•Coaxial, AES/EBU
•AUTOMATIC MEMORY PLAY -CDT/CDP
•Ripping and Playback
•Playback ripped file on cache drive
•EXTERNAL USB DAC
•WAP AUDIO PROCESSING
•HEADPHONE VOLUME CONTNROL VIA REMOTE
CONTROLLER
•SABRE ES9038PRO
•FULL DISCRETE ANALOGUE OUTPUT BUFFER
•FULL DISCRETE HEADPHONE AMPLIFIER
•5 BAY 2.5Inch Storage
W NAS3 Owner’s Manual 03
* During initial operation with CD, NAS3 produces
motor noise till ripping completed.
* Caution : Use proper signal cable otherwise analogue
output buffer can be damaged due to its low impedance
level.

Front Panel
①Power Switch
②IR remote sensor
③LCD Screen
④CD Slot
⑤Keys
⑥Headphone Output
W NAS3 Owner’s Manual 04
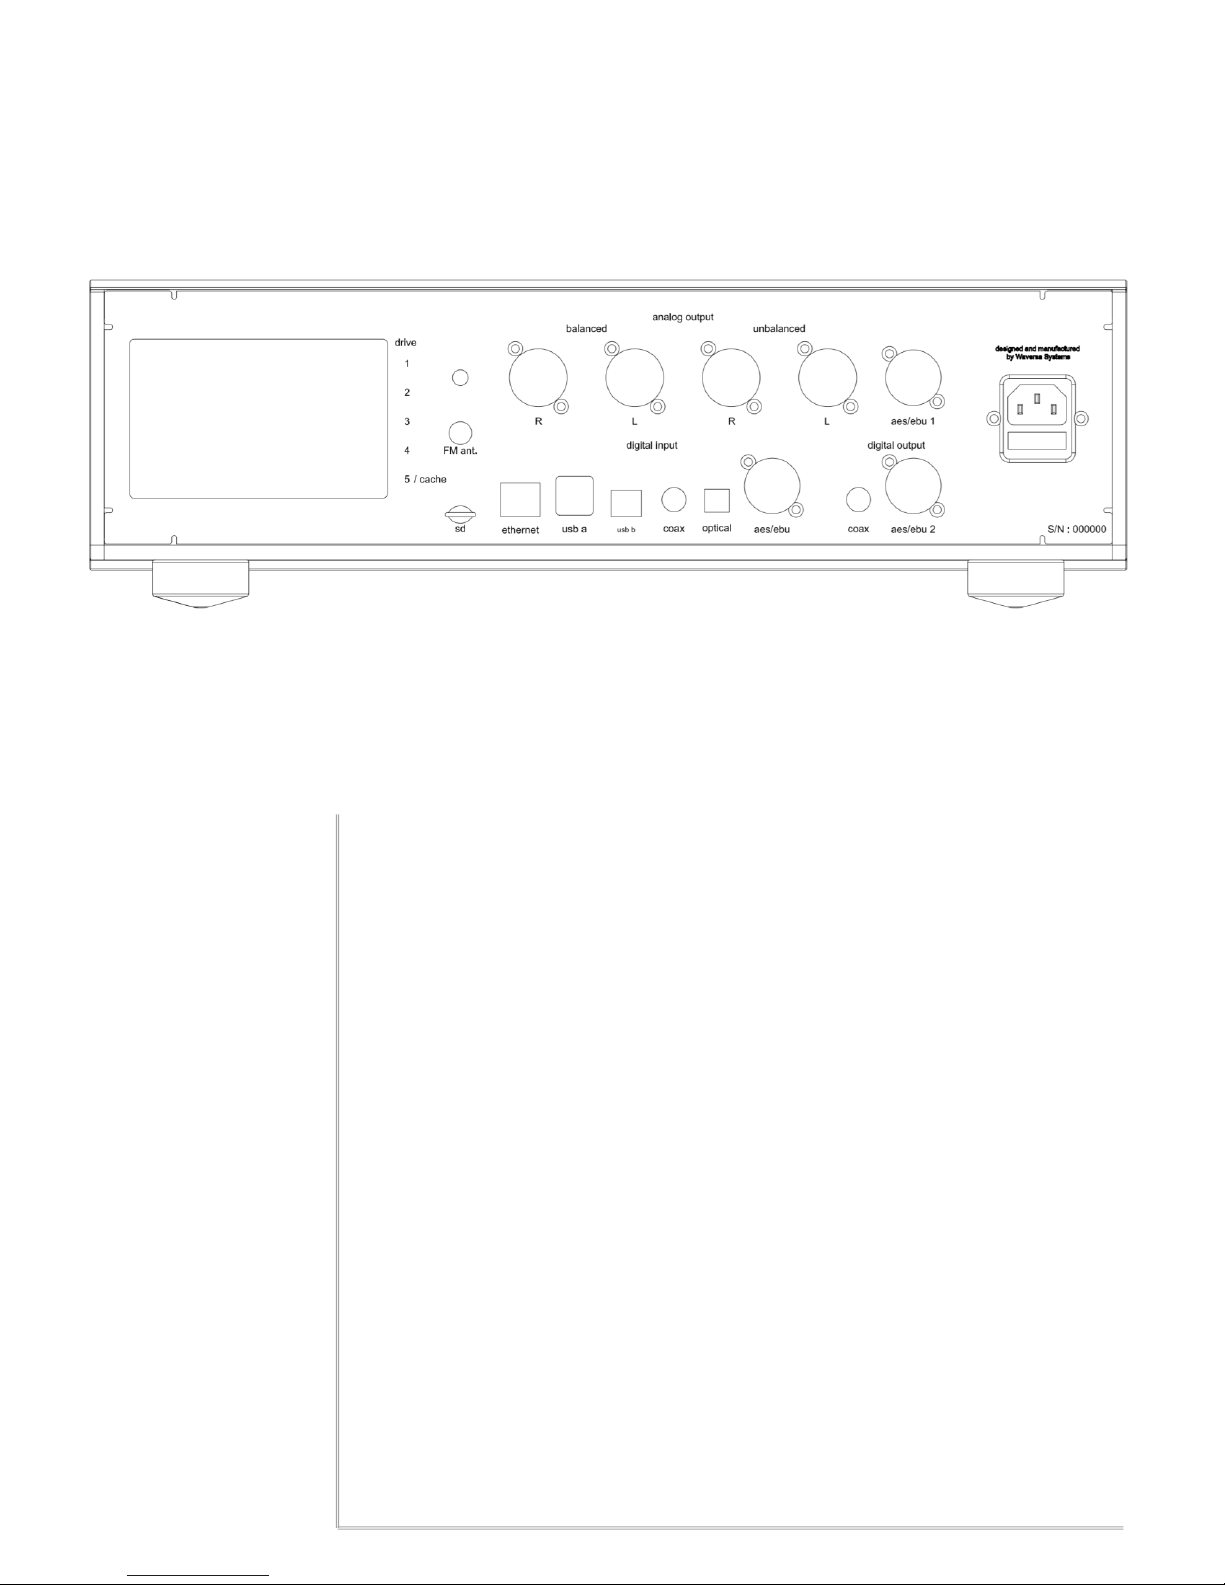
Rear Panel
1. 2 x XLR Output
2. FM Antenna
3. 3 x RCA Output
4. 5 x 2.5 Inch HDD Bay
5. SD Card slot
6. Ethernet
7. 2x USB A
8. 1 x USB B
9. Coaxial Input
10. Optical input
11. AES/EBU Input
12. Coaxial Output
13. 2x AES/EBU Output
14. AC Power
W NAS3 Owner’s Manual 05

INPUT
•Network AUdio
•DLNA
•ROON
•AirPlay
•USB Audio
•Coaxial
•Optical
•AES/EBU
•CD
W NAS3 Owner’s Manual 06
OUTPUT
•Balanced
•Unbalanced
•Coaxial
•AES/EBU
•Headphone
STORAGE
•5x 2.5 Inch HDD/SSD Bay
•External USB
User Interface
•7 Inch LCD Screen
•8x Front button
•Open, Play, Pause, Prev, Next, Source, Menu,
•Select
•IR Remote controller

Operation
•Open –Eject CD
•Play –Play CD
•Pause –Stop CD
•Prev –Previous CD track
•Next –Next CD track
•Source –Change source
•Menu -Change function
•Select –Select Menu
W NAS3 Owner’s Manual 07
Source
•DLNA
•Controllable through DLNA client
application(Mobile App)
•ROON
•ROON Application
•USB
•USB Audio
•AES
•SPDIF Input(XLR)
•COAX
•SPDIF Input (RCA)
•OPT
•SPDIF (Optical)
•CD
•CD Player

DISPLAY
- STATUS SIGNAL : CD
①Source : CD
②RATE : Basic ▶Changed Sampling rate
③Title / Player
④TRACK : Total number of track / Play track
⑤TIME : Current played time
⑥DISK : Total disk time
⑦TRACK : Current track time
⑧SIGNAL PATH
•DLNA or ROON : Input music source
•I2S : Basic sampling rate
•WAP : WAVERSA AUDIO PROCESOR
Upsampling frequency rate
•DAC : DAC chipset
•DOUT : Digital output frequency
•PHONES or LINE : Headphone or Output
mode (Phones mode appears on with
Headphone input)
•Volume : Headphone volume level 0~63 (Use
Remote controller)
W NAS3 Owner’s Manual 08
※ CD track number turns to blue when ripping completed

DISPLAY
- STATUS SIGNAL : DLNA OR
ROON
①Source : DLNA or ROON
②Rate : Basic ▶Upsampling rate
③Title / Player
④SIGNAL PATH
•DLNA or ROON : Input music source
•I2S : Basic sampling rate
•WAP : WAVERSA AUDIO PROCESOR
Upsampling frequency rate
•DAC : DAC chipset
•DOUT : Digital output frequency
•PHONES or LINE : Headphone or Output
mode (Phones mode appears on with
Headphone input)
•Volume : Headphone volume level 0~63 (Use
Remote controller)
W NAS3 Owner’s Manual 09
DISPLAY
- STATUS FM RADIO
①Source : FM RADIO
②Rate : Basic ▶Changed Sampling rate
③PRESET : Memory for Tuned Radio Frequency
④STATION : Received Signal Intensity(dBuV)
⑤SIGNAL PATH
•FM : PCM
•I2S : 44.1
•WAP : WAVERSA AUDIO PROCESOR
Upsampling frequency rate
•DAC : DAC chipset
•DOUT : Digital output frequency
•PHONES or LINE : Headphone or Output
mode (Phones mode appears on with
Headphone input)
•Volume : Headphone volume level 0~63 (Use
Remote controller
※ Radio frequency & Preset to be changed with Select
button
W NAS3 Owner’s Manual 10

DISPLAY
- STATUS DISK
①DISK USED
1 ~ 4 : 2.5” HDD slots for NAS3 storage (Play available
through DLNA application)
5 : Cache HDD for ripping and play
(Designated storage for CD ripping)
•STORAGE RESCAN
If the HDD status does not display proper HDD
storage , press STORAGE RESCAN to reset the status.
W NAS3 Owner’s Manual 09
※ To cache(memory) play, insert ripping CD
again. During cache play, CD motor is not
running. Cache play is recommended to
listen enhanced sound quality.
※ Do not put CD which is unauthorized for
ripping. It comes with ripping lock code
which can cause system error.

MENU
•RES –Resolution for analog output
•BYPASS –bypass original sample rate
•1X –44.1/48
•2X –88.2/96
•4X –176.4/192
•8X –352.8/384
•DOUT –Coaxial, AES/EBU Output
•BYPASS –bypass original sample rate
•1X –44.1/48
•2X –88.2/96
•4X –176.4/192
•CONV
•NONE –bypass original input
•DSD –CONVERT PCM INPUT TO DSD
•DCONV
•NONE –DEFAULT
•F1 –50KHz
•F2 –60KHz
•F3 –70KHz
•LEVEL –Analogue output gain level
•25%
•50%
•75%
•100%
•DISP –LCD Brightness control
•Level range from 1 –8
•STATUS DISK
•STORAGE –Rescan storage
•CD –CD PLAY / RIPPING
•FAST READOUT –FAST RIPPING
•SLOW READOUT –SLOW RIPPING
•ACCURATE READ –ACCURATE RIPPING
•USBPGM –USB FW UPGRADE MODE
•TITLE ON/OFF –DISPLAY TITLE
W NAS3 Owner’s Manual 11

NAS3 QUICK SETTING
NAS3 is controllable via web quick setting page. Type http://wnas3/ to Browser or
http:// IP address.
W NAS3 Owner’s Manual 12
MEDIA RENDERER CONTROL

MEDIA SERVER
-DISPLAY DISK INFORMATION, MEDIA SERVER CONTROL ,DISK FORMAT
※ Cached music to be saved into SLOT5. In case of HDD5 is in full, move the files into
slot 1~4.
W NAS3 Owner’s Manual 13
REMOTE CONTROLLER MODE
NAS3 QUICK SETTING
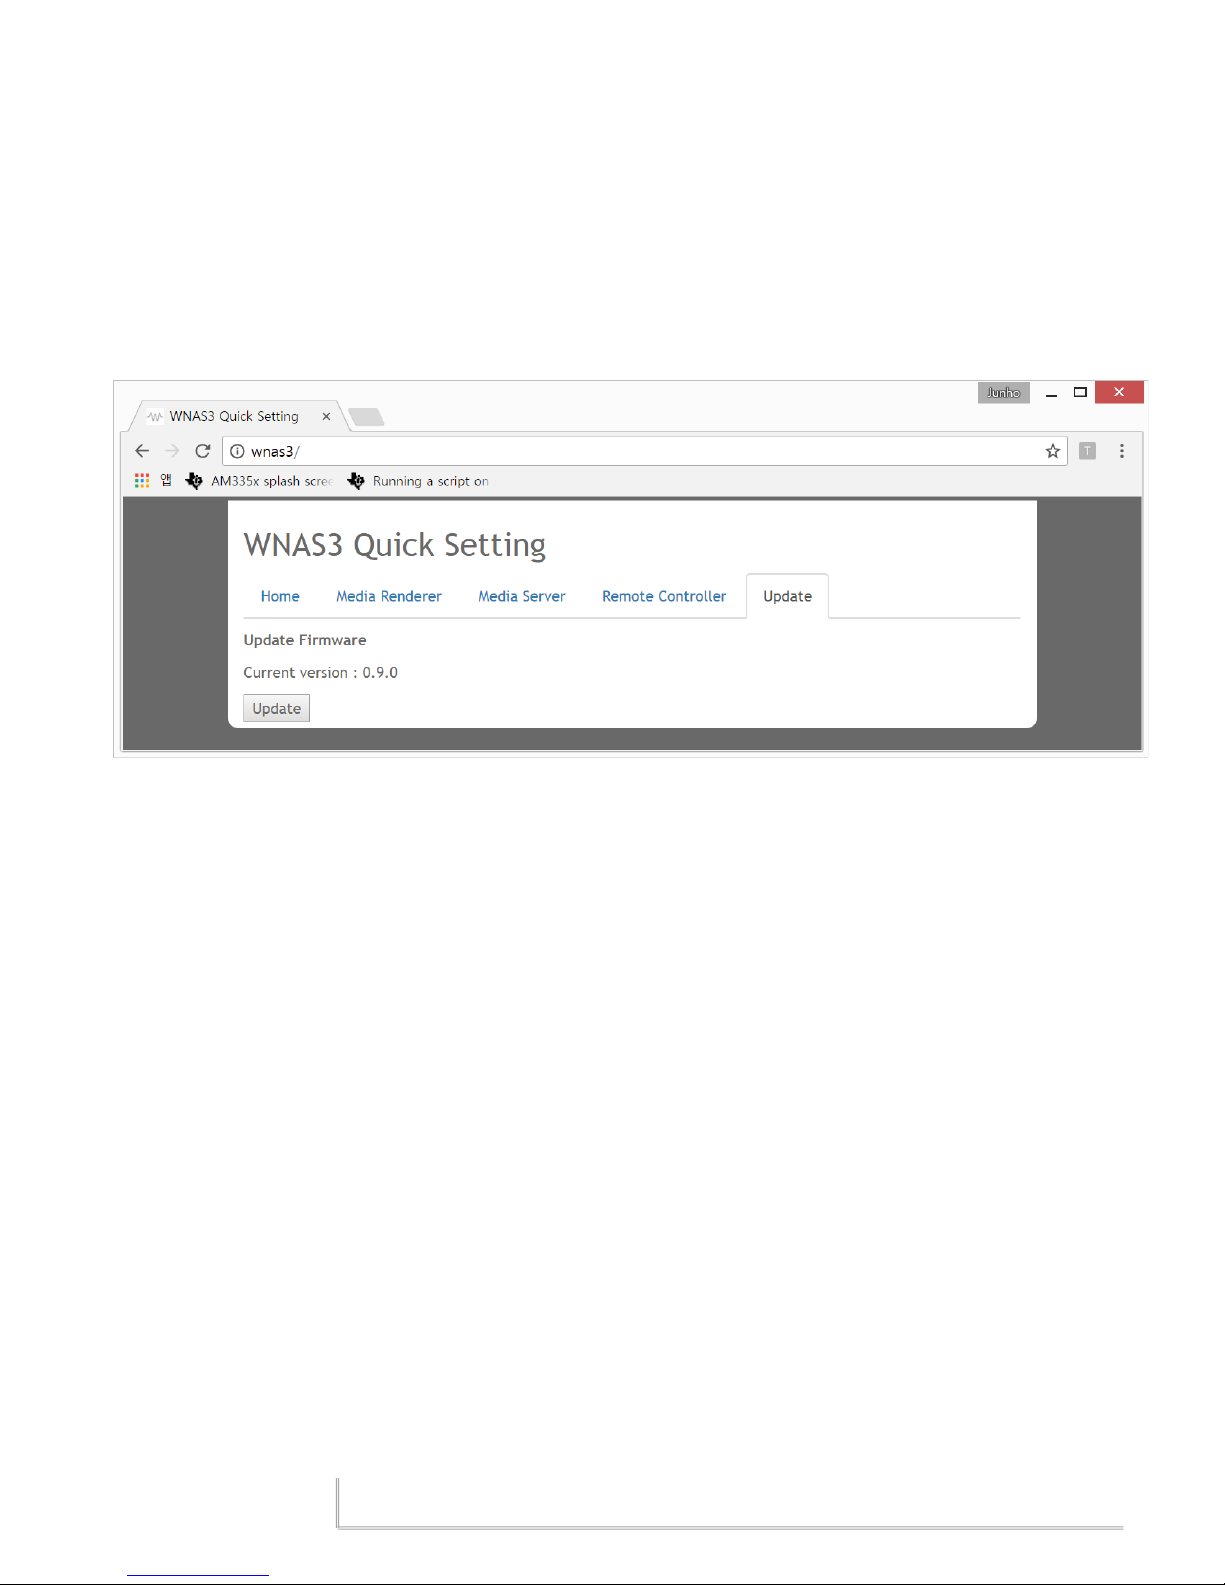
FW Update
Sometimes for specific reasons, firmware will be updated though web.
Press Update 2times and wait until Update success is displayed.
It may takes couple of minutes.
Do not turn off the system during update mode, otherwise system fw can be damaged.
W NAS3 Owner’s Manual 14
NAS3 QUICK SETTING
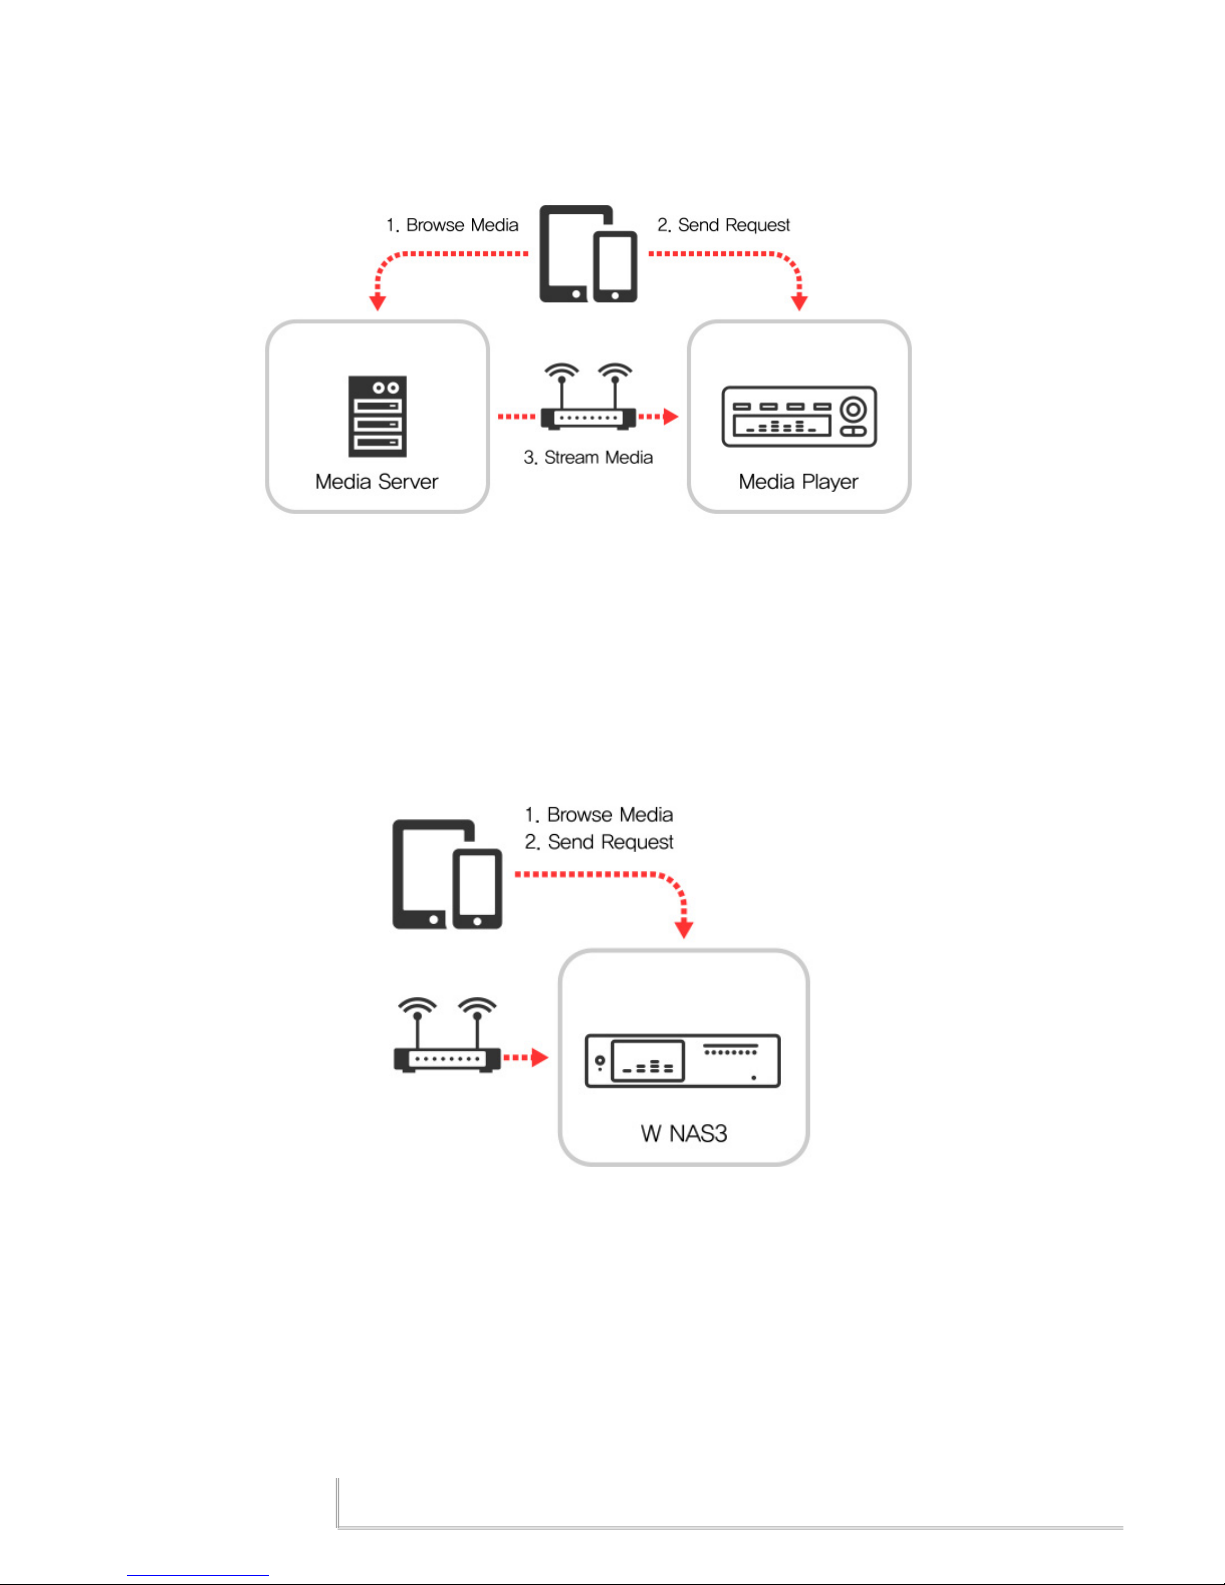
NETWORK SETTING 1.
W NAS3 supports standard DLNA
W NAS3 Owner’s Manual 15
NETWORK play is consisted of home network device, DMR, DMC, DMS.
•DMR (Digital Media Renderer) : Music playback
•DMC (Digital Media Controller) : Smart phone , Smart pad
•DMS (Digital Media Server) : Music storage
W NAS3 incorporates DMR & DMS into system. Connect it into home
network device (AP) and play by smart phone or smart pad. Install
supported DLNA application into your smart phone and play music.
NETWORK SETTING 2.
Available mobile application supporting DLNA
•Android : Bubble UPNP , mconnect, etc
•IOS : Bubble UPNP , mconnect, etc
W NAS3 Owner’s Manual 16
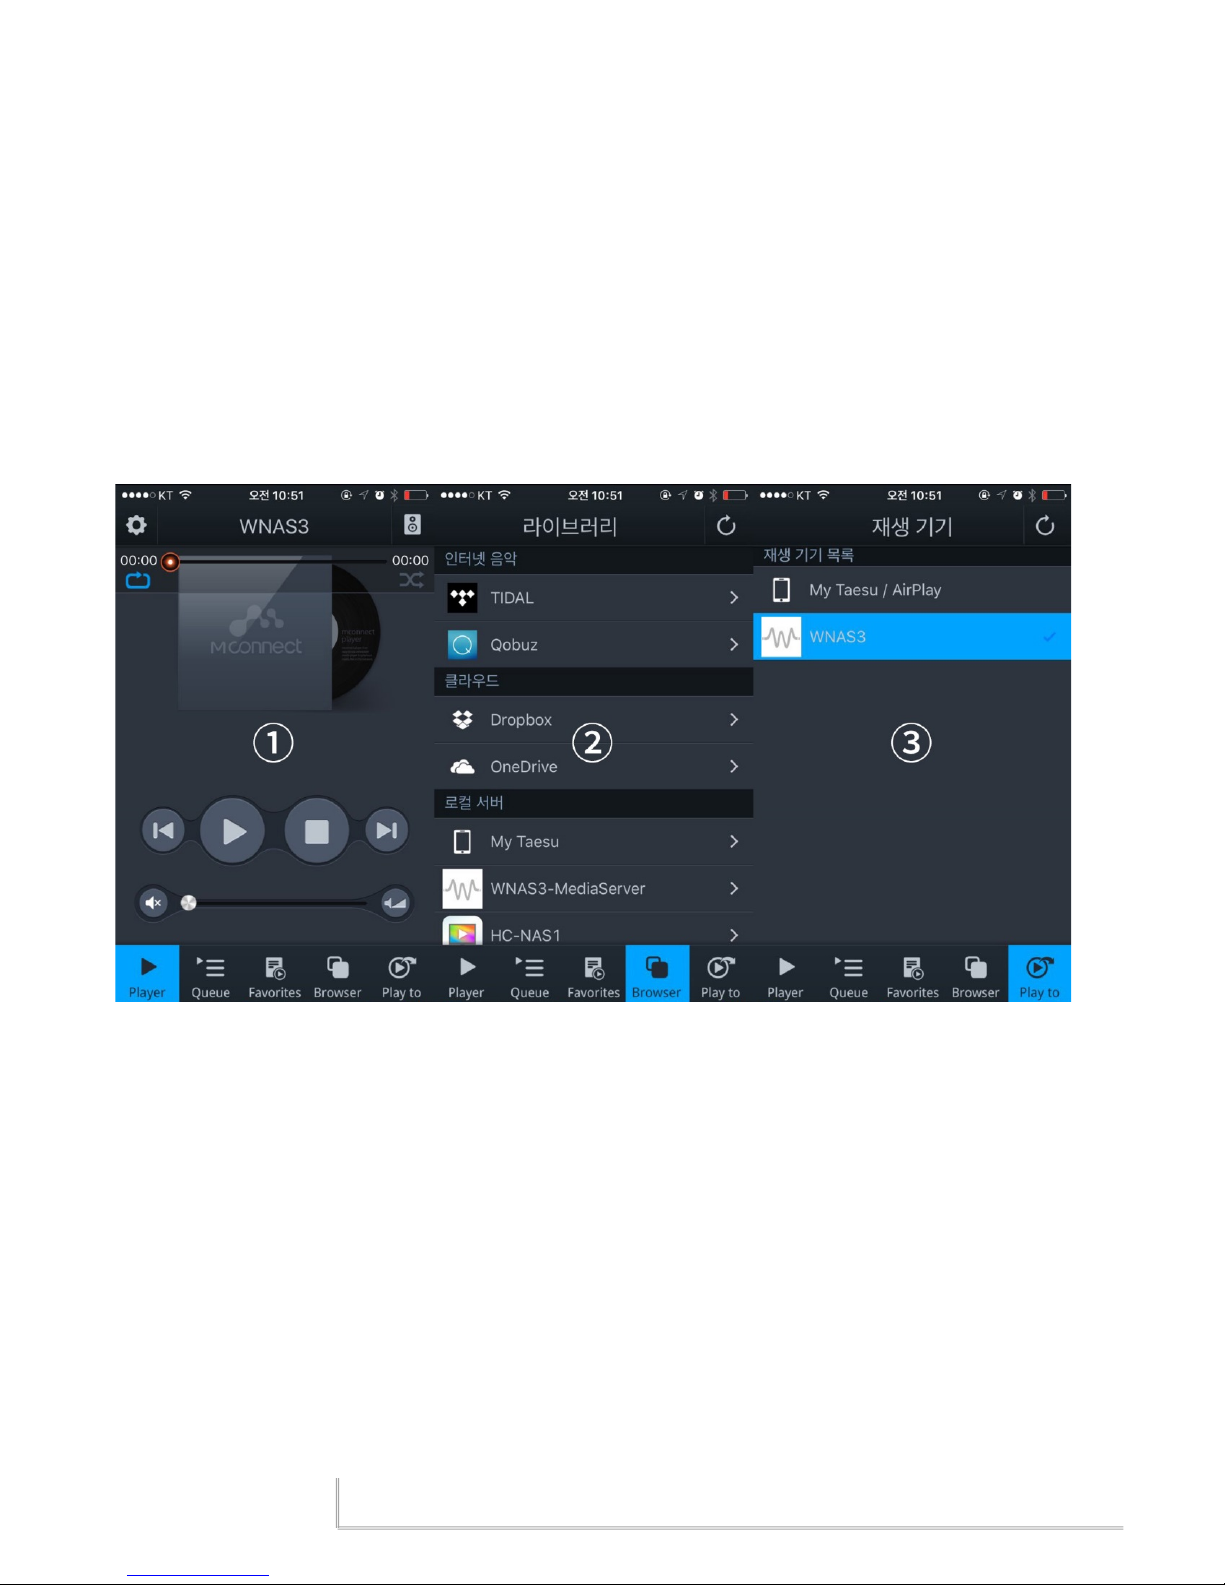
How to use
1. Select player (Renderer)
2. Select music library (NAS ,smart phone,etc)
3. Play

Music file copy into internal disk
Type \\WNAS3 into windows file explorer. Or type \\ IP address .
•ID : root
•Password : root
※ Ripped file to be saved into slot5
W NAS3 Owner’s Manual 17
Each disk has separate folder

W NAS3 specification
W NAS3 Owner’s Manual 18
Digital input
Digital output
Analogue output
Storage
Line voltage
Size
Weight
Ethernet, USB, Coaxial, Optical, AES/EBU
2 x XLR -Balanced
2x RCA -Unbalanced
5x 2.5 inch HDD/SDD Bay
External USB Storage
90~240 VAC @ 50Hz/60Hz
Voltage selectable inside manually
40 Watt
W 440 x L 330 x H 150
Ethernet, USB, Coaxial, AES/EBU
10Kg
Table of contents
Other Waversasystems Server manuals

Popular Server manuals by other brands


HP
HP Cluster Platform Hardware Kits v2010 installation guide

Fujitsu
Fujitsu PRIMERGY TX100 S2 Service supplement

Dell
Dell PowerEdge R815 Getting started guide

Dell
Dell PowerVault Series Recovery guide

Wi-Tek
Wi-Tek WI-IOT411T installation guide

Siemens
Siemens Unix V4.0 Overviews & installation instructions