Waves DiGiGrid IOS User manual

User Guide
DiGiGrid IOS/ IOS-XL

DiGiGrid IOS/IOS-XL / User Guide
2
Contents
INTRODUCTION................................................................................................................................................................. 3
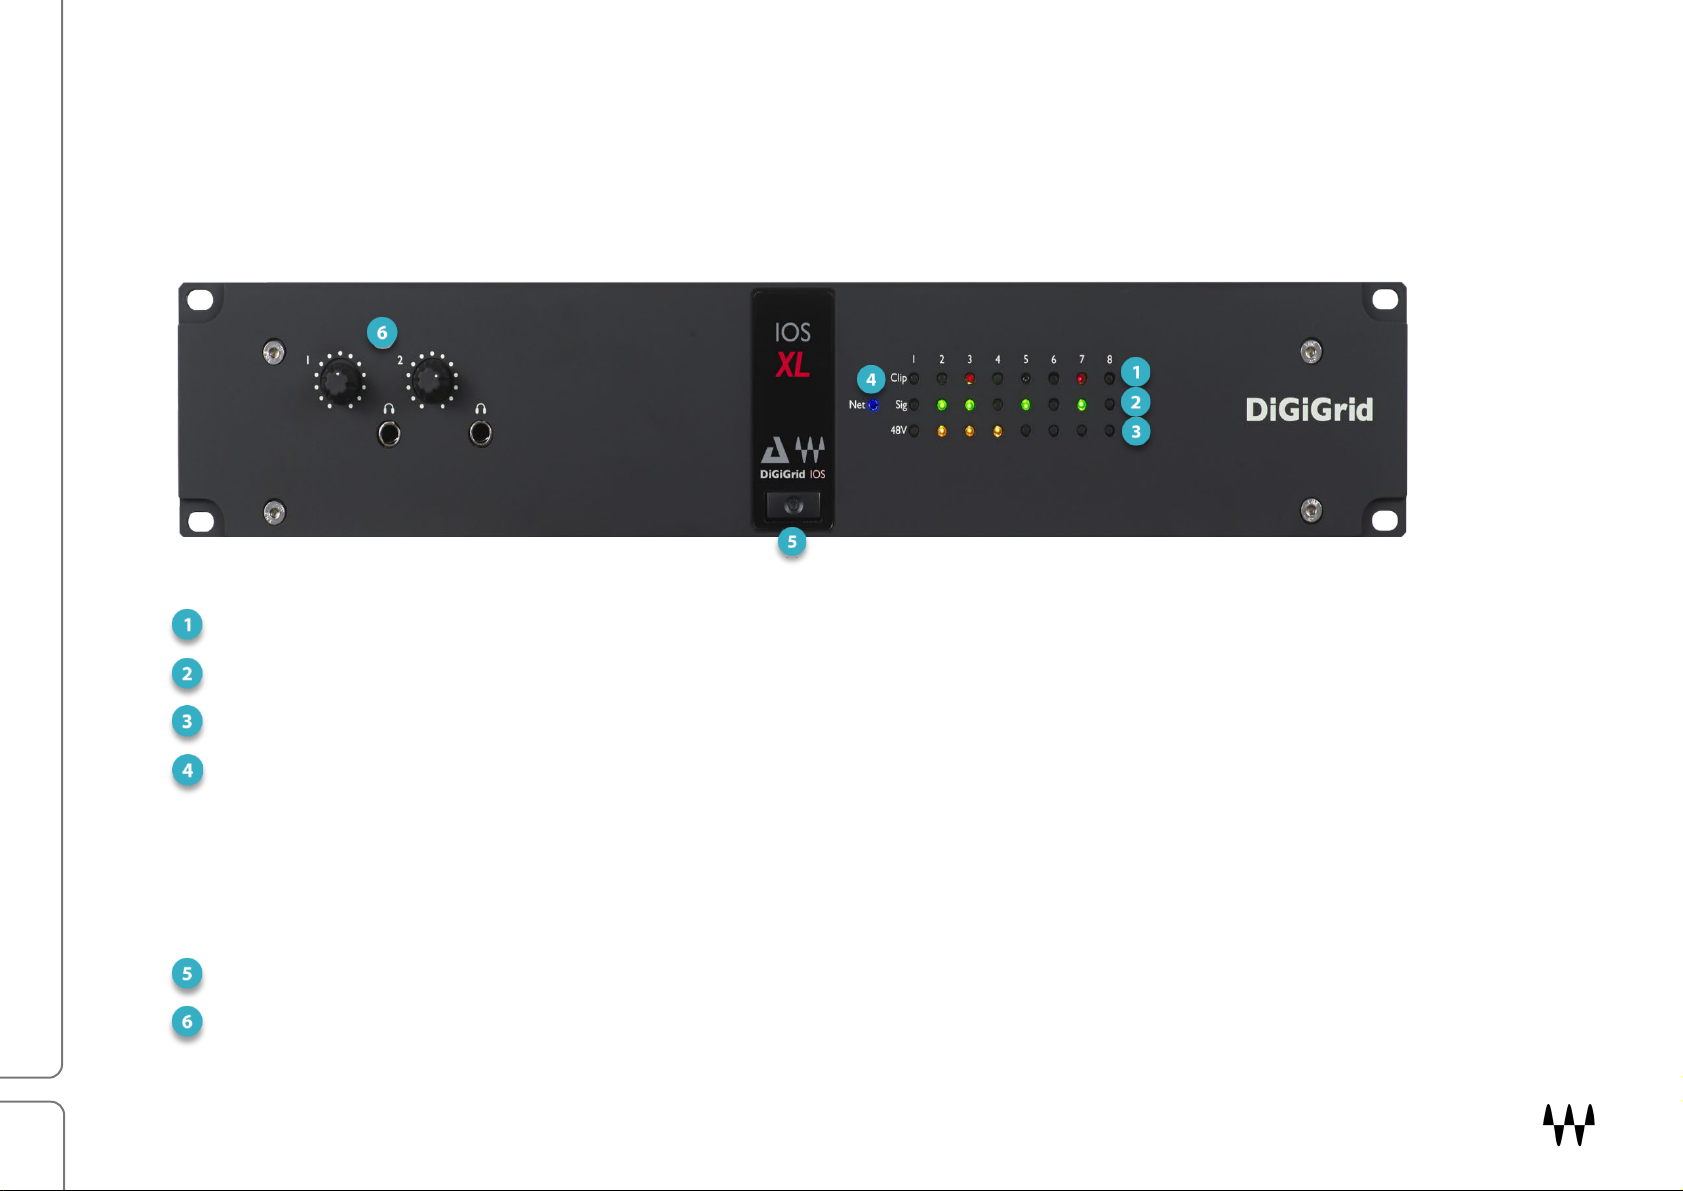
HARDWARE AND CONNECTIONS ................................................................................................................................... 4
GETTING STARTED........................................................................................................................................................... 6
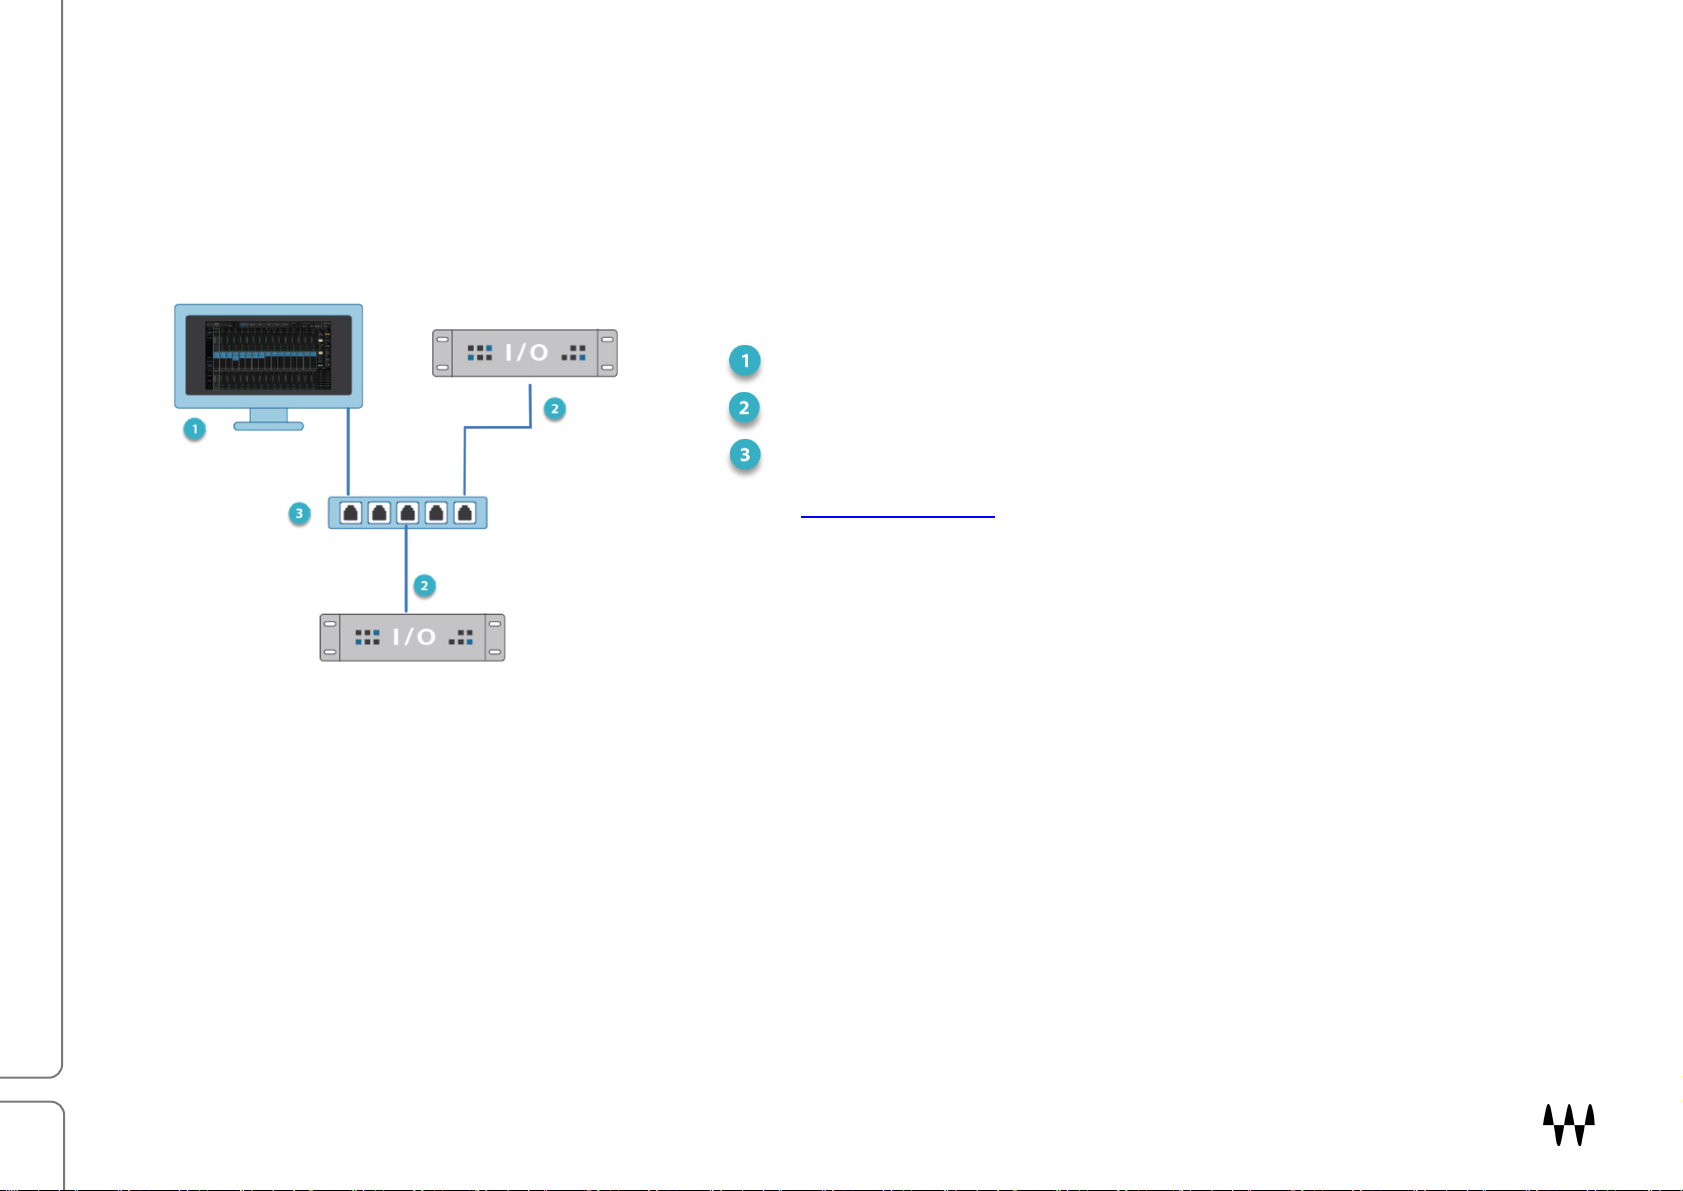
Connect the Hardware ..................................................................................................................................................... 6
One I/O......................................................................................................................................................................... 6
Add I/Os ....................................................................................................................................................................... 7
Download and Install Software ........................................................................................................................................ 8
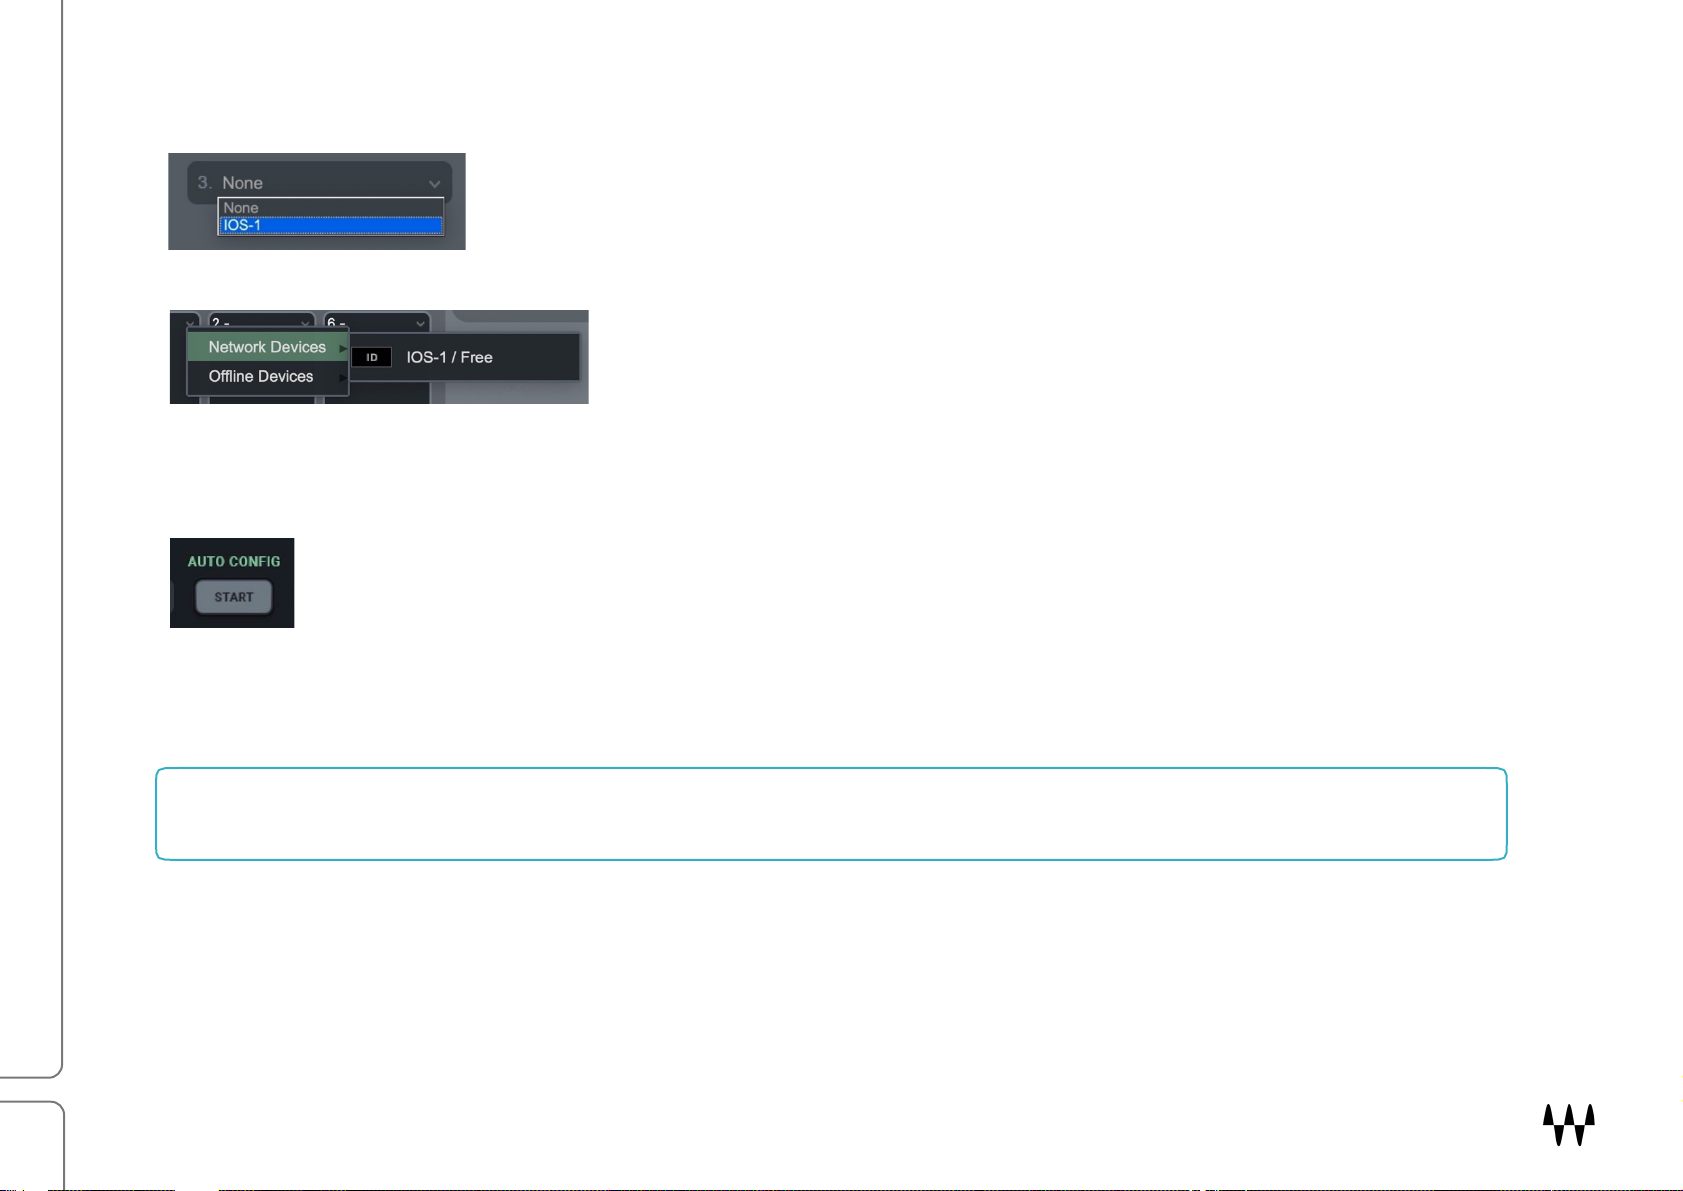
Configure the System ...................................................................................................................................................... 9
Manual Device Configuration ..................................................................................................................................... 10
Automatic Device Configuration ................................................................................................................................. 10
Device Firmware ........................................................................................................................................................ 11
IOS / IOS XL CONTROL PANEL ...................................................................................................................................... 12
Controls Page ................................................................................................................................................................ 13
Clock Page .................................................................................................................................................................... 18
System Info Page and About Page................................................................................................................................ 20
Presets........................................................................................................................................................................... 21
USING IOS/IOS-XL WITH A DAW .................................................................................................................................... 22
USING THE IOS/IOS-XL WITH MIDI ................................................................................................................................ 22
SPECIFICATIONS ............................................................................................................................................................ 23
RESETTING THE UNIT .................................................................................................................................................... 26
INSTALLATION NOTES ................................................................................................................................................... 26
Waves Inc
2800 Merchants Drive, Knoxville, TN 37912 USA
1-865-909-9200
www.waves.com

DiGiGrid IOS/IOS-XL / User Guide
3
Introduction
DiGiGrid IOS and IOS-XL are SoundGrid interfaces with built-in DSP servers for DAWs and Waves SoundGrid
applications. IOS and IOS-XL have the same I/O sections. Both models feature eight mic/line inputs with premium grade
preamps, eight line outputs, two headphone outputs, and MIDI, S/PDIF, and AES inputs and outputs. They also feature
a built-in network switch to connect more SoundGrid components to your system.
The IOS and IOS-XL’s internal DSP server is used to offload plugin processing from the host CPU. This dramatically
increases processing power and enables greater plugin counts—it also provides very low system latency. The IOS
internal SoundGrid DSP server is powered by an Intel i3 processor, while the IOS-XL uses an Intel i7 Extreme processor.
A SoundGrid I/O device is part of a SoundGrid network. SoundGrid is the Waves high-speed networking protocol for
moving audio, clock, and other information between a host system and I/O devices—and between I/O devices
themselves. A SoundGrid host configures the network, assigning servers and I/O devices to mix, process, or record,
depending on the host. SoundGrid I/Os link to the SoundGrid network with standard Ethernet cable.
SoundGrid is scalable. Connect one I/O device to a DAW and you have a high-quality sound card. Add more I/Os and
your system becomes more flexible and powerful. Depending on the host application, a SoundGrid host can assign up to
sixteen I/O devices. Complete SoundGrid systems can be networked together to share devices.

DiGiGrid IOS/IOS-XL / User Guide
4
Hardware and Connections
IOS-XL is a 2U rack-mounted device. Aside from headphone jacks, all connections are from the rear panel.
IOS/IOS-XL FRONT PANEL
Front panel LEDs indicate status regarding essential device functions for each channel.
Input clipping Red = clipping (level can be set through the control panel)
Input signal present Green = signal present
48V phantom power Orange = ON
Network status indicator
Blue: device recognized by the SoundGrid network
Red: device not recognized by the SoundGrid network Yellow: Updating
White: unit malfunction (e.g., firmware did not load properly, unit did not boot properly) Cycling through colors: this
LED is also used to identify the unit from the control panel.
Power switch/indicator
Two ¼-inch TRS headphone jacks with individual volume control knobs; 8 ohms – 600 ohms; gain = OFF to +15 dB

DiGiGrid IOS/IOS-XL / User Guide
5
IOS/IOS-XL REAR PANEL
Mains input: 90–240 V AC 50/60 Hz
Built-in 1GB Ethernet switch, four ports
The four-port Ethernet switch can connect IOS directly to a host computer and three other devices without an
external Ethernet switch. For larger systems, a 1 GB SoundGrid-approved Ethernet switch is necessary. It is not
important which of the Ethernet ports is used to connect to the SoundGrid network.
USB server service port
Recovery/reset button
MIDI in and out (can be linked to Waves applications and to DAWs)
Digital and clock connections: software selected
Clock in and out (BNC connectors for external Word Clock)
S/PDIF in and out (RCA connectors)
AES in and out (XLR connectors)
Analog connections
8 mic/line inputs (combo XLR/TRS connectors)
8 line out ¼ inch TRS connectors
Alt line out (DB25 8 channel balanced connector) See connection diagram in the specifications section.

DiGiGrid IOS/IOS-XL / User Guide
6
Getting Started
Configure SoundGrid and assign your devices as follows, however large or small your system.
Connect the hardware
Install the software
Configure your system
Connect the Hardware
Systems can range from small and simple, to huge and complex.
One I/O
In this example, one DiGiGrid IOS or IOS-XL is connected directly to the SoundGrid host computer using a Cat 5e
Ethernet cable or better. This provides plugin processing and/or DAW playback/recording via the SoundGrid ASIO/Core
Audio driver.
Host computer with SoundGrid application
SoundGrid I/O device
The host computer’s LAN port that’s connected to the SoundGrid network should be used for SoundGrid only. Do not
share this port with the internet or other networks.
In this configuration, all plugin processing is carried out on the host computer. The speed and power of the host defines
overall latency.

DiGiGrid IOS/IOS-XL / User Guide
7
Add I/Os
Adding I/O devices not only increases the number of I/O channels, but lets you have separate devices for stage and
FOH, or live room and control room. Both the IOS and IOS-XL feature a four-port Ethernet switch to connect with
SoundGrid devices. When more than four device connections are needed, use a "star" network configuration with a 1GB
Ethernet switch. Only use switches tested and approved by Waves.
Host computer
I/O devices
1GB Ethernet switch
See this support article for a list of supported switches.
You can connect and assign up to 16 SoundGrid I/O devices to the network, depending on the SoundGrid host
application. All SoundGrid I/O devices, hosts, and servers are connected through the Ethernet switch. You can also add
more computers to enable audio streaming among hosts.

DiGiGrid IOS/IOS-XL / User Guide
8
Download and Install Software
INSTALLING A NEW SOUNDGRID HOST SYSTEM
Installing the Waves SoundGrid host application will also install applicable device drivers and ASIO/Core Audio
drivers. Your devices will appear in the Inventory of your host system. If a device is not visible in the Inventory, you
may need to install a specific driver from Waves Central—please see below. First, however, check the device’s
connections and power.
ADDING AN I/O DEVICE TO AN EXISTING SOUNDGRID HOST SYSTEM
If you are already using a Waves SoundGrid host application and your device does not appear in the Network
Devices list, use Waves Central to update the host application, which also updates the device drivers—or install just
the missing device driver from Waves Central.1
Waves Central
All Waves software is downloaded and installed via the Waves Central application. To install a specific device driver,
launch Waves Central and follow these steps:
Choose All Products
Search for the driver by name
Choose the driver and click Install
If you are new to Waves products, begin by downloading the Waves Central installer from the Waves Download
Page. See the Waves Central User Guide for instructions on how to install drivers, plugins, and applications.
LICENSES
You do not need a license to use this device. However, many hosts or specific host configurations do require a license.
Refer to your host’s product page for details.
1The SoundGrid QRec host is installed with any I/O.

DiGiGrid IOS/IOS-XL / User Guide
9
Configure the System
A SoundGrid network is configured and devices are assigned in a host’s Setup window. At the heart of this window are
racks where devices are assigned. Any compatible device that’s part of the host’s SoundGrid network will be available for
assignment. This collection of devices is called the Inventory. Setup is similar with all hosts: identify the host’s LAN port,
select a device slot, and use the drop-down menu to choose an available device.
Please consult the user guide of your host application for specific instructions.
All SoundGrid devices are configured in a similar manner. Throughout this section, we show DiGiGrid IOS as an example.
SoundGrid QRec
SoundGrid Studio Setup Window

DiGiGrid IOS/IOS-XL / User Guide
10
Manual Device Configuration
You can assign, remove, and manage a device manually. Click on the plus or arrow
symbol in a device slot to open the Device Menu, then select a device.
Any device not already used will be available for assignment. If no other
devices are assigned, the current device will become your clock master.
Drivers and servers are assigned in the same manner.
See the user guide of your host system for specific instructions on device
assignment and I/O channel patching.
Automatic Device Configuration
Certain SoundGrid hosts—including SoundGrid Studio, eMotion LV1 or SuperRack SoundGrid—offer an Auto-
Config tool. Once your devices are connected and powered up, click Auto Config to start the configuration.
Auto-config chooses the correct LAN port on the host computer and scans the SoundGrid network for devices. It then
patches the devices to the host. We recommend that you let Auto-Config take care of things, at least when you are
getting started. If later you add, remove, or swap a device, Auto-Config will reconfigure your inventory and re-patch.
Note that SoundGrid Studio assigns the SoundGrid driver automatically. SuperRack SoundGrid and eMotion LV1 require
that the SoundGrid ASIO/Core Audio driver is assigned manually.
SoundGrid QRec
SoundGrid Studio

DiGiGrid IOS/IOS-XL / User Guide
11
Device Firmware
An I/O that is using outdated or incompatible firmware will not work properly in a SoundGrid network until its firmware is
updated. The color of the FW button in a device slot indicates the current firmware status.
If a device requires updated firmware, click on the FW button to start a hardware scan. Do not disconnect the device or
turn off the computer before Done appears. Once the update is ready, turn the device off and on to reset.
Identify a Device on the SoundGrid Network
Click on the ID button to activate a hard-to-miss LED on the front panel of
the corresponding hardware device. You can also activate the front panel
from the top bar of the device’s control panel.
Grey Compatible firmware
Blue Compatible firmware, but a newer version exists
Red Firmware not compatible and must be updated in order to use
SoundGrid Studio
SoundGrid QRec
SoundGrid Studio
SoundGrid QRec

DiGiGrid IOS/IOS-XL / User Guide
12
IOS / IOS XL Control Panel
There are two ways to open the device control panel:
FROM THE DEVICE RACK
Click the Gear button on a device in the rack slot.
FROM THE DRIVER CONTROL PANEL
Open the driver control panel and then click the Hardware Control Panel button. The
driver control panel is located here in the host computer:
PC: C:\Program Files (x86)\Waves\SoundGrid\Driver Control Panel
Mac: System HD/Applications/Waves/SoundGrid
CONTROL PANEL PAGES
The Clock and Controls pages are used to set up and manage the unit. The About and System Info pages provide
information about the unit, such as MAC address, SOE master, firmware version, and more.
SoundGrid Studio
SoundGrid QRec

DiGiGrid IOS/IOS-XL / User Guide
13
The Controls page is divided into three
sections:
Top Bar
Analog section
Digital section
Focus section: input and output
levels and 48V phantom power for
selected I/O channel are controlled
here.
Controls Page
This is where you configure the inputs and outputs of the IOS/IOS-XL.
Mic preamps, line inputs and outputs, digital I/O, level control and metering.

DiGiGrid IOS/IOS-XL / User Guide
14
TOP BAR
The Top Bar of the Controls page includes an illustration of the IOS/IOS-XL rear panel. When an input or output is
selected in the main section of the page, the corresponding connector is highlighted.
ANALOG SECTION
There are eight mic preamps and line inputs and eight line outputs. Each preamp channel is represented by a button that
turns the channel on or off. Each channel has a meter and a clip indicator. Select a channel and it will appear in the
Focus section, where preamp parameters are controlled.
Use the Focus section on the left side to adjust preamp levels and turn the
48V phantom on and off. The long meters range from -80 dBFS to 0 dBFS.
Mic/Line knob gain range: 0 dB to +52.5 dB in 7.5 dB steps
Line knob gain range: 0 dB to +52.5 dB in 7.5-dB steps
Fine knob digital gain range: 0 dB to +7 dB in 0.5 dB steps
A clip indicator holds for two seconds or for as long as clipping persists.
Peak hold stays lit until you reset it by clicking on the indicator.
An orange light on a channel button indicates that phantom power for that
channel is active. This status is also shown in the Focus section.

DiGiGrid IOS/IOS-XL / User Guide
15
REMOTE PREAMP CONTROL
You can control input preamp functions directly from the channel strip of SoundGrid applications, including eMotion LV1,
SoundGrid Studio and SuperRack SoundGrid.
Control
Function
48V Phantom
On or Off
Preamp Gain Input Controls analog gain in an assigned I/O device that includes a controllable
preamp.
Input Polarity
Mono channels have one polarity reverse button. Stereo channels have two.
Buttons are latching and are colored
green when polarity is reversed.
Digital Input Trim Controls input level from digital sources. Separate controls for L/R
when input is stereo.
This allows you to control preamps “on the fly,” without leaving your monitor mixer. Refer to your host application’s user
guide for details.
ANALOG OUTPUT CONTROLS
In addition to meters and clip and peak indicators—which are identical to those in the input controls—
there is a Headroom switch that provides a -10 dB pad
Presence of the -10 dB pad on an analog output is indicated by a LED.

DiGiGrid IOS/IOS-XL / User Guide
16
Use the SRC button to enable input sample rate conversion. When SRC is selected,
IOS/IOS-XL will convert incoming digital stream to the sample rate of the clock that the
device is locked to. Sample rate conversion is indicated by a yellow light on the channel
button.
DIGITAL SECTION
Digital inputs and outputs are selected in pairs. Two buttons in the Focus section are used to switch digital input and
clock between AES/EBU and S/PDIF. This choice is reflected in the Top Bar illustration.

DiGiGrid IOS/IOS-XL / User Guide
17
CLIP INDICATION AND SMALL METERS
Clip Indication Threshold sets the level where clipping is shown on the meter in the Focus section. The threshold can be
set to 0 dB, -1 dB, -2 dB, or -3 dB. This setting is global: it affects level indication for all channels—input and output.
Each channel button—analog or digital, input or output—has a small level meter that indicates
when signal is present and provides a rough idea of level. A red light on the channel button
indicates clipping.
Headphones output levels are indicated in the same manner.

DiGiGrid IOS/IOS-XL / User Guide
18
Clock Page
Use the Clock page to set the clock source and sample rate for the device and to assess clock status.
SOURCE sets the requested clock source.
Internal The device itself provides the SEO clock.
External WC Clock is provided by an external device via the Word Clock Input connector.
Sync over Ethernet The device receives clock from the SoundGrid network.
Digital IOS/IOS-XL clocks to incoming digital stream

DiGiGrid IOS/IOS-XL / User Guide
19
SAMPLE RATE sets the sample rate when Clock Source is set to Internal. Range: 44.1 / 48 / 88.2 / 96 kHz.
If the device is the network (SOE) clock master, as determined in the Device Racks of the
SoundGrid host, then this setting determines the sample rate of the SoundGrid network.
If Clock Source is set to an external clock source, you cannot change the sample rate from the
host. The Sample Rate menu is grayed out and inoperative.
CLOCK STATUS INDICATORS
Three windows on the right side of the Clock control panel help you to quickly assess the network status of the device.
When the device is a slave in the SoundGrid network, you will likely sync it to the SoundGrid network clock (via SOE).
Even when the device is an SOE slave, you can lock it to an external clock source. For example, if another SoundGrid
I/O device is the SOE master and is locked to a word clock device, you may choose to receive clock from the same
external device over word clock from the master device rather than via network SOE.
In the event that the selected clock source fails, IOS/IOS-XL has a series of clock fallback layers, in this order: WC,
Digital, SOE, Internal. If the device is clocked to external source and that clock source fails, it will seek an alternate
source of clock, in this priority: word clock, Digital 1, Digital 2, and then SOE. If this fails, the device will fall back to
Internal.
Status Reports the presence or absence of sync between the IOS/IOS-XL and
the SoundGrid network.
Current Clock
Source
Displays the current sync method. This may differ from the choice made
in the Source menu.
SOE
Indicates whether this IOS/IOS-XL is the master or a slave in the
SoundGrid network. This mirrors the status information in the SoundGrid
Studio Device Rack.

DiGiGrid IOS/IOS-XL / User Guide
20
System Info Page and About Page
The About page contains a description of the device. The System Info page contains technical details about the device,
including MAC address, Firmware version, and Module version. This information is useful for troubleshooting. Please
have this information handy if you contact Waves technical support concerning the device.
This manual suits for next models
1
Table of contents
Popular Accessories manuals by other brands

omnicharge
omnicharge Omni 20+ quick start guide

Honeywell
Honeywell DT8050M Quick installation guide

Crystal Mountain
Crystal Mountain Storm Service manual

Liquid Image
Liquid Image Apex PLUS user manual

NATURE & DECOUVERTES
NATURE & DECOUVERTES 15225540 manual

PS Audio
PS Audio PerfectWave DAC Mk II Upgrade kit