Wavlink WL-WN523N2 User manual
Introduction
3
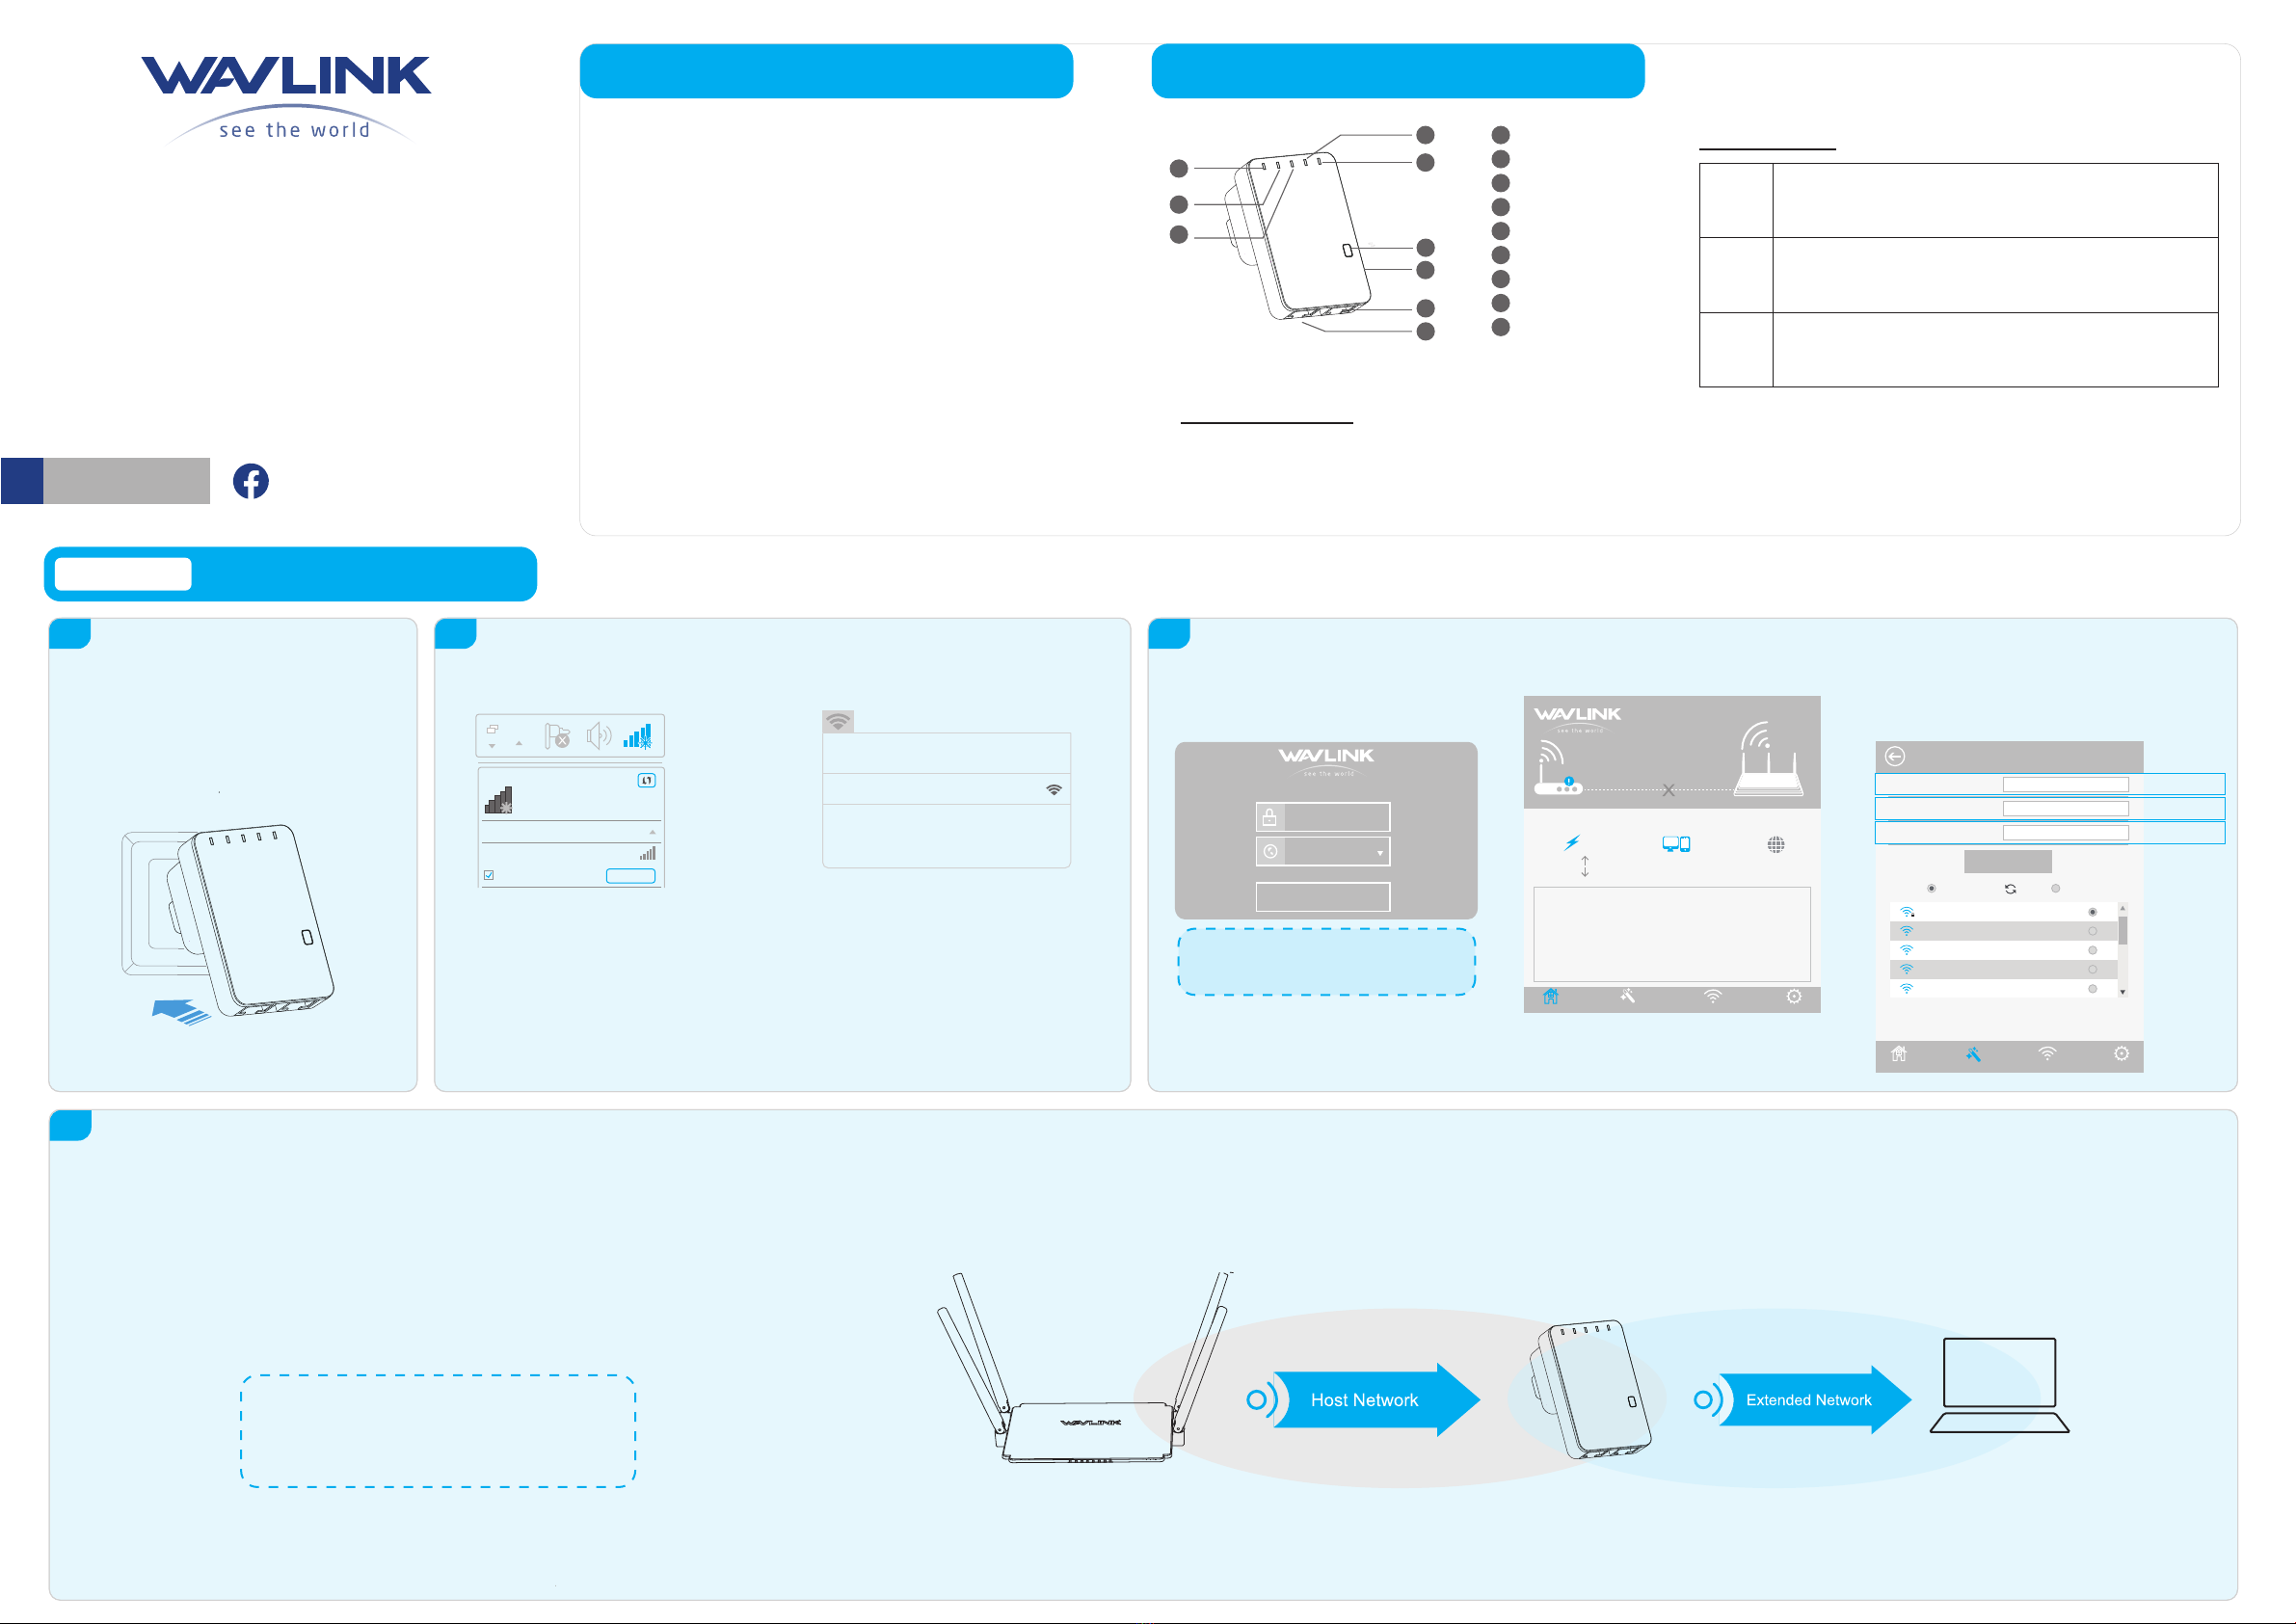
LED Indicators
POWER
LAN/WAN
WPS
ON: The Device is powered on
OFF: The Device is not receiving electrical power.
ON:
The Ethernet port is connected.
OFF: The Ethernet port is disconnected.
Flashing: Transferring data to/from a network device
Slow Flashing: The Device is trying to connect to your PC or Phone
Fast Flashing: The Device is connecting to your AP/Router
WPS Button:
Press and hold for 2seconds, the Device is trying to connect to your PC or Phone
Press and hold for 6 seconds to connect to your Wi-Fi AP/Router (for Repeater Mode)
Reset Button: Press and hold for 3seconds to Reset the Device.
1. Launch a web browser and type http://ap.setup
in the address field. Enter admin (all lowercase)
to login.
2. Click “Wizard”.
OPTION ONE Wi-Fi Repeater Mode
Using a Web Browser
Power ON
1
1. Plug the Device into an electrical outlet near your
Wi-Fi router.
2. Wait until the POWER LED is on and solid green.
If the login window does not pop up, please
refer to the FAQ > Q1.
4. Verify your wireless settings and click "Connect".
For Windows User For Mac OS X User
1. Disconnect the Ethernet (Wired) connection
from your laptop (if any).
2. Turn your laptop’s Wi-Fi ON if it is OFF.
3. Click the Wi-Fi icon on the top right corner
of the screen, and connect to the Device’s
network: WAVLINK-N.
Not connected
Connections are available
Wireless Network Connection
WAVLINK-N
Connect
Connect automatically
Connect to the Device
2Configure
3
1. Disconnect the Ethernet (Wired) connection
from your laptop (if any).
2. Turn your laptop’s Wi-Fi ON if it is OFF.
3. Click the Wi-Fi icon on the taskbar and connect
to the Device’s network: WAVLINK-N.
Wi-Fi:On
Turn Wi-Fi Off
WAVLINK-N
Join Other Network....
Create Network....
Open Network Preferences...
Relocate4
1. Plug the Device into an electrical outlet about halfway between your router(Host Wi-Fi) and the Wi-Fi dead zone. The location you
choose must be within the range of your existing host Wi-Fi.
2. If the signal is weak, relocate it closer to the router to achieve a good (or better) signal quality.
Tips: Use your phone to find the ideal location for the Device.
If your phone’s Wi-Fi signal(received from your router) is higher
than 3 levels, it is the ideal spot to install the Device. If not, we
suggest you to move closer to your router for better Wi-Fi signal.
Wi-Fi Range Extender
English
login
This Device
Repeater
Router
Speed
0KB/S
0KB/S
1Disconnet
Clients Internet
Device Information
WAN Type Repeater
192.168.10.1
192.168.10.1
0.0.0.0
0.0.0.0
82:3F:5D:09:EA:62
Wi-Fi SSID
Channel
Connect to
Status
Up Time
Firmware
Wireless-N
11
NONE
Disconnect
00h:10m
M78N_V3130.1121
Device IP
Gateway
DNS1
DNS2
WAN MAC
Wi-Fi Setup
3. Select a Wi-Fi SSID of your router (Host Wi-Fi) and enter
the password. Either keep the same SSID as your host
Wi-Fi or create a new name for the extended network.
Repeater Wizard
Status Wizard Wi-Fi Setup
Connect
Connect to:
Wi-Fi Password:
Repeater SSID:
Wavlink_530
Wavlink_530
********
Wavlink_Extend
Wireless-562
Wireless-N
Wireless-112
Wireless-MO
Select a Wi-Fi Manually enter
Host Wi-Fi Name
Extended Network Name
Host Wi-Fi Password
Status Wizard
Host Wi-Fi
Default Parameters
- Default IP: 192.168.10.1 - URL: http://ap.setup
- Login Password: admin
- Wi-Fi SSID: Wireless-N
Hardware Overview
1
3
2
WPS Button
Reset Button
WAN/LAN Port
LAN Port
LAN LED
WAN/LAN LED
WPS LED
Wi-Fi LED
Power LED
2
3
4
5
6
7
8
1
9
4
59
8
7
6
The Device is mainly used for providing free Wi-Fi service in big area such as
actory, community, street or etc. The Device can take an existing 802.11n
wireless signal, repeat and extend it to a longer range where it is too far away
for the router or access point to reach. The device supports 2.4G wireless
network connection, and it can supports 2.4G transmission speeds of up to
300Mbps. It has two internal antennas which provide even better wireless
performance, transmission rates. Stability technology automatically avoids
channel conflicts using its channel selection feature.
- Wi-Fi key: no
WAVLINK (@WavlinkOfficial)
WAVLINK SUPPORT (@WavlinkTechSupport)
WL-WN523N2
WL-WN523N2x2
QUICK START GUIDE
300Mbps Wi-Fi Range Extender
GNU General Public License Notice
Press 6seconds
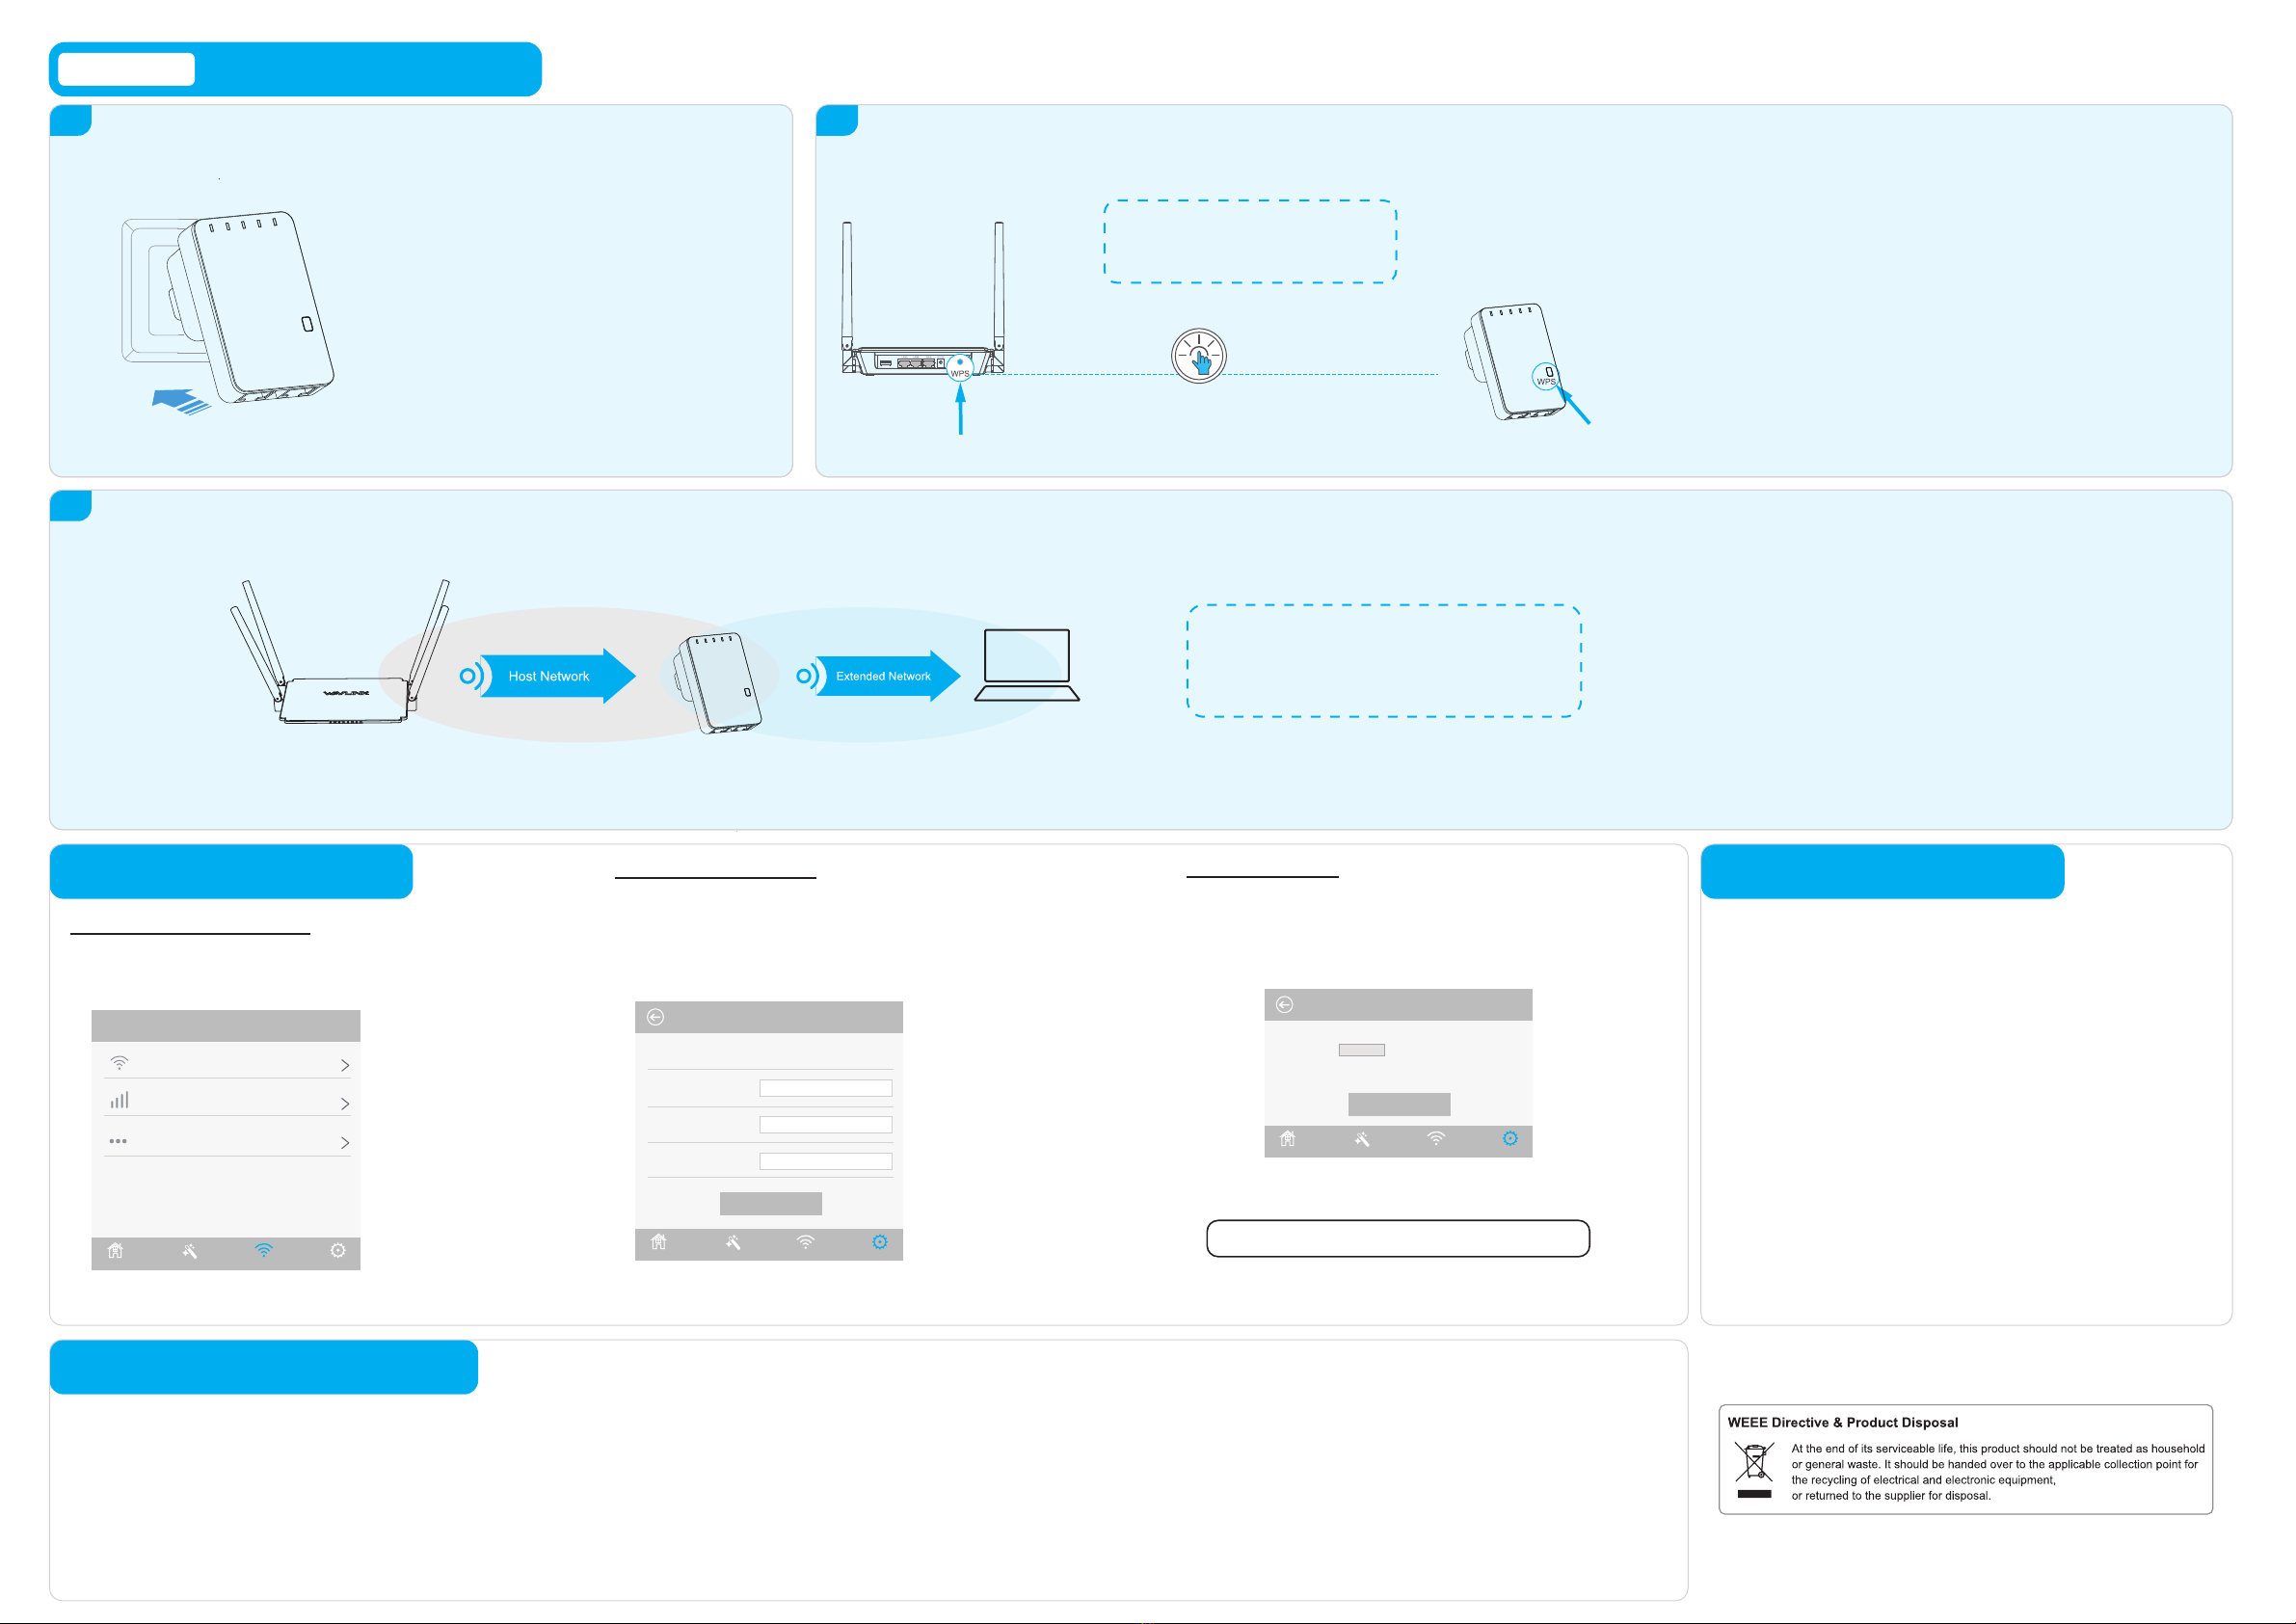
OPTION TWO Wi-Fi Repeater Mode
Using WPS (Wi-Fi Protected Setup)
Note:
1). Some ISP gateways disable the WPS function by default. If the WPS connection fails,
please use OPTION ONE.
2). For more information about using WPS on your router, please refer to the router
manufacturer's user guide.
1.Press the WPS button for 6seconds on the Device.
2. Within two minutes, press the WPS button on your router.
3. The Device will be rebooted, please wait a few minutes.
4. After the reboot, the Devcie’s SSID(Wi-Fi name) will be your router’s SSID with “EXT” within.
The Device’s password will be the same as your router’s password. For using the extended
network, please connect to the SSID with “EXT” within and enter your router’s password.
Tips:The corresponding WLAN LEDs should
turn on and stay solid, indicating successful
connections.
Press 1~2 seconds
Power ON
1Connect
2
1. Plug the Device into an electrical outlet near your
Wi-Fi router.
2. Wait until the POWER LED is on and solid green.
Relocate
3
1. Plug the Device into an electrical outlet about halfway between your router(Host Wi-Fi)
and the Wi-Fi dead zone. The location you choose must be within the range of your
existing host Wi-Fi.
2. If the signal is weak, relocate it closer to the router to achieve a good (or better) signal
quality.
Management via Web Browser
Wireless Basic Configuration
1. Click “Wi-Fi” .
2. You can customize wireless network for the Device.
Change Login Password
The default password of the device is “admin”, we strongly recommend you change
the default password of the device.
1.Visit http://ap.setup, and log in with the default password “admin”.
2. Click “Setup->Login Password”.
3. Enter the old password.Then enter the new password and click “Apply”.
4. Use the new password for future login attempts.
Firmware Upgrade
Firmware upgrade can fix bugs of the Device. However, We DO NOT recommend
you upgrade the firmware of the Device if it works normally.
3. Click “Browse” to locate the downloaded new firmware file.
4. Click “Apply” button, and wait a few minutes for the firmware upgrade to
complete.
Warranty voids if you interrupted the upgrade procedure.
NOTE: Never interrupt the upgrade procedure by closing the web browser or physically
disconnect your computer from the device. If the procedure is interrupt, the firmware
upgrade will fail, and you may have to return the device to the dealer to ask for help.
Tips: Use your phone to find the ideal location for the Device.
If your phone’s Wi-Fi signal(received from your router) is higher
than 3 levels, it is the ideal spot to install the Device. If not, we
suggest you to move closer to your router for better Wi-Fi signal.
2. Click “Setup-> Upgrade Firmware”.
1. Download the latest firmware file for the Device from our Website
www.wavlink.com.
Q1. Why doesn’t the login page appear after entering http://ap.setup?
• Make sure your computer is connected to the Extended network SSID or connect your computer to the
Device using an Ethernet cable.
• Make sure your computer is set to obtain an IP address automatically.
• Verify that http://ap.setup is correctly entered in the web browser and press Enter.
FAQ (Frequently Asked Questions)
For more details, please refer to www.wavlink.com.
This product includes software codes developed by third parties. These software
codes are subject to either the GNU General Public License (GPL), Version 2, June
1991 or the GNU Lesser General Public License (LGPL), Version 2.1, February
1999. You can copy, distribute, and/or modify in accordance with the terms and
conditions of GPL or LGPL.
The source code should be complete, if you want us to provide any additional
source code files under GNU General Public License (GPL), please contact us in
these matters. We are committed to meeting the requirements of the GNU General
Public License (GPL). You are welcome to contact us local office to get the
corresponding software and licenses. Please inform us your contact details
(full address)and the product code. We will send you a software package with the
software and license for free.
The respective programs are distributed WITHOUT ANY WARRANTY; without
even the implied warranty of MERCHANTABILITY or FITNESS FOR A
PARTICULAR PURPOSE.
Please refer to the GNU General Public LicenseWeb site for further information.
http://www.gnu.org/licenses/old-licenses/lgpl-2.0.html
http://www.gnu.org/licenses/gpl.html
Q2. What should I do if the LED does not change to solid after completing OPTION ONE?
• You may have entered the incorrect Wi-Fi password of your host Wi-Fi during the configuration. Please log into the Device’s
web-based interface to check the password and try again.
• Please reset the Device and go through the configuration again.
Q3. How do I restore the Device to its factory d
Q4. Why my Wi-Fi Extender doesn’t work in AP mode?
efault settings?
• While the Device is powered on, press and hold the Reset butt
• Make sure the WAN/LAN port of the Device is connected to the LAN port of your router and then try again.
on until all the LEDs turn on momentarily.
Status Wizard Wi-Fi Setup
Wi-Fi Setup
Wi-Fi Setup
Wi-Fi Signal
Advanced Settings
Status Wizard
Login Password
Old Password:
New Password:
Confirm Password:
Apply
Status Wizard Wi-Fi
Wi-Fi
Setup
Setup
Upgrade Flrmware
Apply
Version:M78N_V3130.1121
Do NOT power off the device during the firmware upgrade. Wait a few
minutes for the firmware upgrade to complete and the device to reboot.
Browse
Press
Host Wi-Fi
Host Router
This manual suits for next models
1
Other Wavlink Extender manuals


Popular Extender manuals by other brands


SIIG
SIIG AV-GM03W3-S1 user manual

Techly
Techly IDATA HDMI-KVM60 user manual

NTI
NTI ST-C5KVM-600 Installation and operation manual

Rose electronics
Rose electronics CrystalLink USB-3-2-1 Fiber Installation and operation manual

MyAmplifiers
MyAmplifiers Nikrans NS-1000 3G installation guide

Prescitech
Prescitech X12 Get started