Wavlink AERIAL HD4 User manual

REV.E1
Hardware Overview
Primary Extender
Default Parameters
Web: http://wifi.wavlink.com
Default IP: 192.168.10.1
Login Password: admin
LED indicators
POWER ON: The Device is powered on
OFF: The Device is not receiving electrical power.
LAN/WAN ON: The Ethernet port is connected.
OFF: The Ethernet port is disconnected.
AC1200
High Power
Outdoor Gigabit Wi-Fi Range Extender WL-WN572HG3
2.4G SSID: WAVLINK-N
5G/AC SSID: WAVLINK-AC
Wireless Key: no
Wi-Fi Signal
Mode
AP/Router
Repeater
WISP
ON ON ON
ON
ON
ON
ON ON
ON OFF
OFF
OFF
OFF
OFF
Flashing
Description
Wi-Fi Signal output power 100%
Better reception: signal strength 75% to 100%
Good reception: signal strength 50% to 75%
Weak reception: signal strength below 50%
Disconnected
Assembly
A1. Fasten the main body holder A2. Plug in the Device
A3. Connect one end of an Ethernet cable to “ POE” port of POE converter.
A4. Connect one end of an Ethernet cable to “LAN DATA IN” port of POE
converter, and connect the other end to a “LAN” port of your Router.
A5. Plug in the power connector to the “DC24V” port of POE converter,
then plug the power adapter into an electrical outlet.
A6. Push the “ON/OFF” button on the POE converter to power on.
POE
Converter
A3 A4
A5
A6
A7. Connect to the Device
OPTION ONE LAN to Wi-Fi Extension Quick Setup
Recommend for big yard Installation
For Windows User
1. Unplug the Ethernet cable from your
computer (if any).
2. Click the Wireless Network Connection
icon on your taskbar.
3. Click the refresh icon and connect to the
Device‘s network: WAVLINK-N or
WAVLINK-AC.
For Mac OS X User
or
1. Unplug the Ethernet cable from
your computer (if any).
2. Click the Wi-Fi icon in the top right
corner of the screen, and connect
to the Device’s network: WAVLINK-N
or WAVLINK-AC.
WAVLINK-N
WAVLINK-AC.
WAVLINK-N
WAVLINK-AC.
2.4G RP-SMA Antenna Connectors
3 x Wi-Fi Signal LEDs
Wi-Fi LED
WAN/LAN LED
POWER LED
Reset button
LAN Port (POE)
Grounding Terminal
Support passive POE power supply via
Ethernet cable.
1. Ensure you use a certified CAT5e/CAT6
Ethernet cable with RJ45 connectors.
2. Ensure the length of the Ethernet cable is
less than 60 meters (196ft.).
ATTENTION:
A8. Launch a web browser and type
http://wifi.wavlink.com in the
address field. Enter (all admin
lowercase) to login.
If the login window does not
pop up, please refer to the
FAQ>Q1.
A9. Click “Wizard”.
A10. Click “AP(LAN Bridge)”.
For Single Band (2.4G) Users
1. Launch a web browser and type
http://wifi.wavlink.com in the
address field. Enter (all admin
lowercase) to login.
If the login window does not
pop up, please refer to the
FAQ>Q1.
Change Login Password
NOTE: The default login password of the Device is “admin”, We
strongly recommend you change the default login password.
2. Click “Setup->
Login Password”.
3. Enter the old password,
then enter the new password
and click “Apply”.
For Dual Band (2.4G+5G) User
A11. Choose a Security Type.
A12. Enter your password for your
extended network.
A11. Choose a Security Type.
A12. Enter your password for your
extended network.
Note:
Some routers might not be compatible with
WL-WN572HG3. If it doesn't work, please:
a. Click the icon at Static IP column to
ON.
b. Enter the info correspondingly.
c. Try again.
Configuration
WAVLINK-N
WPA/WPA2 Mix
WAVLINK-N
WAVLNIK-AC
WPA/WPA2 Mix
ON: The Ethernet port is connected.
OFF: The Ethernet port is disconnected.
LAN
5G RP-SMA Antenna Connectors
LAN LED
WAN/LAN Port (POE) 4
3
2
1
7
8
9
5G 2.4G
5
6Spin 5G antenna into the
5G External RP-SMA
connector
Spin 2.4G antenna into the
2.4G External RP-SMA
connector
Connect the RJ45
cable to RJ45 Port
Pass RJ45 cable through
the holder
Pass RJ45 cable through
the Rubber seal
Pass RJ45 cable through
the spiral cover
Screw the holder
plug the rubber seal to
the holder
Screw the spiral cover
Quick Installation Guide
B7. Relocate
1. Plug the Device into an electrical outlet between your router (Host Wi-Fi) and the Wi-Fi dead zone.
The location you choose must be within the range of your existing host Wi-Fi.
2. Wait until the Wi-Fi Signal LEDs is ON. If the signal is weak, relocate the Device closer to your router for better Wi-Fi signal.
Tips:
Use your phone to find the ideal location for
the Device. If your phone’s Wi-Fi signal
(received from your router) is higher than 3
levels, it is the ideal spot to install the Device.
If not, we recommend you move it closer to
your router for better Wi-Fi signal.
Ideal Location Too Far Away
Flashing
The Best Location
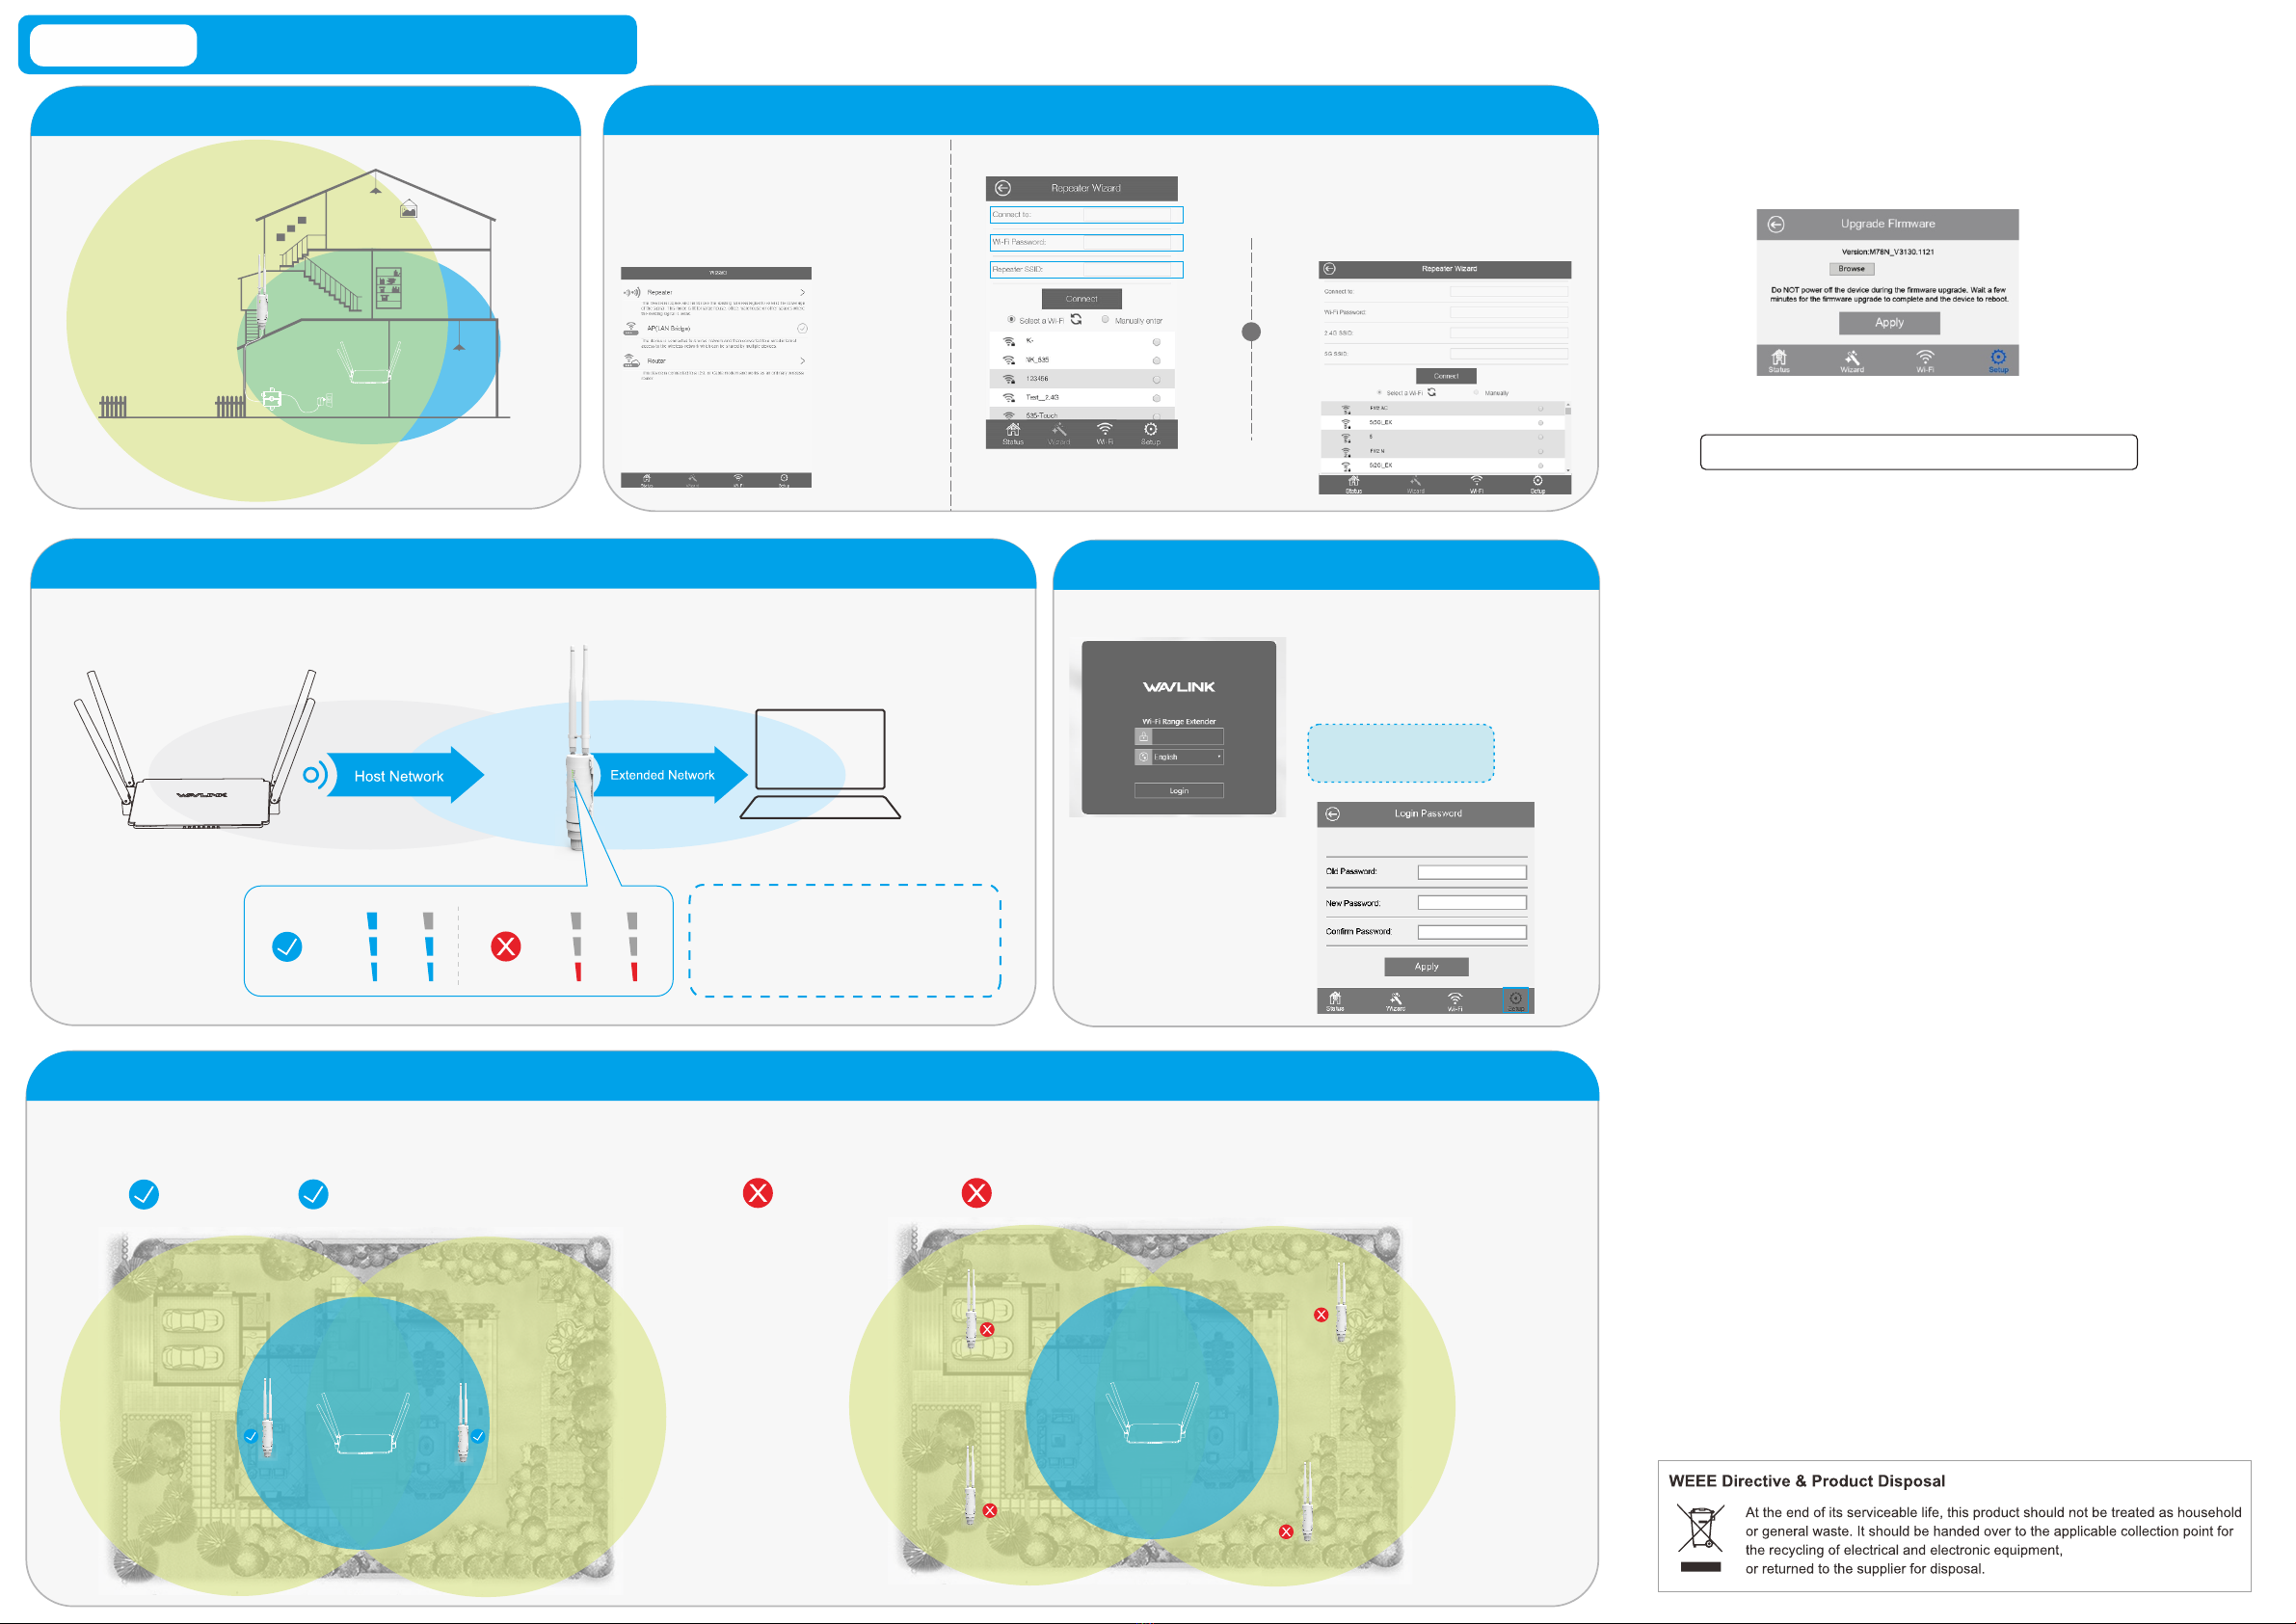
OPTION TWO Wi-Fi to Wi-Fi Extension Quick Setup
Recommend for midsize yard Configuration
B1. Installation
Please refer to OPTION ONE.
A1, A2, A3, A5, A6
B2. Connect to the Device
Please refer to OPTION ONE A7.
B3. Click “Wizard”.
B4. Click “Repeater”.
For Signal Band (2.4G) User
For Dual Band (2.4G+5G) User
B5. Select your router's Wi-Fi SSID(s) and enter the password(s).
Either keep the same SSID(s) as your host Wi-Fi or create
new name(s) for the extended network(s).
B6. Verify your wireless settings and click "Connect".
Wi-Fi Signal LEDs should turn on and stay solid,
indicating successful connections.
or
Host Wi-Fi Name
Host Wi-Fi Password
Extended Network Name
The Best Location
Wi-Fi to Wi-Fi Extension
Please install the device as follows:
Wi-Fi Signal 2 x LEDs or 3 x LEDs are ON Wi-Fi Signal 1 x LED is ON or Flashing, which could cause network disconnection or slow internet.
Picture with “ ”: Recommended Picture with “ ”: Not Recommended
GNU General Public License Notice
This product includes software codes developed by third parties. These software
codes are subject to either the GNU General Public License (GPL), Version 2,
June 1991 or the GNU Lesser General Public License (LGPL), Version 2.1,
February 1999.
You can copy, distribute, and/or modify in accordance with the terms and conditions
of GPL or LGPL.
The source code should be complete, if you want us to provide any additional source
code files under GNU General Public License (GPL), please contact us in these matters.
We are committed to meeting the requirements of the GNU General Public License (GPL).
You are welcome to contact us local office to get the corresponding software and licenses.
Please inform us your contact details (full address)and the product code. We will send you a
software package with the software and license for free.
The respective programs are distributed WITHOUT ANY WARRANTY; without even the implied
warranty of
MERCHANTABILITY or FITNESS FOR A PARTICULAR PURPOSE.
Please refer to the GNU General Public License Web site for further information.
http://www.gnu.org/licenses/old-licenses/lgpl-2.0.html
http://www.gnu.org/licenses/gpl.html
Q1. Why doesn’t the login page appear after entering http://ap.setup?
• If your computer is wirelessly connected, please verify that you have connected to
the device’s SSID. If your computer is connected via an Ethernet cable, please verify
that the connection is stable.
• Make sure your computer is set to obtain an IP address automatically.
• Use the IP address to log in to the page. The default IP is 192.168.10.1. If the
Device is connected to the host Wi-Fi, please go to the router’s DHCP client list to
obtain the Device’s current IP address.
• Please reset the device and try again. If the problem still exists
Q2. How do I restore the device to its factory default settings?
• While the Device is powered on, press and hold the Reset button until all the
LEDs turn on momentarily.
Q3. What should I do if the LED does not change to solid after completing ?
• You may have entered the incorrect Wi-Fi password of your host Wi-Fi during the configuration.
please log into the Device’s web-based interface to check the password and try again.
• Reset the device and go through the configuration again.
Q4. I have enabled a wireless MAC filter, wireless access control, or access control
list (ACL) on my Router. What should I do before configuring and using the Device ?
• If you have enabled those functions of your Router, you may need to disable them first.
And then follow Method ONE or Method TWO to complete the configuration.
FAQ (Frequently Asked Questions)
Firmware Upgrade
Firmware upgrade can fix bugs of the Device. However, We DO NOT
recommend you upgrade the firmware of the Device if it works normally.
1. Click “Setup->Upgrade Firmware”.
2. Click “Browse” to locate the download new firmware file.
3. Click “Apply” button, and wait for a few minutes to the firmware upgrade to
be complete.
Warranty voids if you interrupted the upgrade procedure.
NOTE: Never interrupt the upgrade procedure by closing the web browser or physically
disconnect your computer from the Device. If the procedure is interrupted, the firmware
upgrade will fail, and you may have to return the Device to the dealer to ask for help.
1. Launch a web browser and enter
http://wifi.wavlink.com in the
address field.Enter (all admin
lowercase) to login.
If the login window does not
pop up, please refer to the
FAQ>Q1.
Change Login Password
NOTE: The default login password of the Device is “admin”, We strongly
recommend you change the default login password.
2. Click “Setup->
Login Password”.
3. Enter the old password,
then enter the new password
and click “Apply”.
Other Wavlink Extender manuals


Popular Extender manuals by other brands


BUSCH
BUSCH PANDA WV 1200 A instruction manual

weBoost
weBoost Drive 4G-M Quick install guide

NETGEAR
NETGEAR AX1800 EAX14 user manual

WifiTrax Model Science
WifiTrax Model Science WFD-46 Getting started guide

Rose electronics
Rose electronics Orion XTender OT2-SLDTXUD1D Installation and operation manual

KWJ
KWJ KWJ-WSN Product use guide