Wayne CWS Series Service manual

SPECIFICATIONS
POWER SUPPLY REQUIREMENTS 120 or 230 V, 60 Hz
MOTOR Split Phase
HORSEPOWER
1 HP .................... (CWS100)
3/4 HP ................ (CWS75)
1/2 HP...................(CWS50)
LIQUID TEMPERATURE RANGE 40° F- 120° F
CUT IN PRESSURE 30 PSI
CUT OUT PRESSURE
50 PSI
640000-001 B 08/18© 2018, WAYNE/Scott Fetzer Company.
CONSTRUCTION
MOTOR HOUSE Cast Iron
SEAL PLATE Cast Iron
DIFFUSER Thermoplastic
IMPELLER Thermoplastic
SHAFT Carbon Steel
PUMP SUCTION 1-1/4 in. NPT
PUMP DISCHARGE 3/4 in. NPT
Convertible Well Jet Pump Water Systems
www.waynepumps.com
PERFORMANCE
Model HP PSI
0 ft
10 ft 20 ft 30 ft 40 ft 50 ft 60 ft 70 ft 80ft 90 ft
CWS100 1
30 1056 948 846 750 642 516 384 294 234 180
40 840 750 642 528 384 294 234 180 126 72
50 588 444 330 264 234 180 126 72 - -
CWS75 3/4
30 990 906 774 630 510 408 306 246 186 54
40 780 630 510 408
306 246 186 114 54 -
50 462 330 270 216
156 90 - - - -
CWS50 1/2
30 900 780 690 570
456 348 270 180 90 -
40 660 570 450 348
270 180 90 - - -
50 408 300 210 150
60 - - - - -
Intended for Indoor Use Only
Please read and save these instructions. Read carefully before attempting to assemble, install,
operate or maintain the product described. Protect yourself and others by observing all safety
information. Failure to comply with instructions could result in personal injury and/or property
damage! Retain instructions for future reference.
Operating Instructions and Parts Manual CWS Series
* Refer to Page 13 for Jet Assembly Part Numbers

2
www.waynepumps.com
Operating Instructions and Parts Manual
REMINDER: Keep your dated proof of purchase for warranty purposes! Attach it to this manual or file it for safekeeping.
DESCRIPTION
Jet pumps are single stage domestic water pumps designed for pumping
potable water in applications where the water is up to 90 feet below
pump center line. A pressure switch is a standard feature. A built-in
control valve is available on deep well pumps. Deep well pumps must
be mounted to either a pre-charged, conventional type, or free standing
pressure tank. A Wayne jet assembly is required (not included) for
operation of this pump.
UNPACKING
Inspect this unit before it is used. Occasionally, products are
damaged during shipment. If the pump or components are
damaged, return the unit to the place of purchase for replacement,
or call Customer Support (800-237-0987).
SAFETY SIGNAL WORDS
To help recognize this information, observe the following signal words/
hazard classifications.
Danger indicates an imminently hazardous
situation which, if not avoided, WILL result in death or serious injury.
La mention Danger indique une situation
dangereuse imminente qui, si elle n’est pas évitée, ENTRAÎNE la mort ou
des blessures graves.
Warning indicates a potentially hazardous
situation which, if NOT avoided, COULD result in death or serious injury.
La mention avertissement indique une
situation potentiellement dangereuse qui, si elle n’est pas évitée, risque
d’entraîner des lésions corporelles graves ou même la mort.
Caution indicates a potentially hazardous
situation which, if NOT avoided, MAY result in minor or moderate injury.
MISE EN GARDE La mention mise en garde indique une
situation potentiellement dangereuse qui, si elle n’est pas évitée,
pourrait entraîner des blessures mineures ou modérées.
Notice indicates important information, that if
not followed, may cause damage to equipment.
This is the safety alert symbol. It is used to alert you to potential
bodily injury hazards. Obey all safety messages that follow this symbol
to avoid possible harm.
NOTE: Information that requires special attention.
GENERAL SAFETY INFORMATION
CALIFORNIA PROPOSITION 65
This product can expose you to chemicals, including DEHP,
which is known to the State of California to cause cancer,
birth defects and reproductive harm. For more information,
go to www.P65Warnings.ca.gov.
Ce produit peutvous exposer à des produits chimiques,
notamment du DOP, reconnus par l’État de Californie comme
étant cancérigènes et à l’origine d’anomalies congénitales
et de problèmes de l’appareil reproductif. Pour plus de
renseignements, visiter le site www.P65Warnings.ca.gov.
GENERAL SAFETY
1. Read all manuals included with this product carefully. Be thoroughly
familiar with the controls and the proper use of the
equipment.
2. Know the pump application, limitations and potential
hazards.
Always install a pressure relief valve to match
the system pressure rating and the maximum flow rate.
TOUJOURS installer une soupape de surpression
correspondant à la pression nominale et au débit maximal du système.
Do not use to pump flammable or explosive
fluids such as gasoline, fuel oil, kerosene, etc. Do not use in explosive
atmospheres. Pump should be used to pump ONLY clear water. Failure to
follow this warning will result in death or serious injury, and
void warranty.
Ne pas utiliser pour pomper des
fluides inflammables ou explosifs tels que l’essence, le
mazout, le kérosène, etc. Ne pas utiliser dans des environnements
explosifs. Pomper UNIQUEMENT de l’eau claire. Le non-respect de cet
avertissement entraînera la mort ou des blessures graves, annuler la
garantie..

3
www.waynepumps.com
CWS Series
Disconnect power and release all pressure from
the system before attempting to install, service, relocate or perform any
maintenance. Lock the power disconnect in the open (off) position. Tag
out the power disconnect to prevent unexpected application of power.
Débrancher de la source d’alimentation puis
dissiper toute la pression du système avant d’essayer d’installer,
de réparer, de déplacer ou de procéder à l’entretien. Verrouiller
le sectionneur de courant en position ouverte (OFF). Étiqueter le
sectionneur de courant pour éviter toute mise sous tension imprévue.
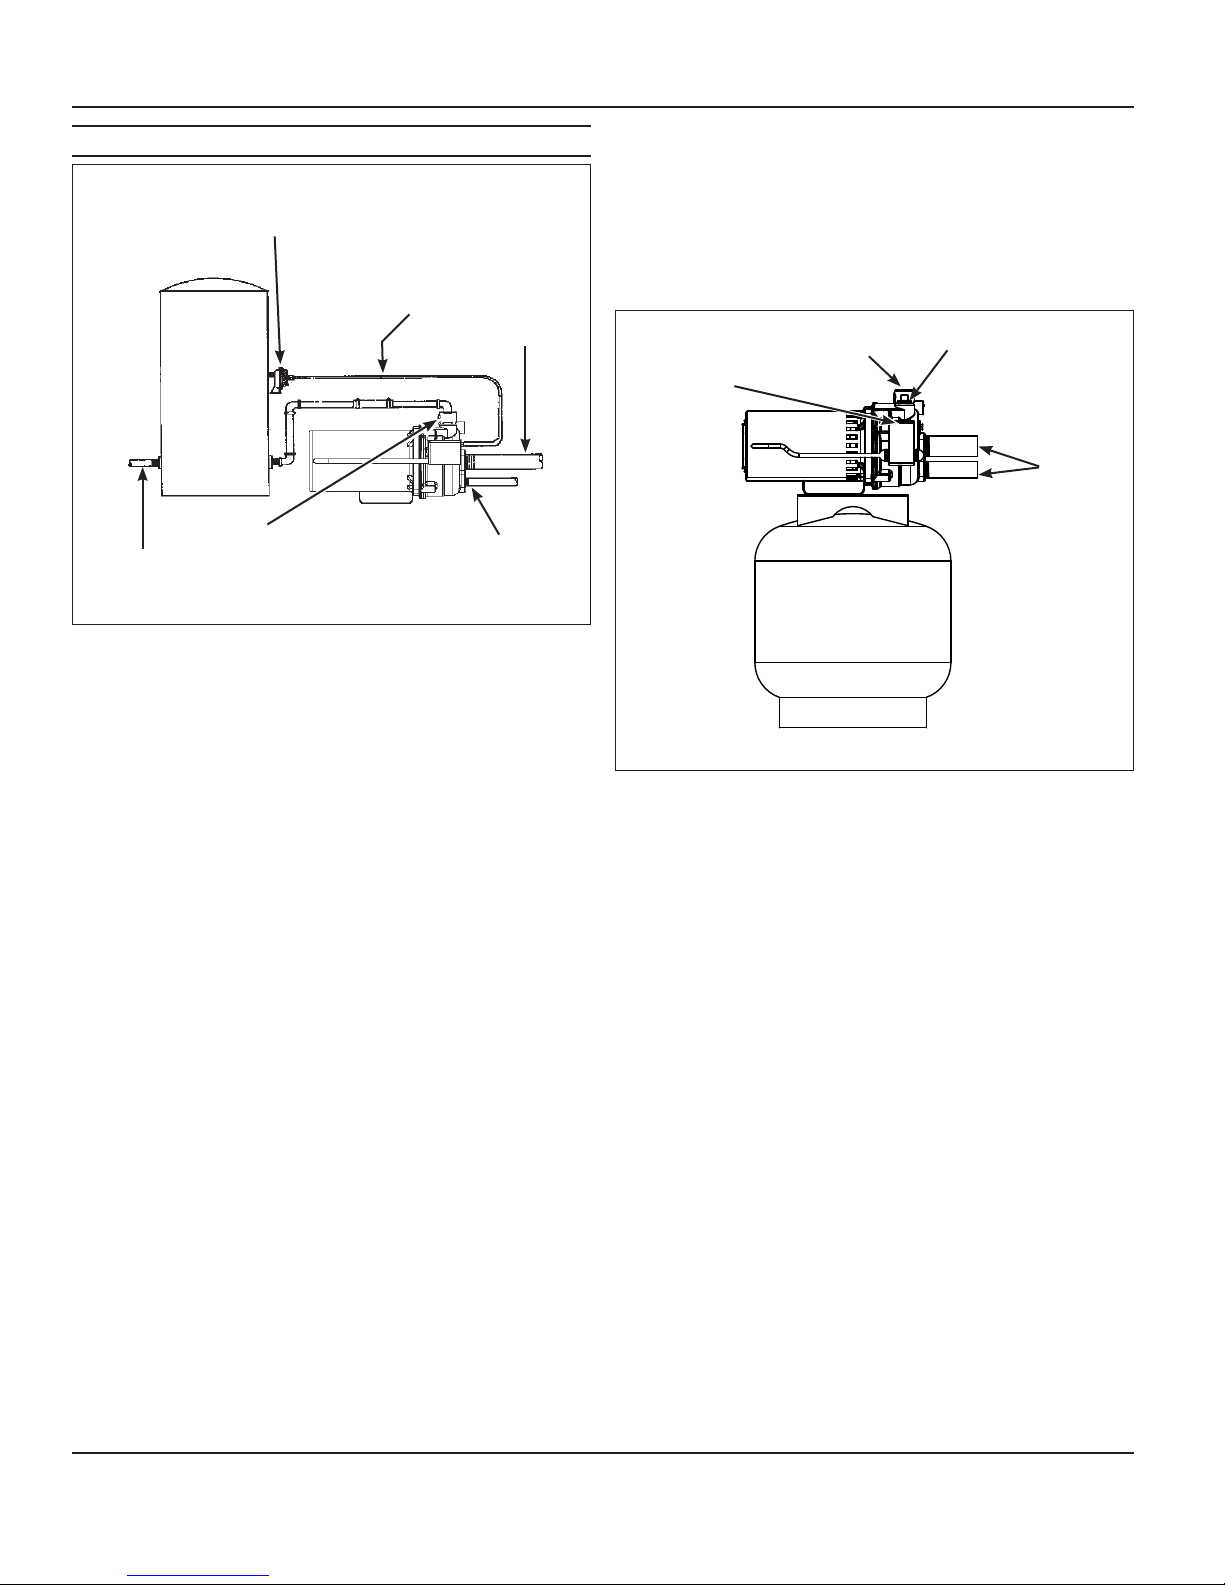
3. Drain all water from the system before servicing.
4. Periodically inspect pump and system components. Perform routine
maintenance as required (See Maintenance, page 8).
Personal Safety:
a. Wear safety glasses at all times when working with pumps.
b. Keep work area clean, uncluttered and properly lighted replace
all unused tools and equipment.
c. Keep visitors at a safe distance from work area.
5. Do not pump chemicals or corrosive liquids. Pumping these liquids
shortens the life of the pumps seals and moving parts and will void
the warranty. Pump ONLY clear water.
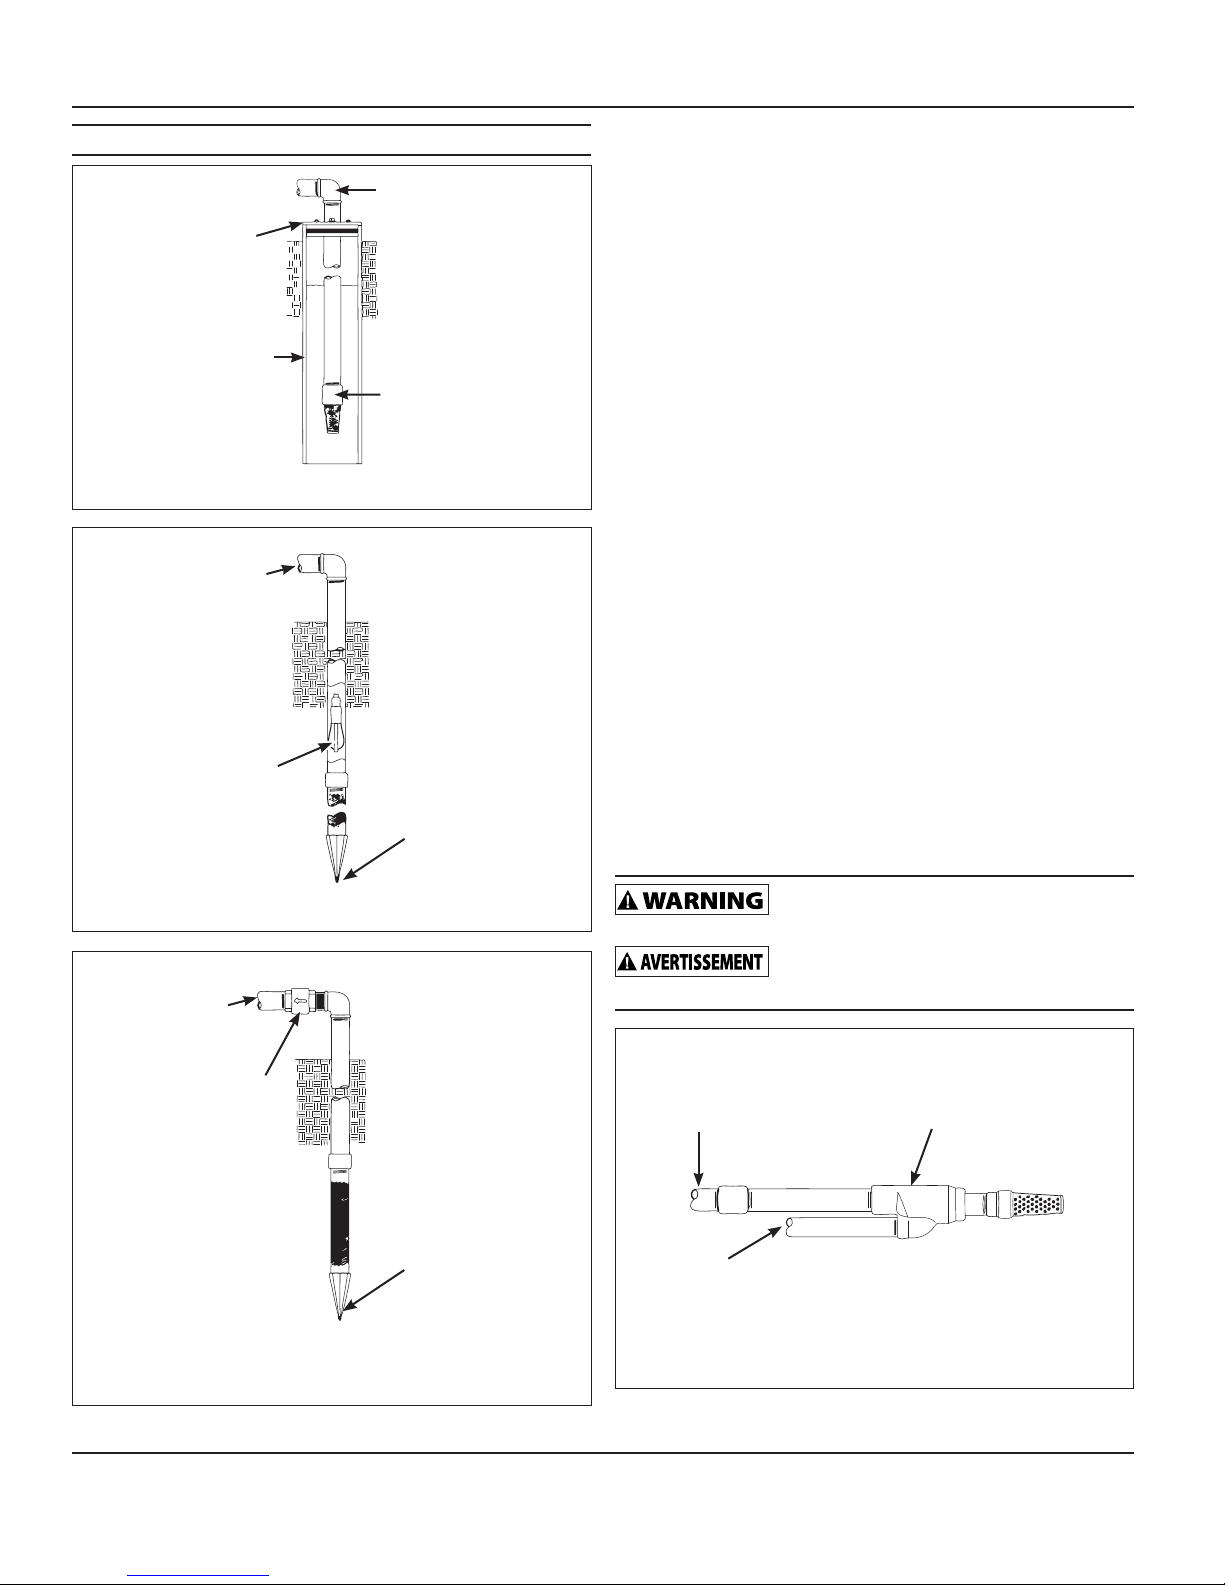
6. When installing pump, cover the well to prevent foreign matter
from falling into well and contaminating the water and/or damaging
internal mechanical pumping components.
7. Always test the water from the well for purity before use. Check with
local health department for test procedure.
8. Complete pump and piping system MUST be protected against
below freezing temperatures. Freezing temperatures could cause
severe damage and void the warranty.
9. Do not run the pump dry or damage will occur and will void
warranty.
This pump is designed for indoor installation
only unless housed and protected from the elements. Failure
to install indoors will significantly increase the risk of injury
or death from electrical shock and void warranty.
Cette pompe est conçue pour
être installée à l’intérieur sauf si elle est abritée et protégée contre
les intempéries. Ne pas l’installer à l’abri dans un local augmente
considérablement le risque de blessure ou de mort par électrocution,
annuler la garantie.
All wiring should be performed by a licensed or
certified electrician.
Tout câblage doit être réalisé par un électricien
agréé ou certifié.
10. Make sure the line voltage and frequency of electrical current supply
agrees with the motor wiring.
11. Do not attempt repairs to the electric motor. All repairs to the motor
must be completed at a licensed or certified electrical motor repair
shop.
Do not touch an operating motor. Modern
motors are designed to operate at high temperatures.
NE PAS toucher un moteur en marche. Les
moteurs modernes sont conçus pour fonctionner à des températures
élevées.
12 Avoid kinking electrical cord and protect electrical cord from sharp
objects, hot surfaces, oil and chemicals.
13. Keep fingers and foreign objects away from ventilation and other
openings. Do not insert any objects into the motor.
Risk of electric shock! Never connect the green
(or green/yellow) wire to a live terminal!
Risque de choc électrique! Ne JAMAIS brancher
le fil vert (ou vert et jaune) à une borne sous tension!
14. Use wire of adequate size to minimize voltage drop at the motor.
Do not handle pump or pump motor with wet
hands, when standing on a wet or damp surface or when standing in
water. Fatal electrical shock will occur.
NE PAS manipuler de pompe ou de moteur de
pompe avec les mains humides ou debout sur une surface mouillée ou
humide, ou dans l’eau. Ceci peut occasionner un choc électrique mortel.
Pump motor is equipped with an automatic
resetting thermal protector and may restart unexpectedly. Protector
tripping is an indication of motor overheating because of operating
pump at low heads (low discharge restriction), excessively high or low
voltage, inadequate wiring, incorrect motor connections, excessive
surrounding air temperature, inadequate ventilation, and/or defective
motor or pump.
Le moteur de la pompe est doté d’un protecteur
thermique à réinitialisation automatique et pourrait redémarrer
de manière imprévue. Le déclenchement du protecteur est une
indication de surchauffe du moteur à cause d’une utilisation de la
pompe à faible hauteur de chute (restriction de faible décharge),
d’une tension excessivement haute ou basse, d’un câblage inadéquat,
d’un branchement incorrect du moteur, d’une température ambiante
excessive, d’une ventilation inadéquate ou d’une pompe ou d’un moteur
défectueux.

4
www.waynepumps.com
Operating Instructions and Parts Manual
PRE-INSTALLATION
WATER SUPPLIES
The water supplies illustrated in Figure 16 (on page 13) are possible
sources for water. These water supplies can be divided into two
categories:
SURFACE WATER
Water from a lake, storage tank, stream, pond and cistern. This water is
usually not fit for human consumption, but may be suitable for washing,
irrigation or other household uses.
GROUND WATER
Water found in the water bearing stratum at various levels beneath the
earth. Of all the fresh water found on earth only 3 percent is found on the
surface and 97 percent is underground.
WATER STORAGE
Tanks are required for these pumps to operate as designed.
TANKS - CONVENTIONAL STORAGE
The function of the tank is to store a quantity of water under pressure.
When full, the tank contains approximately 2/3 water and 1/3
compressed air. The compressed air forces the water out of the tank
when a faucet is opened. An air volume control automatically replaces air
lost or absorbed into the water. The usable water, or draw-down capacity,
of the tank is approximately 1/6 of the tanks total volume when operated
on a 30/50 pressure setting (Figure 1).
TANKS - PRE-CHARGED STORAGE
A pre-charged storage tank has a flexible bladder or diaphragm that acts
as a barrier between the compressed air and water. This barrier prevents
the air from being absorbed into the water and allows the water to be
acted on by compressed air at initially higher than atmospheric pressures
(pre-charged). More usable water is provided than with a conventional
type tank. Pre-charged tanks are specified in terms of a conventional
tank. For example, a 20 gallon pre-charged tank will have the same
usable water or draw-down capacity as a 40 gallon conventional tank,
but the tank is smaller in size (Figure 1). Pre-charged to be set at 28 PSI
with the tank empty of water.
Figure 1 - Conventional and Pre-charged Storage Tanks
AIR VOLUME
CONTROL
CONVENTIONAL TANK PRE-CHARGED TANK
BLADDER
INSTALLATION
LOCATION
Select a location as close to the water supply as possible. Be sure to
comply with any state or local codes regarding the placement of the
pump. The equipment must be protected from the elements or voids
warranty. A basement or heated pump house is a good location. Make
sure the pump has proper ventilation. The temperature surrounding the
pump is not to exceed 100° F (38°C) or nuisance tripping of the motor
overload may occur.
This pump is designed for indoor installation
only, unless housed and protected from the elements. Failure to install
indoors will significantly increase the risk of injury or death from
electrical shock.
Cette pompe est conçue pour être installée à
l’intérieur sauf si elle est abritée et protégée contre les intempéries.
Ne pas l’installer à l’abri dans un local augmente considérablement le
risque de blessure ou de mort par électrocution.
WELLS
A new well should be pumped clear of sand before installing the
pump. Sand will damage the pumping parts and seal. The draw-
down level of the well should not exceed the maximum rated depth
for the pump. The capacity of the pump will be reduced and a loss
of prime may occur.
PIPING
Inlet piping may be copper, steel, or rigid PVC plastic.
Flexible pipe is prohibited on suction pipe (inlet
pipe).
MISE EN GARDE Un tuyau flexible est interdit sur le tuyau
d’aspiration (tuyau d’entrée).
The pipe must be clean and free of rust or scale. Use a pipe joint
compound on the male threads of the metal pipe. Plumber’s seal tape
should be used with plastic threads. All connections must be air tight to
insure normal operation.
Slope all inlet piping upwards towards the pump to prevent trapping air.
Unions or hose couplings can be installed near pump to facilitate removal
for servicing or storage. A rubber hose installed between the water
system and the house piping will reduce the noise transmitted to the
house.
Plastic pipe can be used on all installations except 2 in. deep well jet.
The 2 in. deep well jet requires 1-1/4 in. galvanized steel pipe and special
machined couplings (1-13/16 in. O. D.).
The galvanized steel pipe and the couplings restrict the flow of return
water back to the jet unless the couplings are machined.

5
www.waynepumps.com
CWS Series
INSTALLATION (CONTINUED)
PRESSURE SWITCH
The pressure switch provides for automatic operation. The pump starts
when pressure drops to a cut-in setting. The pump stops when pressure
reaches a cut-out setting. The pressure switch preset and is NOT
adjustable.
PIPE SIZES
Long horizontal pipe runs and an abundance of fittings and couplers
decrease water pressure due to friction loss. See Chart 1, on page 5, to
determine the proper pipe size.
SHALLOW WELL INSTALLATION
A shallow well jet assembly can be used with the deep well pump when
the pump is located a maximum of 25 ft vertically above the water level
(see converting to shallow well pump on page 7). Shallow well installations
have only one pipe between the pump and water supply (Figure 2).
DRILLED WELL (FIGURE 16, PAGE 13)
1. Install a foot valve on the first section of pipe (Figure 2, Illustration A).
2. Lower the pipe into the well.
3. Add pipe until the foot valve is 5 feet below the lowest anticipated
water level.
The foot valve must be at least 18 in. from the
bottom of the well or sand or sediment could be drawn into the system.
MISE EN GARDE Le clapet de pied doit au moins être à 45,7
cm (18po) du fond du puits, sinon du sable ou des sédiments pourraient
être aspirés dans le système.
4. After proper depth is reached, install a well seal or pitless adapter to
support pipe and prevent surface. water and other contaminants
from entering well.
5. Slope the horizontal pipe upward toward the pump to eliminate
trapping air. Sloping the pipe will also aid in priming the pump.
DRIVEN WELL (FIGURE 16, PAGE 13)
• Drive the point several feet below the water table.
NOTE: A packer type foot valve can be installed in the well (Figure 2,
Illustration B). This type of foot valve allows the piping to be filled with
water when priming and makes the inlet pipe much easier to test for
leaks. Follow the manufacturer’s instructions when installing the packer
type foot valve.
As an alternative, an in-line check valve can be used with a driven well
(Figure 2, Illustration C). The pipe between the check valve and the water
level will always be under a vacuum.
Leaking joints or couplings will allow air to leak into the pipe and cause
abnormal pump operation. Make sure to use pipe joint compound on all
male pipe threads.
DUG WELL, CISTERN, LAKE AND SPRING INSTALLATION
(FIGURE 16, PAGE 13)
• Install a foot valve on inlet pipe and lower into water.
The foot valve must be at least 18 in. from the
bottom of the well or sand or sediment could be drawn into the system.
MISE EN GARDE Le clapet de pied doit au moins être à 45,7
cm (18po) du fond du puits, sinon du sable ou des sédiments pourraient
être aspirés dans le système.
NOTE: When a lake is used as a water supply, make sure the inlet pipe
is deep enough to be submerged at all times.
Slope the horizontal piping upward toward the pump to prevent trapping
air. The pipe must be removed during winter months or protected against
freezing.
Protect the pipe from damage from swimmers and boats.
Install a screen around the inlet pipe to prevent
the entrapment of swimmers, wildlife and debris.
Installer un écran autour du tuyau d’entrée pour
éviter de piéger des nageurs, des animaux et des débris.

6
www.waynepumps.com
Operating Instructions and Parts Manual
INSTALLATION (CONTINUED)
TO PUMP
WELL SEAL
FOOT VALVE
WELL CASING
ILLUSTRATION A
Figure 2
PACKER TYPE
FOOT VALVE
ILLUSTRATION B
TO PUMP
DRIVE POINT
Figure 2
TO PUMP
IN-LINE CHECK
VALVE
ILLUSTRATION C
DRIVE POINT
Figure 2
DEEP WELL INSTALLATION
DRILLED WELL (4 IN. OR LARGER) WITH TWO PIPE JET (FIGURE
16, ON PAGE 13 AND FIGURE 3, BELOW)
1. Assemble a 1-1/4 in. foot valve (not included) to the jet body. A 1-1/4
in. coupling is required to connect the larger pipe to the jet assembly.
2. Connect the 1 in. pipe threads into the smaller opening in the jet
body.
3. Lower the jet into the well. Add pipe as needed. Be sure to use pipe
joint compound, or plumber’s seal tape on all male threads.
4. Position the jet 10 - 20 feet below the lowest anticipated water level,
but never closer than 5 feet from the bottom of the well, if possible.
5. Install a well seal to support the pipe and prevent surface water and
other contaminants from entering the well.
6. Install the horizontal pipe from the well to the pump. Piping from the
vertical well pipe to the pump should never be smaller than the well
pipes.
7. Slope both pipes upward toward the pump to prevent trapping air. If
the horizontal distance exceeds 25 feet, see Chart 1, on page 7 for
the recommended pipe sizes.
DUG WELL, CISTERN, LAKE AND SPRING WITH TWO PIPE JET
(FIGURE 16, PAGE 13)
1. Install a 1-1/4 in. foot valve (not included) to the jet body. A 1-1/4 in.
coupling is required to connect the larger pipe to the jet assembly.
2. Connect the 1 in. pipe threads into the smaller opening in the jet
body.
3. Lower the jet into the water below the lowest anticipated water level,
but never closer than 18 in. from the bottom. Sand or debris may be
drawn into the system if the jet is too close to the bottom.
4. Provide protection for the jet and pipes against damage from boats
or swimmers if a lake is used for the water supply.
Install a screen around the inlet pipe to prevent
the entrapment of swimmers, wildlife and debris.
Installer un écran autour du tuyau d’entrée pour
éviter de piéger des nageurs, des animaux et des débris.
Figure 3 - Two Pipe Jet (4” Casing or Greater)
JET BODY
FOOT VALVE
1-1/4 IN. PIPE
1 IN. PIPE

7
www.waynepumps.com
CWS Series
INSTALLATION (CONTINUED)
5. Slope the horizontal pipes upward toward the pump to prevent
trapping air. If horizontal distance exceeds 25 feet, see Chart 1 for
recommended pipe sizes.
DRILLED WELL (2 IN.) WITH SINGLE PIPE PACKER (FIGURES 16
AND 4)
NOTE: Single pipe packer jets rely on the space between single pipe and
inside of well casing for return water to operate jet. Two inch installations
must use 1-1/4 in. galvanized steel pipe with special turned couplings (1-
13/16 in. O.D.) to avoid restricting flow of return water back to jet.
1. Assemble the foot valve and packer to the jet body.
2. Lubricate the rubber cups with petroleum jelly.
3. Attach the first section of pipe and lower jet into well.
4. Add pipe until the jet is positioned 5 - 15 feet below the lowest
anticipated water level. The jet should never be closer than 5 feet
from the bottom of the well or sand and sediment may be drawn
into the system.
5. With the jet in position, fill the pipes with water to make sure the
rubber cups are sealed against inside of the well casing. It may be
necessary to move the jet up and down to seat the cups.
6. Install the casing adapter and the horizontal pipes.
7. Slope both pipes upward toward the pump to eliminate trapping air.
If the horizontal distance exceeds 25 feet, see Chart 1 below, for the
recommended pipe sizes.
CHART 1 - PIPE SIZING
Pump Model
Pump
Opening
Horizontal Distance
(Feet)
0-25 26-100
Deep Well Inlet: Suction 1-1/4 in. 1-1/2 in.
Inlet: Drive 1 in. 1-1/4 in.
Outlet 3/4 in. 1 in.
DEEP WELL PUMP WITH HORIZONTAL AND VERTICAL
STORAGE TANK (FIGURES 5 AND 6)
1. Install the air volume control on the tank as shown.
1-1/4 IN. PIPE
Figure 4 - Single Pipe Jet (2” Casing)
PACKER FOOT VALVE
CUPS
2. Connect the copper tube from the air volume control to the 1/8 in.
NPT opening directly above the 1-1/4 in. opening on the front of the
pump.
3. Install a valve and isolating hose between the system and the house
plumbing to aid in pump removal for servicing and for reducing noise
transmitted through the house piping.
4. Provide a faucet at the lowest point in the system to drain for service
or storage.
Figure 5 - Horizontal Tank
AIR
VOLUME
CONTROL
TUBING
OUTLET
AIR
VOLUME
CONTROL
PRESSURE SWITCH
PRIME PLUG TO JET
ASSEMBLY
CONVENTIONAL TANK
PUMP

8
www.waynepumps.com
Operating Instructions and Parts Manual
INSTALLATION (CONTINUED)
Figure 6 - Vertical Tank
OUTLET
AIR VOLUME
CONTROL
TUBING
PRIMING PLUG
SUCTION
AIR VOLUME CONTROL
DRIVE
DEEP WELL PUMP WITH PRE-CHARGED STORAGE TANK
(FIGURE 7)
1. Check tank pre-charge using a tire pressure gauge. Set air pressure
in tank to 28 psi which is 2 psi below pressure switch cut-in level. An
air valve is located on the side and will accept a standard fitting from
a bicycle pump or air line.
2. Check the pressure with the power off, faucets open and no water
flowing (zero water pressure).
3. Install a valve and isolator hose between the system and the house
plumbing to aid in pump removal for servicing and for reducing noise
transmitted to the house through the piping.
4. Provide a faucet at the lowest point in the system to drain for service
or storage.
CONVERTING THE DEEP WELL PUMP TO SHALLOW WELL
OPERATION (FIGURE 8)
For shallow wells (25 feet or less), a bolt-on shallow well jet is available as
an accessory for deep well pumps. The jet attaches to the front of the
pump with the two bolts provided and converts the deep well pump into
a shallow well pump. The shallow well jet has a 1 in. NPT inlet and a 1/8
in. NPT opening for an air volume control. For optimum performance, an
inline check valve on the inlet side of the shallow well jet is recommended.
Figure 7 - Pre-charged Storage Tank
OUTLET PRIME PLUG
TO JET
ASSEMBLY
PRESSURE
SWITCH

9
www.waynepumps.com
CWS Series
ELECTRICAL
Risk of electrical shock. This pump is designed
for indoor installation only, unless housed and protected from the
elements.
Installer un écran autour du tuyau d’entrée pour
éviter de piéger des nageurs, des animaux et des débris.
Select the proper size wire and fuse. Time delay fuses are recommended
over standard fuses for motor circuit protection. All pump motors have
built-in automatic overload protection that will prevent damage to the
motor due to overheating. If wire run is a short distance, a cord/plug
assembly may be used as long as it meets the minimum wire gage size
called out in Chart 2.
Figure 8 - Shallow Well Jet
TO AIR VOLUME CONTROL
JET ASSEMBLY
Do not connect to electric power supply until
unit is permanently grounded. Connect ground wire to approved ground
then connect terminal provided.
Ne pas connecter à l’alimentation électrique
tant que l’unité n’est pas mise à la terre en permanence. Brancher le fil
de mise à la terre à la masse approuvée puis raccorder la borne fournie.
A metal underground water pipe or well casing at least 10 feet long
makes the best ground electrode. If plastic pipe or insulated fittings
are used, run a wire directly to the metal well casing or use a ground
electrode furnished by the power company.
There is only one proper ground terminal on the unit. The terminal is
located under the pressure switch cover, is painted green and is identified
as GRD. The ground connection must be made at this terminal (Figure 9).
The ground conductor must not be smaller than the circuit conductors
supplying the motor.
The voltage of power supply must match the voltage of the pump.
The unit has dual voltage motors preset at the factory to 115 volts. The
motors can be converted to 230 volts by changing the voltage selector to
the desired voltage (Figure 10). Disconnect power, use needle nose pliers
to pull the selector out approximately 1/4 in., point too, and then reinsert
in correct position.
Disconnect power and release all pressure from
the system before attempting to install, service, relocate or perform any
maintenance.
Débrancher de la source d’alimentation puis
dissiper toute la pression du système avant d’essayer d’installer, de
réparer, de déplacer ou de procéder à l’entretien.
OPERATION
PRIMING THE SHALLOW WELL PUMP
To prevent damage to the pump, do not start
motor until pump has been filled with water.
Pour éviter d’endommager la pompe, ne pas
démarrer le moteur tant que la pompe n’a pas été remplie d’eau.
When the deep well pump is used with the bolt-
on shallow well jet, be sure the control valve slot (Figure 11) is in the
vertical (open) position at all times.
1. Remove prime plug.
2. Fill pump and piping completely full of water.
3. Replace the prime plug.
CHART 2 - RECOMMENDED FUSE AND WIRING
DATA - 60 HZ MOTORS
HP Volt
Dual
Element
Fuse
250V
Distance in Feet
From Meter to Motor
0 51 101
to to to
50 100 200
Wire Size
1/2 115 20 14 12 10
230 10 14 14 14
3/4 115 20 14 12 8
230 10 14 14 14
1115 20 14 12 8
230 10 14 14 14
* above is the suggested size only. Check with local or state code for
proper sizing.

10
www.waynepumps.com
Operating Instructions and Parts Manual
OPERATION (CONTINUED)
L2
3
L1
1
Figure 9 - Electrical Connections
MOTOR
LINE
GROUND
SCREW
Figure 10 - Voltage Selector
230 V 115 V
4. Open a faucet to vent the system.
5. Start the motor. Water will pump in a few minutes. If pump fails to
prime in 5 minutes, stop motor and refill pump with water. Priming
time is proportional to the amount of air in inlet pipe. Do not allow
pump to get hot.
6. Let the system operate for several minutes to flush all pipes.
7. Close faucet and allow pump to build pressure in tank. When the
pressure reaches the cut-out setting, the motor will stop.
The system is now in operation and will automatically cycle on demand.
PRIMING THE DEEP WELL PUMP
To prevent damage to the pump, do not start
motor until pump has been filled with water.
Pour éviter d’endommager la pompe, ne pas
démarrer le moteur tant que la pompe n’a pas été remplie d’eau.
1. Remove prime plug.
2. Fill pump and piping completely full of water.
3. Replace the prime plug.
4. Close the control valve (Figure 11) and open a nearby faucet.
5. Start the motor. The pressure inside the pump body will build almost
immediately as the pump, jet and piping become completely filled
with water.
6. Slowly open the control valve. Water will begin to flow. Continue to
open the control valve until maximum flow is achieved. Opening the
valve too far will cause the water to stop flowing.
Figure 11 - Control Valve
OPEN
1/4 IN. TURN
CLOSED
7. Adjust the valve until there is a steady flow of water. The valve should
be opened as much as possible without losing pressure.
8. Let the system operate for several minutes to flush all piping.
9. Close the faucets and allow the pump to build pressure in the tank.
When the pressure reaches the cut-out setting, the motor will stop.
The system is now in operation and will automatically cycle upon
demand.

11
www.waynepumps.com
CWS Series
MAINTENANCE
Disconnect power and release all pressure from
the system before attempting to install, service,
relocate or perform any maintenance. Lock the power disconnect in the
open (off) position. Tag out the power disconnect to prevent unexpected
application of power.
Débrancher de la source d’alimentation puis
dissiper toute la pression du système avant
d’essayer d’installer, de réparer, de déplacer ou de procéder à l’entretien.
Verrouiller le sectionneur de courant en position ouverte (OFF). Étiqueter le
sectionneur de courant pour éviter toute mise sous tension imprévue.
Protect the pump from freezing during winter
conditions.
MISE EN GARDE
Protéger la pompe du gel pendant l’hiver.
DRAINING THE PUMP
Drain openings are provided on all models. To drain the pump:
1. Remove drain plug and prime plug to vent the system.
2. Drain all piping to a point below the freeze line.
DRAINING THE TANK
Conventional tanks can be drained by opening an outlet at the lowest
point in the system. Remove plug or the air volume control to vent the
tank.
Pre-charged tanks force virtually all the water from the tank when system
pressure is released. No draining is necessary.
RESTARTING PUMP
If the pump has been serviced, drained or has not been used for some
time, be sure there is water in the pump housing (volute) and the piping
to the well. There must be water in the pump housing (volute) at all times
when the pump is running to avoid internal damage of seal members
(See Priming the Shallow Well or Priming the Deep Well Sections).
WATERLOGGED TANKS: CONVENTIONAL
When a tank system has an inadequate ratio of air and water, the pump
will start and stop often and erratically.
1. Disconnect the power to the pump.
2. Open the lowest faucet in the system to release all pressurized water
in the system.
3. Prime the pump (See Priming the Shallow Well or Priming the Deep
Well Sections).
4. Reconnect the power to the pump.
NOTE: As the pump refills the tank with water, the air volume control
supplies the tank with the correct air to water ratio for the system to
operate. If the air volume control is good, the pump will shut off at the
desired cut-off and will be adjusted correctly.
WATERLOGGED TANKS: PRE-CHARGED
If a pre-charged tank becomes waterlogged, the bladder is normally
leaking or broken.
1. Test the tank by depressing the air valve. The air valve will expel
water if the bladder is broken.
2. Replace the tank.
NOTE: Once an internal bladder is leaking or broken, the bladder cannot
be repaired. The tank must be replaced.
PRE-CHARGED TANK
Some air is lost through the internal bladder in any tank. To prevent tank
failure, check the tank pre-charge on a yearly basis.
1. Disconnect power to the pump
2. Open a faucet nearest the tank and allow all water to drain from the
tank.
3. Measure the tank pre-charge at the valve stem using a tire gauge.
4. If necessary, adjust the pre-charge with an air pump 28 - 30 psi on
1/2, 3/4 and 1 HP pumps.
LUBRICATION
The bearing used in the pumps are lifetime lubricated at the factory and
require no additional lubrication.
CWS REPAIR KIT
1. Disconnect power from the pump.
2. Open faucet nearest the tank and allow all of the water to drain from
the tank and pump.
3. Remove 4 cap screws holding pump housing, do not disconnect
pressure switch (Figure 12).
4. Remove pump housing from pump assembly, move it out of the
way.
5. Using a 5/16” socket or flat blade screw drive remove the 2 screws
from the diffuser on the pump assembly.
6. Remove the diffuser.
7. Remove the black plastic cap from the back of the motor, exposing
the motor shaft end.
8. Using a large flat bladed screw driver hold the motor shaft while
unscrewing the impeller.
9. Remove the seal plate. Pay attention to how the original shaft seal is
installed before disassembly.

12
www.waynepumps.com
Operating Instructions and Parts Manual
10. Remove the shaft seal from the impeller, make sure the stainless
steel sleeve comes off the impeller, all you should see on the back of
the impeller is the brass colored threaded insert (Figure 13).
11. Remove the ceramic seat and rubber boot part of the seal from the
cast iron seal plate (Figure 13).
12. Remove the square cut gasket from the seal plate.
13. Reassemble the pump with new parts in reverse order.
14. Wipe down the seal plate to remove any debris or loose rust.
15. Push the ceramic seat of the shaft seal into the seal plate using the
cardboard ring provided to keep the ceramic face clean. You can
use a little water or dish soap to lubricate the seal pocket to make
assembly easier.
16. Slide the square cut gasket over the flange on the seal plate, make
sure not to let the gasket twist.
17. Carefully slip the seal plate over the shaft so as not to disturb seal
position in the seal plate. The seal plate must be orientated during
assembly so the two holes are on a horizontal line across the motor
shaft (Figure 14).
18. Push the bellows side of the shaft seal over the impeller hub, you
can use a little water or dish soap to lubricate the impeller hub to
make assembly easier (Figure 15). Make sure after assembly the
back carbon and white ceramic surfaces are in contact.
19. Holding the motor shaft with a flat blade screw driver thread the
impeller onto the motor shaft, hand tighten. Lubricate the nose of the
impeller with potable water safe lubricant.
20. Replace the plastic cap over the motor shaft end.
21. Reassemble the diffuser, make sure the arrow indicating the top is
pointed toward the top of the pump, torque the two screws to 30
±10 inch pounds.
SEAL
PLATE
Figure 15 - Motor Shaft
MOTOR
IMPELLER
SEAL
SEAT
SEAL PLATE
SEAL
FACING
MUST
BE CLEAN FOR
PROPER SEAL
22. Using the (4) cap screws reattach the pump housing and base to
the pump body. Torque the screws to 140 ±40 inch pounds.
23. Reattach the plumbing connections, reconnect the power and prime
the pump (See section on priming the pump). After reassembling the
pump check for leaks. If a leak is detected, repair before using the
pump.
NOTES

13
www.waynepumps.com
CWS Series
13
Operating Instructions and Parts Manual
(A) SPRING:
A spring that emerges
from the ground.
Occurs when water in
permeable materials is
trapped between
impermeable
material as rock or clay.
(B) LAKE, STREAM or POND:
Surface water, unless treated,
is usually not safe for human
consumption. It may be used
for purposes such as washing
or irrigation.
(C) DUG WELL:
A hole is excavated
several feet in diameter
to a fairly shallow
depth. It is then lined
with brick, stone or
concrete to prevent
cave-in.
(D) DRIVEN WELL:
Pipe with a pointed
screen is driven into
the ground below
the water table.
The depth is usually
less than 50 feet.
Available
diameters are
1" through 2".
(E) DRILLED WELL:
A hole bored into the
earth with machinery and
lined with pipe. Depths
range from a few feet
to over 1000 feet.
Common well diameters
are 2", 3", 4" and 6" for
domestic water wells.
(F) CISTERN:
An underground tank
built to collect rain
water from rooftops.
The water is not fit
for human consumption.
(A) SPRING
(B) LAKE,
STREAM, POND
(C) DUG WELL
(D) DRIVEN WELL (E) DRILLED WELL (F) CISTERN
SHALE
TOP SOIL
CLAY
PERMEABLE
MATERIAL
WATER
BEARING
SAND
WATER TABLE
WATER SUPPLIES
Figure 16 - Water Supplies

14
www.waynepumps.com
Operating Instructions and Parts Manual
14
TROUBLE SHOOTING CHART
Symptom Possible Cause(s) Corrective Action
Pump will not run 1. Power off 1. Turn power on or call power company
2. Blown fuse or tripped breaker 2. Replace fuse or reset circuit breaker
3. Faulty pressure switch 3. Replace 30/50 pressure switch
4. Motor overload tripped 4. Let cool. Overload will automatically reset
5. Low supply voltage 5. Contact an electrician
Motor hums but will not run 1. Line voltage does not match selector switch 1. Check voltage
2. Wiring too small 2. Rewire
3. Damage or misalignment causing rotating
parts to bind
3. Replace or take to service shop for repair
4. Low supply voltage 4. Contact an electrician
Overload trips 1. Low supply voltage 1. Contact an electrician
2. Damage or misalignment causing rotating
parts to bind
2. Take to motor repair shop or locate and repair
mechanical binding
3. High surrounding temperature 3. Provide a shaded, well-ventilated area for pump
4. Rapid cycling 4. See “Pump starts and stops too often” section
5. Inadequate wiring 5. Rewire
Pump runs but delivers little or no water
Note: Check to make sure pump is prop-
erly primed before looking for other causes.
Unscrew priming plug and see if water is in
priming hole.
1. Water level below pump intake 1. Lower suction pipe further into well
2. Control valve open too far (deep well) 2. Adjust control valve or repeat priming
procedure.
3. Discharge not vented while priming 3. Open faucet, repeat priming procedure
4. Leaking in piping on well side of pump 4. Repair piping as needed
5. Well screen or inlet strainer clogged 5. Clean or replace as necessary
6. Clogged nozzle (deep well) 6. Pull jet and clear obstruction
7. Air volume control diaphragm ruptured 7. Replace air volume control (See Page 7)
8. Foot valve may be clogged or stuck closed 8. Clean or replace as needed
9. Pump not fully primed 9. Continue priming, pausing every 5 minutes to
cool pump body. Rell pump as needed
10. Control valve completely closed (deep well) 10. Adjust control valve per deep well priming
procedure (see page 8)
11. Water level below maximum lift specica-
tion
11. Select applicable pump and/or jet assembly
12. Undersized piping 12. Replace as needed
13. Gaseous well 13. Install bafe on pump intake to prevent gas from
entering system
14. Distorted venturi 14. Inspect and replace
15. Incorrect jet assembly for application 15. Purchase a jet assembly matched to your
system when replacing another brand pump
16. Undersized pump 16. Increase horsepower of pump
17. Pump cavitates, (sounds like pumping
gravel)
17. Increase suction plumbing diameter or decrease
pipe friction
18. Low supply voltage 18. Contact an electrician
Pump starts and stops too often 1. Water logged tank (conventional tank) 1. See waterlogged conventional tank on page 11
2. Air volume control tubing kinked or clogged 2. Clean or replace as needed
3. Air volume control tubing connected to
wrong opening on pump
3. Move to correct pump opening
4. Incorrect tank pre-charge (pre-charged
tank)
4. Add or release air as needed
5. Ruptured diaphragm/bladder (pre-charged
tank)
5. Replace tank
6. Leak in house piping 6. Locate and repair leak
7. Foot valve or check valve stuck open 7. Remove and replace
8. Motor overload tripping 8. See overload trips section
9. Faulty pressure switch 9. Replace 30/50 pressure switch

15
www.waynepumps.com
CWS Series
15
Operating Instructions and Parts Manual
For Replacement Parts or Customer Support, Call 1-800-237-0987
Please provide following information:
- Model number
- Serial number (if any)
- Part description and number as shown in parts list
Address parts correspondence to:
Wayne Water Systems
101 Production Drive
Harrison, OH 45030 U.S.A.
1
REPLACEMENT PARTS
Ref. No. Description Models Qty.
CWS50, CWS75, CWS100
1 (2) Square-Ring Gaskets, Impeller, Jet
Pump Dissfuser, and Shaft Seal Assembly
64046-WYN1 (CWS50)
64047-WYN1 (CWS75)
64047-WYN1 (CWS100)
1
2 30/50 Pressure Swtich Kit 64031-WYN1 (ALL MODELS) 1
JET ASSEMBLIES
Description Vertical Distance (ft.) Part No. Qty.
Jet Assemblies N/A 56326-WYN1 (CWS50, Shallow)
56316-WYN1 (CWS75, CWS100, Shallow)
1
2 Inch Casing Jet Assemblies 30’ - 80’ 55462-WYN1 (ALL MODELS) 1
4 Inch Casing Jet Assemblies 30’ - 100’ 55465-WYN1 (ALL MODELS) 1

1616
www.waynepumps.com
Operating Instructions and Parts Manual
LIMITED WARRANTY
For three years for CWS Series models from the date of purchase, from an authorized dealer, Wayne Water Systems will repair or replace, at its option for the original
purchaser, any part or parts of its Well Pumps or Water Pumps (“Product”) found upon examination by Wayne Water Systems to be defective in materials or workmanship.
Please call Wayne Water Systems (800-237-0987) for warranty instructions. Be prepared to provide the model number and the serial number when exercising this
warranty. All transportation charges on Products or parts submitted for repair or replacement must be paid by purchaser.
This Limited Warranty does not cover Products which have been damaged as a result of accident, abuse, misuse, neglect, improper installation, improper maintenance,
or failure to operate in accordance with Wayne Water Systems’ written instructions.
THIS WARRANTY IS IN LIEU OF ANY AND ALL OTHER WARRANTIES, OBLIGATIONS OR AGREEMENTS, EXPRESSED OR IMPLIED, INCLUDING ANY IMPLIED WARRANTY
OF MERCHANTABILITY OR FITNESS FOR ANY PARTICULAR PURPOSE, AND ANY RIGHTS OR REMEDIES AGAINST ANY PERSON OR ENTITY UNDER THE UNIFORM
COMMERCIAL CODE OR OTHERWISE WITH RESPECT TO THE SALE OF THE PRODUCT. THE REMEDIES AND OBLIGATIONS STATED IN THIS WARRANTY ARE THE SOLE
AND EXCLUSIVE REMEDIES OF AND OBLIGATIONS TO THE OWNER FOR ANY AND ALL MATTERS ARISING WITH RESPECT TO OR IN ANY WAY CONNECTED WITH
THE PRODUCT, REGARDLESS OF THE SOURCE OR PROVIDER OF SUCH GOODS. IN NO EVENT, WHETHER AS A RESULT OF BREACH OF CONTRACT, WARRANTY TORT
(INCLUDING NEGLIGENCE) OR OTHERWISE, SHALL WAYNE WATER SYSTEMS OR ANY AFFILIATE BE LIABLE FOR ANY SPECIAL, INCIDENTAL OR CONSEQUENTIAL
DAMAGES.
You MUST retain your purchase receipt along with this form. In the event you need to exercise a warranty claim, you MUST send a copy of the purchase receipt along
with the material or correspondence. Please call Wayne Water Systems (800-237-0987) for return authorization and instructions.
DO NOT MAIL THIS FORM TO Wayne Water Systems.Use this form only to maintain your records.
MODEL NO._____________________ SERIAL NO._________________________ INSTALLATION DATE __________________________
ATTACH YOUR RECEIPT HERE
This manual suits for next models
3
Table of contents
Other Wayne Water System manuals
Popular Water System manuals by other brands

InSinkErator
InSinkErator Instant Warm Handwash System Installation, care & use manual

CEFLA
CEFLA PURE 500 operating manual

IXOM
IXOM GridBee GF10000 owner's manual

Baxi
Baxi ROCA ASIK-90 Installation, assembly and operating instructions

Grunbeck
Grunbeck desaliQ Operation manual

Taco
Taco 1400 Series instruction sheet

EOS
EOS Mill Wheel Mini Assembly and operating instruction

Aquacentrum
Aquacentrum HIGHDROGEN AGE2 GO Blue900 user manual

Intex
Intex ECO5110 owner's manual

Pentair Pool Products
Pentair Pool Products CODELINE 80S Series user guide

Elkay
Elkay EZWSRK Installation & use manual

RadonAway
RadonAway AIRaider 321 Instruction & installation manual