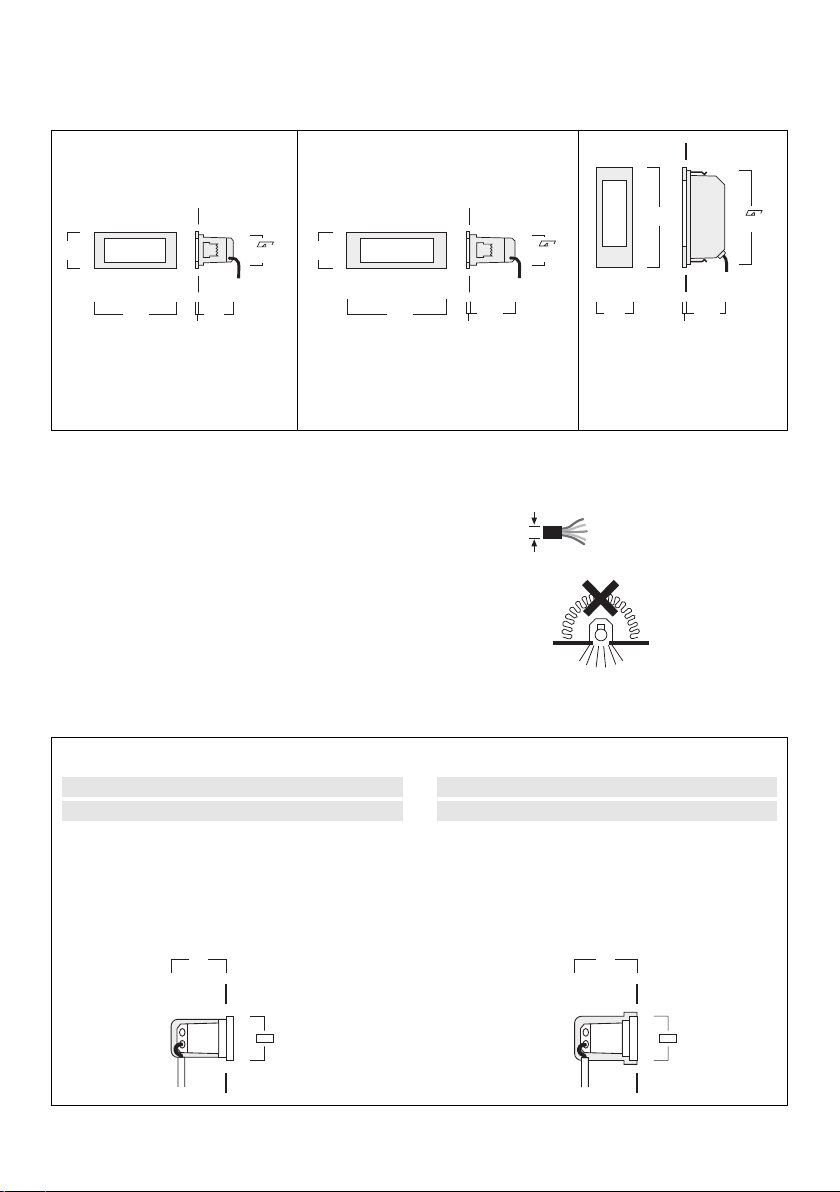
WE-EF STO LED Series User manual

WE-EF LEUCHTEN
Montage- und
Wartungshinweise für
Orientierungsleuchten
Serien STO / STP / STG
STL / STN / SVO
SVG / SVL LED
Installation and
Maintenance Instructions for
Steplights
STO / STP / STG
STL / STN / SVO
SVG / SVL LED Series

Steplights
STO209
STP204
STG209
STO259
STP254
STG259
SVO259
SVG259
SVL259
Orientierungsleuchten
STL209
STN204
STL259
STN254
1
92
205
92
250
92
250
100
8
235 x 76
8
75
190 x 76
8
100
235 x 76
max. Ø 10 mm
Lampen / Lamps
ST_ / SV_204 / 209 . . . . . . . . . . . . . . . . . . . . . . 4 LED / 4W
ST_ / SV_254 / 259 . . . . . . . . . . . . . . . . . . . . . . 6 LED / 6W
Nominalleistung, aktualisierte Daten siehe www.we-ef.com
Nominal power, for latest data refer to www.we-ef.com
Schutzart / Protection IP55
Schutzklasse / Class I, ta = 25°C
AC = 230V, DC = 165V – 263V Nicht geeignet zur Abdeckung
mit Wärmedämmmaterial.
Not suitable for covering with
thermal insulation material.
C
C
Wandeinbautöpfe / Blockouts
Typ / Type I 133-0075 BST20-I C = 105
Typ / Type I 133-0076 BST20-I C = 130
Vorwandmontage
Der Abdeckrahmen sitzt auf dem Mauerwerk auf.
Pre-wallmounting:
Luminaire faceplate rests on wall surface.
Type I Type II
Wandeinbautöpfe / Blockouts
Typ / Type II 133-0077 BST20-II C = 115
Typ / Type II 133-0078 BST20-II C = 140
Inwandmontage
Der Abdeckrahmen schließt mit dem Mauerwerk bündig ab.
Inside wallmounting:
For total flush luminaire installation

2
123
Installation
The product must be installed and maintained by a suitably
qualified professional in compliance with latest building/
construction and/or electrical regulations and relevant
legislation.
Warning: Switch off mains electrical supply prior to
installing and connecting the luminaire. Do not open
luminaire while mains supply is switched on.
Notice: If the luminaire is modified by anybody other than
the original manufacturer, then the warranty will no longer
be valid and shall become the full responsibility of the
modifying person/organisation. Claims based on defects
attributable to improper installation and/or application,
and the consequences thereof, are excluded.
In case of component failure due to abnormal circum-
stances or at end of life, replacement must be carried out
by a suitably qualified and trained professional.
In case of questions please contact our technical hotline:
+49 5194 909209 (from Monday - Friday from 08.00 until
16.00 hours.
Maintenance
Apart from cleaning the product’s exterior surfaces, no
special maintenance work is required. Do not use high-
pressure cleaners.
Protect our environment: Discard used LEDs in compliance
with the most recent environmental legislation.
Installation
Montage und Wartung des Produkts dürfen nur von Fach-
personal mit entsprechender beruflicher Qualifikation in
Übereinstimmung mit den geltenden bautechnischen und/
oder elektrischen Vorschriften durchgeführt werden.
Achtung! Vor dem Montieren und Anschließen der
Leuchte die Spannungsversorgung abschalten. Leuchte
niemals bei eingeschalteter Spannungsversorgung öffnen.
Hinweis: Modifikationen an der Leuchte, die nicht durch
den Originalhersteller erfolgen, führen zum Erlöschen der
Garantie des Originalherstellers und zum vollständigen
Übergang der Verpflichtungen daraus auf die modifizieren-
de Person/Organisation. Ansprüche aufgrund von Mängeln,
die direkt oder indirekt auf unsachgemäße Montage
und/oder Anwendung zurückzuführen sind, sind ausge-
schlossen.
Bei Ausfall von Komponenten aufgrund ungewöhnlicher
Umstände oder am Ende der Lebensdauer darf der Aus-
tausch nur von geschultem Fachpersonal mit entsprechen-
der beruflicher Qualifikation ausgeführt werden.
Bei Fragen wenden Sie sich bitte an unsere technische
Hotline unter +49 5194 909209 (Montag - Freitag von
08:00 Uhr bis 16:00 Uhr).
Wartung
Abgesehen von der äußerlichen Reinigung des Produkts ist
keine besondere Wartung erforderlich. Keine Hochdruck-
reiniger verwenden.
Für die Entsorgung der LEDs sind die zur Zeit gültigen
Umweltgesetze zu beachten.

3
Installation Procedure
1) Switch off the mains electrical supply.
2) Remove frame A and lens B by releasing the two
hexagon socket screws C.
3) Remove board Jby loosening the screws T.
4) Check that rating shown on the luminaire label conforms
with the mains electrical supply.
4) Check that the recess provided can accommodate
luminaire housing. Feed the mains supply cable D
(and second cable Efor through wiring, if required)
through the gtommets Fin the rear of the housing,
while setting luminaire in position. Secure luminaire
by tightening the two Philips head screws G.
5) Connect the mains supply leads to their respective ter-
minals in the terminal block I(N = neutral, L = phase,
= earthing).
5) Replace the lens and secure in position together with
frame by evenly tightening the two hexagon socket
screws.
(For STN please pay attention that the arrows on the
spread lens point downwards into the lighting direction!)
Vorgehensweise
1) Spannungsfreiheit der Anschlussleitung herstellen.
2) Rahmen Aund Abdeckung Bdurch Lösen der Innen-
sechskantschrauben Centfernen.
3) Platinenhalter Jdurch Lösen der Schrauben Theraus-
nehmen.
4) Vergewissern Sie sich, dass die örtliche Versorgungs-
spannung und Frequenz mit den Angaben auf dem
Leistungsschild übereinstimmen.
4) Führen Sie das Kabel D(und falls notwendig das Kabel
Ezur Durchverdrahtung) durch die Kabeleinfährung F
in die Leuchte ein. Setzen Sie das Gehäuse in die
Wandaussparung oder den Wandeinbautopf ein und
befestigen Sie es durch Festziehen der Schrauben G.
5) Nulleiter (N), Phase (L1) und Schutzleiteranschluss
an die dafür vorgesehenen und entsprechend markier-
ten Kontakte der Anschlussklemme Ianschließen.
6) Setzen Sie die Abdeckung Bund den Rahmen Aauf
und verschließen Sie die Leuchte sorgfältig.
(Bei STN ist darauf zu achten, dass die Pfeile auf der
Streuscheibe nach unten in Lichtrichtung zeigen!)

4
D
EIIF
D
G
D
F
B
A
C
J
T
Einzelanschluss
Individual connection
Durchverdrahtung
Through wiring

ST_SV_LED_011119 / 006-0383
Technische Änderungen vorbehalten.
Technical specifications are subject to change.
© WE-EF 2019
WE-EF LIGHTING
Thailand
Tel +66 2 738 9610
Fax +66 2 175 2174
info.asiapacific@we-ef.com
WE-EF LIGHTING
Australia
Tel +61 3 8587 0444
Fax +61 3 8587 0499
info.australia@we-ef.com
WE-EF LIGHTING
United States of America
Tel +1 724 742 0030
Fax +1 724 742 0035
info.usa@we-ef.com
WE-EF LEUCHTEN
Germany
Tel +49 5194 909 0
Fax +49 5194 909 299
info.germany@we-ef.com
WE-EF LUMIERE
France
Tel +33 4 74 99 14 44
Fax +33 4 74 99 14 40
info.france@we-ef.com
WE-EF HELVETICA
Switzerland
Tel +41 22 752 49 94
Fax +41 22 752 49 74
info.switzerland@we-ef.com
WE-EF LIGHTING
United Kingdom
Tel +44 844 880 5346
Fax +44 844 880 5347
info.uk@we-ef.com
www.we-ef.com
Sicherheit
Der Hersteller übernimmt keine Haftung für Schäden, die durch
unsachgemäßen Einsatz oder Montage entstehen.
Werden nachträglich Änderungen an Leuchten und/oder Zubehör
vorgenommen, so gilt derjenige als Hersteller, der diese Änderun-
gen vornimmt.
Safety indices
The manufacturer is then discharged from liability when damage is
caused by improper use or installation.
If any luminaire and/or accessory is subsequently modified, the
persons responsible for the modification shall be considered as
manufacturer.
This manual suits for next models
19
Table of contents
Popular Light Fixture manuals by other brands

Ecosense
Ecosense EcoSpec HP EXT Series quick start guide

Lightolier
Lightolier Lytecaster 1134 specification

Grace
Grace THRIVE installation manual

Fulham
Fulham Thoroled TKT120013RD 01 Series installation instructions

Homelux
Homelux BEACON40 instruction manual

Lightolier
Lightolier Soli ADA Series instruction sheet