Weatherdock raspAIS User manual


Page 2of 21
Content
1SAFETY...................................................................4
1.1 GENERAL SAFETY INSTRUCTIONS ...................................... 4
2PRODUCT AND SERVICE DESCRIPTION ...................5
2.1 INTENDED USE.............................................................. 5
2.2 SCOPE ........................................................................ 5
2.3 IMPORTANT PRODUCT INFORMATIONS .............................. 5
3PRODUCT OVERVIEW ............................................7
3.1 CONNECTIONS /SOCKETS............................................... 7
4FUNKTIONAL ELEMENTS ........................................8
4.1 POWER SUPPLY ............................................................ 8
4.2 HDMI SUPPLY (2) ........................................................ 9
4.3 BNC-SOCKET /ANTENNA-SOCKET (3) .............................. 9
4.4 AIS-RX LED (4) ........................................................... 9
5OPERATION ...........................................................9
5.1 BASIC FUNCTION .......................................................... 9
5.2 NAVIGATING WITH THE RASPAIS ................................... 10
5.2.1 Navigating with openCPN............................ 10
5.2.2 Navigating with Tablet / Smartphone ......... 10
5.3 INSTALLATION INSTRUCTIONS ........................................ 11

Page 3of 21
6MAINTENANCE AND SERVICE ..............................15
7TROUBLE SHOOTING ...........................................16
8LICENSE AGREEMENT...........................................17
9TECHNICAL DATA.................................................20
10 DECLARATION OF CONFORMITY..........................20
Revision of the operating instructions
A21100, Erstellung: VV, NK, Jan. 2018

Page 4of 21
1Safety
1.1 General safety instructions
WARNING
When guiding ships, it is the sole responsibility of the skipper
to operate the vehicle in a safe manner, to have full control of
all conditions during the entire journey. Improper behavior of
the driver of a RaspAIS equipped vehicle, where the driver
does not pay close attention to vehicle operation and
environmental conditions, may result in an accident or
collision with property damage or personal injury.
Warning!
It is the sole responsibility of the user to use the RaspAIS
prudently. The RaspAIS does not release you from your due
diligence obligations!
• Please read all instructions. Keep all safety
instructions ready for the future!
• Please keep the device out of reach of children!

Page 5of 21
2Product and service description
2.1 Intended use
The RaspAIS is a portable AIS receiver designed to work
with a Raspberry Pi®. The unit has a 2 channel parallel
AIS receiver for high performance at sea.
.
2.2 Scope
•1x A211 RaspAIS
•Raspberry Pi 3 modell B
•1x manual
•SD-Card with Open Plotter Image
•1x power adapter
•1x housing
2.3 Important product informations
The RaspAIS is compatible with the worldwide used AIS
system (Automatic Identification System) In the EU it can
be operated in the following countries:

Page 6of 21
BG
DK
DE
EE
FI
FR
GR
IT
SI
LV
LT
BE
MT
NL
NO
AT
PL
ES
HU
GB
CY
SE
IE
IS
PT

Page 7of 21
3Product Overview
3.1 Connections / Sockets
Figure 1 –Description side view
Figure 1 –Description back side view

Page 8of 21
1. Power cable connection
2. HDMI connection
3. BNC socket antenna connector
4. AIS-RX LED
4Funktional elements
4.1 Power Supply
The power supply takes place via the Raspberry Pi®.
Please use the enclosed power supply. The RaspAIS is
powered by the following pins from the Raspberry Pi:
▪Pin 4: + 5 volt
▪Pin 9: GND / 0V
▪Pin 10: UART RX (internal connection from
RaspAIS to Raspberry Pi®)

Page 9of 21
4.2 HDMI supply (2)
You can connect a monitor via the HDMI connection.
Using the OpenCPN already installed on the SD card, you
can visualize the received AIS targets.
You also get access to the user interface of the already
installed OpenPlotter®.
4.3 BNC-socket / Antenna-socket (3)
The FM antenna is connected to the RaspAIS via the BNC
socket. An AIS antenna is recommended, which can be
used on the frequencies 161-162 Mhz. is tuned.
4.4 AIS-RX Led (4)
The RX-AIS Led flashes once every AIS target received.
Color: orange
5Operation
5.1 Basic Function
To put the RaspAIS into operation please connect an FM
antenna and the supplied power supply. The AIS data is
received via your installed antenna and transmitted via

Page 10 of 21
the UART interface to the integrated Raspberry Pi®. With
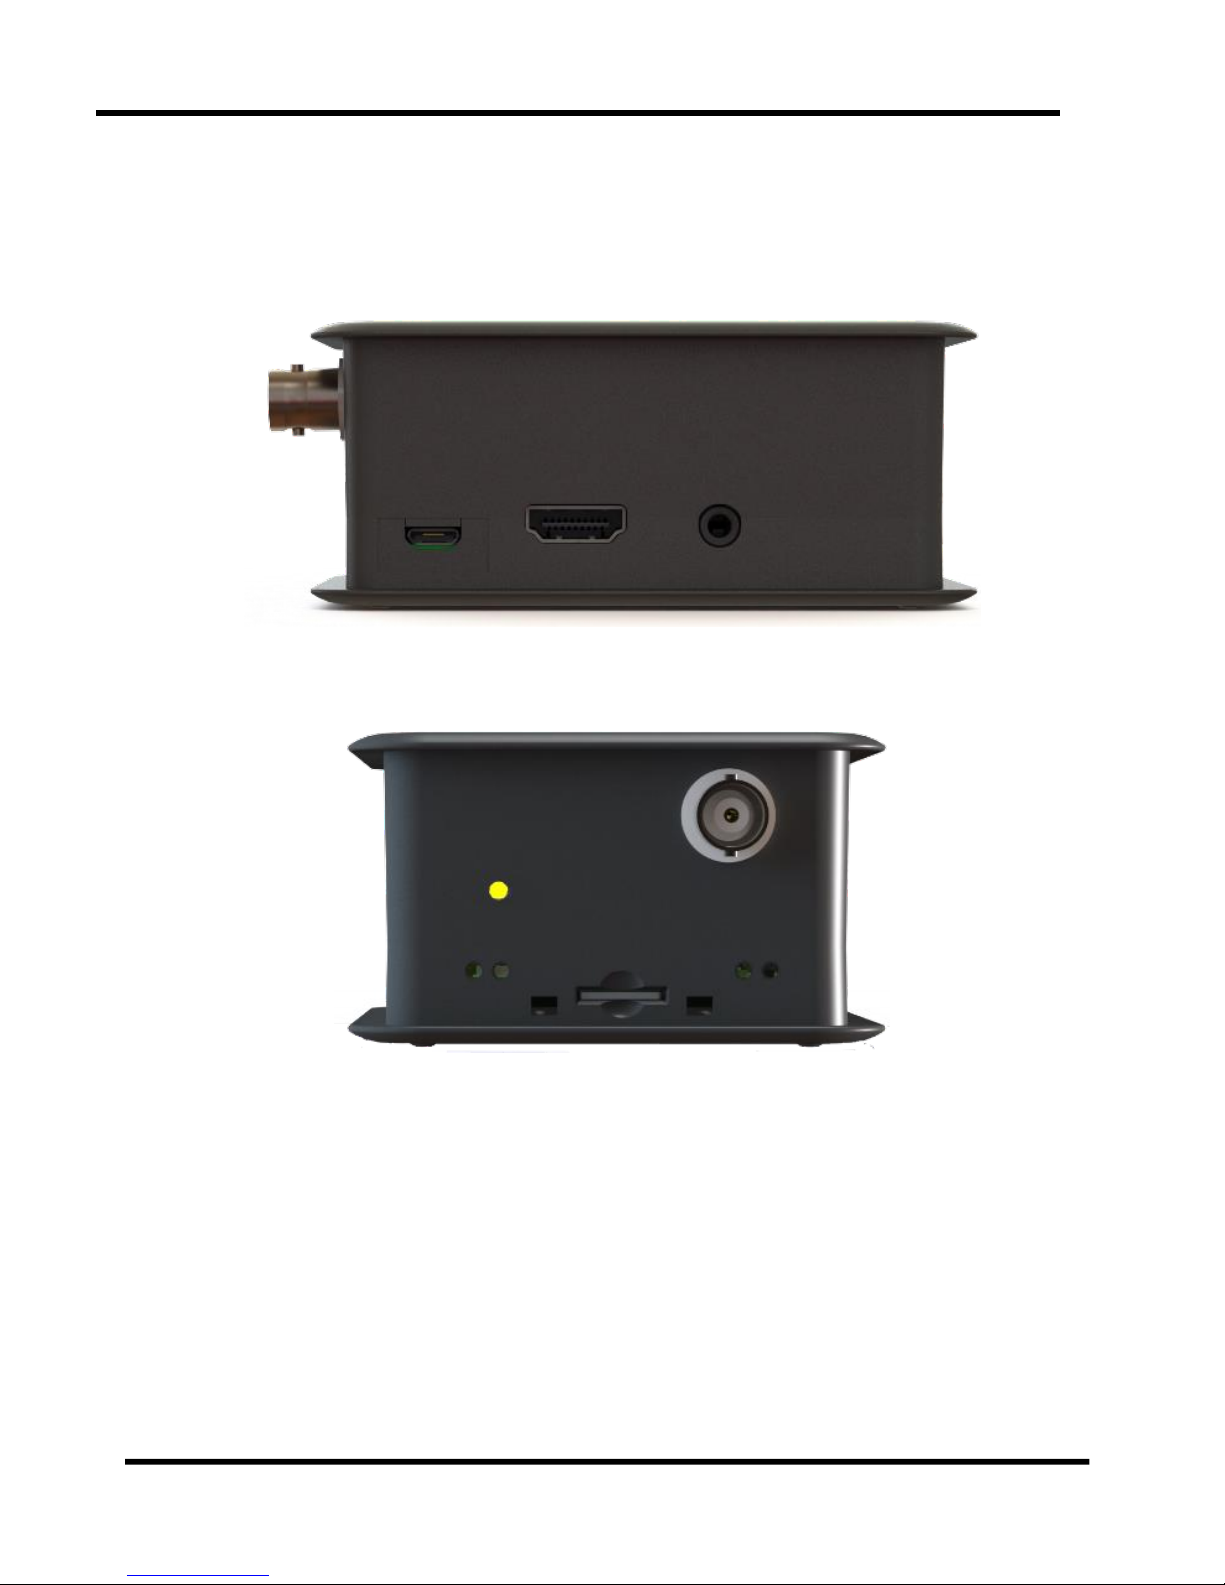
the AIS-RX Led on the RaspAIS you can always carry out
an AIS reception analysis. With every AIS message
received, the RX-AIS Led flashes once.
5.2 Navigating with the RaspAIS
The RaspAIS transmits the received AIS data via a serial
interface (UART) directly to your Raspberry Pi®. Thus, the
AIS targets can be illustrated directly on the connected
display via appropriate navigation software (for
example, openCPN) or transmitted via Wi-Fi to your
tablet / smartphone (for example, openplotter).
5.2.1 Navigating with openCPN
The openCPN already installed on the Raspberry Pi® is
automatically started when the Raspberry PI® is started.
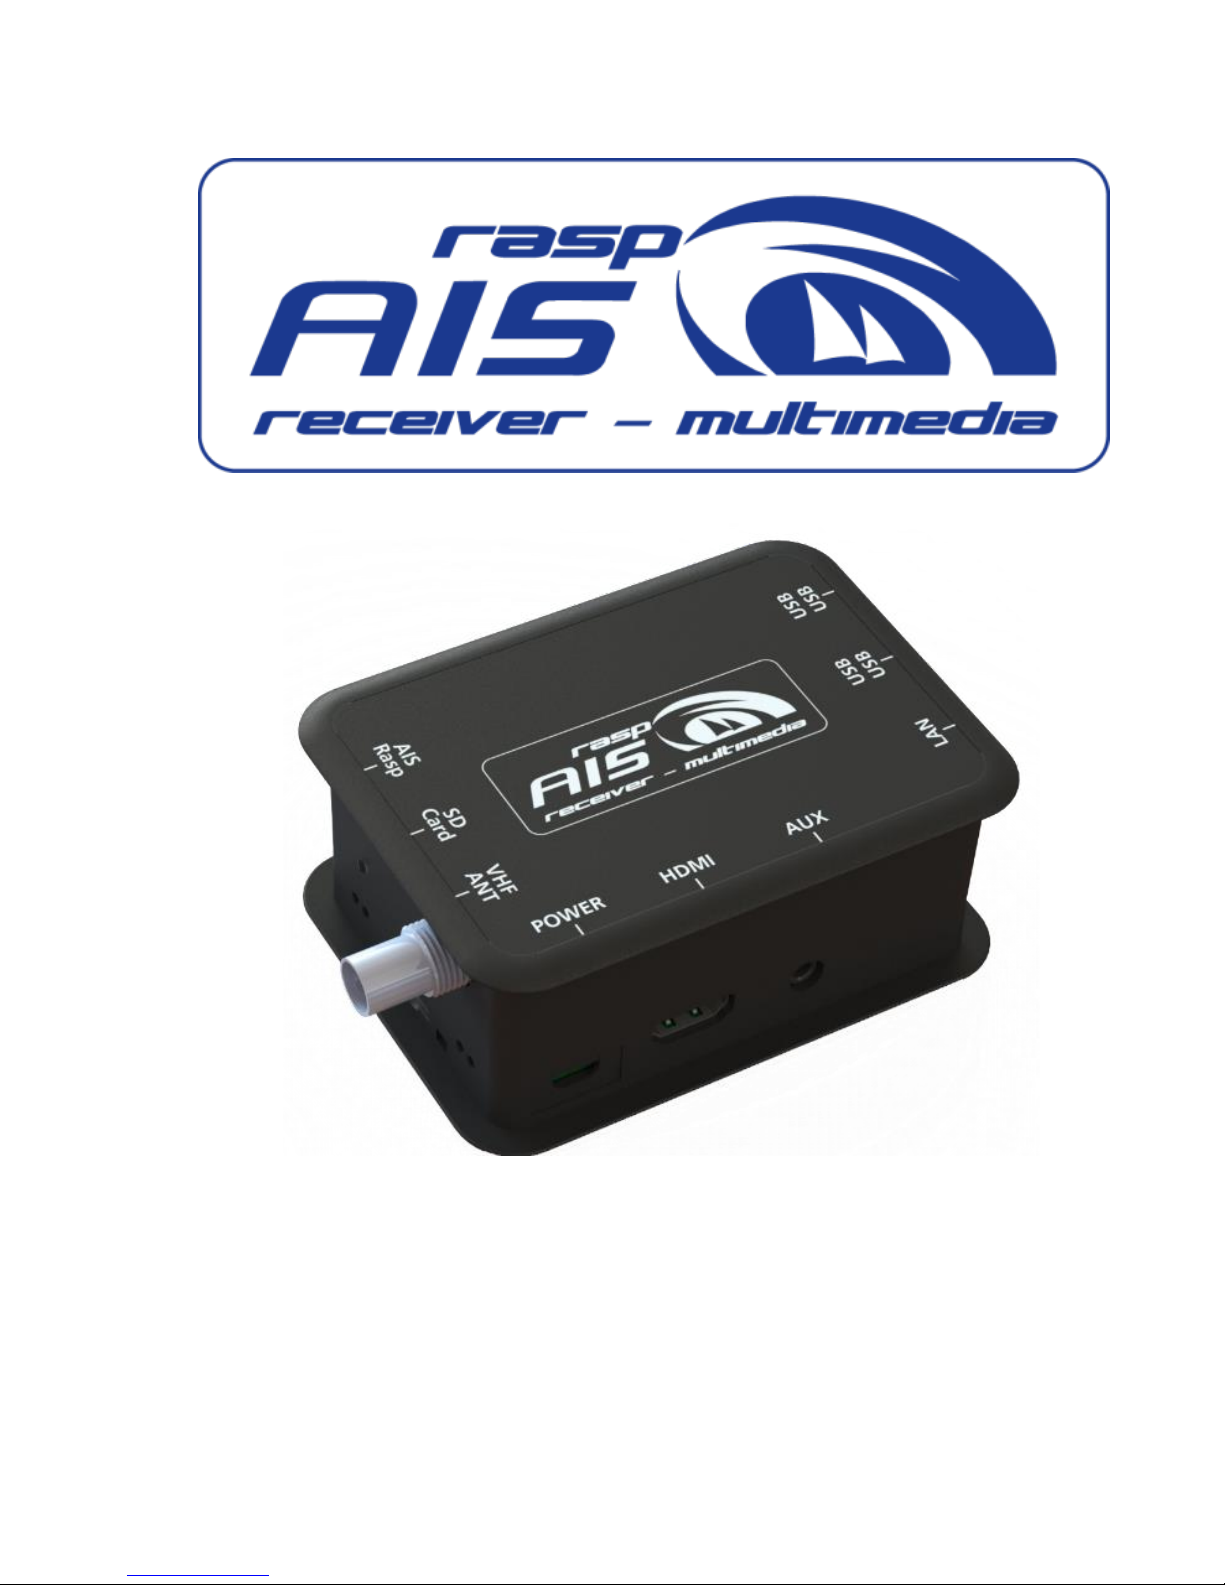
To access the interface, connect a screen via the HDMI
socket (2).
5.2.2 Navigating with Tablet / Smartphone
A Wifi access point is provided via the already installed
OpenPlotter when starting the Raspberry Pi®. Connect to
the tablet / smartphone with the Wifi network "RaspAIS".
The network password is: helloais (configurable in
OpenPlotter).

Page 11 of 21
Start any AIS-enabled navigation app and access the data
via a TCP / IP connection.
TCP / IP settings: IP: 10.10.10.1 Port. 10110
5.3 Installation instructions
To ensure a reliable AIS reception on board, please note
the following:
• Use a 5V power supply> 2 amps (10 watts)
• Mount the RaspAIS safely against environmental
influences • Avoid major sources of interference in the
vicinity (inverter, radio, fridge, ...)
• Pay attention to sources of interference, especially when
installing the antenna.

Page 12 of 21
Weatherdock AG is not the manufacturer of these cards and does not guarantee completeness
and reliability.
We provide these only as a guide and refer to the following source pages.
Installation of charts to Openplotter
Step 1. Download a chart:
Link 1:
https://wiki.openstreetmap.org/wiki/DE:KAP-
charts_from_OpenSeaMap#Beschreibung
Gemäß CC BY-SA lizenziert
© OpenStreetMap-Mitwirkende
Link 2:
https://wiki.openstreetmap.org/wiki/DE:KAP-
charts_from_OpenSeaMap#Beschreibung
https://www.elwis.de/DE/dynamisch/IENC/

Page 13 of 21

Page 14 of 21
After installing a chart, plug your USB stick into the
computer
Step 2. Start your RaspAIS
Insert all cables, note that the power connection is
plugged in at last.
Step 3. Start OpenCPN (if not already open)
Step 4. Press Settings
Step 5. Press Charts
Step 6: Press Add Directory and then the file path where
you saved the chart.
Step 7: Press Open
Step 8. Press on the map and then on Apply
Step 9. Press Ok.
.
Now the chart would have to be loaded as shown in the
picture below.
After that the card is permanently installed. The USB
stick must always remain in the same USB port otherwise
the card will no longer be recognized and the process
must be repeated.

Page 15 of 21
6Maintenance and service
Although Weatherdock AG always endeavors to handle
all publications with the utmost accuracy, this manual
may contain errors or ambiguities. In addition, these
instructions are the sole responsibility of Weatherdock
and can be changed without notice.
.
Contact:
Weatherdock AG
Emmericher Strasse 17
D-90411 Nürnberg
Phone: +49 (0)911-376638-30
Homepage: www.easyais.com

Page 16 of 21
7Trouble shooting
Please read this error prevention options carefully!
errors
fix
There is no data on the
Raspberry
• Make sure that the serial
interface has been activated
• Check if AIS targets are
within reach
• Is the antenna correctly
mounted?
The RaspAIS receives
only very near AIS
targets
•Make sure that there are no
large sources of
interference near the
RaspAIS. (Fridge, etc.)
•Check your antenna system
The RaspAIS works
unreliable / crashes
•Check the power
supply of your
Raspberry Pi®.
•We recommend 5 VDC
/ 2.0 amps

Page 17 of 21
8License agreement
By using the RaspAIS, you agree to the terms of the
following warranty agreements. Please read this
agreement carefully. Weatherdock AG grants you a
limited license to use the device during normal operation
of the product. Title, ownership and intellectual property
rights in and to the Software remain with Weatherdock
AG.
9 Warranty
Weatherdock
Weatherdock AG warrants this product against defects in
material and workmanship for a period of 2 years from
the date of purchase. Within this period, Weatherdock AG
will, at its discretion, repair or replace faulty components
in normal use. Repairs or replacement at the expense of
the company Weatherdock AG are made without
calculation for parts or working hours. The customer,
however, carries the shipping costs. This warranty does
not cover misuse, misuse, accidents or unauthorized
changes or repairs. The implied warranties and rights are
exclusive and supersede any other express or implied
warranty and or statute, including any statutory or other
liability arising from a warranty of merchantability or
fitness for a particular purpose. This warranty gives you

Page 18 of 21
specific legal rights, depending on the country. In no case
Weatherdock AG is responsible for accidental, special,
indirect or consequential damages resulting from the use
or possible disuse of the product or from errors in the
product. Weatherdock AG reserves the sole right to repair
or replace the device or the software or to refund the
purchase price. This right is your sole and exclusive right
in case of warranty. Products purchased in online auctions
do not entitle to discounts or to the use of special offers
Weatherdock AGs. Also, purchase confirmations from
online auctions are not recognized as proof of warranty
claims. To satisfy warranty claims, an original proof of
purchase from the dealer is always required. Weatherdock
AG does not replace missing equipment or accessories in
products purchased in online auctions. In case of
warranty, contact your Weatherdock AG dealer. He will
coordinate the further procedure with you. In the case of
a shipment, pack the device carefully and send it stamped
to the address your trader names. For warranty repairs,
always include a copy of the original proof of purchase as
proof of ownership. The Weatherdock AG RaspAIS
contains no user-repairable parts. If there is a problem
with your device, contact your RaspAIS dealer. Any
attempt to open, modify or modify the device will void
the warranty and may irreparably damage the device.

Page 19 of 21
All brands and trademarks mentioned in this document
are the property of the companies named.
Copyright 2017, Weatherdock AG
Further issue and duplication of these documents,
utilization and communication is not permitted.
Violations committed for damages.

Page 20 of 21
9Technical data
Beschreibung
Wert
Abmessungen
-
Weight
-
Frequenz
161,975 MHz und 162,025 MHz
Channel Bandwidth
25kHz
Channel Step
25kHz
RX sensivity
-
Power consumption
Ca.500 mA
UKW socket
BNC Weiblich
Displays
1 LED (AIS-RX)
Interface
UART TX (38400 Baud)
Operating temperature
-10°C bis +55°C
Stock temperature
-30°C bis +70°C
Tabelle 1: Technische Daten
10 Declaration of Conformity
-----
Table of contents
Other Weatherdock Receiver manuals
Popular Receiver manuals by other brands

Futurecom
Futurecom MOBEXCOM DVE user manual

Tecsun
Tecsun PL-360 Operation manual

HAMTRONICS
HAMTRONICS R306 Installation, operation and maintenance

Cypress
Cypress CA-HDMI150R Operation manual

New Japan Radio
New Japan Radio NJT8302N instruction manual

Velleman
Velleman High-Q Velleman-Kit K8057 Illustrated assembly manual