manuals.online logo
Brands
  1. Home
  2. •
  3. Brands
  4. •
  5. Weathermatic
  6. •
  7. Network Hardware
  8. •
  9. Weathermatic Smartlink SL-AIRCARD-M1NA User manual

Weathermatic Smartlink SL-AIRCARD-M1NA User manual

www.weathermatic.com
ADSLAC_revD
1
SL-AIRCARD SmartLink Aircard
Installation Instructions
Step 1: Installing the Aircard
1. Verify the version of
SmartLine controller is
compatible through the
Advanced menu. Only
versions 3.1 and higher are
compatible.
2. Remove the SmartLink
Aircard , accessory bag
containing screws, and
antenna from the box. On
the outside of the box and
Aircard is a label with the
Aircard 19 digit ID number.
You will need this to activate and register your Aircard
on the SmartLink Network.
3. Screw the antenna into the Aircard.
4. Run the Aircard cable up through the bottom of the
SmartLine controller case. You may need to widen an
existing hole using a drill or punch out the area indicated
on the bottom.
5. Plug the cable into the RJ-11 phone jack located inside
the controller. Ensure it is plugged in completely.
6. Verify all of the cables are out of the way and close the
panel door, ensuring it is closed completely.
7. The Aircard status LED will flash rapidly green until
it cycles through the 4 status positions. This will last
approximately 15-30 seconds.
8. If you have not yet activated and registered your Aircard,
see Step 2 – Setting up your SmartLink Network Account
to activate. You will need the 19-digit ID number.
9. If you have powered up the Aircard, the Aircard
status will be a solid green light once it establishes
communication. If, after activation on the SmartLink
Network, the status flashes red, please contact the Help
Desk.
10. Complete the installation by mounting the Aircard using
the screws provided in your accessory bag. The antenna
should face down.
Step 2: Setting Up Your SmartLink Network Account
1. Go to www.smartlinknetwork.com and click the “Login”
LTELT E
*SmartLink is supported by the latest version of the most popular internet
browsers: Internet Explorer, Firefox, Chrome, and Safari. We recommend you
update your internet browser to the latest version to be sure of compatibility. For
example, Internet Explorer version 8 and higher is supported (version 7 and lower
is not). Go to the Help menu item – About Internet Explorer to see your browser
version number.
button at the top right of the screen. There you can login
to an existing account or create a new one. If you already
have an account, continue to Step 2. When creating a
new account, please fill out all required areas marked
with an asterisk (*). Note: Company Name is required. If
creating a personal account, use your name in place of
the company name.
2. Once logged in, you will be taken to the Sites page.
3. To add a new site, select the “+ New Site” button at the
top of the Site page.
4. Enter the Site name and complete address.
5. Select the Save button.
6. In the selected site, select the “New Controller” button to
activate your Aircard.
7. Enter a name to identify the SmartLine controller to
which the Aircard will be connected.
Installation Instructions for the following models:
• SL-AIRCARD-M1NA
• SL-AIRCARD-M1NA-EXT
• SL-AIRCARDFLOW-M1NA-EXT
• SL-AIRCARDFLOW-M1NA
Commercial Wireless
www.weathermatic.com
ADSLAC_revD
2
Help Desk: 888-484-3776
Monday – Friday 8:00 am – 5:00 pm CST
Online: support.weathermatic.com
Email: support@weathermatic.com
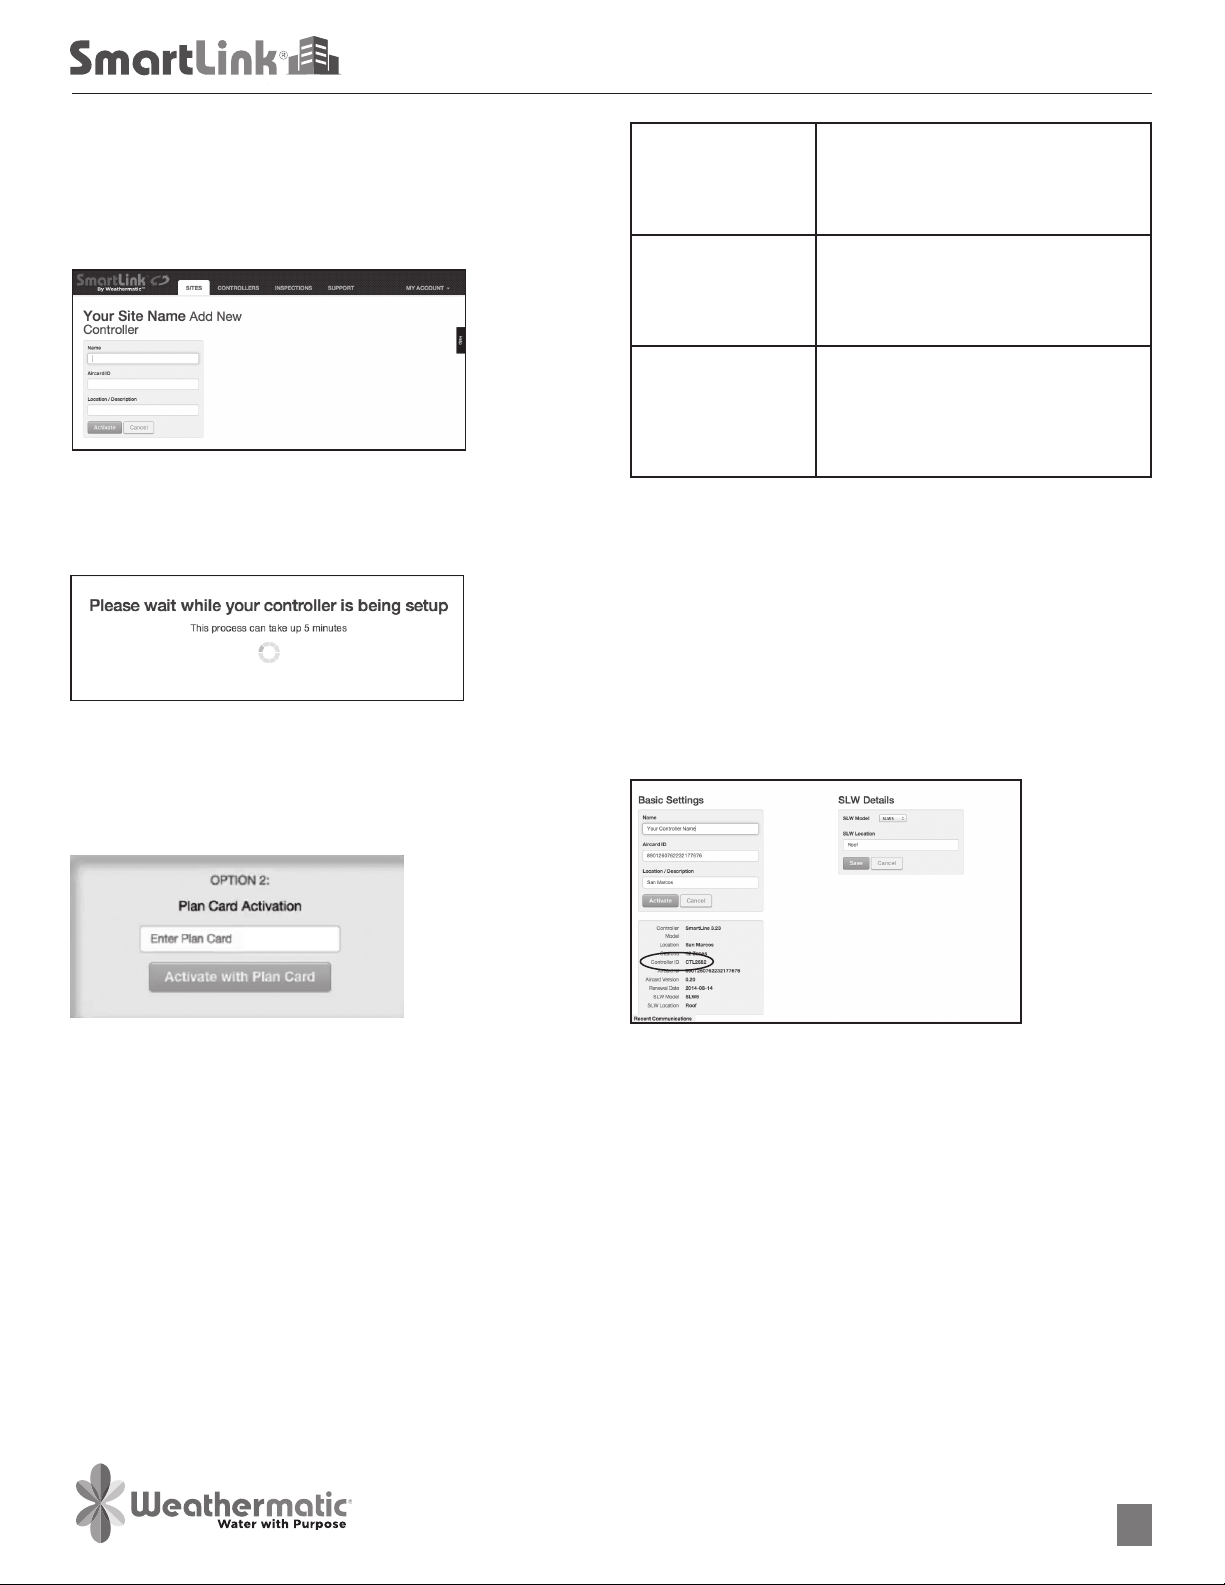
8. On the outside of the box and on the Aircard is a 19
digit number. This is the Aircard ID. Enter it exactly as
shown and verify it is correct.
9. Enter location information.
10. Verify the site is correct or select another site from the
drop down menu.
11. Select the Activate button to activate the Aircard. Only
select the Activate button once.
12. Once the Aircard is activated, you will be taken to the
Subscription page.
13. To activate your access to your new controller, enter the
9-digit subscription plan number found on the PLAN
CARD from the Aircard box or on the sticker on the
FRONT of the Aircard.
14. If you do not have a subscription plan, you have the
option of entering credit card information to charge
the subscription or using the 30-day temporary access
activation. Note: If a subscription plan or credit card
info is not entered prior to the expiration of the 30-day
access, you will lose the ability to access the controller
from SmartLink.
Troubleshooting
SL-AIRCARD SmartLink Aircard
Installation Instructions
Controller not
supported
The controller identifies as firmware
version other than 3.10 or 3.13. Only
3.10 and higher are compatible and
supported. (Contact distributor to
upgrade.)
Could not connect The connection timed out. Usually
this is seen when the Aircard is
unplugged or requires a reset
(unplug, wait 10 seconds and plug
back in).
Connected, but no
response
The Aircard is connected, but it
cannot communicate with the
controller. This can happen if the
controller door is not completely
closed, or possibly for other
unknown controller-related reasons.
Contacting the Help Desk
If there’s a need to contact support, be prepared to provide
the following information:
• Your Name and Contact information
• Site Name
• Which status light is red on the Aircard and/or Error
message received on the SmartLink Network.
• Controller ID – This is found by opening the drop down
menu next to “Additional Controller Info” while in the
controller page.
NOTE: This equipment has been tested and found to comply
with the limits for a Class A digital device, pursuant to part
15 of the FCC Rules. These limits are designed to provide
reasonable protection against harmful interference when the
equipment is operated in a commercial environment. This
equipment generates, uses, and can radiate radio frequency
energy and, if not installed and used in accordance with
the instruction manual, may cause harmful interference
to radio communications. Operation of this equipment in
a residential area is likely to cause harmful interference
in which case the user will be required to correct the
interference at his own expense.
Commercial Wireless

This manual suits for next models

3

Popular Network Hardware manuals by other brands

ICT Protege PRT-RDM2-PCB installation manual

ICT

ICT Protege PRT-RDM2-PCB installation manual

Linksys OGV200 - Network Optimizer For Gaming Quick installation

Linksys

Linksys OGV200 - Network Optimizer For Gaming Quick installation

SMB GFI EXINDA 4062V2 quick start guide

SMB

SMB GFI EXINDA 4062V2 quick start guide

TerraMaster F5-421 Fundamentals and Preliminaries

TerraMaster

TerraMaster F5-421 Fundamentals and Preliminaries

JVC VR-N900U Startup guide

JVC

JVC VR-N900U Startup guide

MicroStrain V-Link-LXRS Technical notes

MicroStrain

MicroStrain V-Link-LXRS Technical notes

Seneca Cloud BOX installation manual

Seneca

Seneca Cloud BOX installation manual

Motorola solutions Avigilon HD-NVR4-PRM-64TB user manual

Motorola solutions

Motorola solutions Avigilon HD-NVR4-PRM-64TB user manual

Omron 3G3MV-PDRT2 user manual

Omron

Omron 3G3MV-PDRT2 user manual

Huawei CR52-LPUF-20 Specifications

Huawei

Huawei CR52-LPUF-20 Specifications

ADC HiGain H2TU-C-319 List 4E manual

ADC

ADC HiGain H2TU-C-319 List 4E manual

Cisco LightStream 1010 Configuration guide

Cisco

Cisco LightStream 1010 Configuration guide

DPS Telecom NetGuardian AAR HC user manual

DPS Telecom

DPS Telecom NetGuardian AAR HC user manual

Trango Broadband Wireless M5830S-SU-EXT installation guide

Trango Broadband Wireless

Trango Broadband Wireless M5830S-SU-EXT installation guide

Canaan Avalon Made 1346 user manual

Canaan

Canaan Avalon Made 1346 user manual

KonNad C2000-A2-MDDA0A0-AD6 user manual

KonNad

KonNad C2000-A2-MDDA0A0-AD6 user manual

ADTRAN NIU3 Installation and maintenance practice

ADTRAN

ADTRAN NIU3 Installation and maintenance practice

Control Techniques FM-3 Reference manual

Control Techniques

Control Techniques FM-3 Reference manual

manuals.online logo
manuals.online logoBrands
  • About & Mission
  • Contact us
  • Privacy Policy
  • Terms and Conditions

Copyright 2025 Manuals.Online. All Rights Reserved.