WebGate WebEye B106 User manual

Quick Reference Guide of WebEye B106
WebGate Inc.
This information is to connect WebEye B106 on Inte
rnet of
dedicated line or local LAN
. For different lines like xDSL,
cable and ISDN, please visit Download
page in WebGate
Internet homepage and download related information.
http://www.webgateinc.com

Quick ReferenceGuide of WebEye B106 2
I. Monitoring of real-time imagesthrough WebEye B106
1. PC and LAN requirements
1.1 PC requirements
lCPU: Pentium II and above
lRAM: 64MB and above
lO/S: Windows 98/NT/Me/2000
1.2 Check display setting in your PC.
1.3 Check Network Setting for PC.
1. Go to P
C Desktop, right click
the mouse on the background.
Scroll down to “Properties”
3. Set color at‘
high
color (16bit)’
or
above’.
4. Set
resolution a
t
‘1024x768 pixels’
or above.
2. Select ‘Settings ’.
5. Click ‘OK’button.
3Scroll down to
‘TCP/IP’
and
configure settings for
Ethernet card.
4. Click on ‘Properties’
1Right click the ‘
Network
Neighborhood’icon.
2
. Scroll down to
‘Properties’.

Quick ReferenceGuide of WebEye B106 3
1.4 Internet Browser Requirements
lInternet Explorer 5.0 and above
lNetscape Navigator 4.7 and above
1.5 Check LAN
lThe WebEye should be connected to a10 Base-T LAN. 10 Base-T LAN is standard for
network configuration.
lIn the rare instance of 100 Base-T LAN, a 10/100 switching hub will be needed to
convert 100 Base T to 10 Base T.
2. Connecting Ethernet and Power Cables to WebEye.
2.1 Connect network and power to WebEye
lMake sure that indicator lights and dipswitches are as follows:
3.
Connect LAN
cable (RJ-45).
4.The power input
jack. Use the included
12-volt power adapter.
5. The green LED should
blink
every 1-2 second(s) 1-
2 seconds
after receiving power.
1.
Connect external camera as
you want channel.
2.
Check DIP switch. Selected channel
switch is up, Not connected
channel is
down.
6. After receiving power,
yellow
LED should go on for 5-
6 seconds
and then go off. This LED starts
to
blink when user accesses WebEye.
5. Go to ‘Gateway’.
6. Check gateway address.
8
. Check IP
address and subnet
mask.
7. Go to ‘IP Address’

Quick ReferenceGuide of WebEye B106 4
2.2 Connect WebEye and a PC with Network Cable.
lTo connect WebEye on Internet or LAN. With this connection remote user may not
access WebEye before local user configure its network setting.
lTo directly connect WebEye to a PC, use the red crossover cable. This connection is just
to configure WebEye.
Note in connecting cable to terminal block
When you connect cable to terminal block, you should peel off the cov
er of cable by 1.5Cm
and insert the cable by 2Cm into the terminal
block.(communication., sensor, alarm and etc) In
case of power cable, the white mark of two lines means ‘+’.
1.5cm
Peeled
0.5cm
Covered
Total length to insert in Terminal Block = 2cm
Direct cable
Connect WebEye to a
PC through a HUB
HUB
Internet
Local User
Remote User
Router
Dedicated line, xDSL line, cable
modem line, ISDN line, and PSTN
(telephone) line are available.
Crossover cable
Connect WebEye directly to
a PC through LAN ports.

Quick ReferenceGuide of WebEye B106 5
3. Install WebEye Setup program in your PC
lCopy WebEyeSetup.exe file from the enclosed CD (or Diskette).
lPaste the file into your PC
lClick the file on your PC to activate Setup program.
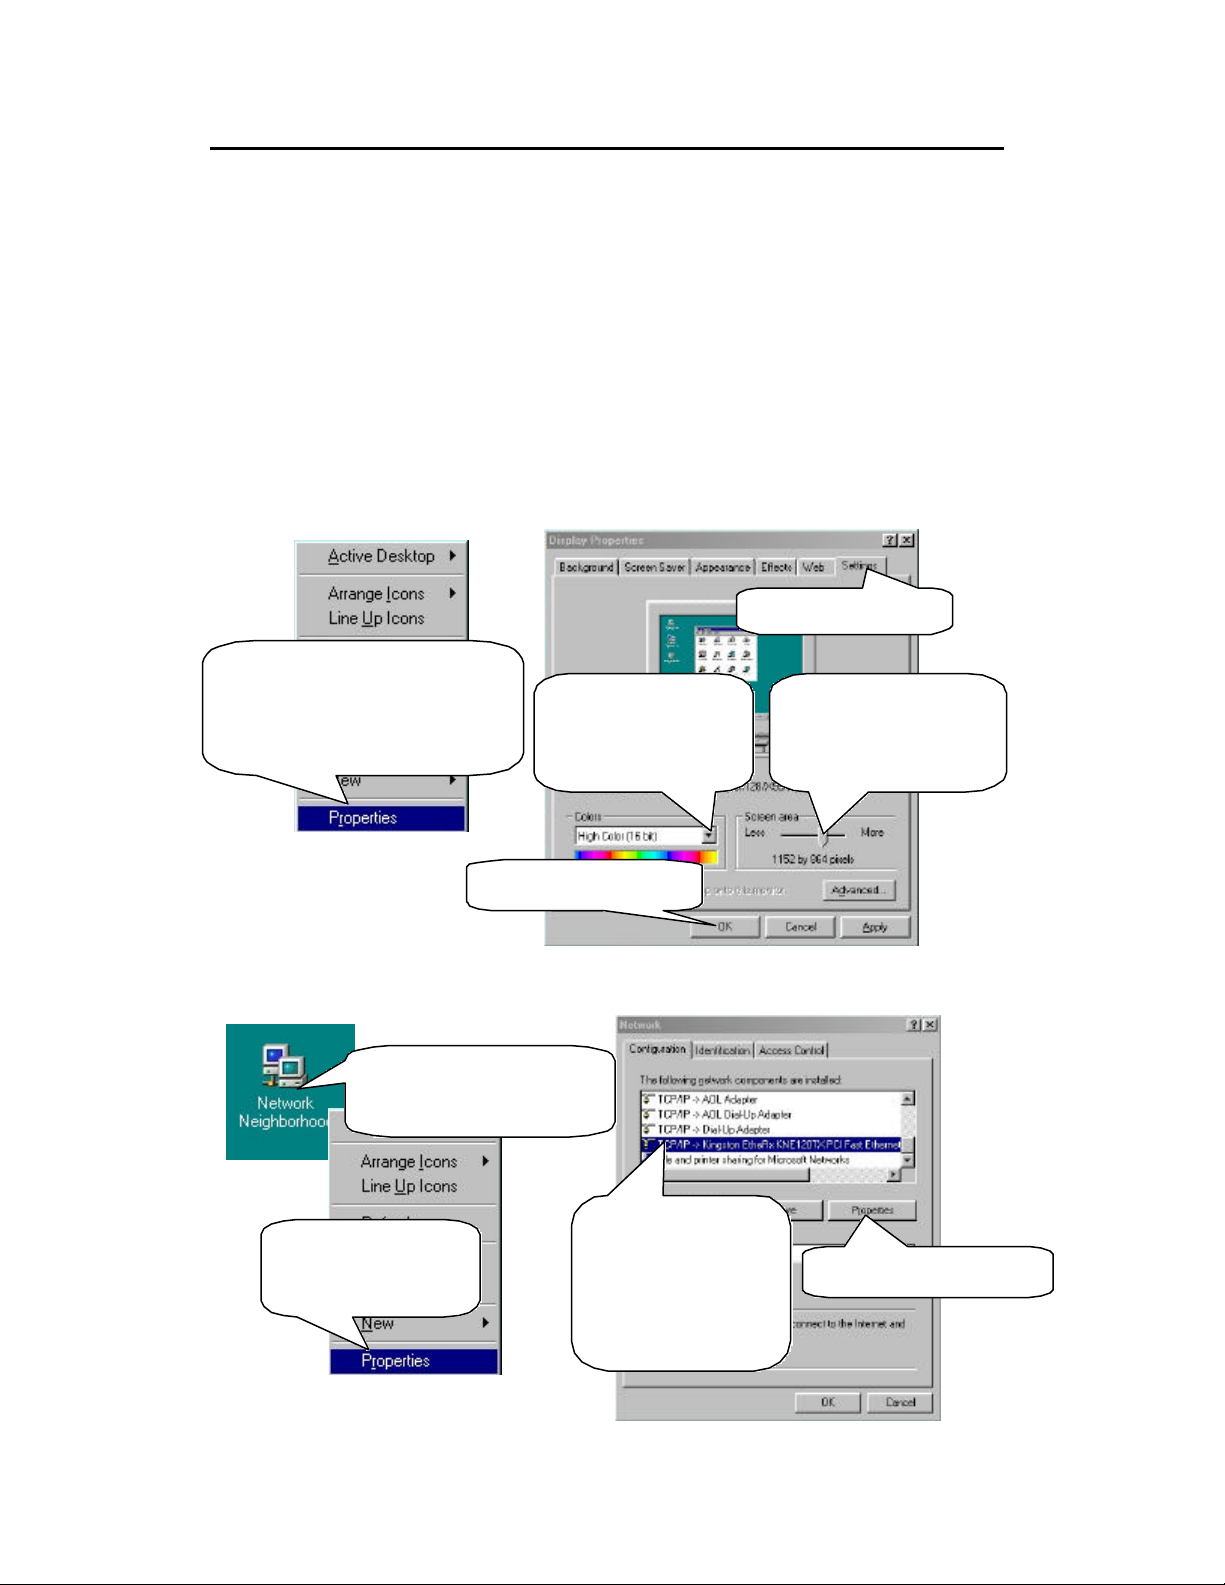
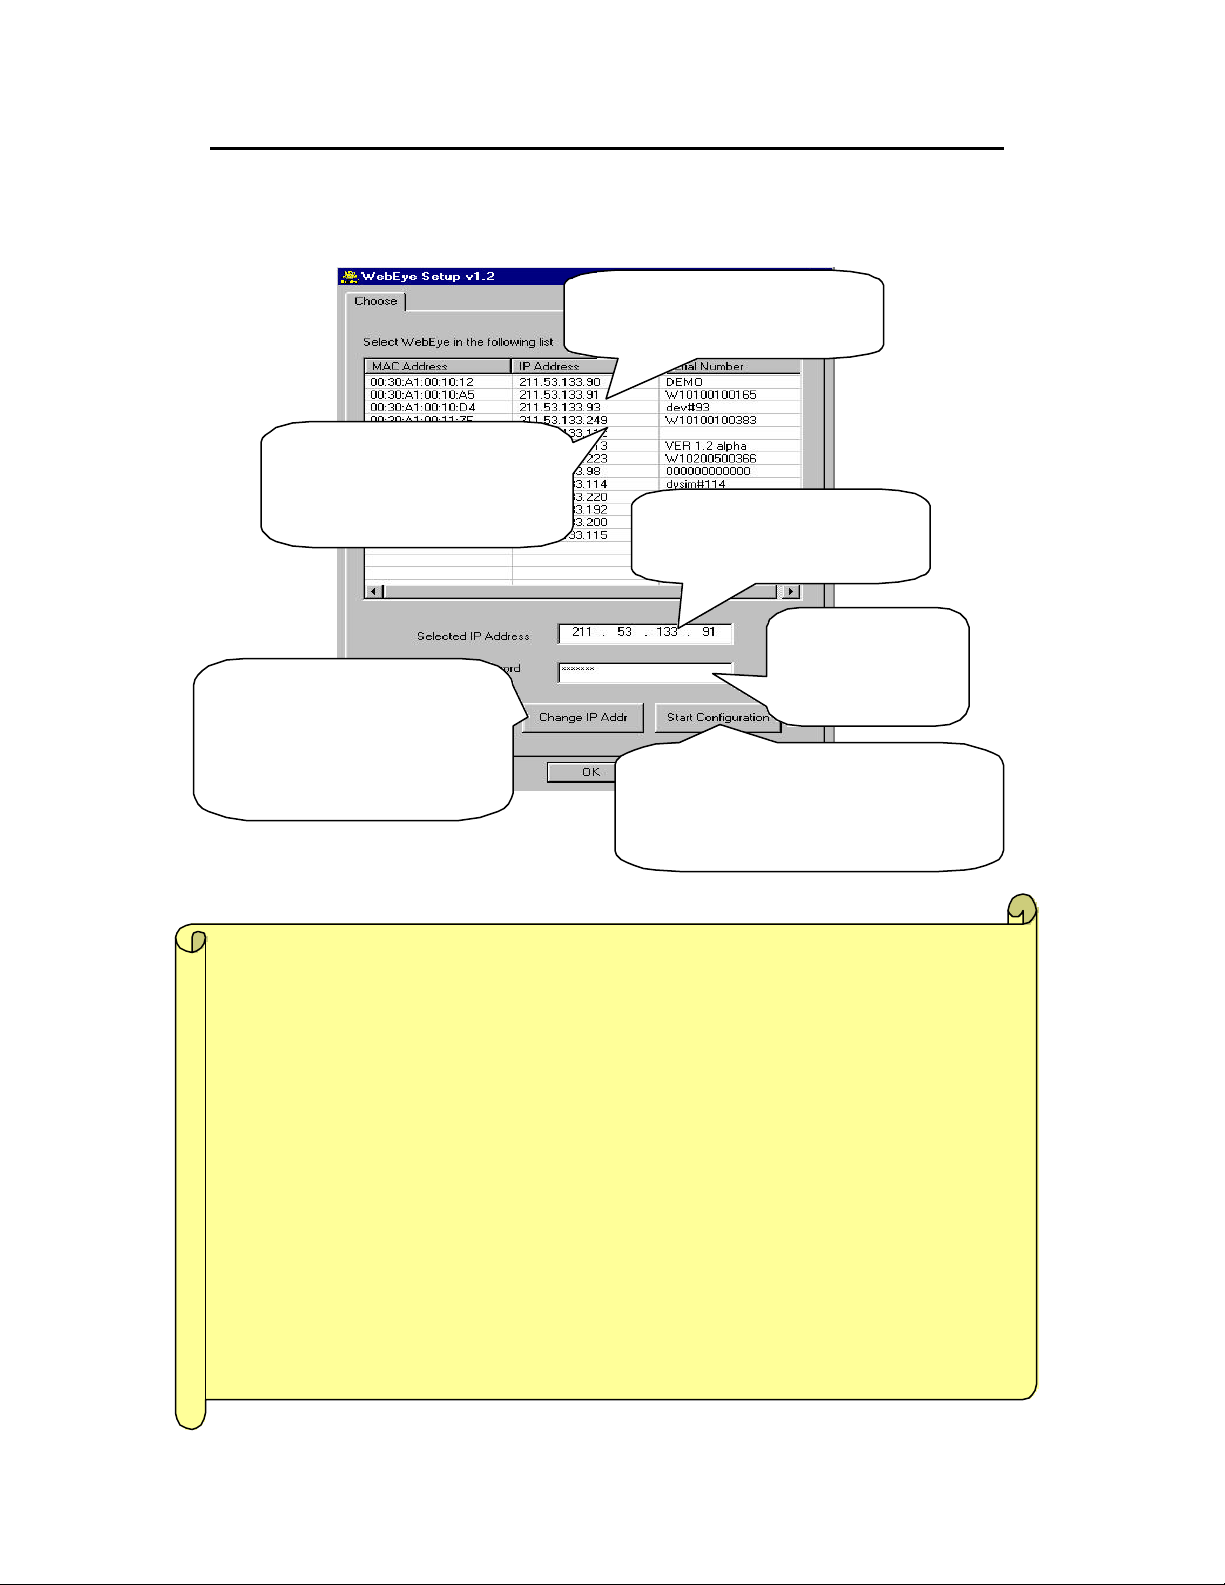
4. Assign IP address to WebEye with Setup program.
lActivate Setup program and assign a new IP address to WebEye.
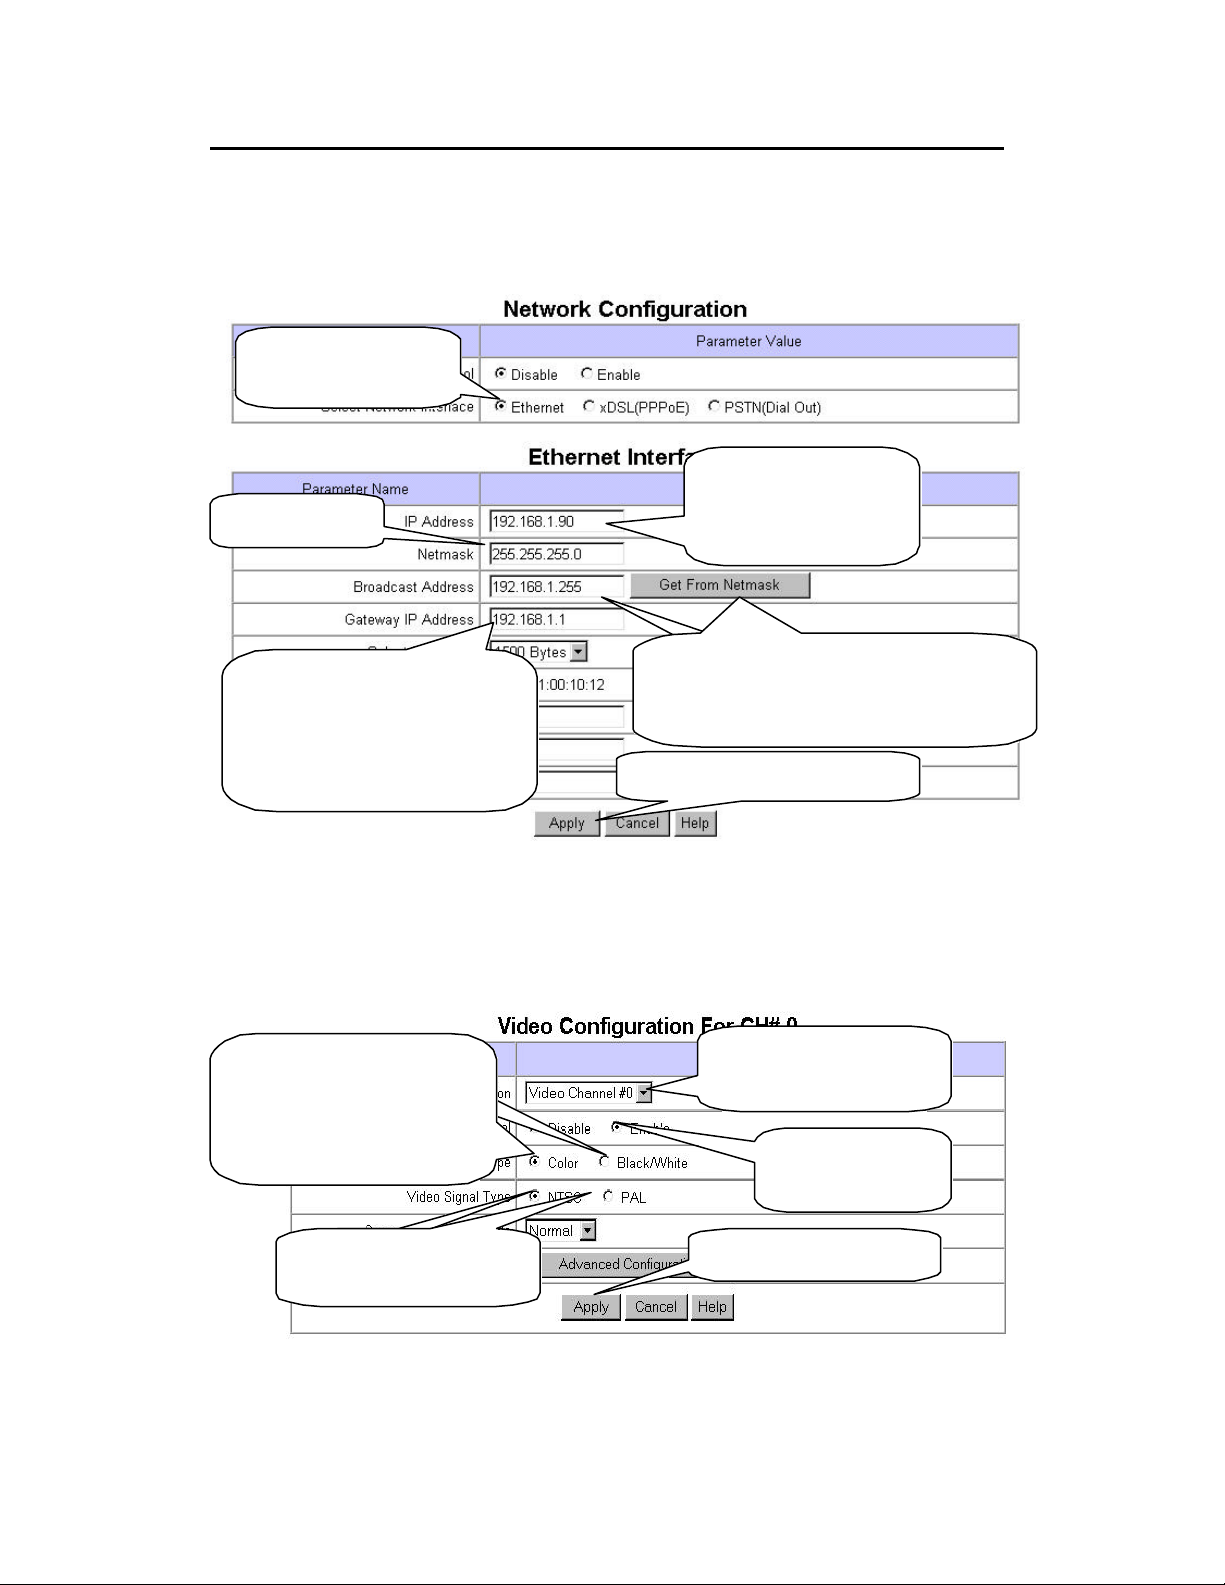
lChange IP address from default one to a new one available on your local
network. Connected on a same local network, any IP address of WebEye
appears on Setup window even if the IP address is from remote network range.
lA user on the local network may access WebEye, when WebEye is assigned a
proper IP address of the local network, though if gateway address, broadcast
address and network mask are not assigned properly. However remote user
cannot access the WebEye without assigning its gateway address, broadcast
address and network mask properly.
lEven when you connected directly WebEye to a PC, you cannot access
WebEye if you don’t assign WebEye with local IP address
*Crossover Cable and Direct Cable *
The crossover cable (red)provided with the WebEye is used to connect the WebEye with a PC. A HUB
is
not necessary to connect the WebEye to a PC if a crossover cable is used. The direct cable (white
)
should be usedif a HUB is used as an intermediary between the WebEye and PC.

Quick ReferenceGuide of WebEye B106 6
* IP Address and MAC Address *
IP Address
IP address is an identification code for computers and devices on a TCP/IP network. Networks using
TCP/IP protocol route messages based on the IP address of the destination. Within a closed network, IP
addresses can be assigned at rand
om as long as each one is unique. However, connecting a private
network to the Internet requires using registered IP addresses to avoid duplicates.
IP address can be
acquired from a network administrator or an Internet service provider.
MAC Address (MediaAccess Control Address)
MAC address is a
hardware identification code that uniquely identifies each node of a network. The
MAC layer interfaces directly with the network media. Consequently, each type of network media
requires a different MAC layer. The MAC address of WebEye is a12-digit number.
A unique MAC
address can be found on the label at the bottom of each WebEye.
1
. Select the default IP address of
WebEye (211.53.133.91).
2. & 6.The selected IP address
appears (211.53.133.91).
3. Enter Admin’s
password. Default
password is ‘admin’.
7. Click ‘Start Configuration’button, to
access WebEye through Internet and
configure administration conditions.
5. After changing IP address, the
new IP address appears. C
lick on
the IP address.
4. Click this button to change IP
address. Upo
n clicking the button,
a new window appears where you
change IP address.

Quick ReferenceGuide of WebEye B106 7
lPlease note!!
When an IP address is assigned to the WebEye, be careful not to assign the
WebEye with an IP address that is not compatible with the local network or
that is already in use by another computer or similar device. Please refer
below example and assign an IP address to WebEye.
Gateway address 192.168.1.1
Subnet mask 255.255.255.0
Broadcast address 192.168.1.255
Already used IP address 192.168.1.2 ~192.168.1.50
Available IP address for WebEye 192.168.1.51~192.168.1.254
However, if there is a subnet mask of 255.255.255.128, then IP addresses
from 192.168.1.129 to 192.168.1.255 are notin the same local network as the
IP address of 192.168.1.1 to 192.168.1.128.
5. Configure administrator’s condition.
lBy clicking ‘Start Configuration’button on setup program, you may access
WebEye administration page through Internet.

Quick ReferenceGuide of WebEye B106 8
5.1 Select ‘Network Configuration’in the menu and configure.
5.2 Select ‘Video Configuration’in the menu.
1. Select ‘Video Channel
#0’among 4 channels.
2. Select ‘Enable’to
use this channel.
3. Skip this step for
the built in
CCD. However by
clicking
‘B/W’, B/W image
s can be
viewed from the built in CCD.
4. Choose proper type
between NTSC and PAL.
5. Click ‘Apply’button.
4.This button makes
WebEye set broadcast
address
automatically. It is possible to input
diretly.
1
. Click ‘Ethernet’
button.
2
. Check if IP address
is same as assigned at
Setup program.
3. Set Netmask.
5
. Set gateway address. If an
unavailable address is assigned,
a popup message informs to
assign the address properly.6. Click ‘Apply’ button.

Quick ReferenceGuide of WebEye B106 9
6. Access WebEye image viewer and configure watching condition
6.1 Enter IP address and access WebEye image viewer
5
. Check user name and password.
Default values do not require retyping.
2. Click ‘WebEye Plug-in’menu, for
Netscape Navigator users.
6. Click ‘Login’button to
access real-time image
viewer.
*
This step is for Netscape
Navigator users only.
Internet Explorer users
can skip this step.
1. Enter IP address of your WebEye in the
address bar
of the
Web browser (e.g. http://192.168.1.51) and press
‘Enter ’key.

Quick ReferenceGuide of WebEye B106 10
4. Click ‘Grant’button. ‘Install
Successfully Completed’ will
appear.
3. Click ‘
Download WebEye
Plug-in Now!’ button.
*
This step is for Netscape
Navigator users only.
Internet Explorer users can
skip this step.
7. Click ‘Yes’button to download and install Active-
X into
your PC. After download of Active-Xplug-in, real-
time
imagescan be seen.
* This step is for
Explorer users only
.
Netscape
users can
disregard thisstep.

Quick ReferenceGuide of WebEye B106 11
lIf you experience a case that Active-X for Internet Explorer or Plug-in for
Netscape Navigator is not installed into your PC properly, please visit
‘Download’page in WebGate Internet homepage (http://www.webgateinc.com). And
download a program to install Active-X or Plug-in manually.
7. Manage the real-time image viewer.
1. Click ‘Download’menu 3. Click ‘WebEye Plugin/ActiveX –
Manual
Installation’
article. Then download
installation program and install it following
the description.
2. Click ‘
WebEye
Series’at ‘Download’
menu.

Quick ReferenceGuide of WebEye B106 12
Set the desired viewer option. Simple viewer, server
-
push viewer, and
java applet viewer viewer
configurations are available
in this menu. For more
information, please refer to User ’s guide.
Resolution, image
size, and
transmission frame rate
can be
altered in the scroll bars.
Images can be viewed in this section. T
o
view other channels,
connect external
cameras and configure settings
properly.
For more information, please refer to
User’s guide.
The Reference Guide has so far covered installation and
usage of the internal camera of WebEye
. The below
sections cover basic information on usage of
external
channelsand viewing through firewalls. For d
etailed
information, please refer to the WebEye User’s Guide.

Quick ReferenceGuide of WebEye B106 13
12345Hi-z
75ohm75ohm
DIP Switch
6
II. Connecting external camera.
1. Functions of DIPswitch.
2. Connecting external camera to WebEye
2.1 Connection diagram.
Video
signal flows
through BNC Cable.
Video signal flows
through LAN Cable.
PC
CCTV Camera
To designate video signal termination. T
o connect
external CCTV cameras , place the switches in
proper positions. Default positions of all 6
switches are up.

Quick ReferenceGuide of WebEye B106 14
2.2 Connecting external camera to WebEye
2.2.1 CH #1
lEnter WebEye administrator’s page
lEnter ‘Video Configuration’page and configure.
lConnect an external camera and check DIP switches’position
2. Select ‘Enable’
to
use the channel.
1. Enter ‘Video Configuration’
page
and select ‘Video Channel #1’
among 6 channels.
3. Choose ‘Color’
or
‘B/W’
according to
external camera type.
4. Choose either NTSC or PAL
according to external camera type
.
5. Click ‘Apply’ button.
12 3 4 5 Hi-z
75ohm75ohm
DIP Switch
6
Connect an external camera through coaxial
cable to ‘CH1’
port. And Channel 1 DIP switch
is down. Leave other unused DIP switch at
default setting.

Quick ReferenceGuide of WebEye B106 15
2.2.2 CH #2
lEnter WebEye administrator’s page.
lEnter ‘Video Configuration’page and configure.
lConnect an external camera.
2. Select ‘Enable’
to
use this channel.
1. Enter ‘Video Configuration’
page
and select ‘Video Channel #2’
among 6 channels.
3. Choose ‘Color’
or
‘B/W’
according to
external camera type.
4
. Choose proper type between
NTSC and PAL.
5. Click ‘Apply’ button.
12 3 4 5 Hi-z
75ohm75ohm
DIP Switch
6
Connect an external camera through coaxial
cable to ‘CH2’
port. And Channel 2 DIP switch
is down. Leave other unused DIP switch at
default setting.

Quick ReferenceGuide of WebEye B106 16
2.2.3 CH #3
lEnter WebEye administrator’s page
lSelect ‘Video Channel 3’in ‘Video Channel Selection’menu.
lConnect external camera and check DIP switches’position
2.2.4 CH #4
l
Enter WebEye administrator’s page
lSelect ‘Video Channel 4’in ‘Video Channel Selection’menu.
lConnect external camera and check DIP switches’position
12 3 4 5 Hi-z
75ohm75ohm
DIP Switch
6
Connect an external camera through coaxial
cable to ‘CH4’
port. And Channel 4 DIP switch
is dow
n. Leave other unused DIP switch at
default setting.
12 3 4 5 Hi-z
75ohm75ohm
DIP Switch
6
Connect an external c
amera through coaxial
cable to ‘CH3’
port. And Channel 3 DIP switch
is down. Leave other unused DIP switch at
default setting.

Quick ReferenceGuide of WebEye B106 17
2.2.3 CH #5
lEnter WebEye administrator’s page
lSelect ‘Video Channel 5’in ‘Video Channel Selection’menu.
lConnect external camera and check DIP switches’position
2.2.4 CH #6
l
Enter WebEye administrator’s page
lSelect ‘Video Channel 6’in ‘Video Channel Selection’menu.
lConnect external camera and check DIP switches’position
12 3 4 5 Hi-z
75ohm75ohm
DIP Switch
6
Connect an external camera through coaxial
cable to ‘CH6’port. And Channel 6 DIP sw
itch
is down. Leave other unused DIP switch at
default setting.
12 3 4 5 Hi-z
75ohm75ohm
DIP Switch
6
Connect an external
camera through coaxial
cable to ‘CH5’
port. And Channel 5 DIP switch
is down. Leave other unused DIP switch at
default setting.

Quick ReferenceGuide of WebEye B106 18
1.4. Connecting many of external cameras to WebEye
1.4.1 Connection diagram
lIn this application, user should designated to ‘on(down)’DIP switch of external camera
connect to WebEye.
lWebEye can connect to external cameras of six at most.
1.4.2 Image View in Ch #1, Ch #2, Ch #3, Ch #4, Ch #5, Ch #6
lEnter WebEye administrator’s page
lEnter each ‘Video Configuration’page and configure as follows
Video signal flows
through LAN Cable.
PC
CCTV Camera
Video signal flows
through BNC Cable.
2. Select ‘Enable’
to
use the channel.
1. Enter ‘Video Configuration’
page
and select ‘Video Channel #1’
among 6 channels.
3. Choose ‘Color’
or
‘B/W’
according to
external camera type.
4. Choose either NTSC or PAL
according to external camera type
.
5. Click ‘Apply’ button.

Quick ReferenceGuide of WebEye B106 19
2. Select ‘Enable’
to
use this channel.
1. Enter ‘Video Configuration’
page
and select ‘Video Channel #2’
among 6 channels.
3. Choose ‘Color’
or
‘B/W’according to
external camera type.
4
. Choose proper type between
NTSC and PAL.
5. Click ‘Apply’ button.
2. Select ‘Enable’
to
use this channel.
1. Enter ‘Video Configuration’
page
and select ‘Video Channel #3’
among 6 channels.
3. Choose ‘Color’
or
‘B/W’
according to
external camera type.
4
. Choose proper type between
NTSC and PAL. 5. Click ‘Apply’ button.
2. Select ‘Enable’
to
use this channel.
1. Enter ‘Video Configuration’
page
and select ‘Video Channel #4’
among 6 channels.
3. Choose ‘Color’
or
‘B/W’
according to
external camera type.
4
. Choose proper type between
NTSC and PAL. 5. Click ‘Apply’ button.

Quick ReferenceGuide of WebEye B106 20
2. Select ‘Enable’
to
use this channel.
1. Enter ‘Video Configuration’
page
and select ‘Video Channel #5’
among 6 channels.
3. Choose ‘Color’
or
‘B/W’
according to
external camera type.
4. Choose proper
type between
NTSC and PAL. 5. Click ‘Apply’ button.
2. Select ‘Enable’
to
use this channel.
1. Enter ‘Video Configuration’
page
and select ‘Video Channel #6’
among 6 channels.
3. Choose ‘Color’
or
‘B/W’acc
ording to
external camera type.
4
. Choose proper type between
NTSC and PAL. 5. Click ‘Apply’ button.
Connect each an external camera through
coaxial cable to external input port.
12 3 4 5 Hi-z
75ohm75ohm
DIP Switch
6
Make used DIP switch at down
setting.
Other WebGate Network Hardware manuals
Popular Network Hardware manuals by other brands

IEI Technology
IEI Technology eMerge Enterprise Install and Setup Guide

CopperOptics
CopperOptics PairGain PG-Flex RT FRL-772 List 1 manual

ABB
ABB PDCOM installation manual

D-Link
D-Link DHP-200 Quick installation guide

Vip-Vision
Vip-Vision NVR4PROPACK Quick installation guide

Unex
Unex RSU-352 Series quick start guide