WEi3u P116G User manual

Supplied User's Manuals
Congratulations on purchasing your WEIBU computer! Your WEIBU computer comes with
the following user's manuals:
●Startup Guide (this user's manual)
Please read this user' s manual first. You can find basic information, including connecting
accessories to your WEIBU computer, setting up Windows, and connecting your WEIBU
computer to the Internet.
●Safety Guide/Recovery and Troubleshooting Guide
Please be sure to read this user's manual. You can find information that helps you use your
WEIBU computer safely, including troubleshooting FAQs as well as instructions on
recovering your WEIBU computer and creating recovery media.
!Notes
●Features and apps mentioned in these user' s manuals may not be available or
preinstalled, depending on the model of your WEIBU computer.
●With the latest Windows updates applied to your WEIBU computer, the operation
procedures described in the user's manuals may vary from the actual ones.
●The visual contents, such as illustrations, photos, and screenshots, used in the manuals
may look different from what you actually see on your WEIBU computer.
WEIBU Support Website
You can find the latest WEIBU support information. When you need any help for using
your WEIBU computer, visit our WEIBU support website first.
https://www.weibu.com
1 .Supplied Items
口AC adapter
口Pen
口Startup Guide
口Warranty Book
口Safety Guide/Recovery and Troubleshooting Guide
!Notes
●Keep the shipping box of your WEIBU computer until you make sure that you have all the
supplied items. If you find anything missing or damaged, contact our Support experts via the
website or your dealer before you dispose of the box.
●The supplied accessories were tested and found functional solely with your computer.
CAUTION Hot surface
To avoid burn, do not use the computer on your lap for a long time.
2.Locating Parts and Controls

01 Dual microphones
02 Camera LED Indicator
03 Camera
04 Camera Shutter
05 Touch Pad
06 Pen tray
07 LCD screen/Touch screen
08 Stereo speakers
09 Power button
10 Keyboard

01 Charging Port
02 USB 3.2 Gen1
03 HDMI Output port
04 Type C
05 Security Lock Slot
01 Headphone Jack
02 USB 3.2 Gen1
03 TF Slot
04 SIM Slot
3.Setting Up
1 Connect to a Power Outlet
Plug the AC adapter to the AC charging port on the computer and connect the AC adapter
and a power outlet with the supplied power cord. Even when you do not intend to use your
computer for an extended period of time, connect it to a power outlet at least every three
months and charge the battery to around 50% of capacity. If the computer is kept
unplugged from a power outlet for an extended period of time, the battery voltage will drop
due to self-discharge to trigger the safety function and the battery may become unavailable
for use. The time period before the safety function is triggered varies depending on the
ambient temperature.
2 Turn On Your Computer
Lift the LCD screen lid and press the power button on the computer.
!Notes
●When lifting the LCD screen lid, do not grasp the area around the camera as it will cause
malfunctions.
●Do not turn off your computer before the Windows Setup window appears.
3 Set Up Windows (Initial Setup)
Follow the instructions displayed on the Windows Setup window to make initial settings.
Note
Please refer to Windows Help or Microsoft's website for more details.
Tips
Connect tσ the Internet

With your computer, you can connect to the Internet via a Wi-Fi (wireless L AN).Before
connecting to the Internet, you need to select a connection service, make a contract with an
Internet service provider accordingly, and make the Internet connection settings on the
computer. For detailed information on the Internet connection settings and required
network devices, refer to the manual from your service provider and the manual that came
with your device. Establishing a successful connection to the Internet completes Windows
license authentication.
Connecting via a Wi-Fi network
1. Select (start), (Settings), Network & Internet, and Wi-Fi, and then set Wi-Fi to On.
2. Select Show available networks.
3. Select the desired Wi-Fi access point, and then select Connect.
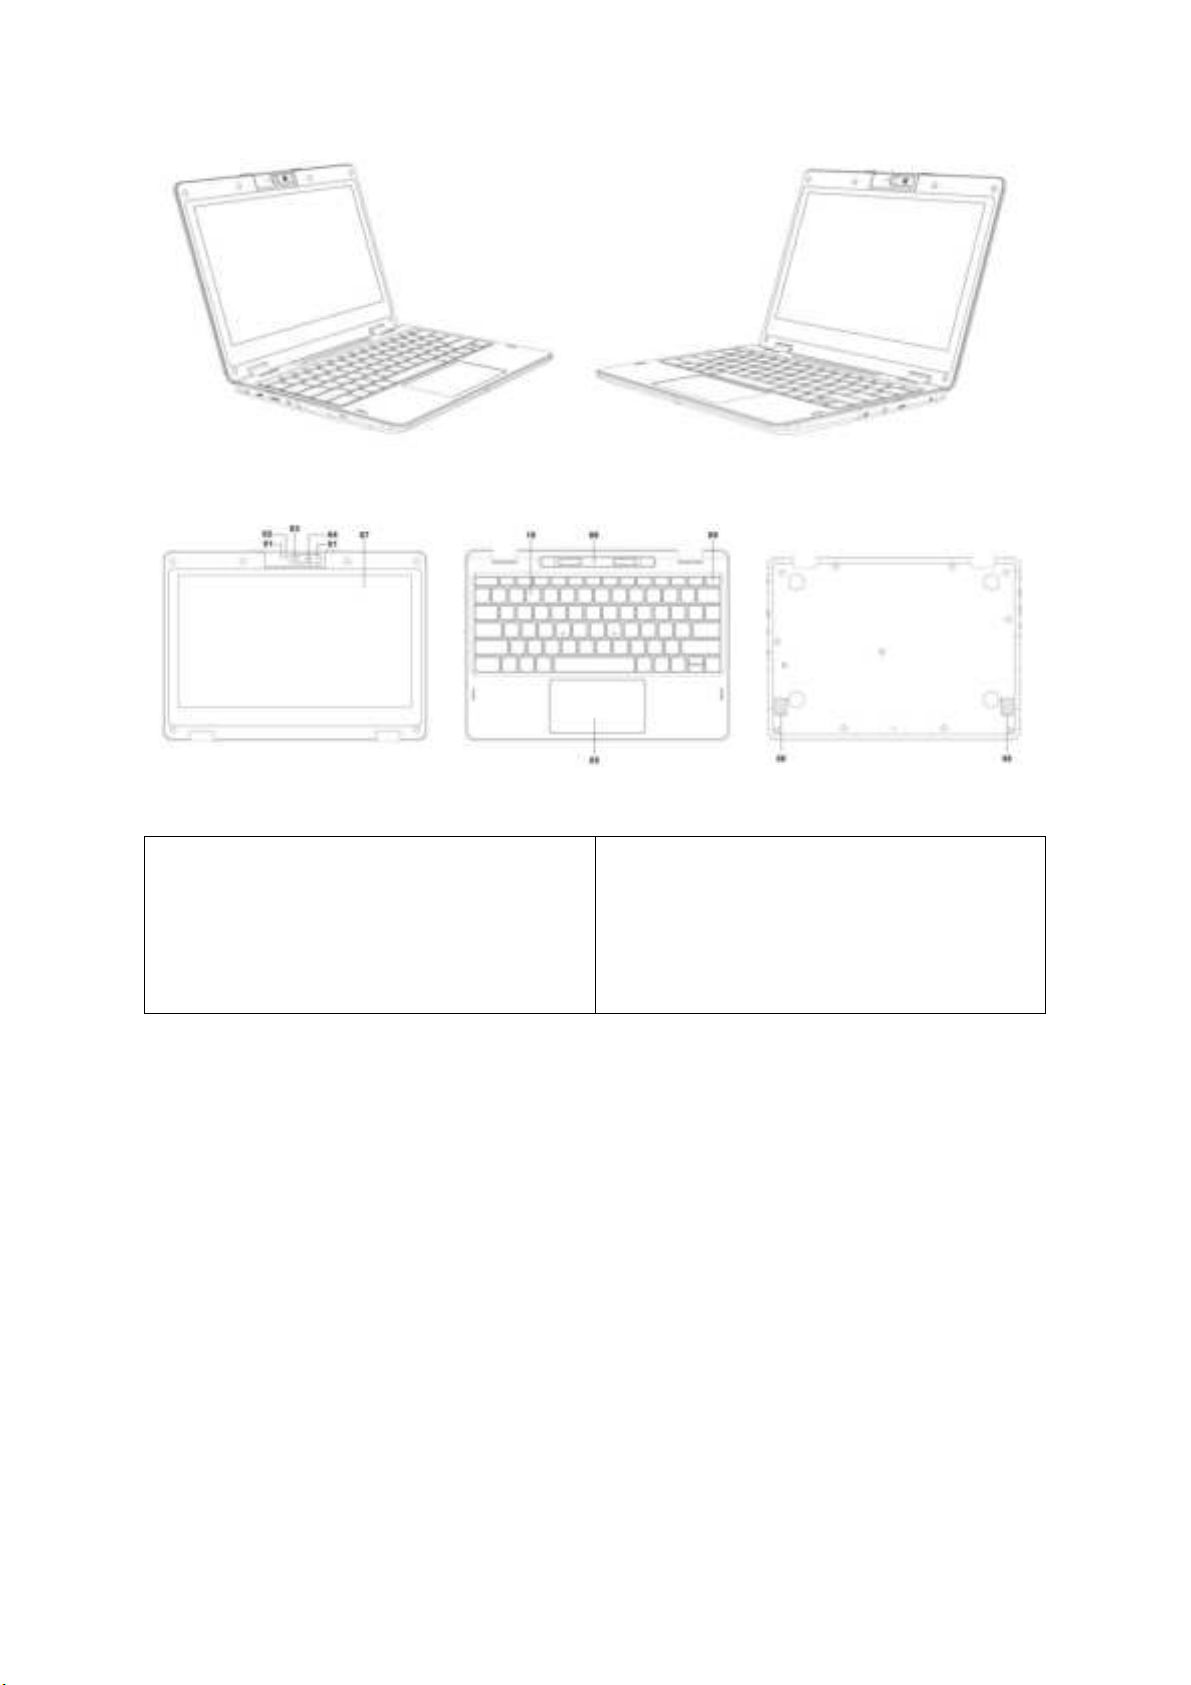
Get Ready to Use Your WEIBU Computer
Running Windows Update
1 Select (start),(Settings), and Windows Update, and then follow the on-screen instructions
to update the Windows.
Updating WEIBU original software
To update WEIBU original software, visit our WEIBU support website at the following
URL, download update programs, and then install them on your WEIBU computer.
https:/ /www.weibu.com/
Creating your own recovery media
Your WEIBU computer does not come with any recovery media. Be sure to create your own
recovery media with a USB flash drive before you first use the computer following your
purchase. For more information, refer to the Safety Guide/ Recovery and Troubleshooting
Guide.
!Note
Always be sure to use the AC adapter to connect your WEIBU computer to a power outlet
before doing a recovery.
Turning off or placing your WEIBU computer into Sleep mode
Upon completion of the Windows setup, select (start),(Power), and then Shut down or
Sleep.
FCC regulatory conformance:
This device complies with Part 15 of the FCC Rules. Operation is subject to the following two
conditions:
(1) This device may not cause harmful interference.
(2) This device must accept any interference received, including interference that may cause
undesired operation.

NOTE: This equipment has been tested and found to comply with the limits for a Class B
digital device, pursuant to part 15 of the FCC Rules. These limits are designed to provide
reasonable protection against harmful interference in a residential installation.
This equipment generates uses and can radiate radio frequency energy and, if not installed
and used in accordance with the instructions, may cause harmful interference to radio
communications. However, there is no guarantee that interference will not occur in a
particular installation. If this equipment does cause harmful interference to radio or
television reception, which can be determined by turning the equipment off and on, the
user is encouraged to try to correct the interference by one or more of the following
measures:
- Reorient or relocate the receiving antenna.
- Increase the separation between the equipment and receiver.
-Connect the equipment into an outlet on a circuit different from that to which the receiver
is connected.
-Consult the dealer or an experienced radio/TV technician for help
NOTE: The manufacturer is not responsible for any radio or TV interference caused by
unauthorized modifications to this equipment. Such modifications could void the user’s
authority to operate the equipment.
RF Exposure
The SAR limit adopted by FCC is 1.6 W/kg averaged over one gram of tissue. The highest SAR
value reported to the FCC for this device type complies with this limit. The highest SAR value
reported to the FCC for this device type when using in portable exposure conditions is 1.04
W/kg.
Table of contents