WEIBANG WB436HKL AL User manual

Lawn Mower
Operator's manual GB NL
FNL
D
Yangzhou Weibang GardenMachine CompanyLimited
Hanjiang Industrial Park,YangzhouCity,Jiangsu
Province 225127,P. R,China
(Original instruction)
Model Numbers:
WB436HKLAL WB436SKLAL
WB486SK AL WB486SKAL V
WB486SBAL-DOV WB486SBALV-DOV
WB486SB AL WB486SB ALV
WB486SKLAL WB486SKLALV WB487SC V AL
WB536SK AL WB536SKAL V WB537SC V AL
WB536SB AL WB536SB ALV WB536SBAL-DOV WB536SBALV-DOV
WB536SH AL WB536SH ALV WB536SKLAL WB536SKLALV
M0103080
WB436HKLAL WB436SKLAL WB436HK AL
WB476SKLAL WB476SKLAL V WB476SK AL V

GBGB
CONTENT
General Operation
Product Specifications
To remove lawn mowerfrom carton
How to set upyour lawn mower
CUSTOMER RESPONSIBILITIES
SERVICE AND ADJUSTMENTS
STORAGE
OPERATION
WARRANTY
SAFETY REGULATIONS
Slope Operation
Children
ASSEMBLY
To assemble grass catcher
General Instruction For Operation
English
GB
Read the operating instructions before you use the machine!
Keep third parties away from the danger zone!
When you are reading the instructions for use, Please unfold the
front and back pages.
01
03
04
04
10-12
12-13
13-15
05-09
16
01-04
01
01
04-05
05
02
Read Operator'smanual
Beware ofsharp
blades Remove sparkplug
before maintenance Caution - Donot touch
rotating cuttingmeans Never operatethe lawn mower
with discharge chuteopen
Do not mowexcessively steepslopes, mow a
cross theface ofslopes, neverup and down Never pickup orcarry alawnmower whilethe
engine is running,Use extremecaution when
reversing orpulling thelawnmower towardsyou.
The guaranteedvalue is:LWA=96dB(A)
Keep hands andfeet away.Weareye and earprotection.
The guaranteedvalue is:LWA=98dB(A)
General hazard safetyalert Beware ofthrown orflying
objects to bystanders.
Keep bystanders awayfrom
the machine.
Copyright WEIBANG China 2015
All right reserved
WB436HKLAL WB436SKLAL
WB486SK AL WB486SKAL V
WB486SBAL-DOV WB486SBALV-DOV
WB486SB AL WB486SB ALV
WB486SKLAL WB486SKLALV WB487SC V AL
WB536SK AL WB536SKAL V WB537SC V AL
WB536SB AL WB536SB ALV
WB536SKLAL WB536SKLALV
WB436HKLAL WB436SKLAL WB436HK AL
WB476SKLAL WB476SKLAL V WB476SK AL V WB536SBAL-DOV WB536SBALV-DOV
WB536SH AL WB536SH ALV

GBGB
I. General Operations
SLOPE OPERATION
lSlopes area majorfactor related to slipand fall
accidents, which can result in severe injury. All slopes
require extra caution.If you feeluneasy on a slope,
do not mow it.
DO:
lMow across the face ofslopes: never up and down.
Exercise extreme cautionwhen changing direction
on slopes.
lRemove obstacles suchas rocks, treelimbs, etc.
lWatch for holes, ruts,or bumps. Tall grass can hide
obstacles.
DO NOT:
lDo not trim near drop-offs, ditches or embankments.
The operator could losefooting or balance.
lDo not trim excessivelysteep slopes.
lDo not mowon wet grass.Reduced footing could
cause slipping.
. CHILDREN
lTragic accidents can occur if the operator is not alert
to the presence of children. Children are often attracted
to the machine and the mowing activity. Never assume
that children will remainwhere you last sawthem.
lKeep children outof the trimmingarea and under
the watchful care ofanother responsible adult.
lBe alert and turn machine off if children enter the area.
lBefore and whilewalking backwards, lookbehind
and down for smallchildren.
WARNING:Do notput hands or feetnear
or under rotating parts. Keep clear ofthe
discharge opening at alltimes.
SAFETY REGULATIONS
01
lBefore starting to use this machine, read, understand
and followall instructions that areprovided in this
manual. Be thoroughly familiar with the controls and the
proper use of the machine before starting operations.
lThis machine may only be operatedby responsible
persons, who are familiar with the operating instructions.
Never allow children orpeople unfamiliar with these
instructions to use the lawnmower. Local regulations
can restrict the age of the operator
lTo prevent injury, be sure that there are no persons in
the immediate area where you are mowing. If any person
enters this area, stop the machine by releasing the drive
control bar. Never mow while people, especially children,
or pets are nearby;
l
Keep in mind that the operator or user is responsible
for accidents or hazards occurring toother people or
their property.
CAUTION: Do not operatethe mower
when barefoot or whilewearing open
sandals. Always wearrobust footwear
when mowing.
lWhile mowing, always wear substantial footwear and
long trousers. Donot operate theequipment when
barefoot or wearing open sandals;
lThoroughly inspect the area where the equipment is
to be used and remove all such objects as rocks, toys,
wire, bones, sticks and any other items, which canbe
thrown by the machine through the discharge opening.
l
Do notpull the mower backwards,unless thisis
absolutely necessary.Always lookdown and behind
you, before and while moving backwards. Use extreme
caution whenreversing or pulling thelawnmower
towards you.
lBefore operatingthe mower, makesure thatall
protective screens, the grass catcherand other pro-
tective devices are properly installed.Never operate
the lawnmower with defective guards, or without safety
devices, for example deflectors and/or grass catchers,
in place.
lObserve the instructionsof the manufacturer, for
proper operation and installation of accessories. Only
those accessories thathave been approvedby the
manufacturer may be used.
lMake sure that the blade(s) of the mower is (are) not
rotating, before crossing graveldrives, walkways or
roads.
l
Stop the engine (motor) andwait until the blade comes
to a complete stop, beforeremoving the grass catcher.
l
Mowing should only be done duringdaylight or under
good artificial lighting.
l
Do not operate the machine while under the influence
of alcohol or drugs.
l
Never operate the mower in wet grass, where feasible.
Always be sure of your footing: Keep a firm hold on the
handle and walk; never run.
l
Before starting theengine (motor), disengageall
blade and self-propelling mechanism or drive clutch on
mowers so equipped.
l
If the mower should start to vibrate abnormally, stop
the engine (motor) and check immediately for the cause.
Vibration is generally a warningof trouble.
l
Keep hands and feet away the enclosure.
l
Worn parts should be referred to our repair shop to be
replaced. If necessary, contact the servicespecified
address.
l
Before using the machine,inspect the machine by
visual to determine whether the cutting, fastening bolts
and the entire mower deck worn or damaged. To avoid
an imbalance may be,replace worn out ordamaged
cutting attachment bolts sets.
lNever allow children tooperate the machine.
lUse extracare whenapproaching blindcorners,
shrubs, trees, or other objects that may obscure vision.
02
. GENERALINSTRUCTIONS FOR
WORKING WITH YOUR LAWNMOWER
lWARNING-petrol ishighly flammable. Useextra
care inhandling petroland other fuels. Theyare
flammable andvapours are explosive.
-Store fuel incontainers specially designedfor this
purpose; Useonly an approved fuel container
-Refuel outdoors only and do not smoke while
refueling; Neverrefuel the machine indoors.
- Never storethe machine orfuel container nearan
open flame,such as a water heater.
-Add fuel beforestarting the engine.Never remove
the cap of the fuel tank or add petrol while the
engine isrunning or when the engine is hot;Allow
the engineto cool before refuelling.
-If petrolis spilled, do not attempt tostart the
engine but move themachine away from thearea of
spillage andavoid creating any sourceof ignition
until petrolvapors have dissipated.;
-Replace all fuel tanksand container caps securely;
- Do notsmoke in theneighbourhood of themower.
lReplace faultysilencers
lClean upany oil or fuel spills.
lDo not startthe engine whenstanding in frontof
the dischargechute.
lDo notput handsor feetnear orunder rotating
parts. Keepclear ofthe discharge opening atall
times.
lDo notoperate theengine in a confinedspace
where dangerouscarbon monoxidefumes can
collect;Walk, neverrun.
l
Always besure of your footing on slopes;
l
Do notchange theengine governorsettings or
over-speed theengine;
l
Never make adjustments or repairs with the
engine (motor)running. Disconnect the sparkplug
wire, and keep the wire away from the plug to
prevent accidentalstarting.
lCheck regularlythat nutsand bolts,especially
blade attachmentbolts, arefastened tightly and
keep theequipment in a good condition.
lNever tamperwith safetydevices. Check their
proper operationregularly.
lMake surethat grass,leaves orother debris
does not collectin the mower;check regularly and
remove suchresidues to prevent blocking.
lStop andinspect yourlawnmower if you strike
any object. Repair, if necessary, before restarting.
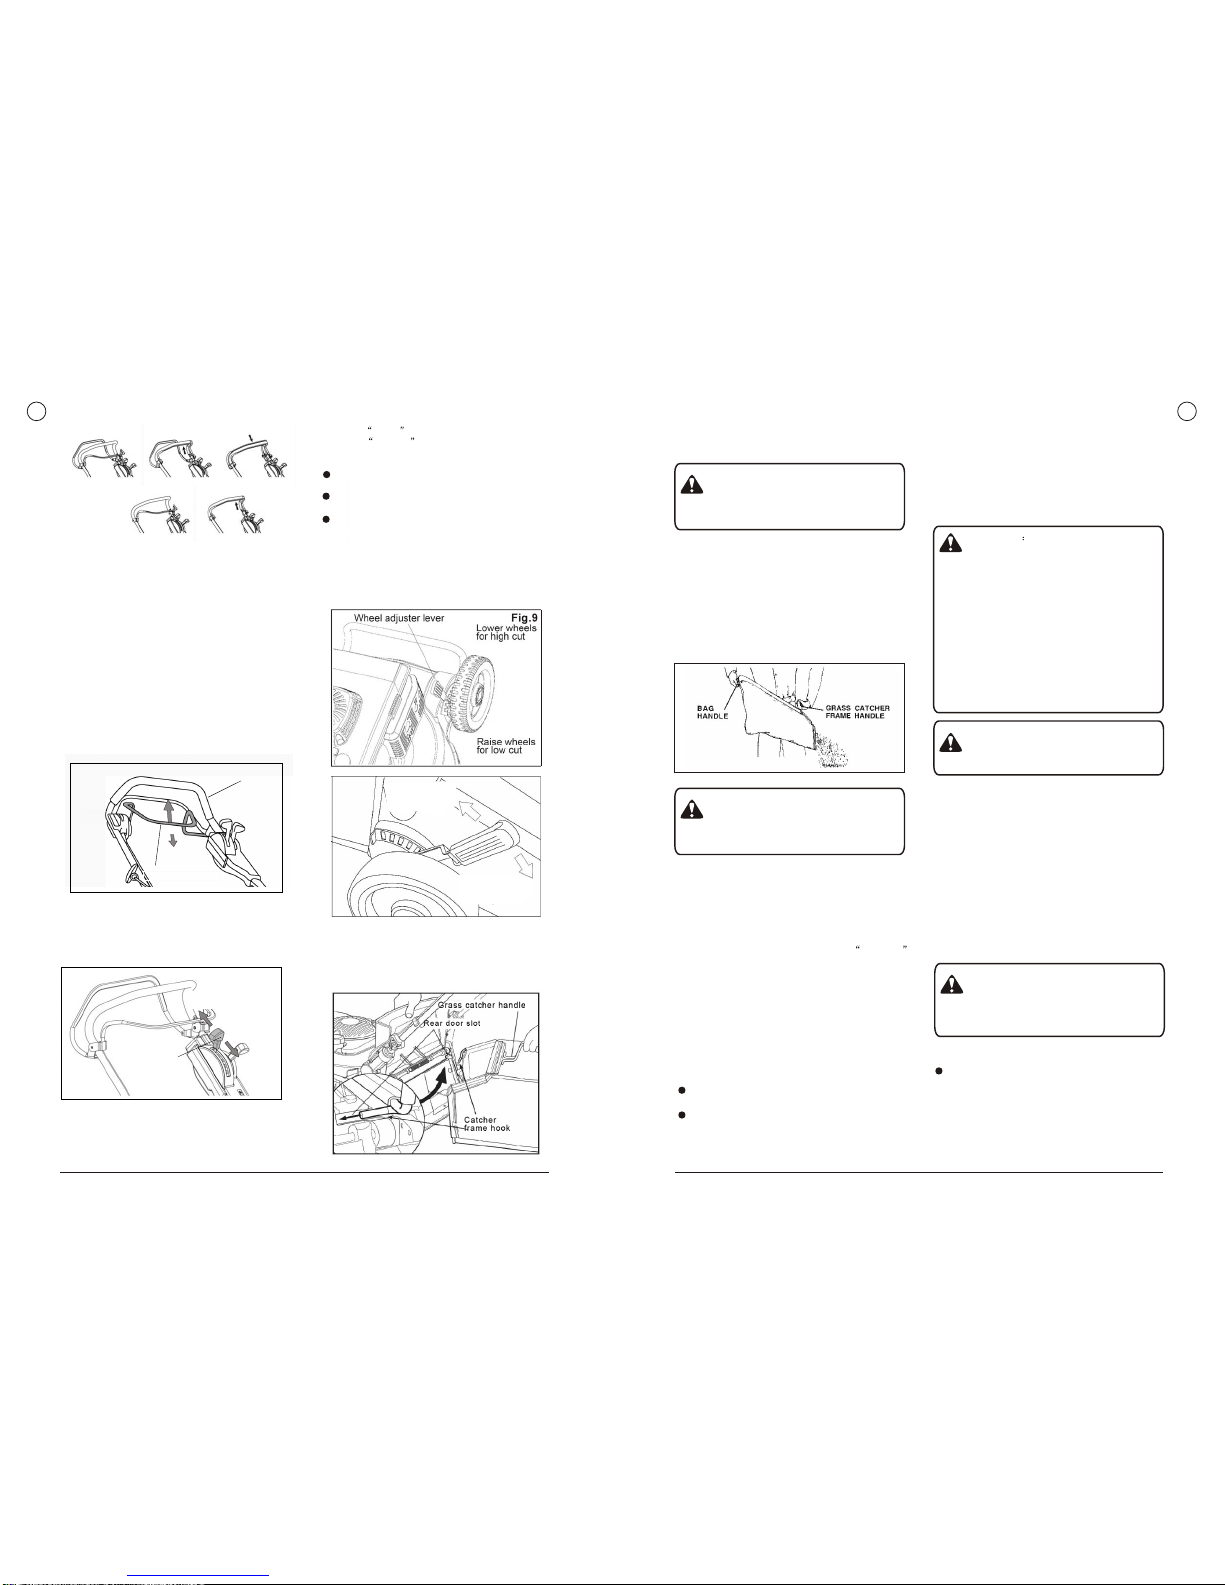
lNever attempt tomake wheel heightadjustments
while theengine (motor) is running.
lGrass catchercomponents are subject towear,
damage and deterioration, which could expose moving
parts orallow objectsto beejected. Frequently
check these componentsand, if necessary, replace
damaged components withparts recommended by
the manufacturer.
lMower bladesare sharp and can cause injuries.
Wrap the blade(s) or wear gloves when handling them,
and useextra caution during blade maintenance.
lBe especiallycareful incase youreverse the
mower orgoing to use the machine.
l
Stop the blade(s) ifthe lawnmower has tobe tilted
for transportationwhen crossingsurfaces other
than grass, andwhen transporting thelawnmower
to andfrom the area to be mowed.
lStart the engineor switch onthe motor carefully
according toinstructions andwith feetwell away
from theblades
lDo not tilt the lawnmowerwhen starting the engine
or switching onthe motor,except if thelawnmower
has to betilted forstarting. In this case, do not tile
it morethan absolutely necessary and lift onlythe
part whichis away from the operator.
lNever pickup orcarry alawnmower whilethe
engine isrunning
lStop the engine and disconnect the spark plug wire:
-before clearingblockages or unclogging chute;
-before checking, cleaning or working on the
lawnmower;
-after strikinga foreign object. Inspect the
lawnmower for damage andmake repairs before re-
starting andoperating the lawnmower;
-if lawnmowerstarts to vibrate abnormally (check
immediately).
lStop theengine:
-whenever youleave the lawnmower;
-before re-fuelling.
lReduce thethrottle settingduring engine shut
down and,if the engine is provided with a shut-off
valve, turn thefuel off atthe conclusion ofmowing;
lAllow theengine tocool beforestoring inany
enclosure
lNever store theequipment with petrolin the tank
inside abuilding wherefumes canreach an open
flame orspark.
lTo reduce the fire hazard, keep the engine,
silencer,battery compartment and petrolstorage
area freeof grass, leaves, or excessive grease.
lCheck thegrass catcherfrequently forwear or
deterioration
lIf thefuel tank has to be drained,this should be
done outdoors.
WARNING: Engineexhaust, some of its
constituents and certain vehiclecomp-
onents contain or emitchemicals known
to cause cancer andbirth defects or o-
ther reproductive harm.
l
l
l
l
l
l
l
l
l
l
l
l
l
l
l
l
l
l
l
l
l
l
l
l
l
l
l
l
l
l
l
l
l
l
l
l
l
l
l
l
l
l
l
l
l
l
l
l
l
l
l
l
l
l
l
l
l
l
l
l
l
l
l
l
l
l
l
l
l
l
l
l
l
l
l
l
l
l
l
l
l
l
l
l
l
l
l
l
l
l
l
l
l
l
l
l
l
l
l
l
l
l
l
l
l
l
l
l
l
l
l
l
l
l
l
l
l
l
l
l
l
l
l
l
l
l

7
65L
2800/min
7
70L
2800/min
7
70L
2800/min
49kg
7
70L
2800/min
53kg
7
70L
2800/min
7
70L
2800/min
48kg
7
70L
2800/min
52kg
96dB(A)
81.5dB(A)
2
5.9m/s
4820403010
98dB(A)
85.1dB(A)
2
7.0m/s
5310403010
98dB(A)
85.1dB(A)
2
7.0m/s
5310403010
98dB(A)
84.3dB(A)
2
7.34m/s
5310403010
98dB(A)
84.3dB(A)
2
7.34m/s
5310403010
7
70 L
2800/min
98dB(A)
85.1dB(A)
2
7.88 m/s
5310403010
7
70L
2800/min
98dB(A)
85.1dB(A)
2
7.88m/s
5310403010
98dB(A) 98dB(A)
Cutting height
adjustment
Frass bag
capacity
Balde speed
Max.
Net weight
Blade type
Noise level according
to 2000/14/EC (LWA)
Noiselevel(LPA)
Vibration
85.1dB(A)
2
5.2m/s
5310403010
85.1dB(A)
2
5.2m/s
5310403010
PRODUCT SPECIFICATIONS
Note The lawnmowers' net weightis depending on
the different model ofengine.
These specifications are supplied as a refer-
ence,so that you willbe familiar with thelawnmower.
We maintainthe right to maketechnical andother
changes without advancenotification.It is therefore
possible that some ofthe details in thismanual may
not coincide completely withyour machine.
CONGRATULATIONS on your purchaseof a new
lawnmower. Ithas been designed,engineered and
manufactured to giveyou the bestpossible depen-
dability and performance.
Should you experienceany problemyou cannot
easily remedy, please contact the nearest authorized
service center/department.We havecompetent,
well-trained technicians andthe proper toolsto se-
Proper Use
The gasoline lawn mower is for private use in the home
and garden suitable hobby. The mowermay only be
used for the maintenance of grass or lawns in the home
and garden hobby can be used.Any other application
that is not listedin this guide isprohibited.
The above use and safety instructions must be strictly
adhered to. The manufacturer assumes no liability for
any damage caused by improper operation, improper
use, misuse,unauthorized repairsor alterations
performed.
03
GB
rvice or repair thislawnmower.
Please read and retain this manual.The instructions
will enable you toassemble and maintain yourlawn
mower properly. Always observethe SAFETY
REGULATIONS CUSTOMER RESPONSIBILITIES
SERIAL NUMBER
DATE OFPURCHASE
THE MODELAND SERIAL NUMBERSWILL BE
FOUND ONA DECALATTACHEDTO THE REAR
OF THE LAWNMOWER HOUSING.
YOU SHOULD RECORD BOTHSERIAL NUM-
BER ANDDATE OFPURCHASE ANDKEEP IN
A SAFEPLACE FOR FUTURE REFERENCE.
We recommend that you write down the serial number
and purchase date in your user manual, so that you will
always have it at hand.
lRead and observe the safety regulations contained
in thismanual.
lFollow a regularschedule for maintaining,caring
for andusing your lawnmower.
lFollow the instructionsin the "Customerrespon-
sibilities" and"Storage" sectionsof this owner's
manual.
l
Remember thatthe operatoris responsible for
accidents withother persons or their property.
ASSEMBLY
04
GB
Model
Cutting width
Motor
Moving type
450mm
KAWASAKI
FJ 180V
Self-propelled
WB436HK AL
430mm
Hand propelled
430mm
Self-propelled
430 mm
Hand propelled
482mm
Self-propelled
482mm
Self-propelled
20-75mm
482mm
Self-propelled
WB486SBAL
482mm
Self-propelled
WB536SKALV
530mm
Self-propelled
25-76mm
WB536SBALV
530mm
Self-propelled
25-76mm
WB536SH
AL V
530mm
HONDA
GXV160
Self-propelled
25-76mm
WB536SKAL
530mm
Self-propelled
/
25-76mm
WB536SBAL
530mm
Self-propelled
/
25-76mm
WB536SH AL
530mm
HONDA
GXV160
Self-propelled
/
25-76mm
530 mm
Self-propelled
25-76 mm
530mm
Self-propelled
25-76mm
Model
Cutting width
Motor
Moving type
Drive speed
Cutting height
/
Drive speed
Cutting height
Cutting height
adjustment
Frass bag
capacity
Balde speed
Max.
Net weight
Blade type
2800/min
46kg
/
25-70mm
8
50L
2800/min
41kg
/
25-70mm
8
50L
2800/min
/
25-70mm
8
50L
2800/min
20-75mm
7
65L
2800/min
53kg
/
20-75mm
7
65L
2800/min
52kg
/
20-75mm
7
65L
2800/min
48kg
Noise level according
to 2000/14/EC (LWA)
Noiselevel(LPA)
Vibration
96dB(A)
85.8dB(A)
2
12.7m/s
GM45D000000310
96dB(A)
74dB(A)
2
5.0m/s
4320403010
96dB(A)
74dB(A)
2
5.0m/s
4320403010
96dB(A)
74dB(A)
2
5.0m/s
4320403010
96dB(A)
81.7dB(A)
2
7.05m/s
4820403010
96dB(A)
81.7dB(A)
2
7.05m/s
4820403010
96dB(A)
81.5dB(A)
2
7.21m/s
4820403010
Adjustable
Adjustable
Adjustable Adjustable Adjustable Adjustable Adjustable
WBAVS
WBAVS
KAWASAKI
FJ180V
WB486SKAL V
WB486SK AL
KAWASAKI
WB436SKLAL
WB436HKLAL
KOHLER XT 675
KAWASAKI
FJ 180V
KOHLER XT 675
44.5kg
38.2kg
WB486SKLAL
WB536SBALV-DOV
WB536SBAL-DOV
Briggs&Stratton 675 Series
KOHLER XT 775 KOHLER XT 775
WB536SKLALV
WB536SKLAL
51kg50kg
Briggs&Stratton 750EX DOV Briggs&Stratton 750EX DOV
WB486SBAL-DOV
48kg
Briggs&Stratton 675 Series
KOHLER XT 675
Briggs&Stratton 750EX DOV
WB486SBALV
WB486SKLAL V
WB486SBAL V-DOV
Briggs&Stratton 675 Series
KOHLER XT 675
Briggs&Stratton 750EX DOV
LONCIN 1P70FA
50.2kg
49kg
55kg
49kg
51.2kg 54kg53kg
41kg
5380401010B
l
l
l
l
l
l
l
l
l
l
l
l
l
l
l
l
l
l
l
FJ180V
KAWASAKI
FJ180V KAWASAKI
FJ180V
Read these instructionsand this manualin its
entirety before youattempt to assembleor op-
erate your new lawnmower.
IMPORTANT: THIS LAWN MOWER ISSHIPPED
WITHOUT OILOR GASOLINE IN THEENGINE.
Yournew lawnmower has been assembled at the
factory with theexception of thoseparts left unas-
sembled for shipping purposes. All parts suchas nuts,
washers, bolts, etc.,necessary to completethe as-
sembly have been placed in theparts bag. To ensure
safe andproper operation of your lawn mower,All
parts and hardware you assemble mustbe tightened
securely.Use the correcttools as necessaryto en-
sure proper tightness.
I.TO REMOVELAWN MOWERFROM
CARTON
lRemove loose parts includedwith mower.
lCut downtwo endcorners of carton and lay end
panel down flat.
lRemove allpacking materialsexcept padding
between upper and lower handle and padding holding
operator presence control barto upper handle.
lRoll lawnmower outof carton and check carton
thoroughly for additional looseparts.
II. HOW TO SET UP YOUR LAWN MOWER
IMPORTANT: UNFOLD HANDLECAREFULLY
SOAS NOTTO PINCH OR DAMAGE CONTROL
CABLES.
III.TOASSEMBLE GRASS CATCHER
l
Put grass catcherframe into grassbag with rigid
part of bag onthe bottom. Make surethe frame han-
dle is outside ofthe bag top.
Fig.2
l
l
l
l
l
l
l
l
l
l
l
l
l
l
l
l
l
l
Upper handle
Locking lever
Lift and turn to desired position
Fig.1
Lift and unfold upper handle to desired height
handle. Refer toService andAdjustments section.
and pull two levers on both sides to lock upper
Locking lever
Push to lock it
CAUTION: Unfold the handle carefully to avoid pinching
and damaging the control cables.
lYourhandles maybe adjusted for yourmowing
comfort. Refer toService andAdjustments section
of this manual.(except 2in1 mower)
CAUTION: Wear protective glovesduring
operation of setting up yourmower.
Remove any packing material from around control bar.
WB436HKL AL WB436SKLAL
WB476SKALV
WB476SKLALV
WB476SKLAL
KOHLER XT 775
Self-propelled
/
25-76mm
7
450mm
25-76mm
7
40kg
2800/min
WB487SCV AL
82.7dB(A) 82.5dB(A)
96dB(A)
2
12.4m/s 2
12.2m/s
GM45D000000310
2
4.16m/s
WB537SC V AL
Loncin 1P70FA
2
4.13m/s
85.6dB(A)
86.2dB(A)
2
8.7m/s
2
6.2m/s
82.5dB(A)
KOHLER XT 775

GBGB
OPERATION
05 06
WB48 AL Series
meanwhile pull theknob ofstarter rope backto the
hook ring on upper handle, assemble. The rope into
the hook ring through the opening of hook ring .
lAlways keep starter rope in hook ring during all
mowing work.
IV. ASSEMBLE ENGINE STARTER KNOB
lPress down engine brake handle by left hand, and
WARNING: The safety position of start-
ing engine is at the back of upper handle.
Users must keep the rope always in the
middle of the hook ring during starting engine
and mowing work. It is danger to starting engine
away from the safety position, which will lead to
the risk of feet hurting.
CAUTION: Wear protective gloves
during operation of setting up your
mower.
Fig.3
Hook ring
Starter rope
l
l
l
l
l
Fig.4
WB53 AL Series
WARNING:The operationof any lawn
mower can result in foreign objects thrown
into the eyes,which can resultin severe
eye damage.Always wear safety glasses
or eye shieldswhile operating yourlawn
mower or performingany adjustments or
repairs. We recommend wide vision safety
mask over spectacles orstandard safety
glasses.
HOW TO USEYOUR LAWN MOWER
ENGINE SPEED
Athrottle located on theside of the upperhandle
controls the engine speed. Fast position is for
DRIVE CONTROL BAR-used to engage power-pro-
pelled forward motionlawn mower.
THROTTLE CONTROL-used for startingthe engine
and allowsyou to select either fast or slow engine
speed.
STARTERHANDLE-used for starting the engine.
PRIMER-pumps additional fuel from thecarburetor
to the cylinderfor use when starting a cold engine.
OPERATOR PRESENCE CONTROL BAR-engine
brake,it must beheld down to the handle tostart the
engine. Release itto stop theengine.
and allows you to select either fast of slow speed.
DRIVE SPEED LEVER -used for adjusting the drive speed
normal cutting, trimmingand better grassbagging.
Slow positionis for light cutting, trimming and fuel
economy.
Yourlawn moweris equippedwith anoperator
presence control bar whichrequires the operator to
be positioned behind the lawnmower handle to start
and operate the lawnmower.
ENGINE CONTROL ZONE
TO OPERATE DRIVE SYSTEM
To start forward motion,lift drive control barup to
handle.
To stop forward motion,release drive control bar.
IMPORTANT: ALWAYS KEEP DRIVE CONTROL
FULLY ENGAGEDAGAINST HANDLE WHEN IN USE.
Engine brake handle/Blade brake handle(Model with BBC)
Drive speed control lever
Engine
Wheel
Bumper
Chassis
Upper handle
Rear cover
Grass catcher
Starter knob
Throttle and drive controler
Height adjustment lever
Locking lever
Air filter
Fig.5
Engine throttle
control lever Start
Slow
Fast
Engine brake handle/Blade brake handle(Model with BBC)
Drive speed control lever
Engine
Wheel
Chassis
Upper handle
Rear cover
Grass catcher
Starter knob
Throttle and drive controler
Height adjustment lever
Locking lever

07
TOADJUST CUTTING HEIGHT
GB
08
Fig.9
GB
CAUTION: Do not run yourlawn mower
without clippingdeflector or approved
grass catcher in place. Neverattempt to
operate the lawn mower with the rear door
removed or propped open.
TO EMPTYGRASS CATCHER
1.Lift up ongrass catcher using theframe handle.
2.Remove grasscatcher with clippingsfrom under
lawn mower handle.
3.Empty clippings frombag using both framehandle
and bag handle.
NOTE: When emptying the grass catcher,do
not drag the bag over the ground;it will cause
unnecessary wear.
Fig.11
CAUTION: During operation of emptying
clippings from grass catcher, please wear
protective gloves to preventenvironmental
influence on your skin.
Lever on eachwheel
Lever on rightside
Raise wheels
for low cut
Lower wheels
for high cut
Fig.10
Never adjust the cuttingheight with the motorstill
running.
The mower isadjusted to onecutting height upon
delivery.
Youcan set the desired cutting height with
adjustment lever to fitdifferent terrain.
Pull the leverout of thecatch, move tothe desired
position and let itfall back into thecatch.
The lawnmower can only be used on level lawns if
the lowest cutting height is being used.
WARNING
TOATTACH GRASS CATCHER
1.Lift therear door ofthe lawn mower and place the
grass catcher frameside hooks intothe slots ofthe
rear door.
2.Thegrass catcher is secured to thelawn mower
housing when the rear door is loweredonto the grass
catcher frame.
1.Be sure lawnmoweris level and areaaround oil fill
is clean.
2. Remove engine oil cap and fillto the full line on the
dipstick. Pour oil slowly. Do not overfill.
NOTE: Allow oil to settle down into engine for accurate
reading. To read proper level,tighten engine oil cap,
then remove it toread the dipstick.
3.Reinstall engine oilcap and tighten.
Check oil level beforeeach use.Add oil if needed.
Fill to full lineon dipstick.
Change the oil after every25 hours of operation or
each season. You may need to change theoil more
often under dusty, dirty conditions.
ADD GASOLINE
NOTE: Before fillingfuel tank, removeand discard
the debris plug thatis inside the tank.
Fill fueltank. Usefresh, clean,regular unleaded
gasoline with aminimum of 87octants. Do notmix
oil withgasoline. Purchase fuel inquantities that
manufacturers specifications inengine hand book.
For typeand gradeof oil to use,see ENGINE
in Customer Responsibilities section of this
manual.
BEFORE STARTING ENGINE
ADD OIL
Yourlawnmower is shipped withoutoil in the engine.
Engine holdsapproximately 0.6Lrefer toengine
can be used within30 days to assurefuel freshness.
WARNING Experience indicates that
alcohol blended fuels (calledgasohol
or usingethanol or methanol) can attract
moisture whichleads toseparation and
formation of acids during storage. Acidic gas
can damage the fuel system of an engine while
in storage. To avoid engine problems, the fuel
system should be emptied beforestorage of
30 days orlonger. Drain the gastank, start
the engineand let it run until the fuel lines
and carburetorare empty. Use fresh fuel
next season.See storage instructions for
additional information. Never useengine or
carburetor cleaner products inthe fuel tank
or permanent damage mayoccur.
CAUTION: Fill to bottom of gas tank fill-
er neck.Do not overfill. Wipe off any
spilled oil or fuel. Donot store, spill or
use gasoline near anopen flame.
TO START ENGINE
NOTE: Due toprotective coatings onthe engine, a
small amountof smoke may be present during the
initial use ofthe product andshould be considered
normal.
1.To start a coldengine, push primer threetimes be-
fore trying to start.Use a firm push.This step isnot
usually necessary whenstarting an engine,which
has already run fora few minutes.
2.Move throttle controllever to fast position.
3.Hold operate presence control bar down tothe han-
dle and pull starter handle quickly. Do not allow starter
rope to snap back.
TO STOPENGINE
To stop engine, releaseoperator presence control
bar.
NOTE: In coolerweather it maybe necessary tore-
peat priming steps. Inwarmer weather over priming
may cause floodingand engine willnot start. Ifyou
do flood engine, wait a few minutes before attempting
to start and donot repeat priming steps.
CAUTION: If the engine failsto start in 30
second after repeated starting operation by
pulling the starterknob, please stopyour
operation and check the causes. See trouble
shooting.
Fig.6 Stop start
ADJUSTING THE DRIVE SPEED (FOR SPEED
ADJUSTABLE MODEL)(See Fig.8)
NOTE:The speed may only be
adjusted when the engine is running
in order to avoid damage!
Hand propelled:
ENGAGE THE BLADE-CLUTCH (See Fig.7)
only for machines with BBC
Power propelled:
Stop start forward
Fig.7
Blade clutch lever
Upper handle
Step 1
Step 2
2.Press the blade-clutch-lever close to the handle-
bar completely to engage blade.
3.Release the lever about 2'' away from the hand-
lebar,until the levermake a'click' sound.And
then re-press the lever and hold it togather with
the handlebar.
4.Release the blade-clutch-lever completely to
dis-engage and stopthe blade.
1. For safety, theblade-clutch-lever can not be en-
gaged directly after releasing. Push the lever
forward until it make a 'click' sound, and then
you can engaged the clutch again.
Fig.8
-First press the lever slightly downwards and adjust
to the desired speed. The lever automatically clicks
back into the nearest new position.
-Position rabbit =fast(max.speed)
-Position tortoise =slow (min.speed)
-The driving speed can be continuously adjusted by us-
ing the adjustment lever mounted on the upper hand.
Slow
(tortoise)
Fast
(rabbit)
Drivespeed
controllever
NOTE:The blade-brake-clutch should be engag-
ed only when the engine is in maximum throttle
state.

GBGB
MOWING TIPS
Under certain conditions,such as verytall grass,
it may benecessary to raisethe height ofcut to re-
duce pushing effort and to keep from overloadingthe
engine and leaving clumps ofgrass clippings. It may
also be necessaryto reduce groundspeed and /or
run the lawn mowerover the area asecond time.
For extremely heavycutting, reduce thewidth of
cut by overlapping previously cut path and mow slowly.
For better grassbagging and mostcutting condi
tions, the engine speed should be set in the fast position.
Pores incloth grass catchers can become filled
with dirt anddust with useand catchers willcollect
less grass. To prevent this, regularly hose catcher off
with water and letdry before using.
Keep top ofengine around starter clear andclean
of grass clippingsand chaff. This will help engine air
flow and extendengine life.
IMPORTANT: FOR BEST PERFORMAN-
CE, KEEP MOWER HOUSINGFREE OF
BUILT-UP GRASS AND TRASH. SEE
CLEANING IN CUSTOMER RESPON-
SIBILITIES SECTION OF THISMANUAL.
09
MAINTENANCE SCHEDULE
CUSTOMER RESPONSIBILITIES
Replace AirFilter Paper
Cartridge
E
N
G
I
N
E
Lubrication Chart
Check Engine Oil Level
Change Engine Oil
Clean Air Filter
Inspect Muffler
Clean or replace Spark
Plug
12
2
FILL IN DATES
AS YOU COMPLETE
REGULAR SERVICE
Check for loose fasteners
Clean/Inspect Grass
Catcher (If Equipped)
Clean Lawnmower
Clean Under Drive
Cover (Power-
Propelled Mowers)
M
O
W
E
RCheck/Sharpen/
Replace Blade
BEFORE
EACH USE AFTER
EACH USE
EVERY 25HOURS
OR EVERY SEASON
3
EVERY
10 HOURS
BEFORE
STORAAGE
SERVICE
DATES
10
GENERAL RECOMMENDATIONS
The warrantyon thislawnmower does not cover
articles that have been subjected to operator
abuse or negligence.To maintain a complete
coverage bythe warrantiesprovided,the opera-
tor must maintain the mower as instructed in
this manual.Fora propermaintenance ofyour
mower,someadjustments willneed to be made
Service and Adjustments section of this manual should
be checked at leastonce each season.
lOnce a year, replace the spark plug, clean or replace
air filterelement and check bladefor wear. A new
spark plug andclean/new air filterelement assures
proper air-fuelmixture and helps yourengine run
better and last longer.
lFollow the maintenance schedule in this manual.
periodically.Alladjustments in the Service
Adjustments section of this manual should be
checked atleast onceeach season.
1 Change more often when operating under a heavy
load or in highambient temperatures.
2 Service more often when operating in dirty or dusty
conditions.
3 Replace blades more often when mowing in sandy
soil.
WARNING: MAKESURE DOING ALL
OPERATIONS WHENTHE ENGINE
STOPPED.
BEFORE EACH USE
1 Check engine oil level.
2 Check for loose fasteners.
LUBRICATION
Keep unit well lubricated.
LAWN MOWER
Always observe safetyrules when performingany
maintenance.
TIRE
Keep tiresfree of gasoline, oil, or insectcontrol
chemicals which can harmrubber.
Avoid stumps, stones, deep ruts, sharp objects and
other hazards that maycause tire damage.
BLADE CARE
For best results, mower blademust be keptsharp.
Replace bent or damagedblades.
to prevent bladefrom turning whenremoving blade
bolt.
1.Disconnectspark plug wire from spark plug and
place wire where it cannot come in contact with spark
plug.
2.Turnlawn mower onits side. Makesure air filter
and carburetor are up.
3.Use a woodblockbetween blade and mowerdeck
TO REMOVE BLADE
NOTE: Protect your handswith gloves and/orwrap
blade with heavy cloth.
4.Remove blade boltby turning counter-clockwise.
5.Remove blade andattaching hardware.
NOTE: Remove theblade adapter and checkthe
key inside hub ofblade adapter.The key must bein
good condition to workproperly. Replaceadapter if
damaged.
TO REPLACE BLADE
1.Position theblade adapter onthe engine crank-
shaft.Be sure key in adapterand crankshaft keyway
are aligned.
2.Be surethe trailing edgeof blade(opposite sharp
edge) is up towardthe engine.
3.Install theblade bolt withthe spring washerinto
blade adapter and crankshaft.
4.Use block of wood betweenblade and lawn mower
housing and tighten the blade bolt, turningclockwise.
IMPORTANT: BLADE BOLTIS GRADE
10.9 HEATTREATED.
Shield
Screw
Pulley
Screw
Block
Blade brake
clutch
Central bolt
Fan
Blade
Spring washer
Screw Models with BBC
Spring
Woodruff key
TO SHARPEN BLADE
NOTE: We do not recommendsharpening blade but
if you do, besure the blade isbalanced.
Care should be taken to keepthe blade balanced.An
unbalanced blade will cause eventual damage to lawn
mower or engine.
The bladecan besharpened witha fileor on a
grinding wheel. Donot attempt tosharpen while on
the mower.
To check bladebalance, drive anail into abeam
or wall.Leave aboutone inch of thestraight nail
exposed. Place centerhole of bladeover the head
of the nail.If blade isbalanced, it shouldremain in
a horizontal position. If either ends of the blade moves
downward, sharpen the heavyend until the bladeis
balanced.
GRASS CATCHER
The grass catchermay be hosedwith water,but
must be dry whenused.
Check yourgrass catcheroften for damage or
deterioration. Throughnormal useit will wear.If
catcher needs replacing,replaceonly with amanu-
facturer approvedreplacement catcher.Give the
lawn mower model numberwhen ordering.
disc
For power
propelled mower
Models without BBC
Pulley
Shield
Adapter
Woodruff key
Friction disc
Friction disc
Lock ring
Spring washer
Central bolt
Blade
Fig.12
5380401010B
l
l
l
l
l
l
l
l
l
l
l
l
l
l
l
l

GBGB
11
DRIVE WHEELS
Check rear drivewheels each timeyou mow tobe
sure they move freely. The wheels notturning freely
means trash, grasscuttings, etc. maybe inside the
drive wheel and dust cover area and must becleaned
out to freedrive wheels.If necessaryto clean the d-
rive wheels, check bothrear wheels.
1.Removehubcaps, bolt, spring lockwasher and
washer.
2.Remove wheels fromwheel adjuster axles.
3.Remove any trashor grass cutting frominside the
dust cover,pinion and/or drive wheelgear teeth.
NOTE: The pinion gear, on both sides of the mower,
are the same, however, they must be installed correctly.
If installed incorrectly, the drive system will not work.
4.Place wheels backon adjuster axles.
5.Replace spring lockwasher, washer, bolt and hub-
caps.
ENGINE
Read the Maintenance section of your engine manual.
LUBRICATION
Use only high quality detergent oil rated withAPI ser-
vice classification SF-SJ.Select the oil'sSAE vis-
cosity grade accordingto your expectedoperating
temperature.
12
LUBRICATIONCHART
LEVEL
F -20 0 30 32 40 60 80 100
C -30 -20 -10 0 10 20 30 40
Temperature range anticipated before next oil change.
SAE30
5W-30
NOTE: Although multi-viscosityoils (5W30,10W30
etc) improvestarting in cold weather, these multi-
viscosity oils will resultin increased oil consumption
when used above 32 F. Check your engine oillevel
more frequently to avoid possible engine damage from
running low on oil.
Change the oilafter every 25hoursof operation or
at least once a yearif the lawn mower isnot used for
25hours in one year.
Check thecrankcase oillevel beforestarting the
engine and aftereach five (5)hours of continuous
use. Tightenoil plug securelyeach time youcheck
the oil level.
TO CHANGE ENGINEOIL
NOTE: Before tipping lawn mowerto drain oil, drain
fuel tank by runningengine until fuel tankis empty.
1.Disconnectspark plug wire from spark plugand
place wire where it cannot come in contact with spark
plug.
2.Remove engine oil cap; lay aside on a clean surface.
3.Tiplawn mower on itsside as shown anddrain oil
into a suitable container. Rock lawn mower backand
forth to remove anyoil trapped inside ofengine.
4.Return lawn mower to upright position. Wipe off any
spilled oil from lawnmower or side ofengine.
5.Fill engine with oil. See ADD OIL in the Operation
section of this manual.
6.Reconnect spark plugwire to spark plug.
CAUTION: Disconnect spark plugwire
from spark plug andplace wire where it
cannot come in contactwith spark plug.
1.Clean the undersideof your lawn mowerby scrap-
ing to removebuild-up of grassand trash.
2.Clean engine often to keep trash from accumulating.
A clogged engine runs hotterand shortens engine life.
3.Keep finished surfaces and wheelsfree of all gaso-
line, oil, etc.
CLEANING
4.We do not recommend using a garden hose toclean
lawn mower unless theelectrical system, muffler, air
filter and carburetorare covered tokeep water out.
Water in enginecan result in shortenedengine life.
AIR FILTER
Yourengine will not runproperly and may bedama-
ged by using a dirtyair filter. Clean the element after
every 25hours of operation, more often if lawnmower
is used in verydusty, dirtyconditions.
See the maintenance sectionof your engine manual.
IMPORTANT: FOR BEST PERFORMAN-
CE, KEEP MOWER HOUSINGFREE OF
BUILT-UP GRASS&TRASH. CLEANTHE
UNDERSIDE OF YOUR MOWERAFTER
EACH USE.
MUFFLER
Inspect and replace corroded muffler as it could create
a fire hazard and/ordamage.
SPARKPLUG
Change yourspark plugeach yearto makeyour
engine start easier and run better. Set spark plug gap
at.030 inch.
SERVICE, REPAIRS ANDADJUSTMENTS
DRIVE BELT
If the belt mustbe replaced, please contactyour ser-
vice agent for details.
REAR DEFLECTOR
The rear deflector, attachedbetween the rear wheels
of your mower, isprovided to minimize the possibility
that objects will be thrown out of the rear of the mower
into the operator'smowing position. Ifthe deflector
becomes damaged, it shouldbe replaced.
ENGINE
ENGINE SPEED
Yourengine speed has beenfactory set. Do notatt-
empt toincrease engine speed orit may result in
personal injury.If you believe thatthe engine is run-
ning toofast or too slow, take your lawn mower to
an authorized service center for repair and adjustment.
THROTTLE CONTROL
If itbecomes necessaryto adjustor replacethe
throttle control, seethe adjustment sectionof your
engine manual.
CARBURETOR
The carburetorhas been preset at the factory and
adjustment should not be necessary. However, minor
adjustment may be requiredto compensate for diff-
erences in fuel, temperature,altitude or load.
The air filter mustbe assembled to thecarburetor
when running engine.
Best carburetor adjustment isobtained when fuel
tank is 1/4 full.
In order for the engineto run, the control barmust
be held inthe operating position.Therefore, an as-
sistant will be requiredto hold the controlbar in the
operating position when makingfinal adjustment to
the carburetor.
See theAdjustment section ofyour engine manual
for further instruction.
l
l
l
l
l
l
l
Caution: Before you change settings or maintenance
tasks:
1.Release drive control barand the engine brake
handle to stop thelawn mower.
2.Make sure the blade andall moving parts have
stopped completely.
3.Disconnect cable from the sparkplug andplace
where it cannot comein contact with plug.
4.Make sure that all the nuts, bolts and screws are
tightened and the devicein a safe condition.
TO ADJUST HANDLE
LAWN MOWER
TO ADJUSTCUTTING HEIGHT
See TO ADJUSTCUTTING HEIGHT in the Ope-
ration section of thismanual.
5.Let the mower to cool before using it ina closed
area off.
6.In orderto avoid the riskof fire, keep motor
housing and ventilationopenings free ofgrass,
leaves and oil orfat.
7.Be sure to check the grass Fang's establishment
of the wear andtear or loss offunctionality.
8.Replace worn out or damaged parts forsecurity
reasons.
Upper handle
LeverA
Fig.13
Lock
Release
LeverA
1. Loosen the 2 lever A on both sides.
2. Rotate upper handle to new catch desired.
3. Re-tighten lever A.
The handle on your lawn mower has different
height positions-adjust to height that suits you.

30 days or more.
LAWN MOWER
When lawn mower is tobe stored for a periodof time,
clean it thoroughly, removeall dirt, grease, leaves, etc.
Store in a clean,dry area.
1.Clean entire lawn mower (See CLEANING in the
Customer Responsibilities section ofthis manual)
Immediately prepare your lawnmower for storage at
the end of the season or ifthe unit will not be used for
STORAGE
2.Lubricate as shown in the Customer Responsibilities
section of this manual.
3.Be surethat all nuts,bolts, screws, andpins are
securely fastened. Inspect moving partsfor damage,
breakage and wear. Replace if necessary.
4.Touch up all rusted or chippedpaint surfaces; sand
lightly before painting.
HANDLE
Youcan foldyour lawn mower handle for storage.
1.Loosenthe two(2) handle knobson sidesof the
upper handle andallow handle tofold down tothe
rear.
2.Remove thetwo (2)handle knobsand screws
at thesides ofthe lower handle, andpivot entire
handle assemblyforward andallow itto reston
3.When settingup your handlefrom the storage po-
sition, the lowerhandle will requiremanual locking
into the mowingposition.
mower,and thenreinstall screwsand knobsto
brackets.
ENGINE
FUEL SYSTEM
IMPORTANT: IT IS IMPORTANT TO PREVENTGUM
DEPOSITS FROM FORMING IN ESSENTIAL SYSTEM
PARTSSUCHAS CARBURETOR. FUEL FILTER,
FUEL HOSE, ORTANKDURING STORAGE.ALSO,
EXPERIENCE INDICATES THAT ALCOHOL BLENDED
FUELS(CALLED GASOHOLOR USING ETHANOL
OR METHANOL) CAN ATTRACT MOISTURE WHICH
LEADS TO SEPARATIONAND FORMATION OF
ACIDS DURING STORAGE.ACIDIC GAS CAN DA-
MAGE THE FUELSYSTEM OFAN ENGINE WHILE
IN STORAGE.
Drain the fuel tank.
Start the engine and let it run until the fuellines and
carburetor are empty.
Never use engine or carburetor cleaner productsin
the fuel tank orpermanent damage may occur.
Use fresh fuel nextseason.
GBGB
13 14
CYLINDER
1.Remove spark plug.
2.Pourone ounce (29ml) of oil through spark plug
hole into cylinder.
3.Pull starter handle slowly a few times to distribute oil.
4.Replace with newspark plug.
OTHER
Do not store gasolinefrom one season toanother.
Replace your gasoline can if your canstarts to rust.
Rust and /or dirt in your gasoline willcause problems.
If possible, store yourunit indoors and coverit to
give protection from dustand dirt.
Cover your unit with a suitable protective coverthat
does not retain moisture.Do not use plastic.Plastic
cannot breathe whichallows condensation toform
and will cause yourunit to rust.
CAUTION: Never store the lawnmower
with gasoline in thetank inside a building
where fumes may reachan open flame
or spark.Allow the engine tocool before
storing in any enclosure.
IMPROTANT: NEVER COVER MOWER
WHILE ENGINEAND EXHAUSTAREAS
ARE STILL WARM.
utes after addingstabilizer to allowthe stabilizer to
reach the carburetor. Do not drain the gastank and
carburetor if using fuelstabilizer.
Drain oil (with enginewarm) and replace withclean
engine oil. (See ENGINE in the CUSTOMER RES-
PONSIBILITIES section of thismanual).
NOTE: Fuel stabilizeris an acceptablealternative
in minimizing the formation offuel gum deposits dur-
ing storage.Add stabilizer to gasolinein fuel tank or
Storage container.Always followthe mix ratio found
on stabilizer container. Run engine at least 10min-
TROUBLE SHOOTINGPOINTS
PROBLEM CAUSE CORRECTION
1.Dirty airfilter.
2.Out offuel.
3.Stale fuel.
4.Water infuel.
5.Spark plugwire is
disconnected.
6.Bad sparkplug.
7.Loose bladeor broken
blade adapter.
8.Control barin released
position.
9.Control bardefective.
1.Clean/replace air filter.
2.Fill fuel tank.
3.Drain tank and refill with fresh clean fuel.
4.Drain fuel tank andcarburetor a
nd refill tank withfresh gasoline.
5.Connect wire to plug.
6.Replace spark plug.
7.Tighten blade boltor replace
blade adapter.
8.Depress control bar tohandle.
9.Replace control bar.
Does not start
1.Engine flywheel brake ison when
control bar is released.
2.Bent engine crankshaft.
3.Blade adapter broken.
4.Blade dragging in grass.
1.Depress control bar toupper
handle before pulling starterrope.
2.Contact a qualified servicecenter.
3.Replace blade adapter.
4.Move lawn mower tocut grass or
to hard surface.
Starter rope hard to pull
1.Cutting height too low.
2.Lift on blade worn off.
3.Catcher not venting air.
1.Raise cutting height.
2.Replace blade.
3.Clean grass catcher.
1.Grass is too highor wheel height
is too low.
2.Rear of lawn mowerhousing/blade
dragging in grass.
3.Grass catcher too full.
4.Handle height position not right for you.
1.Raise cutting height.
2.Raise rear of lawnmower housing
one (1) setting higher.
3.Empty grass catcher.
4.Adjust handle height to suit.
Grass catcher not filling
Hard to push
1. Belt wear.
2.Belt off of pulley.
3.Dirt in drive pinions.
1.Check/replace drive belt.
2.Check/reinstall drive belt.
3.Clean drive pinions.
Loss of drive power
propelled
1.Rear of lawnmower housing of
cutting blade dragging in heavy grass.
2.Cutting too much grass.
3.Dirty air filter.
4.Buildup of grass, leaves,and
trash under mower.
5.Too much oil inengine.
6.Walking speed toofast.
1.Set to Higher Cut position.
2.Set to Higher Cut position.
3.Clean/replace air filter.
4.Clean underside of mowerhousing.
5.Check oil level.
6.Cut at slower walkingspeed.
1.Worn, bent or looseblade.
2.Wheel heights uneven.
3.Buildup of grass, leaves andtrash
under mower.
1.Replace blade. Tightenblade bolt.
2.Set all wheels at sameheight.
3.Clean underside of mowerhousing.
1.Wom, bent or looseblade.
2.Bent engine crankshaft. 1.Replade blade. Tightenblade bolt.
2.Contact a qualified servicecenter.
Loss of power
Poor cut-uneven
Excessive vibration
l
l
l
l
l
l
l
l
l
l
l
l
l
l
l
l
l
l
l
l
l

15
GB
1) Ensure the engineand blades arestopped and thespark plug disconnected
before performing anymaintenance, do not touch the engine muffler after useat
very high temperature.
ATTENTION!Before the mower isstored, makesure the engine cool.
TRANSPORTATION:
Turn off the engine. Make surethe blade are notbent or damaged whenyou are
pushing themower over obstacles.
16
GB
WARRANTY
Proper maintenance ofyour Weibang equipmentis the owner'sresponsibility.Follow the
instructions in yourowners guide forcorrect lubricants andmaintenance schedule.Your
Weibang dealer carries acomplete line of qualitylubricants and filters foryour equipments
engine, transmission, chassisand attachments.
We provide a2 year warrantyfrom date ofpurchase: During thattime we willreplace we
assure a freeof charge replacementof any partor parts found to be defectivein material
or workmanshipor both, after examinationby an authorized dealer, orby theservice
department of Weibang.We will supplyrepair services forthe machine during a warranty
period limited to2 years.
A warrantyperiod of 90days applies tomachines used forcommercial purposes.
All normalwear and tear and/orconsumable parts are protectedfrom manufacturer's
defects in material and workmanship for a period of thirty (30) days fromthe date of purchase.
Damages caused by aninappropriate or faulty operation,by non-observance of thesafety
regulations and operatinginstructions contained inthis manual, byunauthorised repairs
or adismantling of the machineby unauthorisedpersons, or any otherdeficiency that
cannot be attributedto faulty workmanshipor materials, donot fall underthis guarantee.
Such deficiencies, malfunctionsor damages arethe sole responsibility of the owner, and
eventually necessary repairsare at theowner's expense.
This limited warranty gives you specificlegal rights, and which is inaddition to any statutory
rights to which you may be entitledand your statutory rights are not affected by this warranty.
If you need additional information concerning this writtenwarranty, or assistancein obtaining
services, please contact:
If your lawnmowerhas malfunctioned withinthe warranty period,and on presentationof
a properlyfilled in warranty certificateand the purchase invoice,please contact with
Globalpower GardenMachine Bvbaor Yangzhou WeibangGarden Machine,if there
is no authorised maintenance station or dealer inyour area. The machine will berepaired ex-
pense depended on warranty certificate and invoice.
Email questions and comments to:
Visit our website:
www.weibang.com
Yangzhou Weibang Garden Machine Company Limited
Hanjiang Industrial Park Yangzhou,Jiangsu ,P. R,CHINA
Tel:+86-514-87849959,+86-514-87849975 Fax:+86-514-87849938
Lawn MowerPacking List
NAME QTY. REMARK
Lawn Mower
Grass Catcher
ENGINE OPERATOR'S MANUAL
Lawn Mower OPERATOR'S MANUAL
1
1
1
1
Date Type Content Maintenance technician Remarks
Record ofmaintenance/service works

EC DECLARATION OF CONFORMITY
Business name ofthe manufacturer:YangzhouWeibang Garden MachineCompany Limited
full addressof themanufacturer: Hanjiang IndustrialPark, Yangzhou City,
Jiangsu Province225127, P. R.China
nameand addressof theperson (establishedin theCommunity) compiledthe technicalfile:
VanDyck MarcelBelgium, Provinclebaan 79, 2235 Houtvenne Belgium
We declaringthat themachinery
product name:Lawnmower
commercial name: Petrol professionalLawnmower
function: service foragriculture
Model andguaranteed noiselevel :
type: gasoline powered
fulfils allthe relevantprovisions ofDirectives:
and testedin accordancewith belowstandards:
place anddate ofthe declaration:Jiangsu 2016-10-19
signature ofthe person:
GB
LWA=98dB(A)
LWA=96dB(A)
General Manager
WB436HKL AL WB436SKL AL WB486SK AL WB486SK AL V
WB486SB AL-DOV WB486SB AL V-DOV
WB486SB AL WB486SB ALV
WB486SKL AL WB486SKLAL V WB487SC V AL
WB536SK AL WB536SK AL V WB537SC V AL
WB536SB AL WB536SB ALV WB536SB AL-DOV WB536SBAL V-DOV
WB536SH AL WB536SH ALV WB536SKL AL WB536SKL ALV
WB436HKL AL WB436SKL AL WB436HK AL
WB476SKL AL WB476SKL AL V WB476SK AL V
EN ISO 5395-1; EN ISO 5395-2; EN ISO 14982:2009
2006/42/EC, 2014/30/EU, 2000/14/EC
This manual suits for next models
14
Table of contents
Other WEIBANG Lawn Mower manuals