manuals.online logo
Brands
  1. Home
  2. •
  3. Brands
  4. •
  5. Weigand
  6. •
  7. Plumbing Product
  8. •
  9. Weigand TrioSol Unica 2 User manual

Weigand TrioSol Unica 2 User manual

07/2017
GEBRAUCHSANWEISUNG / INSTRUCTIONS FOR USE
MODE D´EMPLOI / GEBRUIKSAANWIJZING
NÁVOD K POU ITÍ / ISTRUZIONI PER L’USO
NAVODILA ZA UPORABO
Technische Änderungen vorbehalten
Infrarotkabinentyp/ Type of cabin
Type de cabine/ Infrarood-cabíne typ
Typ tepelné kabiny/ Tipo di cabina sauna/
Infrardeča kabina p
Spannung/ Voltage
Voltage/ Spanning
Intenzita proudu/
Alimentazione/ Napetost
Leistung/ Power
Puissance/ Vermogen
Výkon/ Potenza/ Moč
Abmaße/ Measurements
Dimensions/ Afmeng
Rozměry/ Dimensioni/
Mere
TrioSol Unica 2 230 Volt ~ 1120 - 1230 W /
700 W / 750 W
1536, 1622, 1708, 1794 x
1278 x 2030 mm
Sehr geehrter Kunde,
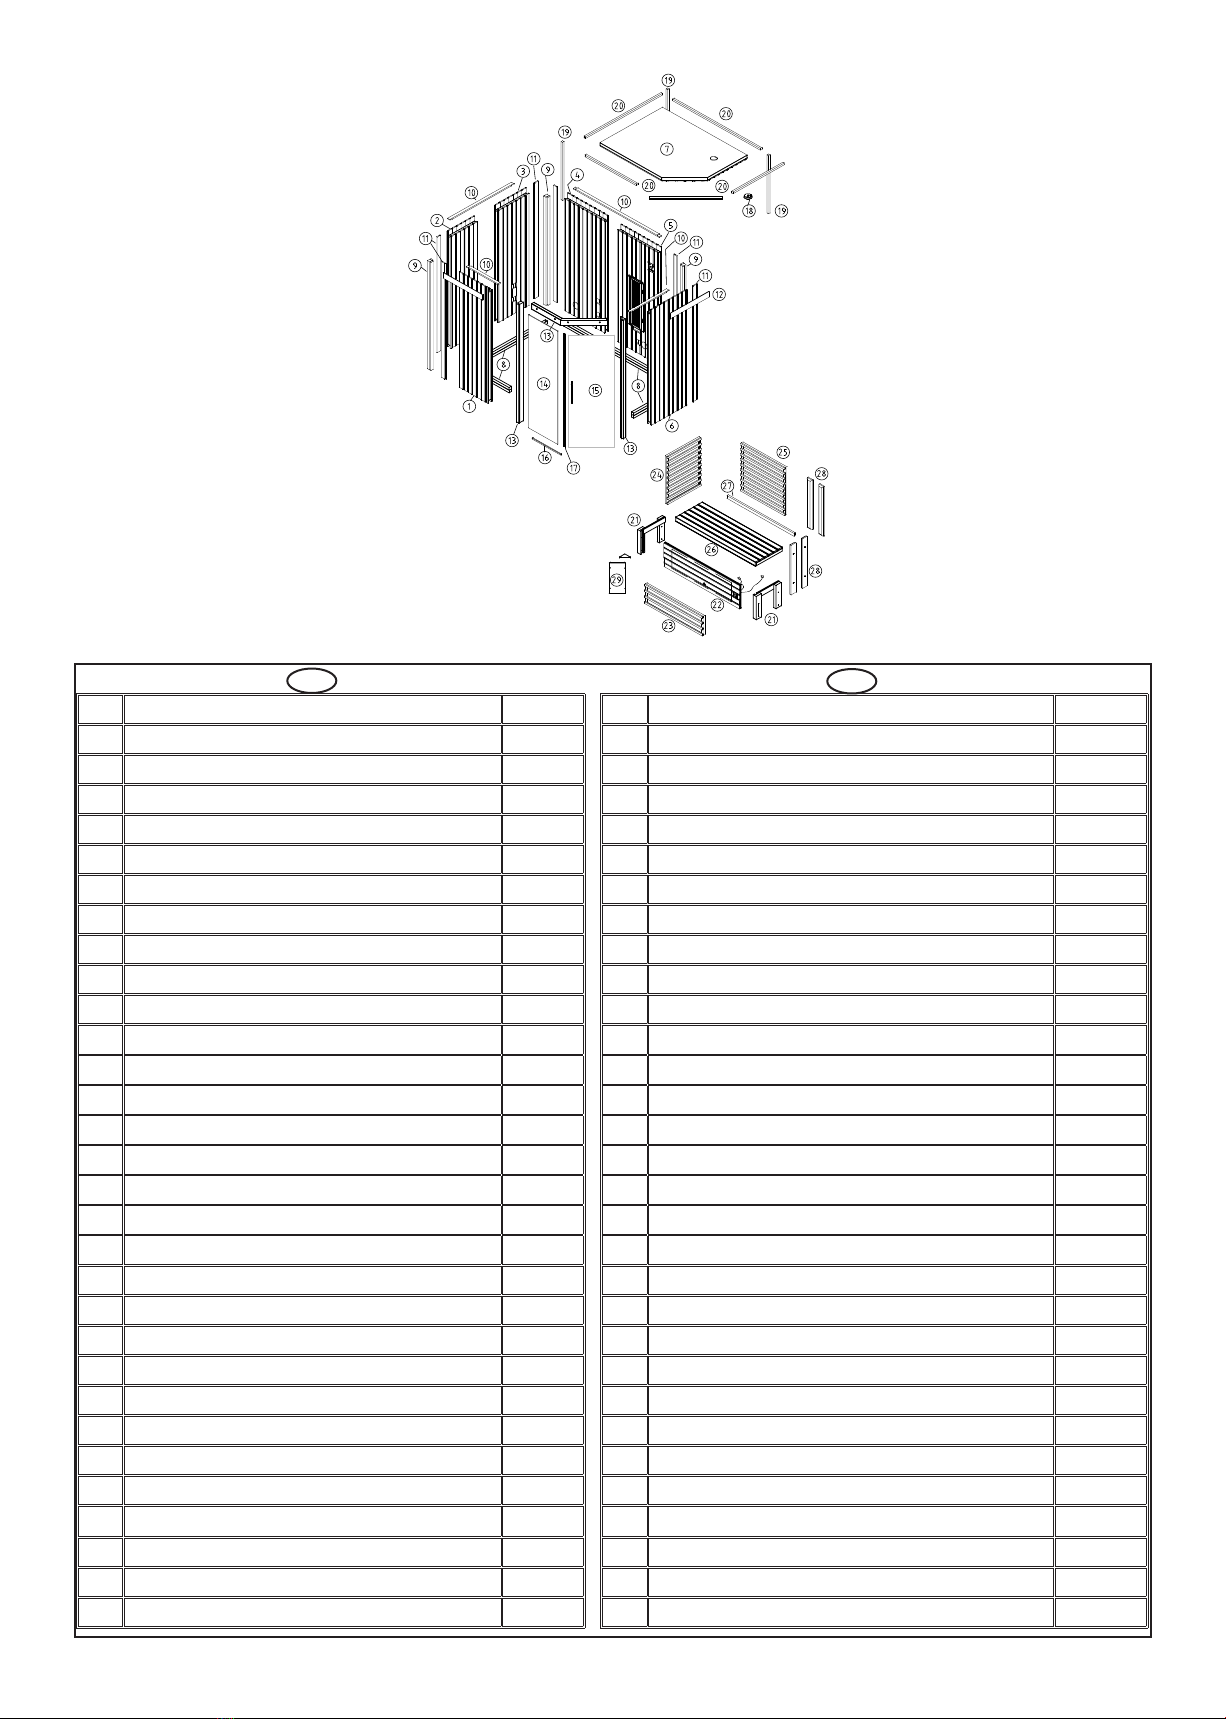
KontrollierenSieanhandder Stückliste, bevor Sie mit derArbeitbeginnen,
oballeEinzelteileauchtatsächlichmitgeliefertwurden. Sollten ausnahms-
weise Einzelteile fehlen oder offensichtliche Beschädigungen durch den
Transportetc.aufweisen,bittenwirSieunssofortzubenachrichtigen.Bean-
standungen können nur im nicht aufgebautem Zustand bearbeitet werden!
Heben Sie den Lieferschein, die Rechnung und die Montagean-
leitung für Rückfragen gut auf und notieren Sie bitte die Seriennummer
(bendet sich unter der Sitzbank) auf der Rechnung.
Warnhinweise:
- Abdecken der Heizkörper verursacht Brandgefahr !
- Infrarotkabinen nicht länger als ca. 30 bis 40 min benützen
(je nach körperlicher Verfassung). Bei Infrarot A-Strahlern nicht
länger als 15 min.
- Kranke Personen sollten vor der Benützung einen Arzt befragen.
- Nicht von hilosen und wärmeempndlichen Personen oder Klein-
kindern benutzen.
- Gebrauchsinformationen beachten.
- Vor Wärmekabinenbesuch die Haut nicht stark reiben oder
hautdurchblutungsfördernde Mittel einnehmen.
- Keine Substanzen einnehmen, die das natürliche Hitze-
schmerzempnden unterdrücken (Alkohol, Drogen, Medikamente).
- Bei zu hohem Hitzeempnden auf der Haut die Sitzposition ändern.
- Dieses Gerät ist nicht dafür bestimmt, durch Personen (einschließlich
Kinder) mit eingeschränkten physischen, sensorischen oder geistigen
Fähigkeiten oder mangels Erfahrung und / oder mangels Wissen
benutzt zu werden, es sei denn, sie werden durch eine für Ihre Sicher-
heit zuständige Person beaufsichtigt oder erhielten von Ihr An-
weisungen, wie das Gerät zu benutzen ist. Kinder sollten beauf-
sichtigt werden, um sicherzustellen, dass sie nicht mit dem Gerät
spielen.
Hinweise:
- Nicht in Nähe von Badewannen und Duschen aufstellen (Mindest-
abstand: ca. 60 cm). Es sind hier die Sicherheitsvorschriften nach
VDE0100, vor allem der VDE0100-702 zu beachten. Zu Schwimm-
becken sind die Abstände nach ÖVE EN1 und die Sicherheitsvor-
schriften nach VDE0100-703 einzuhalten.
- Kabine ist nicht geeignet für öffentliche Standorte, die frei zugäng-
lich sind und ohne regelmäßiger Aufsicht stehen (z.B.: Wohnblöcke,
Hotels ohne Rezeption,...).
- Kabinen nur auf sicherem Untergrund stellen, der feuchtigkeits-
resistent ist (z.B.: Fliesen).
- Öffnen und Reparaturen dürfen nur von einem Fachmann durch-
geführt werden.
- Vor dem Öffnen der Steuerung oder vor einem Austausch der
Heizelemente immer den Netzstecker ziehen.
- Die Kabine immer in geschlossenen Räumen aufstellen - niemals
im Freien.
- Die Kabine sollte regelmäßig gereinigt werden. Vor der Reinigung
den Netzstecker ziehen. Zum Reinigen eignet sich am besten ein
Saunareinigungsmittel.
- Netzstecker musss nach dem Aufstellen der Wärmekabine leicht
zugänglich sein.
- Wenn die Anschlussleitung der Wärmekabine beschädigt wird, muss
sie durch den Hersteller, seinem Kundendienst oder von ähnlich
qualizierten Personen ersetzt werden.
Dear customer,
Before starting to work, please check with the help of the parts list,
whether all elements have actually been supplied. In the event, that
single parts are missing, please inform us immediately. Complaints can
only be dealt with before the cabin has been assembled.
Please keep the delivery note, the bill and the assembling instructions
carefully in case of later quieries and make a note of the serial number
(which you nd below the bench) on your invoice.
Warnings:
- Covering heaters causes danger of re !
- Do not use heat cabins for more than approx. 30 to 40 min
(according to your personal health). Do not use for more than
15 min with infrared A radiators
- Ill people should ask a doctor before use.
- Not to be used by people who are helpless and sensitive to heat or by
small children.
- Observe the instructions for use.
- Do not rub your skin intensively nor take drugs, which stimulate the
blood circulation of the skin, before using the heat cabin.
- Do not take any substances, which suppress the natural sensitivity to
heat and pain (alcohol, drugs, medicine).
- If you feel too much heat on the skin, change your sitting position.
- This appliance is not intended for use by persons (including children)
with limited physical, sensorial or mental capabilities or without
the necessary experience and/or knowledge, unless a person, who is
responsible for their safety, looks after them or provides instructions
on how to use the appliance. Children should be supervised to make
sure that they do not play with the appliance.
Notes:
- Do not put up near bath tubs and showers (minimum distance
approx.: 60 cm). The safety regulations according to VDE100,
especially VDE100-702 have to be observed. Observe the distances
to swimming pools according to ÖVE EN1 and safety regulations
accoring to VDE0100-703.
- The cabin is not suitable for public places, which are freely
accessible and without regular supervision (e.g.: residential blocks,
hotel without reception,...).
- Place the cabin only on safe foundations, which is resistent to
humidity (e.g.: tiles).
- Only experts are allowed to open and repair.
- Take the mains plug out of the socket before opening the controls or
exchanging the heating elements.
- Always put the cabin in enclosed rooms - never in the open air.
- The cabin should be cleaned regularly. Take the mains plug out of
the socket before cleaning. Sauna cleaning agents are best for
cleaning.
- The mains plug must be easily accessible after putting up the heat
cabin.
- If the connecting cable of this heat cabin is damaged, it must be
replaced by the manufacturer, the customer service or similar
qualied persons in order to avoid danger.
2
DGB
Cher client,
S.v.p., avant de commencer le travail, contrôlez à l’aide de la liste de
pièces si tous les éléments ont été vraiment livrés. S’ils y manquent
exceptionnellement des pièces singulières, veuillez nous informer tout
de suite. Il est possible de traiter des réclamations que dans un état non
assemblé.
Préservez le bon de livraison, la facture et le mode d’emploi pour des
demandes de précision.
Avertissements:
- Recouvrir les radiateurs cause le risque d’incendie!
- Ne pas utiliser la cabine thermique pendant plus d’env. 30 à 40 min
(selon l’état de santé). Ne pas s’exposer plus de 15 mn aux infra-
rouges A.
- Les personnes malades devraient consulter le médecin avant
l’utilisation.
- Les personnes dépendant des autres et sensibles à la chaleur ou les
petits enfants ne doivent pas utiliser la cabine.
- Suivre le mode d’emploi.
- Avant de visiter la cabine thermique ne pas frotter fortement la peau
ni prendre de médicaments qui stimulent la circulation sanguine
dans la peau.
- Ne pas prendre de substances qui répriment la sensibilité naturelle
de chaleur et douleur (alcool, drogues, médicaments).
- En cas de forte chaleur sur la peau changer la position du siège.
- Cet appareil ne doit pas être utilisé par des personnes (enfants
inclus) souffrant de déciences physiques, sensorielles ou mentales,
manquant d’expérience ou des connaissances nécessaires, sauf si
elles sont surveillées par une personne chargée de leur sécurité ou
que celle-ci les informe, an qu’elles sachent se servir de l’appareil.
Il convient de surveiller les enfants pour s’assurer qu’ils ne jouent
pas avec l’appareil.
Notes:
- Ne pas poser près d’une baignoire ou une douche (distance mini-
male env. 60 cm). Il faut respecter les régulations de sécurité selon
VDE0100, surtout d’après VDE0100-702. Il faut respecter les
distances aux grands bassins selon ÖVE EN1 et les régulations de
sécurité selon VDE0100-703.
- La cabine n’est pas convenable pour des places publiques qui sont
librement accessibles et sans surveillance régulière (p. ex. : pâtés de
maisons, hôtels sans réception,…)
- Ne poser la cabine que sur une surface sûre (p.ex. : sol carrelé)
- Seulement un expert est autorisé à ouvrir et réparer la cabine.
- Avant d’ouvrir la commande ou de changer les éléments de chauffa-
ge, toujours débrancher le connecteur.
- Poser la cabine toujours dans une pièce fermée – jamais en plein air.
- Il fallait nettoyer la cabine régulièrement. Déconnecter la che avant
le nettoyage. Pour ceci un nettoyant pour sauna est meilleur apte.
- La che d’alimentation doit être facilement accessible après avoir
posé la cabine thermique.
- Si la connexion de cette cabine thermique est endommagée, elle doit
être remplacée par le fabricant, son service après-vente ou par
d’autres personnes qualiées pour éviter des risques.
Geachte klant,
Controleer voordat u met de montage begint aan de hand van de
stuklijst of alle onderdelen ook daadwerkelijk meegeleverd zijn.
Wanneer er onverhoopt onderdelen ontbreken, dient u ons hiervan
direct op de hoogte te stellen. Reclamaties kunnen alleen worden
afgehandeld als het product nog niet is gemonteerd.
Bewaar altijd de aeveringsbon, de rekening en de montagehandlei-
ding voor eventuele vragen.
Veiligheidsvoorschriften:
- Afdekken van de verwarmingselementen veroorzaakt brandgevaar !
- De warmtecabine niet langer dan ca. 30 tot 40 minuten gebruiken
(al naar gelang lichamelijke toestand). Bij infrarood-A-stralers
niet langer dan 15 minuten.
- Mensen met een ziekte dienen voor gebruik eerst een arts te
raadplegen.
- Niet te gebruiken door hulpeloze personen, personen met overgevo-
eligheid voor warmte en door kleine kinderen.
- Gebruiksaanwijzing in acht nehmen.
- Voor het gebruik van de cabine de huid niet sterk wrijven of huid-
doorbloedingsbevorderende middelen innemen.
- Geen middelen nehmen die de natuurlijke warmtegevoeligheid
onderdrukken (alcohol, medicijnen, drugs).
- Bij een te hoge waarneming van warmte op de huid zitpositie
veranderen.
- Dit apparaat mag niet worden gebruikt door personen (waaronder
kinderen) met verminderde lichamelijke, zintuiglijke of geestelijke
vermogens of met een gebrek aan ervaring en/of kennis, tenzij ze
onder toezicht staan van iemand die verantwoordelijk is voor hun
veiligheid of van deze persoon instructies voor het gebruik van het
apparaat hebben gekregen. Kinderen moeten onder toezicht staan om
te voorkomen dat ze met het apparaat gaan spelen.
Let op:
- Niet in de buurt van een bad of douche plaatsen (minimale af-
stand: ca. 60 cm). Hier dienen de veiligheidsvoorschriften conform
VDE0100, vooral VDE0100-702 te worden opgevolgd. Voor zwem-
baden dienen de afstanden conform ÖVE EN1 en de veiligheids-
voorschriften conform VDE0100-703 te worden nageleefd.
- De cabine is niet geschikt voor openbare plaatsen die vrij toegan-
kelijk zijn en waar geen regelmatig toezicht kan worden gehouden
(bijvoorbeeld woonblokken, hotels zonder receptie,...).
- Plaats de cabine altijd op een stabiele ondergrond (bijvoorbeeld
tegels).
- De cabine mag alleen door een vakman worden geopend en gerepa-
reerd.
- Koppel altijd eerst de netstekker los voordat u de bediening opent of
de warmte-elementen vervangt.
- Plaats de cabine altijd in gesloten ruimten – nooit buiten.
- De cabine moet regelmatig worden gereinigd. Koppel voor de reini-
ging de netstekker los. Voor het reinigen kunt u het beste een sau-
nareinigingsmiddel gebruiken.
- De netstekker moet na het plaatsen van de warmtecabine gemakkeli-
jk toegankelijk zijn.
- Als de aansluitkabel van de warmtecabine beschadigd is, moet deze
door de fabrikant, zijn klantenservice of soortgelijke gekwalice
erde personen worden vervangen.
3
NL
F
4
Vážený zákazníku,
dříve než začnete s prací, zkontrolujte si na základě kusovníku, zda
byly skutečně dodány veškeré jednotlivé díly. v případě, že vyjímečně
bude chybět některý díl, okamžitě nás uvědomte. Pozastavte montáž s
tím, že nelze zařízení sestavit.
Pro případ budoucích otázek k našemu výrobku si pečlivě uložte dod-
ací list, fakturu a montážní návod. Na fakturu si, prosím, poznamene-
jte sériové číslo (je uvedeno pod lavicí).
Varovná upozornění:
- Zakrytím topných těles vzniká nebezpečí požáru!
- V kabině nepoužívejte vodu nebo mokré ručníky.
- V tepelné kabině nepobývejte déle než cca 30 až 40 minut
(v závislosti na tělesné kondici).
- Nemocné osoby by měly použití konzultovat s lékařem.
- Kabinu nesmí používat nesamostatné a na teplo citlivé osoby nebo
malé děti.
- Respektujte informace, které se týkají použití kabiny.
- Před návštěvou tepelné kabiny si intenzivně netřete pokožku a
nepoužívejte prostředky podporující prokrvení pokožky.
- Nepoužívejte žádné přípravky, které potlačují přirozený pocit horka
(alkohol, drogy, léky).
- Při příliš intenzivním pocitu horka na pokožce změňte polohu
sezení.
Upozornění:
- Neinstalujte v blízkosti van a sprch (minimální vzdálenost: cca
60 cm). Je třeba respektovat bezpečnostní předpisy dle VDE0100,
především pak VDE0100-702. V případě bazénů je třeba dodržet
vzdálenosti dle ÖVE EN1 a také bezpečnostní předpisy dle
VDE0100-703.
- Kabina není vhodná pro veřejná místa, která jsou volně přístupná a
jsou bez pravidelného dozoru (např.: obytné bloky, hotely bez
recepce atd.).
- Kabiny instalujte pouze na bezpečném podkladu (např.: dlaždicích).
- Otevření řídicí jednotky a veškeré opravy smí provádět pouze
odborník.
- Před otevřením ovládání nebo před výměnou topných prvků vždy
vytáhněte síťovou zástrčku ze zásuvky.
- Kabinu instalujte vždy v interiéru (uzavřeném prostoru) – nikdy ji
neinstalujte venku.
- Kabinu je třeba pravidelně čistit. Před čištěním vždy vytáhněte
síťovou zástrčku ze zásuvky. K čištění jsou nejvhodnější čisticí
prostředky určené pro čištění sauny.
- Síťová zástrčka musí být po instalaci tepelné kabiny snadno
přístupná.
- Pokud je přívodní vedení tepelné kabiny poškozeno, musí být
vyměněno výrobcem, jeho servisní službou nebo podobně
kvalikovanými osobami.
Gentile cliente,
Prima di iniziare con i lavori, verichi di aver ricevuto tutti i pezzi
indicati nella distinta pezzi. Se mancano delle singole parti in via ec-
cezionale, contattateci immediatamente. Possiamo riconoscere reclami
solamente nello stato scomposto della cabina.
In caso di domande, conservi la bolla di consegna, la fattura e le istruzi-
oni per il montaggio e annoti sulla fattura il numero di serie (applicato
sotto la panchina).
Avvertenze:
- La copertura dei radiatori causa pericolo d‘incendio!
- Non utilizzare nella cabina acqua oppure asciugamani bagnati.
- Non utilizzare le cabine sauna per oltre 30 - 40 min circa (secondo
le condizioni siche).
- Persone malate dovrebbero rivolgersi a un medico prima dell‘utilizzo.
- È vietato l‘uso da parte di persone non indipendenti o sensibili al
calore oppure bambini.
- Prestare attenzione alle istruzioni per l‘uso.
- Prima di una seduta nella cabina sauna, non stronare la pelle oppure
non assumere sostanze stimolanti l‘irrorazione sanguigna della cute.
- Non assumere sostanze che riducono il naturale senso di sopportazio-
ne del calore (alcool, droghe, medicine).
- In caso di eccessivo senso di calore sulla pelle cambiare la posizione
di seduta.
Note:
- Non montare la cabina in prossimità di vasche da bagno e docce
(distanza minima: circa 60 cm). Rispettate una distanza di 2 m da
piscine.
- La cabina non è adatta al posizionamento in luoghi pubblici, facil-
mente accessibili e senza regolare vigilanza (p. es.: caseggiati, al-
berghi senza reception,...).
- Posizionare le cabine solo su pavimento sicuro (p. es.: ceramica,...).
- L‘apertura e le riparazioni possono essere eseguite solo da personale
specializzato.
- Prima di aprire il sistema di comando o prima di sostituire i radiatori,
scollegare dall‘alimentazione elettrica.
- Montare la cabina sempre in locali chiusi – mai all‘aperto.
- Pulire regolarmente la cabina. Scollegare l‘alimentazione prima della
pulizia. Per una migliore pulizia è adatto un detergente per saune.
- Dopo l‘installazione della cabina sauna, la presa di alimentazione
deve essere facilmente accessibile.
- Se la linea di collegamento della cabina per la sauna è danneggiata
è necessario farla sostituire da personale del produttore, del servizio
assistenza clienti o da persone qualicate.
IT
CZ
Spoštovani kupec,
preden začnete z delom preverite kosovnico, ali so vsi navedeni deli
dobavljeni. V kolikor posamičen del manjka, ali pa so na delih nastale
vidne poškodbe zaradi transporta, vas prosimo, da nas nemudoma
obvestite. Pritožbe se lahko obravnavajo samo, če so deli v razstavlje-
nem stanju !
Dobavnico, račun in navodila za uporabo skrbno shranite in zapišite
serijsko številko kabine (nahaja se pod klopjo).
Varnostna opozorila:
- Prekrivanje grelnih teles lahko povzroči požar !
- Ne uporabljajte infrardeče kabine dlje kot 30-40 minut (odvisno od
telesne pripravljenosti).
- Ne uporabljajte infrardečega A-grelca (Vitallight grelca) dlje kot
15 minut.
- Bolne osebe se naj pred uporabo posvetujejo z zdravnikom.
- Uporaba se odsvetuje nemočnim osebam, osebam, ki so občutljive
na toploto ter majhnim otrokom
- Upoštevajte navodila za uporabo
- Pred uporabo infrardeče kabine si ne drgnite kože in ne jemljite
sredstev za boljšo prekrvavitev
- Pred uporabo ne jemljite substanc, ki vplivajo na zaznavanje toplote
(alkohol, droge, zdravila)
- Pri prevelikem občutku vročine na koži zamenjajte položaj sedenja
- Ta naprava ni namenjena osebam (vključno z otroci) z omejeni-
mi zičnimi, senzoričnimi in psihičnimi sposobnostmi ali osebam
brez potrebnih izkušenj in/ali znanja o uporabi, razen, če oseba, ki je
zadolžena za njihovo varnost pazi na njih ali jim posreduje navodila
o uporabi naprave. Otroci morajo biti pod nadzorom staršev oziroma
skrbnikov, da se ne igrajo z napravo.
Opozorila:
- Ne postavljajte kabine v bližini kopalne kadi ali tuša (najmanjši do-
voljeni odmik cca. 60 cm).Potrebno je upoštevati varnostna navodila
po VDE100, posebej VDE100-702. Pri bazenih je potrebno
upoštevati odmike po ÖVE EN1 in varnostne predpise po
VDE0100-703.
- Kabina ni namenjena postavitvi v javno dostopne prostore, ki niso
pod nadzorom (npr.stanovanjski bloki, hoteli brez recepcije...).
- Kabina se postavlja na stabilno talno površino, ki je odporna na
vlago (npr.keramične ploščice)
- Popravila sme opravljati samo strokovnjak
- Pred odpiranjem kontrolne enote ali pri zamenjavi grelnih elementov
je potrebno kabino izključiti iz omrežja
- Kabina se vedno postavlja v zaprtih prostorih, nikdar na prostem.
- Kabina se redno čisti. Pred čiščenjem jo izključite iz omrežja. Za
čiščenje se priporoča uporaba sredstva za čiščenje savn.
- Vtikač za elektriko mora biti po postavitvi prosto dostopen.
- Če je poškodovana električna napeljava kabine, jo mora zamenjati
proizvajalec oziroma njegova pooblaščena oseba.
SLO
5
DGB
Pos Bezeichnung Stück Pos Description Quantity
1 Wand 1 1 Stk. 1 wall 1 1 pc.
2 Wand 2 1 Stk. 2 wall 2 1 pc.
3 Wand 3 1 Stk. 3 wall 3 1 pc.
4 Wand 4 1 Stk. 4 wall 4 1 pc.
5 Wand 5 1 Stk. 5 wall 5 1 pc.
6 Wand 6 1 Stk. 6 wall 6 1 pc.
7 Dach 1 Stk. 7 roof 1 pc.
8 Bodenrahmen 4 Stk. 8 oor cornice 4 pcs.
9 Eckpfosten 3 Stk. 9 corner post 3 pcs.
10 Dachrahmen 4 Stk. 10 roof cornice 4 pcs.
11 Eckblenden 6 Stk. 11 corner screen 6 pcs.
12 Dachleisten 2 Stk. 12 roof battens 2 pcs.
13 Frontrahmen 3 Stk. 13 front frame 3 pcs.
14 Seitenglas 1 Stk. 14 lateral glass element 1 pc.
15 Glastür 1 Stk. 15 glass door 1 pc.
16 Alu-Prol 1 Stk. 16 alu-section 1 pc.
17 Dichtung 3 Stk. 17 door seal 3 pcs.
18 Lüftungsrad 1 Stk. 18 ventilation wheel 1 pc.
19 Seitenleisten 3 Stk. 19 lateral strips 3 pcs.
20 Dachleisten 4 Stk. 20 roof battens 4 pcs.
21 Bankauage Links/Rechts 2 Stk. 21 bench support left/right 2 pcs.
22 Abdeckung unter Sitzbank 1 Stk. 22 cover under the bench 1 pc.
23 Flächenheizung Fußteil 1 Stk. 23 base infrared surface heating 1 pc.
24 Flächenheizung Seite 1 Stk. 24 lateral infrared surface heating 1 pcs.
25 Flächenheizung Rücken 1 Stk. 25 rear infrared surface heating 1 pc.
26 Bank 1 Stk. 26 bench 1 pc.
27 Bankauage 1 Stk. 27 bench support strips 1 pc.
28 Rückenpolster 4 Stk. 28 back padding 4 pcs.
29 Montageplatte 1 Stk. 29 assembly board 1 pc.
30 Montageanleitung 1 Stk. 30 assembly instructions 1 pc.
Pos F Désignation Quantité Pos NL Beschrijving Stuk
1 Paroi 1 1 1 Wand 1 1 st.
2 Paroi 2 1 2 Wand 2 1 st.
3 Paroi 3 13 Wand 3 1 st.
4 Paroi 4 14 Wand 4 1 st.
5 Paroi 5 15 Wand 5 1 st.
6 Paroi 6 16 Wand 6 1 st.
7Plafond 1 7 Plafond 1 st.
8Cadre du plancher 4 8 Vloerframe 4 st.
9Poteaux d’angle 3 9 Hoekstijlen 3 st.
10 Cadre du plafond 410 Plafondframe 4 st.
11 Baguettes d’angle 6 11 Hoeklijsten 6 st.
12 Baguettes de plafond 2 12 Plafondlijsten 2 st.
13 Cadre face avant 313 Voorframe 3 st.
14 Vitre latérale 1 14 Zijglas 1 st.
15 Porte en verre 1 15 Glasdeur 1 st.
16 Prolé en aluminium 1 16 Aluminium proel 1 st.
17 Joint 317 Dichting 3 st.
18 Aérateur 1 18 Ventilatie 1 st.
19 Baguettes latérales 3 19 Lijsten zijkant 3 st.
20 Baguettes de plafond 4 20 Plafondlijsten 4 st.
21 Support banquette gauche/droit 2 21 Steun zitbank links/rechts 2 st.
22 Panneau inférieur avant banquette 1 22 Afdekpaneel onder zitbank 1 st.
23 Élément chauffant inférieur 1 23 Verwarmingselement voeten 1 st.
24 Élément chauffant latéral 1 24 Verwarmingselement zijkant 1 st.
25 Élément chauffant arrière 1 25 Verwarmingselement rug 1 st.
26 Assise banquette 1 26 Zitbank 1 st.
27 Baguette banquette 1 27 Lijst voor zitbank 1 st.
28 Dossier rembourré 428 Rugkussen 4 st.
29 Plaque de montage 1 29 Montageplaat 1 st.
30 Instructions de montage 130 Montagevoorschrift 1 st.
Pos IT Descrizione Pezzo Poz. SLO Opis Kos
1 Parete 1 1 pz. 1 Stena 1 1
2 Parete 2 1 pz. 2 Stena 2 1
3 Parete 3 1 pz. 3 Stena 3 1
4 Parete 4 1 pz. 4 Stena 4 1
5 Parete 5 1 pz. 5 Stena 5 1
6 Parete 6 1 pz. 6 Stena 6 1
7Tetto 1 pz. 7 Strop 1
8Proli pavimento 4 pz. 8 Talni okvir 4
9 Montanti angolari 3 pz. 9 Kotni stebri 3
10 Proli tetto 4 pz. 10 Stropni okvir 4.
11 Raccordi angolari 6 pz. 11 Kotne pokrivne deske 6
12 Listelli tetto 2 pz. 12 Stropne letve 2
13 Cornice anteriore 3 pz. 13 Čelni okvir 3
14 Elemento in vetro laterale 1 pz. 14 Stekleni element stranski 1
15 Porta in vetro 1 pz. 15 Steklena vrata 1.
16 Prolo in alluminio 1 pz. 16 Alu prol 1
17 Guarnizioni 3 pz. 17 Tesnilo 3
18 Ventola di aerazione 1 pz. 18 Okrogli zračnik 1
19 Listelli laterali 3 pz. 19 Stranske letve 3
20 Listelli tetto 4 pz. 20 Stropne letve 4
21 Supporti panca sinistra/destra 2 pz. 21 Nosilec klopi levo/desno 2
22 Copertura sotto la panca 1 pz. 22 Pokrivni element pod klopjo 1
23 Riscaldamento radiante base 1 pz. 23 Površinski grelec nožni 1
24 Riscaldamento radiante elementi laterali 1 pz. 24 Površinski grelec stranski 1
25 Riscaldamento radiante elemento posteriore 1 pz. 25 Površinski grelec hrbtni 1
26 Panca 1 pz. 26 Klop 1
27 Inserto panca 1 pz. 27 Nosilna letev klopi 1
28 Schienale 4 pz. 28 Oblazinjenje 4
29 Piastra di montaggio 1 pz. 29 Montažna plošča 1
30 Istruzioni per il montaggio 1 pz. 30 Navodila za montažo 1
8
1 2
4
3
9
5 6
7 8
10
9 10
11 12
11
13 14
15 16
17 18
19
12
20
13
21 22
23 24
14
25 26
27 28
15
29 30
16
-
M
+
Rev. 2.0
Art.Nr. B 6713
TRIO - CONTROL 2
www.tpi.co.at Infraworld
230V/50Hz, 16A
RoHS
31
Bedienungsanleitung Steuerung für
Infrarotkabine TrioSol
1. Licht
Licht mit der -Taste EIN/AUS schalten. Sollte Ihre Kabinen
einen LED-Spot haben, muss dieser mit der Fernbedienung
zusätzlich eingeschalten werden.
2. Einschalten der Infrarotkabine
Durch Drücken der -Taste wird die Kabine EIN/AUS ge-
schaltet.
Start durch Drücken der -Taste mit Verdampfer und mit
der -Taste ohne Verdampfer.
3. Einstellungen
1 x Mode - Infrarot A-Strahler 1
Durch Drücken der -Taste (1x) kann die Intensität des
„Strahlers 1“ verstellt werden. Mit und kann die
Strahlungsstärke von 40 - 100 % verstellt werden (Nach 5
sec ohne Tastendruck springt die Anzeige wieder zurück).
2 x Mode - Infrarot A-Strahler 2
Durch Drücken der -Taste (2x) kann die Intensität des
„Strahlers 2“ verstellt werden. Mit und kann die
Strahlungsstärke von 40 - 100 % verstellt werden (Nach 5
sec ohne Tastendruck springt die Anzeige wieder zurück).
3 x Mode - Verdampfer
Durch Drücken der -Taste (1x) kann die Intensität des
Verdampfers verstellt werden. Mit und kann der
Verdampfer von 0, 40 - 100 % verstellt werden (Nach 5 sec
ohne Tastendruck springt die Anzeige wieder zurück).
4 x Mode - Raumtemperatur
Verstellen der gewünschten Raumtemperatur von 30 - 60°C.
Bei einer Raumtemperatur von 60°C werde zur Sicherheit alle
Strahler abgeschalten (bei 59°C Raumtemperatur schalten sie
wieder ein).
5 x Mode - Flächenheizung
Einstellen der gewünschten Oberächentemperatur der
Flächenheizelemente von 30 - 80°C.
6 x Mode - Zeit
Einstellen der Zeit mit und von 10 min - 2 h
Wichtig: Nach 5 sec ohne Tastendruck wechselt die Anzeige
in den normalen Betrieb (rechts oben in der
Anzeige werden die 5 sec heruntergezählt).
Reset auf Werkseinstellung
Wollen Sie die Steuerung auf die Werkseinstellung zurück
stellen (Laufzeit: 60 min, Raumtemp.: 60°C, FH: 80°C, Infra-
rot A-Strahler Intensität: 100 %).
+ + gleichzeitig gedrückt halten
Es erscheint am Display:
A C H T U N G !
auf
Werkseinstellung
zurückgesetzt !
Operating instructions control for inf-
rared cabin TrioSol
1. Light
Switch the light ON/OFF by using the -button. If your ca-
bin is equipped with an LED spot, you must also switch it on
by using the remote control.
2. Switching on the infrared cabin
By pressing the -button the cabin is switched ON/OFF.
Start by pressing the button with steamer and the
button without steamer.
3. Settings
1 x Mode - Infrarot A radiator 1
By pressing the -button (1x) the intensity of „radiator
1“ is adjustable. With and the radiation intensity
can be adjusted from 40 to 100 % (The display resets after
5 sec. without pressing a button).
2 x Mode - Infrarot A radiator 2
By pressing the -button (2x) the intensity of „radiator
2“ is adjustable. With and the radiation intensity
can be adjusted from 40 to 100 % (The display resets after
5 sec. without pressing a button).
3 x Mode - Steamer
By pressing the button (1x) the intensity of the steamer
is adjustable. With and the steamer intensity
can be adjusted from 0, 40 to 100 % (The display resets after
5 sec. without pressing a button).
4 x Mode - Cabin temperature
Adjustment of the desired cabin temperature from 30 to 60°C.
At a cabin temperature of 60°C all radiators are automatically
switched off for safety reasons (at a cabin temperature of
59°C they are activated again).
5 x Mode - Surface heating
Adjustment of the desired surface temperature of the surface
heating elements from 30 to 80°C.
6 x Mode - Time
Setting of the time with and from 10 min to 2 h
Important: The display returns to normal operation after 5
sec. without pressing a button (on the top right
side of the display the 5 sec. are counted down).
Reset to manufactory setting
If you want to reset to the manufactory settings (operating
time: 60 min, cabin temp.: 60°C, surface heating: 80°C, inf-
rared A radiator intensity: 100 %).
Keep + + pressed at the same time
The display will show:
A C H T U N G !
reset to
manufactory
setting!
Mode d’emploi de la commande pour ca-
bine infrarouge TrioSol
1. Eclairage
Allumez la lumière avec le bouton MARCHE/ARRÊT. Si votre
cabine est équipée d’un spot à LED, vous devez l’allumer indé-
pendamment à l’aide de la télécommande.
2. Mise en marche de la cabine infrarouge
Appuyer sur la touche pour ALLUMER/ETEINDRE la cabine.
Appuyer sur la touche pour mettre en marche avec éva-
porateur, et sur la touche pour mettre en marche sans
évaporateur.
3. Paramètres
1 x Mode - Radiateur 1 à infrarouges A
L’intensité du «radiateur 1» se règle en appuyant sur le bouton
(1x). La puissance de rayonnement est réglable de 40 à
100 % à l’aide des boutons et (L’afchage revient
en arrière si la touche n’est pas actionnée dans les 5 sec.).
2 x Mode - Radiateur 2 à infrarouges A
L’intensité du «radiateur 2» se règle en appuyant sur le bouton
(2x). La puissance de rayonnement est réglable de 40 à
100 % à l’aide des boutons et (L’afchage revient
en arrière si la touche n’est pas actionnée dans les 5 sec.).
3 x Mode - Evaporateur
L’intensité de l’évaporation peut être régulée en appuyant sur la
touche (1x). Appuyer sur et pour régler
l’évaporation de 0, 40 à 100 % (l’afchage revient en arrière
après 5 sec. sans pression).
4 x Mode – Température ambiante
La température ambiante est réglable de 30 à 60 °C. Par mesure
de sécurité, tous les radiateurs s’éteignent lorsque la tempéra-
ture ambiante atteint 60°C. (Ils se rallument lorsque la tempé-
rature ambiante est de 59°C.
5 x Mode – Chauffage de surface
La température de surface des éléments chauffants se règle à
volonté de 30 à 80°C.
6 x Mode - Temps
La minuterie se règle à l’aide de et de 10 mn à 2 h
Important: l’afchage revient au mode normal si la touche
n’est pas actionnée dans les 5 sec. (Le décompte
des 5 sec. est afché en haut à droite de l’écran).
Rétablir la conguration d’origine
Si vous désirez rétablir la conguration d´origine (durée: 60
min, température ambiante: 60°C, chauffage de surface: 80°C,
intensité du radiateur à infrarouges A: 100 %).
Tenez appuyés simultanément + +
L’écran afche:
A T T E N T I O N !
la conguration
d’origine est rétablie !
Gebruiksaanwijzing besturing voor
infraroodcabine TrioSol
1. Licht
Het licht met de toets in-/uitschakelen. Als uw cabines
over een LED-spot beschikken, moet deze apart met de af-
standsbediening ingeschakeld worden.
2. Inschakelen van de infraroodcabine
De cabine wordt in-/uitgeschakeld door op de toets te
drukken. Start met verdamper door op de toets te druk-
ken, of met de toets zonder verdamper.
3. Instellingen
1 x mode - infrarood-A-straler 1
Door op de toets te drukken (1x), kan de intensiteit
van “straler 1“ veranderd worden. Met en kan
de stralingssterkte van 40 -100% veranderd worden (als er
gedurende 5 seconden geen toets wordt ingedrukt, springt
het display weer terug).
2 x mode - infrarood-A-straler 2
Door op de toets te drukken (2x), kan de intensiteit
van “straler 2“ veranderd worden. Met en kan
de stralingssterkte van 40 -100% veranderd worden (als er
gedurende 5 seconden geen toets wordt ingedrukt, springt
het display weer terug).
3 x mode - verdamper
Door op de toets te drukken (1x), kan de intensiteit
van de verdamper worden veranderd. Met en kan
de verdamper van 0, 40 - 100 % worden veranderd (als er
gedurende 5 seconden geen toets wordt ingedrukt, springt
het display weer terug).
4 x mode - ruimtetemperatuur
Veranderen van de gewenste ruimtetemperatuur van 30 -
60°C. Bij een ruimtetemperatuur van 60°C worden alle stra-
lers veiligheidshalve uitgeschakeld (bij een ruimtetemperatu-
ur van 59°C gaan ze weer aan).
5 x mode - oppervlakteverwarming
Instellen van de gewenste oppervlaktetemperatuur van de
oppervlakteverwarmingselementen van 30 - 80°C.
6 x mode - tijd
Instellen van de tijd met en van 10 min - 2 h
Belangrijk: als er gedurende 5 seconden geen toets wordt
ingedrukt, schakelt het display over naar de
normale modus (rechtsboven op het display
worden de 5 seconden afgeteld.
Resetten naar fabrieksinstelling
Als u de besturing wilt terugzetten naar de fabrieksinstelling
(looptijd: 60 minuten, ruimtetemperatuur: 60°C, oppervlak-
teverwarming: 80°C, intensiteit infrarood-A-straler: 100%).
+ + tegelijkertijd ingedrukt houden
Op het display verschijnt de volgende tekst:
LET OP !
Teruggezet naar
fabrieksinstelling
Istruzioni per l’uso dei comandi della
cabina a infrarossi TrioSol
1. Luce
Accendere/spegnere la luce utilizzando il pulsante . Se la
cabina dispone di spot LED, accenderlo separatamente mediante
telecomando.
2. Accensione della cabina a infrarossi
Per accendere/spegnere la cabina, premere il pulsante .
Avviare il funzionamento mediante pulsante con vaporizza-
tore oppure mediante pulsante senza vaporizzatore.
3. Impostazioni
Modalità 1 -radiatore infrarosso VITALlight 1
Premendo una volta il pulsante (1x) è possibile regolare
l’intensità del “radiatore 1”.
Mediante e si regola la potenza del radiatore dal 40
a 100%. (dopo 5 sec senza comandi il display ritorna alla par-
tenza)
Modalità 2 -radiatore infrarosso VITALlight 2
Premendo due volte il pulsante (2x) è possibile regolare
l’intensità del “radiatore 2.
Mediante e si regola la potenza del radiatore dal 40
a 100%. (dopo 5 sec senza comandi il display ritorna alla par-
tenza)
Modalità 3 - Vaporizzatore
Premendo una volta il pulsante è possibile regolare
l’intensità del vaporizzatore. Mediante e si regola il
vaporizzatore da 0, 40 a 100 % (se non si preme il pulsante per
5 secondi, l’indicatore si riporta in posizione iniziale).
Modalità 4 – Temperatura ambiente
Per impostare la temperatura ambiente desiderata tra 30 e
60°C. Con temperatura ambiente pari a 60°C vengono spenti
tutti i radiatori per motivi di sicurezza (i radiatori si riaccendo a
59°C).
Modalità 5 – Riscaldamento a supercie
Per impostare la temperatura superciale desiderata per gli ele-
menti di riscaldamento da 30 a 80°C.
Modalità 6 - Durata
Per impostare la durata mediante e da 10 minuti a
2 ore.
Importante: se non si preme il pulsante per 5 secondi,
l’indicatore torna in modalità di funzionamento normale (il con-
to alla rovescia dei 5 secondi viene visualizzato in altro a destra
sull’indicatore).
Ripristino delle impostazioni di fabbrica
SSe si desidera ripristinare le impostazioni di fabbrica (durata:
60 min., temperatura ambiente: 60°C, riscaldamento super-
ciale: 80°C, intensità radiatori a infrarossi: 100 %).
tenere premuti contemporaneamente + +
Sullo schermo viene visualizzato:
ATTENZIONE!
Impostazioni di fa-
bbrica ripristinate!
Navodilo za uporabo kontrolne plošče za
infrardečo kabino TrioSol
1.Luč
Luč prižgemo in ugasnemo s tipko . Če ima vaša kabina
LED barvno luč je moramo vklopiti tudi preko daljinca.
2. Vklop infrardeče kabine
S pritiskom tipke se kabina vklopi ali izklopi.
Začetek z uporabo uparjalnika s pritiskom tipke in začetek
brez uporabe uparjalnika s pritiskom tipke .
3. Nastavitve
1 x Mode – infrardeč A grelec 1
S pritiskom tipke (1 x) se lahko z nadaljnim pritiskanjem
in tipko nastavlja intenzivnost »Grelca 1« od 40 -
100 % (po 5 sekundah brez pritiska tipke skoči prikaz nazaj).
2 x Mode – infrardeč A grelec 2
S pritiskom tipke (2 x) se lahko z nadaljnim pritiskanjem
in tipko nastavlja intenzivnost »Grelca 2« od 40 -
100 % (po 5 sekundah brez pritiska tipke skoči prikaz nazaj).
3 x Mode – uparjalnik
S pritiskom tipke (1 x) se lahko z nadaljnim pritiskanjem
in tipko nastavlja intenzivnost uparjalnika od 0, 40
- 100 % (po 5 sekundah brez pritiska tipke skoči prikaz nazaj).
4 x Mode – temperatura prostora
Nastavljanje želene temperature prostora od 30 – 60°C. Pri
temperaturi prostora 60°C se iz varnostnih razlogov vsi grelci
izklopijo (pri temperaturi 59°C se ponovno vklopijo).
5 x Mode – površinski grelci
Nastavljanje želene temperature površinskih grelcev od 30 –
80°C.
6 x Mode – čas
Nastavljanje časa delovanja s pritiskom tipk in od
10 min do 2 h.
Pomembno: po 5 sekundah brez pritiska tipke se prikaz spre-
meni v normalno obratovanje (v desnem zgornjem kotu ekrana
se odšteva 5 sekund).
Resetiranje na tovarniške nastavitve
Če želite kontrolni enoti povrniti tovarniške nastavitve (čas de-
lovanja: 60 min., temperatura prostora: 60°C, površinski grelci
80°C, intenzivnost infrardeč A grelec 100%).
+ + istočasno stisnete in zadržite
Na ekranu se izpiše:
A C H T U N G !
reset to
manufactory
setting!
Spracheinstellung Infrarot - Triocontrol
TRIOCONTROL
Infraworld V1.1
--------------------
(Press ON/OFF)
Im Standby-Betrieb die -Taste 5 Sekunden gedrückt halten.
** LANGUAGE **
--------------------
German
+ Change, M Exit
Verändern der Sprache durch drücken der -Taste.
(German -> Englisch -> French -> Italian -> Dutch -> German...)
oder oder = Verlassen des Programmiermodus
D
GB
Language setting infrared - Triocontrol
Choix de la langue Triocontrol - infrarouge
In the standby mode hold the -button pressed for 5 seconds.
Appuyer 5 secondes sur la touche de l’appareil en veille.
Change the language by pressing the -button.
(German -> Englisch -> French -> Italian -> Dutch -> German...)
Changer de langue en appuyant sur la touche .
(German -> Englisch -> French -> Italian -> Dutch -> German...)
or or = exit the programming mode
ou ou = quitter le mode de programmation
D
D
D
GB
GB
GB
F
F
F
F
Impostazione della lingua cabine a infrarossi - Triocontrol
IT
In modalità di funzionamento standby, tenere premuto il pulsante per 5 secondi.
IT
Modicare la lingua premendo il pulsante .
(Tedesco -> Inglese -> Francese -> Italiano -> Olandese -> Tedesco...)
IT
o o = per abbandonare la modalità di programmazione
IT
Taalinstelling infrarood - Triocontrol
NL
In de stand-by-modus de toets 5 seconden ingedrukt houden.
NL
De taal wijzigen door de toets in te drukken.
(German -> Englisch -> French -> Italian -> Dutch -> German...)
NL
of of = de programmeermodus verlaten
NL
20
Nastavitev jezika Triocontrol infrardeča
SLO
V Standby-meniju držite tipko 5 sekund.
SLO
Jezik spremenite s pritiskom tipke.
(German -> Englisch -> French -> Italian -> Dutch -> German...)
SLO
ali ali = zapustimo meni programiranja.
SLO

Popular Plumbing Product manuals by other brands

Bradley CRS Series installation manual

Bradley

Bradley CRS Series installation manual

Grohe ATRIO 25 044 instructions

Grohe

Grohe ATRIO 25 044 instructions

GALA Drain SQ manual

GALA

GALA Drain SQ manual

HOUZER Schock installation instructions

HOUZER

HOUZER Schock installation instructions

DURAVIT UV0600 0050 Mounting and care instructions

DURAVIT

DURAVIT UV0600 0050 Mounting and care instructions

Viega Prevista Dry Instructions for use

Viega

Viega Prevista Dry Instructions for use

Bristan Target TG SNK C Fitting instructions

Bristan

Bristan Target TG SNK C Fitting instructions

Crosswater Darby 15-15P-T installation instructions

Crosswater

Crosswater Darby 15-15P-T installation instructions

GF MULTI/JOINT 3000 Plus user manual

GF

GF MULTI/JOINT 3000 Plus user manual

Kohler K-1162-S1HB Roughing-In Guide

Kohler

Kohler K-1162-S1HB Roughing-In Guide

aquabrass Midtown 15019 installation guide

aquabrass

aquabrass Midtown 15019 installation guide

Kohler Stillness 979T-4 installation instructions

Kohler

Kohler Stillness 979T-4 installation instructions

Sensea EASY VSQ 42 V 51 Assembly, Use, Maintenance Manual

Sensea

Sensea EASY VSQ 42 V 51 Assembly, Use, Maintenance Manual

Hans Grohe AXOR Front 26023 Series Instructions for use/assembly instructions

Hans Grohe

Hans Grohe AXOR Front 26023 Series Instructions for use/assembly instructions

Spectrum Brands Pfister Woodbury RT6-5WD Quick installation guide

Spectrum Brands

Spectrum Brands Pfister Woodbury RT6-5WD Quick installation guide

baliv WT-240 manual

baliv

baliv WT-240 manual

brondell SWASH BL97 Installation

brondell

brondell SWASH BL97 Installation

American Standard COLONY SOFT 4175.500 installation instructions

American Standard

American Standard COLONY SOFT 4175.500 installation instructions

manuals.online logo
manuals.online logoBrands
  • About & Mission
  • Contact us
  • Privacy Policy
  • Terms and Conditions

Copyright 2025 Manuals.Online. All Rights Reserved.