manuals.online logo
Brands
  1. Home
  2. •
  3. Brands
  4. •
  5. Weikan Home
  6. •
  7. Accessories
  8. •
  9. Weikan Home Smart Doorbell User manual

Weikan Home Smart Doorbell User manual

User Manual
Smart Doorbell
1. Smart Doorbell Overview
1.2 Smart Doorbell Specications
Item Description
Camera Sensor 1/2.7” 1080P CMOS
Camera Lens 138° Field of View
Image Resolution 1920x1080
Video Bit rate Auto Adapter
Wi-Fi IEEE 802.11b/g/n 2.4GHz
Battery 2 x 18650 Lithium ion rechargeable batteries
Power Supply 5V (Micro USB) or 12~24V (AC/DC)
Dimensions 74mm x 30.5mm x 151mm
Weight 188g
Packing List:
• Smart Doorbell
• Sync Module
• Screw pack for mounting
• User Manual
• Warranty Card
Lens
Ambient Light Sensor
Mic
PIR Sensor
Micro USB Slot and
Battery Compartment
(Removable)
Power Button
Red (Link) LED
USB Plug
Speaker
Green (Power) LED
Reset Button
1.1 Sync Module
Main Button
Reset Button
White and Blue
Breathing LED
Speaker
*Note: Rechargeable batteries
not included.
AC/DC Power
Connectors
Security Screw Hole
Red (Charging) LED
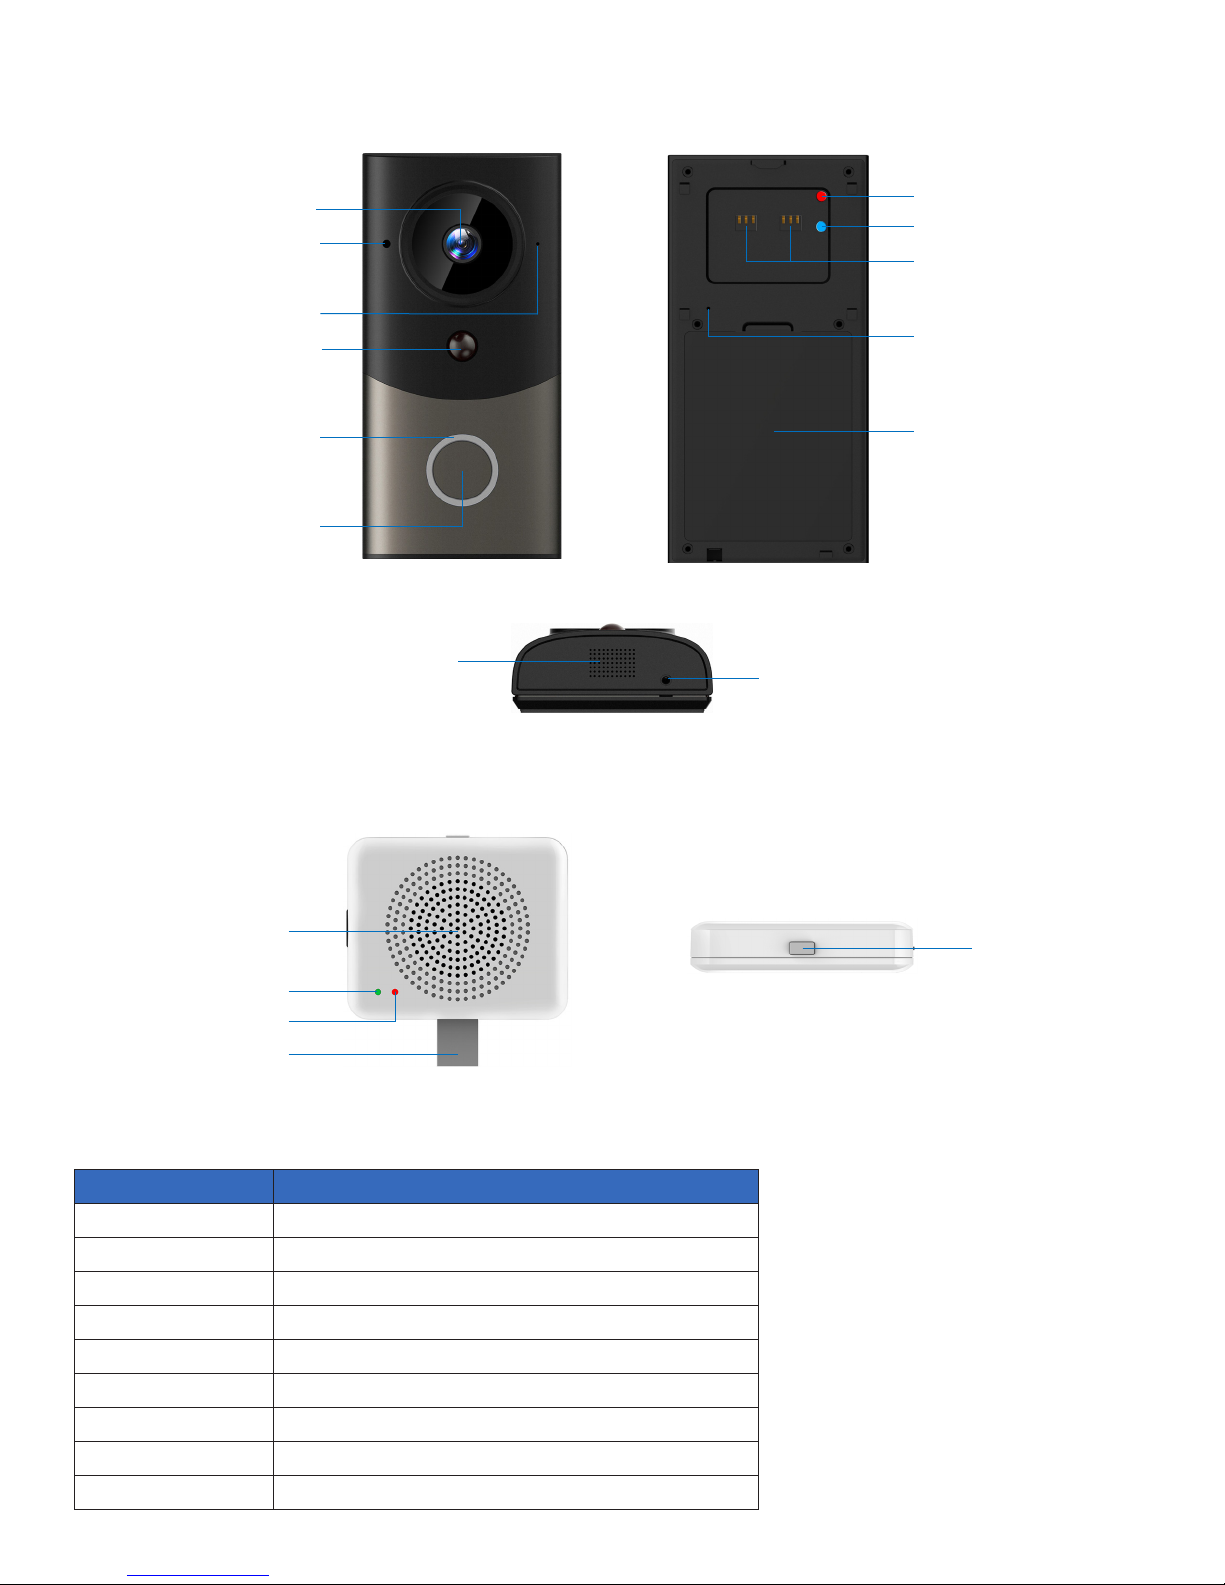
2. Getting Started with Your Smart Doorbell
2.1 Powering On, Off and Recharging
Turn On: Press the power button for 2 seconds until you hear “Power up”, then release, your
Smart Doorbell is on. You can also press the main button to turn it on. During the boot process,
the speaker of the doorbell will sound and the blue LED light will rotate clockwise.
*Note: The main button does not support shutdown.
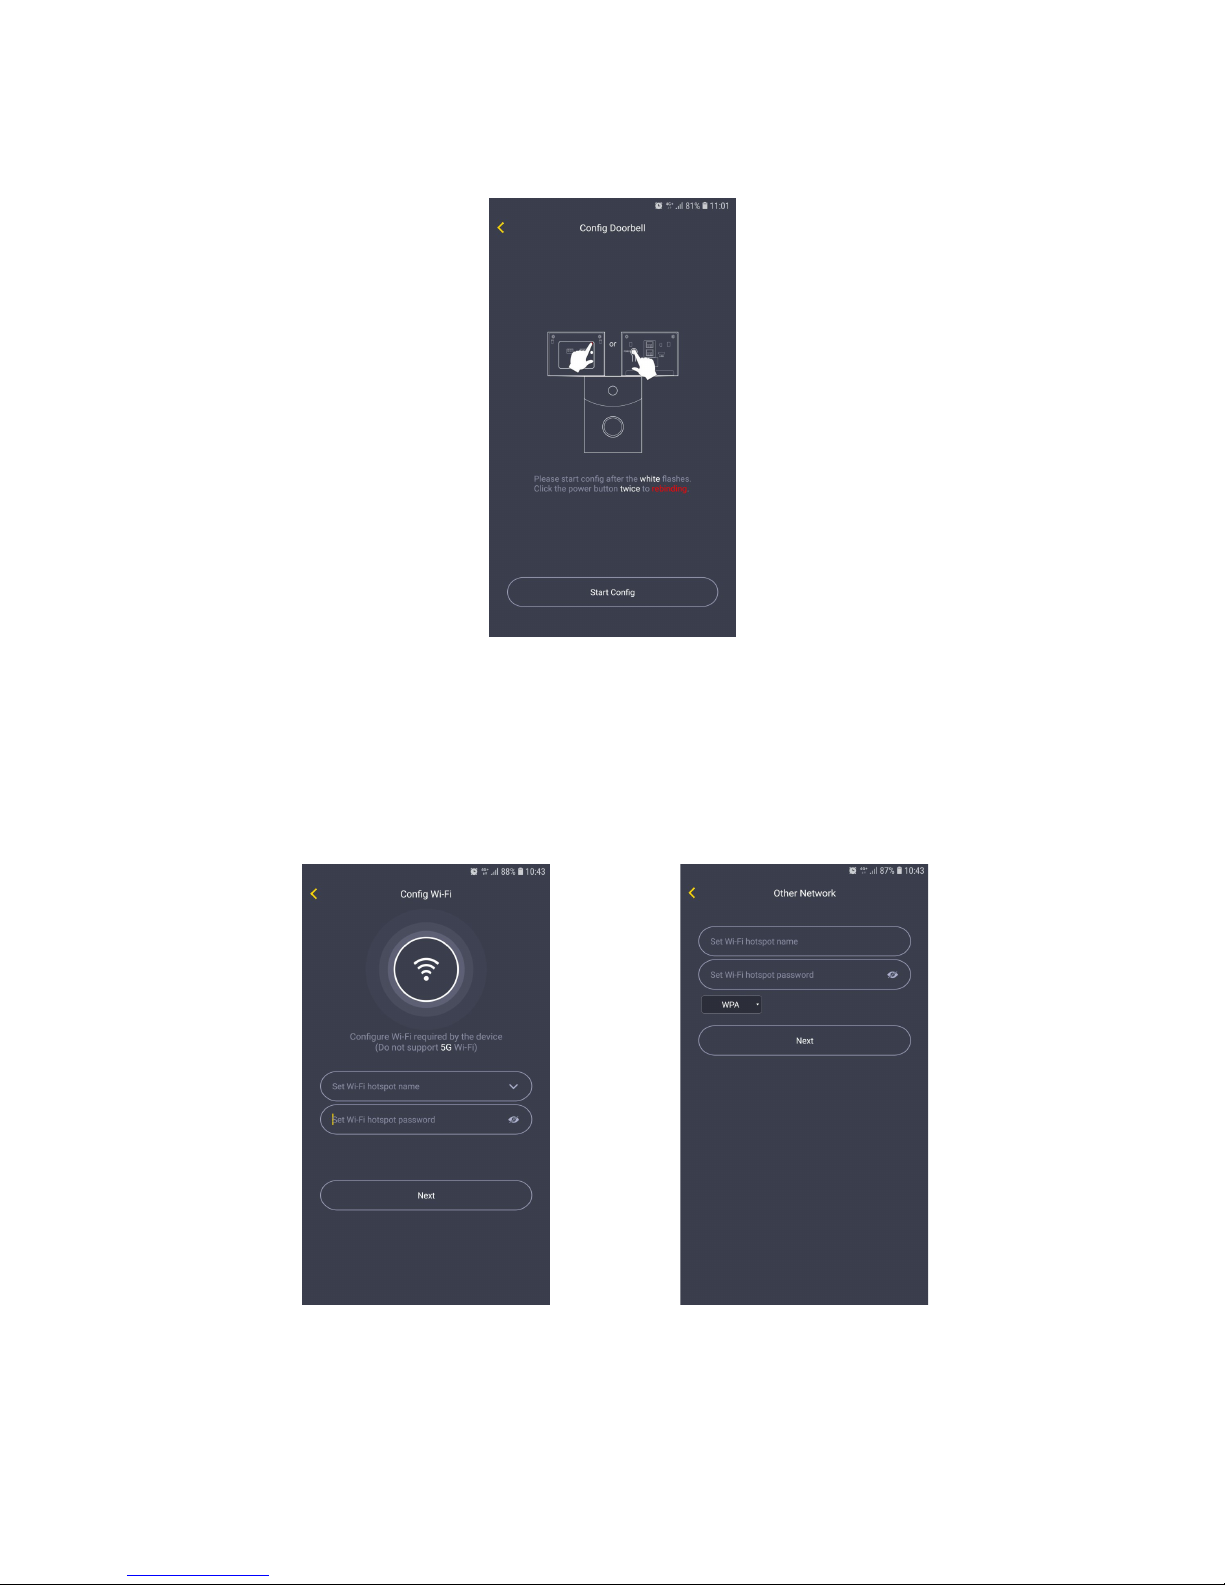
*Note: The rst time the Smart Doorbell is turned on, its camera will automatically scan for a
connection, indicated by a ashing white LED light and a sound will play “Scan QR code”.
Please use the VPai Home app to congure the Smart Doorbell network. For details, refer to
section 2.2 “Using Your Smart Doorbell with a Phone”.
Turn Off: Press and hold the power button for 2 seconds until hearing “Power down”, then release.
Charge the Battery: If the Smart Doorbell’s batteries are low on power, the battery icon on the
VPai Home app screen will ash. To charge the Smart Doorbell’s batteries, insert the provided
Micro USB to USB charging cable to a 5V/1.5A adapter and your Smart Doorbell, or use a
12~24V AC/DC power supply to charge the Smart Doorbell. When charging, the red LED light
will turn on. When it is fully charged, the red LED light will turn off.
*Note: When the batteries are too low, a sound will play “Low battery, system will shut down”
after about 15 seconds. If not charged, the doorbell will be shut down automatically.
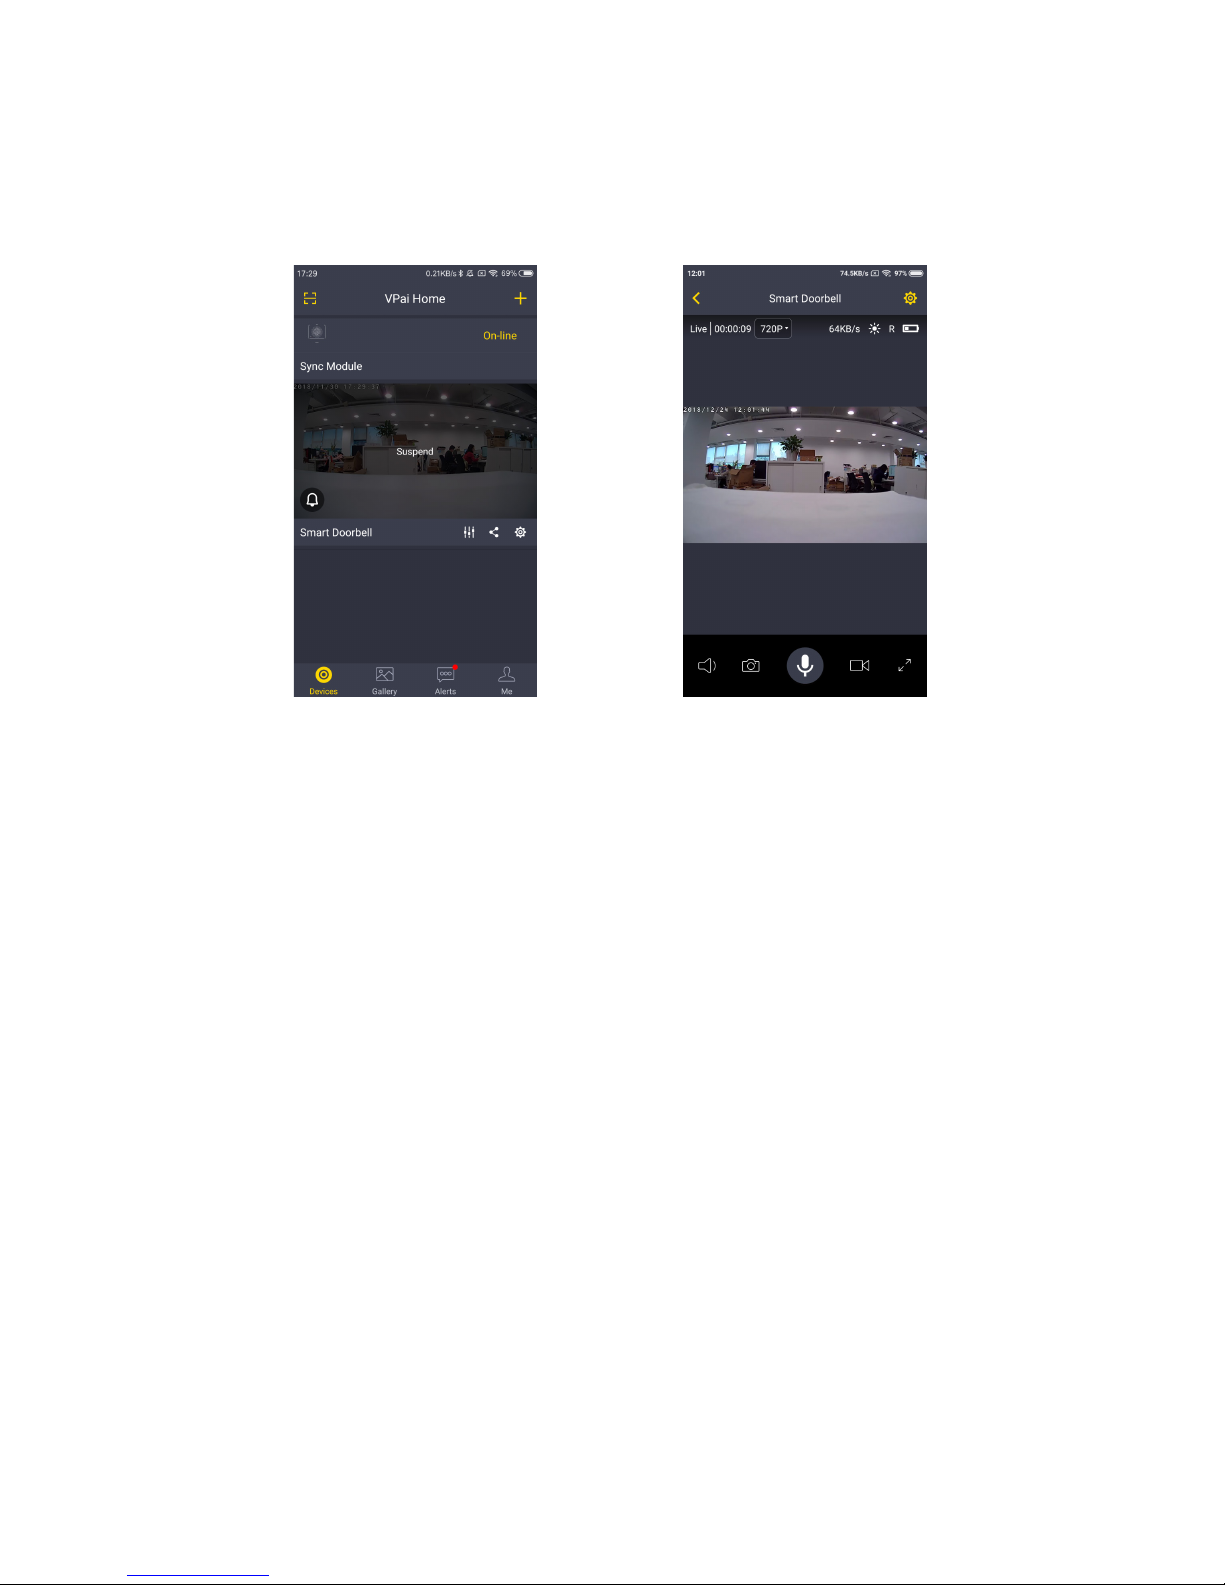
Smart Doorbell supports Android and iPhone. It can easily connects to a home Wi-Fi network
and enables quick and easy setup with its user-friendly mobile app.
2.2 Using Your Smart Doorbell with a Phone
The Smart Doorbell connects with Android phones and iPhones. In order to use your Smart
Doorbell, the ofcial VPai Home app must be installed. You can scan the QR code below
to download and install the VPai Home app. The Android app can also be found on the
VPai website ( www.vpai360.com/en/apps/ ), Google Play Store, Baidu App assistant, Tencent
mobile assistant, Peasecod platform and on other similar platforms.
*Note: Android 5.0 and iOS 9.0 above is required.
The Smart Doorbell must be connected to a Sync Module.
The Sync Module is the central hub of the Smart Doorbell with loud speaker. This connects to
your Wi-Fi network and to your Smart Doorbell.
Connect Sync Module to Wireless Router: Once the VPai Home app has been installed on your
phone, open the app and choose to log in with either your Email, WeChat, Facebook or LINE
account.
Tap the add device “+” button on the app and select “Sync Module” in “Choose Device”
interface. The screen prompts will show as follows:
*Note: It takes around 20 seconds before the sound will play “Pairing mode” and the red LED
light starts ashing.
Tap the “Go To Connect Sync Module Wi-Fi” button and select the Wi-Fi hotspot named
VPaiHome_xxxx. The password is: 12345678. After the connection is established, the “Cong
Current Sync Module” button becomes clickable when you return to “Cong Sync Module”
interface. The screen prompts will show as follows:
Connect the Sync Module to the power supply. Tap “Start Cong” button after hearing the
sound “Pairing mode” and when the red LED light on the sync module starts ashing.
Once connected to the Sync Module, tap “Cong Current Sync Module” button to access
the next page. You can change the Wi-Fi name and password by clicking “Change name
and password”. Tap “Congure the Wi-Fi connection to the Sync Module” to connect the
Sync Module to the Internet.
Tap “Change name and password” button, enter a name and password, and then tap “Next”
to complete the setup. After that, you need to reconnect to the Sync Module’s Wi-Fi you just
set up. Change the name and password settings as shown below:
In the “Cong Sync Module” interface, you can tap “Congure the Wi-Fi connection to the
Sync Module” to connect your Sync Module to the Internet. Tap the Wi-Fi name drop-down ar-
row (iPhones require manual input), select the Wi-Fi hotspot and enter the password. The Sync
Module will restart after you tap “Next”. When the Sync Module is connected to the Internet,
the red LED light will stop ashing.
*Note: 5G network is not supported.
*Note: To reset the Sync Module, press the reset button on the module for 8 seconds until the
red LED light ashes fast.
The Sync Module’s Wi-Fi can be used as a normal wireless network after the Internet
conguration of the Sync Module is complete. You can connect the Smart Doorbell to the
Internet through the Sync Module.
Connect Smart Doorbell to Sync Module’s Wi-Fi: Tap the add device “+” button on the app
screen to enter the “Choose Device” interface. The screen prompts will show as follows:
Select “Doorbell” to enter the “Cong Doorbell” interface, and then tap the “Start Cong”
button when the white LED ashes to enter the “Cong Wi-Fi” interface.
Tap the Wi-Fi name drop-down arrow and select the sync module’s Wi-Fi (iPhone require
manual input), and enter the Wi-Fi password. The Wi-Fi conguration will show as follows:
Tap “Next” and then use your Smart Doorbell’s camera to scan the QR code on the app. Aim the
camera to the QR code from a distance of about 15 to 25cm for a few seconds. Please follow the
on-screen instruction as shown below.
*Note: When rebinding to the device, you have to press the Power button twice to start
scanning the QR code.
*Note: After the QR code has been successfully scanned, you will hear “Scan nished” and the
Smart Doorbell will start to connect to the Sync Module. The white LED light below the main
button will ash until the Wi-Fi connection is established. You will hear “Wi-Fi connected” when
the connection is successful. The Wi-Fi connection information will be automatically saved. The
next time the Smart Doorbell is switched on, the Wi-Fi will connect automatically. If the Wi-Fi
disconnects, a white LED light below the main button will ash.
After the Smart Doorbell has been successfully added to the VPai Home app, you can modify
its name. Tap “OK” to return to the app home page. The modied name will be displayed on
the home page. Tap the Smart Doorbell’s camera preview to enter the camera operation
interface. You can view the camera’s real-time image, take photos, record videos, send voice
messages and etc. The Smart Doorbell operation interface will show as follows:
*Note: To wake up the device, tap on the camera preview screen.
For full app instructions please visit the ofcial website. Instructions for Android: www.vpai360.
com/en/apps/home/android/; Instructions for iOS: www.vpai360.com/en/apps/home/
apple/.
You can update the Smart Doorbell rmware by either manual update or auto update. For
manual update, you can check the latest rmware in the Device Settings page of VPai Home
app. For auto update, when you connect your Smart Doorbell to your phone through the VPai
Home app, it will automatically detect the latest rmware and prompt you when a new rm-
ware update is available. If you choose to accept the update, the white LED light will keep
turning and the device will simultaneously play “Upgrading”. When the rmware update is
complete, the white LED light will stop turning and the device will play “Upgrading nished”. The
device will restart after the update has nished.
*Note: Make sure that your Smart Doorbell is fully charged or connected to a power supply
before upgrading the rmware. Do not turn off the device during the update.
3. Smart Doorbell Firmware Update
•Check the user agreement before using the device.
•The camera supports a USB charging adapter with an output power of 5V/1.5A. It can also
be charged with an AC/DC power supply with an output voltage of 12~24V.
•Do not drop or beat your device, so as not to damage the device or scratch the camera
lenses.
•During operation the device will become a little hot, this is normal behavior.
4. Precautions and Warnings
用户使用说明
智能门铃
1. 智能门铃产品概况
1.2 产品规格
项目 规格
传感器类型 1/2.7" 1080P CMOS
镜头 138° 视角
图像尺寸 最大 1920x1080
视频码率 自适应
无线标准 IEEE 802.11b/g/n 2.4GHz
电池 2 x 18650 锂离子充电电池
电源供应 5V (Micro USB) 或12~24V (AC/DC)
尺寸 74mm x 30.5mm x 151mm
重量 188g
包装清单:
• 智能门铃(含安装支架)
• 接收盒
• 螺丝包
• 用户使用说明
• 保修卡
镜头
环境光传感器
麦克风
远红外传感器
Micro USB 接口和电
池盖(可拆卸)
电源键
LED红灯
USB接口
扬声器
LED绿灯
复位按钮
1.1 接收盒
主按钮
复位键
白色&蓝色 LED灯
扬声器
*注意:包装清单中不包含电
池,需另行购买。
AC/DC 供电连接器
防拆螺丝孔
红色LED灯
2. 开始使用
2.1 开关机与电池充电
开机:长按电源键2s,听到“开机”后松开,门铃启动完成。您也可以短按主按钮开机,按下时,门
铃响起,蓝色LED点亮并顺时针转动。
*注意:主按钮不支持关机 。
*注意:门铃初次开机会自动进入扫码连接状态,LED白灯会持续闪烁,同时播放“扫描二维码”。请
使用VPai Home App配置门铃网络,详见章节2.2“手机与门铃连接使用”。
关机:长按电源键2s,听到“关机”松开电源键,门铃关机完成。
电池充电:如果已经安装电池,当电池电量低时,VPai Home App的直播界面上的门铃电池图标会闪
烁,请打开电池盖,使用5V/1.5A的电源适配器通过Micro USB线或12~24V 的AC/DC电源给门铃充电
充电时,红色LED灯长亮,充满电后,红色LED指示灯将熄灭。
*注意:电池电量过低时,将播放“电量低,即将关机”,15秒左右后,如果不接入充电器,门铃将自
动关机。
智能门铃支持Android手机和iPhone连接。通过VPai Home App快速简单的设置,可以轻松的将智能
门铃连接到家庭Wi-Fi网络。
2.2 手机与门铃连接使用
智能门铃支持与安卓和iPhone连接使用。初次使用前,请用手机扫描以下二维码并根据提示下载及
安装VPai Home App。安卓端的App也可通过访问VPai官网(www.vpai360.com/cn/apps-cn/)
、Google Play Store、百度App助手、腾讯手机助手、豌豆荚等平台下载。
手机系统要求:Android 5.0或者iOS 9.0及以上系统。
智能门铃必须要连接接收盒网络。
接收盒是您的摄像系统的中心枢纽,它可以与您的智能门铃和无线网络连接。
连接接收盒到无线路由器:在你的手机安裝了VPai Home App后,打开App,选择以邮箱,微信,
Facebook或者LINE账号登录App。
点击添加设备“+”按钮,进入“选择设备”界面后,选择“接收盒”,如下图:
*注意:红色LED灯开始闪烁并播放 “配对模式”之前大约需要等待20秒。
点击“前往连接接收盒Wi-Fi”按钮,选择名称为VPaiHome_xxxx的Wi-Fi热点,默认密码为:
12345678。连接成功后返回配置接收盒界面,“配置当前接收盒”按钮变为可点击状态。如下图:
将接收盒连接到电源。当红色LED灯开始闪烁,并听到“配对模式”后,点击“开始配置”按钮。
连接接收盒网络成功后,点击“配置当前接收盒”,进入下一页,再点击“修改接收盒名称密码”可以
配置接收盒的Wi-Fi名称以及连接密码;或者点击“配置接收盒连接的Wi-Fi”可以设置接收盒的外网。
点击“修改接收盒名称密码”,修改接收盒的Wi-Fi名称和连接密码。输入完成后,点击“下一步”完
成设置。之后需要您重新连接到刚才设置的接收盒Wi-Fi。修改名称和密码设置如下图:
在配置接收盒界面中,点击“配置接收盒连接的Wi-Fi”可以将接收盒连接到外网。点击Wi-Fi名称输入
框的下拉箭头(iPhone手机需要手动输入),选择可以连接外网Wi-Fi并输入对应的密码后。点击“下一
步”后,接收盒会重启。接收盒连接外网成功后,接收盒红色LED灯常亮。
*注意:不支持5GHz网络。
*注意:长按接收盒复位按钮8秒,直到红色LED快速闪烁可以恢复出厂设置。
接收盒的外网配置完成后,接收盒的Wi-Fi可以作为一个普通的无线网络使用。可以通过接收盒将门铃
接入网络。
智能门铃与接收盒的连接:点击App上的添加设备“+”按钮,进入“选择设备”界面。如下图:
选择“智能门铃”进入“配置智能门铃”界面。当设备的白色LED闪烁时,点击“开始配置”按钮,进
入“配置Wi-Fi”界面。
点击Wi-Fi名称输入框的下拉箭头选择已配置好的接收盒网络(iPhone手机需要手动输入),并输入Wi-Fi
密码。配置Wi-Fi如下图:
点击下一步,用门铃扫描App上的二维码。将二维码对准门铃的镜头,距离15至25cm左右,等待几秒
钟。请参考下图。
*注意:重新绑定设备,请双击设备电源按钮启动扫码功能。
*注意:扫码成功后门铃将会语音提示“扫描完成”,门铃开始连接接收盒网络。连接过程中主按钮
下方的白色LED灯闪烁,连接成功后,白色LED灯熄灭并提示“无线连接成功”。Wi-Fi连接信息会自
动保存,下次开机时会自动连接。使用过程中若门铃的Wi-Fi断开连接,主按钮下方的白色LED灯将
会闪烁。

Popular Accessories manuals by other brands

Digistar EZ3600 Getting started

Digistar

Digistar EZ3600 Getting started

sun garden Easy Sun Operation manual

sun garden

sun garden Easy Sun Operation manual

Multitech Reveal RBS301-TILT-US user guide

Multitech

Multitech Reveal RBS301-TILT-US user guide

Green Brook PowerBreaker K21S-WP Installation & operating instructions

Green Brook

Green Brook PowerBreaker K21S-WP Installation & operating instructions

ThinkGizmos XN012 AERO ADVANTAGE user manual

ThinkGizmos

ThinkGizmos XN012 AERO ADVANTAGE user manual

Bluesky Eliptig-S A00-1515 1 A user manual

Bluesky

Bluesky Eliptig-S A00-1515 1 A user manual

M-Elec Blind Snake installation guide

M-Elec

M-Elec Blind Snake installation guide

V-tech VC7151-302A user manual

V-tech

V-tech VC7151-302A user manual

Thermo Forma 370 Series Operating and maintenance manual

Thermo Forma

Thermo Forma 370 Series Operating and maintenance manual

GOAL ZERO Sherpa 100AC user guide

GOAL ZERO

GOAL ZERO Sherpa 100AC user guide

TriStar BW-4770 user guide

TriStar

TriStar BW-4770 user guide

wattstopper PW-100 installation instructions

wattstopper

wattstopper PW-100 installation instructions

wattstopper DT-200 installation instructions

wattstopper

wattstopper DT-200 installation instructions

iDeaPLAY BP300 user guide

iDeaPLAY

iDeaPLAY BP300 user guide

Silvercrest SAD 12 C2 operating instructions

Silvercrest

Silvercrest SAD 12 C2 operating instructions

Rcom MINI user guide

Rcom

Rcom MINI user guide

Aqua One AquaStyle 850 instruction manual

Aqua One

Aqua One AquaStyle 850 instruction manual

Chef's Choice Diamond Hone 2000 instruction manual

Chef's Choice

Chef's Choice Diamond Hone 2000 instruction manual

manuals.online logo
manuals.online logoBrands
  • About & Mission
  • Contact us
  • Privacy Policy
  • Terms and Conditions

Copyright 2025 Manuals.Online. All Rights Reserved.