WELDER INSTALLATION
Electrical Connection
The BW-TIG200ACDC is designed to run on a standard 15A 230V AC power
supply. If an extension cord must be used, it should be no longer than 10m and
be a heavy duty industrial 15A version with a minimum cable core of 2.5mm2.
Operating Environment
Adequate ventilation is required to provide a proper cooling for the BW-
TIG200ACDC. Ensure that the machine is placed on a stable level surface
where clean cool air can easily flow across the unit. The BW-TIG200ACDC has
electrical components and control circuit boards which will be damaged by
excessive dust and dirt, a clean operating environment is essential.
MMA WELDING OPERATION
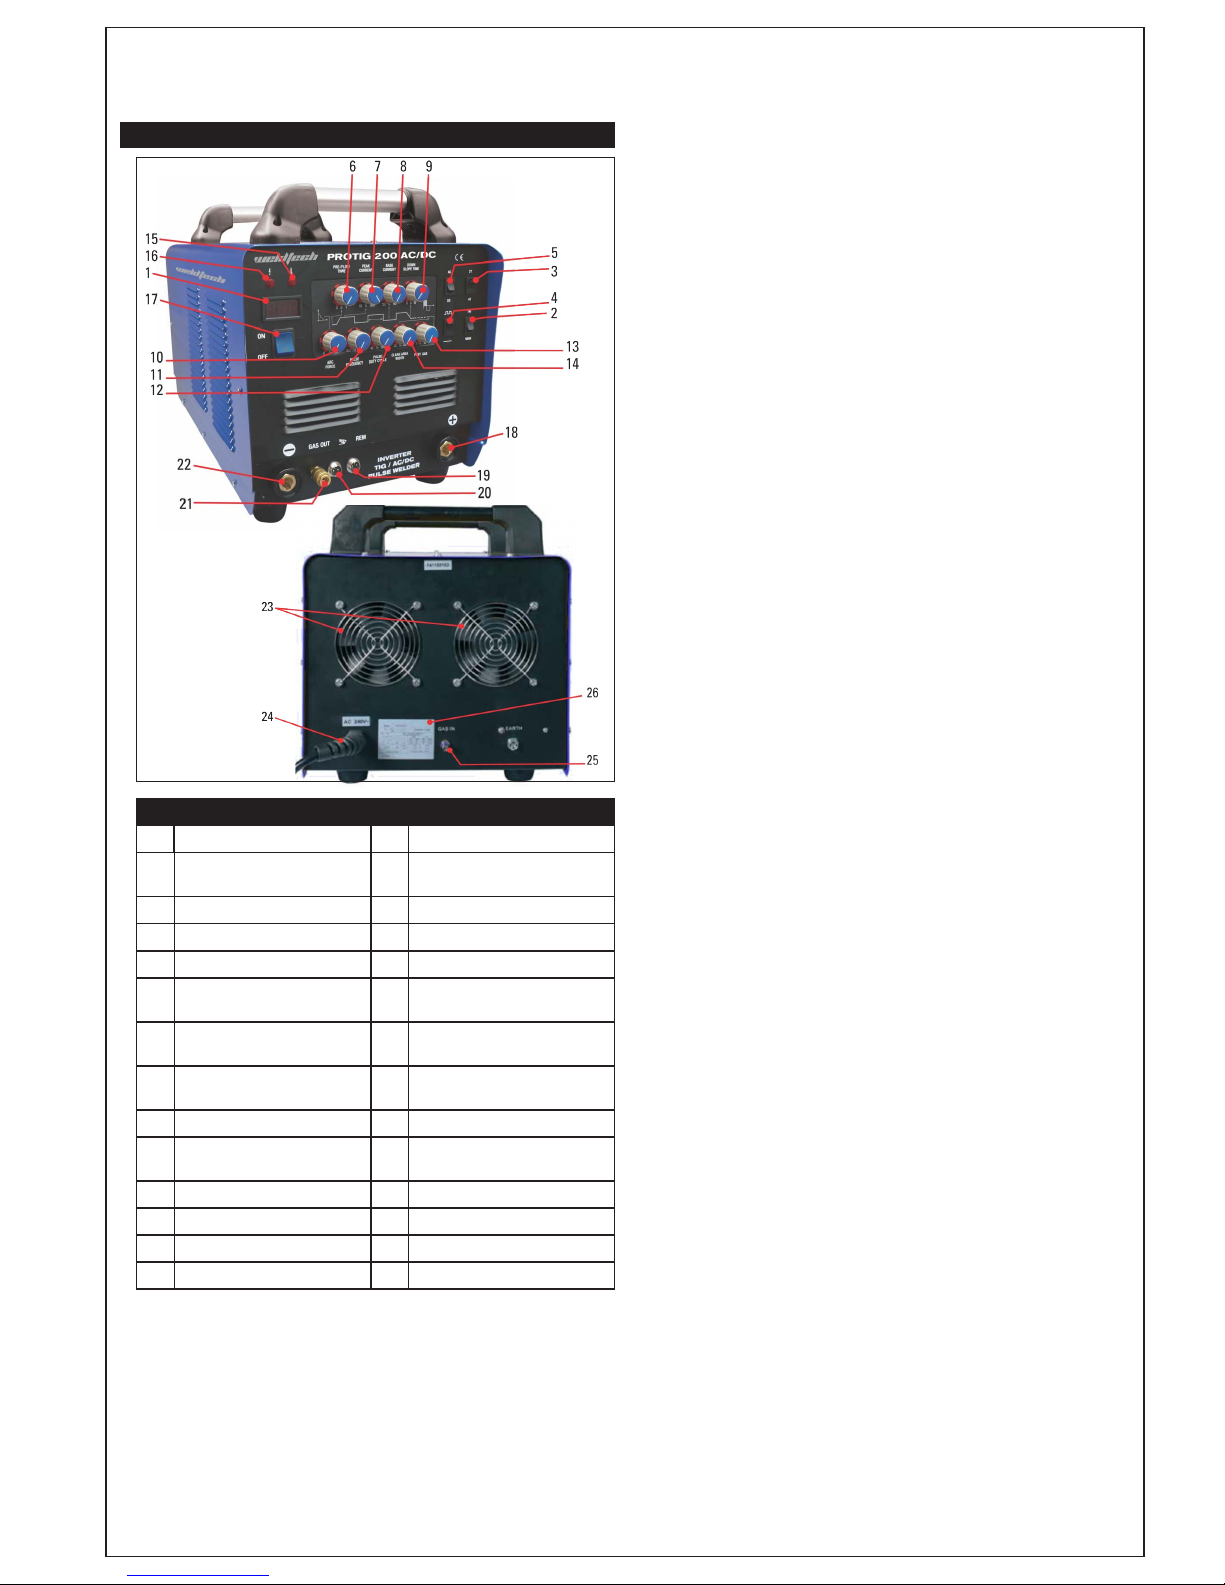
Connect the machine to suitable mains power using the Mains Input Power
Lead (24). Switch the Mains Power Switch (17) to ON to power up the machine.
Connect the Working Lead/Clamp Quick Connector to the Negative Welding
Power Output Socket (22.) Connect the Clamp to the work piece. Contact with
the work piece must be firm and contact clean, bare metal, with no corrosion,
paint or scale.
Insert an electrode into the Electrode holder and connect the Electrode Holder
and Work Lead to the Positive Welding Power Output Socket (18).
NOTE: This polarity connection configuration is valid for most GP (General
Purpose) MMA electrodes. There are variances to this. If in doubt, check the
electrode specifications or consult the electrode manufacturer.
Set the Welding Mode Switch (2) to MMA position, set the AC/DC Mode
Switch (5) to ‘DC’ position, set the Pulse Switch (4) to straight.
NOTE: some MMA electrodes are suitable for AC welding output, check the
electrode specifications or consult the electrode manufacturer.
Set the Peak Current Adjustment Knob (7) and Arc Force Adjustment Knob (10)
to the desired position.
You are now ready to weld!
DC TIG WELDING OPERATION
Connect the machine to suitable mains power using the Mains Input Power
Lead (24). Switch the Mains Power Switch (17) to ON to power up the machine.
Connect the Working Lead/Clamp Quick Connector to the Positive Welding
Power Output Socket (18) Connect the Clamp to the work piece. Contact with
the work piece must be firm and contact clean, bare metal, with no corrosion,
paint or scale.
Connect the TIG Torch Power Lead Quick Connector to the Negative Welding
Power Output Socket (22). Connect the Torch Gas Line to the Gas Outlet
Connector (21). Where applicable connect the Torch Remote Switch Plug to
the Switching Connection Socket (20).
Set the Welding Mode Switch (2) to TIG position, set the AC/DC Mode Switch
(5) to ‘DC’ position, set the Pulse Mode Switch (4) to straight/ non pulse, set the
Trigger Mode Switch (3) to 2T or 4T as desired.
Connect the gas regulator to an argon gas cylinder (not included with
machine) and connect the gas hose from the regulator to the gas inlet on
the rear of the machine (25). Ensure all hose connections are tight. Open gas
cylinder valve and adjust regulator, flow should be set between 5-15l/min for
most TIG welding applications. Re-check regulator flow pressure with torch
triggered as static gas flow setting may drop once gas is flowing.
Set the Peak Current Adjustment Knob (7), Gas Pre-flow Time Adjustment Knob
(6), Down Slope Adjustment Knob (9) and Gas After-flow Adjustment Knob (13)
to the desired position.
You are ready to weld!
DC PULSE TIG WELDING OPERATION
Connect the machine to suitable mains power using the Mains Input Power
Lead (24). Switch the Mains Power Switch (17) to ON to power up the machine.
Connect the Working Lead/Clamp Quick Connector to the Positive Welding
Power Output Socket (18) Connect the Clamp to the work piece. Contact with
the work piece must be firm and contact clean, bare metal, with no corrosion,
paint or scale.
Connect the TIG Torch Power Lead Quick Connector to the Negative Welding
Power Output Socket (22). Connect the Torch Gas Line to the Gas Outlet
Connector (21). Connect the Torch Remote Switch Plug to the Switching
Connection Socket (20).
Set the Welding Mode Switch (2) to TIG position, set the AC/DC Mode Switch
(5) to ‘DC’ position, set the Pulse Mode Switch (4) to pulse, set the Trigger
Mode Switch (3) to 2T or 4T as desired.
Connect the gas regulator to an argon gas cylinder (not included with
machine) and connect the gas hose from the regulator to the gas inlet on
the rear of the machine (25). Ensure all hose connections are tight. Open gas
cylinder valve and adjust regulator, flow should be set between 5-15l/min for
most TIG welding applications. Re-check regulator flow pressure with torch
triggered as static gas flow setting may drop once gas is flowing.
Adjust the Base Current (8), Pulse Frequency (11) and Pulse Duty (12) pulse
settings as desired.
Set the Peak Current Adjustment Knob (7), Gas Pre-flow Time Adjustment Knob
(6), Down Slope Adjustment Knob (9) and Gas After-flow Adjustment Knob (13)
to the desired position.
You are ready to weld!
AC TIG WELDING OPERATION
Connect the machine to suitable mains power using the Mains Input Power
Lead (24). Switch the Mains Power Switch (17) to ON to power up the machine.
Connect the Working Lead/Clamp Quick Connector to the Positive Welding
Power Output Socket (18) Connect the Clamp to the work piece. Contact with
the work piece must be firm and contact clean, bare metal, with no corrosion,
paint or scale.
Connect the TIG Torch Power Lead Quick Connector to the Negative Welding
Power Output Socket (22). Connect the Torch Gas Line to the Gas Outlet
Connector (21). Connect the Torch Remote Switch Plug to the Switching
Connection Socket (20).
Set the Welding Mode Switch (2) to TIG position, set the AC/DC Mode Switch
(5) to ‘AC’ position, set the Pulse Mode Switch (4) to straight/ non pulse, set the
Trigger Mode Switch (3) to 2T or 4T as desired.
Connect the gas regulator to an argon gas cylinder (not included with
machine) and connect the gas hose from the regulator to the gas inlet on
the rear of the machine (25). Ensure all hose connections are tight. Open gas
cylinder valve and adjust regulator, flow should be set between 5-15l/min for
most TIG welding applications. Re-check regulator flow pressure with torch
triggered as static gas flow setting may drop once gas is flowing.
Set the Peak Current Adjustment Knob (7), Clean Area Width/AC Balance
Adjustment (14), Gas Pre-flow Time Adjustment Knob (6), Down Slope
Adjustment Knob (9) and Gas After-flow Adjustment Knob (13) to the desired
position.
You are ready to weld!
AC PULSE TIG WELDING OPERATION
Connect the machine to suitable mains power using the Mains Input Power
Lead (24). Switch the Mains Power Switch (17) to ON to power up the machine.
Connect the Working Lead/Clamp Quick Connector to the Positive Welding
Power Output Socket (18) Connect the Clamp to the work piece. Contact with
the work piece must be firm and contact clean, bare metal, with no corrosion,
paint or scale.
Connect the TIG Torch Power Lead Quick Connector to the Negative Welding
Power Output Socket (22). Connect the Torch Gas Line to the Gas Outlet
Connector (21). Connect the Torch Remote Switch Plug to the Switching
Connection Socket (20).
Set the Welding Mode Switch (2) to TIG position, set the AC/DC Mode Switch
(5) to ‘AC’ position, set the Pulse Mode Switch (4) to pulse, set the Trigger
Mode Switch (3) to 2T or 4T as desired.
Connect the gas regulator to an argon gas cylinder (not included with
machine) and connect the gas hose from the regulator to the gas inlet on
the rear of the machine (25). Ensure all hose connections are tight. Open gas
cylinder valve and adjust regulator, flow should be set between 5-15l/min for
most TIG welding applications. Re-check regulator flow pressure with torch
triggered as static gas flow setting may drop once gas is flowing.
Adjust the Base Current (8), Pulse Frequency (11) and Pulse Duty (12) pulse
settings as desired.
Set the Peak Current Adjustment Knob (7), Clean Area Width/AC Balance
Adjustment (14), Gas Pre-flow Time Adjustment Knob (6), Down Slope
Adjustment Knob (9) and Gas After-flow Adjustment Knob (13) to the
desired position.
You are ready to weld!