Wellav OMP150 User manual

OMP150-IPTV System
User Manual

CMP100 User Guide
i
Revision History
Date
Version
Description
Author
05/10/20
1
Initial Release
ERH
05/28/2021
Update
ACP
12/7/2021
Added Cluster Feature
ACP

CMP100 User Guide
ii
This guide contains some symbols to call your attention.
DANGER
The DANGER symbol calls your attention to a situation that, if ignored, may
cause physical harm to the user.
CAUTION
The CAUTION symbol calls your attention to a situation that, if ignored,
may cause damage to Our product.
NOTE
The NOTE symbol calls your attention to important information.
TIP
The TIP symbol calls your attention to additional information that, if
followed, can make procedures more efficient.
Red
Arrow
The Red Arrow symbols point to import details mention the context above
or below an image.
Blue
Arrow
The Blue Arrow symbol indicates the motion path of an item in an operation
step.
Thick
Arrow
The thick Arrow symbol calls your attention to a serial of operation steps
mentioned in the context.
This guide also contains the following text conventions.
Bold Italic
The bold Italic text indicates a button to click, an item in the drop-down
menu to select, or a certain item in the UI.

CMP100 User Guide
iii
Safety Instructions
•Read these instructions
•Keep these instructions
•Follow all instructions
•Heed all warnings
•Do not use this unit near water.
•Only use a damp cloth to clean chassis
•Do not install near any heat sources such as radiators, heat registers, stoves, or other
apparatus (including amplifiers) that produce heat
•Do not block any ventilation openings. Install in accordance with the manufacturer’s
instructions
•This unit is grounded through the power cord grounding conductor. To avoid electrocution,
do not remove the power cord before the outlet is switched off or unplugged. If the plug does
not fit into your outlet, consult an electrician for replacement of the outlet.
•Route power cords and other cables so that they are not likely to be damaged.
•Only use attachments/accessories specified by the manufacturer.
•Do not wear hand jewelry or watch when troubleshooting high current circuits.
•Do not work on the system during periods of lightning.
•Refer all servicing to qualified service personnel. Servicing is required when this unit has
been damaged in any way.
•Damage Requiring Service: Unplug this product from the wall outlet and refer servicing to
qualified service personnel under the following conditions:
•When the power-supply cord or plug is damaged.
•If liquid has been spilled, or objects have fallen into the product.
•If the product has been exposed to rain or water.
•If the product does not operate normally by following the operating instructions. Adjust
only those controls that are covered by the operating instructions as an improper
adjustment of the controls may result in damage and will often require extensive work by
a qualified technician to restore the product to its normal operation.
•If the product has been damaged in any way.
•Replacement parts: When replacement CHAPTERs are required, be sure the service
technician uses replacement CHAPTERs specified bythe manufacturer. Unauthorized part
substitutions made may result in fire, electric shock or other hazards.

CMP100 User Guide
iv
SAFETY PRECAUTIONS
There is always a danger present when using electronic equipment.
Unexpected high voltages can be present at unusual locations in defective
equipment and signal distribution systems. Become familiar with the equipment that
you are working with and observe the following safety precautions.
•Every precaution has been taken in the design of the products to ensure that it is as safe as
possible. However, safe operation depends on you the operator.
•Always be sure your equipment is in good working order. Ensure that all points of connection
are secure to the chassis and that protective covers are in place and secured.
•Never work alone when working in hazardous conditions. Always have another person close
by in case of an accident.
•Always refer to the manual for safe operation. If you have a question about the application or
operation contact the manufacturer for assistance.
Electrostatic Discharge (ESD) Caution:
•Always wear an ESD-preventive wrist or ankle strap when handling electronic components.
•Handle cards by the faceplates and edges only. Avoid touching the printed circuit board and
connector pins.
•Avoid touching any electronic components while holding any module in hands.
Danger of explosion if battery is incorrectly replaced

CMP100 User Guide
5
Table of Contents
REVISION HISTORY .................................................................................................................................I
TABLE OF CONTENTS .............................................................................................................................5
SECTION 1 OVERVIEW ...........................................................................................................................8
1.1 PRODUCT OVERVIEW ..................................................................................................................................8
1.2 FRONT PANEL OVERVIEW.............................................................................................................................8
1.3 REAR PANEL OVERVIEW...............................................................................................................................9
SECTION 2 INSTALLATION......................................................................................................................9
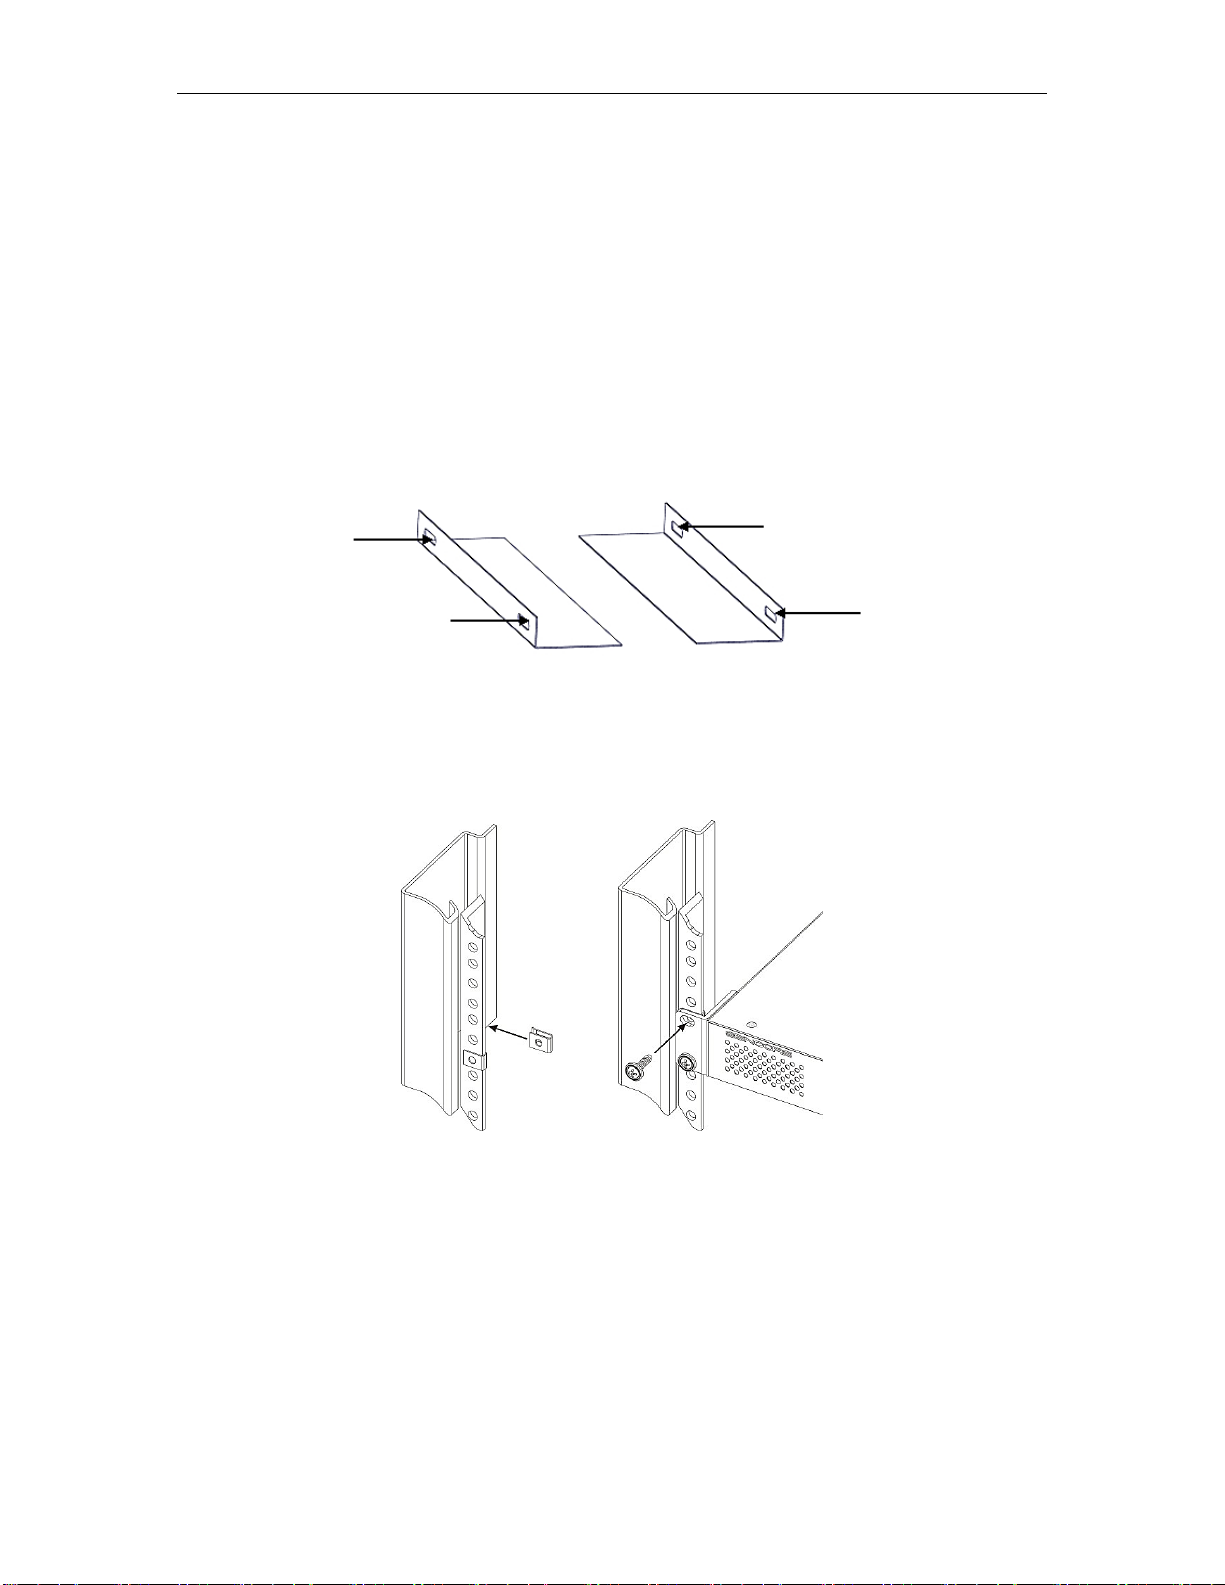
2.1 RACK INSTALLATION ............................................................................................................................9
2.2 AC POWER CONNECTION.............................................................................................................................9
SECTION 3 WEB INTERFACE OPERATION ..............................................................................................11
3.1 OMP150 WEB INTERFACE OVERVIEW .................................................................................................11
3.1.1 Connecting to the Management Port ..........................................................................................11
3.1.2
Login to the OMP150 Web Interface ..........................................................................................11
3.2 DEVICE STATUS OVERVIEW .................................................................................................................12
3.3 QUICK START ...................................................................................................................................13
3.4 CHANNELS .......................................................................................................................................16
3.4.1 Channel List..................................................................................................................................16
3.4.2 Channel Grouping ........................................................................................................................19
3.4.3 Local Channels .............................................................................................................................20
3.4.4 EPG...............................................................................................................................................21
3.5 VOD..............................................................................................................................................24
3.5.1 Local VOD.....................................................................................................................................24
3.5.2 VOD Home Page...........................................................................................................................27
3.5.3 VOD Grouping ..............................................................................................................................29
3.5.4 3rd party APPs...............................................................................................................................29
3.6 OVERLAYS........................................................................................................................................31
3.6.1 Video Takeover ............................................................................................................................31
3.6.2 Text Overlay .................................................................................................................................32
3.6.3 Picture Overlay.............................................................................................................................34
3.7 APK SETTINGS .................................................................................................................................35
3.7.1 APK Layout...................................................................................................................................35
3.7.2 APK Background...........................................................................................................................36
3.7.3 APK Management ........................................................................................................................37
3.7.4 WGT Management ......................................................................................................................38
3.7.5 APK Layout Theme .......................................................................................................................39
3.8 OPERATION......................................................................................................................................39
3.8.1 User..............................................................................................................................................40
3.8.2 Authorization ...............................................................................................................................42
3.8.3 Packages ......................................................................................................................................45
3.8.4 Region ..........................................................................................................................................47
3.8.5 Discount .......................................................................................................................................49
3.8.6 Statistics.......................................................................................................................................50
3.8.7 Access Control..............................................................................................................................50
3.8.8 Advanced Setting .........................................................................................................................52

CMP100 User Guide
6
................................................................................................................................
错误
!
未定义书签。
3.9 CLUSTER..........................................................................................................................................52
3.9.1 Cluster Status ...............................................................................................................................53
3.9.1 Cluster Topology ..........................................................................................................................53
3.9.1 Node Settings...............................................................................................................................58
3.9.1 Run Log ........................................................................................................................................59
3.10 SYSTEM SETTING...............................................................................................................................59
3.10.1 Network .....................................................................................................................................60
3.10.2 System........................................................................................................................................61
3.10.3 DHCP ..........................................................................................................................................62
3.10.4 Time ...........................................................................................................................................63
3.10.5 License........................................................................................................................................63
3.11 TOOLS ............................................................................................................................................64
SECTION 4 APPENDICES .......................................................................................................................66
APPENDIX A-FREQUENTLY ASK QUESTION ......................................................................................................66
APPENDIX B-APK MANAGEMENT.................................................................................................................67
APPENDIX C-WARRANTY.............................................................................................................................68
APPENDIX D-SUPPORT AND CONTACT INFORMATION........................................................................................68
1Returning for Service or Calibration .............................................................................................68
2RMA Number................................................................................................................................68
3Shipping the Product ....................................................................................................................68

CMP100 User Guide
7
Section 1 Overview
1.1 Product Overview
OMP150 IPTV system is a compact, highly-integrated and flexible solution
that can provide high-quality live video and VOD content for end users via IP
network. With embedded Android-based APK, it supports up to 50 live SD/HD
programs, third-party VOD systems and 500 terminals. Equipped with ample
function modules, OMP150 can also provide a customized welcome page, OSD
message, organization introduction, advertisements and other value-added
services. With the popularity of IP network, OMP150 now is widely used in hotels,
hospitals, schools, communities, yachts and other areas where the streaming of
live or VOD content is required via IP network.
1.2 Front Panel Overview
OMP150 is a 1RU Server with 2 hardware models namely OMP150100 and
OMP150200. See pictures below for the differences of the two hardware.
OMP150100
1. Console: Server NIC, used to remotely connect to the Server BIOS system
(for technicians)
2. USB interface*2
3. Ethernet port (ETH0 to ETH5): used for management or data traffic,
depending on the settings
OMP150200
1
2
3
1
3
2

CMP100 User Guide
8
1. USB interface*2
2. Reset to Factory Default button
3. Power switch button
1.3 Rear Panel Overview
OMP150100
1. VGA interface
2. Fan for ventilation
3. Power switch button
4. Power input interface: AC100~240V, 50/60Hz
OMP150200
1. Power input interface: AC100~240V, 50/60Hz
2. Fan for ventilation
3. VGA interface for monitor display
4. PMIT remotely connect to the server BIOS system
5. USB interface
6. VGA interface for monitor display
7. Ethernet port for management and data traffic
1
2
3
4
1
2
3
4
5
6
7
8
7

CMP100 User Guide
9
Section 2 Installation
2.1 Rack Installation
The OMP150 is designed to be mounted in a standard 19” rack. It takes 1RU of rack
space. To install it into a rack, please use the following steps:
•Determine the desired position in the rack for the OMP150. Make sure that the air
intake on the front of the unit and the exhausts on the back of the unit will not be
blocked.
•Install the brackets at desired position if there is no supporting plate in the rack.
•Insert the rack mount clips into place over the mounting holes in the rack.
•Slide the OMP150 into the position in the rack.
•Secure the chassis to the rack by installing the four supplied screws through the
front mounting holes and tightening.
2.2 AC Power Connection
The OMP150 is to be powered by supplies with operating 120V or 240V systems. The
power supply will automatically detect the system it is connected to. To hook up the
power, use the following steps:
•Locate the power cords that are contained in the box. Please only use the
supplied 3-prong power connector or one with equal specifications. NEVER

CMP100 User Guide
10
tamper with or remove the grounding pin. This could cause damage to OMP150,
personnel, or property.
•Plug the female end of the power cords into the front of the unit.
•Locate a protected outlet to plug into the male ends of the power cables.
When you take the equipment from a cold condition into a much warmer and
humid condition, the equipment should be acclimated to the warm and humidity
condition for at least 30 minutes. Powering up a non-acclimated unit may lead to
shortcut or other damage to electronic components.
A professional UPS system is recommended for better performance of your
content distribution system.

CMP100 User Guide
11
Section 3 Web Interface Operation
3.1 OMP150 Web Interface Overview
3.1.1 Connecting to the Management Port
OMP150 has multiple Ethernet ports, with which you can access the management
interface of the device. There are six (6) ports tagged with ETH0, ETH1, ETH2, ETH3,
ETH4 and ETH5. You can see the labels on the front panel of OMP150100. For
OMP150200, the six ports (ETH0 to ETH5) are placed at the back on the unit from left to
right.
3.1.2 Login to the OMP150 Web Interface
To enter the OMP150 web interface, use one of the following supported browsers and
navigate to the unit’s IP address:
•Firefox
•Google Chrome
OMP150 has six (6) Ethernet ports where you can log in and access the management
interface. Factory network settings of management port are:
•IP address: 192.168.1.201 Gateway:192.168.1.254 for ETH0
•IP address: 192.168.2.201 Gateway:192.168.2.254 for ETH1
•IP address: 192.168.3.201 Gateway:192.168.3.254 for ETH2
•IP address: 192.168.4.201 Gateway:192.168.4.254 for ETH3
•IP address: 192.168.5.201 Gateway:192.168.5.254 for ETH4
•IP address: 192.168.6.201 Gateway:192.168.6.254for ETH5
•Subnet Mask: 255.255.255.0
You can connect to any port and type the corresponding IP address to log in to the web
interface. The default username/password are admin/admin. Click the login button to
access the web interface.

CMP100 User Guide
12
3.2 Device Status Overview
After a successful login, the Status will be displayed. It will show you the following:
•System status
•Terminal status
•Network status
•Channels status
System status will display the real-time status of CPU, Memory and Hard Disk usage of
the device, aiming to avoid system crash caused by excessive resource usage.
Terminal status will display the number of terminals connected. You can click to
see details about the terminal like Room Number, MAC Address, IP Address, Login Time
and Status (online or offline).
Network status will display the Ethernet port status. You can click to see detailed
information on the network as shown in the picture below.
•ETH: this will show GREEN if the port is connected to a device and RED if no
connection.
•Status: this shows the speed (100Mb/s or 1000Mb/s) of the network where the
port connects. All 6 ports on OMP150 are adaptively set to 100Mb/s or 1000Mb/s,
depending on the network they connect to.

CMP100 User Guide
13
•IP Address: this shows the IP address on the port.
•MAC Address: this shows the unique MAC address on the port.
•Input/Output: this shows the settings of the Ethernet port, being used for input or
output.
•Model: this shows the settings of the Ethernet port, as DHCP or Static.
•Up Bytes: this shows the real-time traffic of the output data on the port.
•Down Bytes: this shows the real-time traffic of the input data on the port.
Channel status will display all enabled services with active and inactive video sources.
You can click to see more information of the channel, as shown in the picture
below.
After login, you will also see the Main Menu on the left side of the Web interface where
you can navigate to further configure the OMP150.
•Status
•Quick Start
•Channels
•VOD
•Overlays
•APK Settings
•Operation
•Cluster
•System Setting
•Tools
To continue the configuration on the unit, select the menu you want to navigate to.
3.3 Quick Start
This menu guides you for the following configuration steps:
•Network
•Time
•Channel List
•Status

CMP100 User Guide
14
Network:
Network shows the Status, IP Address, MAC Address, and the setting on each Ethernet
port. You can change the IP address depending on your Network setup. You can also
bond (input/output bond) the Ethernet port on this page as shown in the picture below.
Bonded ports share the same IP address and can have data output of 2000 Mb/s.
Time:
This allows you to manually input the time.
or sync via NTP Address.

CMP100 User Guide
15
Channel:
This menu allows you to input the source IP address and output the service via UDP,
RTP or HTTP.
See CHANNELS menu for more details on the page.
Status
This is same with the Welcome page when you first log in to the unit. It shows the status
of the System, including CPU, Memory and Hard Disk Status. It also displays the UP and
DOWN data traffic on each port.

CMP100 User Guide
16
3.4 Channels
This menu allows you to configure:
•Channel List
•Channel Grouping
•Local Channels
•EPG
3.4.1 Channel List
Channel tab allows you to add input stream, delete, import, export service configuration
and change the channel order on this page. You can click and do the followings
on the appearing line:
•Edit Name
You can modify the name of the input service on this field.
•Select the ETH port where the source is connected
For the Source port, there will be a drop-down arrow with which you can select
the ETH port for the source. This will only display the port which is set as INPUT
on the NETWORK page.
•Select the source protocol (UDP, RTP, RTSP or HTTP)
•Type in the source IP address and IP port
•Select the Output protocol (UDP, RTP or HTTP)
•Type in the Output IP address and IP port
•Select the ETH port where you want to output
For the HTTP protocol, the output port will be “ALL”
For the UDP or RTP protocol, there will be a drop-down arrow with which you can
select the ETH port for the output. This will only display the port which is set as
OUTPUT on the NETWORK page.
•Set Logo on the channel if there is needed.
•Enable the Channel.
•Save and delete the Channel.

CMP100 User Guide
17
Reference for IP address of input and output.
UDP: XXX.XXX.XXX.XXX:XXXX
RTP: XXX.XXX.XXX.XXX:XXXX
RTSP: XXX.XXX.XXX.XXX/live/00XX/index.smil
HTTP: XXX.XXX.XXX.XXX/live/00XX/index.m3u8
You can also click if you need to add more input (maximum of 100 programs)
with the same port and protocol of input and output. See the picture below for reference.

CMP100 User Guide
18
After batch addition, you can now modify the parameters for each service.
After configuring, you can create a backup file configuration by clicking .
Loading the backup file can be done by clicking .
When using the UDP protocol, you can output 100 services to unlimited number of
terminals with OMP150100 and 150 services to unlimited number of terminals with
OMP150200. To do this, you need to check the box . Take note
that the protocol, IP address and IP port of the input should be same with those of the
output. To implement this, it is also required for the source, the OMP150, and the STB in
the same network.
After you enable the “Send channel list only”, the output bitrate should show 0kbits/s,
indicating that the Service output is normal.

CMP100 User Guide
19
You can also add logo per Live Channel by clicking for each service.
After you set the logo, the logo should be displayed on the same line with the Service.
3.4.2 Channel Grouping
This allows you to create a channel group of services based on genre like Music, Movies,
Series, Kids, etc.You can customize categories and programs to help viewers to quickly
search the programs they want.
To create a channel group, go to Channels and click Channel Grouping. Click “+”under
Group List to add new a category.
You can add and delete channel group and manage channels based on the channel
group you created. To categorize the programs, select a channel group and click “Edit
Group”. Then there will be lists of all enabled programs from which you can select the
ones you want to be adding to the category. Select that program then click “OK”.
Other manuals for OMP150
1
Table of contents
Other Wellav Network Hardware manuals
Popular Network Hardware manuals by other brands

exemys
exemys EGW1-MB-HT user manual

General DataComm
General DataComm OCM-2000 Installation & operation manual

evertz
evertz 7700 Series manual

Kindermann
Kindermann HDMI/USB-HDBT3 Extender 4K60 Set Commissioning and operating instructions

FieldServer
FieldServer FS-8700-22 X30 Driver manual

Force 10
Force 10 Adit 3104 IP Reference manual