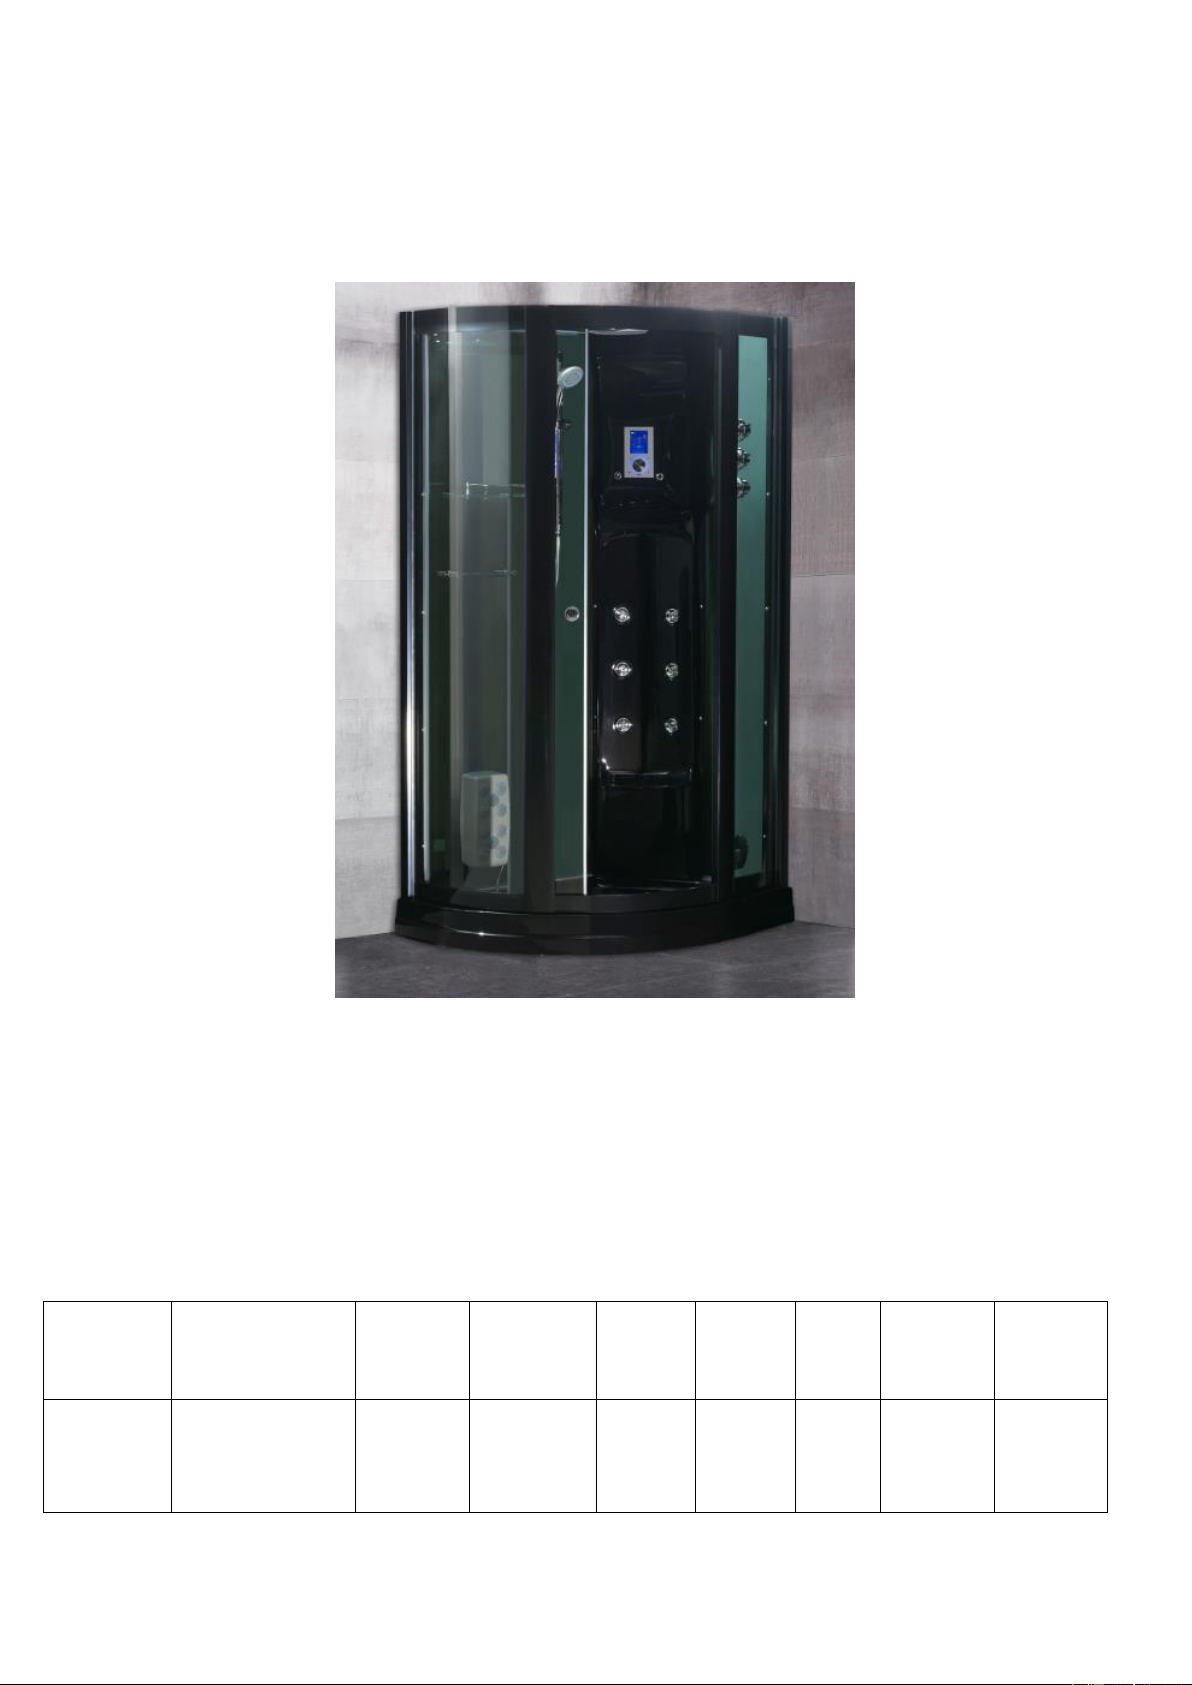
Wellgems WG-U683 User manual

1
Steam Room Manual
WG-U683 R
Model
Size
LxWxH mm
Light
Steam
generator
Fan
Loudsp
eaker
faucet
Top
shower
Hand
shower
WG-U683
1200x850x2200
√
√
√
√
√
√
√

2
No.
Name
No.
Name
No.
Name
1
Cover
7
Door handle
13
Computer panel
2
Top shower
8
Foot massage
14
Shower column
3
Hand shower
9
Hose of foot massage
15
Back jet
4
Shower pole
10
Tray
16
Steam outlet
5
Shampoo shelf
11
Ceiling light
6
Towel rail
12
Thermo mixer(faucet)
2
3
4
5
6
7
8
10
11
12
13
14
15
16
1
9

3
Dear user,
Thank you for purchasing our leisure sanitary ware. To enable you to use this product safely
and effectively, please read this Manual carefully before use.
I. Warning for using the steam room
1. Please read this manual carefully before using, and guarantee the reliable grounding.
2. For the sake of safe use, please don't lock the steam room.
3. People after drinking, suffering from heart disease or hypertension, the elder and the
pregnant women is not allowed to use this product.
4. Any child or person with mental disability use this product must be with the company of a
normal adult.
5. Pay attention to anti-slip.
6. Each time before use, check to confirm the power switch is turned on, and the leakage
protection , the master valve for cold/hot water supplies . Remember to cut off the master
supply each time after use.
7. If you feel uncomfortable, please shut off the power immediately.
8. Before turn on the faucet, please rotate the handle of cold/hot to the middle of H/C, and
turn on the faucet, test the water temperature by finger, and then rotate the handle to adjust
the temperature of water until feel comfortable.
9. When using steam function, please don’t use the shower or water massage function.
10. Keep your body away from the outlet of steam, to avoid scald.
11. Never start the motor without water(if steam room with massage bathtub).
12.Close the door and do not enter the steam shower when the sterilization is on.
13. Keep any flammable material or any object with the temperature of over 75℃away
from the product surface, for it may damage the product and cause the fire.
14. Don't cut off the power supply immediately each time after the use of the steam. Turn off
the display first, and switch off the power only when the water remained inside the steam
generator is completely drained off controlled by the computer to avoid any possible damage
to the steam generator.
15. Protect the electric wires from water, dampness, insects and mice when the product is
unused for a long time. Shut off the master valve for power supply and the cut-off valves in
the water pipeline immediately. Check the wires and grounding before the start of the
product which is unused for a long time.
16. It is required to shut off all functions of the product and wipe the water on hands before
taking out the power plug. It is strictly forbidden to take out the plug of the active product or
with a wet hand.

4
17. It is forbidden to use this product in case of thundering. Cut off the master supply of the
product and take out the power plug
18. Stop the service of the product with trouble on the electric circuit immediately, for it may
cause the fire by short-circuit or electric shock by trouble. Ask the qualified and licensed
professionals to make the repair.
II. Electrical parameters
Supply Voltage
Power
Output Voltage
Steam
generator
220V/
3KW
Lights
220V
12W
12V
III. Water supply
1. Connect the cold/hot water hose(red is hot water hose, blue is cold water hose)to water
supply, and make sure install a valve before connecting the cold/hot hose.
2. To prolong the service life of steam generator, we suggest install a wire mesh filter to the
cold/hot water hose.
IV. Electricity installation: It is essential that the installation is carried out by a qualified
electrician.
1. Connect the master computer control box of the steam room to the wire connectors of all
functional electrical parts. Insert the wiring cords firmly, and keep them away from any
water pipe connector that may have water drips due to leakage. Identify the connection
symbols on the wiring cards before insertion, as the error connection may damage the
electrical parts in the steam room.
2. Reliably connect the earth wire of the steam room to the indoor electrical grounding unit
and make sure that it really works.
3. Connect the power supply.
(1)A fixed socket shall be taken for the power supply of the steam room, which should be
the bipolar switching socket for independent service (i.e., the null and live wires can be on or
off at the same time). No other electrical appliance can be connected to the same supply. The
power wire shall be the rubber-sheathed three-core wire, with the sectional area for each core
no less than 2mm2 (i.e., 3x2mm2). Fire-retardant wall bushing shall be used for the supply
crossing the wall to make it safe.
(2) This product is supplied with the special power wires and special plugs with leakage
protection. The user shall install the socket at the water-resistant place within the length
of the special power wire of the steam room, see installation and construction drawing.

5
4. Earth wire: the earth wire of the steam room shall be connected reliably to the grounding
unit of the building, as well as the earth wire of the power socket.
V. Drain connection
1. Move the steam room assembled completely and connected with water and electricity
supplies back to the installation position selected.
2. Lead the drain pipe on the bottom of the tub into the floor drainer preset in the bathroom.
Take care not to squeeze, bend or clog the flexible drain pipe, to make sure of the fast and
smooth drainage.
3. In case of any leakage of the drainer, stop it up with the rubber pad or silicone.
VI. Installation steps:
A. Two persons are required to assemble the unit.
B. The glass is toughened safety glass. Please take great care when handling and fitting
the glass panels. In particular, avoid the glass edges coming into contact with hard
surfaces.
C. Please use silicon during assembly.
Level the tray to the ground(adjust the feet if needed), make sure the drain hose is
installed already and put it into the water outlet of the ground. Put a blanket or carton on
the tray to prevent from scratches
1.

6
2.
3.
Install the fixed glass, 4x25mm screw,
8 pcs
Install the horizontal and vertical frame, 4x10mm
screw,8 pcs
Cut the seal according to the width of
backwall, put it on the top of
backwall
Cut the seal according to the width of backwall,
put it on the bottom of backwall
This side is inside

7
4.
5.
4x10mm screw,10
pcs,fix backwall
and aluminium
4x10mm screw,2 pcs
each corner
install the shower panel ,6x30mm
screw and nut,5 pcs each side,
and bottom 2 pcs

8
6.
7.
Hang door glass into the track of aluminium,adjust the
wheel to fit well,finally fasten the screw of wheel
Put the door glass on a table,install the
wheel,don’t fasten the screw of wheel too
tightly now
Put on the cover, fasten
screws,4x16mm ,5pcs
6x30mm screw and nut,4 pcs

9
8.
9.
Install the rest accessories such as foot massage,
towel rail, door handle etc.
Install the fixed glass seal
outside,if the seal is too hard
in winter, you can drop this
seal into hot water to make
it soft.
Install door side seal in door glass,two
sides of door glass
You can use a wood to help installing the seal.
Glass in this
side

10
10.
Connect the wire of cover to control box, fan to
fan, light to light, loudspeaker to loudspeaker.
fan
light
loudspeaker
Connect the hoses to C. Check the symbols on A or B (depending on your shower model) on your
thermo mixers front plate to find the correct position for the hoses on the back side of the mixer.

11
VII. Operation
1. Each time before use, check if the power switch is turned on, and the master valve for
cold/hot water supplies is open.
2. Check if the special leakage-protection plug of the steam room is inserted correctly. To
switch on the power each time, check if the leakage protection switch of the plug works well
in this way: press RESET with the power indicator on. If the red light is still on when TEST
is pressed or is not on as RESET is pressed, it means that the leakage protection
malfunctions or has any trouble. Please call the professional to make the repair at this time.
3. All functions of the steam room can be used so long as its power supply and water
supply are checked as normal.
4. Each time after use, remember to cut off the water and electricity supplies.
Computer panel

12

13
Remote control
Computer panel operation
A. Notes:
1.this panel is equipped with capacitive touch buttons,make sure to advod direct
contacting with shower head while selecting installation loaction of the panel.Otherwise it
will lead to malfunction or trigger the panel lock.
2.all function keys are located at the most convenient locations.
3.When the panel is on power ,it will give out one sound of ring .
B. functions introduction:
1.spare massage 2.steaming 3.exhaust fan 4.FM 5.lighting
6.ozone disinfection 7.bluetooth 8.telephone
(1)start up/shut down and unlocking of panel
①、startup

14
Touch on the panel or press on the remote control to turn on the system.The back
light of shuttle switch and LCD screen will light up;the screen will show currenct
temperature.The system will automatically set a countdown of one hour and turn on the
overhead light.
②、shutdown
When the system is operational and unlocked,touch on the panel or on the remote
control to turn off the system.It will also stop functioning as the countdown ends
③、Locking / unlocking of the panel
When the system is operational.The panel will be locked for no operation in 30 seconds and
the icon on the LCD sreen will light up,press shuttle switch to unlock the panel.
The icon will disappear and all keys on the panel will become operable.
(2)Instruction for operation
After stratup the default location of cursor will be .Rotate the shuttle switch to
move the cursor.After the cursor moves to a function,press the shuttle switch or the function
keys on the remote control to quickly turn on and turn off the function.The icons will light
up after functions are turned on and vanish after functions are turned off.
(3)operating instruction
1. Setting of steam function, temperature and duration
①. Move the cursor to ,press the shuttle switch or press on remote
control to start the steam bath function. After startup, the icon will light up.
will flash for shortage of water. Press the shuttle switch or on remote
control again to turn off the steam function. After the steam function is turned on, the steam
machine will shut down automatically as the steam temperature reaches the set value and
reopens as the steam temperature falls below the set value.

15
②. The default steam temperature is 45 ℃and the default duration is 45min.
③Setting of steam bath temperature: After turning on the steam machine, move the cursor
to , press the shuttle switch or press on remote control to enter the
temperature setting mode. As the icon ℃flashes, rotate the shuttle switch to adjust the
temperature or press on the remote control to raise the temperature or to lower
the temperature. Temperature setting range: 25 ~ 60 ℃.
④setting of duration: After turning on the steam machine, move the cursor to ,
press the shuttle switch or press on remote control to enter the temperature
setting mode, then press once again to enter duration setting mode. As the icon
flashes, rotate the shuttle switch to adjust the time or press on the remote control
to increase the time or to decrease the time. Timing range: 5 ~ 50min.
⑤. Settings of temperature and time will automatically take effect in 3 seconds, the system
will exit the temperature and time setting mode.
⑥Drainage: 5 minutes after the shutdown of system, the steam tank will drain water for 3
minutes.
2. Spray
Move the cursor to and press the shuttle switch. The first press will turn on
upper spray; the second press--switch to middle spray; the third press--switch to lower spray;
the fourth press will start the automatic cycle of upper, middle and lower spray,
automatically switch in every 5 seconds. the fifth press will turn off the spray.
In the case that the remote control is used to control the spray, press on the
remote control. The first press will turn on upper spray; the second press--switch to middle
spray; the third press--switch to lower spray; the fourth press will start the automatic cycle of
upper, middle and lower spray; the fifth press will turn off the spray.

16
(Kindly reminder: in order not to be scalded, pls turn the suitable temperature when turn on
the hot/cold water)
3. Exhaust fan function
Move the cursor to and press the shuttle switch or press on the
remote control to turn on or turn off the exhaust fan. Icon will light up after startup. 4.
Light function
Move the cursor to and press the shuttle switch or press on the
remote control to turn on or turn off the lights. Icon will light up after startup.
5. Ozone disinfection
When steam machine, spray, fan and multimedia are off, move the cursor to and
press the shuttle switch or press on the remote control to turn on or turn off the
ozone. After startup, icon light up and all other functions will be disabled except
lighting function. Emission of ozone will last for 10 minutes, then the exhaust fan will
automatically start and operate for 15 minutes.
6. Radio Function
Move the cursor and press the shuttle switch or press on the
remote control to turn on or turn off the radio function. Icon will light up after startup.
①Channel search: After turning on the radio function, move the cursor to and
press the shuttle switch or press on the remote control to turn on the channel search
function. Then the LCD would show channel and the icon “Frequency” will flash.
Rotate the shuttle switch to turn on incremental tuner or press and on the
remote control to switch channels. The step length is 0.1MHz.

17
In radio mode, touch or to start automatic upward, downward search; or
press on the remote control to enter channel search mode and press or on
the remote control for one second, which will start automatic upward, downward search until
a valid station is obtained.
After unlocking the panel and exiting from function settings, touch or . The
cursor will automatically return to and start the automatic upward, downward
search until a valid station is obtained
②Station storage: when a radio station has been found (the “radio frequency” icon would
flash), press the shuttle switch for 2 seconds or press on the remote control for 2
seconds to store the current radio frequency. The LCD will show the frequency and
icon will flash for two seconds; in this way, at most 10 radio frequencies can be
stored on different channels.
③Frequency range: 87.5 ~ 108.0MHz.
④Switch of channels: When the radio is turned on and the panel is unlocked, move the
cursor to press the shuttle switch, rotate the shuttle switch or press on the
remote control to switch channels and play programs on the stored radio channel.
7. Bluetooth
Turn on the system and the power supply of Bluetooth module. Bluetooth module will
connect to cellphone 5 seconds later; Bluetooth module will break the connection and refuse
connection request when the system is turned off.
Move the cursor to and press the shuttle switch or press on the
remote control to turn on or turn off the Bluetooth function. After Bluetooth is enabled,
icon will flash for no connection and will be dynamically displayed for successful
connection. The screen will show "OFF" when the music halts and "On" when the music

18
goes on. After turning on Bluetooth player, press on the panel to switch to the next
song, press on the panel to switch to the previous song. When using remote control
to switch songs, you first need to press on the remote control to song switch mode,
then press to switch to the next song and for the previous song.
8. Phone function
After turning on the system and completing Bluetooth connection, the cursor will
automatically move to “Telephone” icon, the icon will light up and will flash
when a phone call comes in. Press the shuttle switch to answer the phone, the icon
will be dynamically displayed. Then press the shuttle switch to hang up the phone and the
multimedia player will automatically return to the original state.
During the access to or reception of phone calls, the cursor can only move between
non-multimedia functions and phone. After the cursor moves to a non-telephone icon, it will
automatically return to the phone icon for no operation in five seconds. Multimedia control
keys on the remote control will be disabled during ringing and reception of calls. When a
phone call comes in, touch to reject the call.
9. Volume control
In the radio and Bluetooth mode, touch on the panel to enter the volume
adjustment mode. Icon would flash on the LCD screen. Rotate the shuttle switch to
adjust volume. Wait for 3 seconds or press the shuttle switch to exit from the volume
adjustment mode.
In radio or Bluetooth mode, when the remote control is used to adjust the volume,
press on the remote control to enter volume adjustment mode if steam machine is off,
then press or on the remote control to increase or lower the volume; if the
steam machine is operational, press on the remote control to enter the mode of steam

19
temperature setting, press again to enter the mode of steaming duration setting, then press
again to enter volume adjustment mode. The fourth press would return to the steam
temperature setting. As the system enters the volume adjustment mode, would begin to flash
on the LCD screen.
Operation of thermo mixer(faucet)
Four way functions thermo mixer
Foot massage
Hand shower
Top shower
Back jet
Turn on/off water
And adjust water volume
Adjust water temperature

20
(1) Turn handle in the four way function themo mixer (as shown in the figure) to select the
different shower patterns and related functions like top shower, hand shower,back jet, foot
massage
(2) Turn on the water supply. turn it left and right to adjust the water volume.
(3)Test the water temperature by finger, and then rotate the handle to adjust the temperature
of water until feel comfortable then choose your desired shower pattern.
(4) You can turn the adjustment ring on the shower to get the different shower massage
effect.
(5) To use the foot massage, please take the foot massage out,then turn the handle to symbol
, put the foot on it,turn on the water,you will enjoy the wonderful foot massage.
(6) After use, turn off the water supply.
VIII. Trouble shooting
Error
Description
Reasons
Solutions
E10
Overtime water
intake
A. General water valve is not
open; B. Failure of inlet valve
control system; C. Failure in
water level detection.
After the steam function is turned on ,the
system will open water inlet after it detects
shortage of water. If the system shows no
water after 10 seconds or the tank remains
unfilled after 1 minute, the system would
report “E10” fault as well as turn off steam
function and inlet valve.
E16
Temperature
anormaly
A. Failure of temperature
detection circuit; B. Failure of
temperature probe.
When the system is turned on ,it shows “E16”
fault and turn off the steam function. Cut off
the power and check the temperature probe as
well as related lines
E18
Communication
Fault
A. Short circuit or open
circuit in communication line;
B. Fault of communication
driver circuit; C. Damage of
CPU I/O port.
During normal use, the board and the display
box have communication problems for five
successive seconds, the system shows “E18”
fault and automatically turn off all external
load. Please check whether the computer
cables are properly connected.
Table of contents
Popular Bathroom Fixture manuals by other brands

Exclusive Heritage
Exclusive Heritage CO-10160D installation guide

Spectrum Brands
Spectrum Brands Pfister R89-220 Series Maintenance & Care Guide

Schell
Schell COMPACT VERONA 01 122 06 99 Mounting and installation instructions

OVE
OVE PASADENA PA0603400 installation manual

CSI
CSI SPA-812201 Assembly instructions

KOVYX
KOVYX K2O KSM1006 instruction manual