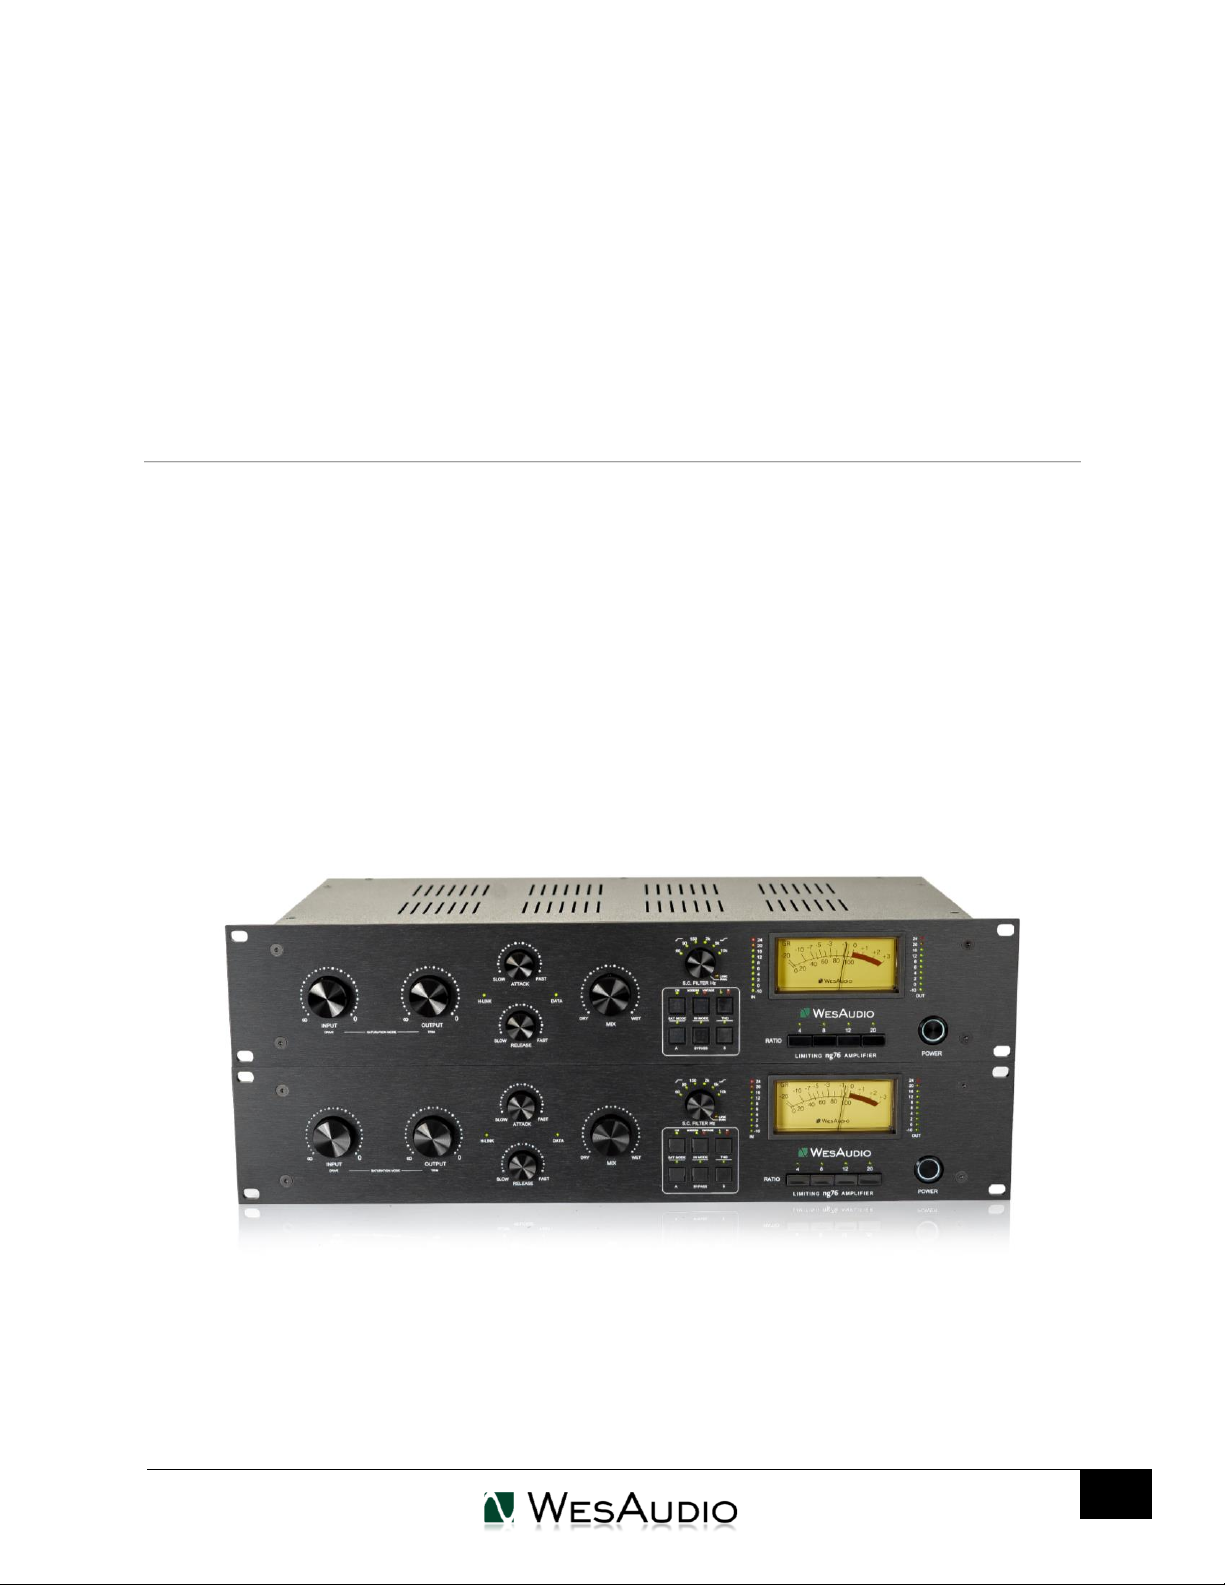
WesAudio ng76 User manual

WESAUDIO
4/12/23
NG76 USER MANUAL REV1
1

WESAUDIO
4/12/23
NG76 USER MANUAL REV1
2
Thank You for the purchase of ng76
ng76
Next Generation FET Compressor with digital recall
With kind regards
Radoslaw Wesolowski and Michal Weglicki

WESAUDIO
4/12/23
NG76 USER MANUAL REV1
3
Next Generation FET Compressor with digital
recall
FET compressors have been an essential tool in recording studios for over 50 years. Its
distinctive sound and reliability have made it a go-to for producers and engineers around
the world. The 76-style FET compressor has left its mark on countless hit records which has
helped to establish its reputation as a reliable and versatile tool in recording technology.
We have improved this design, creating a whole new level of versatility with seamless DAW
integration - We present ng76 - fully analog FET compressor with digital recall.

WESAUDIO
4/12/23
NG76 USER MANUAL REV1
4
Contents
1. Main Features...........................................................................................................................................6
2. Stereo Pairs...............................................................................................................................................7
3. Hardware ..................................................................................................................................................7
3.1. Specification.............................................................................................................................................7
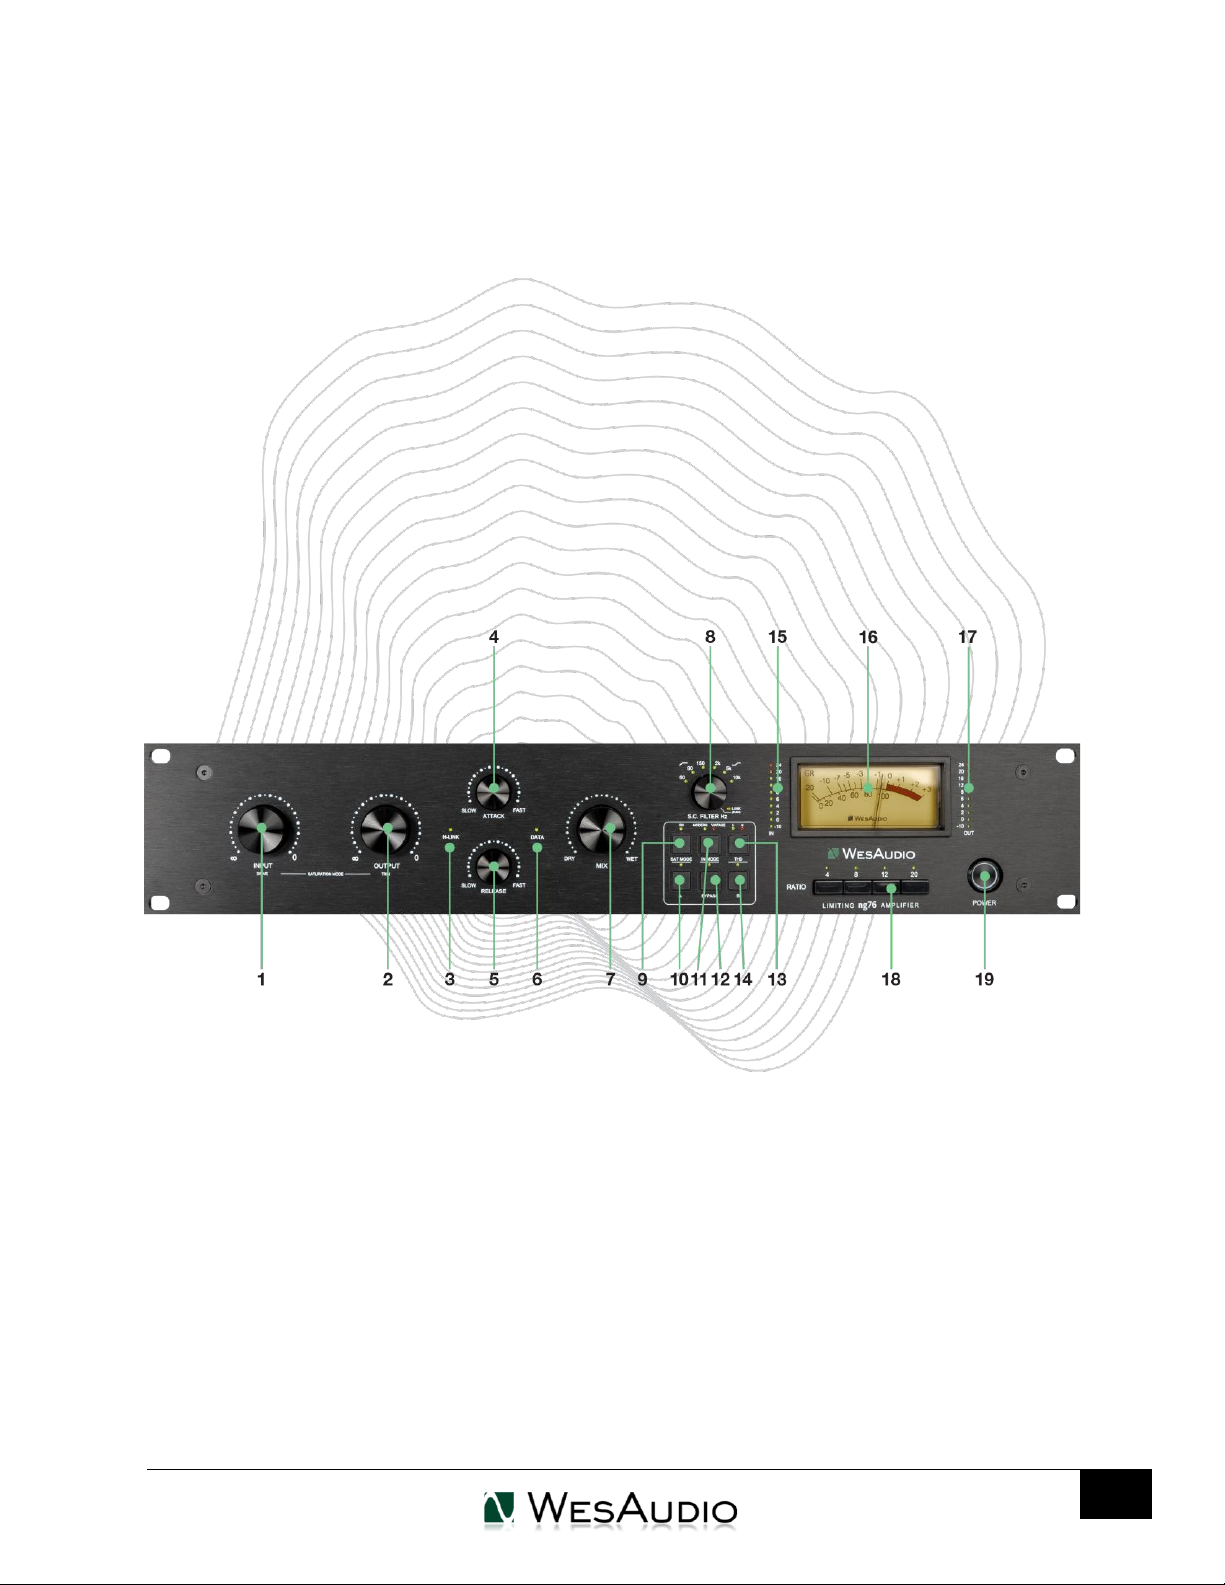
3.2. Front panel ...............................................................................................................................................8
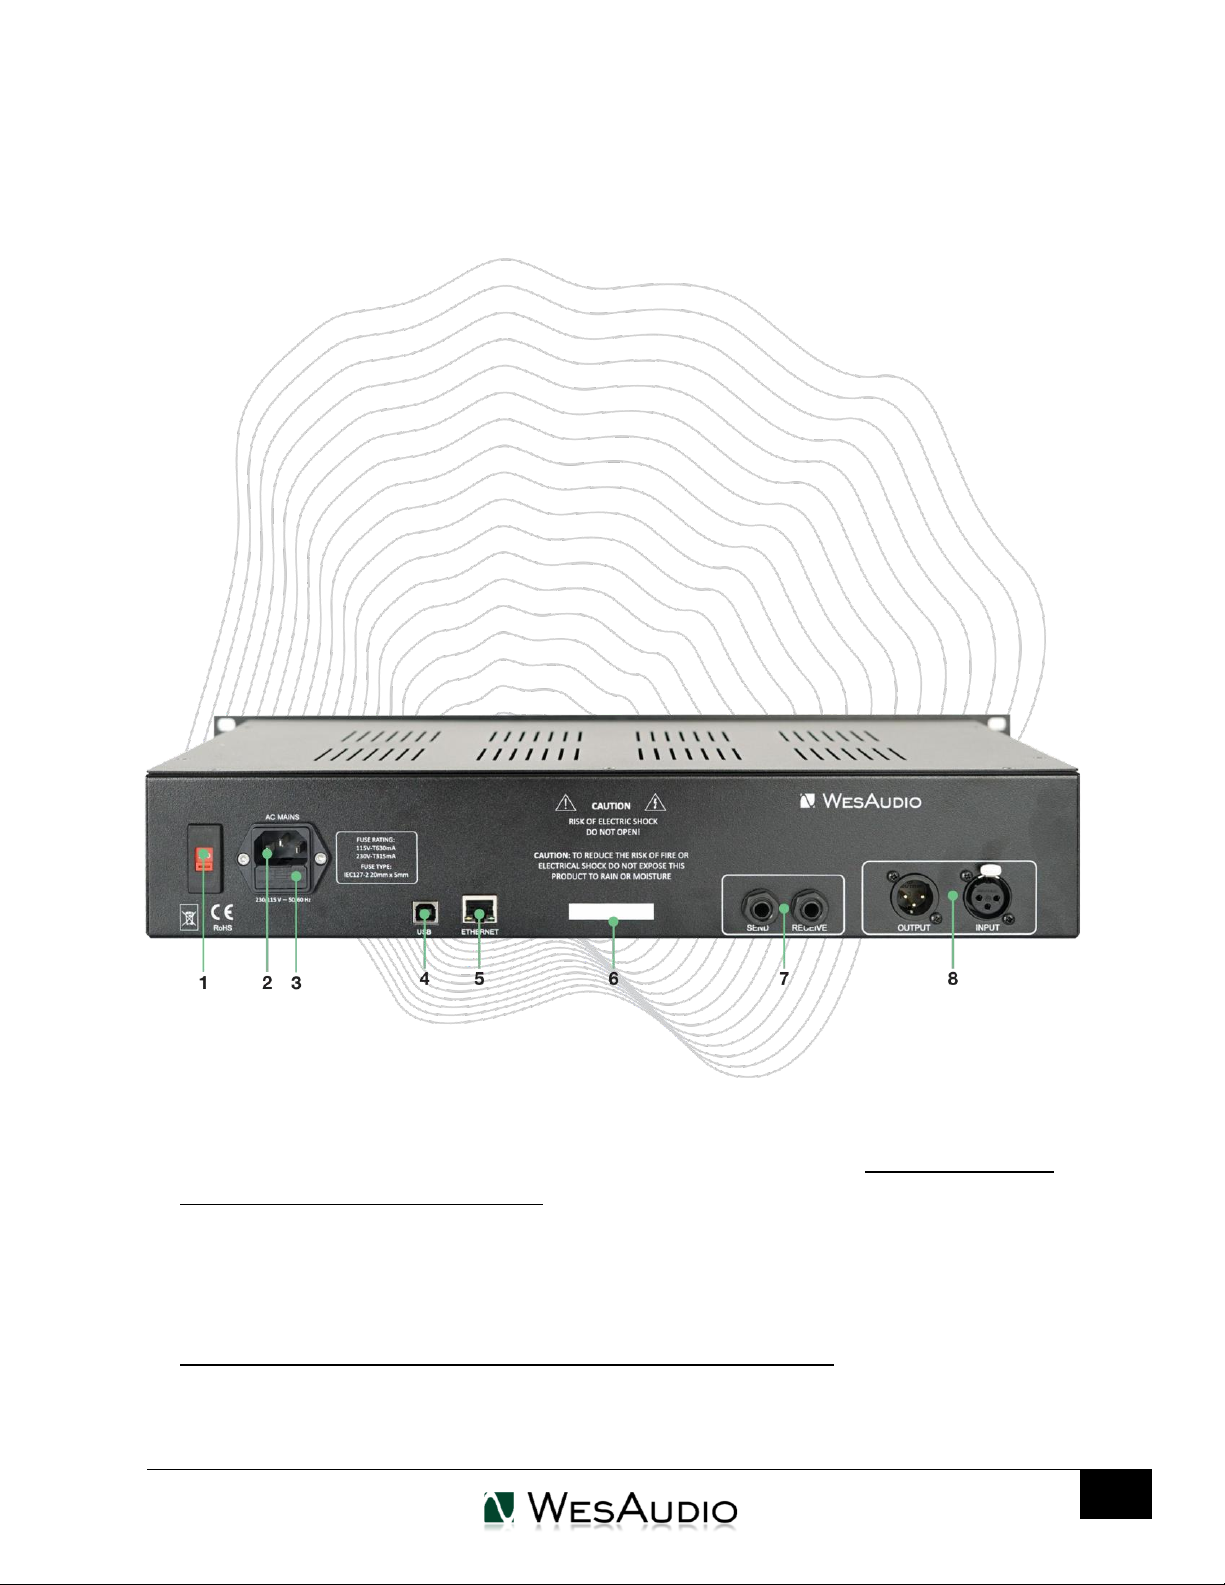
3.3. Rear panel ..............................................................................................................................................10
3.4. Audio signal connection .........................................................................................................................12
3.5. Signal Flow..............................................................................................................................................13
3.6. Side Chain EQ .........................................................................................................................................14
3.7. THD.........................................................................................................................................................14
3.8. Saturation mode.....................................................................................................................................15
3.9. Input mode –Vintage vs Modern...........................................................................................................15
3.10.Stereo operation and matched pairs .....................................................................................................15
4. Software setup........................................................................................................................................17
4.1. Installation..............................................................................................................................................17
4.1.1. Windows.............................................................................................................................................17
4.1.2. OSX......................................................................................................................................................18
4.1.3. Troubleshooting..................................................................................................................................19
4.2. GConManager ........................................................................................................................................20
4.2.1. How to check firmware version..........................................................................................................20
4.2.2. How to perform firmware upgrade....................................................................................................21
4.3. Set up GCon Connection ........................................................................................................................22
4.3.1. USB......................................................................................................................................................23
4.3.2. Ethernet..............................................................................................................................................24
4.3.3. Default network configuration. ..........................................................................................................25
4.3.4. Enable/Disable DHCP..........................................................................................................................26
4.3.5. Set up GCon connection using Static IP address ................................................................................27
4.3.5.1. Windows –which static IP address should I choose?............................................................27
4.3.5.2. OSX –how to check your IP address......................................................................................29

WESAUDIO
4/12/23
NG76 USER MANUAL REV1
5
4.3.5.3. Set up static IP address..........................................................................................................31
4.3.6. Direct connection –setting IP address on PC/MAC............................................................................32
5. Automation and recall ............................................................................................................................33
5.1. DAW Plug-in ...........................................................................................................................................33
5.1.1. Mono plug-in ......................................................................................................................................34
5.1.2. Stereo Plug-in .....................................................................................................................................36
5.1.3. Stereo Plug-in –automation of linked channels.................................................................................37
6. Abbreviations and terms.........................................................................................................................38
7. Warranty.................................................................................................................................................38
8. History.....................................................................................................................................................39

WESAUDIO
4/12/23
NG76 USER MANUAL REV1
6
1.Main Features
True ANALOG sound with extremely convenient control!
Full Total Recall and plugin control, compatible with most DAWs.
100% analog FET mono compressor with 24dBu of headroom.
Classic lightning speed compression style based on WesAudio Beta76 design.
Classic controls known from FET style compressor - INPUT / OUTPUT / ATTACK / RELEASE.
Additional MIX knob for parallel compression.
Carnhill Transformers (input and output).
Saturation mode - Special mode where static compression is triggered to produce
sonics based on FET circuit, and One knob which sets INPUT and OUTPUT in an opposite
way. It allows to use the unit as a saturation box / clipper.
Four ratio settings 4:1 / 8:1 / 12:1 / 20:1 - all possible combinations including ALL button
mode!
Modern and Vintage modes to support two 1176 revisions (F & G):
•Vintage - transformer balanced input,
•Modern - Electronically balanced input.
Features a sophisticated side chain circuit EQ with two independent sections:
•HPF 60 Hz / 90 Hz / 150 Hz - to maintain low end information while
compressing,
•High Shelf of 2kHz / 5kHz, 10kHz - to tame high frequencies by emphasizing
high/high mid-range content.
Vintage gain reduction meter.
Very precise INPUT and OUTPUT metering.
Hardware A/B buttons to compare two independent settings.
THD - total harmonic distortion with LOW and HIGH settings, based on the FET circuit.
Fully digitally controlled and isolated analog circuit.
ANALOG AUTOMATION in DAW.
Ethernet and USB connectivity for integration with digital plug-in.
Size: 2U.

WESAUDIO
4/12/23
NG76 USER MANUAL REV1
7
2.Stereo Pairs
Ng76 is available in stereo pairs, each pair is carefully calibrated in the factory for stereo
usage –of course it still can be used either as dual mono independent compressors or one
stereo unit:
•Includes 2 separate mono-channel devices that can be linked together through
dedicated software.
•Compression detectors can be linked for true stereo compression using dedicated
cable (included).
•All parameters between units can be linked via a dedicated plug-in –change on
one channel triggers update on the other channel.
3.Hardware
This chapter explains all physical aspects of ng76 unit.
3.1. Specification
•Attack time 20 us –800 us
•Release time 50 ms –1100 ms
•Compression ratio 4:1; 8:1; 12:1; 20:1; all button mode and all combinations
•True Bypass
•SC High Pass filter 60,90,150Hz
•SC High Shelf filter 2KHz, 5KHz, 10kHz
•Output impedance 50 ohm
•Frequency response 20Hz to 20kHz (+/- 1dB)
•Signal to noise ratio SNR >83dB
•Max signal level +24dBu
•THD+N MIN 0.2%
•Noise floor -95dBu
•Power consumption 8W
•Dimensions 88x483x235mm
•Weight 6 kg
•Balanced output and input
•Case Rack: 2U
•Warranty: 2 years

WESAUDIO
4/12/23
NG76 USER MANUAL REV1
8
3.2. Front panel
1. Input –Determines the level of the input signal entering the compressor.
2. Output –Determines the level of the output signal leaving the compressor. It is used to
recover signal level affected by gain reduction in compression circuit.
3. H-LINK LED –indicates state of host-module connection.
4. Attack –It sets the Attack time from 20 microseconds to 800 microseconds. The attack time is
fastest when the Attack knob is in fully clockwise position, and its slowest when it’s in its fully
counterclockwise position.
5. Release –It sets the Release time from 50 milliseconds to 1100 milliseconds. The release time is
fastest when Release knob is in its fully clockwise position and is slowest when it is in its fully
counterclockwise position.

WESAUDIO
4/12/23
NG76 USER MANUAL REV1
9
6. DATA LED –indicates that data is being sent from HOST to the device.
7. MIX –WET/DRY signal mixer knob. Allows the parallel compression to be used.
8. SC Filter EQ/ SC Link –There are two functions for this knob:
a. Pushing the knob toggles sidechain detector LINK on and off when two units are
linked via back TRS sockets.
b. Rotary encoder allows to select EQ in the side chain circuit:
i. First 6 position engages separate EQ sections,
ii. Moving further right compressor will start to select various combinations.
9. Saturation mode –Enables/Disables saturation mode. Please note when saturation mode is
engaged, sidechain filters, attack, release, ratio controls are disabled and don’t have any
effect.
10. A–internal preset memory buttons which can be used to compare two different compressor
settings.
11. INPUT MODE –toggles between VINTATE and MODERN modes INPUT modes (electronically
balanced vs transformer balanced input stage).
12. BYPASS –True bypass.
13. THD –Total Harmonic Distortion –Possible options: OFF/LOW/HIGH.
14. B–internal preset memory buttons which can be used to compare two different compressor
settings.
15. VU IN Metering –INPUT metering before any processing (-10dBu to 24dBu).
16. Gain reduction meter –This meter shows gain reduction (please note that this meter is
disabled when Saturation Mode is engaged).
17. VU OUTPUT Metering –OUTPUT metering (-10dBu to 24dBu).
18. Ratio - The Ratio button controls the depth of the compression, with a ratio of 4:1 being the
lowest possible compression value and 20:1 being the highest. Additionally, you have the
option to disable the ratio to disengage compression and enable any combination of ratios
you prefer. To activate more than one ratio (e.g., pressing the All button IN!), you can either
press all the ratios at the same time or press one ratio and then press and hold while
engaging the others you want.
19. POWER Button –Power switch.

WESAUDIO
4/12/23
NG76 USER MANUAL REV1
10
3.3. Rear panel
1. Voltage selector –selection between 115V (60Hz) and 230V (50Hz). Please check Fuse
holder description before switching.
2. AC socket
3. Fuse holder –The fuse holder contains two fuses - one is currently in use, while the other
one is a spare. If, for any reason, your unit fails to power up, it is recommended to swap
the fuses and check if this resolves the issue.
IMPORTANT NOTE: each voltage standard has different fuse type:
a. 115V –T630mA
b. 230V –T315mA.

WESAUDIO
4/12/23
NG76 USER MANUAL REV1
11
If You would like to change voltage settings it is mandatory to get proper Fuse!
4. USB Socket –USB2+ compatible port for GCon connectivity (management).
5. ETHERNET Socket –Ethernet port for GCon connectivity (management) based on UDP
protocol (LAN single subnet).
Please note that only one connection type can be used at the same time.
6. Serial Number
7. TRS LINK - connectors for stereo compression.
8. XLR INPUT / XLR OUTPUT –input and output signal connection.

WESAUDIO
4/12/23
NG76 USER MANUAL REV1
12
3.4. Audio signal connection
Ng76 is digitally controlled analog unit –it means that signal must be connected in
analog domain, but all its functions can be controlled via digital management protocol.
Signal is provided via back XLR sockets for each channel, TRS socket is only for side
chain detectors link (stereo operation).

WESAUDIO
4/12/23
NG76 USER MANUAL REV1
13
3.5. Signal Flow
Below figures show ng76 signal flow.
SATURATION
MODE
COMPRESSION
MODE
MODERN - ELECTRONICALLY BALANCED INPUT
VINTAGE: TRANSFORMER BALANCED INPUT
INPUT SIGNAL XLR
COMPRESSION / THD
OUTPUT SIGNAL XLR
TRUE BYPASS
OUTPUT TRANSFORMER
OUTPUT
METERING
OUTPUT POTENTIOMETER
INPUT POTENTIOMETER
ER
SATURATION MODE / THD
DRIVE
INPUT METERING
TRIM

WESAUDIO
4/12/23
NG76 USER MANUAL REV1
14
3.6. Side Chain EQ
Ng76 implements 2 independent EQ sections in sidechain circuit:
•HPF at 60 Hz, 90 Hz and 150 Hz (all filters 6dB/Octave),
•High Shelf at 2 kHz, 5 kHz, 10 kHz (all filters 6dB/Octave).
The HPF section helps to avoid the compressor reacting on low end content, while
high shelf filters allow to trigger more compression with high content –as a result high
shelf filter will make our source material darker depending on the settings.
3.7. THD
THD –Total Harmonic Distortion –adds harmonic content to source material.
WesAudio's Total Harmonic Distortion (THD) circuit is renowned for adding harmonic
content to the source material. It has been a part of most of the units we produce.
However, this time, we wanted to provide you with more color options. In this
implementation, we have fully relied on the FET compression circuit, and each level
(LOW/HIGH) adds an odd harmonic to the source material.

WESAUDIO
4/12/23
NG76 USER MANUAL REV1
15
3.8. Saturation mode
The saturation mode (SAT MODE) is a unique operating mode that triggers the
compression side chain circuit through an internal DAC with a high-frequency sine wave
(25kHz+) instead of the source material. This results in compression being established at a
static level (around 10dB of gain reduction) to achieve the harmonic distortion typical of FET
compression and to take advantage of the THD circuit. Moreover, the INPUT and OUTPUT
potentiometers are connected in opposite ways through the DRIVE knob, meaning that
when DRIVE is at its maximum, INPUT is at its maximum, and OUTPUT is at its minimum, and
vice versa. This allows us to engage in clipping because hitting the FET circuit too hard will
result in audible distortion. DRIVE is designed to maintain unity gain until clipping occurs,
which will most likely lead to signal level loss but an increase in rms level. For this purpose,
TRIM was added to enable negative and positive output modification between
approximately -8 dB and +8 dB.
When Saturation mode is enabled, attack, release, sidechain filter, ratio, GR metering
are disabled.
3.9. Input mode –Vintage vs Modern
This setting allows to select input stage of ng76 compressor:
•MODERN –electronically balanced input where transformer section is bypassed (like
revision G of 1176),
•VINTAGE –transformer balanced input stage (like revision F of 1176).
In practice Modern will give us cleaner results, while Vintage will leave its mark on the
low-midrange section of the frequency response.
3.10. Stereo operation and matched pairs
Stereo units can work in two modes:
•Dual mono compression –detectors are unlinked.
•True stereo compression –detectors are linked using TRS connection on the back.

WESAUDIO
4/12/23
NG76 USER MANUAL REV1
16
How to link two mono units for true stereo compression (detectors linked):
1. Link two units using attached cable:
2. Link two units using Stereo plugin (please refer to next chapters for more information).
3. Engage stereo link for stereo compression (detectors linked), disengage for dual
mono compression (detectors unlinked).
To change LINK settings either use the plug-in or push the SC encoder.
Please note that ng76 are available in stereo pairs. Such units are paired on the factory
settings level to maintain the lowest possible difference either in level or compression
behavior. Getting two independent mono units most likely will end up in different behavior
especially in true stereo mode with compression detectors in sidechain circuit linked.

WESAUDIO
4/12/23
NG76 USER MANUAL REV1
17
4.Software setup
Software package can be downloaded from http://www.wesaudio.com/download by
anyone who purchased related HW unit. To check currently supported plugin types and
platforms, please follow the above link.
4.1. Installation
To install Plugin Bundle package, please visit
http://www.wesaudio.com/download and download recent version of software.
4.1.1. Windows
Start the installer application, if you will encounter any system warnings about this
installer, please ignore them:
Select any components which you would like to install.
•If this is FIRST installation, please unplug all WesAudio devices from your
workstation.
•When the USB driver is installed, the application will inform you that all devices
should be connected –please do so.
•If USB driver installation is triggered, the user will be asked to restart the computer.
We know that this is an unwanted activity, but it is a necessary step for USB driver
to install with success.
Select „More Info”
...And select „Run anyway”

WESAUDIO
4/12/23
NG76 USER MANUAL REV1
18
•If computer restart is triggered, this Installer will start again during start up. If for
some reason the installer won’t be started after the restart, please start the same
installer manually again.
4.1.2. OSX
Because OSX architecture and USB devices handling is much simpler in concept, the only
thing to note is to have all devices connected during installation procedure.
Start the installer application, if you will encounter any system warnings about this
installer, please ignore them *(sometimes it is necessary to open context menu with right
mouse button and trigger installation once again):

WESAUDIO
4/12/23
NG76 USER MANUAL REV1
19
4.1.3. Troubleshooting
If anything would fail during installation procedure, please contact our support at
support@wesaudio.com. We will get back to you as soon as possible.
Below you can find some symptoms and description which will help to investigate the
issue:
“Can’t find my device on plugin drop down menu.”
Unfortunately, there could be dozens of root causes. On Windows machines it is very
important to check if a USB device is successfully connected on system level. That can
be checked in “Control Panel →System →Device Manager”:
** Please note that for WINDOWS it is necessary to install USB driver which is critical to
communicate with HW units. It is required step only during first installation, and this option
will be automatically disabled during any software upgrades.

WESAUDIO
4/12/23
NG76 USER MANUAL REV1
20
4.2. GConManager
GCon Manager is a generic application which implements configuration management over
compatible units. It can be found in Application folder data:
- For OSX: “/Applications/WesAudio/GConManager”
- For WINDOWS: folder specified during installation phase, by default in: “c:/Program Files
x86/WesAudio/GConManager.exe”.
This section describes how to manage firmware of available units, but GConManager also
provides other functions which will be described in next chapters.
4.2.1. How to check firmware version
Each device reports to your workstation with version, which indicates compatibility
between your host application, and remote module. To check firmware upgrade please to
GConManager CONFIG application:
Table of contents
Other WesAudio Recording Equipment manuals