West Bend L5658B User manual

COUNTERTOP OVEN
Instruction Manual
Register this and other Focus Electrics products through our website:
www.focuselectrics.com
Important Safeguards...............................................................................................2
Operating Precautions..............................................................................................3
Accessories..............................................................................................................4
Positioning Racks.....................................................................................................5
Using Your Countertop Oven...................................................................................5
Cleaning Your Countertop Oven ............................................................................11
Troubleshooting Guide...........................................................................................12
Warranty.................................................................................................................13
SAVE THIS INSTRUCTION MANUAL FOR FUTURE REFERENCE
©2008 West Bend®, a Brand of Focus Electrics, LLC.
www.focuselectrics.com

IMPORTANT SAFEGUARDS
2
To prevent personal injury or property damage, read and follow all instructions
and warnings.
When using electrical appliances, basic safety precautions should always be
followed including the following:
•Read all instructions, including these important safeguards and the care and use
instructions in this manual.
•Do not touch hot surfaces. Use handles or knobs.
•To protect against electric shock, do not immerse cord, plugs, or other electric
parts in water or other liquids.
•Close supervision is necessary when this appliance is used by or near children.
•Unplug from outlet when not in use and before cleaning. Allow to cool before
putting on or taking off parts.
•Do not operate this appliance with a damaged cord or plug, after the appliance
malfunctions or if the appliance is dropped or damaged in any manner. If you
experience any problems with your appliance, unplug it immediately from the
electrical outlet. For service information see warranty page.
•The use of accessory attachments not recommended by Focus Electrics may
cause injuries.
•Do not use this appliance outdoors.
•Do not let cord hang over the edge of a table or counter, or touch hot surfaces.
•Do not place on or near a hot gas or electrical burner or in a heated oven.
•Extreme caution must be used when moving an appliance containing hot oil or
other hot liquids.
•To disconnect, turn all controls to “OFF”, then remove plug from wall outlet.
•Do not use appliance for other than intended use.
•This appliance has a polarized plug (one blade is wider than the other). To
reduce the risk of electric shock, this plug is intended to fit into a polarized outlet
only one way. If the plug does not fit fully into the outlet, reverse the plug. If it
still does not fit, contact a qualified electrician. Do not attempt to modify the plug
in any way.
•Use extreme caution when removing the trays or disposing of hot grease.
•Do not clean with metal scouring pads. Pieces can break off of the pad and touch
electrical parts, creating a risk of electrical shock.
•Oversize foods or metal utensils must not be inserted in this appliance as they
may create a fire or risk of electric shock.

•A fire may occur if the appliance is covered or touching flammable material
including curtains, draperies, walls and the like, when in operation. Do not store
any item on top of appliance when in operation.
•Extreme caution should be exercised when using containers constructed of other
than metal or glass.
•Do not store any materials, other than manufacturers recommended accessories
in this oven when not in use.
•Do not place any of the following materials in the oven: plastic, paper or
cardboard.
•Do not cover racks, trays or any parts of the oven with aluminum foil, as
overheating will occur.
•Always turn timer control and heat selector to “OFF” and unplug the appliance
from outlet when not in use and before cleaning.
•For household use only.
To prevent personal injury or property damage, read and follow all instructions
and warnings. OPERATING PRECAUTIONS
•This device is not intended to heat oil or other liquids.
•Do not use sharp utensils to clean oven door glass as scratching may weaken it
and cause shattering.
•Do not touch heating elements as serious burns may result.
•Set cooking containers, pans, trays and racks on a hot pad, trivet or other heat
protective surface. Do not set directly on the counter, table or other surface.
•Failure to clean after each use may result in fire hazard.
•Unplug oven and close door if fire is observed.
•A short power-supply cord is provided to reduce risks resulting from becoming
entangled in or tripping over a longer cord.
•Longer, detachable power-supply cords or extension cords are available and
may be used if care is exercised in their use. While use of an extension cord is
not recommended, if you must use one, the marked electrical rating of the
detachable power-supply cord or extension cord should be at least as great as
the electrical rating of the appliance. If the appliance is of the grounded type,
the extension cord should be a grounding-type 3-wire cord. The cord should be
arranged so that it will not hang over the counter top or tabletop where it can be
pulled by children or tripped over.
•Do not attempt to repair this product yourself.
SAVE THESE INSTRUCTIONS
3

ACCESSORIES
Oven Rack
Spit, Forks &
Thumbscrew
Handle
Temperature
Control
Function
Control
Broil Grid
Drip Pan
Indicator
Light
Timer Control
Pizza Disc Crumb Tray
Oven Rack: Your oven includes a chrome plated oven rack. This may be placed in
to the oven in any orientation. Turning the rack upside down will allow for more
space in relation to the heating elements allowing taller foods to fit in to the oven.
Drip Pan and Broil Grid: The broil grid allows fat to drip in to the drip pan,
channeling grease away from food, helping to prevent spattering. The broil grid is
always used with the drip pan. Never use the broil grid by itself as grease may
drip onto a heating element creating a fire hazard. The drip pan may be used by
itself for baking or reheating items.
Rotisserie, handle and forks: The rotisserie consists of a rotating rotisserie rod,
rotisserie forks, handle and thumbscrews to adjust the forks. Insert the oven rack in
the bottom position and place the drip pan on top of the oven rack to catch fat
drippings. Always tighten the thumbscrews on the forks to prevent food from
dislodging during cooking. Use the rotisserie handle provided to easily slip the rod
and food into the drive mechanism. The pointed end of the square drive rod must be
inserted into the rotating rotisserie drive inside the oven.
Pizza Disc: This oven is equipped with a 12” pizza disc to allow for even baking of
pizzas. Do not bake any pizza larger than 12” in this oven.
Crumb Tray: Allows for easy disposal of crumbs.
CONVECTION COOKING
Convection cooking combines hot air movement by means of a fan and provides
faster cooking in many cases than regular radiant type countertop ovens. The fan
sends air to every area of the food, quickly sealing in moisture and flavor producing
more of an even temperature all around the food. If you hear a motor running
(humming) it’s the convection feature hard at work.
4

POSITIONING RACKS
To accommodate a wide variety of foods, the oven rack is reversible and has three
rack positions. The rack can be inserted in the up or down position in to any of the
rack support guides located along the oven sidewalls.
Rack in UP position Rack in DOWN position
USING YOUR COUNTERTOP OVEN
Before first use: Remove any stickers or labels from heating surfaces. Make sure
the oven is free from any paper or objects not intended for use in the oven. Clean
the interior, oven rack, pans, trays and other accessories as described in the
“Cleaning Your Countertop Oven” section of this manual.
•Some smoke and/or odor may occur upon heating due to the release of
manufacturing oils – this is normal.
•Some minor expansion/contraction sounds may occur during heating and cooling
– this is normal.
•You may hear a humming sound coming from the motor during convection
cooking – this is normal.
Recommended Pan Sizes – The following pan sizes should fit your Countertop
Oven. To be sure the pan will fit, place the pan inside the oven prior to preparing
your recipe. When baking in loaf pans, we recommend you do not fill the pan more
than half full.
•12-cup mini muffin pan
•6-cup muffin pan
•8 x 4 loaf pan
•9 x 5 loaf pan
•8” round or square baking pan or dish
•1-1½ quart casserole dish – most types
Note: Because your countertop oven is smaller than your regular oven, it will heat up
faster and cook in shorter periods of time. You may want to adjust the recipes
cooking time or temperature.
5

6
Basic Use:
1. Plug the cord in to a 120 volt, AC electrical outlet ONLY.
2. Place the oven rack, trays and pans in to the desired position.
3. Set the function control to the desired setting.
4. Set the temperature control to the desired cooking temperature.
5. Set the timer control and allow the oven to preheat for 10 minutes. Note: When
setting the timer for less than 15 minutes, you must turn the timer past the 15
minute mark and then back to the number of minutes you wish to time. This
must be done to activate timer and turn the appliance on. Note: The “TOAST”
function requires no preheating.
6. After the oven has preheated, place the food in the proper cooking container on
to the oven rack. Note: Food should never be placed directly on the racks.
7. Set the timer control to the desired cooking time.
8. When the time has elapsed, a bell will sound and the oven will turn off
automatically. Using hot pads or oven mitts open the door and remove the
cooking container. Unplug from the electrical outlet. Allow the oven to cool
completely before cleaning.
CAUTION: Use extreme caution when opening the door and keep your hands and
face away because very hot air or steam may be released. Do not rest cooking
containers on glass door as damage could occur.
Warm Function: To be used for keeping cooked foods warm.
1. Arrange food items in proper cooking containers on to oven rack. Note: Food
should never be placed directly on to the racks.
2. Set the function control to “WARM.”
3. Set the temperature control to the desired temperature for warming. Only the
top heating elements will operate.
4. Set the timer control to the desired time setting. When the time has elapsed, a
bell will sound and the oven will turn off automatically. Use hot pads or oven
mitts, open the door and remove the cooking container. Unplug from the
electrical outlet. Allow the oven to cool completely before cleaning.

7
Broil Function:
1. Place the broil grid in to the drip pan. Place the food item on to the broil grid (do
not allow food to hang over the grid).
2. Place the oven rack in to a rack support guide in either the up or down position.
Place the broil grid, drip pan and food on to the oven rack. Ensure there is at
least a 1” clearance between the food and the heating elements.
3. Set the function control to “BROIL.”
4. Set the temperature control to “MAX” (490°F - 254.44°C).
5. Set the timer control to the desired time. When the time has elapsed, a bell will
sound and the oven will turn off automatically. Using hot pads or oven mitts
open the door and remove the drip pan, grid and food. CAUTION: Use
extreme caution when opening the door and keep your hands and face away
because very hot air or steam may be released. Do not rest cooking containers
on the glass door because damage could occur.
Broiling Guide
Cooking results may vary; adjust these times to suit your individual requirements.
Check often during broiling to avoid overcooking. All broiling times are based on
meats that are at a thawed temperature. For best results, pre-heat the countertop
oven for 15 minutes at the desired cooking temperature.
MEAT OVEN TEMP COOKING TIME
Hamburger 400°F (205°C) 15-20 min.
T-Bone Steak 400°F (205°C) 20-25 min.
Pork Chops 400°F (205°C) 20-25 min.
Lamb Chops 400°F (205°C) 20-25 min.
Chicken Legs 400°F (205°C) 30-35 min.
Fish Filets 350°F (175°C) 20-25 min.

Rotisserie Function: We recommend that you do not cook anything larger than a
4lb. roast or poultry on the rotisserie. Season as desired or baste with your favorite
sauces.
1. Slide the oven rack in to the lowest rack guide position in the down position.
Place the drip pan on this rack to catch the food drippings.
2. Insert the pointed end of the spit through one of the forks, making sure the
points of the fork face in the same direction as the pointed end of the spit. Slide
the fork towards the square end of the spit and secure with the thumbscrew.
3. Place the food to be cooked onto the spit by inserting the spit (pointed away
from you) directly through the center of the food embedding it completely.
4. Slide the second fork onto the spit at the other end of the roast or poultry.
Continue to slide the fork until it is securely embedded in the food. Secure the
fork with the thumbscrew. Ensure the food is
centered on the spit. Note: Foods may change
shape during cooking. Check to make sure there is
at least a 1” clearance between food and heating
elements at all times during the cooking cycle.
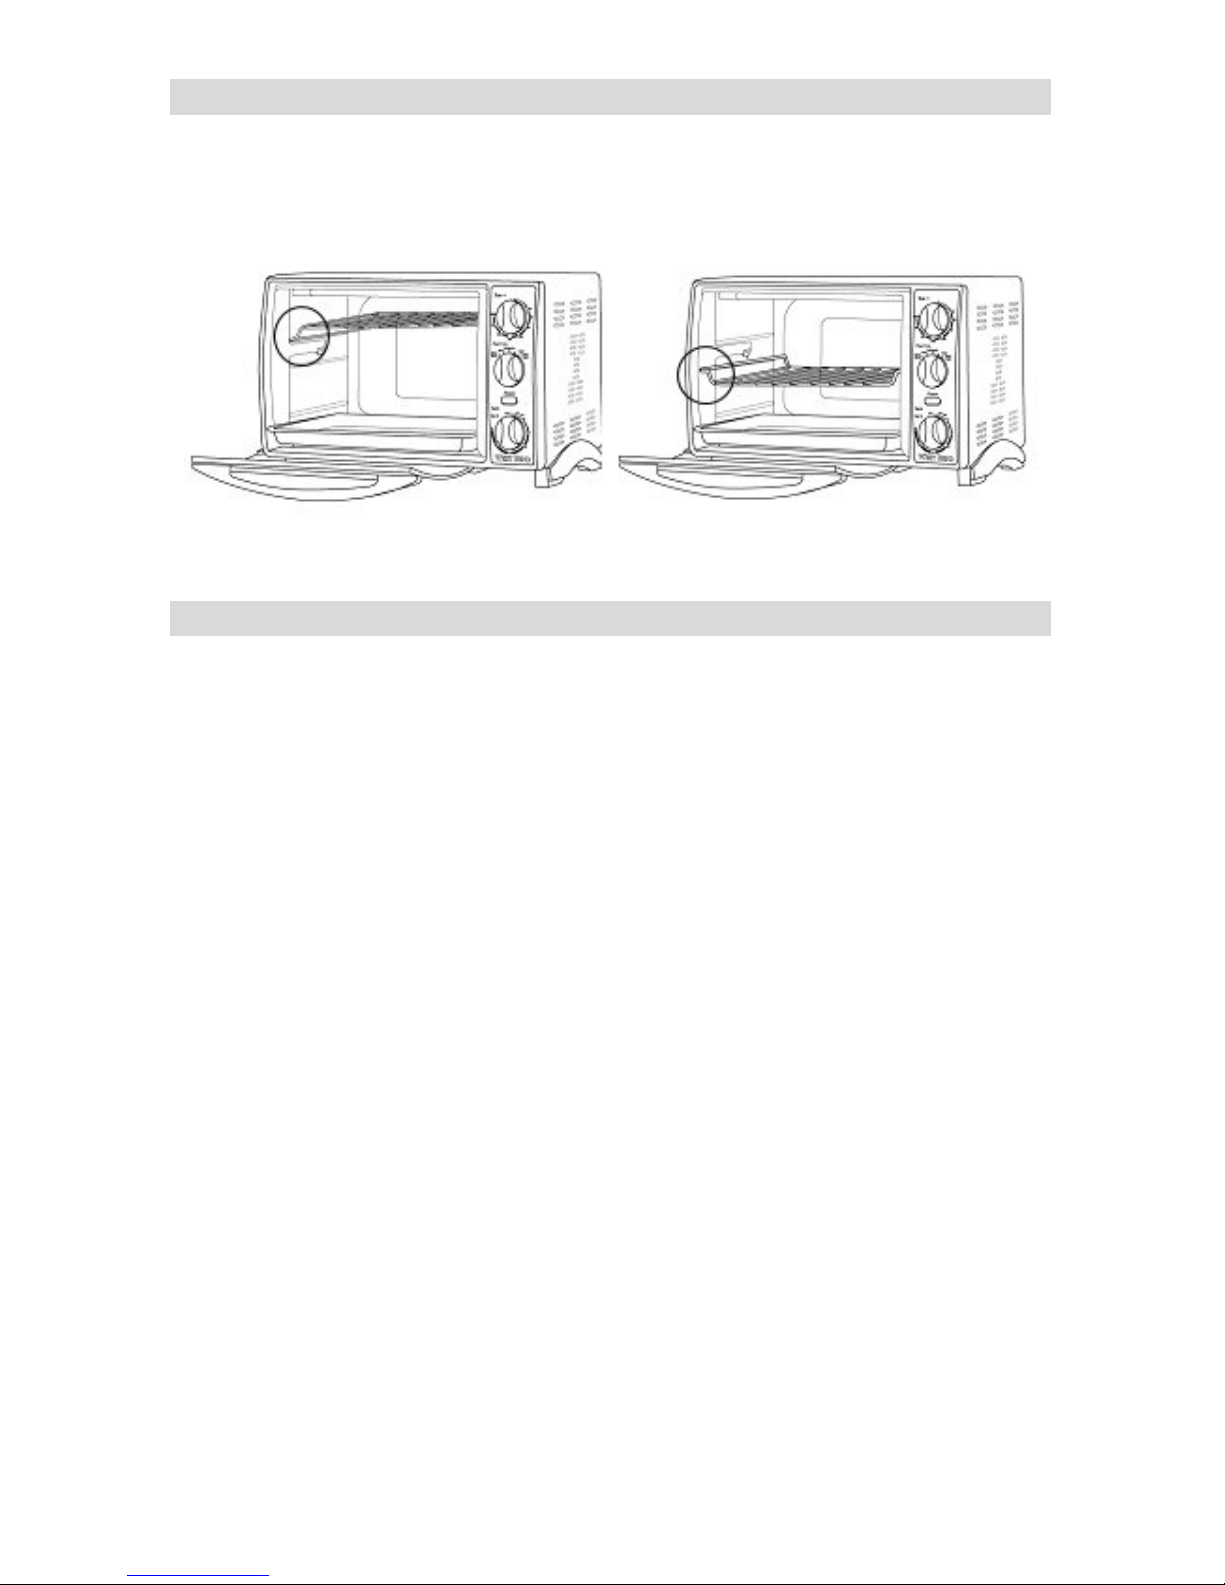
5. Insert the pointed end of the spit in to the drive socket located on the right-hand
side of the oven wall. Make sure the square end of the spit rests in the spit
support located on the left-hand side of the oven wall.
6. Set the temperature control to “MAX” (490°F - 254.44°C).
7. Set the function control to “ROTISSERIE.”
8. Turn the timer ontrol counter-clockwise to “STAY ON.” Check the meat
temperature with a reliable meat thermometer. Tip: Use an independent timer
to remind you to check the meat temperature.
9. When cooking has been completed, turn the timer control clockwise to “OFF.”
CAUTION: Use extreme caution when opening the door and keep your hands
and face away because very hot air or steam may be released. Do not rest
cooking containers on glass door as damage could occur.
10. Using hot pads or oven mitts, open the door and remove the spit by placing the
hooks of the rotisserie handle under the grooves on either side of the spit. Lift
the left side of the spit first by lifting it up and out. Pull the spit out of the drive
socket and carefully remove the food from the oven. Unscrew the thumbscrew
from the pointed end of the spit and remove the fork. Remove the meat from
the spit and place onto a serving platter. Tip: For delicious gravy, reserve the
drippings and thicken with cornstarch or flour in a stovetop pan. DO NOT place
drip pan directly on to a stove burner.
8

9
Rotisserie Cooking Guide
Cooking results may vary; adjust these times to suit your individual requirements. All
rotisserie times are based on cooking meats at a thawed temperature. For best
results, pre-heat the countertop oven for 15 minutes on the desired cooking
temperature.
MEAT OVEN TEMP TIME PER LB.
Beef Roast 300-325°F (150° -165°C) 25-30 min.
Pork Roast 325°F (165°C) 40-45 min.
Ham 300-325°F (150°-165°C) 35-40 min.
Chicken 350°F (175°C) 25-30 min.
Note: Chicken should be bound in string to prevent the chicken legs or wings from
unraveling during roasting and ensure the rotisserie assembly rotates smoothly.
Toast Function: The large capacity oven allows for toasting 4 to 6 slices of bread, 6
English muffin halves, frozen waffles or pancakes. When toasting only 1 or 2 items,
place the food in the center of the oven.
1. Ensure the crumb tray is in position.
2. Place the oven rake in to the middle rack support guide in the up position. Place
food to be toasted onto the oven rack.
3. Set the temperature control to “MAX” (490°- 254.44°C).
4. Set the function control to “TOAST” setting.
5. Set the timer control to the desired darkness (Light - Dark).
6. When toasting is complete, remove the oven rack using hot pads or oven mitts.
Tips: If toasting several batches of bread, one after the other, set the timer
control one setting lighter after the first batch as the oven will be warm and
require less toasting time.

10
Bake/Roast Function: CAUTION: Do not use roasting bags, plastic or glass
containers in the oven as damage could occur.
1. Position the oven rack in to the bottom rack support guide.
2. Place item to be cooked (in proper cooking container) onto the oven rack.
3. Set the temperature control to the desired temperature.
4. Set the function control to “BAKE/ROAST.” Preheat the oven if necessary.
5. Turn the timer control counter-clockwise to desired time or the “STAY ON”
position. When baking is complete, turn the timer control clockwise to “OFF.”
Use hot pads or oven mitts to open the door and remove the cooking container.
CAUTION: Use extreme caution when opening the door and keep your hands
and face away because very hot air or steam may be released. Do not rest
cooking containers on glass door as damage could occur.
Baking/Roasting Guide
All roasting times are based on cooking meats at a thawed temperature. Frozen
meats may take much longer. Use of a meat thermometer is highly recommended.
Cooking results may vary; adjust these times to suit your individual requirements.
For best results, pre-heat the countertop oven for 15 minutes on the desired cooking
temperature.
MEAT OVEN TEMP TIME PER LB.
Pork Roast 325°F (165°C) 40-45 min.
Beef Roast 300-325°F (150°-165°C) 25-30 min.
Ham 300-325°F (150°-165°C) 35-40 min.
Chicken 350°F (175°C) 25-30 min.
Follow the package or recipe directions for baking times and temperatures when
baking your favorite cookies, cakes and pies. For easy cleanup, you may want to
position the drip pan in to the bottom of the oven to catch any spillover.
Baking Pizzas:
1. Place the oven rack in to the middle rack support guide.
2. Set temperature control to “MAX” (490°F - 254.44°C).
3. Set function control to “BAKE/ROAST.”
4. Preheat oven for 10 minutes. Place pizza on pizza disc and slide disc onto the
oven rack making sure it is as far back as it will go inside the oven. Bake to
desired doneness. For optimal browning performance do not insert the drip pan.

11
Slow Cooking: Cook stews, soups, rump roast and briskets and a large variety of
other foods in your Countertop Oven by cooking 6-10 hours at the “BAKE/ROAST”
setting between 225°F (107°C) - 250°F (121°C). Use the cooking times given in
your favorite recipe.
1. Place the oven rack in to the lower or middle rack support guide.
2. Set the temperature control to 225°F (107°C).
3. Set the function control to “BAKE/ROAST.”
4. Place food to be cooked in a covered casserole dish and place on rack in oven.
5. Turn the timer control counter-clockwise to “STAY ON.” When baking is
complete, turn the timer control clockwise to “OFF.” Using hot pads or oven
mitts open the door and remove the cooking container. CAUTION: Use
extreme caution when opening the door and keep your hands and face away
because very hot air or steam may be released. Do not rest cooking containers
on glass door as damage could occur.
CLEANING YOUR COUNTERTOP OVEN
CAUTION: Before cleaning any part of the oven, always set the timer control to
“OFF,” unplug the cord from the electrical outlet and allow the oven to cool
completely.
To keep your countertop oven clean, wipe away food spills, spatters and crumbs
after each use.
1. The oven rack, drip pan, broil grid, crumb tray, rotisserie spit and forks may be
washed in warm, soapy water with a dishcloth, rinsed and dried or in an
automatic dishwasher. Do not use any metal or abrasive scouring pads or
cleaners on these parts as damage to the finish may occur.
2. Wipe the exterior of the oven and glass door with a soft, damp cloth and dry. Do
not use any type of scouring pad or cleaner on the exterior surfaces or the glass
door as scratching will occur. If glass is scratched, it can weaken and shatter.
3. Wipe the interior of the oven with a damp cloth, wipe clean and dry. Do not use
any metal or abrasive scouring pads, cleaners or oven cleaner on the inside of
oven, as damage will occur. Be careful when wiping around the heating
elements to prevent damage.

12
TROUBLESHOOTING GUIDE
PROBLEM POTENTIAL
CAUSE SOLUTION
Incorrect
temperature or
setting
Adjust time or temperature.
Because your countertop oven is
smaller than your regular oven, it
will heat up faster and cook in
shorter periods of time.
Overcooked/under
cooked foods
Rack placement Racks may need to be adjusted
to accommodate specific food
types.
Burnt smell Food build-up
inside oven, on
heating elements
or in crumb tray.
Refer to “Cleaning Your Oven”
section.
Oven does not turn
on Unit is
unplugged.
Timer is not on.
Plug unit in to electrical outlet
Turn timer control to desired
setting.
Only one heating
element is heating Function setting
is on “WARM” Change function setting to
correct position.
Heating element does
not stay on Heating elements
will cycle on and
off to maintain the
proper
temperature.

13
L5658B 06/08 West Bend®, a Brand of Focus Electrics, LLC. Printed in China
PRODUCT WARRANTY
Appliance 1 Year Limited Warranty
Focus Electrics, LLC (“Focus Electrics”) warrants this appliance from failures in the material
and workmanship for one (1) year from the date of original purchase with proof of purchase,
provided the appliance is operated and maintained in conformity with the provided Instruction
Manual. Any failed part of the appliance will be repaired or replaced without charge at Focus
Electrics’ discretion. This warranty applies to indoor household use only.
This warranty does not cover any damage, including discoloration, to any non-stick surface of
the appliance. This warranty is null and void, as determined solely by Focus Electrics if the
appliance is damaged through accident, misuse, abuse, negligence, scratching, or if the
appliance is altered in any way.
THIS WARRANTY IS IN LIEU OF ALL IMPLIED WARRANTIES, INCLUDING WARRANTIES
OF MERCHANTABILITY, FITNESS FOR A PARTICULAR PURPOSE, PERFORMANCE, OR
OTHERWISE, WHICH ARE HEREBY EXCLUDED. IN NO EVENT SHALL FOCUS
ELECTRICS BE LIABLE FOR ANY DAMAGES, WHETHER DIRECT, INDIRECT,
INCIDENTAL, FORSEEABLE, CONSEQUENTIAL, OR SPECIAL, ARISING OUT OF OR IN
CONNECTION WITH THIS APPLIANCE.
If you think the appliance has failed or requires service within its warranty period, please
contact the Focus Electrics Customer Service Department at (866) 290-1851, or e-mail us at
[email protected]. A receipt proving the original purchase date will be required for all
warranty claims, hand written receipts are not accepted. You may also be required to return
the appliance for inspection and evaluation. Return shipping costs are not refundable. Focus
Electrics is not responsible for returns lost in transit.
Valid only in USA and Canada
REPLACEMENT PARTS
Replacement parts, if available, may be ordered directly from Focus Electrics, LLC several
phone by calling (866)290-1851, or by writing to:
Focus Electrics, LLC
Attn: Customer Service
P. O. Box 2780
West Bend, WI 53095
To order with a check or money order, please first contact Customer Service for an order total.
Mail your payment along with a letter stating the model or catalog number of your appliance,
which can be found on the bottom or back of the unit, a description of the part or parts you are
ordering, and the quantity you would like. Your check should be made payable to Focus
Electrics, LLC.
Your state/province’s sales tax and a shipping fee will be added to your total charge. Please
allow two weeks for processing and delivery.
This manual contains important and helpful information regarding the safe use and care of your
new Focus Electrics product. For future reference, attach dated sales receipt for warranty proof
of purchase and record the following information:
Date purchased or received as gift: _______________________________________________
Where purchased and price, if known: _____________________________________________
Item number and Date Code (shown bottom/back of product):___________________________

FOUR A POSER SUR UN PLAN DE
TRAVAIL
Mode d’emploi
Enregistrez ce produit et d’autres produits Focus Electrics sur notre site Web:
www.focuselectrics.com
Précautions Importantes ..........................................................................................2
Précautions D’Utilisation ..........................................................................................3
Accessoires..............................................................................................................4
Positions des Grilles.................................................................................................5
Utilisation de Votre Mini-Four...................................................................................5
Nettoyage de Votre Mini-Four................................................................................11
Guide de Dépannage.............................................................................................12
Garantie .................................................................................................................13
CONSERVEZ CE MANUEL D’INSTRUCTIONS POUR RÉFÉRENCE FUTURE
©2008 West Bend®, une Marque de Focus Electrics, LLC.
www.focuselectrics.com

PRECAUTIONS IMPORTANTES
Pour empêcher toute blessure physique ou tout dommage matériel, lisez et
suivez toutes les consignes et mises en garde.
Lorsque vous utilisez des appareils électriques, les précautions de sécurité
élémentaires devraient toujours être respectées, notamment les précautions ci-
dessous :
•Lisez toutes les instructions, notamment les présentes précautions importantes, ainsi
que les consignes pour l’entretien de ce manuel.
•Ne touchez pas les surfaces chaudes. Utilisez des poignées rectangulaires ou
rondes.
•Pour vous protéger contre tout choc électrique, n’immergez pas le cordon, les fiches
ni aucune autre pièce électrique dans l’eau ni dans tout autre liquide.
•Une surveillance étroite est nécessaire lorsque vous cet appareil est utilisé par ou à
proximité d’enfants.
•Débranchez l’appareil de la prise électrique lorsqu’il n’est pas utilisé et avant de le
nettoyer. Laissez l’appareil refroidir avant la mise en place ou le retrait de pièces et
avant tout nettoyage.
•N’utilisez pas cet appareil avec un cordon abîmé ou une fiche détériorée, si l’appareil
a connu un disfonctionnement ou si l’appareil est tombé ou a été détérioré de quelque
manière que ce soit. Si vous rencontrer un problème quel qu’il soit avec votre
appareil, débranchez-le immédiatement de la prise secteur. Pour des informations
sur les réparations, voir la page de garantie.
•L’utilisation d’accessoires non recommandés par Focus Electrics risque de causer un
incendie, une électrocution ou des blessures.
•N’utilisez pas cet appareil à l’extérieur.
•Ne laissez pas pendre le cordon du bord du plan de travail ou de la table et assurez-
vous qu'il ne touche pas de surface chaude.
•Ne placez pas cet appareil sur ou à proximité d’un brûleur à gaz ou électrique chaud
ou d’un four chaud.
•Soyez extrêmement prudent lorsque vous déplacez un appareil contenant de l’huile
chaude ou tout autre liquide chaud.
•Pour débrancher, régler l’interrupteur à « OFF » et retirer ensuite la fiche de la prise
murale.
•N’utilisez pas l’appareil pour une autre utilisation que l’utilisation indiquée.
•Cet appareil est pourvu d’une fiche polarisée (une lame est plus large que l’autre).
Pour réduire le risque d’électrocution, cette fiche est conçue pour s’encastrer dans
une prise secteur polarisée dans un sens uniquement. Si la fiche ne s’insère pas
complètement dans la prise secteur, retournez la fiche. Si elle ne s’encastre toujours
pas, contactez un électricien qualifié. Ne tentez pas de modifier la fiche de quelque
manière que ce soit.
•Utilisez la plus extrême prudence lorsque vous retirez le plateau ou jetez la graisse
chaude.
•Ne le nettoyez pas à l’aide de tampons à récurer métalliques. Des morceaux risquent
de se détacher du tampon à récurer et d’entrer en contact avec les parties
électriques, créant ainsi un risque d’électrocution.
2

•Aucun aliment de grande taille ni ustensile métallique ne doit être inséré dans cet
appareil car cela risque de provoquer un risque d’incendie ou d’électrocution.
•Un incendie risque de se produire si l’appareil est couvert d’une matière inflammable
ou entre en contact avec une telle matière, notamment les rideaux, les tentures, les
parois et des matières équivalentes, pendant son fonctionnement. Ne rangez aucun
objet au-dessus de l’appareil pendant son fonctionnement.
•Une attention extrême devrait être apportée lors de l’utilisation de récipients
constitués de matières autres que le métal ou le verre.
•Ne ranger aucun objet, autre que les accessoires recommandés par le fabricant, à
l’intérieur de ce four lorsque vous ne l’utilisez pas.
•Ne placez aucune des matières suivantes à l’intérieur du four : plastique, papier ou
carton.
•Ne couvrez pas les grilles, les tiroirs ni aucune autre des pièces du four de feuille
d’aluminium car cela provoquerait une surchauffe.
•Réglez toujours la Minuterie et le Sélecteur de source de chaleur sur « OFF » puis
débranchez l’appareil électrique de la prise secteur lorsque vous ne l’utilisez pas et
avant de le nettoyer.
•Pour une utilisation domestique uniquement.
Pour empêcher toute blessure physique ou tout dommage matériel, lisez et
suivez toutes les consignes et mises en garde.
PRECAUTIONS D’UTILISATION
•Cet appareil n’est pas conçu pour chauffer de l’huile ni tout autre liquide.
•N’utilisez pas d’ustensile tranchant pour le nettoyage de la porte vitrée du four car les
rayures risqueraient de l’affaiblir et de la faire voler en éclats.
•Ne touchez pas les éléments chauffants car des brûlures graves peuvent en résulter.
•Posez les récipients, plats, tiroirs et grilles sur une manique, une grille ou toute autre
surface résistante à la chaleur. Ne les posez pas directement sur le plan de travail,
sur la table ni sur toute autre surface.
•Le fait de ne pas nettoyer l’appareil après chaque utilisation risque de provoquer un
risque d’incendie.
•En cas d’incendie, débranchez le four puis fermez la porte du four.
•Le cordon d’alimentation fourni est court pour réduire les risques qu’une personne se
prenne les pieds ou trébuche sur un cordon plus long.
•Des cordons d’alimentations plus longs détachables ou des cordons de rallonge sont
disponibles et peuvent être utilisés à condition de faire preuve de prudence lors de
leur utilisation. Bien que l’utilisation d’un cordon de rallonge ne soit pas
recommandée, si vous devez en utiliser un, la puissance nominale indiquée pour le
cordon d’alimentation détachable ou pour le cordon de rallonge devrait être au moins
aussi importante que la puissance nominale de l’appareil. Si l’appareil est de type
raccordé à la terre, le cordon de rallonge devrait être relié à la terre et composé de
trois fils. Le cordon devrait être disposé de manière à ne pas pendre depuis le plan de
travail d’où il risque d’être tiré par des enfants ou d’où quelqu’un pourrait s’y prendre
les pieds.
•N’essayez pas de réparer cet appareil vous-même.
3
CONSERVEZ CES CONSIGNES

ACCESSOIRES
Grille du Four
Broche,
Fourchons &
Vis à Serrage
Manuel
Poignée
Contrôle de la
Température
Contrôle des
Fonctions
Grille du Gril
Egouttoir
Voyant Indicateur
Contrôle de la
Minuterie
Disque à
Pizza Tiroir de
Récupération des
Miettes
Grille du Four : Votre four est livré avec une grille de four chromée. Celle-ci peut être
placée dans le four selon l’orientation de votre choix. Le fait de retourner la grille libèrera
davantage d’espace par rapport aux éléments de chauffage et permettra de placer des
aliments plus volumineux à l’intérieur du four.
Egouttoir et Grille Du Gril : La grille du gril permet à la graisse de s’écouler vers
l’égouttoir, évacuant ainsi la graisse loin des aliments afin d’éviter toute projection. La
grille du gril s’utilise toujours avec l’égouttoir. N’utilisez jamais la grille du gril seule
car la graisse risquerait de s’écouler vers un élément chauffant et de provoquer un
risque d’incendie. L’égouttoir peut être utilisé seul pour la cuisson ou le réchauffage
d’aliments.
Rôtissoire, Poignée et Fourchons : La rôtissoire est composée d’une broche de
rôtissoire pivotante, de fourchons à rôtir, d’une poignée et de vis à serrage manuel
permettant de régler les fourchons. Insérez la grille du four en position basse puis placez
l’égouttoir au-dessus de la grille du four afin de récupérer les écoulements de graisse.
Serrez toujours la vis à serrage manuel sur les fourchons afin d’empêcher les aliments de
se détacher pendant la cuisson. Utilisez la poignée de la rôtissoire fournie afin de faire
glisser facilement la broche dans le mécanisme d’entraînement. L’extrémité pointue de la
tige d’entraînement carrée doit être insérée à l’intérieur de l’entraînement de rotation de la
rôtissoire à l’intérieur du four.
Disque à Pizza : Ce four est équipé d’un disque à pizza de 12” (30 cm) pour une cuisson
homogène des pizzas. Ne cuisez aucune pizza de plus de 12” dans ce four.
Tiroir de Récupération Des Miettes : Permet de retirer facilement les miettes.
CUISSON PAR CONVECTION
La cuisson par convection ajoute le déplacement de l'air chaud par un ventilateur et
obtient dans la plupart des cas une cuisson plus rapide que celle qu’on obtient avec les
mini-fours à rayonnement conventionnels. Le ventilateur fait circuler l’air sur toute la
surface de l’aliment afin de conserver au plus tôt le jus et la saveur tout en équilibrant la
température autour de la nourriture. Si vous entendez tourner le moteur (ronronner) c’est
que la fonction convectrice est en train de fonctionner.
4

POSITIONS DES GRILLES
Afin de s’adapter à une grande diversité d’aliments, la grille du four est réversible et peut
être positionnée à trois emplacements. La grille peut être insérée en position haute ou
basse dans les supports de guidage situés sur les parois latérales du four.
Grille en position HAUTE Grille en position BASSE
UTILISATION DE VOTRE MINI-FOUR
Avant la première utilisation : Retirez tout autocollant ou toute étiquette se trouvant sur
les éléments chauffants. Vérifiez que le four ne contient aucun papier ni objet non destiné
à une utilisation dans ce four. Nettoyez l’intérieur, la grille du four, les plats, les tiroirs et
les autres accessoires selon la description fournie dans la section « Nettoyage de Votre
Four/Gril » du présent manuel.
•Il est possible que de la fumée et une légère odeur se dégagent pendant le chauffage
en raison de la diffusion des huiles de fabrication : c’est tout à fait normal.
•De petits bruits d’expansion/contraction peuvent être produits pendant le chauffage et
le refroidissement : c’est tout à fait normal.
•Si vous entendez tourner le moteur (ronronner) c’est que la fonction convectrice est
en train de fonctionner : c’est tout à fait normal.
Taille recommandée pour les plats de cuisson – Les tailles suivantes devraient
convenir à votre mini-four. Pour être sûr que le plat convient, placez-le à l’intérieur du four
avant de suivre la recette. Si vous voulez cuire dans un moule à pain nous
recommandons de ne pas le remplir au-dessus de la moitié.
•Moule à 12 mini-muffins
•Moule à 6 muffins
•Moule à pain de 8 x 4 pouces
•Moule à pain de 9 x 5 pouces
•Plat de cuisson rond ou carré de 8 pouces
•Cocotte de 1-1½ quart – la plupart des modèles
Remarque : Comme votre mini-four est plus petit que votre four conventionnel, il
chauffera plus vite et les aliments seront cuits en moins de temps. Il faudra sans doute
ajuster la température ou la durée de cuisson indiquées par la recette.
5

6
Utilisation de Base :
1. Branchez le cordon à une prise secteur de 120 volts CA UNIQUEMENT.
2. Placez la grille du four et les tiroirs/plats dans la position souhaitée.
3. Réglez la commande de fonction selon le réglage souhaité.
4. Réglez la commande de température selon la température de cuisson souhaitée.
5. Réglez le contrôle de la minuterie mais laissez le four en préchauffage pendant 10
minutes. Remarque :: Lorsque vous réglez la minuterie à moins de 15 minutes, vous
devez tourner au-delà du repère 15 minutes, puis revenir en arrière jusqu’au nombre
de minutes désiré. Cette opération est nécessaire pour activer la minuterie et allumer
l’appareil. Remarque : La fonction grillade légère (« Toast ») ne nécessite aucun
préchauffage.
6. Une fois le four préchauffé, placez les aliments dans un récipient adapté sur la grille
du four. Remarque : les aliments ne doivent jamais être placés directement sur les
grilles.
7. Réglez la commande de la minuterie selon le temps de cuisson souhaité.
8. Lorsque la durée est écoulée, une sonnerie retentit et le four s’éteint
automatiquement. Utilisez des gants de cuisine ou des maniques pour ouvrir la
porte puis retirez le récipient de cuisson du four. Débranchez la fiche de la prise
secteur. Laissez le four refroidir complètement avant de le nettoyer.
ATTENTION : Soyez extrêmement attentif à maintenir les mains et le visage à l’écart de
la porte lors de son ouverture car de vapeur ou de l’air chaud risquent de s’en échapper.
Ne posez pas de récipient de cuisson sur la porte vitrée car cela risque de la détériorer.
Fonction Maintien au chaud (Warm) : A utiliser pour maintenir au chaud des aliments
cuits.
1. Placez les aliments, dans des récipients adaptés, sur la grille du four. Remarque :
les aliments ne devraient jamais être placés directement sur les grilles.
2. Réglez le contrôle de fonction sur maintien au chaud « WARM ».
3. Réglez la commande de température selon la température de maintien au chaud
souhaitée. Seuls les éléments chauffants du haut fonctionneront.
4. Réglez la commande de la minuterie selon le réglage souhaité. Lorsque la durée est
écoulée, une sonnerie retentit et le four s’éteint automatiquement. Utilisez des gants
de cuisine ou des maniques pour ouvrir la porte puis retirez le récipient de cuisson
du four. Débranchez la fiche de la prise secteur. Laissez le four refroidir
complètement avant de le nettoyer.

7
Fonction Gril :
1. Placez la grille du gril dans l’égouttoir. Placez les aliments sur la grille du gril (ne
laissez pas les aliments pendre au-delà de la grille).
2. Placez la grille du four dans les guides de support en position haute ou en position
basse. Placez la grille du gril, l’égouttoir et les aliments sur la grille du four. Vérifier
la présence d’au moins 1” (2,50 cm) d’espace dégagé entre les aliments et les
éléments de chauffage.
3. Réglez le contrôle de fonction sur grill « BROIL ».
4. Réglez le contrôle de température au « MAX » (490°F/254.44°C).
5. Positionnez la commande de la minuterie sur le réglage souhaité. Lorsque le temps
imparti est écoulé, une sonnerie retentit et le four s’éteint automatiquement. Utilisez
des gants de cuisine ou des maniques pour ouvrir la porte puis retirez l’égouttoir, la
grille et les aliments du four. ATTENTION : Soyez extrêmement attentif à maintenir
les mains et le visage à l’écart de la porte lors de son ouverture car de vapeur ou de
l’air chaud risquent de s’en échapper. Ne posez pas de récipient de cuisson sur la
porte vitrée car cela risquerait de la détériorer.
Guide Pour Les Grillades
Les résultats peuvent varier. Ajustez le temps de cuisson à votre goût. Vérifiez souvent
pendant la cuisson au grilloir pour éviter toute cuisson excessive. Tous les temps de
rôtissage sont indiqués pour des viandes non congelées. Pour un meilleur résultat,
préchauffez le mini-four pendant 15 minutes à la température de cuisson souhaitée.
VIANDE TEMP DURÉE
Hamburger 400°F (205ºC) 15-20 min.
Steak d’aloyau 400°F (205ºC) 20-25 min.
Côtelettes de porc 400°F (205ºC) 20-25 min.
Côtelettes d’agneau 400°F (205ºC) 20-25 min.
Cuisses de poulet 400°F (205ºC) 30-35 min.
Filets de poisson 350°F (175ºC) 20-25 min.
This manual suits for next models
1
Table of contents
Languages:
Other West Bend Oven manuals

West Bend
West Bend AFWB15BK13 User manual

West Bend
West Bend L5659B User manual

West Bend
West Bend Chris Freytag Countertop Oven User manual

West Bend
West Bend Rotary Oven User manual

West Bend
West Bend Rotisserie Oven User manual

West Bend
West Bend QUIKSERVE 76026 User manual

West Bend
West Bend Studio Toaster User manual

West Bend
West Bend Soho L5704 User manual

West Bend
West Bend 74766 User manual