Westcott FJ-X3 User manual

FJ-X3 Wireless Trigger
User Manual
v 1.2.0
10/13/2022

Contents
Contents 1
Introduction 3
Components (Included) 4
FJ-X3 M Universal Wireless Trigger (#4785) 4
FJ-X3 M Universal Wireless Trigger with Sony Adapter (#4786) 4
FJ-X3 S Wireless Trigger for Sony Cameras (#4788) 4
Important things to know before starting… 5
Reviewing Firmware Files 5
TTL ±3 Flash Exposure Compensation 5
Canon Continuous Mode 5
FJ-X3 Wireless Trigger: Overview 6
Main Screen 7
Settings Menu 7
FJ-X3: Warnings 8
FJ-X3: Firmware Updates 8
FJ-X3: Preparing Your Camera 8
FJ-X3: Getting Started 9
Charging 9
Removing & Replacing the Battery 9
FJ-X3: Mounting & Removing 9
Mounting to a Shoe (Hot/Cold) 9
Removing from a Shoe (Hot/Cold) 10
2.5mm PC Port Connection [Output Only] 10
Mounting with the Adapter for Sony Cameras (Product #: 4711) 10
FJ-X3: Powering On & Off 10
Power On 10
Power Off 10
FJ-X3: Test Fire & Settings Lock 11
Test Firing 11
FJ-X3: Camera Selection 11
FJ-X3: Controls, Modes & Functions 11
Group Controls 11
Change Exposure Mode 11
Change TTL Exposure Compensation 12
Change M (Manual) Exposure Power Output (Individual Group) 12
1

Change M (Manual) Exposure Power Output (All Manual Groups) 12
Group SLP (Sleep) Mode 12
Channel Controls 13
Change Channels [CH] 13
FJ-X3: Syncing 13
Sync Functions 13
Changing the Sync Function 13
HIgh-speed Sync (HSS) 14
Freeze Mode 14
X-Sync Mode 14
FJ-X3: Remote ZOOM 15
Remote FJ80 Series ZOOM Control [Single Group] 15
Remote FJ80 Series ZOOM Control [All Groups] 15
Enabling the Modeling Lamp 15
Enabling an Audible Beep 15
TTL to Manual Exposure 16
FJ-X3: Settings Menu 16
Settings Menu 16
Settings Menu Options 16
Warranty Information 17
Legal Information 18
2

Introduction
Thank you for purchasing the Westcott FJ-X3 Wireless Flash Trigger.
The FJ400, FJ200, FJ80II, FJ80, FJXR (all sold separately), and FJ-X3 Wireless Flash Trigger make-up
what’s known as the FJ Wireless System. The performance of the FJ Wireless System is one of the
industry’s most reliable lighting systems. All of our lights are paired with Lithium Polymer batteries,
ensuring fast recycle times and over 400+ full power flashes on a single charge no matter what light you
selected. This provides all of the power you need to extend your time on location to capture the images
you want. The FJ Wireless System has a 9-stop output range combined with accurate color temperatures
throughout the entire output range to ensure you’re getting color-accurate images every time.
When paired with the FJ-X3 M Wireless Trigger,you can say, “Goodbye,” to the need for multiple
brand-specific triggers. The FJ Wireless System and the FJ-X3m have you covered with their multi-brand
compatibility. This versatile unit offers everything required by professional photographers today to
achieve lighting success - including TTL, HSS, Continuous Capture, Freeze Sync, and so much more. The
FJ-X3 also comes in a Sony-specific model, FJ-X3 S Wireless Trigger, eliminating the need for an Adapter
for Sony Cameras.
One last thing, and this is the important one. Don’t forget that Westcott HQ is based in Maumee, OH, and
our team’s available to answer your questions, Monday-Friday 9 am-5 pm ET. We also have a community
of loyal Westcott users who are ready to share their tips and tricks via the Westcott Lighting Community
on Facebook during the week or on the weekend.
We hope you’re excited to get started with your new lighting tool because we’re excited to see what you
create.
Thank you for your business.
-Team Westcott
3

Components (Included)
FJ-X3 M Universal Wireless Trigger (#4785)
●FJ-X3 M Wireless Trigger
●FJ-X3 Rechargeable Battery
●USB-A to USB-C Cable
FJ-X3 M Universal Wireless Trigger with Sony Adapter (#4786)
●FJ-X3 M Wireless Trigger
●FJ-X3 Rechargeable Battery
●Sony Camera Adapter
●USB-A to USB-C Cable
FJ-X3 S Wireless Trigger for Sony Cameras (#4788)
●FJ-X3 S Wireless Trigger
●FJ-X3 Rechargeable Battery
●USB-A to USB-C Cable
4

Important things to know before starting…
Reviewing Firmware Files
Firmware updates will be made available on the Westcott Firmware Update page:
(https://www.westcott.com/firmware.) Firmware updates often improve the overall performance of the
device or allows for minor updates to the GUI of the FJ Wireless product. Please review ALL
documentation included with each firmware download to ensure all of the necessary preparation steps
are complete before installing the firmware.
TTL ±3 Flash Exposure Compensation
±3 TTL Flash Exposure Compensation (FEC) on the FJ-X3 is independent of the Flash Exposure
Compensation (FEC) on the connected FJ Wireless light. Meaning, a change of the FEC ±3 on the FJ-X3
will adjust the light output in TTL mode; however, the connected FJ Wireless light’s screen will not
indicate the FEC changes made on the FJ-X3. The FJ Wireless light FEC can be further adjusted ±3.
Canon Continuous Mode
When photographing in Canon Continuous Mode, two overlapping squares will be visible on the FJ
Wireless Trigger, and the FJ Wireless System will default to Manual Mode; disabling TTL and HSS
functionality. Exit Continuous Mode on the Canon camera to resume TTL and HSS functionality.
5

FJ-X3 Wireless Trigger: Overview
6

FJ-X3: LCD Display
Main Screen
Settings Menu
7

FJ-X3: Warnings
●Use only with the Westcott FJ-X3 Lithium Polymer Battery.
●Keep away from fire, water, and moisture. Do not submerge in water.
●Avoid drastic temperature changes before, during, and/or after use.
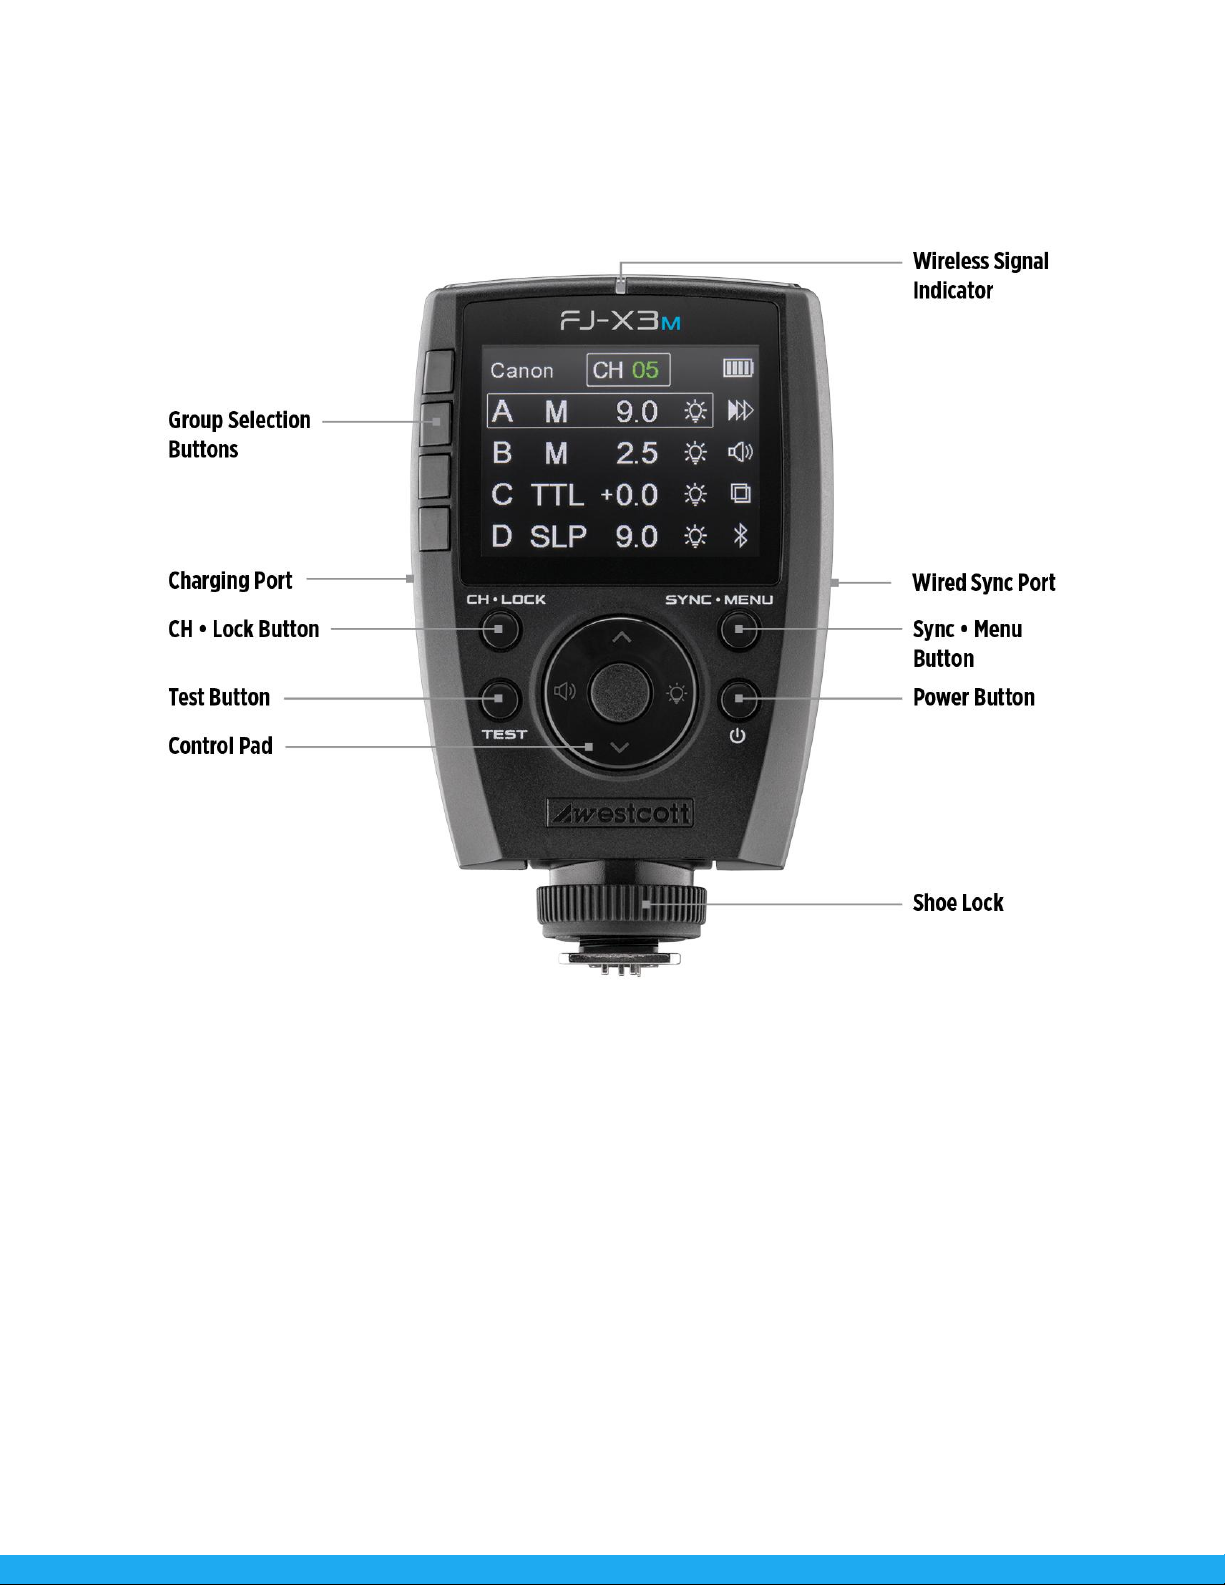
●Do not overtighten the shoe lock wheel when mounting to the camera.
●Always confirm proper installation, locking, and unlocking when adding or removing from the
camera hot shoe. (NOTE: Failure to completely rotate the dial to lock and unlock could
permanently damage the locking pin.)
●Never force the battery into the battery bay.
●Always remove the FJ-X3 Lithium Polymer Battery from the trigger during travel/storage to avoid
accidental operation.
●Surrounding RF interference may affect the communication performance of the FJ-X3.
●Do not attempt to modify any Westcott products. Contact Westcott for assistance.
●The operating temperature range is 14-104°F (-10-40°C).
FJ-X3: Firmware Updates
The FJ-X3 Wireless Transmitter is designed with a USB-C port to allow for firmware updates only. Future
firmware updates will result in performance enhancements, modified menu options, and improved menu
layouts. Please visit https://www.westcott.com/firmware to confirm your FJ-X3 has the latest firmware
before using it.
FJ-X3: Preparing Your Camera
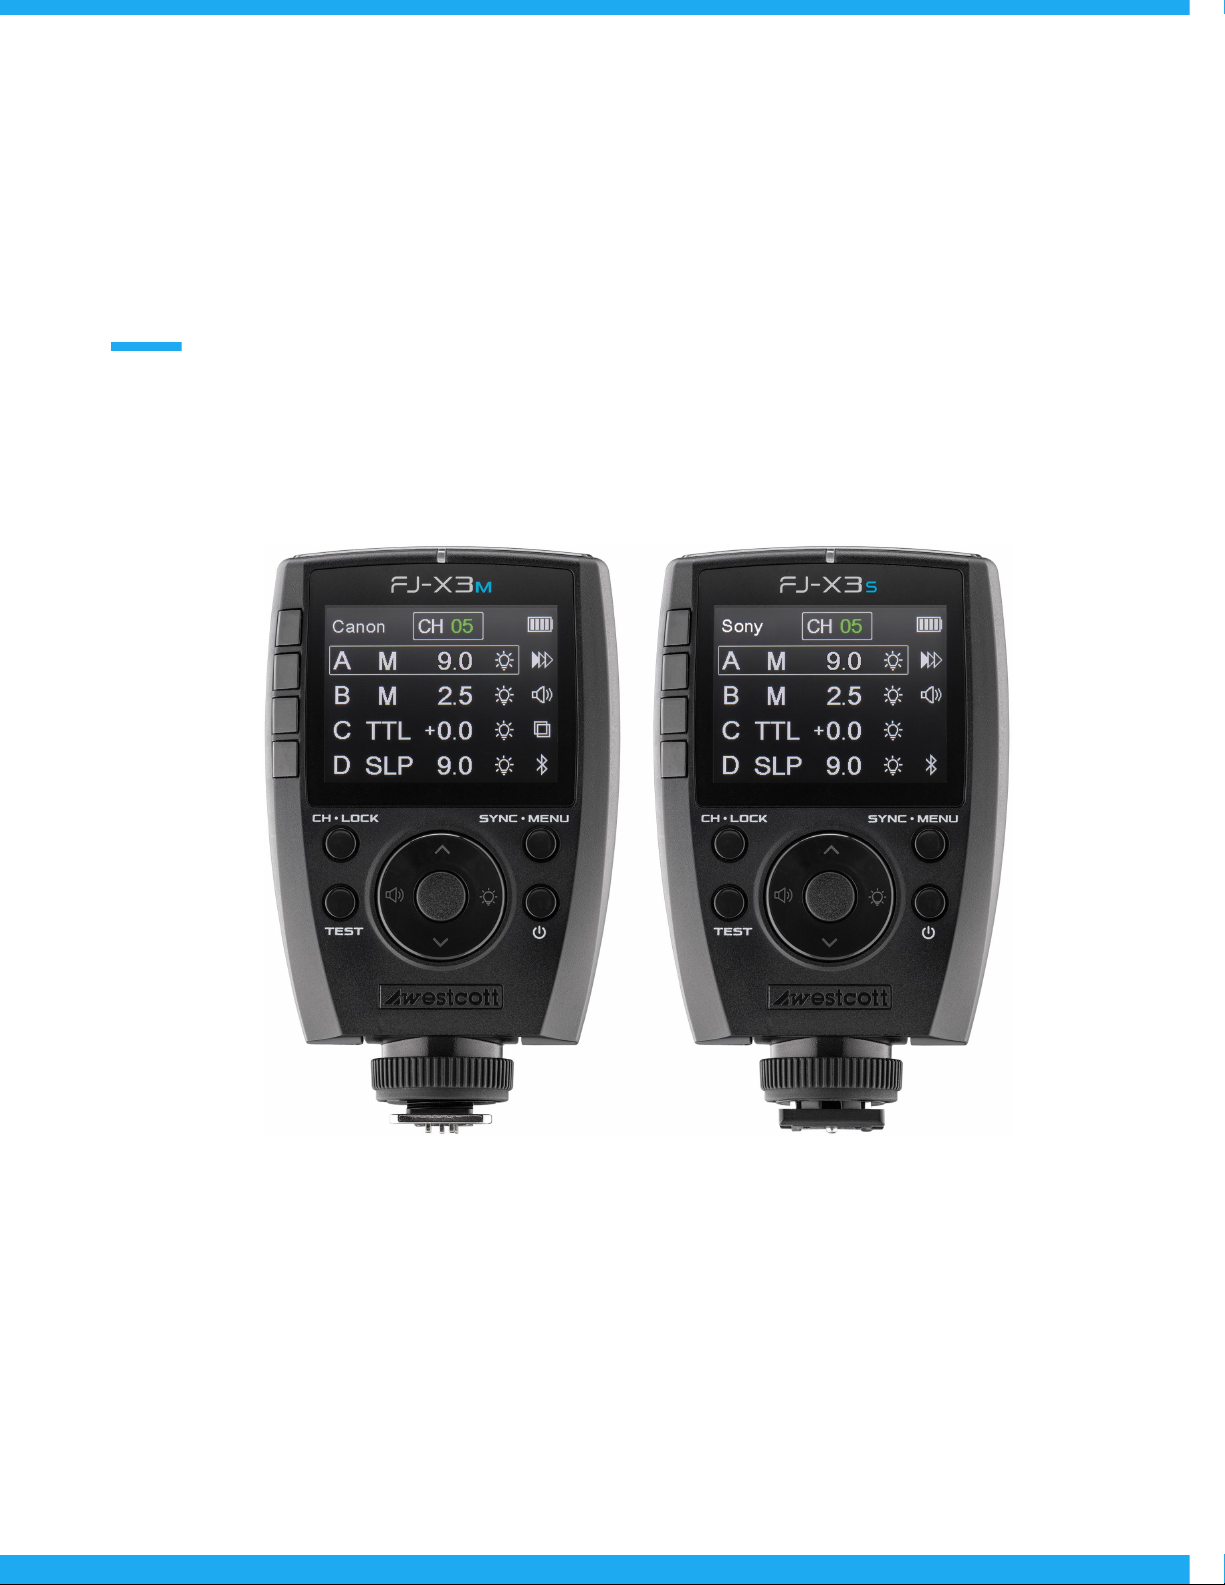
An FJ-X3 Wireless Trigger is compatible with various brands of cameras to communicate with FJ Wireless
devices, including the FJ400, FJ200, FJ80II, FJ80, and FJ-XR. Each camera manufacturer has developed
a unique approach to how their cameras interact with off-camera lights. Therefore, a few adjustments to
your camera settings are required for the FJ-X3 to properly communicate with your camera. Below are a
few settings to check out first. We recommend referring to your camera’s user manual for details specific
to your camera brand and model.
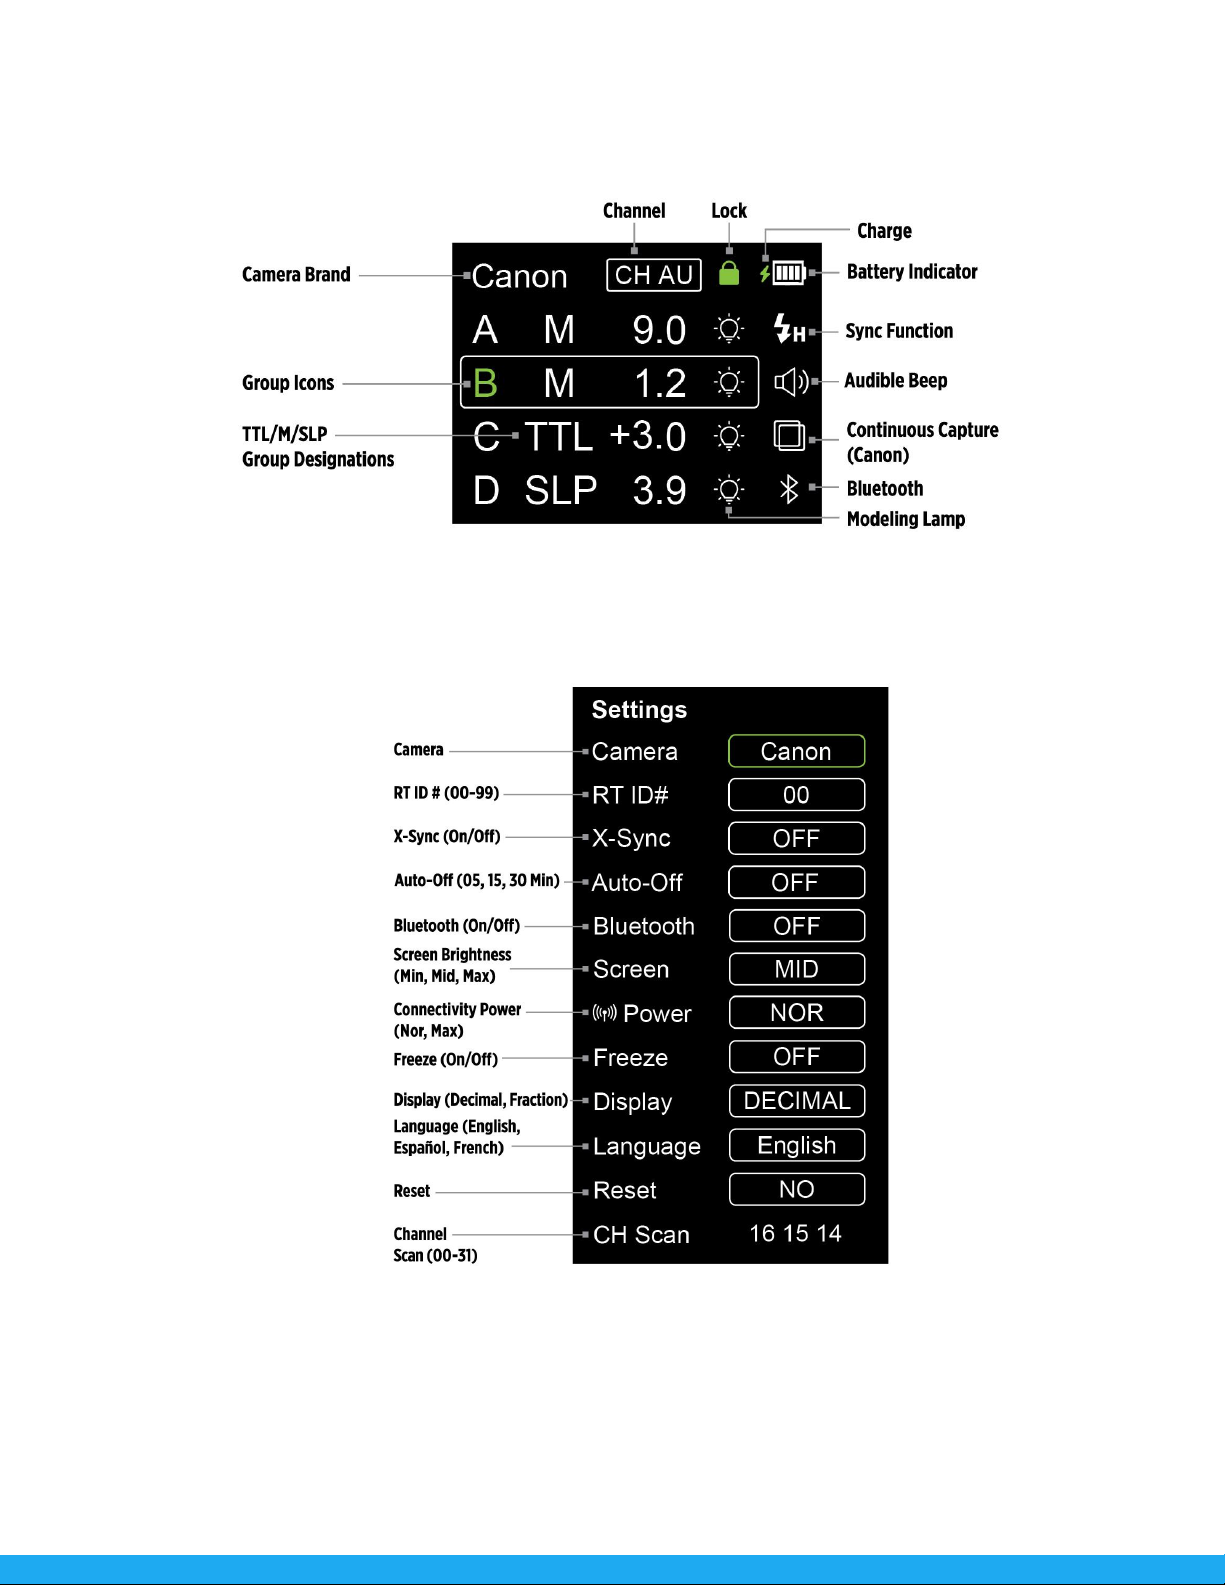
●Set Silent Shutter to Off.
●Set E-Front Curtain to Off.
●Set Wireless Mode to On or Off (camera brand/model dependent; Canon “ON” & Sony “OFF”).
●Set Red-Eye Reduction to Off (camera brand/model dependent).
●Set Exposure Compensation to 0 (zero) in-camera.
●Set White Balance to Daylight, 5500K, or Custom at 5500K (not Auto).
●Various camera models require you to set the Sync type (Front Curtain, Rear Curtain, HSS)
manually in the camera’s Flash Menu before the FJ-X3 Sync can be adjusted.
8

●Various camera models automatically adjust the Sync setting to HSS when HSS is enabled in the
camera settings, and the native sync speed has been exceeded.
●Ensure the camera’s battery level is above 25%.
●Ensure the camera contacts are clean and the FJ-X3 is seated correctly and aligned properly.
FJ-X3: Getting Started
Charging
1. Access the USB-C port on the left side of the FJ-X3.
2. Plug the USB-A to USB-C cable into the FJ-X3.
3. Plug the opposing end of the cable into any 5V power source.
4. The estimated charging time is 3 hours.
NOTE: During cold weather usage, the FJ-X3 battery charge may deplete quicker or show inaccurate
charge status.
Removing & Replacing the Battery
1. Turn the FJ-X3 over with the battery cover facing upwards.
2. Apply slight pressure to the textured area and slide the battery cover in the direction of the arrow
to remove the battery cover.
3. Remove the battery by inserting your finger into the half-circle cutout above the
battery and lean the battery forward. Or, turn the FJ-X3 over and gently shake the unit over your
hand until the battery dislodges from the battery bay.
4. Reinsert a battery by aligning the 3 contact points on the battery with those
inside the battery bay. Angle the battery and gently insert into the battery bay. (NOTE: Never
force the battery into place.]
5. Ensure that the battery is seated flush by gently pressing it into place.
6. Reinstall the battery cover by laying the cover flat and covering ¾ of the battery. Use the textured
area to slide the battery cover toward the base of the FJ-X3 until it clicks into place.
FJ-X3: Mounting & Removing
Mounting to a Shoe (Hot/Cold)
1. Turn the FJ-X3 OFF.
2. Looking at the FJ-X3 screen, turn the Shoe Lock dial to the right until it stops.
3. Gently slide the FJ-X3 into the camera’s hot shoe.
4. Turn the Shoe Lock dial to the left to lock into place.
NOTE: Avoid turning the shoe lock too far to the left or right.
9

NOTE: Never force the FJ-X3 into a shoe.
Removing from a Shoe (Hot/Cold)
1. Turn the Shoe Lock dial to the right to unlock from the hot shoe.
2. It’s vital that the Shoe Lock dial be rotated entirely until it stops so that the locking pin has
retracted into the base. [Failure to do this could cause permanent damage to the FJ-X3.]
3. Slide the FJ-X3 toward the back of the camera to remove it.
2.5mm PC Port Connection [Output Only]
The 2.5mm port (output only) can be used to initiate wired synchronization with third-party strobes and
triggers that offer a synchronization port (input). [cables sold separately]
NOTE: The Westcott FJ-XR Wireless Receiver (#4701) is equipped with a 3.5mm plug which adds FJ
Wireless Communication to 3rd-party strobes equipped with a 3.5mm sync port (input).
Mounting with the Adapter for Sony Cameras (Product #: 4711)
1. Slide the Adapter for Sony Cameras (sold separately) into the camera’s hot shoe with the release
button facing the back of the camera.
2. Once the adapter is mounted, loosen the FJ-X3’s Shoe Lock dial and slide the FJ-X3 into the
adapter’s shoe.
3. Turn the FJ-X3 Shoe Lock dial to the left to lock it into place.
NOTE: Avoid turning the shoe lock too far to the left or right.
NOTE: Never force the FJ-X3 into a shoe.
FJ-X3: Powering On & Off
Power On
Long press the Power button for 3 seconds until you see the Westcott logo. The wireless signal indicator
will continually flash green.
NOTE: Certain camera models may require the FJ-X3 trigger to be turned ON before turning on the
camera.
Power Off
Long press the Power button for 3 seconds until the screen turns off.
10

FJ-X3: Test Fire & Settings Lock
Test Firing
●Test fire connected FJ Wireless lights by quick pressing the Test button on the FJ-X3. Any Groups
that are in M (Manual Mode) or TTL will fire accordingly.
NOTE: Any FJ Wireless lights in SLP (sleep mode) will not fire.
Trigger Settings Lock
Enabling Settings Lock ensures no accidental changes while using the FJ-X3.
●Long press the CH | LOCK button to lock the current trigger settings.
●Long press the CH | LOCK button again to unlock the trigger to adjust the settings.
FJ-X3: Camera Selection
Select your preferred camera type and follow the directions listed below.
1. Long Press the SYNC | MENU button.
2. Press the center button of the Control Pad to highlight the camera selection box.
3. Press the up and down arrows on the Control Pad repeatedly until the preferred camera
manufacturer is selected [Canon, Nikon, Sony, Fujifilm, RT (Canon), Olympus, Lumix (Panasonic).
4. Once selected press the center button to confirm the selection.
5. Long press the SYNC | MENU button to return to the main screen.
FJ-X3: Controls, Modes & Functions
Group Controls
The FJ-X3 allows control of 6 groups [A-F] of FJ Wireless lights via the trigger interface, while the
Westcott StudioLink mobile app allows control of 16 groups [A,B,C,D,E,F,G,H,I,J,L,O,P,Q,S,U]. Up to twenty
strobes can be assigned to a single group. There are four groups visible on the FJ-X3 screen, and
additional groups can be found by pressing the down arrow on the Control Pad. Next to each Group
Letter [A-F] on the screen is the Exposure Mode and Group Exposure Box icons which can be adjusted
using the following steps.
Change Exposure Mode
1. Adjust the Exposure Mode by pressing the up or down arrows on the Control Pad until the
desired group is highlighted green.
11

2. Repeatedly press the corresponding Group Selection Button to the left of the Group icon to
cycle through the available exposure modes [SLP, TTL, M].
Change TTL Exposure Compensation
1. Adjust the Exposure Mode by pressing up or down on the Control Pad until the desired group is
highlighted green.
2. Repeatedly press the corresponding Group Selection Button to the left of the Group icon to
select [TTL] Exposure Mode.
3. Press the center button on the Control Pad to highlight the Group Exposure Box green.
4. Press the up or down arrows to adjust the exposure compensation between -3.0 to 3.0. [NOTE:
This compensation is independent of the onboard exposure compensation available on FJ
Wireless lights.]
Change M (Manual) Exposure Power Output (Individual Group)
1. Adjust the Exposure Mode by pressing the up or down arrows on the Control Pad until the
desired group is highlighted green.
2. Repeatedly press the corresponding Group Selection Button to the left of the Group icon to
select [M] Exposure Mode.
3. Press the center button on the Control Pad to highlight the Group Exposure Box green.
4. Press the up or down arrows to adjust the manual exposure between 1.0 to 9.0.
NOTE: A long press of the center Control Pad button will highlight the power setting and allow full stop
adjustments.
Change M (Manual) Exposure Power Output (All Manual Groups)
1. Ensure you are on the FJ-X3’s main control screen.
2. Long press the Sound Selection Button [ ] (left) on the Control Pad to highlight all groups
[A-F].
3. Quick press the center Control Pad button to highlight all Group Exposure Boxes in green.
4. Press the up or down arrows on the Control Pad to adjust the manual exposure for groups
operating in Manual Mode (only).
5. Quick press the center button to confirm the desired manual exposure.
6. Long press the Sound Selection Button [ ] again to return to individual group exposure.
Group SLP (Sleep) Mode
FJ Wireless lights can be placed into SLP (sleep) mode from any FJ transmitter; disabling the unit’s ability
to flash while other flash groups continue operating normally.
1. Determine the Group [A-F] that the FJ Wireless light is assigned to.
12

2. Press the corresponding Group Selection Button on the FJ-X3 or FJ80 Series’s MODE function
icon [HOST mode] continuously until SLP (sleep) appears on the transmitter and flash next to the
Group. NOTE: Any lights assigned to this Group will also enter SLP (sleep) mode.
3. Exit SLP mode by continually pressing the corresponding Group Selection Button or FJ80’s
MODE Function icon [HOST mode] until the screen displays TTL or M.
NOTE: It’s important that the Exposure Mode setting is updated from the FJ-X3 Wireless Transmitter or
FJ80 [HOST], otherwise, the flash unit(s) will re-enter SLP (sleep) when the next transmission signal is
received from an FJ-X3 transmitter.
Channel Controls
The FJ-X3 offers 32 channels [AU, 01-31] for reliable communication between your FJ-X3 Wireless Trigger
and FJ Wireless lights. This provides multiple connectivity options for users without concern of
interference from additional FJ Wireless lights being used by other photographers in the same area.
Change Channels [CH]
1. Quick press the CH | LOCK Button once to highlight the Channel Icon green.
2. Press the up or down arrows on the Control Pad to select the desired channel option [AU, 01-31].
3. Once the channel has been selected, quick press the center button on the Control Pad and/or
make no further presses to confirm the selected channel. The Channel Icon will turn white after 3
seconds.
NOTE:Enable [AU] (Automatic Channel Selection) by selecting [AU] from the available channels on the
FJ-X3 and FJ Wireless lights. While the middle Selectable Menu Option displays [CH], long-press Last
Group Selection Button on the FJ-X3 to engage communication between the FJ-X3 & FJ Wireless lights.
NOTE: Only one FJ-X3 in AU mode can operate an FJ Wireless Flash System.
FJ-X3: Syncing
Sync Functions
●Front Curtain Sync [icon] – Standard flash operation with shutter speed limitations native to the
camera model. See Sync (Normal) section.
●High-Speed Sync (HSS) [icon] – Flash operation allowing higher shutter speed synchronization up
to 1/8000s. See Sync (HSS) section.
●Rear Curtain Sync [icon] – Flash operation for achieving trailing effects and shutter drag.
Changing the Sync Function
Press the SYNC| MENU repeatedly to select the desired Sync Mode.
●Canon: 1/250s
●Nikon: 1/320s
●Sony: 1/250s
13

●Fuji: 1/250s
●Olympus: 1/250s
●Panasonic Lumix: 1/250s
NOTE: Available sync options may vary depending on your camera model’s internal menu settings. See
section FJ-X3: Preparing Your Camera.
HIgh-speed Sync (HSS)
●Canon: 1/8000s
●Nikon: 1/8000s
●Sony: 1/8000s
●Fuji: 1/8000s
●Olympus: 1/8000s
●Panasonic Lumix: 1/8000s
Freeze Mode
The FJX3 also has the ability to enable Freeze Mode on the FJ400, FJ200, and FJ80 II units. Freeze Sync
is ideal for freezing fast-moving objects lit by compatible FJ Wireless lights.
1. Long press the SYNC | Menu button.
2. Press the down arrow on the Control Pad until Freeze is highlighted.
3. Press the center button on the Control Pad and quickly press the up or down arrow on the
Control Pad until YES appears.
4. Press the center button to enable Freeze mode.
5. Long press the SYNC | MENU button to return to the main screen.
6. Front Curtain and Rear Curtain Sync now have the ability to use Freeze Mode.
X-Sync Mode
The FJ-X3 Wireless Trigger was designed with a single center-pin mode known as X-Sync Mode. This
functionality allows the basic triggering of many film cameras and other camera models not listed as
completely compatible on the FJ Camera Compatibility list. By default, X-Sync is OFF. When X-Sync is ON
in the Settings menu it will disable HSS and TTL operations and may result in misfires for cameras that
do not use a center pin firing mechanism.
NOTE: Normal Sync Speed is determined by the camera manufacturer and subject to change based
upon the camera model.
NOTE: Native and HSS speeds may vary depending on various camera models.
14

FJ-X3: Remote ZOOM
Remote FJ80 Series ZOOM Control [Single Group]
1. Long press the Modeling Lamp icon [ ] (right) on the Control Pad to enter the ZOOM menu.
2. Press the up or down arrows on the Control Pad to locate the group for which the ZOOM needs
adjusting.
3. Quick-Press the center button on the Control Pad to adjust the ZOOM setting [0-5}.
4. Press the up or down buttons to adjust the FJ80 ZOOM settings.
5. Press the center button to confirm the FJ80 ZOOM selection.
6. Long-press the Modeling Lamp icon [ ] again to return to the Main Menu.
Remote FJ80 Series ZOOM Control [All Groups]
1. Long press the Modeling Lamp icon [ ] (right) on the Control Pad to enter the ZOOM menu.
2. Long press the Sound Selection Button [ ] (left) on the Control Pad to highlight all groups
[A-F].
3. Press the Control Pad’s center button to adjust the FJ80 ZOOM setting [0-5].
4. Press the up or down arrows on the Control Pad to adjust the FJ80 ZOOM settings.
5. Press the center button again to confirm the FJ80 ZOOM selection.
6. Long press the Modeling Lamp icon [ ] again to return to the Main Menu.
Enabling the Modeling Lamp
1. Using the Control Pad select the group for which you wish to change the modeling lamp status.
2. Press the Modeling Lamp icon [ ] (right) on the Control Pad to enable the Modeling Lamp.
3. The Modeling Lamp icon [ ] will be displayed on the screen when active.
Enabling an Audible Beep
1. Using the Control Pad select the group for which you wish to change the audible beep.
2. Press on the [ ] (left) on the Control Pad to enable the audible beep.
3. The [ ] icon will be displayed on the screen when active.
NOTE: Control of the audible beep only applies to FJ flash models equipped with the recycle beep
functionality.
15

TTL to Manual Exposure
1. Long press the first Group A’s Group Selection Button to convert the TTL strobe output from the
last shot to the Equivalent Manual Exposure.
NOTE: Group A is the only channel that is able to be converted from TTL to Manual.
FJ-X3: Settings Menu
Settings Menu
1. Long press SYNC | Menu to access the Settings Menu.
2. Use the side Group Selection buttons to select the corresponding displayed screen option or
use the Control Pad’s up or down arrows to go through the Settings pages.
3. Press the Control Pad’s center button to select the green highlighted option.
4. Push the up or down arrows to adjust the setting.
5. Press the center button, or a side Group Selection button, to confirm the setting.
6. Long press the SYNC | MENU button to return to the main screen.
Settings Menu Options
●Camera: [Canon, Nikon, Sony, Fujifilm, RT (Canon), Olympus, Lumix (Panasonic)]
●RT ID #: [00-99]
●X-Sync: [On/Off]
●Auto-Off: [05, 15, 30, Off]
●Bluetooth®: [On/Off]
●Screen Brightness: [MIN, MID, MAX]
●FJ-X3 Transmitting Power: [MIN, NOR, MAX]
●Freeze: [On, Off]
●Power Display: [Decimal, Fraction]
●Language: [English, French, Spanish] (Coming Winter 2022)
●Factory Reset
●Channel Recommendations: (Displays recommended channels)
16

Warranty Information
Westcott’s warranty obligations for this product are limited to the following terms.
The F.J. Westcott Co. (“Westcott”) warrants this Westcott branded product against defects in materials
and workmanship under normal use for a period of ONE (1) YEAR from the date of retail purchase from
Westcott or an authorized retailer by the original end-user purchaser (“Warranty Period”). If a defect
arises and a valid claim is received within the Warranty Period, at its option and to the extent permitted
by law, Westcott will either (1) repair the defect at no charge, using new or refurbished replacement parts,
or (2) exchange the product with a product that is new or which has been manufactured from new or
serviceable used parts and is at least functionally equivalent to the original product. This Limited
Warranty applies only to products manufactured by or for Westcott that can be identified by the Westcott
trademark, trade name, or logo affixed to them.
This warranty does not apply to: (a) damage caused by accident, abuse, misuse, flood, fire, earthquake,
mold, or other external causes; (b) damage caused by operating the product outside the permitted or
intended uses described by Westcott; (c) a product or part that has been modified to alter functionality or
capability without the written permission of Westcott; or (d) cosmetic damage, including but not limited to
scratches, dents, and broken plastic.
Disclaimer: By purchasing, borrowing and/or using this product for any event, both public or private, you,
the customer, accepts all responsibility and releases Westcott, and its associates, of any and all liability in
the event of manufacturer’s defect, malfunction or misuse of the product which may lead to further
injuries or complications unforeseen by the user. Westcott is not responsible for any potential or incurred
damage caused by failure to properly mount, hang, or store the product, which includes, but is not
limited to damage to cameras, electronics, electrical equipment, buildings, building materials, personal
injury, death, or disability, fire damage, or any and all other damage not mentioned previously.
Please contact Westcott’s Repair Department for a Return Authorization Number “RMA” prior to
requesting warranty service. This RMA must be clearly written on the outside of the box to the left of the
shipping label. Items sent in without pre-authorization or that do not fall under the limited warranty will be
returned at the expense of the sender.
Repair Department: 419-243-7311
Email: service@westcott.com
Shipping: F.J. Westcott Co, 1425-B Holland Rd. Maumee, OH 43537
17

Legal Information
Westcott products are made to the company’s traditionally high standards of quality and comply with all
applicable government safety regulations and requirements. In an effort to provide the best quality
products possible, we periodically make product modifications. Actual products may not be identical to
items pictured. Future firmware updates may result in performance enhancements, removal of features
to achieve optimal performance, and modified menu options and layouts.
Made in the USA.
©F.J. Westcott Co. All rights reserved.
18
Other manuals for FJ-X3
1
This manual suits for next models
2
Table of contents
Other Westcott Camera Accessories manuals

Westcott
Westcott Apollo 1070 Manual

Westcott
Westcott PokerLite 7051 Manual

Westcott
Westcott PokerLite 7054 Manual

Westcott
Westcott 1874 Manual

Westcott
Westcott 1894 Manual

Westcott
Westcott 1871 Manual

Westcott
Westcott 1814 Manual

Westcott
Westcott 1868 Manual

Westcott
Westcott 1877 Manual

Westcott
Westcott 1857 Manual