Western Digital Data Lifeguard Tools User manual

Software Manual
Data Lifeguard Tools

WD
Data Lifeguard Tools
User Manual
Information furnished by WD is believed to be accurate and reliable; however, no responsibility is assumed by WD for its use nor for
any infringement of patents or other rights of third parties which may result from its use. No license is granted by implication or
otherwise under any patent or patent rights of WD. WD reserves the right to change specifications at any time without notice.
Western Digital is a registered trademark; and WD, the WD logo, and Data Lifeguard Tools are trademarks of Western Digital
Technologies, Inc. Other marks may be mentioned herein that belong to other companies.
© 2006 Western Digital Technologies, Inc. All rights reserved.
2779-001005-A02 Apr 2006

TABLE OF CONTENTS – i
Table of Contents
1 Introduction . . . . . . . . . . . . . . . . . . . . . . . . . . . . . . . . . . . . . . . . . . . 1
2 Install Data Lifeguard Tools . . . . . . . . . . . . . . . . . . . . . . . . . . . . . 2
Splash Screen Options . . . . . . . . . . . . . . . . . . . . . . . . . . . . . . . . . . . . . . . . 4
3 Using Data Lifeguard Tools. . . . . . . . . . . . . . . . . . . . . . . . . . . . . . 5
View Installation Tutorial . . . . . . . . . . . . . . . . . . . . . . . . . . . . . . . . . . . . . 5
Set Up Your Hard Drive . . . . . . . . . . . . . . . . . . . . . . . . . . . . . . . . . . . . . . 6
Utilities . . . . . . . . . . . . . . . . . . . . . . . . . . . . . . . . . . . . . . . . . . . . . . . . . . 13
Hard Drive Information. . . . . . . . . . . . . . . . . . . . . . . . . . . . . . . . . . . . . . 15
Install the Hard Drive in a Macintosh System . . . . . . . . . . . . . . . . . . . . . 16
4 Service and Support . . . . . . . . . . . . . . . . . . . . . . . . . . . . . . . . . . . 17

DATA LIFEGUARD TOOLS
INTRODUCTION – 1
USER MANUAL
Introduction
WD provides Data Lifeguard Tools to assist with hard drive installation, management, and
diagnostics. The Data Lifeguard Tools software is also available at support.wdc.com/download.
Depending on your setup and configuration, you can use either the Windows or DOS version
of Data Lifeguard Tools.
Note: The Windows and DOS versions of Data Lifeguard Tools vary slightly from one
another in text, graphic placement, or color.
The Data Lifeguard Tools main menu describes the functions of the program:
View Installation Tutorial — Create, view, and print a customized installation manual.
Set Up Your Hard Drive — Partition and format an installed hard drive; overcome
system BIOS limitations.
Utilities — Copy all files or a specific folder from one drive to another; reformat
partitions or partition unallocated space.
Hard Drive Information — Configure jumper settings and other technical information
regarding your hard drive.
1

DATA LIFEGUARD TOOLS
INSTALL DATA LIFEGUARD TOOLS – 2
USER MANUAL
Install Data Lifeguard Tools
1. Insert the Data Lifeguard Tools CD into your CD-ROM drive.
a) If using the Windows version, the CD autoruns on your desktop.
b) If using the DOS version, restart the computer and boot from the CD.
2. The Data Lifeguard Tools splash screen appears. Click the Run Data Lifeguard
Installation software button.
3. Click Next.
4. Read the license agreement and if you accept the terms, click Yes.
2

DATA LIFEGUARD TOOLS
INSTALL DATA LIFEGUARD TOOLS – 3
USER MANUAL
5. Click Next to begin installation.
6. Click Finish to complete installation.
7. Remove the Data Lifeguard Tools CD from your CD-ROM drive and click OK.
8. If necessary, click OK to the following message.
9. Congratulations! Data Lifeguard Tools installation is now complete.
The Data Lifeguard main menu appears and you may begin using the program (see x-
reference).
10. Select any of the options in the Data Lifeguard Tools splash screen (see “Splash Screen
Options” on page 4) or click Exit to exit out of the Data Lifeguard Tools splash screen.

DATA LIFEGUARD TOOLS
INSTALL DATA LIFEGUARD TOOLS – 4
USER MANUAL
Splash Screen Options
The following options are available in the Data Lifeguard Tools splash screen:
Create a Data Lifeguard Bootable Installation Diskette — If your system cannot boot
from a CD or you prefer to use a floppy diskette instead, you can create a bootable
Data Lifeguard Tools diskette by clicking this option.
Download Latest Data Lifeguard Diagnostics — Clicking this option takes you to the
WD Data Lifeguard Diagnostics download page (Internet connection required). The
Data Lifeguard Diagnostic Tools are used primarily for determining the physical
condition of your hard drive. If you are having computer problems that you suspect are
drive-related, you can test your drive with this tool.
Register your WD Hard Drive — Clicking this option takes you to the WD product
registration page (Internet connection required).
User Manual — Clicking this option launches the user manual PDF file from the
Data Lifeguard Tools CD.
Install Adobe Acrobat — Clicking this option launches the Adobe Acrobat Reader 6.0
program installer from the Data Lifeguard Tools CD.

DATA LIFEGUARD TOOLS
USING DATA LIFEGUARD TOOLS – 5
USER MANUAL
Using Data Lifeguard Tools
Open the Data Lifeguard Tools program as follows:
Windows — Click the Start button and point to:
Programs --> Western Digital - Data Lifeguard Tools.
DOS — Boot from the Data Lifeguard Tools CD or bootable diskette.
View Installation Tutorial
This section allows you to create and print custom hardware installation instructions.
Note: The model number for your hard drive is printed on the label located on the top of the
drive.
1. Select View Installation Tutorial from the Data Lifeguard Tools menu.
2. Data Lifeguard Tools asks you to select the interface of your hard drive. Click
EIDE/ATA or SATA depending on your interface then click Next.
3. If you are using Windows, your default Web browser opens automatically and displays
your custom instructions. If using the DOS version, your instructions are displayed in the
window. Click Next to print the instructions.
3

DATA LIFEGUARD TOOLS
USING DATA LIFEGUARD TOOLS – 6
USER MANUAL
Set Up Your Hard Drive
This section contains instructions for installing your new WD hard drive as a new boot drive
or as an additional storage drive. For instructions on installing hard drives larger than 137
GB, see page 9.
Install a New Boot Drive
1. Select Set Up Your Hard Drive from the Data Lifeguard Tools menu. Data Lifeguard
takes several moments to scan for system devices.
2. After Data Lifeguard Tools detects your installed hard drives, select the new drive that
you want to format or partition as the new boot drive and click Next.
Note: Data Lifeguard does not format or partition a currently installed boot drive (the
drive icon cannot be selected).
3. Select Installation Type as Add the drive as a boot device. To create customized
partitions, select the box to change advanced options and check Custom Partition.
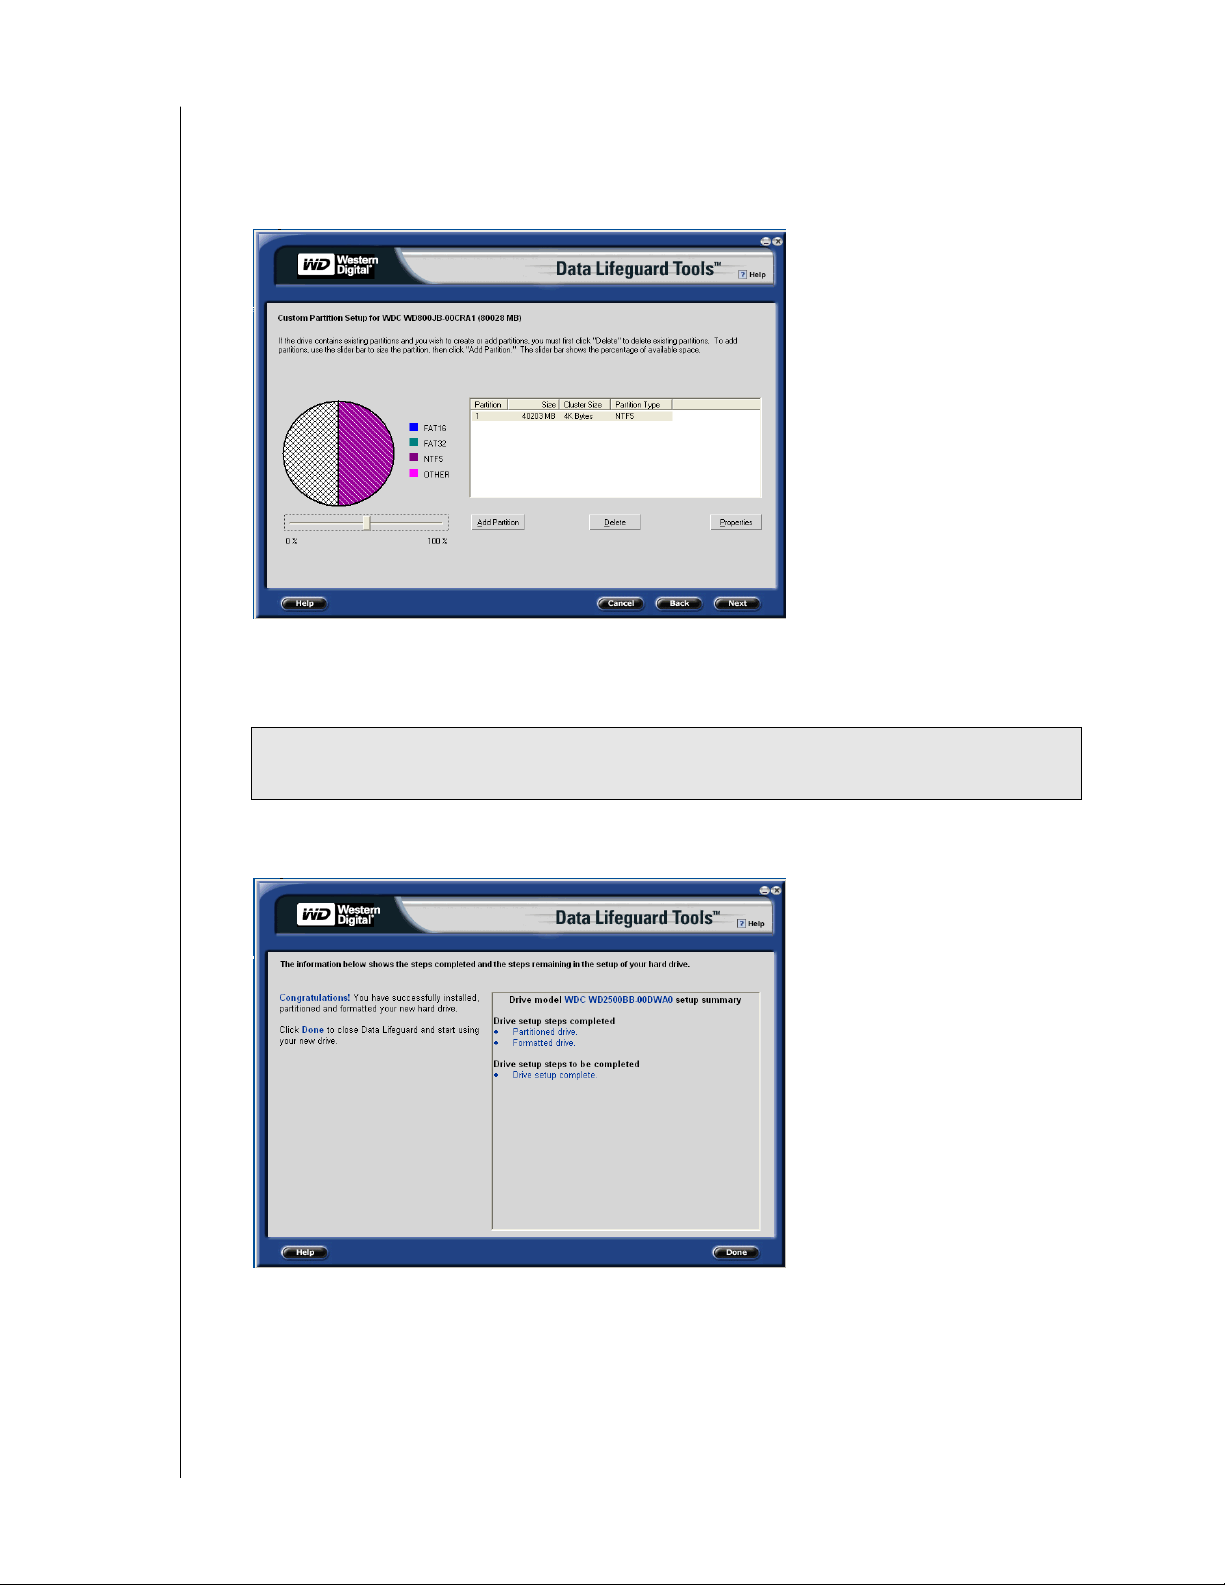
4. The Custom Partition Setup screen below appears. Your hard drive is automatically
partitioned to the largest capacity based on your operating system limitations. For
instructions on installing hard drives larger than 137 GB, see “Install a Drive Larger than
DATA LIFEGUARD TOOLS
USING DATA LIFEGUARD TOOLS – 7
USER MANUAL
137 GB” on page 9. If the drive contains existing partitions and you want to create or add
partitions, you must first click Delete to delete existing partitions. To add partitions, use
the slider bar to size the partition, then click Add Partition. After setting the partitions,
click Next.
5. The next screen outlines your setup options, number of partitions, file format, and the
size of each partition. Data Lifeguard is now ready to set up your new hard drive. Click
Erase, then Next to continue.
6. After Data Lifeguard Tools completes formatting and partitioning the drive, the setup
summary screen outlines all steps completed. Click Done to close or exit.
CAUTION: Continuing will erase all existing data on the hard drive. If you are certain,
click Yes to proceed with format and partition.
Table of contents
Other Western Digital Software manuals


