Westfalia WT350 User manual

DE1
WT350 Vibrationswecker –BEDIENUNGSANLEITUNG
1. Funktionen
Quarzuhrzeit
2 Alarme mit Schlummerfunktion
Stoppuhr & Timer-Funktion
Tägliche Alarme als Vibration oder Alarmtöne
2. Aufbau
Teil A - LCD
A1: Vibrations-Symbol
A2: Uhrzeit
A3: Alarmzeit 1
A4: Alarmzeit 2
A5: Sekunden/Wochentag
Teil B - Tasten
B1: “+” Taste
B2: “SNOOZE/LIGHT“ Taste
B3: “-”Taste
B4: Schalter der Alarmart
B5: Schalter der Alarmlautstärke
B6: Alarm 2 on/off - Schalter
B7: Alarm 1 on/off - Schalter
B8: Hauptschalter: Funktionsauswahl
B9: “RESET” Taste
Teil C - Gehäuse
C1: Aufhängöse
C2: Batteriefachabdeckung
C3: Standfuß
3. Inbetriebnahme:
Entfernen Sie die Abdeckung vom Batteriefach
Legen Sie 2 x AA Batterien unter Beachtung der Polarität [ “+” und “–“ Markierungen]
Befestigen Sie die Abdeckung erneut auf das Batteriefach.

DE2
4. Zeit- und Alarmeinstellung
4.1 Zeiteinstellung:
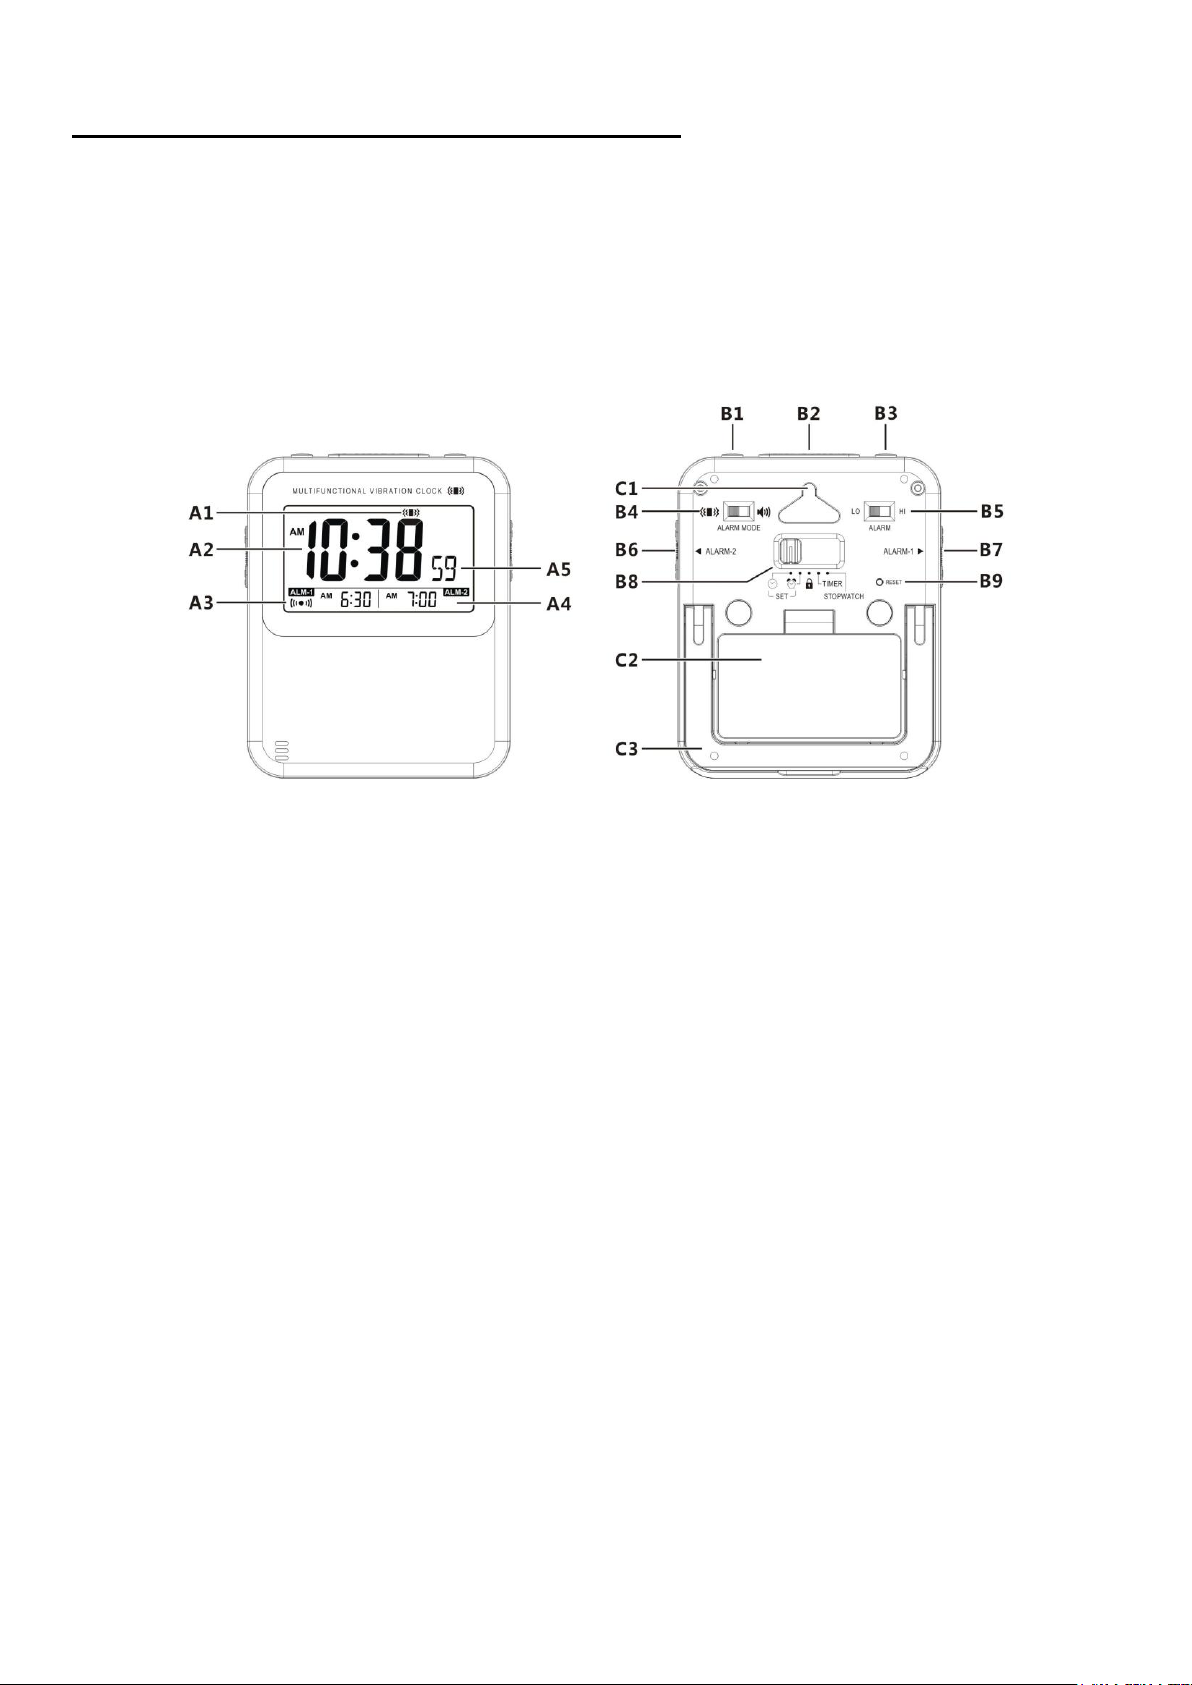
Drücken Sie die “+” Taste (B1) im Zeitanzeigemodus (Hauptschalter auf ) um dieAnzeige der Sekunde oder des
Wochentags auszuwählen. Drücken Sie die “-“Taste (B3) um das Datum und das Jahr anzuzeigen.
Schieben Sie den Hauptschalter (B8) auf “ ” um in die Zeiteinstellung zu gelangen und 24 Hr blinkt auf der
Anzeige. Drücken Sie die “+” oder die “-” Taste (B1 / B3) um die Anzeige im 12-Stunden- oder 24-Stundenformat
auszuwählen. Drücken Sie die “SNOOZE/LIGHT” Taste um zu bestätigen und mit der Einstellung fortzufahren.
00 TZ blinkt auf der Anzeige. Drücken Sie die “+” oder die “-” Taste (B1 / B3) um eine Zeitzone von -12 bis 12
einzustellen. Drücken Sie die “SNOOZE/LIGHT” Taste um zu bestätigen und mit der Einstellung fortzufahren.
GER blinkt auf der Anzeige. Drücken Sie die “+” oder die “-” Taste (B1 / B3) um die Sprache der Wochentage
einzustellen. Drücken Sie die “SNOOZE/LIGHT” Taste um zu bestätigen und mit der Einstellung fortzufahren.
Die Stunde blinkt auf der Anzeige. Drücken Sie die “+” oder die “-” Taste (B1 / B3) um die Stunde einzustellen.
Drücken Sie die “SNOOZE/LIGHT” Taste um zu bestätigen und mit der Einstellung fortzufahren.
Die Minute blinkt auf der Anzeige. Drücken Sie die “+” oder die “-” Taste (B1 / B3) um die Minute einzustellen.
Drücken Sie die “SNOOZE/LIGHT” Taste um zu bestätigen und mit der Einstellung fortzufahren.
Die Sekunde blinkt auf der Anzeige. Drücken Sie die “+” oder die “-” Taste (B1 / B3) um die Sekunde einzustellen.
Drücken Sie die “SNOOZE/LIGHT” Taste um zu bestätigen und mit der Einstellung fortzufahren.
2018 Yr blinkt auf der Anzeige. Drücken Sie die “+” oder die “-” Taste (B1 / B3) um das Jahr einzustellen. Drücken
Sie die “SNOOZE/LIGHT” Taste um zu bestätigen und mit der Einstellung fortzufahren.
D und M blinken auf der Anzeige. Drücken Sie die “+” oder die “-” Taste (B1 / B3) um die Anzeige als Format
Datum-Monat oder Monat-Datum einzustellen. Drücken Sie die “SNOOZE/LIGHT” Taste um zu bestätigen und mit
der Einstellung fortzufahren.
Der Monat blinkt auf der Anzeige. Drücken Sie die “+” oder die “-” Taste (B1 / B3) um den Monat einzustellen.
Drücken Sie die “SNOOZE/LIGHT” Taste um zu bestätigen und mit der Einstellung fortzufahren.
Das Datum blinkt auf der Anzeige. Drücken Sie die “+” oder die “-” Taste (B1 / B3) um das Datum einzustellen.
Drücken Sie die “SNOOZE/LIGHT” Taste um zu bestätigen und zum Anfang der Einstellungen zurückkehren oder
schieben Sie den Hauptschalter (B8) auf , um die Einstellungen zu speichern und zur normalen Zeitanzeige zu
wechseln.
Hinweise:
Schieben Sie den Hauptschalter (B8) jederzeit auf um die Einstellungen zu bestätigen und zum normalen
Zeitanzeigemodus zurückzukehren.
Halten Sie die “+” oder die “-” Taste gedrückt um den Einstellungsprozess zu beschleunigen.
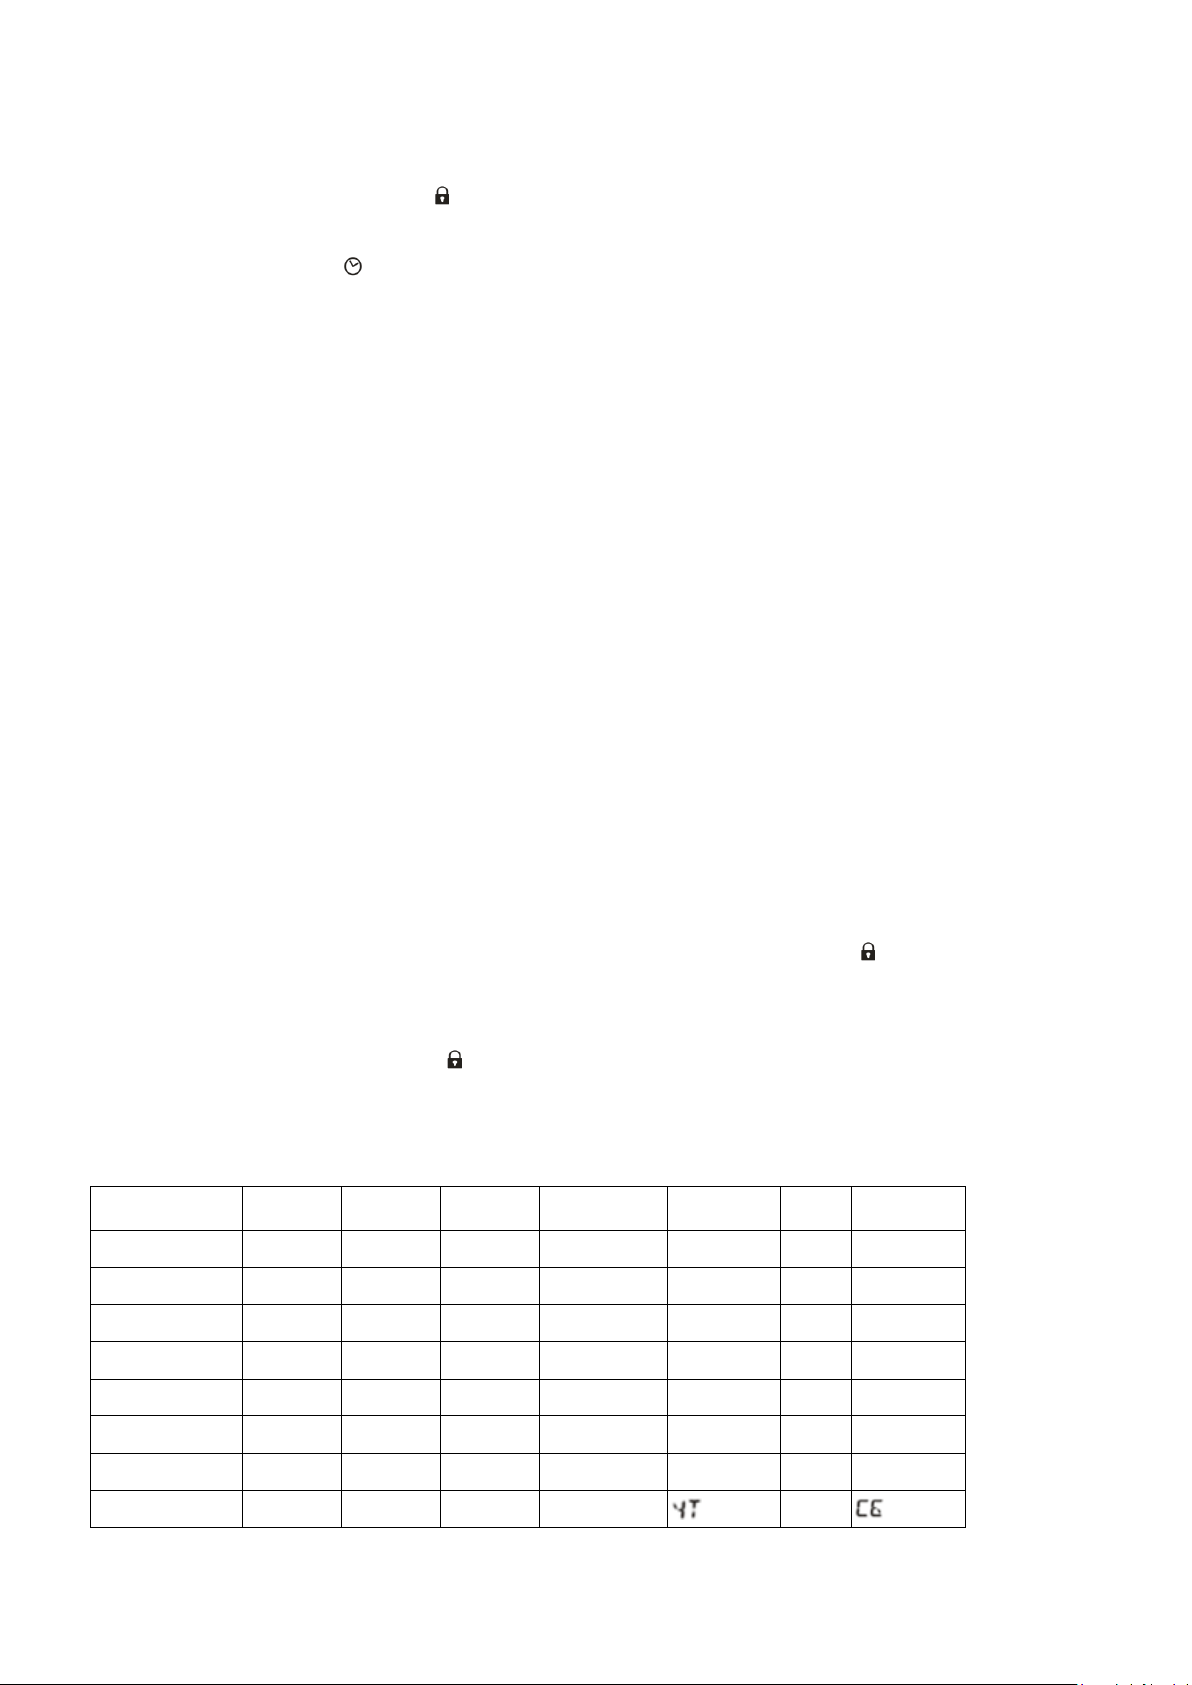
8 Sprachen sind für die Wochentage verfügbar: Deutsch, Englisch, Französisch, Italienisch, Niederländisch,
Spanisch, Dänisch und Russisch. Die Abkürzungen der Wochentage in allen Sprachen sind wie folgt:
Sprache
Sonntag
Montag
Dienstag
Mittwoch
Donnerstag
Freitag
Samstag
Deutsch, GER
SON
MON
DIE
MIT
DON
FRE
SAM
Englisch, ENG
SUN
MON
TUE
WED
THU
FRI
SAT
Dänisch, DAN
SON
MAN
TIR
ONS
TOR
FRE
LOR
Niederländisch, NET
ZON
MAA
DIN
WOE
DON
VRI
ZAT

DE3
Italienisch, ITA
DOM
LUN
MAR
MER
GIO
VEN
SAB
Spanisch, ESP
DOM
LUN
MAR
MIE
JUE
VIE
SAB
Französisch, FRA
DIM
LUN
MAR
MER
JEU
VEN
SAM
Russisch, RU
BC
NH
BT
CP
NT
4.2 Weckalarm-Funktion:
4.2.1Alarmeinstellung
Schieben Sie den Hauptschalter (B8) auf um in die Alarmzeiteinstellung zu gelangen.
Die Alarmzeit von ALM-1 blinkt auf der Anzeige. Drücken Sie die “+” oder die “-” Taste (B1 / B3) um die Alarmzeit
von Alarm 1 einzustellen. Drücken Sie die “SNOOZE/LIGHT” Taste um zu bestätigen und mit der Einstellung
fortzufahren.
Die Alarmzeit von ALM-2 blinkt auf der Anzeige. Drücken Sie die “+” oder die “-” Taste (B1 / B3) um die Alarmzeit
von Alarm 2 einzustellen. Drücken Sie die “SNOOZE/LIGHT” Taste um zu bestätigen und zum Anfang der
Einstellungen zurückkehren oder schieben Sie den Hauptschalter (B8) auf , um die Einstellungen zu speichern
und zur normalen Zeitanzeige zu wechseln.
Hinweise:
Schieben Sie den Hauptschalter (B8) jederzeit auf um die Einstellungen zu bestätigen und zum normalen
Zeitanzeigemodus zurückzukehren.
Halten Sie die “+” oder die “-” Taste gedrückt um den Einstellungsprozess zu beschleunigen.
4.3.2 Alarmarten
Mit dem Alarmart-Schalter (B4) kann zwischen Alarmton “” und Vibration ” ” als Alarmart gewählt werden.
Die Lautstärke des Alarms kann mit dem Alarmlautstärke-Schalter (B5) erhöht oder verringert werden.
Hinweis: Bei der Wahl des Vibrationsalarms ist eine Platzierung des Weckers unterhalb des Kopfkissens
empfehlenswert. Der Wecker kann während des Vibrationsalarms umkippen und von Oberflächen
herunterfallen.
4.3.3 Aktivieren/Deaktivieren von Alarm und Schlummerfunktion.
Schieben Sie den Alarm 1 on/off –Schalter oder den Alarm 2 on/off - Schalter (B6 / B7) auf ON um Alarm 1 oder
Alarm 2 zu aktivieren. Das Alarmsymbol “ ” wird angezeigt.
Während des Alarmtons oder des Vibrationalarms blinkt das “” Alarmsymbol. Drücken Sie die
“SNOOZE/LIGHT” Taste und der Alarm wird für 5 Minuten angehalten und ertönt oder vibriert danach erneut. Das
Schlummer-Symbol " ” blinkt auf der Anzeige während die Schlummerfunktion aktiv ist.
Schieben Sie den Alarm 1 on/off –Schalter oder den Alarm 2 on/off - Schalter (B6 / B7) auf OFF um Alarm 1 oder
Alarm 2 zu deaktivieren. Anderfalls wird der Alarmton oder der Vibrationsalarm für 3 Minuten aktiv sein und danach
automatisch aufhören.

DE4
5. Timer/Stoppuhr
5.1 Countdown-Timer
Einstellung des Countdown-Timer
Schieben Sie den Hauptschalter (B8) auf TIMER um in den Countdown-Timer-Modus zu wechseln.
Drücken Sie die “+” oder die “-” Taste (B1 / B3) um den Zahlenwert des Timers anzupassen. Drücken Sie die
“SNOOZE/LIGHT” Taste um die Countdown-Funktion zu starten.
Drücken Sie die “SNOOZE/LIGHT” Taste erneut um die Countdown-Funktion anzuhalten und drücken Sie nun die
“+” und die “-” Taste (B1 / B3) gleichzeitig um den Zahlenwert des Timers zurück auf 0 zu setzen.
Halten Sie die “+” oder die “-” Taste (B1 / B3) während der aktiven Countdown-Funktion gedrückt, um die aktuelle
Uhrzeit anzuzeigen und kehren Sie mit dem loslassen der Tasten schnell in den Countdown-Timer-Modus zurück.
Hinweise:
Der maximale Zahlenwert des Countdown-Timers beträgt 39 Stunden und 59 Minuten
Halten Sie die “+” oder die “-” Taste gedrückt um den Einstellungsprozess zu beschleunigen
Timer-Alarm
Der Alarmton oder der Vibrationsalarm werden für 3 Minuten aktiv, sobald der Countdown-Timer den Zahlenwert 0
erreicht. Drücken Sie eine beliebige Taste um den Alarm anzuhalten oder schieben Sie den Hauptschalter um den
Countdown-Timer-Modus zu verlassen.
5.2 Stoppuhr
Schieben Sie den Hauptschalter (B8) auf STOPWATCH um in den Stoppuhr-Modus zu wechseln.
Drücken Sie die “SNOOZE/LIGHT” Taste um die Zählfunktion der Stoppuhr zu starten.
Halten Sie die “+” oder die “-” Taste (B1 / B3) während der aktiven Zählfunktion gedrückt, um die aktuelle Uhrzeit
anzuzeigen und kehren Sie mit dem loslassen der Tasten schnell in den Stoppuhr-Modus zurück.
Drücken Sie die “SNOOZE/LIGHT” Taste erneut um die Zählfunktion anzuhalten und drücken Sie nun die “+” und
die “-” Taste (B1 / B3) gleichzeitig um den Zahlenwert der Stoppuhr zurückzusetzen.
Hinweis:
Der maximale Zahlenwert der Stoppuhr beträgt 39 Stunden und 59 Minuten
6. Hintergrundbeleuchtung
Drücken Sie die “LIGHT”Taste (B2) und die Hintergrundbeleuchtung wird für 5 Sekunden angeschaltet.
7. Reset /Neustart
Drücken Sie mit einen spitzen Gegenstand die “RESET”(B9) Taste auf der Rückseite des Weckers um den
Wecker auf die Werkseinstellungen zurückzusetzen.
Vorsichtsmaßnahmen
Setzen Sie das Gerät nicht extremer Gewalteinwirkung oder Stößen aus.
Setzen Sie das Gerät nicht hohen Temperaturen, direktem Sonnenlicht, Staub und Feuchtigkeit aus.
Tauchen Sie das Gerät nicht in Wasser.
Vermeiden Sie den Kontakt mit ätzenden Materialien.

DE5
Werfen Sie das Gerät nicht ins Feuer. Es könnte explodieren.
Öffnen Sie nicht das Gehäuse und manipulieren Sie nicht bauliche Bestandteile des Geräts.
Batterie-Sicherheitshinweise
Verwenden Sie nur Alkali-Batterien, keine wiederaufladbaren Batterien.
Legen Sie die Batterien unter Beachtung der Polarität (+/-) richtig ein.
Ersetzen Sie stets einen vollständigen Batteriesatz.
Mischen Sie niemals alte und neue Batterien.
Entfernen Sie erschöpfte Batterien sofort.
Entfernen Sie die Batterien bei Nichtnutzung.
Laden Sie die Batterien nicht auf und werfen Sie sie nicht ins Feuer. Sie könnten explodieren.
Bewahren Sie die Batterien nicht in der Nähe von Metallobjekten auf, da ein Kontakt einen Kurzschluss verursachen
kann.
Setzen Sie Batterien keinen hohen Temperaturen, extremer Feuchtigkeit oder direktem Sonnenlicht aus.
Bewahren Sie Batterien außerhalb der Reichweite von Kindern auf. Verschlucken der Batterien kann zum Ersticken
führen.
Verwenden Sie das Produkt ausschließlich für den vorgesehenen Zweck!
Hinweispflicht nach dem Batteriegesetz
Altbatterien gehören nicht in den Hausmüll. Wenn Batterien in die Umwelt gelangen, können diese
Umwelt- und Gesundheitsschäden zur Folge haben. Sie können gebrauchte Batterien unentgeltlich bei
ihrem Händler und Sammelstellen zurückgeben. Sie sind als Verbraucher zur Rückgabe von
Altbatterien gesetzlich verpflichtet!
Hinweispflicht nach dem Elektronikgerätegesetz
Laut Elektro- und Elektronikgerätegesetz (ElektroG) gehört Elektroschrott nicht in den Hausmüll,
sondern ist zu recyceln oder umweltfreundlich zu entsorgen. Entsorgen Sie ihr Gerät in einen
Recycling Container oder an eine lokale Abfallsammelstelle.

EN1
WT350 Vibration alarm clock - USER MANUAL
1. Feature
Time from quartz clock
Dual daily snooze alarm function
Timer & stopwatch function
Daily alarm alerts in vibration or alarm sounds.
2. Appearance
Part A - LCD
A1: Vibration icon
A2: Time
A3: Alarm time 1
A4: Alarm time 2
A5: Second/Day of week
Part B - Button
B1: “+” button
B2: “SNOOZE/LIGHT“button
B3: “-” button
B4: Alarm mode slide switch
B5: Alarm volume slide switch
B6: Alarm 2 on/off slide switch
B7: Alarm 1 on/off slide switch
B8: Main switch: Function selection slide switch
B9: “RESET” button
Part C - Structure
C1: Hanging hole
C2: Battery door
C3: Stand
3. Getting started:
Open battery compartment cover
Insert 2 x AA batteries observing polarity [ “+” and“ –“ marks]
Replace battery compartment cover.

EN2
4. Time and alarm setting
4.1 Time setting:
In time display mode (main switch to ), press “+” button (B1) to select to view the day of week or seconds. Press
“-“button (B3) to select to view date and year.
Slide main switch (B8) to “ ” to enter the setting of time and 24 Hr is blinking. Press the “+” or the “-” button (B1 /
B3) to set 12-hour or 24-hour time display. Press the “SNOOZE/LIGHT” button to confirm and continue the setting.
00 TZ is blinking. Press the “+” or the “-” button (B1 / B3) to set a time zone from -12 to 12. Press the
“SNOOZE/LIGHT” button to confirm and continue the setting.
GER is blinking. Press the “+” or the “-” button (B1 / B3) to set weekday language. Press the “SNOOZE/LIGHT”
button to confirm and continue the setting.
The hour is blinking. Press the “+” or the “-” button (B1 / B3) to set the hour. Press the “SNOOZE/LIGHT” button to
confirm and continue the setting.
The minute is blinking. Press the “+” or the “-” button (B1 / B3) to set the minute. Press the “SNOOZE/LIGHT”
button to confirm and continue the setting.
The second is blinking. Press the “+” or the “-” button (B1 / B3) to set the second. Press the “SNOOZE/LIGHT”
button to confirm and continue the setting.
The 2018 Yr is blinking. Press the “+” or the “-” button (B1 / B3) to set the year. Press the “SNOOZE/LIGHT” button
to confirm and continue the setting.
The D and M are blinking. Press the “+” or the “-” button (B1 / B3) to set Date-Month or Month-Date display. Press
the “SNOOZE/LIGHT” button to confirm and continue the setting.
The month is blinking. Press the “+” or the “-” button (B1 / B3) to set the month. Press the “SNOOZE/LIGHT” button
to confirm and continue the setting.
The date is blinking. Press the “+” or the “-” button (B1 / B3) to set the date. Press the “SNOOZE/LIGHT” button to
confirm and return to the beginning of this setting or slide the main switch (B8) to to confirm the setting and
return to normal time display.
Notes:
At any time, slide main switch (B8) to to confirm the setting and return to normal time display.
Hold the “+” or the “-” button pressed to accelerate the setting process and reach the desired value more quickly.
There are 8 languages for day of week: German, English, French, Italian, Dutch, Spanish, Danish and Russian.
The languages and their selected abbreviations for each day of the week are shown in the following table.
Language
Sunday
Monday
Tuesday
Wednesday
Thursday
Friday
Saturday
German, GER
SON
MON
DIE
MIT
DON
FRE
SAM
English, ENG
SUN
MON
TUE
WED
THU
FRI
SAT
Danish, DAN
SON
MAN
TIR
ONS
TOR
FRE
LOR
Dutch, NET
ZON
MAA
DIN
WOE
DON
VRI
ZAT
Italian, ITA
DOM
LUN
MAR
MER
GIO
VEN
SAB
Spanish, ESP
DOM
LUN
MAR
MIE
JUE
VIE
SAB
French, FRA
DIM
LUN
MAR
MER
JEU
VEN
SAM
Russian, RU
BC
NH
BT
CP
NT

EN3
4.2 Alarm clock function:
4.2.1 Alarm setting
Slide main switch (B8) to to enter the setting of alarm time.
Alarm time of ALM-1 is blinking. Press the “+” or the “-” button (B1 / B3) to set the alarm time of Alarm 1. Press the
“SNOOZE/LIGHT” button to confirm and continue the setting.
Alarm time of ALM-2 is blinking. Press the “+” or the “-” button (B1 / B3) to set the alarm time of Alarm 2. Press the
“SNOOZE/LIGHT” button to confirm and return to the beginning of this setting or slide the main switch (B8) to to
confirm the setting and return to normal time display.
Notes:
At any time, slide main switch (B8) to to confirm the setting and return to normal time display.
Hold the “+” or the “-” button pressed to accelerate the setting process and reach the desired value more quickly.
4.3.2 Alarm alert modes
Alarm could be set to alert in sound “” or vibration ” ” by alarm mode slide switch (B4).
The alarm volume could be adjusted to lower volume or louder volume by slide switch (B5) on rear casing.
NOTE: When the alarm mode is set in vibration mode, we suggest to place the unit under the pillow. The unit
might fall off while vibrating if it is placed on surfaces by stand.
4.3.3 Activate/Deactivate alarm and snooze alarm
Slide alarm 1 or alarm 2 on/off slide switch (B6 / B7) to ON to activate alarm 1 or alarm 2 function, alarm icon
“ ” display.
When alarm alerts or vibrates, icon “ ” flashes, press “SNOOZE/LIGHT”button, alarm snoozes for around 5
minutes, then it alerts or vibrates again. Snooze Icon " ” flashes on the LCD during the snooze time. This
process can be repeated 7 times.
Slide alarm on/off slide switch (B6 / B7) to OFF to deactivate alarm function. Otherwise, the alarm signal alerts or
vibrates for about 3 minutes, then stops automatically.
5. Timer/stopwatch
5.1 Timer
Setting of timer
Slide main switch (B8) to timer to enter to timer function.
Press the “+” or the “-” button to adjust the timer value, and start countdown function by pressing
“SNOOZE/LIGHT” button.
Press “SNOOZE/LIGHT” button again to stop it, and then press the “+” and the “-” button together to reset timer
value to zero.
When timer is counting down, hold the “+” or the “-”button to view the current time, and return to timer display by
releasing “+” or “-“ button
NOTE:
Maximum countdown timer value is 39hours 59 minutes

EN4
Hold the “+” or the “-” button pressed to accelerate the setting process and reach the desired value more quickly.
Timer alarm
When the timer counts to zero, the unit will sound or vibrate for around 3 minutes. Press any button to stop the alert
sound or vibration, or slide main switch to exit timer function.
5.2 Stopwatch
Slide main switch (B8) to stopwatch to enter to stopwatch function.
Press “SNOOZE/LIGHT” button to start count up.
When stopwatch is counting up, hold the “+” or the “-“ button to view the current time, and return to stopwatch
display by releasing “+” or “-“ button
Press “SNOOZE/LIGHT” button again to stop it and then press the “+” and the “-” button together to reset the
stopwatch.
NOTE:
Maximum stopwatch value is 39hours 59 minutes 59 seconds
6. Backlight
Press “LIGHT”button (B2), backlight will last for around 5 seconds.
7. Restart
Use a pin to press the “RESET”(B9) button on the rear of the unit or reinstall the batteries in order to restart clock
with default settings.
Precautions
Do not subject the unit to excessive force or shock.
Do not expose the unit to extreme temperatures, direct sunlight, dust or humidity.
Do not immerse in water.
Avoid contact with any corrosive materials.
Do not dispose this unit in a fire as it may explode.
Do not open the inner back case or tamper with any components of this unit.
Batteries safety warnings
Use only alkaline batteries, not rechargeable batteries.
Install batteries correctly by matching the polarities (+/-).
Always replace a complete set of batteries.
Never mix used and new batteries.
Remove exhausted batteries immediately.
Remove batteries when not in use.
Do not recharge and do not dispose of batteries in fire as the batteries may explode.
Ensure batteries are stored away from metal objects as contact may cause a short circuit.
Avoid exposing batteries to extreme temperature or humidity or direct sunlight.
Keep all batteries out of reach from children. They are a choking hazard.
Use the product only for its intended purpose!
Consideration of duty according to the battery law
Old batteries do not belong to domestic waste because they could cause damages of health and

EN5
environment. You can return used batteries free of charge to your dealer and collection points. As end-user
you are committed by law to bring back needed batteries to distributors and other collecting points!
Consideration of duty according to the law of electrical devices
This symbol means that you must dispose of electrical devices separated from the General household
waste when it reaches the end of its useful life. Take your unit to your local waste collection point or
recycling centre. This applies to all countries of the European Union, and to other European countries
with a separate waste collection system.

FR1
Réveil vibreur WT350 –GUIDE D’UTILISATION
1. Caractéristiques
Horloge à quartz pour l’heure
Double rappel d’alarme
Minuteur et chronomètre
Alarme en mode vibration ou sonore.
2. Apparence du produit
Partie A - LCD
A1 : Icône de vibration
A4 : Heure d'alarme 2
A2 : Heure
A5 : Secondes/Jour de la semaine
A3 : Heure d'alarme 1
Partie B - Touches
B1 : Touche « + »
B6 : Commutateur activer/désactiver Alarme 2
B2 : Touche « RAPPEL/LUMIÈRE »
B7 : Commutateur activer/désactiver Alarme 1
B3 : Touche « - »
B8 : Commutateur principal : Commutateur de sélection
de fonction
B4 : Commutateur mode Alarme
B9 : Touche « RESET »
B5 : Commutateur de volume
Partie C - Structure
C1 : Trou de suspension
C3 : Support
C2 : Couvercle du compartiment à piles
3. Mise en route :
Ouvrez le couvercle du compartiment à piles
Insérez 2 piles AA en respectant les polarités [marques « + » et « - »]
Replacez le couvercle du compartiment des piles.

FR2
4. Réglage de l'heure et de l'alarme
4.1 Réglage de l'heure :
En mode affichage de l’heure (commutateur principal sur ), appuyez sur la touche « + » (B1) pour sélectionner
de voir le jour de la semaine ou les secondes. Appuyez sur la touche « - » (B3) pour sélectionner de voir le jour et
l’année.
Positionnez le commutateur principal (B8) sur « » pour accéder au réglage de l’heure, 24 heures se mettent à
clignoter. Utilisez les touches « +»/« - » (B1/B3) pour choisir le format d'affichage de l'heure, 12 ou 24 heures.
Appuyez sur la touche « Rappel d’alarme/Rétroéclairage » pour confirmer et continuer.
00 TZ se met à clignoter. Utilisez les touches « + »/« - » (B1/B3) pour choisir un fuseau horaire de -12 à 12.
Appuyez sur la touche « Rappel d’alarme/Rétroéclairage » pour confirmer et continuer.
GER se met à clignoter. Utilisez les touches « + »/« - » (B1/B3) pour choisir la langue du jour de la semaine.
Appuyez sur la touche « Rappel d’alarme/Rétroéclairage » pour confirmer et continuer.
Les heures se mettent à clignoter. Utilisez les touches « + »/« - » (B1/B3) pour régler les heures. Appuyez sur la
touche « Rappel d’alarme/Rétroéclairage » pour confirmer et continuer.
Les minutes se mettent à clignoter. Utilisez les touches « + »/« - » (B1/B3) pour régler les minutes. Appuyez sur la
touche « Rappel d’alarme/Rétroéclairage » pour confirmer et continuer.
Les secondes se mettent à clignoter. Utilisez les touches « + »/« - » (B1/B3) pour régler les secondes. Appuyez sur
la touche « Rappel d’alarme/Rétroéclairage » pour confirmer et continuer.
2018 se met à clignoter. Utilisez les touches « + »/« - » (B1/B3) pour régler l'année. Appuyez sur la touche
« Rappel d’alarme/Rétroéclairage » pour confirmer et continuer.
J et M se mettent à clignoter. Utilisez les touches « + »/« - » (B1/B3) pour choisir le format d'affichage Jour-Mois ou
Mois-Jour. Appuyez sur la touche « Rappel d’alarme/Rétroéclairage » pour confirmer et continuer.
Le mois se met à clignoter. Utilisez les touches « + »/« - » (B1/B3) pour choisir le mois. Appuyez sur la touche
« Rappel d’alarme/Rétroéclairage » pour confirmer et continuer.
Le jour se met à clignoter. Utilisez les touches « + »/« - » (B1/B3) pour choisir le jour. Appuyez sur la touche
« Rappel d’alarme/Rétroéclairage » pour confirmer et retourner au début de ce réglage ou positionnez le
commutateur principal (B8) sur pour confirmer le réglage et retourner à l’affichage de l’heure normale.
Remarques :
À tout moment, positionnez le commutateur principal (B8) sur pour confirmer le réglage et retourner à
l’affichage de l’heure normale.
Maintenez appuyée la touche « + »/« - » pour accélérer le réglage et atteindre plus rapidement la valeur souhaitée.
Le jour de la semaine pour être affiché en 8 langues : Allemand, anglais, français, italien, néerlandais, espagnol,
danois ou russe. Les langues et les abréviations sélectionnées pour chaque jour de la semaine sont présentées
dans la table suivante.
Langue
Dimanche
Lundi
Mardi
Mercredi
Jeudi
Vendredi
Samedi
Allemand, GER
SON
MON
DIE
MIT
DON
FRE
SAM
Anglais, ENG
SUN
MON
TUE
WED
THU
FRI
SAT
Danois, DAN
SON
MAN
TIR
ONS
TOR
FRE
LOR

FR3
Néerlandais,
NET
ZON
MAA
DIN
WOE
DON
VRI
ZAT
Italien, ITA
DOM
LUN
MAR
MER
GIO
VEN
SAB
Espagnol, ESP
DOM
LUN
MAR
MIE
JUE
VIE
SAB
Français, FRA
DIM
LUN
MAR
MER
JEU
VEN
SAM
Russe, RU
BC
NH
BT
CP
NT
4.2 Fonction de réveil :
4.2.1 Réglage de l’alarme
Positionnez le commutateur principal (B8) sur « » pour accéder au réglage de l’heure d'alarme.
Les heures de l’alarme 1 se mettent à clignoter. Utilisez les touches « + »/« - » (B1/B3) pour régler les heures de
l’alarme 1. Appuyez sur la touche « Rappel d’alarme/Rétroéclairage » pour confirmer et continuer.
Les heures de l’alarme 2 se mettent à clignoter. Utilisez les touches « + »/« - » (B1/B3) pour régler les heures de
l’alarme 2. Appuyez sur la touche « Rappel d’alarme/Rétroéclairage » pour confirmer et retourner au début de ce
réglage ou positionnez le commutateur principal (B8) sur pour confirmer le réglage et retourner à l’affichage de
l’heure normale.
Remarques :
À tout moment, positionnez le commutateur principal (B8) sur pour confirmer le réglage et retourner à
l’affichage de l’heure normale.
Maintenez appuyée la touche « + »/« - » pour accélérer le réglage et atteindre plus rapidement la valeur souhaitée.
4.2.2 Modes de l'alarme
L’alarme peut être réglée en mode sonore « » ou vibration « » à l’aide du commutateur du mode
d’alarme (B4).
Le volume sonore de l’alarme peut être faible ou élevé, réglé à l’aide du commutateur (B5) situé à l’arrière.
Remarque : Lorsque le mode alarme est réglé sur vibration, il est recommandé de placer le réveil sous l’oreiller.
En vibrant, l’unité peut tomber si elle est placée sur d’autres supports.
4.2.3 Activer/désactiver l’alarme et le rappel d’alarme
Positionnez le commutateur activer/désactiver l’alarme 1/2 (B6/B7) sur ON pour activer l’alarme 1/2, l’icône
d’alarme « » apparaît.
Lorsque l’alarme sonne ou vibre, l’icône « » se met à clignoter, appuyez sur la touche « Rappel
d’alarme/Rétroéclairage » pour déclencher à nouveau l’alarme dans environ 5 minutes. L’icône de rappel d’alarme
« » se met à clignoter sur l'écran LCD pendant le délai de rappel d'alarme Cette opération peut être répétée 7
fois.
Positionnez le commutateur activer/désactiver l’alarme (B6/B7) sur OFF pour désactiver l’alarme. Autrement
l'alarme sonne ou vibre pendant environ 3 minutes, puis s'arrête automatiquement.
5. Minuteur/chronomètre
5.1 Minuteur

FR4
Réglage du minuteur
Positionnez le commutateur principal (B8) sur minuteur pour accéder au minuteur.
Utilisez les touches « + »/« - » pour régler la valeur du minuteur, et appuyez sur la touche « Rappel
d’alarme/Rétroéclairage » pour lancer le compte à rebours.
Appuyez de nouveau sur la touche « Rappel d’alarme/Rétroéclairage » pour arrêter le minuteur ; utilisez les
touches « + »/« - » pour remettre à zéro le minuteur.
Lors du compte à rebours du minuteur, maintenez appuyée la touche « + »/« - »pour afficher l’heure actuelle ;
relâchez la touche pour retourner à l’affichage du minuteur
Remarque :
La valeur maximale du compte à rebours est de 39 heures 59 minutes
Maintenez appuyée la touche « + »/« - » pour accélérer le réglage et atteindre plus rapidement la valeur souhaitée.
Alarme par minuteur
Lorsque le minuteur arrive à zéro, l’unité sonne ou vibre pendant environ 3 minutes. Appuyez sur une touche
quelconque pour arrêter le son ou la vibration, ou positionnez le commutateur principal de manière à quitter le
minuteur.
5.2 Chronomètre
Positionnez le commutateur principal (B8) sur Chronomètre pour accéder au chronomètre.
Appuyez sur la touche « Rappel d’alarme/Rétroéclairage » pour lancer le compte à rebours.
Lors du compte à rebours du chronomètre, maintenez appuyée la touche « + »/« - »pour afficher l’heure actuelle ;
relâchez la touche pour retourner à l’affichage du chronomètre
Appuyez de nouveau sur la touche « Rappel d’alarme/Rétroéclairage » pour arrêter le chronomètre ; utilisez les
touches « + »/« - » pour remettre à zéro le chronomètre.
Remarque :
La valeur maximale du chronomètre est de 39 heures 59 minutes 59 secondes
6. Rétroéclairage
Appuyez sur la touche « Rétroéclairage » (B2), pour activer le rétroéclairage pendant environ 5 secondes.
7. Réinitialisation
Utilisez une épingle pour appuyer sur le bouton « RESET » (B9) situé à l’arrière ou réinstallez les piles afin de
redémarrer l’horloge avec les réglages par défaut.s
Précautions
Ne soumettez pas l'appareil à une force ou à un choc excessif.
N'exposez pas l'appareil à la lumière directe du soleil, à des températures extrêmes, à l'humidité ou à la poussière.
Ne plongez pas l'appareil dans l'eau.
Évitez de le mettre en contact avec des matériaux corrosifs.
Ne jetez pas cet appareil au feu, il risque d'exploser.
N'ouvrez pas le panneau arrière et n'apportez aucune modification aux composants de cette unité.

FR5
Avertissements de sécurité concernant les piles
Utilisez uniquement des piles alcalines non rechargeables.
Installez les piles en respectant les polarités (+/–).
Remplacez toujours toutes les piles en même temps.
Ne mélangez pas des piles usagées avec des piles neuves.
Lorsque les piles sont déchargées, les retirer immédiatement de l'appareil.
Retirez les piles lorsque vous n'allez pas utiliser l'appareil.
N'essayez pas de recharger des piles qui ne sont pas rechargeables et ne jetez aucune pile au feu, elle risque
d'exploser.
Rangez vos piles de façon à ce qu'aucun objet métallique ne puisse causer de court-circuit.
Évitez d'exposer les piles à des températures extrêmes, à l'humidité ou à la lumière directe du soleil.
Conservez vos piles hors de la portée des enfants. Elles présentent un risque d'étouffement.
N'utilisez cet appareil que pour l'usage auquel il est destiné !
Obligation légale concernant la mise au rebut des piles
Ne jetez pas les piles usagées avec les ordures ménagères, car elles sont nuisibles à la santé et à
l'environnement. Vous pouvez ramener les piles usagées sans frais à votre revendeur et aux points de
collecte. En tant que consommateur, vous êtes obligés par la loi de ramener les piles usagées aux
revendeurs et aux points de collecte !
Respect de l'obligation de la loi sur les appareils électriques
Ce symbole signifie que les appareils électriques ne doivent pas être jetés aux ordures ménagères à
la fin de leur vie utile. Ramenez votre appareil à un point de collecte de déchets ou à un centre de
recyclage local. Ceci s'applique à tous les pays de l'Union européenne et aux autres pays européens
disposant d'un système de collecte sélectif des déchets.

ES1
Reloj con alarma y vibración WT350 –MANUAL DE USUARIO
1. Características
Hora de un reloj de cuarzo
Función de alarma con retardo diaria dual
Función de temporizador y cronómetro
Alertas de alarma diaria con vibración o sonidos de alarma.
2. Apariencia
Parte A - LCD
A1: Icono de vibración
A4: Hora de la alarma 2
A2: Hora
A5: Segundo / Día de la semana
A3: Hora de la alarma 1
Parte B - Botones
B1: Botón “+”
B6: Interruptor deslizante de alarma 2 conectada /
desconectada
B2: Botón "POSPONER DESPERTADOR/LUZ"
B7: Interruptor deslizante de alarma 1 conectada /
desconectada
B3: Botón “-”
B8: Interruptor principal: Interruptor deslizador de
selección de función
B4: Interruptor deslizador de modo de alarma
B9: Botón “RESET”
B5: Interruptor deslizador de volumen de alarma
Elementos C - Estructura
C1: Agujero para colgar
C3: Soporte
C2: Tapa de las pilas
3. Primeros pasos:
Abra la cubierta del compartimento de las pilas.

ES2
Inserte 2 pilas AA observando la polaridad [marcas “+” y “-”]
Vuelva a colocar la cubierta del compartimento de las pilas.
4. Configuración de hora y alarma
4.1 Configuración de la hora:
En modo pantalla horaria (interruptor principal en ), pulse el botón “+” (B1) para seleccionar y ver el día de la
semana o los segundos. Pulse el botón “-“ (B3) para seleccionar y ver la fecha y el año.
Deslice el interruptor principal (B8) a la posición “ ” para entrar en la configuración de la hora y parpadea 24 Hr.
Pulse el botón “+” o el botón “-” (B1/B3) para fijar la hora de la pantalla horaria en 12 horas o 24 horas. Pulse el
botón “SNOOZE/LIGHT” para confirmarlo y continuar la configuración.
Parpadea 00 TZ. Pulse el botón “+” o el botón “-” (B1/B3) para configurar una zona horaria de -12 a 12. Pulse el
botón “SNOOZE/LIGHT” para confirmarlo y continuar la configuración.
Parpadea GER. Pulse el botón “+” o el botón “-” (B1/B3) para fijar el idioma del día de la semana. Pulse el botón
“SNOOZE/LIGHT” para confirmarlo y continuar la configuración.
La hora parpadea. Pulse el botón “+” o el botón “-” (B1/B3) para configurar la hora. Pulse el botón
“SNOOZE/LIGHT” para confirmarlo y continuar la configuración.
Parpadean los minutos. Pulse el botón “+” o el botón “-” (B1/B3) para configurar los minutos. Pulse el botón
“SNOOZE/LIGHT” para confirmarlo y continuar la configuración.
Parpadean los segundos. Pulse el botón “+” o el botón “-” (B1/B3) para configurar los segundos. Pulse el botón
“SNOOZE/LIGHT” para confirmarlo y continuar la configuración.
Parpadea el año 2018. Pulse el botón “+” o el botón “-” (B1/B3) para configurar el año. Pulse el botón
“SNOOZE/LIGHT” para confirmarlo y continuar la configuración.
Parpadea el D y el M. Pulse el botón “+” o el botón “-” (B1/B3) para configurar la pantalla de fecha-mes o
mes-fecha. Pulse el botón “SNOOZE/LIGHT” para confirmarlo y continuar la configuración.
Parpadea el mes. Pulse el botón “+” o el botón “-” (B1/B3) para configurar el mes. Pulse el botón “SNOOZE/LIGHT”
para confirmarlo y continuar la configuración.
Parpadea la fecha. Pulse el botón “+” o el botón “-” (B1/B3) para configurar la fecha. Pulse el botón
“SNOOZE/LIGHT” para confirmarlo y volver al inicio de esta configuración o deslice el interruptor principal (B8)
hasta para confirmarlo y volver a la pantalla horaria normal.
Notas:
En cualquier momento, deslice el interruptor principal (B8) hacia para confirmar la configuración y volver a la
pantalla horaria normal.
Mantenga pulsado el botón “+” o el botón “-” para acelerar el proceso de configuración y alcanzar el valor que
desee de forma más rápida.
Existen 8 idiomas para el día de la semana: alemán, inglés, francés, italiano, holandés, español, danés y ruso. Los
idiomas y las abreviaturas seleccionadas para cada día de la semana se muestran en la tabla siguiente.
Idioma
Domingo
Lunes
Martes
Miércoles
Jueves
Viernes
Sábado
Alemán, GER
SON
MON
DIE
MIT
DON
FRE
SAM
Inglés, ENG
SUN
MON
TUE
WED
THU
FRI
SAT

ES3
Danés, DAN
SON
MAN
TIR
ONS
TOR
FRE
LOR
Holandés, HOL
ZON
MAA
DIN
WOE
DON
VRI
ZAT
Italiano, ITA
DOM
LUN
MAR
MER
GIO
VEN
SAB
Español, ESP
DOM
LUN
MAR
MIE
JUE
VIE
SAB
Francés, FRA
DIM
LUN
MAR
MER
JEU
VEN
SAM
Ruso, RU
BC
NH
BT
CP
NT
4.2 Función de alarma del reloj
4.2.1 Configuración de la alarma
Deslice el interruptor principal (B8) a la posición para entrar en la configuración de la hora de la alarma.
Parpadea la hora de la alarma de ALM-1. Pulse el botón “+” o el botón “-” (B1/B3) para fijar la hora de la alarma de
la Alarma 1. Pulse el botón “SNOOZE/LIGHT” para confirmarlo y continuar la configuración.
Parpadea la hora de la alarma de ALM-2. Pulse el botón “+” o el botón “-” (B1/B3) para fijar la hora de la alarma de
la Alarma 2. Pulse el botón “SNOOZE/LIGHT” para confirmarlo y volver al inicio de esta configuración o deslice el
interruptor principal (B8) hasta para confirmarlo y volver a la pantalla horaria normal.
Notas:
En cualquier momento, deslice el interruptor principal (B8) hacia para confirmar la configuración y volver a la
pantalla horaria normal.
Mantenga pulsado el botón “+” o el botón “-” para acelerar el proceso de configuración y alcanzar el valor que
desee de forma más rápida.
4.2.2 Modos de alerta de alarma
Se puede fijar la alarma en alerta de sonido “ ” o vibración ” ” mediante el interruptor deslizante del modo
de alarma (B4).
Se puede ajustar el volumen de la alarma a un volumen más bajo o más alto deslizando el interruptor deslizante
(B5) situado en la carcasa trasera.
Nota: Cuando el modo de alarma se fija en modo vibración, sugerimos colocar la unidad debajo de la
almohada. La unidad puede caerse mientras vibra si se coloca sobre superficies en un soporte.
4.2.3 Active/Desactive la alarma y la alarma de retardo
Deslice el interruptor deslizante de alarma 1 o alarma 2 on/off (B6/B7) a la posición ON para activar la función de
alarma 1 o alarma 2; se muestra el icono de la alarma “ ”.
Cuando la alarma alerta o parpadea, el icono “ ” parpadea; pulse el botón “SNOOZE/LIGHT”; la alarma se
retarda durante aproximadamente 5 minutos; posteriormente vuelve a alertar o vibrar. El icono de retardo " ”
parpadea en la pantalla LCD durante el tiempo de retardo. Este proceso puede repetirse 7 veces.
Deslice el interruptor deslizante de alarma on/off (B6/B7) a la posición OFF para desactivar la función de alarma.
En caso contrario, la señal de alarma alerta o vibra durante aproximadamente 3 minutos y después se detiene
automáticamente.
5. Temporizador/cronómetro

ES4
5.1 Temporizador
Configuración del temporizador
Deslice el interruptor principal (B8) hacia temporizador para entrar en la función del temporizador.
Pulse el botón “+” o el botón “-” para ajustar el valor del temporizador e iniciar la función de cuenta atrás pulsando
el botón “SNOOZE/LIGHT”.
Vuelva a pulsar el botón “SNOOZE/LIGHT” para detenerlo, y después, pulse el botón “+” y el botón “-”
conjuntamente para reiniciar el valor del temporizador a cero.
Cuando el temporizador inicia la cuenta atrás, mantenga pulsado el botón “+” o el botón “-” para ver la hora actual,
y vuelva a la pantalla del temporizador soltando el botón “+” o el botón “-“.
NOTA:
El valor de cuenta atrás máximo del temporizador es de 39 horas 59 minutos
Mantenga pulsado el botón “+” o el botón “-” para acelerar el proceso de configuración y alcanzar el valor que
desee de forma más rápida.
Alarma del temporizador
Cuando el temporizador llegue a cero, la unidad sonará o vibrará durante aproximadamente 3 minutos. Pulse
cualquier botón para detener el sonido de alerta o vibración o deslice el interruptor principal para salir de la función
del temporizador.
5.2 Cronómetro
Deslice el interruptor principal (B8) hacia el cronómetro para entrar en la función de cronómetro.
Pulse el botón “SNOOZE/LIGHT” para iniciar la cuenta hacia delante.
Cuando el cronómetro cuenta hacia adelante, mantenga pulsado el botón “+” o el botón “-“ para ver la hora actual y
volver a la pantalla del cronómetro soltando el botón “+” o “-“.
Vuelva a pulsar el botón “SNOOZE/LIGHT” para detenerlo y después pulse el botón “+” y el botón “-”
conjuntamente para reiniciar el cronómetro.
Nota:
El valor máximo del cronómetro es de 39 horas 59 minutos y 59 segundos.
6. Luz de fondo
Pulse el botón “LIGHT” (B2); la retroiluminación durará durante aproximadamente 5 segundos.
7. Reinicio
Use un alfiler para pulsar el botón “RESET” (B9) en la parte posterior de la unidad o vuelva a instalar las pilas para
reiniciar el reloj con los ajustes por defecto.
Precauciones
No golpee la unidad ni la someta a una fuerza excesiva.
No exponga la unidad a temperaturas extremas, luz directa del sol, polvo o humedad.
No la sumerja en el agua.
Evite que entre en contacto con materiales corrosivos.

ES5
No se deshaga de la unidad arrojándola al fuego, ya que podría explotar.
No abra la carcasa posterior interna ni altere ningún componente de la unidad.
Advertencias de seguridad sobre las pilas
Use solamente pilas alcalinas, no use pilas recargables.
Instale las pilas correctamente, haciendo coincidir las polaridades (+/–).
Siempre cambie el juego completo de pilas.
Nunca mezcle baterías usadas y nuevas.
Quite las pilas agotadas de inmediato.
Quite las pilas cuando no se utilicen.
No las recargue ni las deseche en el fuego, ya que pueden explotar.
Asegúrese de que las pilas estén almacenadas lejos de objetos metálicos, ya que el contacto con ellos puede
causar un cortocircuito.
Evite exponer las pilas a temperaturas extremas, a la humedad o a los rayos directos del sol.
Mantenga todas las pilas lejos del alcance de los niños. Constituyen peligro de asfixia.
¡Use el producto únicamente para la finalidad prevista!
Consideración de obligaciones según la ley sobre pilas
No debe tirar las pilas usadas a la basura de su hogar, ya que pueden causar daños a la salud y al
medio ambiente. Puede devolver las pilas usadas sin cargo alguno a su distribuidor y puntos de
recogida. ¡Como usuario final, tiene la obligación de devolver las pilas que utilice a su distribuidor y
otros puntos de recolección!
Consideración de obligaciones según las leyes sobre dispositivos electrónicos
Este símbolo indica que no debe deshacerse de los aparatos eléctricos en la basura doméstica
general cuando lleguen al final de su vida útil. Lleve su unidad a su punto de recogida selectiva de
basura o al centro de reciclaje de su localidad. Esto es de aplicación en todos los países de la Unión
Europea, y en otros países no europeos con sistema de recogida selectiva de basuras.
Table of contents
Languages:
Other Westfalia Alarm Clock manuals