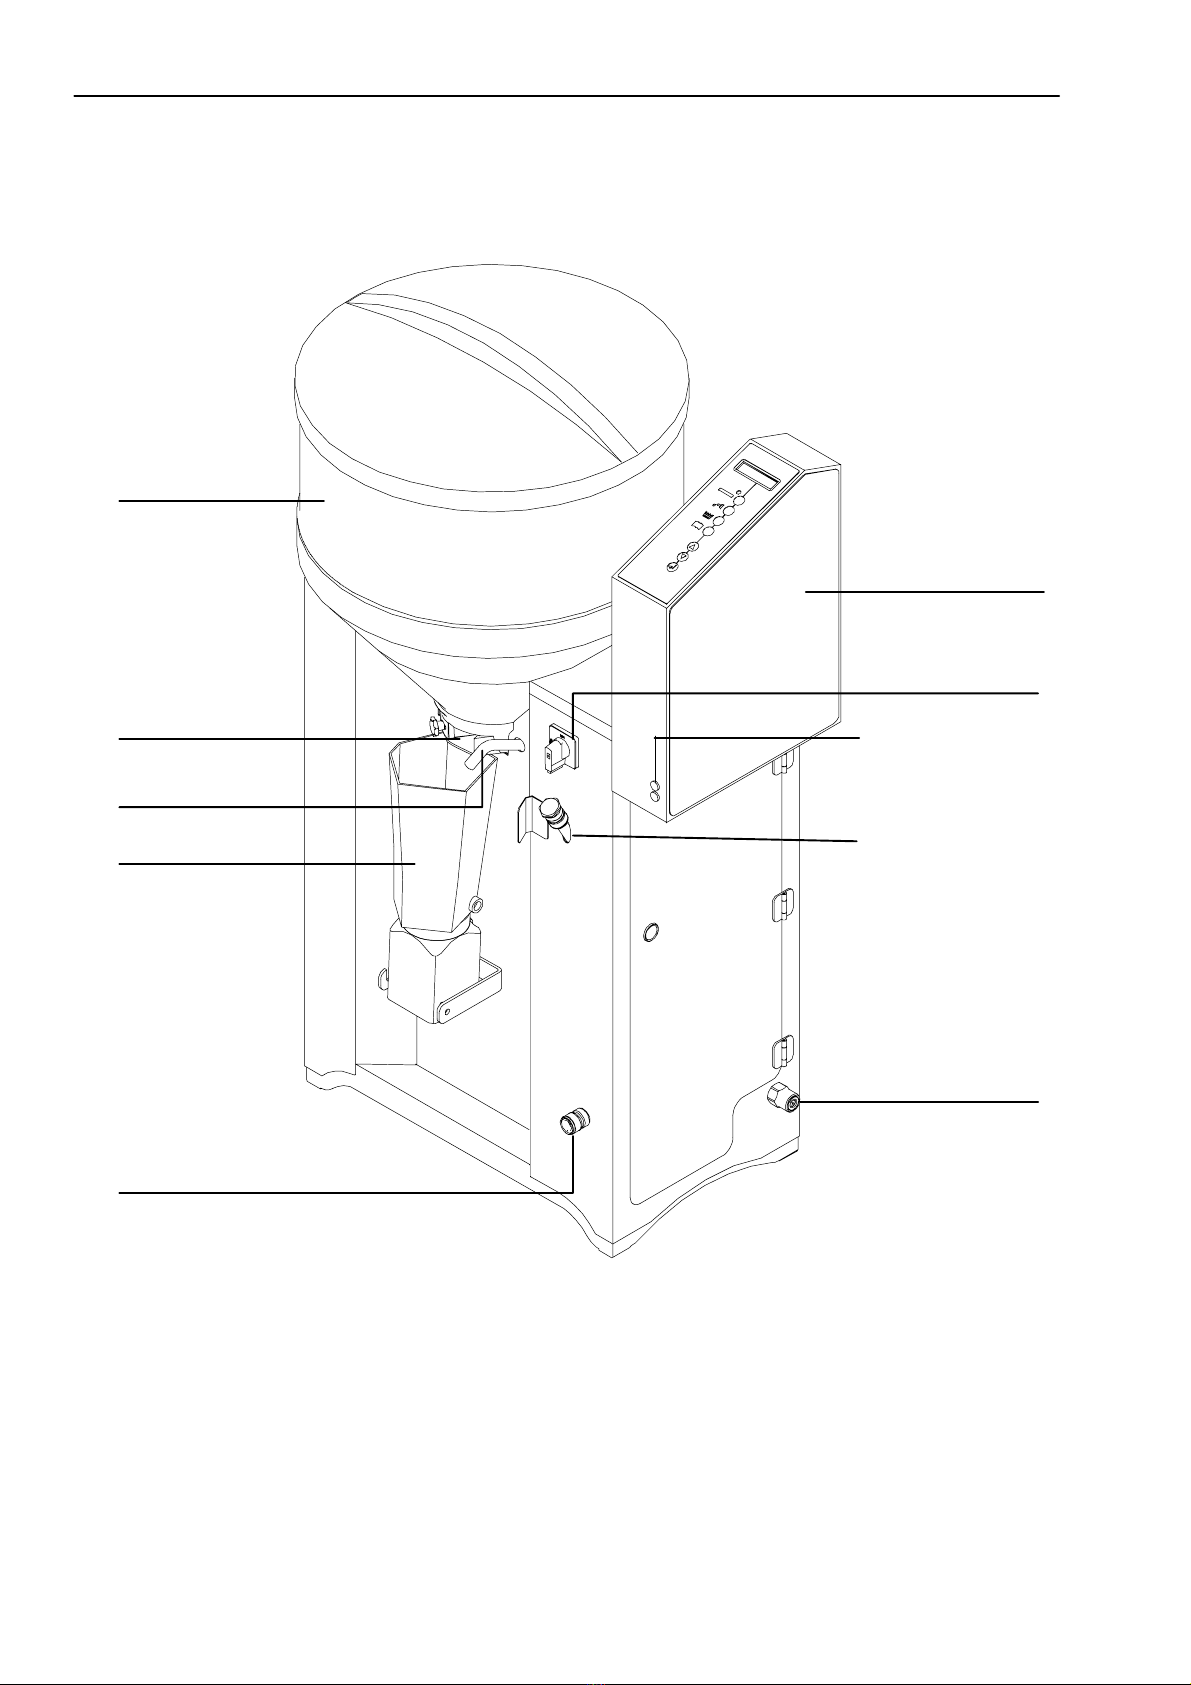
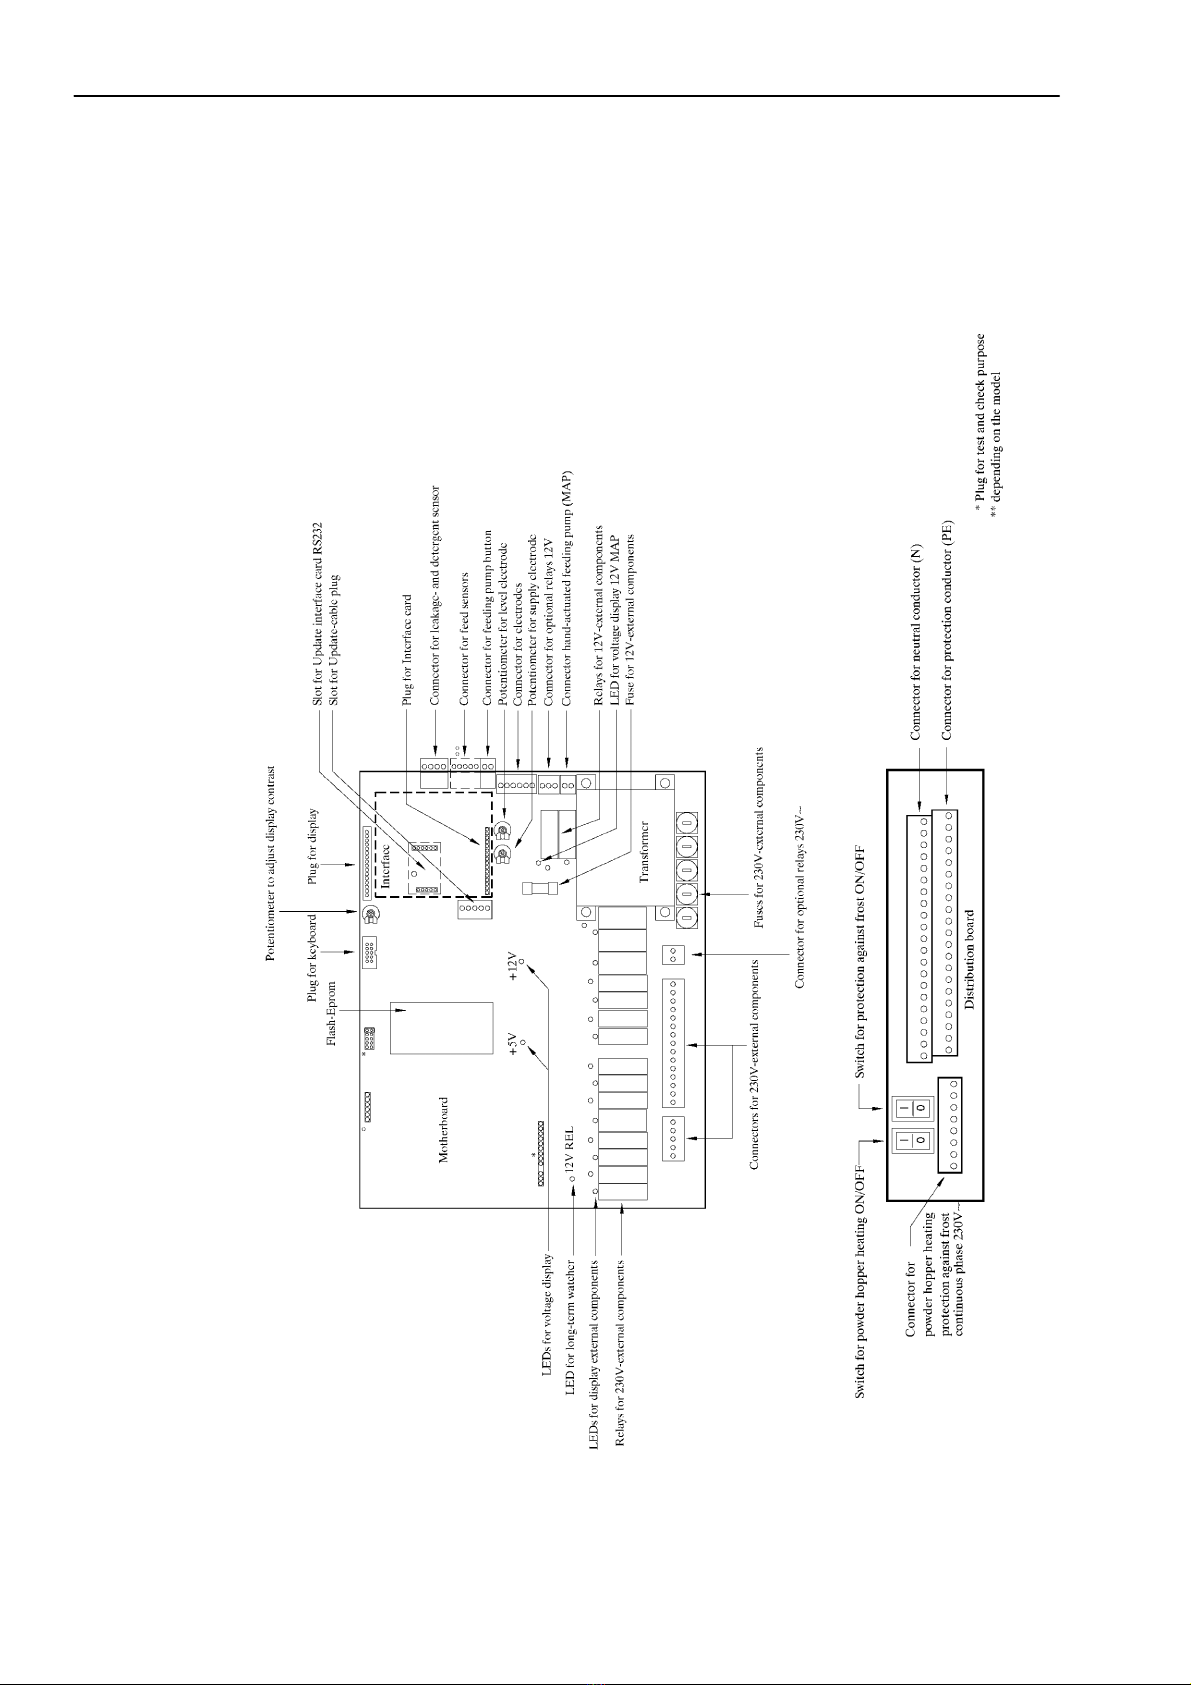
Westfalia 7163-9001-044 Guide

Westfalia Landtechnik GmbH Postanschrift:
Werner-Habig-Straße 1 -D-59302 Oelde Westfalia Landtechnik GmbH
Telefon (02522) 77-0 -Telefax (02522) 77-2488 D-59299 Oelde
Printed in F.R.Germany
7163--9001--044 Combi
7163--9001--046 Fresh Milk
07--2002 as of Program Version 01.01
Automatic Calf Feeder PREMIUM BOY / PREMIUM BIG BOY SM
TAK5--SM2--27--F1 VDW5--SM2--27--F1
TAK5--SM2--28--P1 VDW5--SM2--28--P1
TAK5--SM2--30--P1 VDW5--SM2--30--P1
TAK5--SM2--32--P1 VDW5--SM2--32--P1
TAK5--SM2--38--P1 VDW5--SM2--38--P1
(DAIRY PROGRAM controlled by CALFSCAN)
Operating Instructions and Spare Parts List
Westfalia
Landtechnik


3
Table of contents
1 Introduction 6...........................................................
1.1 Safety Instructions 6...............................................................
1.2 Danger Signs on the Automatic Calf Feeder 7.........................................
1.3 Information Signs on the Automatic Calf Feeder 7......................................
1.4 Construction Parts System--Machine Combi 8.........................................
1.4.1 Motherboard and Distribution Board SM 2 Plus 10.................................
1.4.2 Heat Exchanger / Circulation Pump 11...........................................
1.4.3 Hand--Actuated Feeding Pump 12...............................................
2 Specifications Automatic Calf Feeder 13...................................
3 Locating the Automatic Calf Feeder 15.....................................
3.1 Local Electrical Connection 15........................................................
3.2 Installing the Automatic Calf Feeder 15................................................
3.3 Mounting the Sucking Station 16......................................................
3.4 Mounting the Race--Way 17..........................................................
3.5 Connecting the Micro--Identification “Calfscan” 17.......................................
3.6 Water and Milk Connection 18........................................................
3.6.1 Water Connection 18..........................................................
3.6.2 Milk Connection 19............................................................
4 Operating Elements 20....................................................
4.1 Keyboard 20.......................................................................
4.1.1 Operational Control Keys 21....................................................
4.1.2 Entering the Values 22.........................................................
4.1.3 Selecting the Options 23.......................................................
5 Installing the Automatic Calf Feeder 24....................................
5.1 Connecting the Automatic Calf Feeder to the Mains Supply 24............................
5.2 Filling the Boiler of the Heat Exchanger with Water 24...................................
5.3 Deaerating the Circulation Pump (if available) 25........................................
5.4 Filling the Milk Powder into the Powder Hopper 25......................................
5.5 Filling the Milk Storage Tank 25.......................................................
5.6 Calibrating the Feed Components 26..................................................
5.7 Setting the Heating 27...............................................................
5.7.1 Adjusting the Thermostats 27...................................................
5.7.2 Recommendations for Temperature Settings 28...................................
5.7.3 Measuring the Temperature 28..................................................
5.8 Heating for Milk Powder Outlet and Protection against Frost 29...........................
6 Functioning of the Automatic Calf Feeder 30...............................
6.1 Preparing the Milk Portions 30........................................................
6.2 Distributing the Milk 30..............................................................
6.2.1 In the Restricted Mode 30......................................................
6.2.2 In the Ad Libitum Mode 31......................................................
7 Settings in Setup 32......................................................
7.1 Different selections in Setup 32.......................................................
7.2 Function Table „Setup“ 34............................................................
7.3 How to make entries in Setup 35......................................................
8 Connecting the System--Machine to the Feeding Computer 36...............
8.1 Connecting the System--Machine to the VC3--Bus 36....................................

4Table of contents
9 Entries on the Feed Computer 38..........................................
9.1 Setup in DP5 38....................................................................
9.2 Setup in DP4.4 44..................................................................
9.3 Setup in C16 47....................................................................
9.4 Setup Related to the Automatic Feeder 47.............................................
9.5 Settings for Animal--Specific Increase of the Concentration on C16 48.....................
9.6 Settings for Animal--Specific Fresh Milk Ratio of the Feed Portion 48......................
10 Functions of the Menu Key 49............................................
10.1 Hand Functions 49.................................................................
10.2 Portion Values 50..................................................................
10.2.1 Selecting the Concentration 50.................................................
10.2.2 Entering the Milk Ratio 51.....................................................
10.2.3 Entering the Additive 51.......................................................
10.2.4 Restricted/Adlib--Mode 51.....................................................
10.3 Milk Values 52....................................................................
10.3.1 Selecting the Operating Mode 52...............................................
10.3.2 Entering the Milk Value 52.....................................................
10.3.3 Commuting to MP--mode 53...................................................
10.3.4 Commuting to 1--Circle--Mode 53...............................................
10.4 Calibration 54.....................................................................
10.4.1 Calibrating Water, Milk, MP 54.................................................
10.4.2 Calibrating Additives and Detergent 56..........................................
10.5 Machine Values 57.................................................................
10.5.1 Intermediate Mix 57..........................................................
10.5.2 Mixer Afterrun 57.............................................................
10.5.3 Emptying Mixer 57...........................................................
10.5.4 Press out the Milk 58.........................................................
10.5.5 Entering the Distribution Pause 58..............................................
10.5.6 Box 1 / Box 2 59.............................................................
10.6 Diagnosis 60......................................................................
10.6.1 Valves/Motors 60.............................................................
10.6.2 Sensors 60..................................................................
10.6.3 Calibration 61................................................................
10.6.4 Identification 61..............................................................
10.6.5 Checking 61.................................................................
10.7 Version 62........................................................................
10.8 Function Table of the Menu Key for Connection to Bus--System 63.......................
11 Functions of the Automatic Key 65.......................................
11.1 Display in the Automatic--Mode 65...................................................
11.2 Releasing an Extra--Portion 67......................................................
12 Functions of the Cleaning Key 68.........................................
12.1 Entering the Figures 69.........................................................
12.2 Selecting the Options 70............................................................
12.3 Cleaning 71.......................................................................
12.3.1 Mixer Cleaning 71............................................................
12.3.2 Cleaning the Heat Exchanger 72...............................................
12.3.3 Heat Exchanger with Suction Hoses 74.........................................
12.3.4 Air Cleaning 76..............................................................
12.3.5 Heat Exchanger with Sponge 77...............................................
12.4 Settings 79.......................................................................

5
Table of contents
12.4.1 Mixer Cleaning 79............................................................
12.4.2 HE Cleaning 79..............................................................
12.4.3 Air Cleaning 79..............................................................
12.4.4 HE/Hose Cleaning 80.........................................................
12.4.5 Hose Cleaning 80............................................................
12.4.6 Detergent 80................................................................
13 Service and Maintenance of the Automatic Calf Feeder 81..................
13.1 The Day after the First Commissioning 81............................................
13.2 Carrying Out a Regular Check Routine 82............................................
13.3 Shutdown 82......................................................................
14 Fault Messages 84.......................................................
14.1 Memory Error 84..................................................................
14.2 Heat Exchanger 84................................................................
14.3 Temperature 85...................................................................
14.4 Electrode Fault 85.................................................................
14.5 Communication 85.................................................................
14.6 Identification 85...................................................................
14.7 Milk Empty 85.....................................................................
14.8 Lack of Water 86..................................................................
14.9 Emptying Mixer 86.................................................................
15 Accessories 87..........................................................
15.1 Two--Group--Valve--Unit 87..........................................................
15.2 Additive Dispenser 88..............................................................
15.3 Fully Automatic Heat Exchanger Cleaning 88..........................................
15.4 Electrical Vapour Screen for MP-- and Powder Additive Outlet 89.........................
15.5 Detergent Dosing Pump 89.........................................................
15.6 Protection against Flies 90..........................................................
16 Replacement of the Program Chip 91.....................................
EC DECLARATION OF CONFORMITY A.......................................

6Introduction
1 Introduction
1.1 Safety Instructions
Be sure to read and follow all instructions contained in this manual before connecting and
using the automatic calf feeder.
:Use the appliance only to feed calves.
:Servicing and installation of the automatic calf feeder has to be restricted to qualified
and authorised service personnel.
:Read the user’s manual carefully before installing or operating the machine.
To facilitate customer service on the calf feeders, store the documentation accompanying
the appliance near to the automatic feeder.
:The faultless functioning of the automatic calf feeder requires expert installation, correct
handling, as well as careful care and maintenance.
:Incorrect data entries may have serious consequences. Therefore check the correctness of
all data entries.
:The livestock owner is responsible for a regular and scrupulous control of his animals
and the functioning of the appliance. If, for any reason, the system should break down or
some calves should not make use of it, the livestock owner is responsible for choosing
other feeding methods for those animals.
:The manufacturer accepts no responsibility for damages and their consequences caused
by incorrect installation and operation, improper use, inadequate service and mainte-
nance or false entries.
:Remove any projecting object from the stable (e.g. pipe ends), because Responder
collars could get caught in it.
:You will find further safety instructions in the following chapters.

7
Introduction
1.2 Danger Signs on the Automatic Calf Feeder
CAUTION!
This sign warns you of rotating parts starting to work automatically.
This sign is located on potential danger areas such as the milk powder
hopper, the milk powder outlet, the mixer as well as the outlet for pow-
der additives on the additive dispenser.
In order to avoid injuries, before carrying out any kind of operation on
above listed parts, it is imperative to make the automatic feeder current-
less by turning the main switch to position „0/OFF“ or by pulling the
mains plug.
CAUTION!
This sign warns you of electric shocks.
In order to avoid injuries, before opening the control unit, it is impera-
tive to make the automatic feeder currentless by turning the main switch
to position „0/OFF“ or by pulling the mains plug.
1.3 Information Signs on the Automatic Calf Feeder
Before connecting the automatic calf feeder to the mains supply and
activating the heating (see chapter 5 “Installing the Automatic Calf
Feeder”, page 24), carefully read the operating instructions.
Any questions about this product? Then, feel free to get
in touch with us. Before calling us, please write down
the information (machine type, machine number) on
the nameplate located at the left of the feeder chassis,
as well as the program version (refer to chapter „Menu
1--99, Machine data“).
Our address:
Förster--Technik GmbH,
Gerwigstr. 25,
D--78234 Engen,
Tel. +49/(0)7733/9406--0,
Fax +49/(0)7733/9406--99
Internet: www.foerster--technik.de

8Construction Parts System--Machine Combi
1.4 Construction Parts System--Machine Combi
Main switch ON/OFF
Milk--resp. water outlet
Quick--acting closure
for sponge cleaning
Mixer
Milk powder hopper
Dosing slide
Control unit with
operating elements
Milk connection
Water connection
Pilot lamps for milk
powder outlet heating
and protection against
frost

9
Construction Parts System--Machine Combi
Circulation valve*
Thermostat for minimum
operating temperature
Milk pump
Heating thermostat
Water connection
Milk valve
Circulation valve
Water valve heat exchanger
Water valve boiler
Milk connection
Detergent pump (accessory)
Box valve 2 (accessory)
Receptacle for detergent (accessory)
Box valve 1
Water connection for hose cleaning
* not available on model TAK5--SM2--27--F1

10 Motherboard and Distribution Board SM 2 Plus
1.4.1 Motherboard and Distribution Board SM 2 Plus
On the motherboard are located the transformer for weak current supply of the processor
control, the relays, the connectors for external components, the fuses and LEDs.

11
Heat Exchanger / Circulation Pump
1.4.2 Heat Exchanger / Circulation Pump
Mixer to mix up
the feed components
Hose connection
box valve/teat
Hose connection to the water line
(at the right side)
Hose connection to the milk
tank (at the right front)
Heat exchanger with circulation
pump (not available on model
„TAK5--SM2--27--F1“) and stainless
steel coil. The circulation pump
keeps the warm water in the boiler
running at high speed effecting in
this way a rapid heat transfer to the
liquid inside the stainless steel coil
Solenoid valve
for milk supply
Solenoid valve water supply
heat exchanger
Milk pump for flow
and dosing of the liquid
components
Mixer outlet valve
Feeding pump
Solenoid valve water
supply boiler
Solenoid valve
for HE--cleaning

12 Hand--Actuated Feeding Pump
1.4.3 Hand--Actuated Feeding Pump
Thanks to the hand--actuated feeding pump that is located below the valve unit, calves may
easily get accustomed to the teat. You can activate the feeding pump either by pressing a
key on the operating unit (stylized teat) or by pushing a button on the remote control. The
milk is then delivered directly from the mixer via the valve unit to the teat and into the
mouth of the calf.
You can also use the feeding pump e.g. to drain off manually the rinsing water in the
mixer jar via the mixer outlet valve. To this end, press Menu key and select „Emptying
Mixer“ in submenu „Hand Functions“.
Mixer outlet valve
Suction hose
Feeding pump
Hose connection mixer
Box valve 1
Hose from mixer
outlet valve
Cubical plug for
box valve 2 (option)
Do not clean the feeding pump by means of the cleaning sponge!

13
Specifications Automatic Calf Feeder
2 Specifications Automatic Calf Feeder
Please observe the information on the nameplate located at the left of the chassis!
Electrical Connection
TAK5--SM2--38--P1, TAK5--SM2--27--F1 (400 V)
230V / 400V / 3 / N / PE, 50 Hz, 16 A
TAK5--SM2--27--F1 (230 V)
230V / L / N / PE, 50 Hz, 16 A
TAK5--SM2--28--P1 (only for U.S.A. and Canada)
240V / L1, L2 / Grd / 60 Hz, 15 A
TAK5--SM2--30--P1 (only for Japan)
200V / L1, L2 / Grd / 50/60 Hz, 20 A
TAK5--SM2--32--P1
230V / L / N / PE, 50 Hz, 20 A
V D W 5 -- S M 2 -- 3 8 -- P 1 , V D W 5 -- S M 2 -- 2 7 -- F 1 ( 4 0 0 V )
230V / 400V / 3 / N / PE, 50 Hz, 16 A
VDW5--SM2--27--F1 (230 V)
230 V / L / N / PE, 50 HZ, 16 A
VDW5--SM2--28--P1 (only for U.S.A and Canada)
240V / L1, L2 / Grd / 60 Hz, 15 A
VDW5--SM2--30--P1 (only for Japan)
200V / L1, L2 / Grd / 50/60 Hz, 20 A
V D W 5 -- S M 2 -- 3 2 -- P 1
230V / L / N / PE, 50 Hz, 20 A

14 Specifications Automatic Calf Feeder
Dimensions of the automatic calf feeder (Combi version)
Height: 126 cm
Width: 67 cm in case of closed lateral doors
115 cm in case of open lateral doors
Depth: 57 cm without dispenser for powder additives
66 cm with dispenser for powder additives
Weight (with basic equipment): approx. 66 kg
Dimensions of the automatic calf feeder (Fresh milk version)
Height: 120 cm
Width: 67 cm in case of closed lateral doors
115 cm in case of open lateral doors
Depth: 57 cm without dispenser for powder additives
66 cm with dispenser for powder additives
Weight (with basic equipment): approx. 62 kg
Water connection
1/2“ hose with 3/4“ hose coupling.
The local water pressure has to be between 2,5 and 6 bar.
Heat exchanger
Boiler capacity: approx. 7 l.
Capacity of the stainless steel coil: 0,5 l
Milk powder hopper -- storage capacity (with top section)
Approx. 35 kg
Number of sucking stations
Each calf feeder can provide approx. 20 -- 30 rearing calves or 15 -- 20 fattening calves with
feed per sucking station. One calf feeder with 2 sucking stations can provide approx.
50 -- 60 rearing calves, 20 -- 30 fattening calves or 20 rearing calves and 15 fattening calves
with feed.
Specifications are subject to change without prior notice.

15
Locating the Automatic Calf Feeder
3 Locating the Automatic Calf Feeder
3.1 Local Electrical Connection
:Refer installation of the local electrical connection to qualified electricians.
:Observe local recommendations and protective measures. To operate the automatic calf
feeder, it is demanded to install an earth leak switch (30 mA) in the local power
supply.
:The automatic calf feeder requires its own power supply: refer to chapter 2, page 13,
„Specifications“.
:Observe rated voltage and frequency. The rated voltage indicated on the nameplate of the
calf feeder must correspond to the one of the mains supply.
:In case of overvoltage risk, install an overvoltage limiter in the local main distribution
frame.
For animals’ safety and to prevent electrical interferences, carry out an earth bonding of all
metal parts such as water line, sucking station, race--way and automatic calf feeder. At the
rear of the calf feeder is located the connection screw for the earth bonding which has to be
connected to earth, such as e.g. an equipotential busbar, by means of a short coupling.
As it is technically impossible to protect the installation against lightning stroke separately,
it is to the owner to install an adequate lightning protection, such as e.g. a lightning protec-
tion system for the entire building. We recommend to conclude a lightning protection
insurance.
3.2 Installing the Automatic Calf Feeder
:It is advisable to place the calf feeder in a dry location, if possible, not in the animal area
(e.g. in the fodder storage or similar detached room).
:A fence of planks protects the automatic calf feeder against dirt and flies. In summer,
when flies occur with increased frequency, you can protect the mixer jar, the milk
powder and the additive outlet by means of a large fly protection (accessory). Steam can
easily escape through the openings of the fly screen grating.
:Frost does not cause any damages to the automatic calf feeder. In order to ensure a good
functioning of the feeding process even in case of frost, you have to equip the calf feeder
with an equipment for protection against frost (accessory). The owner is responsible for
a reliable water supply.
:The suction hoses can be easily guided through a wall.
:If possible, place the milk storage tank next to the automatic calf feeder.
Earth bonding
Lightning
protection

16 Mounting the Sucking Station
3.3 Mounting the Sucking Station
:Install the sucking station max. 65 cm above the stable ground.
Mount the teat approx. 15 cm above the suction hose connection of the mixer.
:Fix the suction hose in such a way, that the mixer jar can easily be tipped in forward
direction. The suction hoses should not exceed a length of 2 m.
:Mount the suction bracket with splash board towards the bottom.
:Make sure that there is no sag in the connecting hose between mixer and feeding pump,
in order to prevent accumulation of water or milk.
Teat at max.
65 cm height
Suction hose
Teat bracket
The teat should be mounted in
the feeding station approx. 15
cm above the suction hose
connection of the mixer
15 cm

17
Mounting the Race--Way
3.4 Mounting the Race--Way
Mount an appropriate race--way in front of the sucking station, in order to prevent a calf
from being pushed aside by other calves.
:Mount the race--way according to the mounting instructions.
3.5 Connecting the Micro--Identification “Calfscan”
:Connect the Micro--Identification „Calfscan“ according to the mounting instructions.
:Calfscan has been preassembled in the stainless steel shell and adjusted. You do not need
to carry out further adjustments.
:Mount and operate Calfscan only in the original stainless steel shell.
:Install the cable for Calfscan in such a way that calves cannot touch them.
:Carefully check the wiring. See installation plan.
The antenna type is decisive for the identification range. In case of Micro--Identification
„Calfscan“ you can set the range by the antenna--Squelch (see chapter 8.1, page 36, „Con-
necting the System--Machine to the Feeding Computer“). The following table contains the
Squelch values and identification ranges for the different Responders.These Squelch values
are empirical and have already been factory--set.
Responder Squelch (standard values) identification range
X--Responder 0 max. 25 -- 30 cm
Eartag--Responder 0max. 25 -- 30 cm
PM--Responder 180 max. 20 -- 25 cm
A Responder can be read simultaneously at two antennas. If, for instance, at antenna 1 a
Responder is read that is actually assigned to antenna 2, we talk about faulty identifica-
tion due to an overlap of reach. A faulty identification may also occur when calves,
standing beside the feeding box, are identified. In this case you have to set the identifica-
tion range once again. If necessary, close off the area beside the feeding station, so that
calves do not have access to it.

18 Water and Milk Connection
3.6 Water and Milk Connection
Water connection
Milk connection
3.6.1 Water Connection
:Connect the 1/2“ water hose with a 3/4“ hose coupling at the right of the automatic calf
feeder.
The water pressure supplied by customer has to be between 2,5 and 6 bar.
Note: To ensure troublefree functioning of the automatic feeder, take care that the water
pressure does not fall below 2,5 bar!
Take care that there is no pressure variation of the water pipe.
In case of water pipes with small cross section it may happen that, in the feeding mode or
when water is taken out of the same pipe simultaneously, the water pressure will drop.
When the water pressure is below 2,5 bar you have to use a header tank.
Install additional water stop valve.
Since September 1, 2000 the pressure reducer is factory--set to 1,5 bar.
Do not alter the setting of the pressure reducer!
In case the notes above should not be observed, there is no guarantee that the automatic
feeder will run trouble- free!

19
Water and Milk Connection
3.6.2 Milk Connection
Convey the milk from the milk storage tank straight to the automatic calf feeder. In case
long pipes are inevitable, use bigger diameters.
:To avoid air bubbles, do not hang the milk hose into the milk tank from above but install
connection for milk pipe at the bottom of the milk tank.
Air--containing pipes, very long and thin, as well as thin--walled pipes being prone to con-
tract, lead to untimely switching--off or change--over of the system.
Should the milk pipe be made of several sections, make sure that the connections -- both at
the milk tank and the automatic feeder -- are reliably leakproof.
For hygienic reasons, avoid gross differences of diameter. Only use couplings and joining
pieces easy to clean.
When the automatic calf feeder only runs in the water mode, close the milk connection
by means of a blind plug (part of the delivery).

20 Operating Elements
4 Operating Elements
4.1 Keyboard
You can carry out all major settings and operations concerning e.g. operating mode, portion
values, calibration, cleaning, diagnosis etc. via the keyboard. The display shows all current
settings.
Arrow--Up--key
Arrow--Down--key
Enter key
Cleaning key
Menu key
Automatic key with LED
Display
Key for feeding pump
Automatic
This manual suits for next models
1
Table of contents