Westinghouse W-038 User manual

Owner’s Manual
Outdoor Lighting Fixture
Installation Instructions
W-038
1/17/04
Please write model number here for future reference: / Veuillez noter le numéro de mod-
èle aux fins de référence ultérieure: / Por favor, incluya el número del modelo aquí para
futura referencia:
12 pg_W-038_EFS_1/04 3/8/05 7:23 AM Page 1

2
ASSEMBLY INSTRUCTIONS FOR OUTDOOR LIGHT FIXTURE
Congratulations on your Westinghouse purchase. This fixture has been designed to give you
many years of beauty and service. Please email questions and comments to:
catalogroom@westinghouselighting.com.
NOTE: Carefully unpack fixture and parts. Make sure all parts are included before
discarding any packing materials (see figure 1).
WARRANTY INFORMATION
This Westinghouse Lighting Fixture is warranted against defects in material and workmanship for
a period of Five Years from purchase date. This warranty is in lieu of all other
warranties expressed or implied.
This warranty does not cover acts of nature such as lightning damage, or corrosion and
discoloration of components, nor does it cover damages caused through abuse, improper
installation, surges in electric current, or acts of third parties.
This warranty does not cover broken glass. If fixture is received with broken glass, please call
Westinghouse Lighting for free replacement.
This warranty does not cover costs of removing and re-installing the light fixture.
If this fixture fails for any reason covered by this warranty, simply return the fixture with a copy of
the original sales receipt, freight prepaid and Westinghouse Lighting, at its option, shall repair or
replace the fixture or refund the purchase price.
WARNINGS
ELECTRICAL SHOCK CAN RESULT IN SERIOUS INJURY.
Read and follow instructions exactly as shown. If instructions are
unclear, do not proceed. Contact a qualified electrician. Read all
instructions before beginning. Proper wiring is essential for safe
operation of this fixture. When cutting or drilling into walls or
ceilings, do not damage electrical wiring, gas lines, or water lines.
If any of the fixture or wiring components are damaged, do not
install fixture. Return to place of purchase.
For fixtures provided with 75° C or 90° C supply wire warning only.
(These warnings are provided on the U.L. label and on the fixture
carton.) Risk of fire. Most dwellings built before 1985 have supply
wires rated 60° C. Consult a qualified electrician before installing.
NOTE: For fixture employing a grounded convenience outlet.
CAUTION: “This fixture employs a grounded type receptacle and is
not intended for connection to a two wire ungrounded source of
supply.”
12 pg_W-038_EFS_1/04 3/8/05 7:23 AM Page 2

3
FIGURE 1.
*NOT SUPPLIED
*OUTLET
BOX (E)
FINIAL (N)
CAP NUTS 2 (L)
CAGE (K)
Line art shown may not exactly match the fixture enclosed.
However, the installation instructions do apply to this fixture.
FINIAL (N)
CROSS
BAR (C)
GLASS
PANELS (J)
CAP NUTS 1 (A)
BACK PLATE (B)
COVER (M)
MOUNTING
SCREWS (D)
GREEN
GROUNDING
SCREW (H)
*OUTLET BOX
SCREWS (F)
WIRE
CONNECTORS (G)
GROUND
WIRE
SIDE
HOLE (I)
12 pg_W-038_EFS_1/04 3/8/05 7:23 AM Page 3

4
CAUTION: For fixtures labeled for outdoor and wet location use, provide a water-tight seal
between the fixture and the mounting surface by using silicone or similar caulking.
NOTE: Underwriters Laboratories (UL) does not require all fixtures to have ground wires. These
fixtures meet all UL specifications.
1. Turn off power at circuit box to avoid possible electric shock.
2. Remove cap nuts 1 (A) from back plate (B) and remove universal mounting plate or cross
bar (C) leaving mounting screws (D) in place.
3. Secure universal mounting plate or cross bar (C) to outlet box (E) (vertically or
horizontally, see fig. 1) with outlet box screws (F) (not included).
4. Identify color coding of fixture wires (see figure 2 on page 11).
5. To connect wires, take black fixture wire (group A from fig. 2) and place evenly against
black outlet box wire. Do not twist wires.
6. Fit wire connector (G) (see fig. 1) over wires and twist until there is a firm connection.
If wire connector (G) easily comes off, reattach and check again for a firm connection.
7. Repeat steps 5 and 6 with the white (group B from fig. 2) fixture and outlet box wires.
8. Partially thread green grounding screw (H) into side hole (I) on
mounting plate or cross
bar
(C) (see fig. 1).
9. Wrap ground wire from fixture around green grounding screw (H) leaving enough excess
wire to then connect ground wire and outlet box wire with wire connector (G), if applicable.
10. Tighten green grounding screw (H). Do not over tighten.
11. Tuck wires inside outlet box (E) (see fig. 1).
MOUNTING AND WIRING INSTRUCTIONS
FIXTURE ASSEMBLY INSTRUCTIONS
1. Place back plate (B) over mounting screws (D) (see fig. 1).
2. Secure into place with cap nuts 1 (A).
3. Install lamp(s). Do not exceed recommended wattage.
4. Slide glass panels (J) into place inside cage (K).
5. Remove cap nuts 2 (L) from top of cage (K).
6. Raise cage (K) while lining up holes in cover (M).
7. Secure with cap nuts 2 (L).
8. Screw finials (N) to top and/or bottom (if applicable).
12 pg_W-038_EFS_1/04 3/8/05 7:23 AM Page 4

LES INSTRUCTIONS D'ASSEMBLAGE DE L'APPAREIL
D'ÉCLAIRAGE POUR UTILISATION EXTÉRIEURE
Félicitations ! Vous avez acheté un produit de Westinghouse Lighting. Cet appareil d'éclairage a
été conçu pour durer de nombreuses années. Veuillez envoyer vos questions et commentaires par
courriel, à l'adresse suivante : catalogroom@westinghouselighting.com
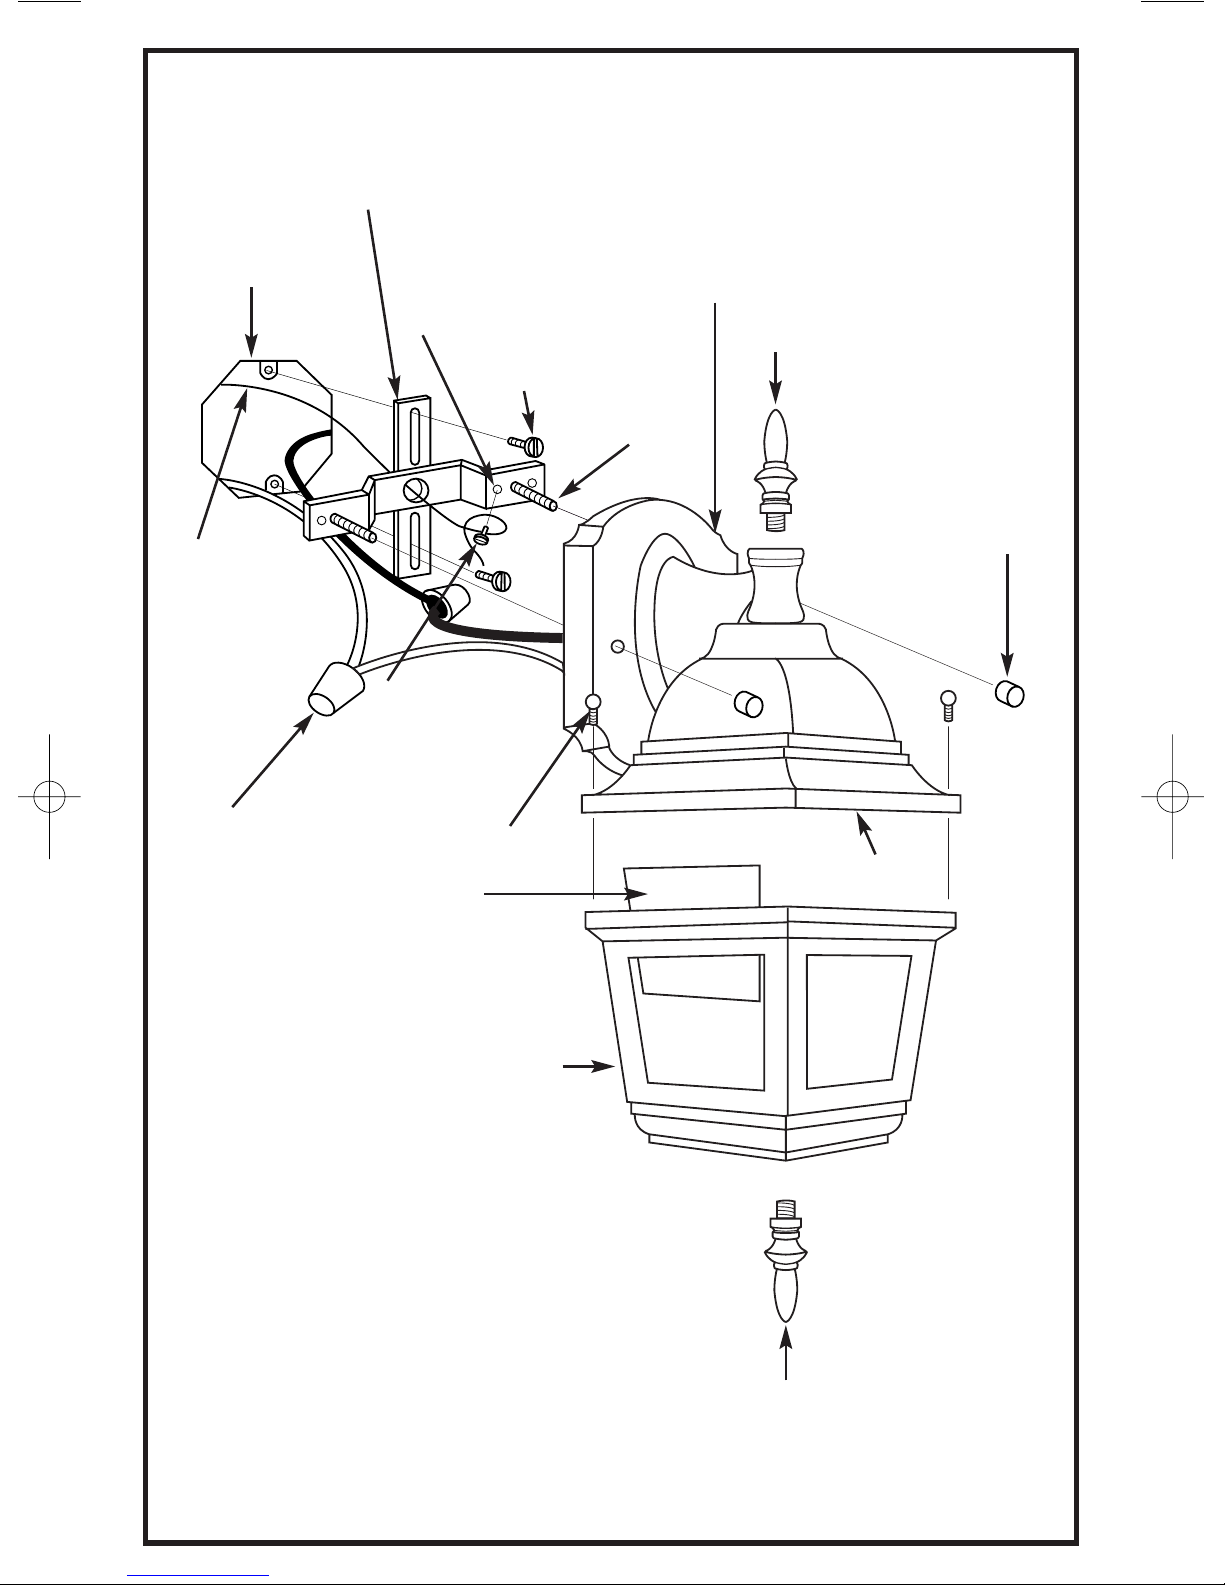
NNOOTTAA::Déballez soigneusement l'appareil d'éclairage et les pièces. Assurez-vous que toutes les
pièces y sont avant de mettre l’emballage au rebut (voir fig. 1).
GARANTIE LIMITÉE DE CINQ ANS
Cet appareil d'éclairage Westinghouse est assorti d’une garantie de 5 ans contre les défauts de
matériaux et de fabrication, qui entre en vigueur à partir de la date d'achat. La présente garantie
se substitue à toute autre garantie expresse ou tacite.
Cette garantie ne porte ni sur les dommages survenant suite à une catastrophe naturelle (telle que
la foudre), ni sur la corrosion ou la décoloration des pièces; la garantie ne porte pas sur les dom-
mages survenant suite à une utilisation anormale, une installation impropre, une surtension de
courant électrique ou des actes d’un tiers.
Cette garantie ne porte pas sur le verre brisé. Si vous avez reçu votre appareil d'éclairage avec un
globe de verre brisé, veuillez appeler Westinghouse Lighting afin d’obtenir une pièce de remplace-
ment sans frais.
Cette garantie ne porte pas sur les frais de démontage et de réinstallation du ventilateur.
Si cet appareil d'éclairage ne fonctionne pas pour une des raisons couvertes par la présente
garantie, renvoyez tout simplement l'appareil d'éclairage et une copie de la preuve d’achat origi-
nale, frais de transport prépayés, à Westinghouse Lighting qui, à sa discrétion, réparera ou rem-
placera l'appareil ou vous remboursera le montant du prix d’achat.
5
MISE EN GARDE : L'ÉLECTROCUTION POURRAIT
CAUSER DE GRAVES BLESSURES PERSONNELLES.
Lisez ces instructions et suivez-les exactement comme illustré. En cas
de doute, ne commencez pas l'installation. Consultez un électricien
qualifié. Lisez toutes les instructions avant de commencer l'installation.
Un câblage approprié est essentiel au bon fonctionnement de cet
appareil d’éclairage. Lorsque vous faites une entaille ou que vous
percez un trou dans un mur ou un plafond, n'endommagez pas les
câbles électriques, les canalisations de gaz ou d'eau. Si l'un des com-
posants de raccordement ou de l'appareil d'éclairage est endommagé,
n'installez pas cet appareil d'éclairage. Retournez-le à l'endroit où vous
l'avez acheté.
NOTA : Pour appareil d’éclairage avec sortie terre
MISE EN GARDE : Cet appareil d’éclairage utilise un réceptacle muni
d’un fil de terre et ne doit pas être branché à un bloc d’
alimentation à deux fils non mis à la terre.
Convient uniquement aux appareils comportant un avertissement indi-
quant que l'appareil d'éclairage est doté d'un fil supportant une chaleur
de 75°C ou 90°C. (Ces avertissements se trouvent sur
l'étiquette U.L. et sur l'emballage de l'appareil d'éclairage.)
Risque d’incendie. La plupart des bâtiments construits avant 1985 sont
dotés de fils calculés pour 60°C. Consultez un électricien
qualifié avant l’installation.
12 pg_W-038_EFS_1/04 3/8/05 7:23 AM Page 5
Table of contents
Languages:
Popular Landscape Lighting manuals by other brands

LIGMAN
LIGMAN MALTA 1 installation manual

Saxby Lighting
Saxby Lighting Islay 68784 Instruction leaflet

LIGMAN
LIGMAN EU-10016-3 installation manual

LIGMAN
LIGMAN KI-60475 installation manual

Cooper Lighting
Cooper Lighting McGraw-Edison ZD Credenza specification

Cooper Lighting
Cooper Lighting Generation CLB25MWW5C373 Specification sheet

Malibu Boats
Malibu Boats CM110P instructions

AMP Lighting
AMP Lighting OrchardPro APL-3018-B-BZ Installation & maintenance guide

Cooper Lighting
Cooper Lighting Invue 42 - 175W Specification sheet

ABBA
ABBA SPB12 installation guide

Techmar
Techmar Garden Lights GILVUS + manual

LIGMAN
LIGMAN RADO 1 installation manual