4
Bedienung
Verwendung an einem Sat-Receiver
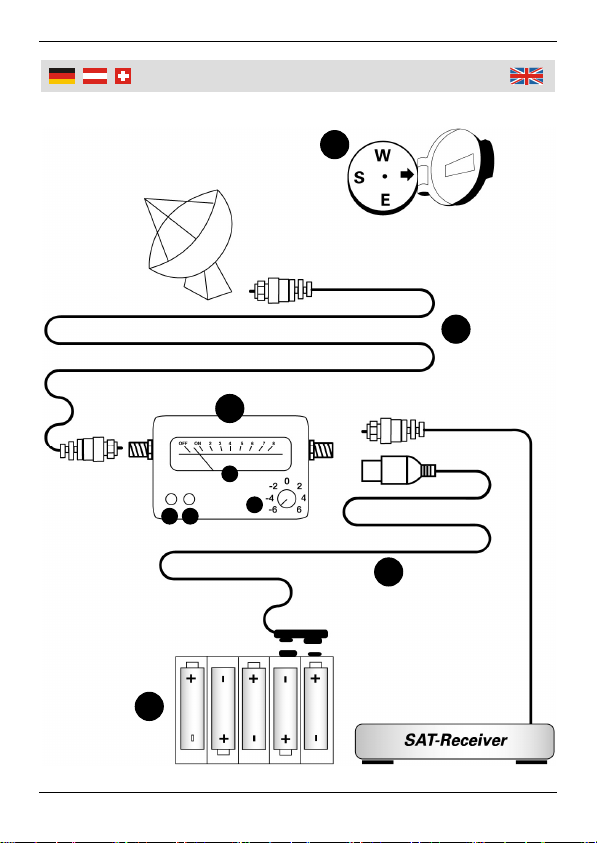
1. Verbinden Sie den LNB (Low Noise Block Converter, auch LNC)
oder einen Multischalterausgang mittels des mitgelieferten F-
Verbindungskabels (B) mit der Buchse TO LNB am Sat-Finder
(A).
2. Verbinden Sie den Antenneneingang Ihres ausgeschalteten Sat-
Receivers mit der Buchse TO REC am Sat-Finder (A). Achtung,
Kurzschlüsse am Ausgang des Receivers können diesen be-
schädigen.
3. Schalten Sie den Sat-Receiver ein. Die Skalenbeleuchtung am
Sat-Finder ist nun eingeschaltet. An den Leuchtdioden (A3+A4)
können Sie die momentan eingestellte Ebene ablesen (Siehe
auch Seite IV).
4. Drehen Sie den Dämpfungsregler (A2) zu Beginn auf die Positi-
on 6, um die maximale Empfindlichkeit des Eingangs zu ge-
währleisten. Falls schon ein starkes Signal anliegt, stellen Sie
den Regler so ein, dass der Zeiger in der Anzeige (A1) auf 5
steht.
5. Richten Sie Ihren Satellitenspiegel mithilfe des beiliegenden
Magnet-Peilkompasses (E) auf die Position des gewünschten
Satelliten aus. Dabei unterstützt Sie der Signalton. Positions-
und Elevationswerte der Satelliten finden Sie in entsprechenden
Fachzeitschriften und auf den Internetseiten der Satelliten-
betreiber.
6. Beginnen Sie nun mit der Feinabstimmung, indem Sie den
Spiegel horizontal und vertikal ausrichten, bis der Wert in der
Anzeige sein Maximum erreicht hat. Bei Erreichen des höchst-
möglichen Wertes, stellen Sie den Regler wieder so ein, dass
der Zeiger ungefähr auf 5 steht. Wiederholen Sie die Feinab-
stimmung bis Sie das maximale Ergebnis erzielt haben.
7. Führen Sie die oben beschriebenen Schritte gegebenenfalls
auch mit unterschiedlichen Polarisationsebenen (Horizon-
tal/Vertikal), sowie im unteren und oberen Band aus (Low-