Wexiodisk WD-BF90 User manual

BAR-FED TURN TRACK
WD-BF90 & WD-BF180
(translation of the original documentation)
Read the manual before use!
Installation and user manual
S/N: (En) Valid from: 202012 Rev.: 4.0


1. General instructions ........................................................................ 1
1.1 Symbols used .................................................................................................. 2
1.2 Checking that the product and manual correspond ......................................... 2
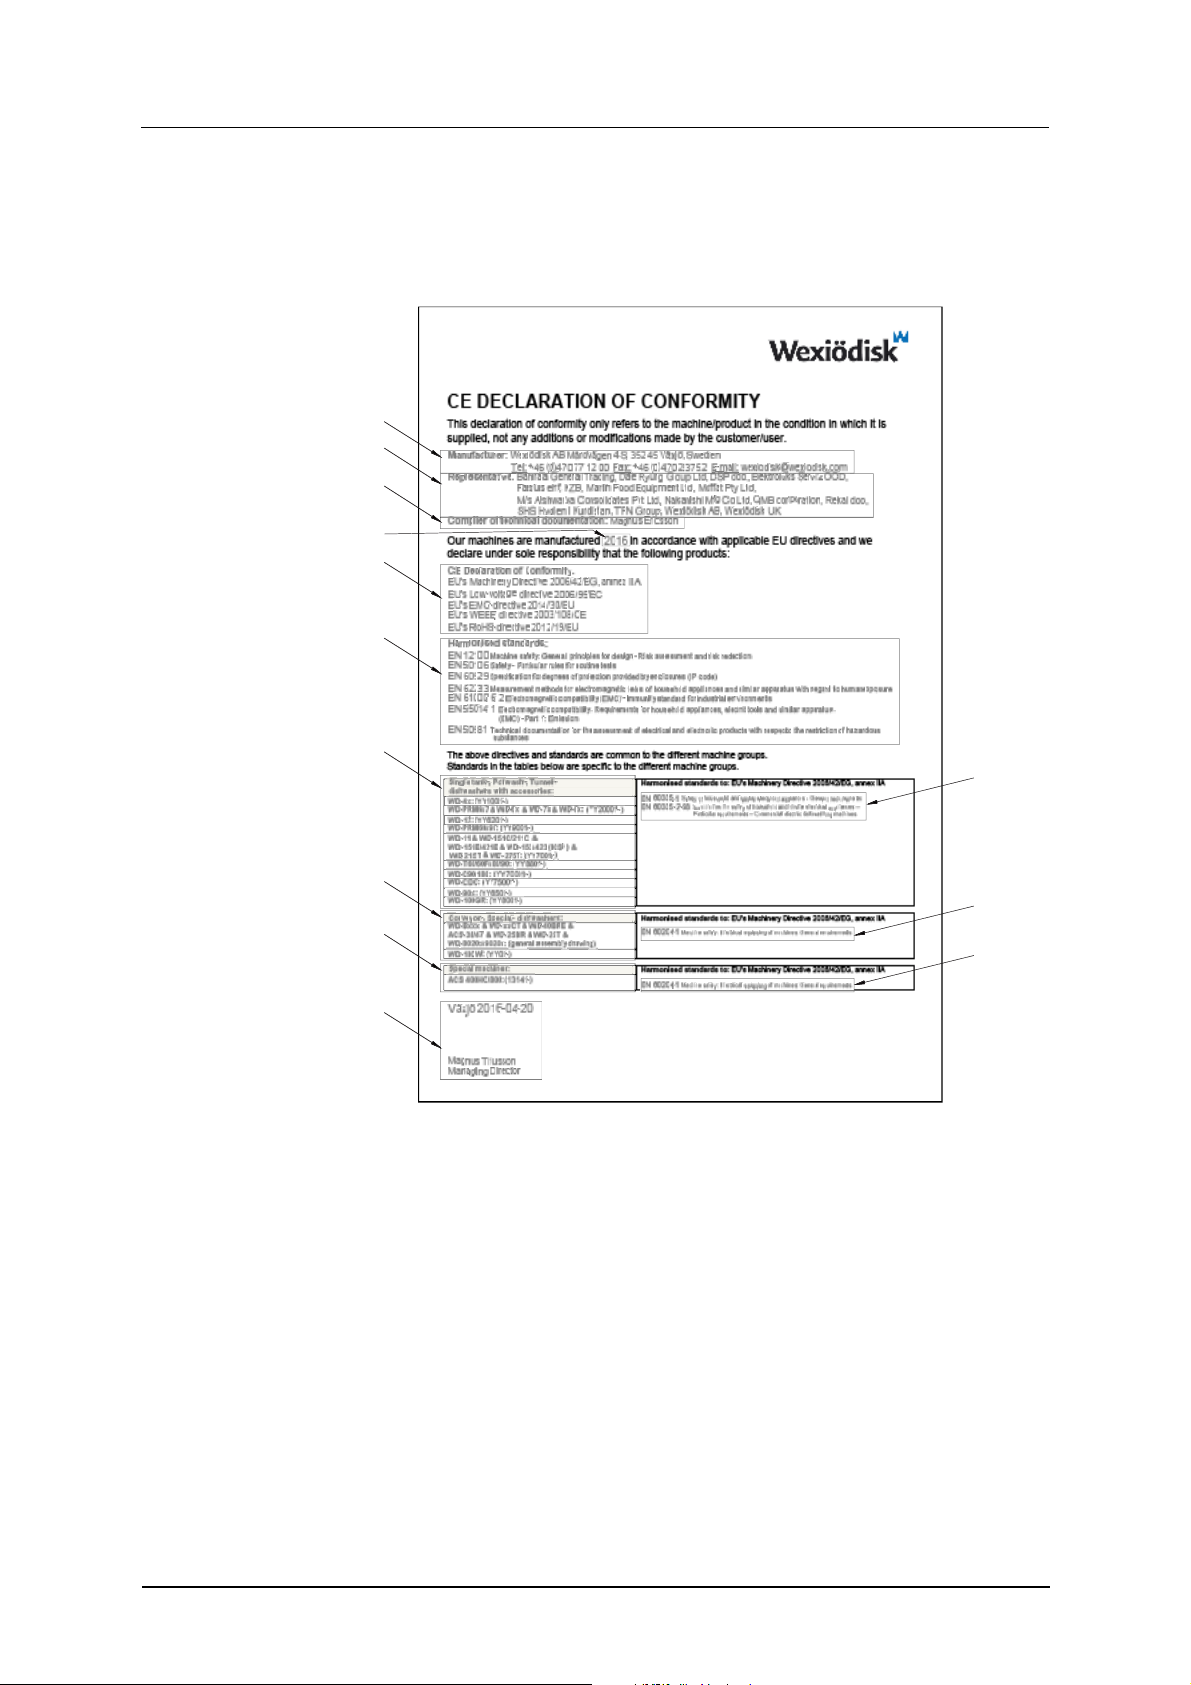
1.3 EU Declaration of Conformity .......................................................................... 3
2. Safety instructions ........................................................................... 4
2.1 General information ......................................................................................... 4
2.2 Transport .......................................................................................................... 5
2.3 Installation ........................................................................................................ 5
2.4 Operation ......................................................................................................... 5
2.4.1 Risk of crushing ........................................................................................ 5
2.4.2 Risk of slipping .......................................................................................... 5
2.4.3 Sounds ...................................................................................................... 5
2.5 Cleaning ........................................................................................................... 5
3. Installation ........................................................................................ 6
3.1 General information ......................................................................................... 6
3.2 Requirements for the installation site ............................................................... 6
3.2.1 Lighting ..................................................................................................... 6
3.2.2 Drain/waste pipe ....................................................................................... 6
3.2.3 Ventilation and ambient temperature ........................................................ 6
3.2.4 Space for servicing ................................................................................... 6
3.3 Transport and storage ...................................................................................... 7
3.3.1 Unpacking ................................................................................................. 7
3.3.2 Recycling .................................................................................................. 7
3.4 Installation ........................................................................................................ 8
3.4.1 Preparing for the installation ..................................................................... 8
3.4.2 Positioning the machine ............................................................................ 8
3.4.3 Connection to dishwasher ........................................................................ 9
3.5 Connections ................................................................................................... 13
3.5.1 Electrical connection ............................................................................... 13
3.5.2 Drain/waste pipe connection ................................................................... 14
3.6 Trial operation ................................................................................................ 15
3.6.1 Start-up schedule .................................................................................... 15
3.7 Technical documentation ............................................................................... 15
WD-BF90 & WD-BF180 Rev. 5.0 (202201)

4. Instructions for use ........................................................................ 16
4.1 Preparations ................................................................................................... 16
4.1.1 Machine design ....................................................................................... 17
4.2 Using the machine ......................................................................................... 18
4.3 After use – Cleaning ...................................................................................... 19
4.3.1 Incorrect cleaning methods ..................................................................... 19
4.3.2 Daily cleaning ......................................................................................... 19
4.3.3 Operating problems ................................................................................ 20
5. Technical information .................................................................... 21
WD-BF90 & WD-BF180 Rev. 5.0 (202201)

WD-BF90 & WD-BF180 Rev. 5.0 (202201)
General instructions
1
1. General instructions
Read the instructions in this manual carefully as they contain important
information regarding the correct, effective and safe installation, use and
servicing of the machine. Service personnel should have access to all
documentation for the machine.
Keep this manual in a safe place so that it can and should be used by other
operators of the machine.
• The product is intended to be used together with dishwashers for washing
dishware that is found in the general catering and restaurant trade.
• The capacity requirements of the machine can be found in the TECHNICAL
DATA chapter.
Before the dishwasher is started up and used, the following points should be
observed:
• The SAFETY INSTRUCTIONS chapter must be studied carefully before
commissioning the machine
• Installation of the machine must be performed in accordance with the
requirements and instructions indicated in the INSTALLATION and
TECHNICAL SPECIFICATIONS chapters.
• Any personnel who may at some point use the machine must be trained in
its operation, use and care.
• The machine should not be used by anyone suffering from a physical or
mental illness.
• A close eye should be kept on any children in the vicinity of the machine to
ensure they do not tamper with it.
• All cover plates must be fitted during use.
The machine and equipment requires an annual service. Contact one of our
authorised or trained service companies for such a service.

WD-BF90 & WD-BF180 Rev. 5.0 (202201)
General instructions
2
1.1 Symbols used
This symbol warns of situations where a safety risk may arise. The instructions
given should be followed in order to prevent injury and dangerous situations.
This symbol on a machine part warns of electrical equipment. The machine must
be entirely non-live during servicing, turn off the power at the power switch and if
required, the switch should be locked to prevent unintentional operation. The
component may only be removed by a qualified electrician.
This symbol warns that the machine’s electronics are sensitive to electrostatic
discharge (ESD), which is why a static electricity wristband must be used when
handling the electronics at all times.
This symbol explains the right way to perform a task in order to prevent poor
results and/or damage to the machine.
This symbol identifies recommendations and hints to help you get the best results
when washing, to increase the machine’s lifespan and reduce the risk of
emergency shutdown.
This symbol explains the importance of careful and regular cleaning of the
machine to meet hygiene requirements.
This symbol warns of the importance to read the manual before using the
machine.
This symbol warns that local regulations must be followed for recycling of
packaging etc. as well as the destruction of the machine.
This symbol shows where any earth cable for potential equalisation can be
connected. The earth bolt is placed on the machine’s stand.
1.2
Checking that the product and manual correspond
Check that the type of transport turn track on the rating plate corresponds with the
type description on the cover of the manual. If manuals are missing, it is possible
to order new ones from the manufacturer or the local distributor.

WD-BF90 & WD-BF180 Rev. 5.0 (202201)
General instructions
3
1.3 EU Declaration of Conformity
A so-called EC Declaration of Conformity is provided on delivery of the product.
1. Contact details of the manufacturer (Wexiödisk AB, Mårdvägen 4, SE-
35245 Växjö, SWEDEN. Tel.: +46 470 771200, Fax: +46 470 23752,
E-mail: wexiodisk@wexiodisk.com
2. Representatives of Wexiödisk AB.
3. Person responsible for the product’s documentation.
4. Year of manufacture of the product.
5. The EU directives with applicable provisions to which all the dishwashers,
special machines and accessories comply.
6. Harmonised standards for the directives specified, and which the
dishwashers, special machines and accessories meet, wherever relevant.
7. Model designation and serial number of the dishwashers, special machines
and accessories the document applies to.
8. Place and date with signature and name (in block letters) of the person
responsible for ensuring compliance with legislation and regulations.
CE_16_2
1
2
3
5
6
7
7
7
8
6
6
6
4

WD-BF90 & WD-BF180 Rev. 5.0 (202201)
Safety instructions
4
2. Safety instructions
Read the chapter GENERAL INSTRUCTIONS carefully before starting work.
2.1 General information
The dishwasher the turn track is connected to is CE marked, meaning the entire
installation (dishwasher and turn track) meets the requirements of the EU
Machinery Directive on product safety. Product safety means that the design of
the equipment will prevent personal injury or damage to property. The CE mark
is only valid for an unmodified machine. Any damage to the machine arising from
failure to follow the instructions will invalidate the supplier’s warranty and product
liability.
Installation, repairs and servicing must be performed by a qualified professional
in accordance with applicable local and national regulations. We recommend that
the work is performed by the manufacturer or one of the manufacturer’s
authorised service companies.
To further improve safety during installation, operation and servicing, the operator
and the personnel responsible for installing and servicing should read the safety
instructions carefully.
In order to avoid dangerous situations, the following must be followed:
• Switch off the machine immediately in the event of failure or malfunction.
• Make sure the machine is non-live before removing the cover plate. Turn
off the power using the power switch. If required, the switch must be locked
to prevent unintentional operation.
• The machine and equipment requires an annual service. The machine
should be serviced by a person authorised or trained to do so by us. Use
original spare parts.
• Warranty repairs must be performed by an authorised company. Contact
an authorised service company to draw up a programme of preventive care
and maintenance. For authorised service companies, please see
www.wexiodisk.com or contact Wexiödisk AB.
• The regular checks described in the manual must be carried out in
accordance with the instructions.

WD-BF90 & WD-BF180 Rev. 5.0 (202201)
Safety instructions
5
2.2 Transport
Handle the equipment with care during unloading and transport to avoid the risk
of it tipping over. Never lift or move the machine without using the wooden
packaging to support the stand.
2.3 Installation
The turn track is powered by the dishwasher's feed mechanism. See the
dishwasher’s Installation and user manual if intervention in the dishwasher’s
electrical equipment is necessary.
2.4 Operation
Be very careful around the product when the machine is in operation.
2.4.1 Risk of crushing
Avoid contact with the turn track’s drive mechanism during use. The movement
of the drive mechanism can cause crushing injuries.
2.4.2 Risk of slipping
The floor should be kept clean and dry to eliminate any risk of slipping. Mop up
any water and leftover food that has been spilt.
2.4.3 Sounds
The machine is not silent during operation, see TECHNICAL SPECIFICATIONS.
Hearing protection may therefore need to be used.
2.5 Cleaning
Do not use a pressure washer for cleaning. An ordinary hose is all that is required
for rinsing the turn track.

WD-BF90 & WD-BF180 Rev. 5.0 (202201)
Installation
6
3. Installation
Read the chapters GENERAL INSTRUCTIONS and SAFETY INSTRUCTIONS
carefully before starting work.
3.1 General information
Read these instructions carefully, as they contain important information regarding
the correct installation method.
The instructions should be used together with the dishwasher’s wiring diagram.
These can be found in the dishwasher’s electrical cabinet.
3.2 Requirements for the installation site
The requirements for installation of the product are the same as for the
dishwasher to which it is connected (see also the dishwasher's installation and
user manual.)
3.2.1 Lighting
In order to ensure the best possible working conditions during installation,
operation, servicing and maintenance, make sure that the machine is installed in
a well-lit room.
3.2.2 Drain/waste pipe
There must be a drain pipe with an effective trap for water used for rinse cleaning.
The floor drain capacity can be found in the TECHNICAL SPECIFICATIONS.
3.2.3 Ventilation and ambient temperature
The product is intended to be used in an indoor environment at normal room
temperature. In order to ensure the best possible working conditions, a certain air
renewal rate is required in the dishwashing room. The ventilation requirements for
the dishwashing room are to be dimensioned on the basis of the applicable
standards.
3.2.4 Space for servicing
A 1-metre area should be left clear in front of the machine for servicing purposes.

WD-BF90 & WD-BF180 Rev. 5.0 (202201)
Installation
7
3.3 Transport and storage
Always transport the product in an upright position.
Take care during transport, as there is a risk of tipping. N.B.! The machine must
not be transported without a pallet or other support. This may also result in
damage. When transporting the machine without a normal wooden pallet, always
check that none of the components underneath the machine can be damaged.
A=Wooden pallet
If the turn track is not to be installed immediately, it must be stored in a frost-free
area where the air is dry.
3.3.1 Unpacking
Check that all parts have been delivered by comparing them with the delivery
note.
Remove the packing material. Inspect the machine for any transport damage.
3.3.2 Recycling
Packaging must be sent for destruction or recycling in accordance with local
regulations.
The machine is manufactured from stainless steel plate, among other things, and
also contains electronic components. Recycling of the appliance when its
economic lifetime has been reached must be carried out in accordance with
current rules and regulations.
WD4_17
A

WD-BF90 & WD-BF180 Rev. 5.0 (202201)
Installation
8
3.4 Installation
3.4.1 Preparing for the installation
• Check that there is sufficient room for the machine at the installation
location.
• Check that the installation location has the correct waste connection.
3.4.2 Positioning the machine
Check the following points before the machine is placed in position:
• Remove the protective plastic on the sides which are to be stood against a
wall.
• Place the turn track in position and check that it, and any accessories, are
horizontal. Adjust the height with the legs.

WD-BF90 & WD-BF180 Rev. 5.0 (202201)
Installation
9
3.4.3 Connection to dishwasher
A=Dishwasher
B=WD-BF90
C=WD-BF180
D=Feed hook to remove
• Connect the turn track and other peripheral equipment to the dishwasher
in accordance with the dishwashing room's layout drawing.
• When the turn track is connected to the infeed on a dishwasher, a straight
section must be used between the turn track and the machine and any
hooks must be retained.
• When the WD-BF90/WD-BF180 is connected to the outfeed of a
dishwasher, the outermost feed hook (D) (in the machine) on the side the
WD-BF90/WD-BF180 is turned towards, must be removed.
• Check that the machine to which WD-BF90/WD-BF180 is being connected
has the correct set point value (row 115) set for this option.
A A
B
B
A A
C
C
D
DD
D
WDBF_13

WD-BF90 & WD-BF180 Rev. 5.0 (202201)
Installation
10
Adjusting the turn track
180°turn track
1. Adjustable foot for adjusting the height of the turn track in relation to the
dishwasher.
2. Lock nuts on the inside for adjusting the height of the stop rail.
3. Stop rail
4. Support for stop rail (adjustable)
5. Basket support (adjustable)
WDBF_12
12
2
3
4
5

WD-BF90 & WD-BF180 Rev. 5.0 (202201)
Installation
11
1. Dishwasher
2. Turn track
3. Lock nut + washer
4. Drive bar
5. Sliding block
6. Cover strip
7. Screw + nut + washer
8. Dishwasher loading cradle
The turn track is set to its default settings at the factory, but may need to be
adjusted according to the conditions at the place of installation.
• The holes in the connection end of the turn track must fit against the hole
in the lower edge of the dishwasher’s outfeed opening.
• Fit the cover strip (6) and screw the turn track and machine together using
the screws, washers and nuts provided (7).
• Adjust the drive bar (4) so that the upper edge is at the same height as the
sliding surface on the machine’s loading cradle (8). The height of the drive
bar is adjusted by raising or lowering the stop rail attached to the end of the
turn track using the lock nuts at (3) and using the stop rail’s adjustable
support attached to the bottom plate of the turn track.
WDBF_11
2
1
1
2
3
4 5 6 78

WD-BF90 & WD-BF180 Rev. 5.0 (202201)
Installation
12
Fitting the feeding arm
The turn track’s drive mechanism must be connected to the machine’s loading
cradle once the turn track has been fitted and adjusted.
1. Stainless steel washer
2. Turn track drive arm
3. Plastic washer
4. Cotter pin
5. Feeding arm
6. Plate
7. Screw
8. Dishwasher loading cradle
9. Lock nut
• The plate (6) is fitted to the existing holes on the machine’s loading cradle
(8). The plate must be turned in the right direction depending on the feed
direction of the equipment.
• The feeding arm (5) is connected to the loading cradle (8) and to the
existing holes on the turn track’s drive arm (2). Note the position of the
plastic washers (3).
WDBF_10
1
2
3
4
5
6
1
3
7
4
8
9

WD-BF90 & WD-BF180 Rev. 5.0 (202201)
Installation
13
3.5 Connections
3.5.1 Electrical connection
Information about electrical connections can be found on the dishwasher’s wiring
diagrams. The wiring diagrams are shown on the inside of the electrical cabinet
door. Store the diagrams in the electrical cabinet after installation.
Cabling from the limit switch
The cable from the limit switch on the connected roller table is drawn through an
existing hole at the end of the dishwasher and on to the terminal box located in
the lower part of the dishwasher behind the front panels (see wiring diagram for
connection).
Connection of 90°turn track and roller table on the machine’s outfeed side
A=Limit switch
B=Roller table
C=Turn track
D=Dishwasher
E=Terminal box
WDBF_09
A
B
C
D
E

WD-BF90 & WD-BF180 Rev. 5.0 (202201)
Installation
14
3.5.2 Drain/waste pipe connection
Connect the drain at (1). The drain pipe can be connected to the dishwasher drain
or run to a floor drain, where it must end above the water level. The drain should
be a 50 mm metal pipe if there is a risk of mechanical collision.
Ensure that the drain connection is kept in place by using e.g. cable ties in the
designated areas.
A=90°turn track
B=180°turn track
1=Drain connection
2=Basket support (x1 to be fitted on the feed side of the turn track)
AB
WDBF_07_08_R1

WD-BF90 & WD-BF180 Rev. 5.0 (202201)
Installation
15
3.6 Trial operation
Test the turn track together with the dishwasher. Prepare the machine for a trial
run by following the INSTRUCTIONS FOR USE in the machine’s user manual.
The instructions describe the measures that must be taken to prepare the
machine for operation.
3.6.1 Start-up schedule
This should be completed when the machine is started up and used.
Read the installation and user manuals carefully. Then check the following points:
Start the dishwasher and load baskets containing dishware. Perform the
following checks:
• Transport of baskets along the turn track.
• Check the function of the drive unit and stop rail catches.
• Limit switch function. When a basket activates the limit switch on a
connected roller table, the turn track and dishwasher should stop. When
the basket is removed the equipment should restart automatically.
• Drainage system integrity.
Train and inform personnel concerning:
• Care (daily, weekly and other frequencies)
• Recommendations concerning annual service.
3.7 Technical documentation
For correct use and servicing, it is essential that the documentation
accompanying the equipment be made available to personnel who will be using
it. The installation and user manual, which describes handling and care, among
other things, should be stored near the equipment.
Machine type:
Machine serial number:
Installation date:

WD-BF90 & WD-BF180 Rev. 5.0 (202201)
Instructions for use
16
4. Instructions for use
Read the chapters GENERAL INSTRUCTIONS and SAFETY INSTRUCTIONS
carefully before starting work.
This chapter describes what must be done with the turn track:
• Prior to use
• Regarding the way in which the machine should be used
• Following use
4.1 Preparations
Check:
• That the turn track and removable parts have been cleaned. If not – clean
them
• That removable parts are correctly in place
• That the dishwasher connected has been started up
This manual suits for next models
1
Table of contents
Popular Accessories manuals by other brands

SUNSAVER
SUNSAVER 24K user manual

S+S Regeltechnik
S+S Regeltechnik AERASGARD ACO2-W Operating Instructions, Mounting & Installation

REV Ritter
REV Ritter EMW202R-1 instruction manual

Apogee
Apogee ensemble user guide

Honeywell Home
Honeywell Home C7189U installation instructions

Spectech
Spectech T1034 user manual

Yaesu
Yaesu RF UTUNING KIT operating manual

Chemtrol
Chemtrol Pyxis LS-200 user manual

GentleTent
GentleTent GT HOME 410 Disassembly manual

ROSE DISPLAYS
ROSE DISPLAYS ANOQUICK ROUND WITH CABLE AND CRIMP SLEEVES instruction sheet

Logitek
Logitek ULTRA-VU Operation & service manual

Dorner
Dorner 2700 Series Installation, maintenance & parts manual