Whip Mix ProCal User manual

ProCal™
User Manual
Whip Mix Corporation •361 Farmington Ave. •P.O. Box 17183 •Louisville, KY 40217-0183 USA
502-637-1451 •800-626-5651 •Fax 502-634-4512 •www.whipmix.com

ProCal
Operating Instructions
Product Overview
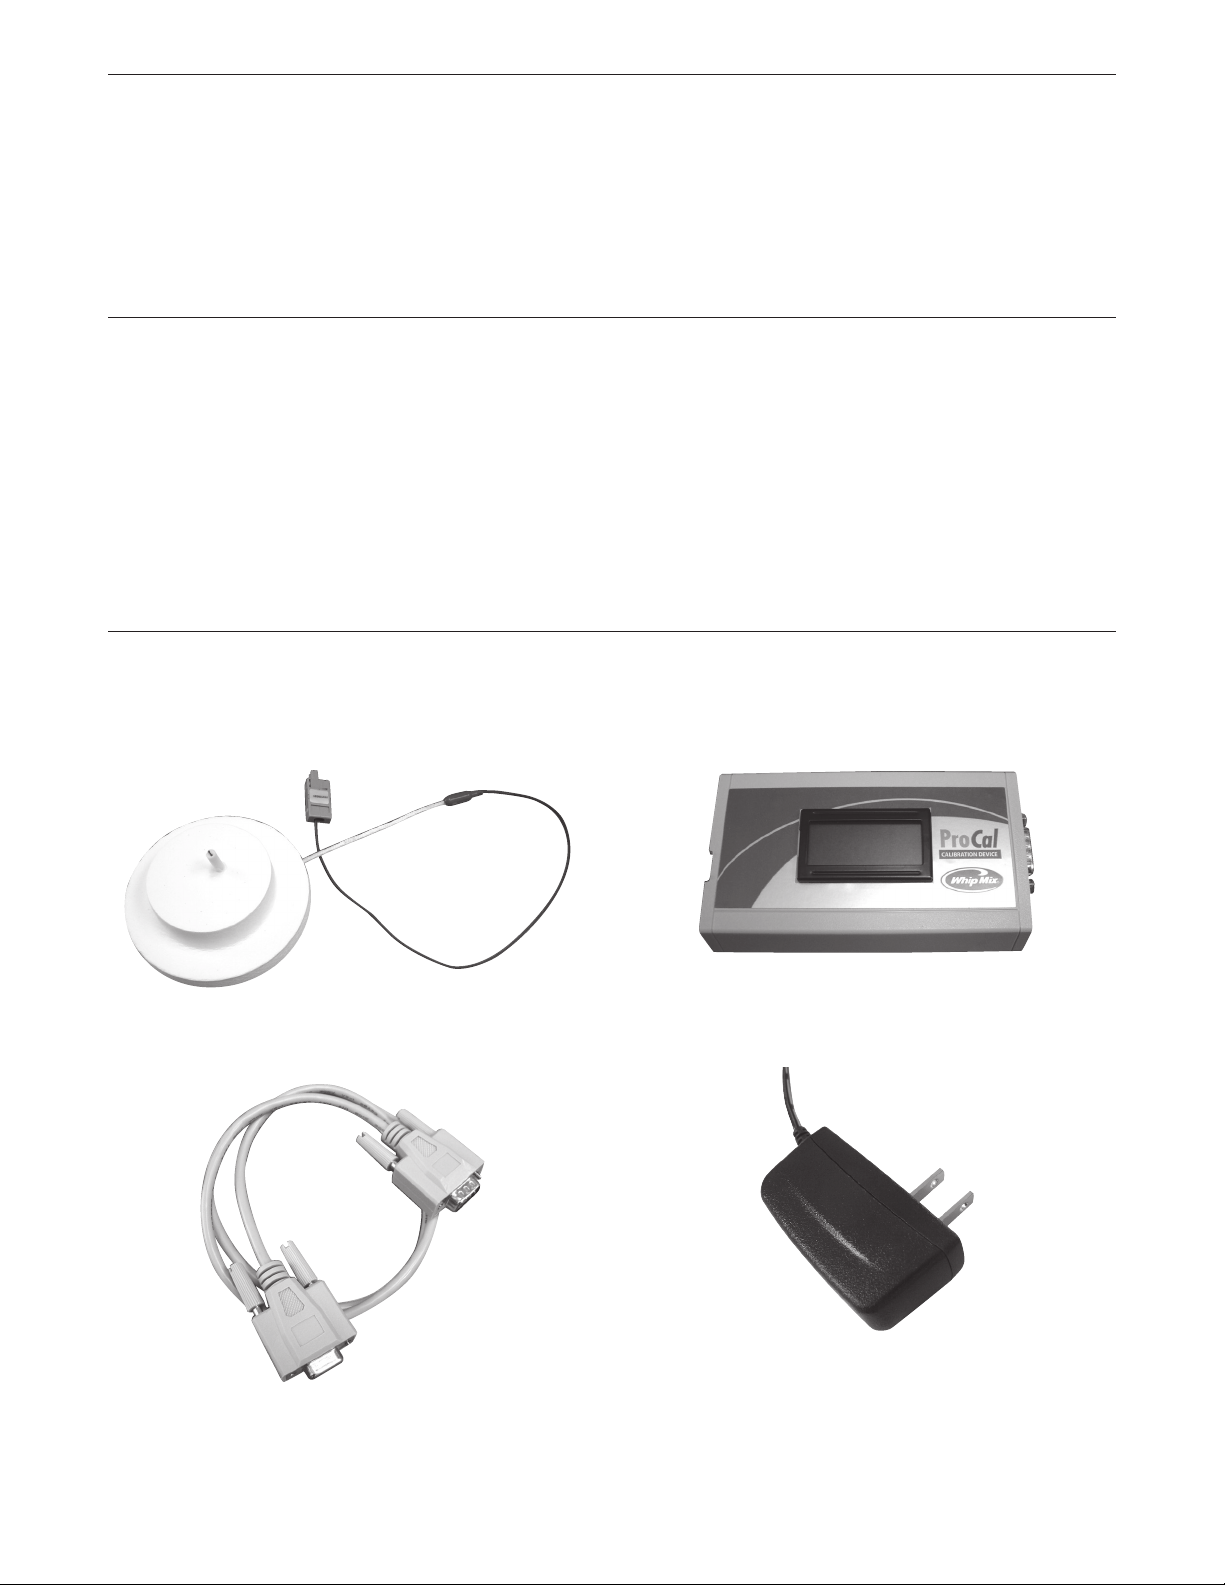
The Pro Cal Calibration Kit is a professional grade
instrumentation system designed to rapidly monitor the
calibration status of your furnace, and automatically
recalibrate the furnace to factory specifications.
It is recommended that you read this manual thoroughly
before using the kit as there are valuable examples of
procedures and decisions you will want to be acquainted
with in order to maximize the benefits you’ve invested in.
What You Can Do With It
QC = Quick Check (Pro 200 Series). For FireLite refer to
page 9.
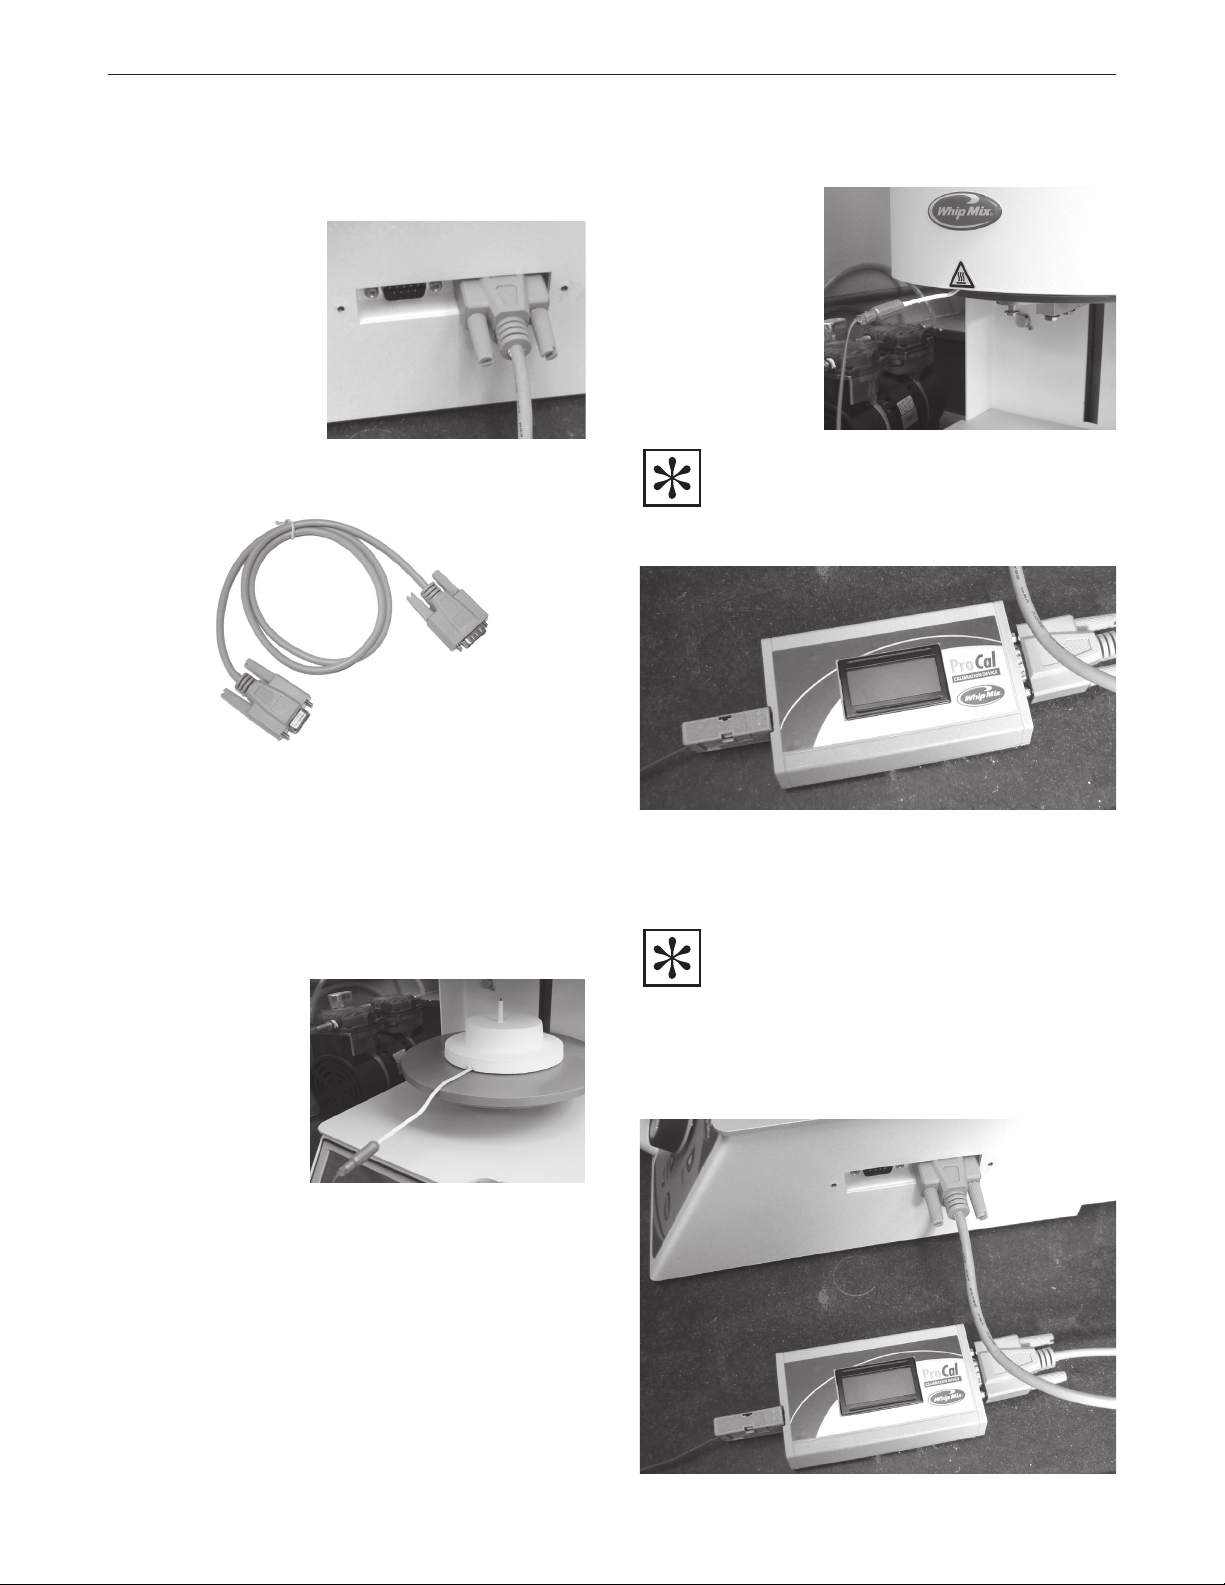
The Quick Check feature allows you to rapidly spot check
the need for calibration. Simply place the Special Firing
Tray on the Lift Table, connect the Tray to the Instrument
Box and the Instrument Box to the furnace calibration
port, and dial in the desired temperature you want to
verify. The LCD readout on the ProCal box should agree
with the furnace display to within three degrees Celsius. If
not, you can choose one of several options:
1. If you check several temperatures and only one
seems to be different, you can go into the firing
programs which have hold temperatures at that
value and use the Program Level Fusing Adjust to
fine tune just those programs.
2. If you check several temperatures and they all either
overfire or underfire, you can go into the Special
Functions menu and select High Fusing Adjust for
temperatures over 800°C or Low Fusing Adjust for
temperatures under 800°C and enter the average
correction value needed.
3. You can do a fully automated calibration.
Full Recalibration (Pro 200 Series Only)
The full recalibration mode requires several hours to
complete, so you’ll want to reserve it for times when the
temperature is more than three degrees from nominal.
Why does it take so long? To get a valid calibration
which will most closely match the conditions in which it
is used every day the furnace must be fully heat soaked.
Secondly, the automatic calibration program requires
one pass at three separate temperatures to build the
calibration file. Thirdly, a second complete pass is
necessary to confirm that the calibration pass is valid.
This is exactly the same rigorous process that your
furnace went through before it left the factory originally.
Why Do Furnaces Require Periodic
Temperature Recalibration?
There are several reasons why furnaces require periodic
QC checking and recalibration:
Effluents given off by the materials fired in the furnace
can deposit on the platinum/palladium thermocouple and
in some cases, chemically react with the noble metals,
thereby affecting the temperature sensed.
Oxide layers can build up on the thermocouple
through many cycles of vacuum, then exposure to
air and chemically react with the noble metals in the
thermocouple.
Prolonged high heat exposure can eventually crystallize
the noble metals making them brittle and inhibiting the
buildup of charge on each leg. The millivolts given off by
a thermocouple to register temperature accumulate all
along the heat exposed legs of the thermocouple, not just
at the tip.
The heater wire also becomes brittle and scaly along its
surface after extended usage. This can affect the infrared
spectrum irradiated by the heater and redirect the angle
which the photons emitted by the heater such that the
ones striking the thermocouple are more diffused and
therefore create less charge buildup in the thermocouple,
affecting the calibration.
How It Works - What’s it doing in there?
The thermocouple in the Special Firing Tray monitors the
furnace activity and reports its accumulated charge back to
the Instrument Box. The Instrument Box filters the electrical
noise inherent with very low level signals in the microvolt to
millivolt range. The cleaned-up signal is then sent to a pre-
amplifier with a built in digital filter to further boost the signal
and clean it up some more. Finally, the signal is presented
to a 24 bit Analog to Digital Converter (ADC) for conversion
into digital ones and zeros to be transmitted to the furnace
computer. There is also a local “ambient” temperature
sensor inside the Instrument Box which monitors the “cold
junction” temperature at the point where the thermocouple
alloys transition into the electronics. This cold junction
temperature sensor output is automatically used by the
computer inside the Instrument Box to correct any
measurement errors as the reference signal from the
SpecialFiring Tray makes its way back to the furnace.
Once the digital reference value from the Special Firing
Tray is received back in the furnace computer its value is
compared to the internal furnace thermocouple and the
sign (relative over-firing or under-firing) and the magnitude
of the difference are stored permanently in the furnace
computer.
After the calibration process is complete, every time
the furnace temperature is commanded to a specific
temperature, the furnace computer looks at the target
temperature, determines which calibration value is
appropriate for that target value, and either adds or
subtracts the stored calibration correction value in order to
produce the accurate temperature desired, all in real-time.
1

ProCal
Operating Instructions
Kit Contents
• Instrument Box
• Special Firing Tray
• Data Cable
• Operator Manual
• FireLite 95031 Wall Charger (Sold separately)
Important Notes / Reminders
The Special Firing Tray and the Instrument box form a
MATCHED SET. These two components are calibrated
together at the factory and the overall system accuracy
depends upon these two components always being used
together. If more than one Kit is on site, never use the
Special Firing Tray from one Kit with the Instrument
box of another Kit or inaccurate calibrations will
result.
Since High Temperatures are present in the Furnace for
extended periods of time, it is NOT RECOMMENDED
that Full Calibrations be attempted unless someone
is present in the vicinity of the furnace at all times.
Component Familiarization
Instrument Box
FireLite 95031 Wall Charger (optional)
Special Firing Tray
Data Cable
2

ProCal
Operating Instructions
Turn the Furnace Power to the OFF position.
This is required to
prevent electrical surges
which could damage the
sensitive electronics in
the Instrument Box.
Remove the two small
thumbscrews on the
right side of the furnace
chassis to expose the
calibration ports. There are two 9-pin connectors inside
the furnace which are now exposed.
Turn the Furnace Power to the ON position.
Wait for the furnace self-test to complete and for the Lift
Table to automatically lower to the bottom position.
• Tray Placement
Carefully remove the normal furnace firing tray by
lifting it about an inch upward to clear the centering
pin with a pair of forceps or tongs.
Use the forceps
or tongs to place
the Special Firing
Tray with the
thermocouple
embedded in
it onto the tray
centering pin and
allow it to come to
rest on the Lift Table. Swivel the Special Firing Tray so
that the wire umbilical coming out of the edge of the
Special Firing Tray is facing the front of the furnace.
Setup for Either Quick Check or Full Calibration
(Pro 200 only)
Use the Furnace
Up Arrow button
to raise the table
until it is fully
closed and the
wire umbilical is
protruding out of
the front/center
of the muffle.
NOTE: IT IS IMPOSSIBLE TO PULL VACUUM WITH THE
SPECIAL FIRING TRAY IN PLACE BECAUSE OF THE WIRE
UMBILICAL. THE CALIBRATION QUICK CHECKS AND FULL
RECALIBRATION DO NOT REQUIRE VACUUM, SO THIS IS
NOT AN ISSUE.
• Finally, connect the end of the Special Firing Tray
umbilical into the Instrument box by inserting the
green connector into the end of the Box opposite
theend with the Data Cable plugged into it.
IMPORTANT: PLACE THE INSTRUMENT BOX WELL TO THE
RIGHT SIDE OF THE FURNACE SUCH THAT THE BOX IS
OUT OF THE PENUMBRA OR “SUNSHINE” EMITTED BY
THE MUFFLE HEATER. IT NEEDS TO BE “IN THE SHADE”
SO THAT THE ELECTRONICS ARE NOT AFFECTED BY
DIRECT HEAT “SHINING” ON THE INSTRUMENT BOX.
( EVEN IF YOU HAVE TO LET THE INSTRUMENT BOX
HANG OFF THE FRONT OF THE TABLE OR COUNTER
SUPPORTING THE FURNACE.)
3

ProCal
Operating Instructions
Procedure for Pro 200 Series Only
Navigating to the Pro Cal Menu
From the Pro 200 Main Menu Select Special
Functions.
Main Menu
>Special Functions
Scroll Through the Special Functions Menu Items
until you reach “Calibrate Oven” and select it.
>Calibrate Oven
When prompted for a password , enter “291”
Password = 291
which will Bring up the Pro Cal Menu as below.
Pro Cal Furnace
>Quick QC Check
Pro Cal - Cool Muffle
Pro Cal - Soaked Muffle
Select “Quick QC Check” by pressing the Selector
Knob OR pressing the Next button.
Entering a Temperature to Check
The Pro 200 is now ready to raise the temperature to any
setting you desire and hold the temperature constant for up
to 40 minutes. Select the specific temperature by rotating
the Selector Knob clockwise for increased temperature
or counterclockwise for decreased temperature. Once
rotated to the desired temperature press the Selector
Knob inward to got to the newly selected temperature.
Pro Cal Furnace
Change Idle Temp
>Roll Knob 250 C
Press Knob = GoTemp
NOTE: YOU CAN SELECT A NEW STABLE IDLE
TEMPERATURE AT ANY TIME BY PRESSING THE LAST
BUTTON ON THE PRO 200 ROLLING THE SELECTOR KNOB
TO A NEW TEMPERATURE VALUE AND THEN PRESSING THE
SELECTOR KNOB AGAIN. THE PRO 200 WILL TRANSITION TO
THE NEW VALUE. YOU CAN REPEAT THIS AS MANY TIMES
AS YOU WISH. IF YOU ARE DONE WITH THE PRO CAL QUICK
CHECK ACTIVITY YOU CAN PRESS THE MAIN MENU BUTTON
TO EXIT THE PRO CAL MODE AT ANY TIME AND THE PRO 200
WILL AUTOMATICALLY REVERT BACK TO THE PRIMARY IDLE
TEMPERATURE YOU DESIGNATED WHEN YOU ORIGINALLY
SETUP YOUR FURNACE FOR THE FIRST TIME.
The Pro Cal “Idle” temperature is NOT the same as the Idle
Temperature you selected from the Special Functions
Menu. The Pro Cal is a separate operating mode.
Allow Stabilization Time
It is suggested that a period of at least 15 – 20 minutes is
allowed for stabilization time before manually recording
the value on the Instrument box LCD display to insure a
stable reading.
What to do with the Results
It is suggested that you survey three temperatures
(minimum) to look for overall trends, and to help you
decide which type of correction method best fits your
available time and addresses the current situation the best.
The three primary temperatures suggested are:
Celsius Value Fahrenheit Value
850°C 1562
1000°C 1832
1150°C 2102
These are the temperatures used by the Full Calibration
method.
For example, if you surveyed the three temperatures
above and when the furnace display said 850°C the LCD
display on the Instrument box read 851°C.
AND at 1000°C on the furnace display the Instrument box
read 1002°C.
AND at 1150°C on the furnace display the Instrument box
read 1151°C.
All three being slightly higher on the Instrument box
indicates that the furnace is slightly OVERFIRING across
the board. Since the Over-firing values are not more than
3 degrees C above the nominal target temperatures, a
Full Calibration run IS NOT INDICATED. The fastest and
easiest way to proceed from here is to enter a 1 or 2 degree
OVERFIRE into the Special Functions High Fusing Adjust
section of the Pro 200 software.
The procedure for doing so follows in the next section of
this manual.
One thing to remember about using the Special Functions
Menu selected Fusing Adjustment entry is it affects all
User Program Firings equally, every single one ofthem.
Conversely, if you had found, in the QC Survey above:
Furnace Display Instrument Box Display
850°C 850°C
1000°C 1001°C
1150°C 1150°C
Only a single temperature range is over-firing. You would
NOT want to use the Special Functions HighFusing
Adjust entry method to register the Over-firing at the
Quick Check Survey (Assumes the Physical Setup Step is Complete)
4

ProCal
Operating Instructions
(Affects all User Firing Programs with a Hold
Temperature ABOVE 800°C)
1. Main Menu
Run Program
Change Program
>Special Functions
2. Special Functions
Select Language
Cal Low Fusing
> Cal High Fusing
3.
High OverFire?
>Yes
4. High Temp Adjustment
>0C
(0C – 50C)
Navigate to screen #3 above. If you want to register an
Over-firing correction, simply press the Selector Knob
OR press the Next button. If you want to register an
Under-firing correction, first roll the Selector Knob until
the answer to the question “High Overfire?” displays “No”
(meaning its not Over-firing, its Under-firing), then press
the Selector Knob OR press the Next button to get to
screen #4 above.
Enter the difference between what the Furnace Display
said during the Quick Check and what the Instrument box
Display said at the same time. Then press the Selector
Knob OR press the Next button to record the correction.
Example: Lets say the furnace Target Temperature was
set to 1000°C. When stabilized, the furnace Displayed
1000°C, and the Instrument Box Display shows 998°C.
The Instrument Box is always the reference point, not
the furnace. So, the furnace is running two degrees
HIGHER than the Instrument Box, in other words, the
furnace is OVERFIRING by two degrees. You would
answer “Yes” to the “High Overfire?” question in screen
#3 above (Yes is the default already displayed) by pressing
the Selector Knob OR pressing the Next button, and
then in screen #4 above you would roll the Selector Knob
until the adjustment value “2C” displays, then press the
Selector Knob OR press the Next button to record the
correction.
Remember, this correction will affect all programs with
Hold Temperatures above 800°C.
1000°C temperature because thefollowing would result:
Furnace Display Instrument Box Display
850°C 849°C
1000°C 1000°C
1150°C 1149°C
As you can see from the table above, using the High
Fusing Adjustment in this instance would fix the
1000°C Overfire concern, but it would also produce an
undesired Under-firing situation in the ranges above
(1150°C) and below (850°C).
You can still address a deviation from nominal in a
single range by going into each program that has a
Hold Temperature in that range and use the Program
Level Fusing Adjustment.
How To Enter An Overfire Correction Using The
Special Functions High Fusing Adjust
(Pro 200 only)
5

ProCal
Operating Instructions
Affects This One User Firing Program ONLY)
1. Main Menu
Run Program
Change Program
>Special Functions
2. Special Functions
Select Language
Cal Low Fusing
> Cal High Fusing
3.
High OverFire?
>Yes
4. High Temp Adjustment
>0C
(0C – 50C)
5. Main Menu
Run Program
Change Program
>Special Functions
6. Special Functions
Select Language
Cal Low Fusing
> Cal High Fusing
7.
High OverFire?
>Yes
8. High Temp Adjustment
>0C
(0C – 50C)
9. Main Menu
Run Program
Change Program
>Special Functions
10. Special Functions
Select Language
Cal Low Fusing
> Cal High Fusing
11.
High OverFire?
>Yes
12. High Temp Adjustment
>0C
(0C – 50C)
13. Main Menu
Run Program
Change Program
>Special Functions
You will be returned to Main Menu.
How to Enter An Overfire Correction Using
The Program Level Fusing Adjust
(Pro 200 only)
Roll Selector Knob
to item, push Knob
to select
Press Knob to Skip
Roll Knob to item,
push Knob to
select
Press Knob to Skip
Roll Knob to
Program #, push
Knob to select
Press Knob to Skip
Press Knob to Skip
Roll Knob to “Yes”,
then press Knob to
Select.
Press Knob to Skip
Roll Knob to
“Under-fires” if
desired, then press
Knob to Select.
Press Knob to Skip
Roll Knob to set
correction, then
press Knob to
record value
Press Knob to Skip
6

ProCal
Operating Instructions
Pro Cal Furnace
Calibration 850 C
1:35:00
Pro Cal Furnace
Calibration 1000 C
1:20:00
Pro Cal Furnace
Calibration 1150 C
1:05:00
Pro Cal Furnace
Open Cool
0:50:00
Pro Cal Furnace
Profile 850 C
0:45:00
Pro Cal Furnace
Profile 1000 C
0:30:00
Pro Cal Furnace
Profile 1150 C
0:15:00
Pro Cal Furnace
Done Successfully!
850C 1001C 1149 C
Idle 234 C
Full Calibration Run
(Pro 200 only)
IMPORTANT NOTE: WHEN THE FULL CALIBRATION RUN
FINISHES SUCCESSFULLY, THE PRO CAL SOFTWARE
WILL AUTOMATICALLY ZERO OUT ANY PREVIOUSLY
ENTERED HIGH FUSING ADJUSTMENTS AND LOW
FUSING ADJUSTMENTS AS THE NEWLY MINTED FULL
CALIBRATION CANCELS THE NEED FOR SUCH ENTRIES.
THE PROGRAM LEVEL FUSING EDITS WILL, HOWEVER
REMAIN IN EFFECT UNTIL USER MODIFIES THEM AGAIN.
When to Run
It is recommended that a Full Calibration Run be
performed ONLY when the QC Quick Check survey
indicates a deviation of over 3 degrees C between the
displayed value on the furnace display and the displayed
value on the Instrument Box display.
To Preheat or Not
It is recommended that the Preheat version of the Full
Calibration Run be used for best accuracy. The difference
in Run Time is 27% but even the shorter version requires
2:15 hours versus the cool muffle version Run Time of
4:25hours.
How to Launch the Calibration Run
See the Physical Setup Section Described Previously to
configure the Kit for a Run, then:
From the Pro 200 Main Menu Select Special Functions.
Main Menu
>Special Functions
Scroll Through the Special Functions Menu Items until
you reach “Calibrate Furnace” and select it.
>Calibrate Furnace
When prompted for a password , enter “291” which will
Bring up the Pro Cal Menu as below.
Password = 291
Scroll down to the Pro Cal with Cool Muffle Selection as
shown below and press the Selector Knob.
Pro Cal Furnace
Quick QC Check
>Pro Cal – Cool Muffle
Pro Cal – Soaked Muffle
Pro Cal Furnace
Quick QC Check
>Pro Cal – Cool Muffle
Pro Cal – Soaked Muffle
Pro Cal Furnace
Connect
Instrument Box
Pro Cal Furnace
Initial Check
4:25:00
Pro Cal Furnace
Preheat 400 C
4:15:00
Pro Cal Furnace
Preheat 600 C
3:15:00
Pro Cal Furnace
Preheat 975 C
2:15:00
Pro Cal Furnace
Open Cool
2:05:00
Pro Cal Furnace
Heat 600 C
1:50:00
How to Keep Tabs on the
Calibration Run
The sample displays below will keep you informed of the
run’s progress
COOL MUFFLE TIMELINE
7

ProCal
Operating Instructions
Pro Cal Furnace
Calibration 1150 C
1:05:00
Pro Cal Furnace
Open Cool
0:50:00
Pro Cal Furnace
Profile 850 C
0:45:00
Pro Cal Furnace
Profile 1000 C
0:30:00
Pro Cal Furnace
Profile 1150 C
0:15:00
Pro Cal Furnace
Done Successfully!
850C 1001C 1149 C
Idle 234 C
Inspecting the Results
• Within 40 Minutes of Completion
The three calibration results for 850°C, 1000°C, and
1150°C are on the confirmation screen shown above.
• Anytime Thereafter you can retrieve the information
by doing the following:
Main Menu
>Special Functions
>Calibrate Furnace
Password = 292
Profile Results
850 C: 849 C
1000 C: 999 C
1150 C: 1151 C
Pro Cal Furnace
Quick QC Check
Pro Cal – Cool Muffle
>Pro Cal – Soaked Muffle
Pro Cal Furnace
Connect
Instrument Box
Pro Cal Furnace
Initial Check
2:15:00
Pro Cal Furnace
Heat 600 C
2:05:00
Pro Cal Furnace
Calibration 850 C
1:35:00
Pro Cal Furnace
Calibration 1000 C
1:20:00
SOAKED MUFFLE TIMELINE
8

ProCal
Operating Instructions
Detailed Directions for Use with the FireLite Oven
1. Replace the firing tray with the Pro Cal Tray.
2. Power on the FireLite oven and set the idle
temperature (Special Function 22) to 650 degrees
C/1202 degrees F, and let it soak for at least an hour
with the table down.
3. Plug the connector from the Pro Cal Tray into the Pro
Cal device.
4. Plug the FireLite power adaptor into the Pro Cal
device and into an AC wall power outlet (115 Volt
ONLY). Make sure the Pro Cal device display powers
on.
5. Determine what temperature needs to be checked
and create a program with that temperature as the
Final Temperature with a Hold Time of 30 minutes.
Note: For High Fusing porcelains select a
temperature ABOVE 800 degrees C.
For Low Fusing porcelains select a temperature
BELOW 800 degrees C.
6. Run the program and 15-20 minutes into the Hold
Time record the difference between the oven
temperature and the Pro Cal device displayed
temperature.
7. Abort the program and enter the Fusing Adjust mode:
(Special Functions 18 for HIGH FUSING OVER-FIRES)
(Special Functions 19 for HIGH FUSING UNDER-
FIRES)
(Special Functions 16 for LOW FUSING OVER-FIRES)
(Special Functions 17 for LOW FUSING UNDER-
FIRES)
8. Enter the recorded value for the difference found in
Step 6 during the program run, press Enter to save.
9. This completes the Fusing Adjust process.
• Possible Error Conditions & What to Do
Error Number
Displayed Problem What to Do About It
100 Pro Cal reading exceeds upper limit This could be a bad furnace thermocouple, causing the furnace
temperature to go very high. Remove the Pro Cal Kit and verify
the furnace Actual Temperature is tracking the furnace Target
Temperature. If the furnace itself is not the issue, contact Whip Mix
Customer Service.
102 The difference between the furnace
temperature reading and the Pro Cal
temperature reading is too great.
Make sure the Pro Cal tray is inside the furnace, and check the
cable connections between the tray and the Instrument Box and the
Instrument Box to the furnace connectors are seated tightly. Restart
the Pro Cal cycle, if error persists, contact Whip Mix Customer
Service.
103 Cannot read temperature from
Instrument Box.
Make sure the Pro Cal tray is inside the furnace, and check the
cable connections between the tray and the Instrument Box and the
Instrument Box to the furnace connectors are seated tightly.
Turn the furnace main power off, leave it off for ten seconds then turn
it back on and restart the Pro Cal cycle, if error persists, contact Whip
Mix Customer Service.
104 Cannot sense temperature rising on Pro
Cal Tray (but electronic communications
are good)
This most likely means the Pro Cal Kit is connected correctly, but
the Pro Cal tray is not physically on the furnace lfit table. Verify Pro
Cal Tray is inside furnace muffle. If error persists, contact Whip Mix
Customer Service.
105 High Ambient Temperature Reading The Pro Cal Instrument Box contains an “ambient temperature
sensor” which monitors the internal temperature of the Instrument
Box itself. If the reading is too high it can affect the accuracy of the
Calibration. Move the Instrument Box away from the furnace so
that it is not exposed to elevated heat from either the furnace being
calibrated or another nearby furnace.
Troubleshooting
(Pro 200 only)
9

ProCal
Operating Instructions
Troubleshooting
(Pro 200 only)
106 Unstable temperature readings. The primary cause would be an intermittent electrical connection
between the Tray and the Instrument Box or between the Instrument
Box and the furnace. Re-seat all connections and re-launch the
calibration.
Turn the furnace main power off, leave it off for ten seconds then turn
it back on and restart the Pro Cal cycle, if error persists, contact Whip
Mix Customer Service.
107 No Ambient Temperature Reading (See also Error 105 above) This is most probably an electronic fault
inside the Instrument Box and would render inaccurate calibrations if
not addressed.
Turn the furnace main power off, leave it off for ten seconds then turn
it back on and restart the Pro Cal cycle, if error persists, contact Whip
Mix Customer Service.
The following three Error Codes 108, 109 and 110 have multiple possibilities.
First, verify all the Pro Cal Kit electrical connections are tightly connected, especially if Error 108 is displayed (the first
temperature to be checked). Re-start the Pro Cal cycle afterwards.
Second, if the furnace has been idle for a while or at low heat with the Lift Table open, moisture may have accumulated
in the white muffle insulation. Pre-soak the muffle at high heat for 30 minutes to an hour (you can use the Quick Check
Selection on the Pro Cal Menu and enter 850 – 1000°C as a target temperature), then re-start the Pro Cal cycle afterwords.
Third, use the Quick Check mode and set an 850°C Target Temperature and wait for the furnace Actual Temperature to
rise to 850°C. Observe the Actual Temperature for a couple of minutes and if the Actual Temperature on the furnace display
is not stable at 850°C, there is a significant problem in the furnace itself which will require attention. Consult Whip Mix
Customer Service in this instance.
Error Number
Displayed Problem What to Do About It
108 Pro Cal Temperature Check failed at 850°C See above.
109 Pro Cal Temperature Check failed at 1000°C. See above
110 Pro Cal Temperature Check failed at 1150°C. See above
These are two additional Error Codes.
Error Number
Displayed Problem What to Do About It
111 Communication Error The furnace cannot communicate with the Pro Cal Instrument
Box electronically. Check the connections at both the furnace
and the Instrument Box. (Possible defective cable.)
Turn the furnace main power off, leave it off for ten seconds
then turn it back on and restart the Pro Cal cycle, if error
persists, contact Whip Mix Customer Service.
112 Unreliable temperature data readings. Basically the same as Error 106.
Turn the furnace main power off, leave it off for ten seconds
then turn it back on and restart the Pro Cal cycle, if error
persists, contact Whip Mix Customer Service.
10

ProCal
Operating Instructions
Technical Support
Specifications
For additional support please contact us at (800)626-5651.
• Special Firing Tray – Type K Thermocouple with
ceramic support, ceramic fiber sheath in hot zone.
Maximum Temperature: 1200 Degrees Celcius.
• Instrument Box – ABS plastic enclosure with 2 line by
8 character LCD Display.
Maximum Temperature: 125 Degrees F
Power: +5 VDC +/- .1% @ .030 Amps, furnished by
Furnace under test via Data Cable.
Fuse: None (draws power from furnace under test)
• Data Cable – 9 pin DSub Male/ 9 Pin DSub Female,
shielded. Standard RS232 Computer Cable.
Maximum Temperature: 125 Degrees F.
• System Accuracy: +/- 0.125% of measured
temperature.
• Calibration Results Accuracy: +/- 3 degrees Celsius
from 700°C to 1200°C.
• Pollution Category: 1
• For Indoor Use Only
• Environmental Ratings:
Altitude: Up to 2,000 meters
Ambient Temperature: 5°C – 40°C
Relative Humidity: 80% @ 31°C
linearly decreasing to 50% @ 40°C
• Duty Cycle: 100%
• Dimensions: Case – 14.0", (355 mm) Width
14.5", (369 mm) Length
5.0", (127 mm) Depth
• Shipping Weight: 3.86 LB, (1.75 Kg)
IT11594 08/19
Table of contents
Other Whip Mix Measuring Instrument manuals