Whirlpool ACE 010 Operating and maintenance manual

1
INSTALLATION, QUICK START INSTALLATIE, SNEL AAN DE SLAG
INSTALLATION, HURTIG START
INSTALLASJON, HURTIG START
ASENNUS, PIKAOPAS
ÜZEMBE HELYEZÉS, RÖVID
KEZDÉSI ÚTMUTATÓ
INSTALACE, NÁVOD VE ZKRATCE
INSTALACJA, SKRÓCONA
INSTRUKCJA OBSŁUGI
УСТАНОВКА, КРАТКОЕ
СПРАВОЧНОЕ РУКОВОДСТВО
INŠTALÁCIA, ÚVODNÁ PRÍRUČKA
INSTALLATION, DÉMARRAGE RAPIDE
AUFSTELLUNG, KURZANLEITUNG
INSTALLAZIONE, GUIDA RAPIDA
INICIO RÁPIDO PARA LA INSTALACIÓN
INSTALAÇÃO, GUIA DE INICIAÇÃO RÁPIDA
INSTALLATION, SNABBGUIDE
ACE 010

2
INSTALLATION
PRIOR TO CONNECTING
ENSURE THATTHE APPLIANCEIS NOT DAMAGED.
AFTER CONNECTING
THE EARTHING OF THIS APPLIANCEis compulso-
ry. The manufacturer will accept no re-
sponsibility for injury to persons, animals
or damage to objects arising from the
non-observance of this requirement.
The manufacturers are not liable for any
problems caused by the user’s failure to ob-
serve these instructions.
DONOT OPERATE THIS APPLIANCEif it has a
damaged mains cord or plug, if it is not
working properly, or if it has been dam-
aged or dropped. Do not immerse the
mains cord or plug in water. Keep the
cord away from hot surfaces. Electrical
shock, fire or other hazards may result.
CHECKTHATTHE VOLTAGE on the rating
plate corresponds to the voltage in your
home.
MOUNTING THE APPLIANCE
FOLLOW THE SUPPLIED separate mounting in-
structions when installing the appliance.
THIS APPLIANCEIS DESIGNED TO WORK
in ambient temperatures above
freezing point of water (0°C).
If residual water is allowed to
freeze, the appliance may be
damaged.

3
IMPORTANT SAFETY INSTRUCTIONS
DONOT HEAT, OR USE FLAMMABLE LIQUIDS in or
near the appliance. Fumes can create a
fire hazard or explosion.
DONOT LEAVE THE APPLIANCEUNATTENDED
READ CAREFULLY AND KEEP FOR FUTURE REFERENCE
ONLY ALLOW CHILDREN to use the appliance
under adult supervision and after adequate
instructions have been given, so that the child
is able to use the appliance in a safe way and
understands the hazards of improper use.
THIS APPLIANCE IS NOT INTENDED FOR use by persons
(including children) with reduced physical,
sensory or mental capabilities, unless used under
the supervision of a person responsible for their
safety.
WARNING!
ACCESSIBLE PARTS MAY BECOME HOT during use, young
children should be kept away.
DONOT USE corrosive chemicals or vapors
in this appliance. This type of appliance
is specifically designed to heat water. It
is not designed for industrial or labora-
tory use.
THIS APPLIANCE IS DESIGNED FOR DOMESTIC USE ONLY!
PRECAUTIONS
USE HOT PADS OR OVEN MITTS to prevent
burns, when touching hot parts.
THIS APPLIANCEIS DESIGNED TO MAKE COFFEE or heat
drinks. Be careful to avoid being scalded by
sprays of water or steam or due to improper
use of the appliance.

4
ACCESSORIES & PARTS
CONTROL PANEL
STEAMKNOB
WATER TANK
POWER CABLE
STEAM/HOT WATER TUBE
DRIP MESH
DRIP TRAY
CAPPUCCINO MAKER
NOZZLE
BOILER OUTLET
PRESSER
FILTER HOLDER
LARGE TWO-CUP FILTER
SMALL ONE-CUP OR POD FILTER
STEAMSELECTOR BUTTON
COFFEE/HOT WATER BUTTON
ON/OFF BUTTON
ON LIGHT
TEMPERATURE OK LIGHT (COFFEE
OR HOT WATER)
STEAM INDICATOR LIGHT
LIGHT SWITCH

5
FILLING THE WATER TANK
REMOVE THE WATERTANK by pulling it out (to-
wards the front).
NEVER USE THE APPLIANCEWITHOUT WATER IN
THE TANK and always remember to top up
when the level drops to a couple of cen-
timetres from the bottom.
FILL THE TANK with fresh
clean water taking care
not to exceed the MAX
level. Refit the tank.
1
2
1. TURN THE APPLIANCEon by pressing the ON/OFF
BUTTON AND ATTACHTHE FILTER HOLDER TO THE APPLI-
ANCEWITHOUT ADDING GROUND COFFEE.
2. PLACEACUP UNDER THE FILTER HOLDER. Use the
same cup as will be used to prepare the coffee
in order to preheat it.
3. WAIT FOR THE OK INDICATOR LIGHT to come on,
then immediately press the coffee knob. Run
the water off until the OK in-
dicator light goes out, then in-
terrupt delivery by pressing
the coffee button again.
4. EMPTY THE CUP. Wait until the
OK indicator light comes on again
then repeat the same operation. (It
is normal for a small and harmless
puff of steam to be given off when
removing the filter holder).
PREHEATING THE COFFEE UNIT
TOATTACHTHE FILTER HOLDER, position it under the
boiler outlet
with the han-
dle towards
the left,
push it
upwards
and at the
same time rotate the
handle firmly towards the right.
AUTO OFF
FOR ENERGY SAVING PURPOSES, the appliance has
an automatic switch-off function (the power
light goes off), if it is not used for a long peri-
od of time.
TOTURN THE APPLIANCEON, press the
ON/OFF switch.

6
1
2
1. AFTER PREHEATING the appliance as described
above, place the ground coffee fil-
ter in the filter holder, making sure
the projection is correctly insert-
ed in the slot. Use the smaller
filter to make one coffee or
the larger filter to make two
coffees.
HOW TO PREPARE ESPRESSO COFFEE USING
THE FILTER HOLDER FOR GROUND COFFEE
2. TOMAKE ASINGLE COFFEE ONLY, place one level
measure (about 7 g) of ground cof-
fee in the filter. To prepare two cof-
fees, place two loosely filled
measures (about 6+6 g) of
ground coffee in the fil-
ter. Fill the filter a little at a time to prevent the
ground coffee from overflowing.
IMPORTANT: for correct operation, before
adding the ground coffee to the filter holder,
clean the filter from residues of ground coffee
from the previous infusion.
5. PLACETHE CUP or cups under the filter holder
spouts.
You are rec-
ommended to
heat the cups
before mak-
ing the cof-
fee by rinsing
them with a little
hot water.
6. MAKE SURE THE OK LIGHT IS ON
(if off, wait until it comes on),
then press the coffee button.
When the required quantity of
coffee has been run off, press
the same button again. (You should
not run off coffee for more than 45
seconds at a time).
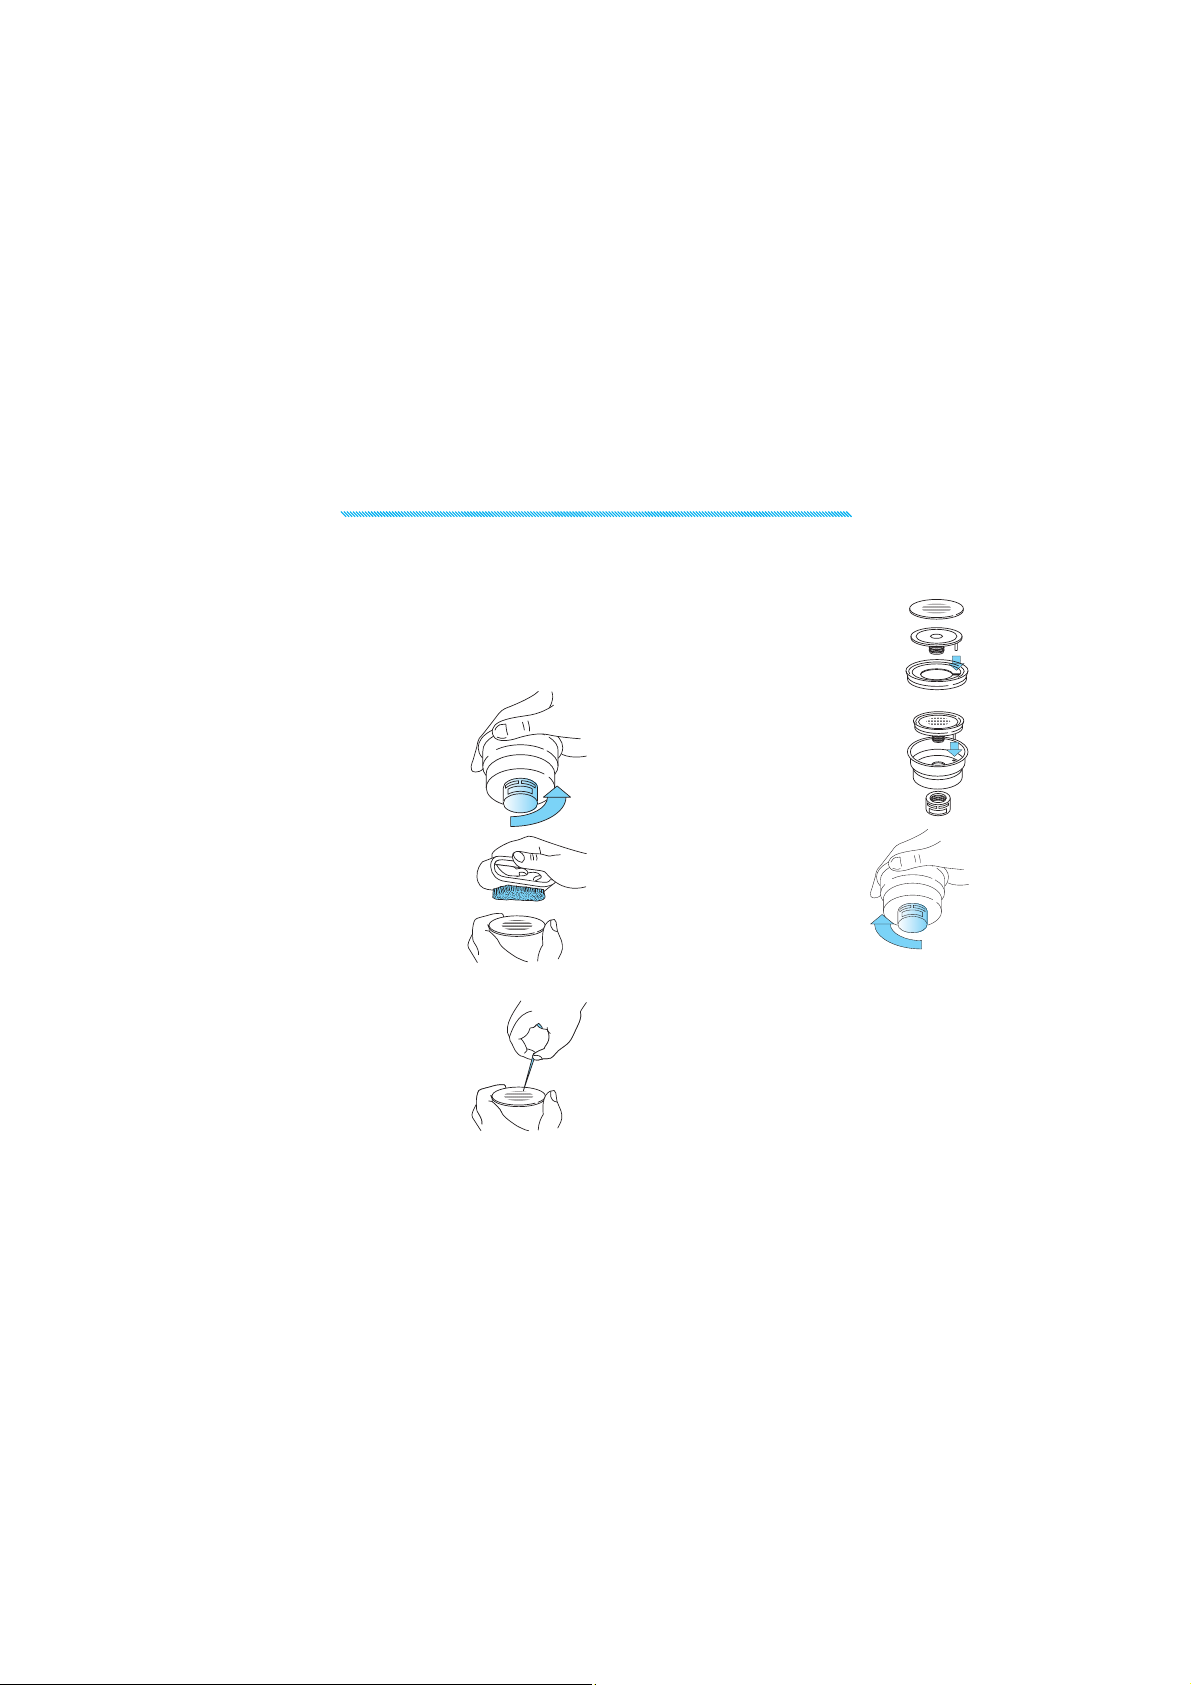
7. TOREMOVE THE FILTER HOLDER, rotate the handle
from right to left.
IMPORTANT: to avoid splashes, never remove
the filter holder while the appliance is deliver-
ing coffee.
8. TOELIMINATE THE USED COFFEE GROUNDS, block the
filter in place using the lever incorpo-
rated in the handle and empty the
coffee by turning the filter
holder upside down and tap-
ping.
9. TOTURN THE COFFEE MACHINE OFF,
press the ON/OFF button.
IMPORTANT: the first time the
appliance is used, all accessories
and the internal circuits must be
washed through by making at least
five coffees without using ground coffee.
3. DISTRIBUTE THE GROUND COFFEE evenly and press
lightly with the
presser
NB: Correct
pressing of the
ground coffee
is essen-
tial to
obtain
a good espresso. If pressing is
excessive, coffee delivery will be slow and
the froth will be dark. If pressing is too light,
coffee delivery will be too rapid and the froth
will be skimpy and light coloured.
4. REMOVE ANY
EXCESS COFFEE
from the rim
of the fil-
ter hold-
er and
attach the fil-
ter holder to the appli-
ance. Rotate firmly to avoid leaks of
water.

7
1
2
HOW TO PREPARE ESPRESSO COFFEE USING PODS
1. PREHEATTHE APPLIANCEas described in the sec-
tion “PREHEATING THE COFFEE UNIT”, making
sure the filter holder is attached. This obtains a
hotter coffee.
NB: Use pods conforming to the
ESE standard indicated on the
pack with the following logo:
THE ESE STANDARD is a system ac-
cepted by leading pod producers
and enables espresso coffee to be prepared
simply and cleanly.
2. PLACETHE SMALL FILTER (1 cup or pods)
in the filter holder, making sure the
projection is correctly inserted in
the slot.
3. INSERT APOD, centring it as far as possible
on the filter. Always follow the instruc-
tions on the pod pack to position the
pod on the filter correctly.
4. ATTACHTHE FILTER HOLDER to the appliance. Al-
ways rotate
as far as it will
go.
5. PROCEED ASin points 5, 6 and 7 in the previ-
ous paragraph.

8
HOW TO MAKE CAPPUCCINO COFFEE
1. PREPARE THE ESPRESSO COFFEES as described in
the previous paragraphs, using sufficiently
large cups.
2. PRESS THE STEAMBUTTON and wait
for the OK light to come on. This in-
dicates that the boiler has reached
the ideal temperature for steam
production.
3. INTHE MEANTIME, fill a recip-
ient with about 100 grams of
milk for each cappuccino to be
prepared. The milk must be at
refrigerator temperature (not
hot!). In choosing the size of the recipient, bear
in mind that the milk doubles or triples
in volume.
NB: YOU ARE RECOMMENDED TO USE
SEMISKIMMED MILK AT REFRIGERATOR
TEMPERATURE.
4. PLACETHE RECIPIENT containing the
milk under the cappuccino maker.
7. POUR THE FROTHED MILK into the cups contain-
ing the espresso coffee prepared previously.
The cappuccino is ready. Sweeten to taste and,
if desired, sprinkle the froth with a little cocoa
powder.
NB: To prepare more than one cappuccino,
first make all the coffees then at the end pre-
pare the frothed milk for all the cappuccinos.
NB: to make coffee again after the milk has
been frothed, cool down the boiler first or the
coffee will be burnt. To cool it, place a contain-
er under the boiler outlet, press the steam but-
ton and run off water until the OK light goes
out. Make the coffee as described in the previ-
ous paragraphs.
5. DIP THE CAPPUCCINO MAKER into
the milk for about 5 mm and
turn the steam knob anti-
clockwise, taking care not to
immerse the raised line on the
cappuccino maker (indicated by
the arrow).
Turn the steam knob at least a half turn anti-
clockwise. Steam is discharged from the cap-
puccino maker, giving the milk a creamy frothy
appearance. To obtain a creamier froth, dip the
cappuccino maker into the milk and rotate the
container with slow movements from the bot-
tom upwards.
6. WHEN THE REQUIRED TEMPERATURE
IS REACHED (60°C is ideal), interrupt
steam delivery by rotating the
steam knob clockwise and at the
same time pressing
the steam button.

9
IMPORTANT: always clean the cappuccino
maker after use. Proceed as follows:
1. DISCHARGE ALITTLE STEAMfor a few seconds by
rotat-
ing the
steam
knob.
This
emp-
ties any
milk left
inside the
steam spout.
IMPORTANT: To ensure hygiene,
you are recommended to follow this pro-
cedure each time you make cappuccino to
avoid milk stagnating in the milk circuit.
3. REMOVE THE NOZZLE from the steam
tube by pulling it downwards.
4. WASH THE CAPPUCCINO MAKER and
steam nozzle thoroughly with warm
water.
5. MAKE SURE the two holes shown
in are not blocked. If necessary,
clean with a pin.
6. REPLACETHE STEAMNOZZLE by in-
serting it onto the steam tube
and rotating firmly towards the
top of the tube.
7. REPLACETHE CAPPUCCINO MAKER by
inserting it and rotating anticlockwise.
HOT WATER PRODUCTION
1. TURN THE APPLIANCEON by pressing
the ON/OFF button. Wait until the
OK indicator light comes on.
2. PLACEARECIPIENT under the cappuccino mak-
er.
3. PRESS THE COFFEE BUTTON and at the same time
turn the steam knob anticlockwise.
Water comes out of the cappucci-
no maker;
4. TOINTERRUPT DELIVERY OF HOT WATER, close the
steam knob by rotating clockwise
and press the coffee button again.
(You should not run off hot water
for more than 45 seconds at a time).
2. WITH ONE HAND, HOLD THE CAP-
PUCCINO TUBE FIRMLY and with the
other unscrew the cappuccino
maker itself by rotating clock-
wise and extracting downwards.

10
CLEANING AND MAINTENANCE
1. BEFORE PERFORMING ANY CLEANING operations,
leave the appliance to cool down and unplug
from the mains socket.
2. DONOT USE SOLVENTS OR ABRASIVE cleaning
products to clean the appliance. A soft, damp
cloth is sufficient.
3. EMPTY AND WASH the drip tray and drip mesh
frequently.
4. CLEANTHE WATER TANK regularly.
IMPORTANT: Never immerse the appliance in
water. It is an electrical appliance.
CLEANING THE FILTER HOLDER
ABOUT EVERY 200 COFFEES, clean the filter holder
for ground coffee as follows:
Remove the filter with frother.
Clean the inside of the filter holder. Never
wash in a dishwasher.
Unscrew the cap of the frother
by turning anticlockwise.
Remove the frother from
the container by pushing it
from the cap end.
Remove the gasket.
RINSE ALL COMPONENTS and clean
the metal filter thoroughly in
hot water using a brush.
MAKE SURE the holes in the metal fil-ter are
not blocked. If necessary, clean with
a pin.
Replace the filter and gasket on
the plastic disk. Make sure to in-
sert the pin on the plastic disk into
the hole in the gasket indicated by
the arrow.
Replace the assembly in the steel
filter container, making sure the
pin is inserted in the hole in the
support.
Finally, screw on the cap by
turning clockwise. Failure to
clean as described above in-
validates the guarantee.

11
CLEANING THE BOILER OUTLET
ABOUT EVERY 300 COFFEES, the espresso boil-
er outlet must be
cleaned as follows:
1. MAKE SURE the ap-
pliance is not hot and
that it is unplugged
from the mains.
DESCALING
3. CLEANTHE BOILER with a damp cloth
4. CLEANTHE OUTLET thoroughly in hot
water using a brush. Make sure the
holes are not blocked. If necessary,
clean with a pin.
5. RINSE UNDER RUNNING WATER, rubbing all the
time.
6. SCREW THE BOILER OUTLET BACKON. Failure to
clean as described above invalidates the guar-
antee.
YOU ARE RECOMMENDED TO DESCALE the coffee ma-
chine about every 200 coffees or a maximum
of every two months.
YOU SHOULD USE ACOMMERCIALLY AVAILABLE PROD-
UCTSPECIFICALLY FOR DESCALING ESPRESSO COFFEE MA-
CHINES.
IFSUCHAPRODUCTIS NOT AVAILABLE, proceed as fol-
lows.
1. FILL THE TANK with half a litre of water.
2. DISSOLVE 2 spoonfuls (about 30 grams) of cit-
ric acid (obtainable from chemist’s or drug
stores)
3. PRESS THE ON/OFF BUTTON and wait for the OK
indicator light to come on.
4. MAKE SURE the filter holder is not attached
and position a recipient under the boiler out-
let.
5. PRESS THE COFFEE BUTTON, half empty the tank
by turning the steam knob every now and
then to run off a little solution. Stop run-off by
pressing the button again.
6. TURN THE APPLIANCEOFF.
7. LEAVE THE SOLUTION TO WORK for 15 minutes
then turn the appliance on again.
8. PRESS THE COFFEE BUTTON to empty the tank
completely.
9. TOELIMINATE RESIDUES of solution and scale,
rinse the tank well, fill with clean water (with-
out citric acid) and replace in position.
10. PRESS THE COFFEE BUTTON and run the water
off until the tank is completely empty
11. INTERRUPT water run-off and repeat opera-
tions 9, 10 and 11 again. Repair of damage to
the coffee machine caused by scale is not cov-
ered by the guarantee unless descaling is per-
formed regularly as described above.
2. USING ASCREWDRIVER, unscrew the screw fixing
the espresso boiler outlet filter

12
NOESPRESSO COFFEE IS DELIVERED No water in the tank
The holes in the fil-
ter holder spouts are
blocked.
The espresso boiler outlet
is blocked
The filter is blocked
The tank is incorrectly in-
serted
PROBLEM POSSIBLE CAUSE SOLUTION
Fill the tank with water
Clean the spout holes.
Clean as described in the
chapter “Cleaning the
boiler outlet”
Clean as described in the
section “cleaning the filter
holder”.
Insert tank correctly.
THE ESPRESSO COFFEE DRIPS from
the edges of the filter holder
rather than the holes.
The filter holder is insert-
ed incorrectly
The espresso boiler gas-
ket has lost elasticity
The holes in the filter
holder spouts
Attach the filter holder
correctly and rotate firmly
as far as it will go.
Have the espresso boiler
gasket elasticity replaced
at a service centre
Clean the spout holes.
THE ESPRESSO COFFEE IS COLD The espresso OK indicator
light was not on when the
coffe switch was pressed
No preheating performed
The cups were not pre-
heated
Wait until the OK light
comes on not on when
the coffee switch was
pressed.
Preheat as described in
the paragraph “Preheat-
ing the appliance”.
Preheat the cups by rins-
ing them in hot water.
THE PUMP IS EXCESSIVELY NOISY The water tank is empty
The tank is incorrectly in-
serted.
Fill tank
Insert tank correctly.

13
THE COFFEE FROTH IS TOO LIGHT
(delivered from the spout too
fast)
PROBLEM POSSIBLE CAUSE SOLUTION
The ground coffee is
not pressed down firmly
enough
There is not enough
ground coffee
The ground coffee is too
coarse
Incorrect type of ground
coffee.
Press the ground coffee
down more firmly).
Increase the quantity of
ground coffee
Use ground coffee for
espresso coffee ma-
chines only
Change the type of
ground coffee.
THE COFFEE FROTH IS TOO DARK
(delivered from the spout too
slowly)
The ground coffee is
pressed down too firmly
There is too much ground
coffee
The espresso boiler outlet
is blocked
The filter is blocked
The ground coffee is too
fine
The coffee is damp or
ground too fine
Incorrect type of ground
coffee.
Press the coffee down less
firmly.
Reduce the quantity of
ground coffee
Clean as described in the
chapter “Cleaning the
boiler outlet”
Clean as described in the
section “cleaning the fil-
ter holder”.
Use ground coffee for
espresso coffee machines
only
Use only ground coffee
for espresso coffee ma-
chines. Make sure it is not
damp
Change the type of
ground coffee.
NOMILK FROTH IS FORMED WHEN
MAKING CAPPUCCINO
Milk not cold enough.
Cappuccino maker dirty. Always use semi-skimmed
milk at refrigerator tem-
perature.
Thoroughly clean the
holes in the cappucci-
no maker in
particular
those indi-
cated by the
arrows.

14

15

16
GB
Whirlpool is a registered trademark of Whirlpool, USA.
© Whirlpool Sweden AB 2012. All rights reserved. Made in Sweden.
5019-300-00751
ENVIRONMENTAL HINTS
THE PACKING BOX may be fully recy-
cled as confirmed by the recy-
cling symbol. Follow local dis-
posal regulations. Keep po-
tentially hazardous packag-
ing (plastic bags, polystyrene
etc.) out of the reach of children.
THIS APPLIANCEis marked according to the Euro-
pean directive 2002/96/EC on Waste Electrical
and Electronic Equipment (WEEE). By ensuring
this product is disposed of correctly, you will
help prevent potential negative consequences
for the environment and human health, which
could otherwise be caused by inappropriate
waste handling of this product.
THE SYMBOL on the product, or on the docu-
ments accompanying the
product, indicates that this
appliance may not be treat-
ed as household waste. In-
stead it shall be handed over
to the applicable collection
point for the recycling of elec-
trical and electronic equip-
ment.
DISPOSALmust be carried
out in accordance with lo-
cal environmental regula-
tions for waste disposal.
For more detailed information about treat-
ment, recovery and recycling of this prod-
uct, please contact your local city office, your
household waste disposal service or the shop
where you purchased the product.
Before scrapping, cut off the mains cord so
that the appliance cannot be connected to the
mains.
TROUBLE SHOOTING GUIDE
WHEN CALLING FOR SERVICE, please give the se-
rial number and type number of the appli-
ance (see Service label). Consult your warranty
booklet for further advice.
IFTHE MAINS CORD NEEDS REPLACING it should
be replaced by the original mains cord,
which is available via our service organi-
zation. The mains cord may only be re-
placed by a trained service technician.
SERVICE ONLY TO BE CARRIED OUT
BY ATRAINED SERVICE TECHNICIAN.
It is hazardous for anyone other
than a trained person to carry
out any service or repair oper-
ation, which involves the re-
moval of any cover.
DONOT REMOVE ANY COVER.
SUPPLY VOLTAGE 220- 230V/50HZ
RATED POWER INPUT 1100 W
FUSE 10A(UK 13 A)
OUTER DIMENSIONS (HXWXD) 382 X595 X305
Table of contents
Other Whirlpool Coffee Maker manuals
Popular Coffee Maker manuals by other brands

Saeco
Saeco Incanto sirius operating instructions

RONDELL
RONDELL RDE-1103 Manual instruction

Nespresso
Nespresso Essenza Plus BEC350 manual

BRAVILOR BONAMAT
BRAVILOR BONAMAT Rivero 12 Operator's manual

Curtis
Curtis GEM-12D Installation instructions, service & warranty information

Logik
Logik L15PEM11 instruction manual