manuals.online logo
Brands
  1. Home
  2. •
  3. Brands
  4. •
  5. Whirlpool
  6. •
  7. Microwave Oven
  8. •
  9. Whirlpool MW83OOXL User manual

Whirlpool MW83OOXL User manual

This manual suits for next models

1

Other Whirlpool Microwave Oven manuals

Whirlpool Microwace Oven User manual

Whirlpool

Whirlpool Microwace Oven User manual

Whirlpool YGH8155XMQ2 User manual

Whirlpool

Whirlpool YGH8155XMQ2 User manual

Whirlpool GT 384 User manual

Whirlpool

Whirlpool GT 384 User manual

Whirlpool YWMT50011KS0 User manual

Whirlpool

Whirlpool YWMT50011KS0 User manual

Whirlpool YMH2175XS User manual

Whirlpool

Whirlpool YMH2175XS User manual

Whirlpool MAGICOOK 20 L Elite-B User manual

Whirlpool

Whirlpool MAGICOOK 20 L Elite-B User manual

Whirlpool WML55011 User manual

Whirlpool

Whirlpool WML55011 User manual

Whirlpool YMH1170XSS User manual

Whirlpool

Whirlpool YMH1170XSS User manual

Whirlpool MWN 410 User manual

Whirlpool

Whirlpool MWN 410 User manual

Whirlpool Magicook 20G User manual

Whirlpool

Whirlpool Magicook 20G User manual

Whirlpool REDACU2S519 User manual

Whirlpool

Whirlpool REDACU2S519 User manual

Whirlpool FT 381 User manual

Whirlpool

Whirlpool FT 381 User manual

Whirlpool WMCS7024PW Series User manual

Whirlpool

Whirlpool WMCS7024PW Series User manual

Whirlpool MWX203 User manual

Whirlpool

Whirlpool MWX203 User manual

Whirlpool AMW 585 IX User manual

Whirlpool

Whirlpool AMW 585 IX User manual

Whirlpool SUPREME CHEF MWP 338 User manual

Whirlpool

Whirlpool SUPREME CHEF MWP 338 User manual

Whirlpool RM770PXB User manual

Whirlpool

Whirlpool RM770PXB User manual

Whirlpool AMW 490 IX User manual

Whirlpool

Whirlpool AMW 490 IX User manual

Whirlpool MH1160XSB0 User manual

Whirlpool

Whirlpool MH1160XSB0 User manual

Whirlpool GH5184XPT User manual

Whirlpool

Whirlpool GH5184XPT User manual

Whirlpool COOK20 MWP201SB User manual

Whirlpool

Whirlpool COOK20 MWP201SB User manual

Whirlpool JT479IX User manual

Whirlpool

Whirlpool JT479IX User manual

Whirlpool VM11D-8P Guide

Whirlpool

Whirlpool VM11D-8P Guide

Whirlpool MH7135XE User manual

Whirlpool

Whirlpool MH7135XE User manual

Popular Microwave Oven manuals by other brands

Sharp R-390D manual

Sharp

Sharp R-390D manual

PROFILO MD1000 instruction manual

PROFILO

PROFILO MD1000 instruction manual

Candy MIC 201 EX User instructions

Candy

Candy MIC 201 EX User instructions

PITSOS GMW3101B user manual

PITSOS

PITSOS GMW3101B user manual

Sears 5648744780 Use & care manual

Sears

Sears 5648744780 Use & care manual

BOMANN CB 1272 Instruction manual & guarantee

BOMANN

BOMANN CB 1272 Instruction manual & guarantee

Conrad Electronic 2372935 operating instructions

Conrad Electronic

Conrad Electronic 2372935 operating instructions

GE Spacemaker JVM1440BH datasheet

GE

GE Spacemaker JVM1440BH datasheet

DAEWOO ELECTRONICS KOR-6L8K5S83 Operating instructions & cook book

DAEWOO ELECTRONICS

DAEWOO ELECTRONICS KOR-6L8K5S83 Operating instructions & cook book

DAEWOO ELECTRONICS KOR-1N5A9S Operating instructions & cook book

DAEWOO ELECTRONICS

DAEWOO ELECTRONICS KOR-1N5A9S Operating instructions & cook book

Daewoo KQG-6617G Operating instructions & cook book

Daewoo

Daewoo KQG-6617G Operating instructions & cook book

Samsung M1779 Owner's instructions

Samsung

Samsung M1779 Owner's instructions

GE JES1143 Use and care & cooking guide

GE

GE JES1143 Use and care & cooking guide

Miele H6200BM(TB) Operating and installation instructions

Miele

Miele H6200BM(TB) Operating and installation instructions

Jocel JMO011480 instruction manual

Jocel

Jocel JMO011480 instruction manual

Sharp R-752M Operation manual with cookbook

Sharp

Sharp R-752M Operation manual with cookbook

Electrolux EVL8E00X user manual

Electrolux

Electrolux EVL8E00X user manual

STOVES Q900GRF DO User, installation & servicing instructions

STOVES

STOVES Q900GRF DO User, installation & servicing instructions

manuals.online logo
manuals.online logoBrands
  • About & Mission
  • Contact us
  • Privacy Policy
  • Terms and Conditions

Copyright 2025 Manuals.Online. All Rights Reserved.

Microwave Oven Model $W83OOXl
Vents (Not
Shown)
DefrostG&e(NotShow*)
\
Model and Serial
Number Plate
copy your Model and Serial
Numbee
Here
If you need
servlce 01 CalI with a questIon have this
irformatton wadv
t Complete Model and Serial Numbers (from the Plate Just
behlnd the ~!(CfOWc]Ve oven door on the oven frame)
2
purchase dote from sales slip (Or date rnstalted)
copy mS mformatlon in
these spaces Keep this book.
“our warranty and
sales SIIP together In Q
handv
Place
Responsibilities
Installation
Proper, Safe Use
Precautions to Avoid Possible
Exposure to Excessive
Microwave Energy
Using Your Microwave Oven :
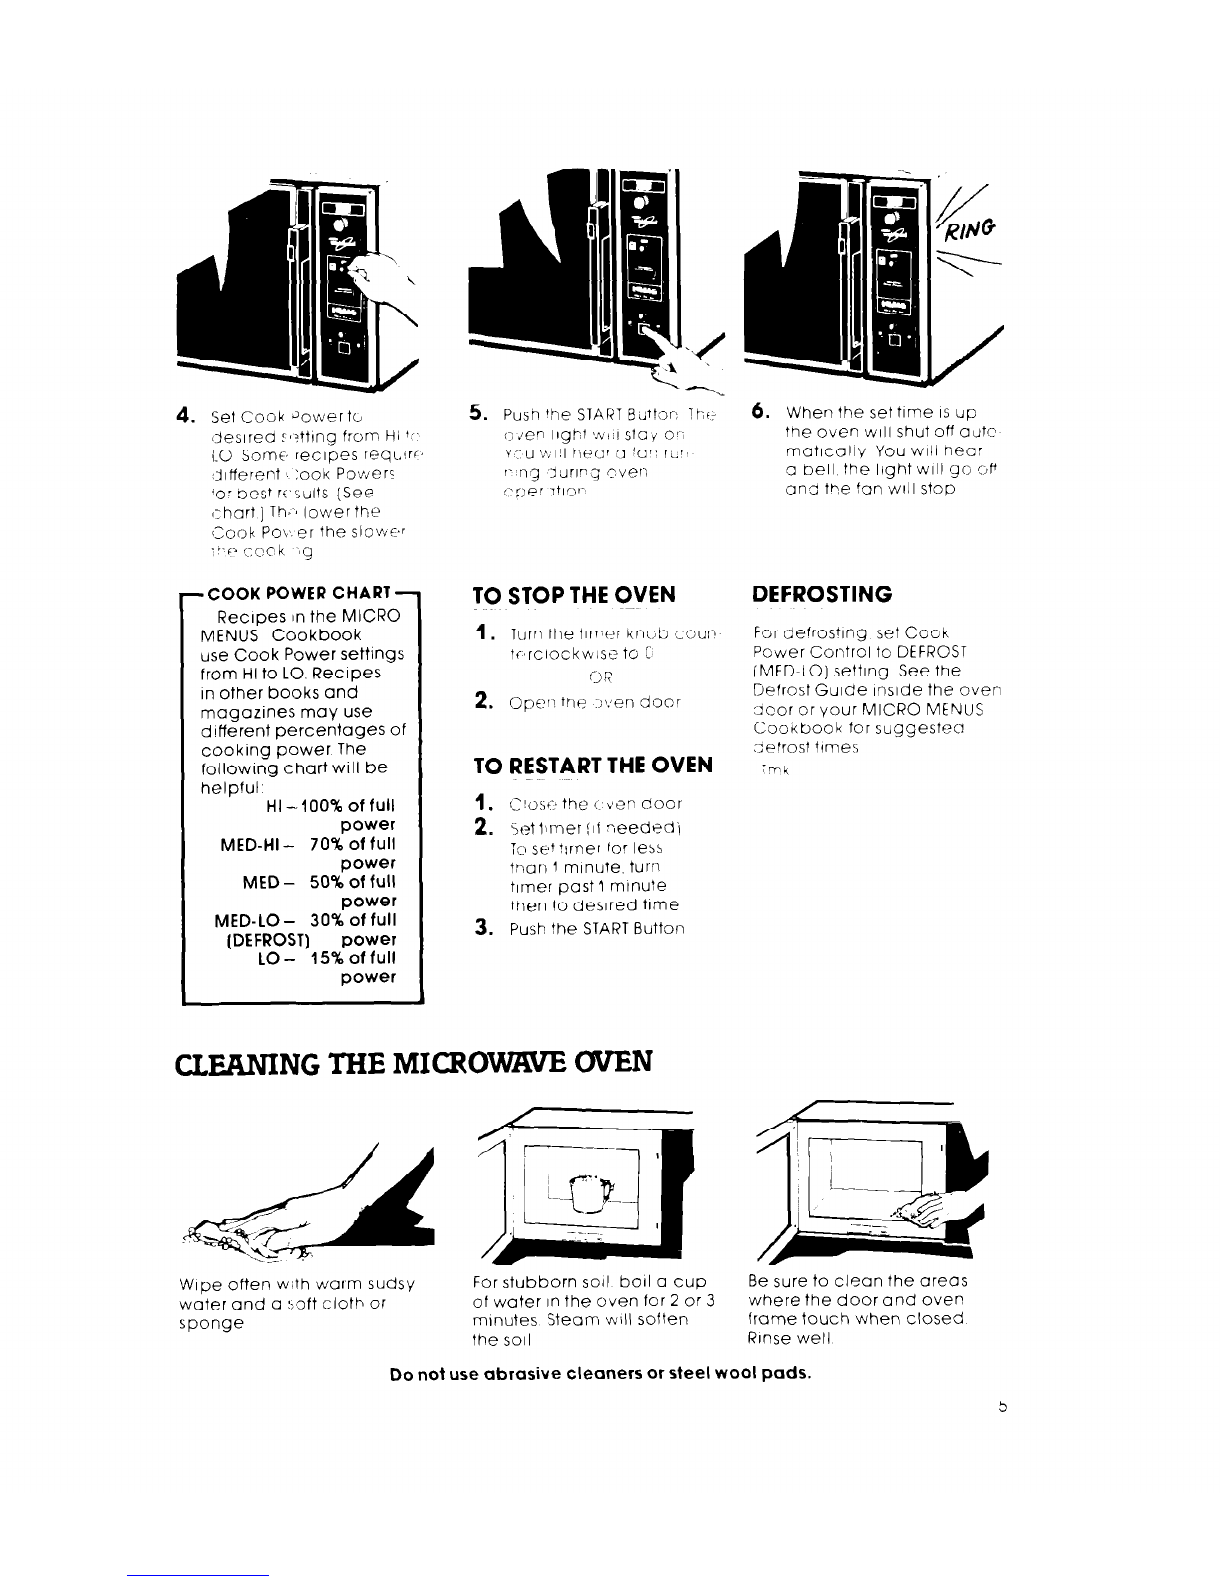
Setting the Controls
Defrosting
Cleaning the Microwave Oven
Contents
Page 2
2
3
3
4
4
5
5
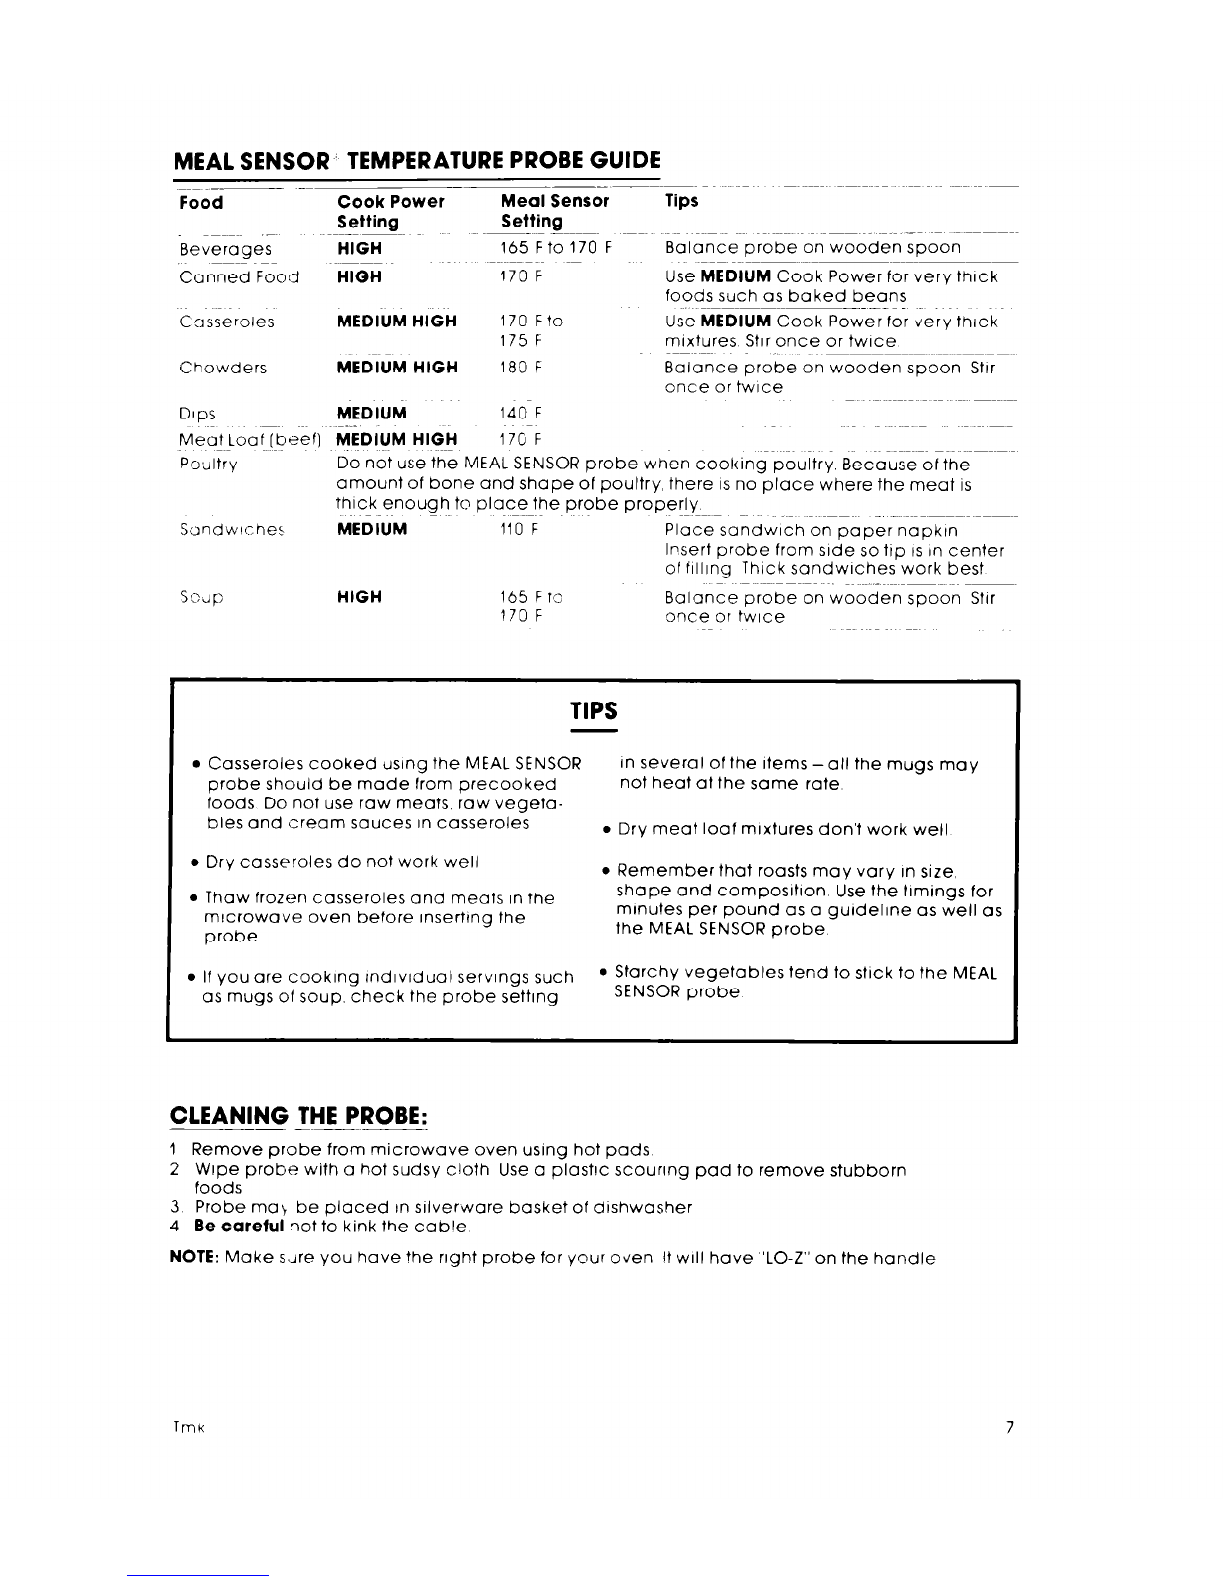
Cooking with the Temperature
Probe ,...,
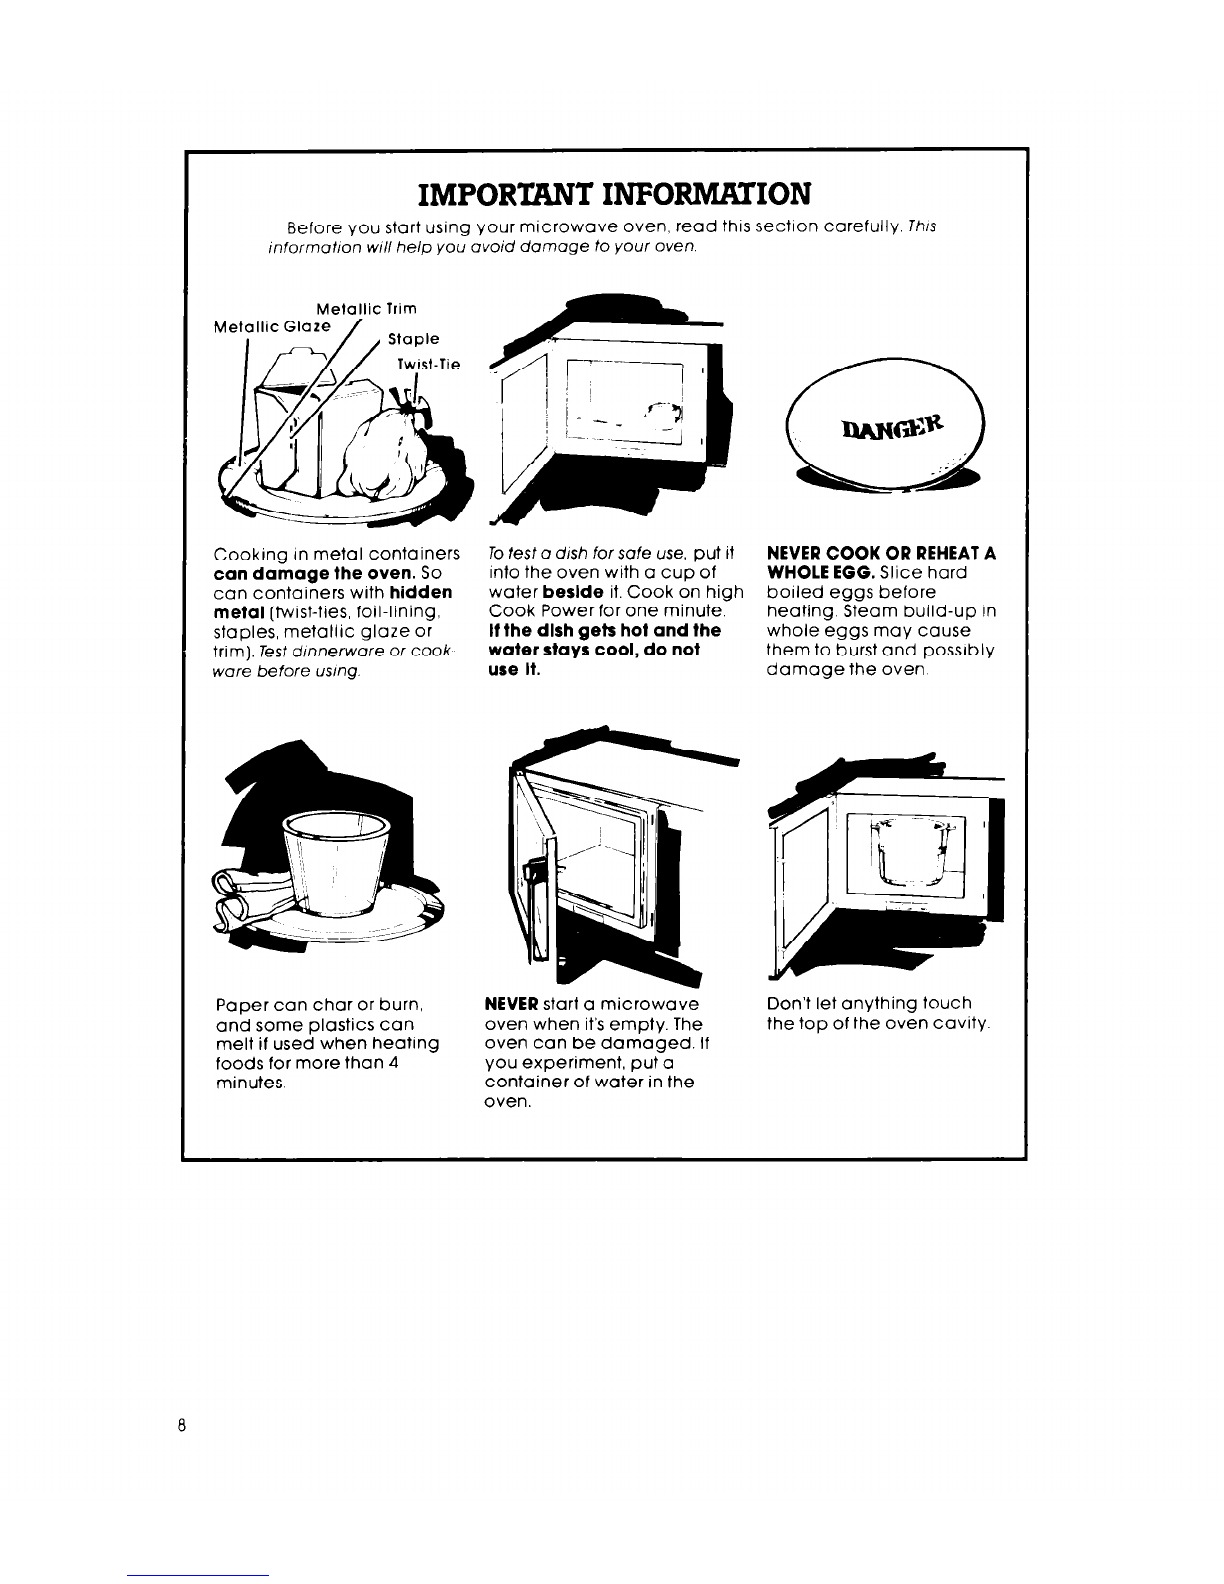
Important Information
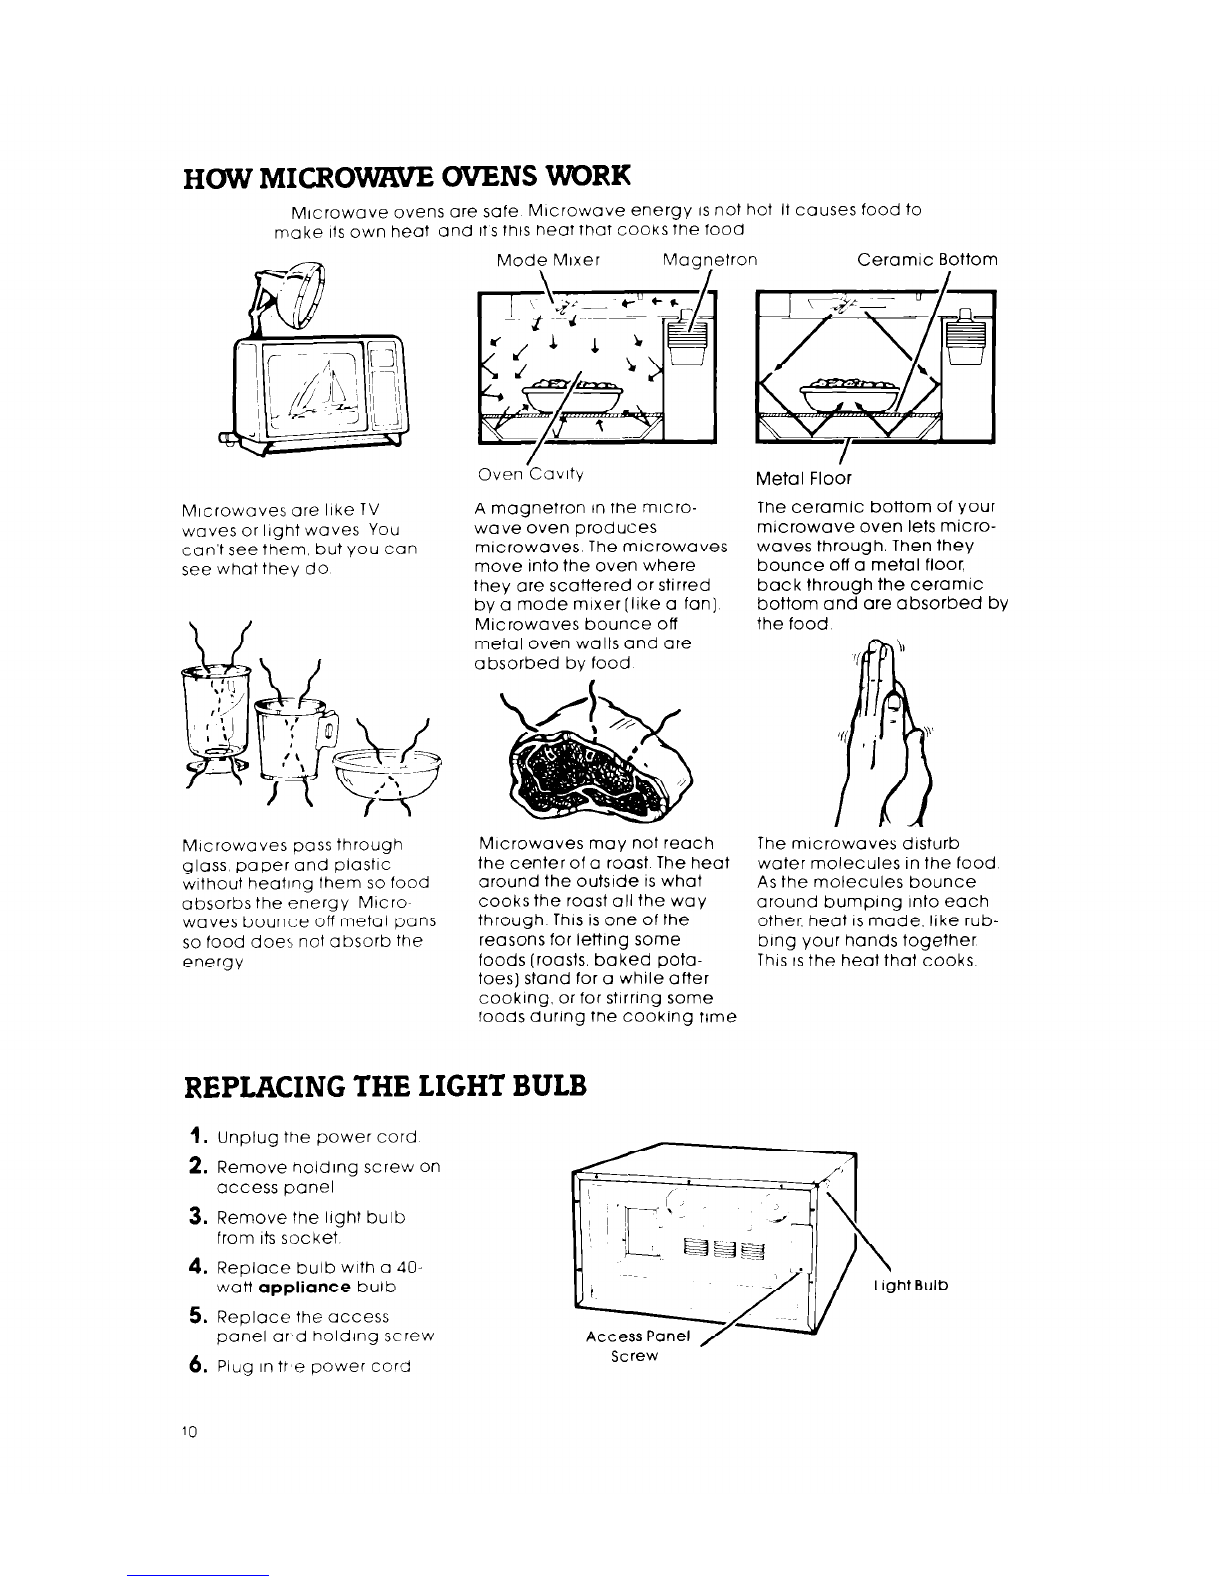
How Microwave Ovens Work
Replacing the Light Bulb
Building In Your Microwave Oven
If You Need Service or Assistance
1. Before Calling For Assistance
2. If You Need Assistance
3. If You Need Service
4. If You Have a Problem
Page
Your responsibilities.. .
Fill out and return the “Microwave Registration Card”attached to the oven door.
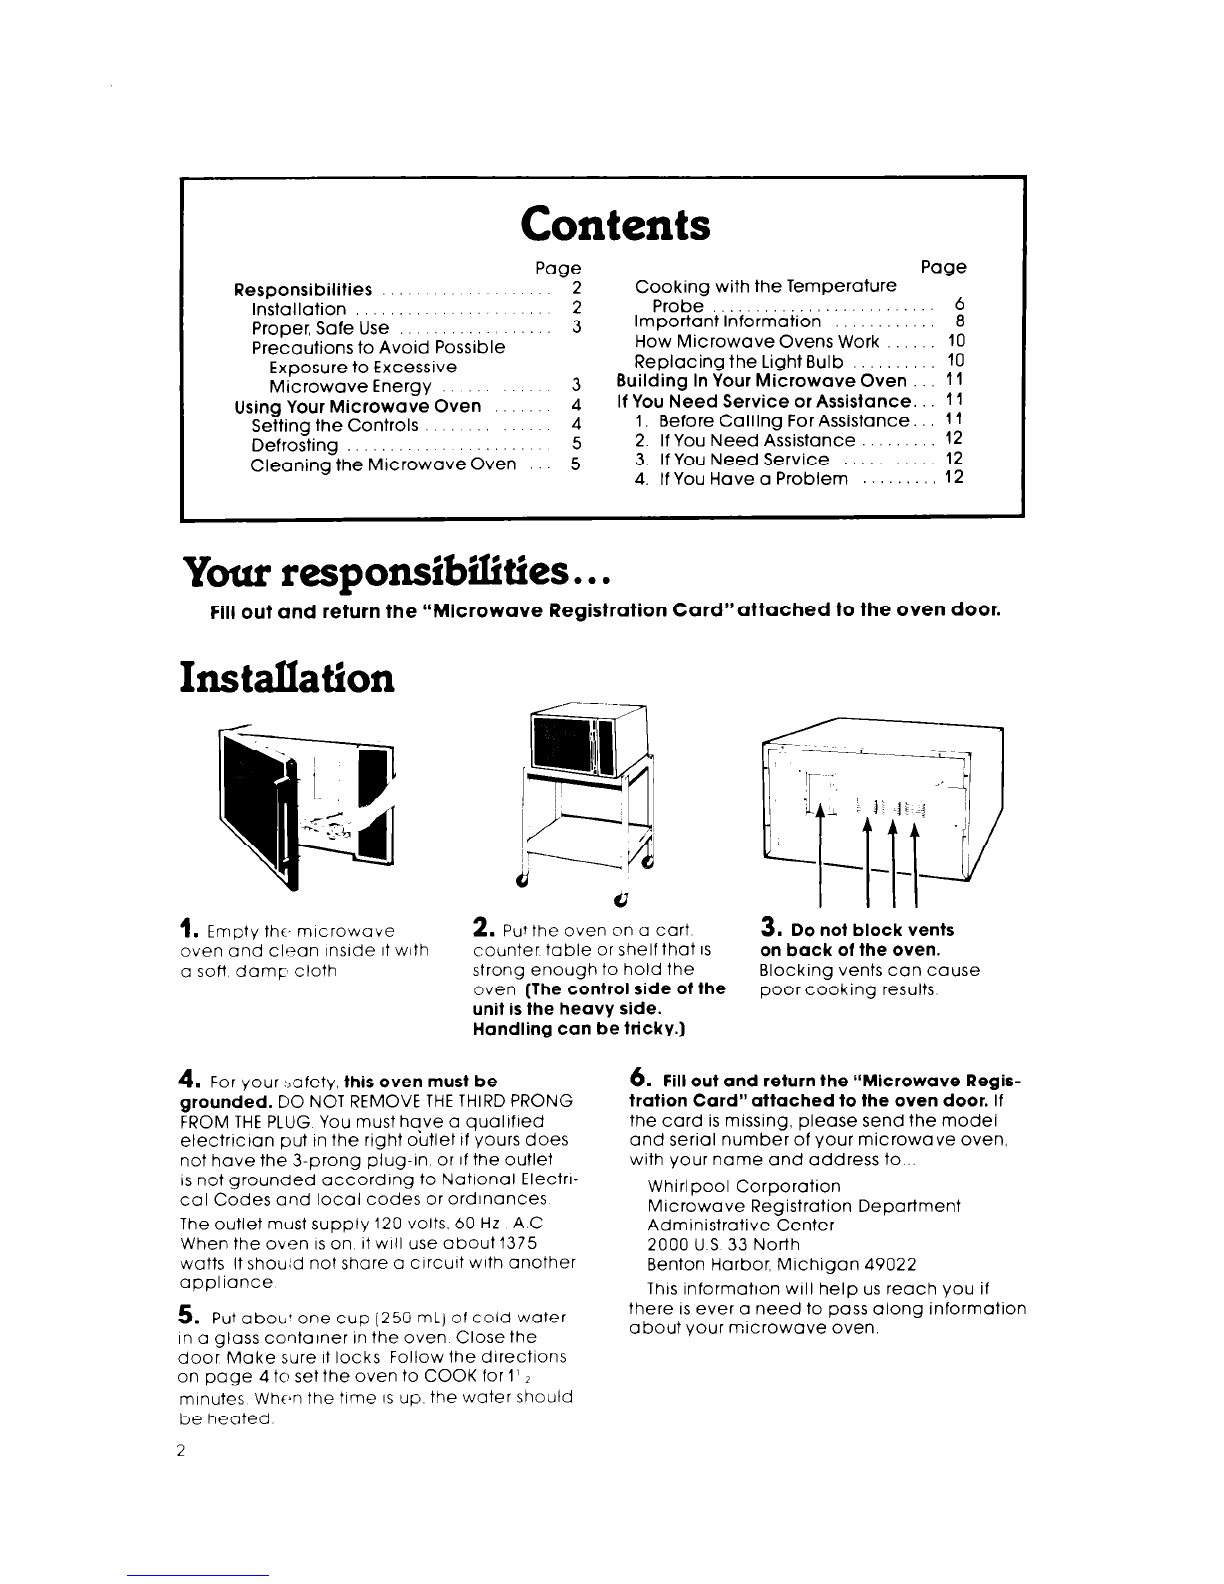
Installation
1. Empty the, mlcrowave
even and clean InsIde It with
a soft damp cloth
2.
Put the oven nn a
Curt
3. Do not block vents
counter table or shelf that IS
on back of the oven.
strong enough to hold the Blocking vents can cause
oven
(The control side of the
poor cooking results
unit is the heavy side.
Handling can be tricky.)
4. For your :,afety,
this oven must be
grounded.
DO NOT REMOVE THE THIRD PRONG
FROM THE PLUG You must hqve a quaIlfled
electrlctan put tn the right outlet tf yours does
not have the 3-prong plug-In or If the Outlet
IS not grounded according to National Electn-
cal Codes and local codes or ordinances
The outlet must supply 120 volts, 60 Hz A.C
When the oven ISon it will use about1375
watts It shou;d not share a clrcult with another
aopliance
5. Put aboLl’ one cup (250 ml) of cold water
In a glass container in the oven Close the
door Make sure it locks Follow the directions
on page 4 to set the oven to COOK for 1’ 2
minutes When the time IS up. the water should
be heated
2
6.
Fill out and return the L‘Microwave Regis-
tration Card” attached to the oven door.
If
the card is missing, please send the model
and serial number of your microwave oven,
with your name and address to...
Whirlpool Corporation
Microwave Registration Departmeni
Administrative Center
2000 U S 33 North
Benton Harbor, Michigan 49022
This information will help us reach you if
there is ever a need to pass along information
about your microwave oven.
Proper, safe use
Your microwave must be...
l
Installed according to the rnstallation
instructions
l
Protected from the weather.
l
Used only for jobs expected of home mrcro-
wave ovens
l
Used only by people who can operate it
properly.
l
Kept clean and in good repair.
NEVER start the oven when
it’s empty. The oven can be
damaged.
DO NOT cook or reheat
whole eggs in the micro-
wave oven. Steam build-
up can cause an egg to
burst Damage to the oven
or injury to the user may
result
DO NOT use the oven until
you have read and under-
stand ALL the information
on safe use.
Using your microwave oven
Mlcrowave Oven Controls
Cook Power Selector
MEAL SENSOR’
Temperature Probe
/ Control
- Probe Signal Light
- ON Signal Light
- Start Button
SETTING THE CONTROLS
Be sure you understand the basics of mlcrowave oven cooklng before you start
Start “vlth recipes from your MICRO MENUS Cookbook Follow the directions
carefully
NEVER START THE OVEN WHEN IT’S EMPTY.
The oven can be damaged For testing
use nt least a cup of water
Be sure you have read and
understand the dIrectIons.
1.
Put food jn the oven
Tmk
2. C!ose the door. Make
sure it locks The oven
won’t work If the door Isn’t
closed tightly
3.
Set cooklng times up to
35 minutes by turning the
timer knob clockwise
The oven light will come
or Turr? counterclock-
wise to reduce time
Each mark is 15 sec-
onds tor the first 5
minutes. After 5 minutes,
each mark is 1 minute.
To set time for less than 1
minute. turn timer past
1 minute then to desired
time
L.
\
c
4.
Set Cook 30wer tc
(Jeslred t r?ttlng from Hi 1”
1.0 Some recipes reqc.lrc,
:Jlfferent :ook Powers
‘0: oest r<,sults (See
(Ihart ] Th,j lower the
~Ciook Po\.er the sIov~~’
1” F’ <;0 0 k _,
9
-COOK POWER CHART -
Recipes In the MICRO
MENUS Cookbook
use Cook Power settings
from HI to LO. Recipes
in other books and
magazines may use
d!fferent percentages of
cooking power The
following chart will be
helpful, HI -100% of full
power
MED-HI - 70% of full
power
MED - 50% of full
power
MED-LO - 30% of full
(DEFROST) power
LO- 15%
of
full
power
-J
--
TO STOP THE OVEN DEFROSTING
1.
lurn the tlmer kncjb tour’
tf,rclockwlse to C’
CjR
2.
Cper tne 7lyen door
For defrosting set Cook
Power Control to DEFROST
IMED-LO) setting See the
Defrost Guide Inside the oven
:llcor or your MICRO MENUS
Cookbook for suggester
aefrost times
TO RESTART THE OVEN
1. :.~:‘!oscthe ! b’ef-c.001
2.
Set lamer of needed\
10 se+ turner for less
tnarll mlnuye. turn
turner past 1 mtnute
then to desired time
3. Push the START Button
CLlXNING THE MICROWWE OVEN
Wipe often w;th warm sudsy
water and a r;gft cloth or
sponge
For stubborn so11 boll a cup Be sure to clean the areas
of water In the 0ven for 2 or 3 where the door and oven
minutes Steam will soften frame touch when closed
the soil Rinse well
6.
When the set time IS up
the oven WIII shut off autc
matically You will hear
a bell the light will g0 or
and the fan WIII stop
Do not use ubrasive cleaners or steel wool pads.
THE MEAL SENSOR”: TEMPERATURE PROBE
Roast or bake meats or casseroles to a set temperature instead of by time. When
the MEAL SENSOR Temperature Probe is properly used, the microwave oven will turn
off automatically when the probe senses the temperature vou set.
For casseroles, the tip of
the probe should be In
the center of the food Stir
foods when recom-
mended Replace the
probe
1.
Insert at least of the
temperature probe Into
the food
For Irqurds, balance the
probe on a wooden spoon
or spatula so the tip of the
probe is In the center of
the liqurd
For roasts, the tip of the
probe should be in the
‘center of the largest mus-
cle. but not touching fat or
bone
0
I
Socket
2. Place food in the oven
and plug the probe into
the socket on the oven
wall
3. Make sure the probe
does not touch any part
of the oven interior.
Close the door. The Probe
Signal Light will come on.
4.
Set the Cook Power If
desired 5. Move the Meal Sensor
pointer to the final cook-
ing temperature you
want
6. Push the START Button.
When the probe senses
the cooking temperature
a buzzer sounds, and the
oven turns off
DO... DON’T...
l
use hot pads when removing probe from
food or food from oven.
l
stir foods during cooking when
recommended.
l
stir soups, casseroles and drinks before
serving
l
cover roasts with foil and let stand a few
minutes after cooking. Remove foil if you
decide to cook it longer.
l
let probe or probe cable touch any part of
the oven interior.
l
let probe touch foil (if used). Foil can be
kept away from probe with wooden tooth-
picks. Remove foil if arcing occurs.
0 use paper, plastic wrap or plastic con-
tainers. They will be in the oven too long.
l
use probe in regular oven.
l
force probe into frozen food.
l
use probe for foods that need to simmer.
b .Tmk
MEAL SENSOR. TEMPERATURE PROBE GUIDE
~~~~-~ -~
Food Cook Power - Meal Sensor
Setting Setting
Beverages
HIGH
165 Fto 170 F
Canned Food
HIGH
170 F
Casseroles
Chowders
MEDIUM HIGH
170 Fto
175 F
MEDIUM HIGH
180 F
DIPS
MEDIUM
140 F
Tips
Balance probe on wooden spoon
Use
MEDIUM
Cook Power for very thick
foods such as baked beans
Use
MEDIUM
Cook Power for very thick
mixtures Stir once or twice
Balance probe on wooden spoon Star
once or twice
Meat Loaf
[beef) MEDIUM HIGH
170 F
f%Jitry
Do not use the MEAL SENSOR probe when cooking poultry. Because of the
amount of bone and shape of poultry, there IS no place where the meat is
thick enough to place the probe properly ~~~ _ .~~~~~~~~~ ~~~~~
Sondwlches
MEDIUM
110 F Place sandwich on paper napktn
Insert probe from side so ttp IS In center
of flllrng Thick sandwiches work best
SOJP
HIGH
165 F ro
170 F Balance probe on wooden spoon Stir
Once or twice
TIPS
l
Casseroles cooked using the MEAL SENSOR In several of the Items -all the mugs may
probe should be made from precooked not heat at the same rate
foods Do not use raw meats, raw vegeta-
bles and cream sauces in casseroles
l
Dry meat loaf mixtures don’t work well
l
Dry casseroles do not work well
l
Remember that roasts may vary In size,
l
Thaw frozen casseroles and meats In the
mrcrowave oven before rnserttng the
probe
shape and composrtron Use the timings for
minutes per pound as a gurdelrne as well as
the MEAL SENSOR probe
l
If you are cookmg Indlvlduai servings such
l
Starchy vegetables tend to stick to the MEAL
as mugs of soup. check the probe setting SENSOR probe
CLEANING THE PROBE:
1 Remove probe from microwave oven using hot pads
2 Wipe probe with a hot sudsy cloth Use a plastic scouring pad to remove stubborn
foods
3 Probe ma\ be placed In srlverware basket of dishwasher
4 Be careful
?ot to kink the cable
NOTE:
Make sdre you have the right probe for your oven H will have ‘LO-Z” on the handle
Tmk
7
IMPORTANT INFORMATION
Before vou start usinq your microwave oven, read this section carefully. Th/s
informotlon WI// help yo;&oid damage to your oven.
Metallic Trim
Metallic Glaze
Cooking In metal containers
can damage the oven. So
can containers with
hidden
metal
(twist-ties, foil-ltning,
staples, metallic glaze or
trim). Tesf dmnerwore or cook
ware before usmg.
Paper can char or burn,
and some plastics can
melt if used when heating
foods for more than 4
minutes.
To test o dish for safe use, put it
into the oven with a cup of
water
beslde
it. Cook on high
Cook Power for one minute.
If the dlsh gets hot and the
water stays cool, do not
use It.
NEVER
start a microwave
oven when it’s empty. The
oven can be damaged. If
you experiment, put a
container of water in the
oven.
NEVER COOK OR REHEAT A
WHOLE EGG.
Slice hard
boiled eggs before
heating. Steam build-up in
whole eggs may cause
them to burst and possibly
damage the oven
Don’t let anything touch
the top of the oven cavity
Rough or harsh cleaners
can scratch or dull the
oven finrsh
DO NOT USE THE
Make popcorn only In
poppers designed for use
In mrcrowave ovens
Follow popper directions.
Results are the popper
manufacturer’s
responsibrlrty
USE HOT PADS.
Mrcrowave
energy does not heat
containers, but the hot
food does
volm’
w@
If your electric power line
voltage is less than the
normal 120 volts, cooking
times may be longer.
DO NOT
store thongs in the
oven
Liquids heated In certain
contarners may overheat
The liquid may then splash
out with a loud noise This
does not harm the oven,
but you should not use
such containers to heat
liquids again.
Follow MICRO MENUS
Cookbook directions
carefully. If using a
different cookbook, you
may need to experiment
with times and Cook
Powers.
l
Double-check all
settings
l
Use the oven only for
defrosting, cooking or
reheating.
Overcooking some foods
can cause them to scorch
or flame...especially foods
lrke potatoes, popcorn,
snacks, etc. See the MICRO
MENUS Cookbook
Do NOT OVERCOOK
POTATOES, At the end of the
recommended cooking
time they should be
slightly firm. Wrap in foil
and set aside for 5 minutes
They will finish cooking
while standing.
It
IS
normal for the inside of
the oven door to look wavy
after the oven has been run-
ning for a while.
It is normal for the signal
lights to flicker while the
microwave oven is on.
nk
HOW MICRO- OVENS WORK
Microwave ovens are safe Microwave energy
IS
not hot It causes food to
make Its own heat and it’s thts heat that cooks the food
Microwaves are like TV
waves or light waves You
can’t see them, but you can
see what they do
Mrcrowaves oass through
glass paper and plastic
wrthout heating them so food
absorbs the energy Mtcro~
waves bounce off metal pans
so food does not absorb the
energy
Mode Mixer Maanetron Ceramic Bottom
Oven.Cavity
A magnetron tn the micro-
wave oven produces
mrcrowaves The microwaves
move into the oven where
they are scattered or stirred
by a mode mtxer [Irke a fan]
Microwaves bounce off
metal oven walls and are
absorbed by food
Microwaves may not reach
the center of a roast The heat
around the outsrde IS what
cooks the roast all the way
through This is one of the
reasons for letting some
foods (roasts, baked pota-
toes) stand for a while after
cookrng, or for stirring some
foods during the cooking time
REPLACING THE LIGHT BULB
Metal Floor
The ceramic bottom of your
microwave oven lets micro-
waves through. Then they
bounce off a metal floor,
back through the ceramic
bottom and are absorbed by
the food
The mrcrowaves disturb
water molecules in the food
As the molecules bounce
around bumping into each
other, heat
IS
made, like rub-
bing your hands together
This ISthe heat that cooks
1.
unplug the power cord
2. Remove holding screw on
access panel
3. Remove the light bulb
from
its
socket
4. Replace bulb with a 402
watt
appliance
bulb
5. Replace the access
panel ar,d holding screw
6. Plug In ttse power cord
Access Panel
Screw
10