Whisper Booth Administrator Guide

1
Whisper Booth How to Guide
The Whisper Room uses a few devices to make the recording process possible. The devices used are
a microphone, an audio interface, and a few cables. The purpose of the audio interface is to record
to a computer via USB or to record to an SD card. The audio interface that the Center for Innovation
uses is the MixPre3, which is made by a well-known company called Sound Devices. Sound Devices is
known for their amazing quality and features. The MixPre3 has the capability to record three
microphones at a time. The CFI has other options to record more than three microphones at a time,
if you need more let our manager know and we will be happy to assist.
Steps to using the device
1) Inserting SD Card or plugging in computer
2) Powering On
3) Formatting SD card
4) Gain Staging
5) Plugging in Headphones
6) Recording
1) If you are using a computer, you need to use a DAW (Digital Audio Workstation). There are many
free DAWs that are available to download such as Audacity, Garageband, Pro Tools|First, etc. After
you plug in the device via the USB-C cable you can select the sound device as your audio device in
your DAWs audio preferences.
If you are using an SD card, you need to insert an SD card into the device. It is a good practice to
have the MixPre3 turned off before inserting the SD card and removing it after your recording is
done. The SD slot is located behind the bumper on the back of the MixPre3. (Figure 1)
(Figure 1)
(Figure 1)

2
2) After you have the SD card inserted, you can plug in the USB-C cable for power (Figure 2). It can
receive power three different ways. One way is USB bus power from a computer. If you do not have
a computer, the device uses a stand-alone power supply that also uses the USB-C port (Figure 2). It
can also be powered by four AA batteries if there is not a wall power socket available. Once the
power is supplied to the device, use the on/off switch to turn it on. (Figure 2)
3) After you insert the SD card you will need to format the card. Remember, whenever you format an
SD card you will lose all the data on it, so it is a good idea to backup important documents and data
before you format. To format turn the device back on. Once it is turned on you might be presented
with a message that says “Error, Card was not formatted by MixPreII, Please re-format”. This is
completely normal, click okay to continue. It might present you with another message about
timecode, do not worry about this and just continue by pressing okay. Now you will see a meter
screen view on the LCD touch screen. Press the three horizontal lines (menu icon) in the upper right-
hand corner. (Figure 3)
(Figure 2)
(Figure 3)

3
After you select the menu icon you will be on one of three menu pages. You can tab through the
different menu pages by pressing the word “Menu” (Figure 4). Tab through the different menu
pages until you come upon a menu with “SD Card” as an option (Figure 4). Press “SD Card,” then
click “edit,” and after press “format.” It will remind you that when you format your SD card it will
erase your data, make sure to back up your data before you format.
Now that your SD card is formatted or you have your DAW ready, you can start to plug in the
microphone(s) (Figure 5). Microphones use a type of connector called an XLR. You will see two XLR
inputs on the left side and one XLR input on the right side. You can plug the microphone into any of
these inputs. Notice that each input has a number, this will be important later so remember which
input number you use. (Figure 5)
(Figure 4)
(Figure 5)

4
4) Now that you have your microphone(s) plugged in, go back to the metering page on the LCD screen.
To get back to this screen press the home icon in the upper right card corner of the LCD screen. If
you are using more than one microphone you can view all microphone levels by touching the meter
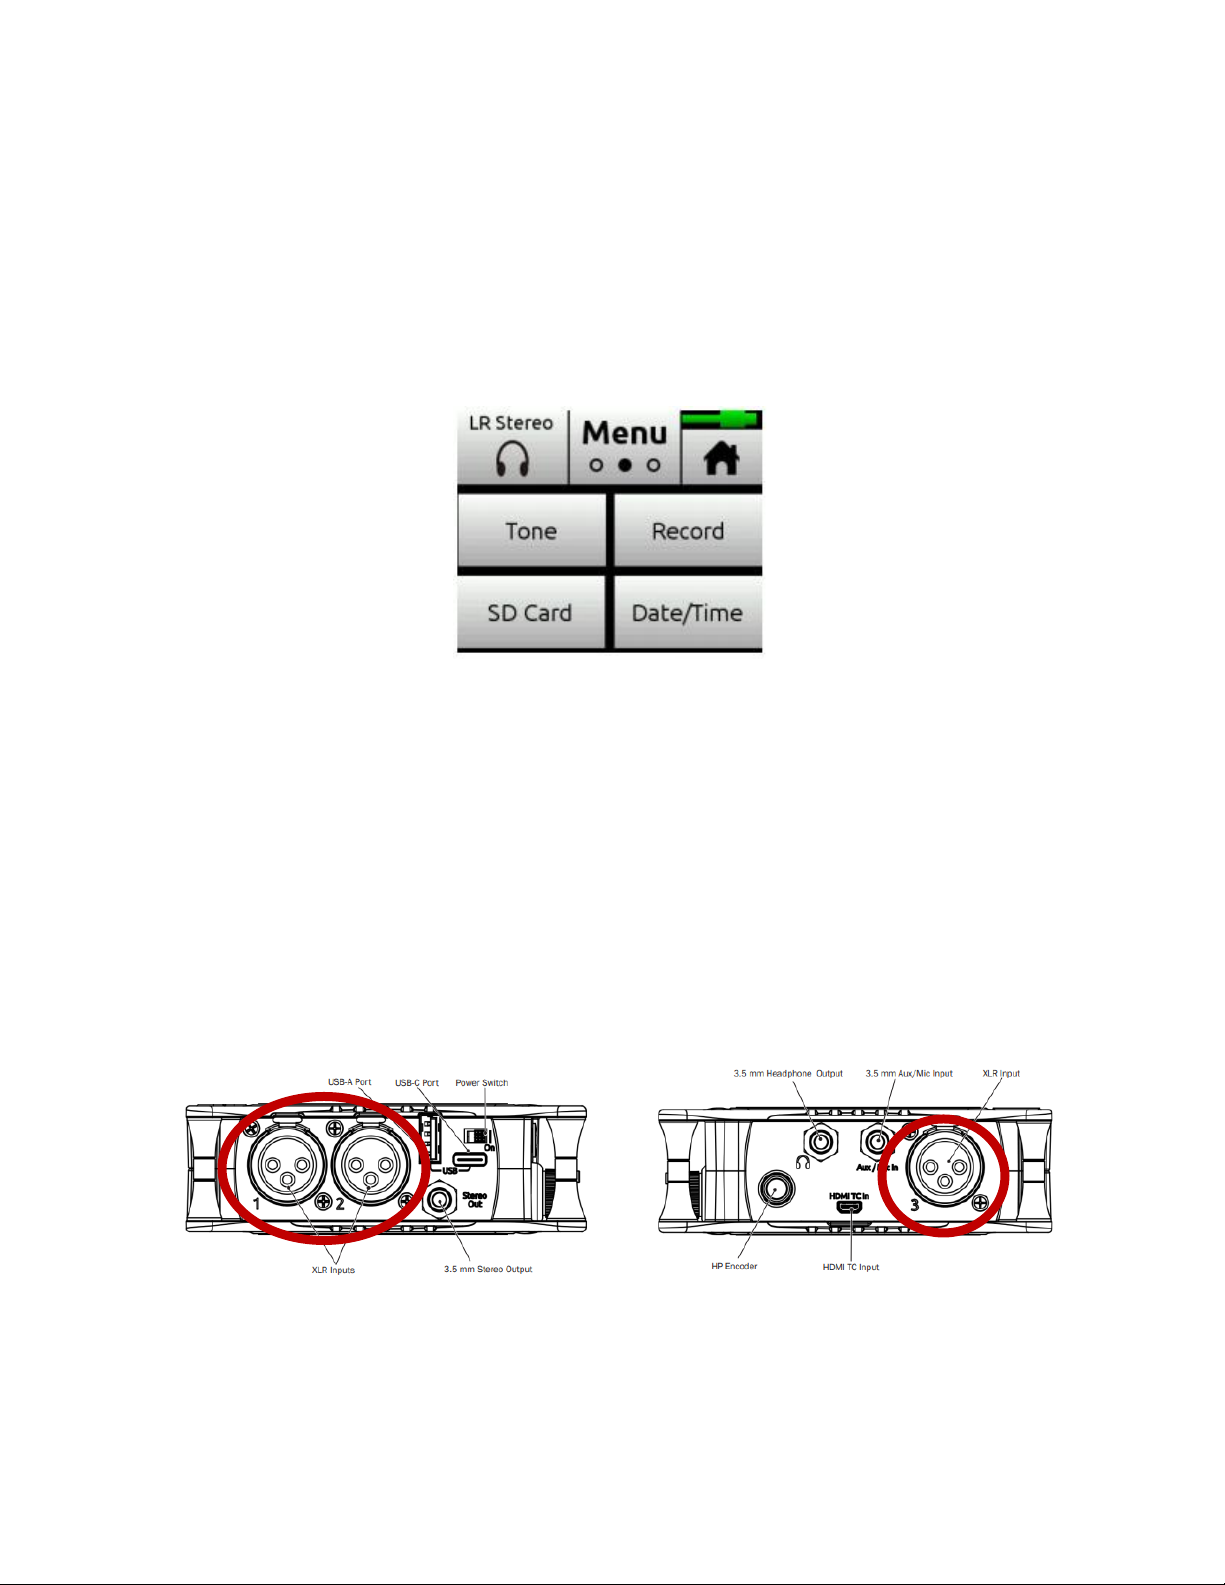
view once, and now you should the numbers 1, 2, and 3 (Figure 6). If you accidently press it twice,
that is okay. Just keep toggling through them again to get to the correct view.
Once you have the microphone(s) plugged in we are ready to turn up the gain. Gain brings the level
of the microphone up to an appropriate recording level. The gain should be high enough that is
acceptable for playback and listening, but if it is too high you will encounter distortion, also known
as clipping. Gain and volume are related, if you turn up the gain you will notice the volume of the
microphone increases. The MixPre3 makes this process, also known as gain staging, extremely easy.
There are three gain knobs on the front face of the device (Figure 7). These gain knobs are also
known as preamplifiers. Each preamplifier has a number next to it and this number corresponds to a
microphone input. So whatever XLR input you plugged your microphone into will be affected by the
preamplifier that has the same number. Use the preamplifier knob to turn up the gain until your
meter is showing a level above -30 (Figure 6), but make sure not to go above 0 or else you will
encounter distortion. The preamplifier knob has an LED ring around it that will light up green when
you have some sort of level but will turn red if you clip.
(Figure 6)
(Figure 7)

5
5) Now that you have your gain staging complete, we can start to prep to connect your headphones.
You will notice on the left side of the MixPre3 there is a headphone jack and to left of that there is
another knob (Figure 8). This other knob is for your headphone volume. I recommend turning the
headphone volume all the way down before you plug your headphones in. When you turn the knob,
you will be able to see the headphone gain level on the LCD screen. Once the headphone gain level
is at zero, plug in your headphones. Now that your headphones are plugged in you can slowly bring
up the headphone level until you are comfortable.
6) Now you should be set to record on either the SD card or your computer DAW. To record on the SD
card just hit “REC” on the front of the MixPre3 (Figure 9). To record on your DAW, arm the
microphone channel in your DAW to record enable and then hit record. All these DAW controls will
be in your DAW manual if you cannot figure out how to configure this. To stop recording on the SD
card press the square button on the front of the MixPre3. To stop recording in your DAW press the
stop button.
Now that you are done recording, turn the MixPre3 off and you can now safely remove the SD card
or unplug from your computer. If you need help, please let the CFI manager or audio engineer know
and they will be happy to help you! Have fun recording!
(Figure 8)
(Figure 9)
Table of contents
Popular Recording Equipment manuals by other brands

Beyond Acoustic
Beyond Acoustic SU-200R instruction manual

Taco Electronic Solutions
Taco Electronic Solutions iWorX LCI3 quick start guide

Milltronics
Milltronics PL-533 instruction manual

LaLaLand
LaLaLand KORG Delta MIDI installation manual

Razr
Razr Bee 8 quick start guide

Fred’s Lab
Fred’s Lab Buzzzy User and service manual