manuals.online logo
Brands
  1. Home
  2. •
  3. Brands
  4. •
  5. Whistler
  6. •
  7. GPS
  8. •
  9. Whistler WGPX-545 Instructions for use

Whistler WGPX-545 Instructions for use

1
Whistler WGPX-545/550
WGPX-545
&
WGPX-550
Hardware User Manual
Turn-by-Turn GPS eceiver
Note
Contents of this manual and product specifications can change without notice.
Rev 3
2
Whistler WGPX-545/550
Introduction
If you have any questions concerning the operation of this Whistler product please call:
Whistler Customer Service
1-800-531-0004
Hours: Monday Friday
8:00 am to 5:00 pm CT
or visit
www.whistlergroup.com
Please keep the receipt in a safe place. You may register your WGPX online at:
www.whistlergroup.com. If the unit is returned without a dated store receipt, an out of warranty
service charge applies.
Note: Your warranty period begins at the time of purchase. The warranty is validated only by a
copy of the original store receipt. Now is the time to record the serial number of the unit (located
under the flipped down GPS antenna ) in the space provided in the warranty section of the
manual.
3
Whistler WGPX-545/550
Dear Whistler Owner,
Thank you for purchasing the Whistler Turn-By-Turn (TBT) GPS Receiver. Please take some
time to read both this hardware manual and the GPS mapping software manual in order to
understand and maximize the operating features. There is no better way to experience what’s near
you or how to get there than by using a Whistler WGPX series GPS. Both the WGPX and wMap
Mapping software were designed for ease of use to make your purchase and experience a pleasant
one.
Both manuals and our Whistler Customer Service Representatives are here to assist you. For more
general GPS information or frequently asked questions, please see our FAQ page at
www.whistlergroup.com.
Before using the WGPX for the first time make sure that you read the important Safety
Information in the sections that follow.
Enjoy the WGPX. Please drive safely.
Sincerely,
The Whistler Group, Inc.
Enjoy
4
Whistler WGPX-545/550
Table of Contents
Contents
Introduction ........................................................................................................2-3
Safety Information................................................................................................. 5
Software ............................................................................................................... 6
FCC ...................................................................................................................... 7
Components.......................................................................................................... 8
Features ...........................................................................................................9-11
Front iew .............................................................................................................................. 9
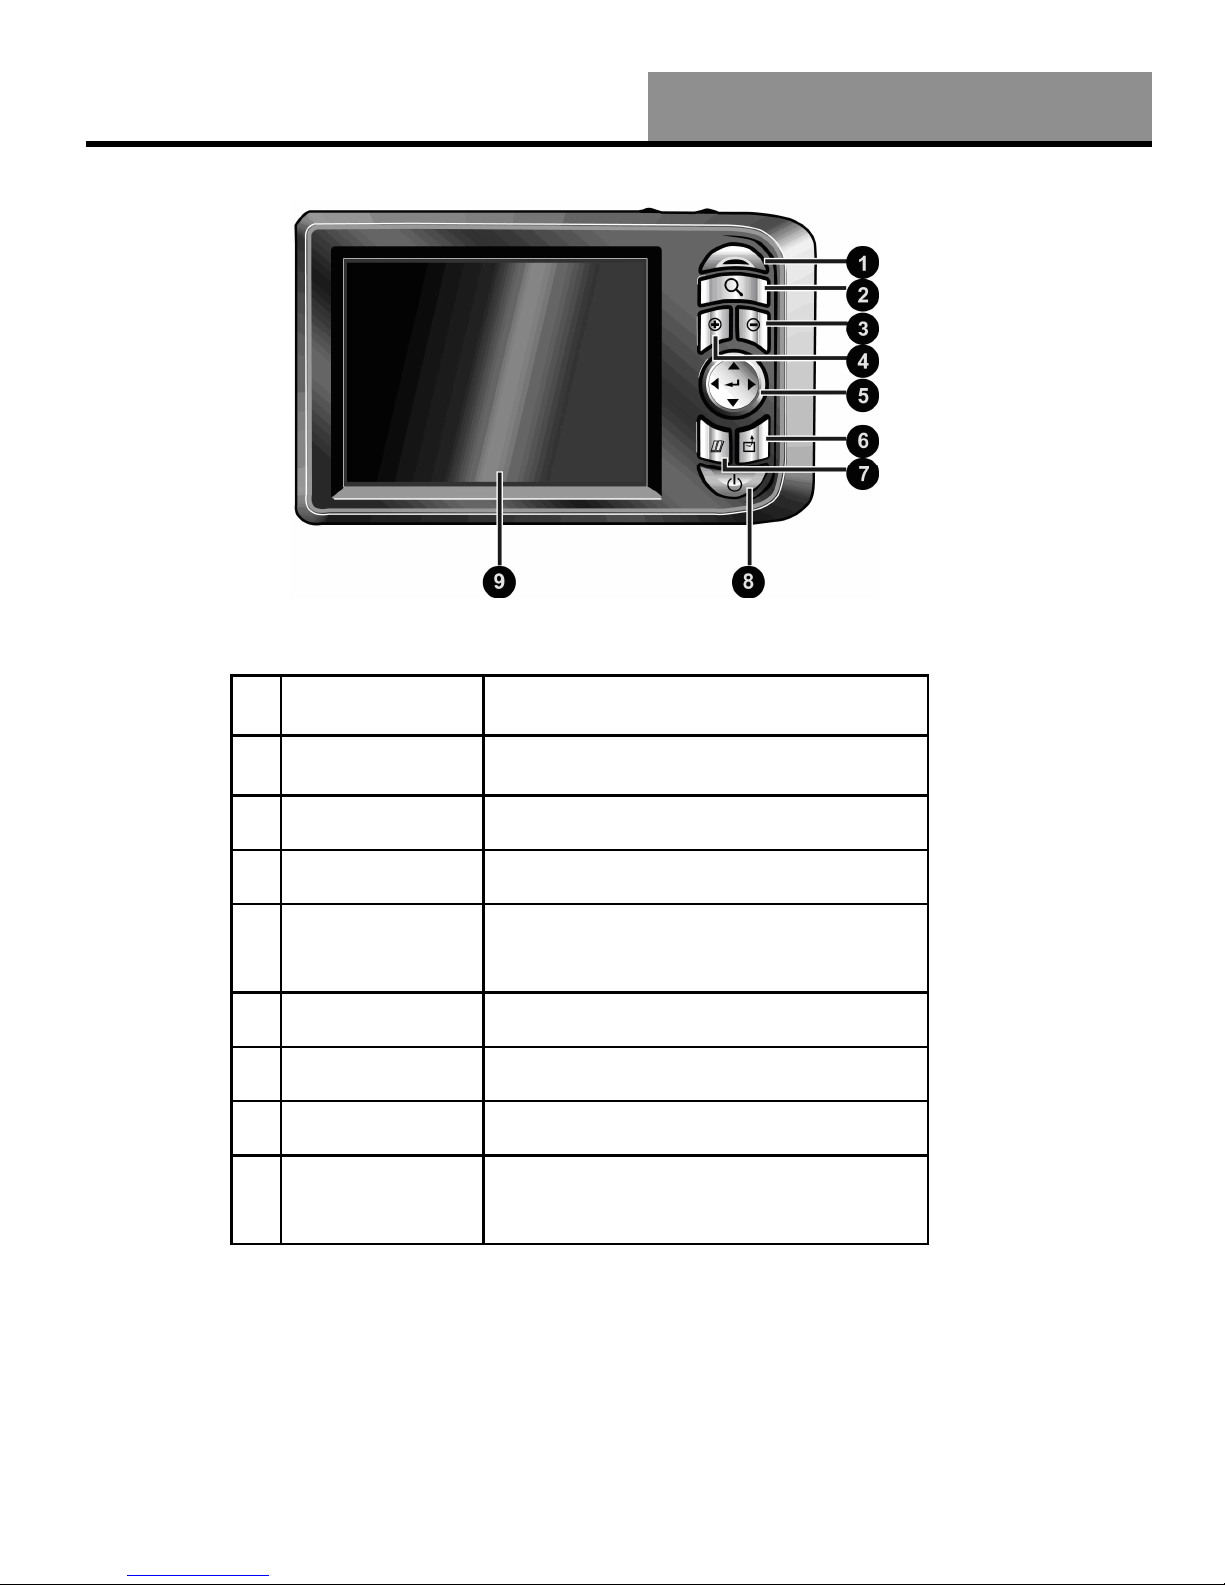
Rear iew ............................................................................................................................. 10
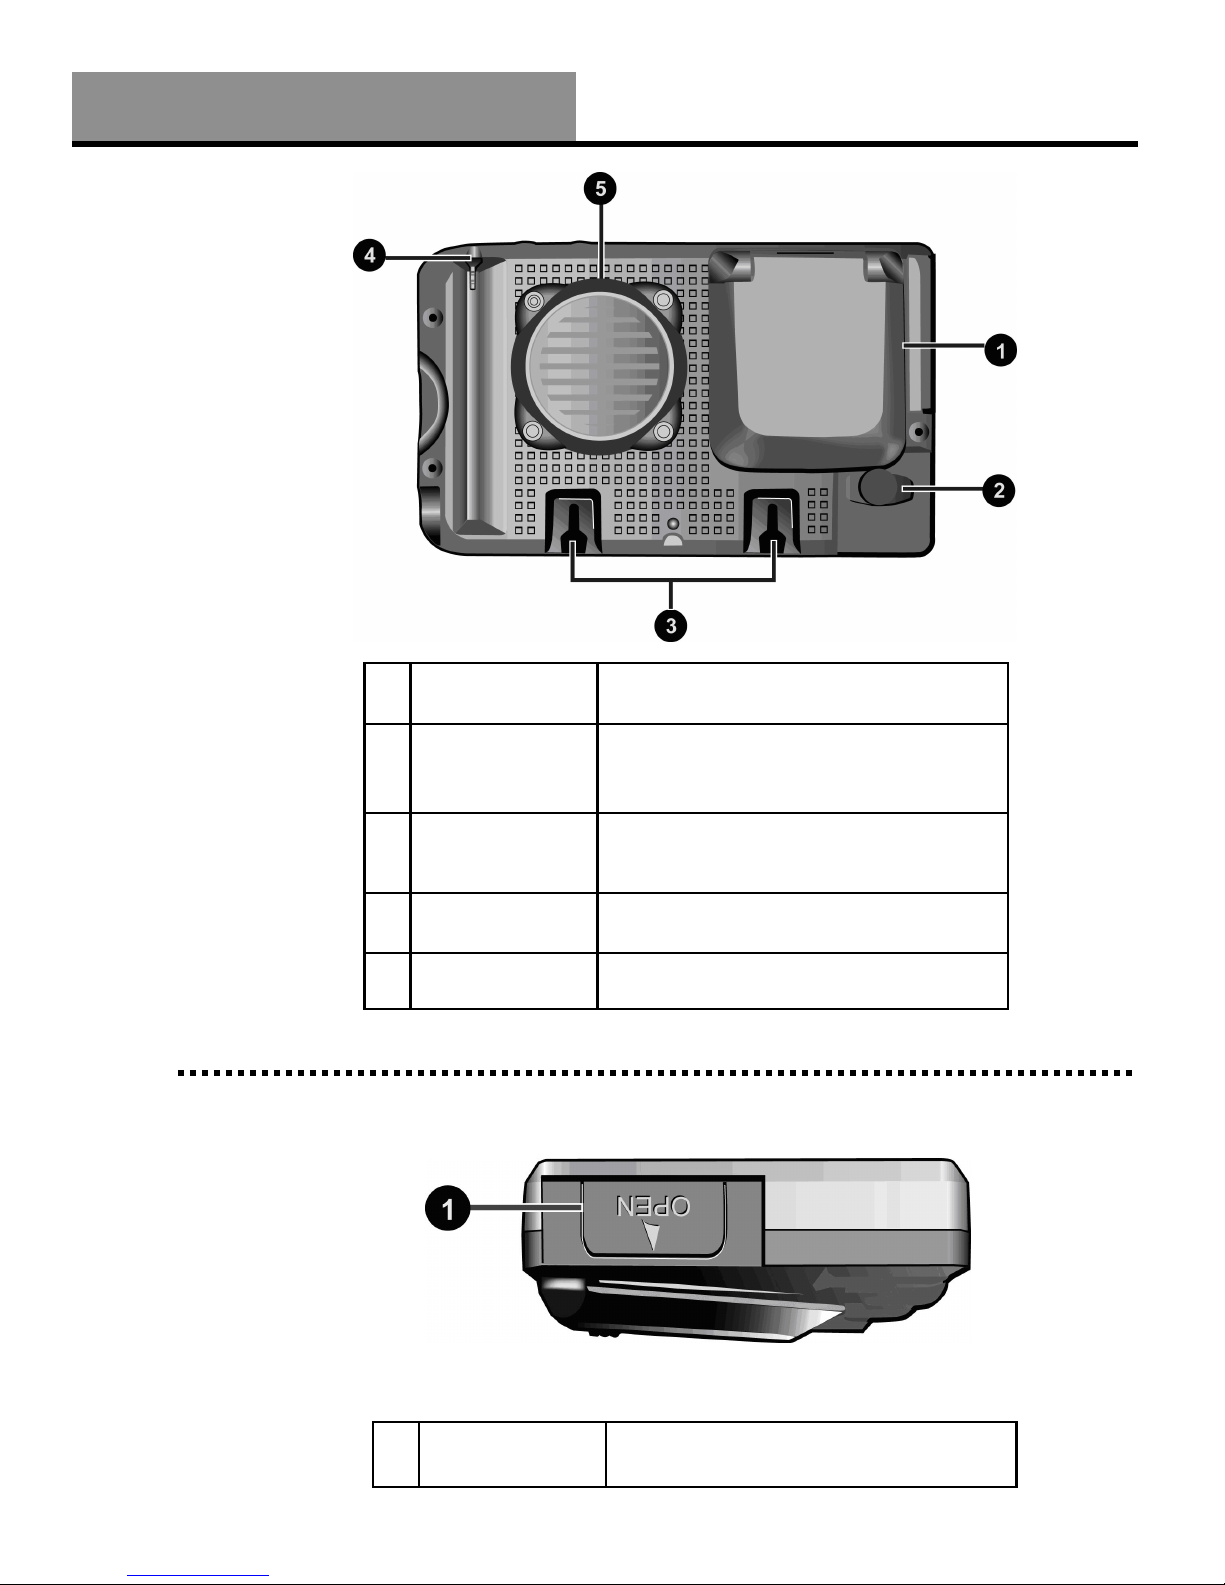
Left iew .............................................................................................................................. 10
Top iew .............................................................................................................................. 11
Bottom iew ......................................................................................................................... 11
Right iew ............................................................................................................................ 11
Battery Installation and Charging...........................................................................12
Battery Installation ................................................................................................................ 12
Charging the Battery—In Home ......................................................................................... 12-13
Secure Digital (SD) Card Information .....................................................................14
Inserting the SD card............................................................................................................. 14
Removing the SD card ........................................................................................................... 14
Installation......................................................................................................15-16
Assembling the Windshield Bracket.................................................................................... 15-16
Power Connection ................................................................................................................. 16
Operation.......................................................................................................17-29
Startup ................................................................................................................................. 17
Shutdown ............................................................................................................................. 17
Using the Function Buttons .................................................................................................... 18
Using the Stylus .................................................................................................................... 19
Functions of the Stylus ...................................................................................................... 19
Main Menu Items ....................................................................................................................... 19
Setting .................................................................................................................................. 19
Time................................................................................................................................. 20
olume ............................................................................................................................. 20
Warning Message .............................................................................................................. 21
Align Screen................................................................................................................. 21-22
Backlight Settings ......................................................................................................... 22-23
Help ................................................................................................................................. 24
GPS Reset......................................................................................................................... 24
Music .................................................................................................................................... 25
Starting Music Playback ................................................................................................ 25-26
Create Custom Playlist ....................................................................................................... 26
Photo iewer .................................................................................................................... 27-28
System Reset......................................................................................................................... 29
Care, Maintenance and Storage.............................................................................30
Troubleshooting ...................................................................................................31
Warranty Information ...................................................................................... 31-33
Specifications .......................................................................................................34
Accessories ..........................................................................................................35
5
Whistler WGPX-545/550
Important Safety Information
WA NING: It is the user’s responsibility to use this product prudently and maintain safe-driving
practices at all times. This GPS should be used only by someone able to clearly understand the
instructions and able to operate the controls. For proper safety we recommend that a passenger
operate the GPS unit. However, in cases where you are alone, it is recommended that you pull
over to make any adjustments to the GPS unit. It is also important to make sure that the unit is
secure, does not block the driver’s field of vision, and will not become a hazard in case of an
accident. Do not mount or place the GPS unit on an air bag equipped steering wheel or passenger
area. In case of an accident this can be deadly.
The Global Positioning System (GPS) is operated by the government of the United States, which
is solely responsible for its accuracy and maintenance. The system is subject to changes which
could affect the accuracy and performance of all GPS equipment.
Safety Information
X Do not secure in
front of airbag
X Do not loosely place
on dashboard
X Do not block
driver’s view
X Do not secure in
front of airbag
6
Whistler WGPX-545/550
The detailed mapping software is provided by NAVTEQ and Netropa. The detailed mapping
software is as accurate and detailed as possible. Whenever maps are digitized, there is still a
possibility that some inaccurate or incomplete data can be found. It is because of these
inaccuracies that the WGPX-545/550 is a travel aid and is not intended for precise measurement
in navigation or aircraft use.
Differences between manufactured and shipped versions of the software may be present; this
software may be updated frequently. If the descriptions in this manual are different from your
software version, please follow the software version currently on hand.
Software Use Terms
Copyright laws protect the WGPX’s operating system and internal mapping software. Whistler’s
wMap mapping software is copyrighted by their respective owners. Please carefully review the
software agreement information enclosed in the Whistler’s wMap Mapping Software User’s
Guide.
Note: By opening the DVD package you accept the terms and conditions listed in the agreement.
Once opened, the DVD package cannot be returned to the place of purchase.
Software
7
Whistler WGPX-545/550
FCC ID: JINAV-51XX
This device complies with Part 15 of the FCC Rules. Operation is subject to the following two
conditions:
(1) This device may not cause harmful interference, and
(2) this device must accept any interference received, including interference that may cause
undesired operation.
This equipment has been tested and found to comply with the limits for a Class B digital device,
pursuant to part 15 of the FCC Rules. These limits are designed to provide reasonable protection
against harmful interference in a residential installation. This equipment generates, uses and can
radiate radio frequency energy and, if not installed and used in accordance with the instructions,
may cause harmful interference to radio communications. However, there is no guarantee that
interference will not occur in a particular installation. If this equipment does cause harmful
interference to radio or television reception, which can be determined by turning the equipment
off and on, the user is encouraged to try to correct the interference by one or more of the following
measures:
• Reorient or relocate the receiving antenna.
• Increase the separation between the equipment and receiver.
Changes and modifications not expressly approved by the Whistler Group, Inc., may void the
warranty. Repairs should be made only by an authorized Whistler Repair Center.
FCC Compliance
8
Whistler WGPX-545/550
Packaging :
Components
1 2 3
4 5 6
7 8 9
10 11 12
• Cradle - accepts the 12 volt
power cord and windshield
bracket.
• SD Card—Preloaded with
detailed maps.
• Whistler Mapping Software
on DVD includes maps of the
United States and Canada.
• WGPX with color TFT LCD
touch screen display.
• Play MP3 music files that are
saved on the SD card.
• View JPG formatted photo
images.
1 WGPX Unit 7 USB/Power Cable
2 Windshield Mount 8 SD Memory Card
3 Interface Bracket* 9 Battery
4 Mounting Cradle 10 D D
5 DC Power Cord 11 Quick Guide
6 AC Adapter 12 Stylus
Note: Actual
accessory
appearances may
differ from the
drawings pictured.
* May not be
included.
WGPX Feature Highlights
9
Whistler WGPX-545/550
Features
1 Charge Indicator Displays the battery charging status
Red = Charging; Green = Charged
2 Find-Target
Hotkey
Press to quickly enter the destination window
3 Zoo Out Button Zooms out of the map/picture view
4 Zoo In Button Zooms in on the map/picture view
5 Directional Pad Press up/down/left/right keys to move around
onscreen or press the center of button to
select items
6 ESC Button Exits current operation
7 Menu Button Returns to the Main Menu window
8 Power Button Switches the power on/off
9 Touch Screen Displays system status. Use stylus to directly
input data or select items on the screen
Front View
Note: The unit has a protective plastic layer over the display screen. Remove this layer before use.
10
Whistler WGPX-545/550
1 Retractable Flip
up Antenna
Receives satellite signals– flip up 90
degrees to use
2 External
Antenna
Connector
For connection of an external antenna -
(MMCX type)
3 Cradle
Mounting
Location
Quickly secures the unit to the cradle
bracket
4 Stylus Use stylus to directly input data or select
items on the screen
5 Speaker Audio output
Rear View
Features
1 Battery Lid Open the battery lid to replace/remove the
rechargeable battery
Left View
11
Whistler WGPX-545/550
Features
Top View
1 Reset System reset button – press to reset
2 Volu e Control Adjusts the volume level
Botto View
1 USB/Power
Connection Port
Dual function port for USB connector and
charger
Right View
1 Headphone
Jack
Connection to external headphones
2 SD Me ory
Card Slot
Location for the preloaded SD memory
card. The maps are saved on this memory
card. Do not remove this card while in use.
12
Whistler WGPX-545/550
Battery Installation
Follow these procedures to install the rechargeable battery:
1. Open the battery compartment cover by following the steps in Figure 11A.
2. Insert the battery (remove battery from bag) while observing correct polarity (+) and (-), as
shown in Figure 11B.
3. Close battery compartment cover.
Note: Charge and remove the battery when the unit will not be used for a long period of time.
Damage caused by a leaky or improperly charged battery is not covered under warranty. Check
with the battery manufacturer about their specific product warranty and disposal recommendations.
Charging the Battery - In Home
Before using the GPS for the first time, we strongly suggest you fully charge the battery.
1. Insert the USB connector into the AC adapter.
2. Insert the other end of the USB cable into the power port under the GPS unit.
3. Plug the AC adapter into a wall outlet.
Battery Installation and Charging
Fig 11A Fig 11B Fig 11C
13
Whistler WGPX-545/550
Charging the Battery - In Home (Continued)
When charging starts, the charging indicator light will be red. Please wait for the charging to
complete (this might take several hours). The indicator light will be green when charging is
complete.
This device uses a Lithium-Ion battery, please note the following:
• Please do not charge in a hot environment or expose to direct sunlight.
• Lithium-Ion batteries do not need to be discharged. Do not wait until the battery is depleted to
recharge.
• When not in use for a long period, charge the battery and remove it from the unit. To store the
battery; insert the battery into the GPS unit with the (+) and (-) terminals near the battery door.
Battery Installation and Charging
14
Whistler WGPX-545/550
Secure Digital (SD) Card
The unit is equipped with a SD memory card slot. Purchasing SD (Secure Digital) cards will
expand the memory capacity.
Inserting the SD card:
Insert the memory card as shown below: With the metal contacts of the memory card facing back,
insert the card into the slot on the left side of the unit (as shown below). Gently press until it locks
in place.
Secure Digital Card (SD) Info.
Standard SD/MMC
type memory card.
SD shown
unlocked
emoving the SD card:
1. Gently press the top of the memory card, and the card will
eject automatically.
2. Then gently pull the memory card to remove.
Note:
• The included memory card contains the digital map files
that are required for the GPS navigation data. Please do
not delete.
• When removing the memory card, please make sure the
card is not reading data, or it will cause a system crash.
• Do not set the SD memory card as write protected (locked)
or the system will not operate properly.
Note: Remove SD card
with unit off and not
installed on the cradle.
15
Whistler WGPX-545/550
Assembling the Windshield Bracket
The included windshield bracket set can be securely placed on the front windshield. This device will effectively
secure the GPS unit to the vehicle’s windshield. Note: Not recommended for motorcycle use with supplied bracket.
Follow the procedures below to secure the bracket:
1. Follow the arrows and slide component A into component B fitting holes to secure. Note: If item B is not
included, continue to the next step.
2. Follow the indicated directions and insert component B into slots on cradle C, slide in the direction indicated by
the arrows to secure.
3. Once the cradle is secure, bend the bracket arm as shown below. Remove the protective plastic that may be
covering the suction cup. The bracket may not adhere to the windshield with this plastic on the suction cup.
4. Press the locking tab toward the windshield to secure the suction cup to the windshield, ensuring the cradle is
resting firmly on the dashboard as shown below.
Installation
• Please note the directions of the arrows,
when fitted, the assembly should be
tight. If these directions are not
followed, a loose fit will result and
components must be reassembled.
16
Whistler WGPX-545/550
Assembling the Windshield Bracket—Continued
5. Finally, insert the GPS unit onto the cradle as shown below.
Important notes:
• When using the windshield bracket, do not install in a location that will block the view of the driver.
• The bracket cradle should be resting securely on the dashboard to prevent excessive vibration.
Power Connection
While the GPS in sitting in the cradle and the included power cord is plugged into both the cradle and the cigarette
lighter, the battery is charging.
1. Insert the small plug into the power jack on the rear of the bracket cradle.
2. Insert the other end of the power cord into the cigarette lighter.
Installation and 12 Volt Power
Flip
antenna up
17
Whistler WGPX-545/550
First Time Use
The unit has a protective plastic layer over the display screen. Remove this layer before use.
Startup
Press and hold the power button for about two seconds to turn on the power. A warning page is
displayed followed by the unit’s main menu which consists of four functions: GPS, Music, Photo,
and Setting. Use the directional pad (see page 18) or tap the icon using the stylus or a finger to
select that function.
Operation
GPS Loads the navigation program and navigation screen
Music Plays MP3 music files only
Photo Displays JPG images only
Setting System adjustments and operation instructions
Battery Gauge
Time
Power Button
Shutdown
Important: Exiting Current application is
necessary before turning off GPS unit!
Press the power button to turn the unit off.
Main Menu Screen
Starts GPS
Program
Note: Model WGPX-550
screen images shown
throughout manual,
WGPX-545 images
similar.
18
Whistler WGPX-545/550
Using the Function Buttons
Control the main functions with the buttons on the right hand side.
Operation
1 Find-Destination
Hotkey
Fast forward to the destination window. This
window provides 6 location searches
enabling quick setting of destinations. Also
allows switching to full screen viewing in
Photo iewer.
2 Zoo -Out Zooms out of the map
3 Zoo -In Zooms in on the map
4 Directional Pad Pressing up changes map view. Pressing
down turns Mute on or off. Press left/right
keys to change pages.
5 ESC Key Exits current operation—limited function in
GPS mode
6 Menu Directory Returns to the main menu
7 Power Button Switches the power on/off
19
Whistler WGPX-545/550
Using the Stylus
The stylus is an optional tool instead of using a finger to tap the screen for operating this unit. Use
the stylus to select icons/items on the screen or scroll around the map. The stylus is concealed in
the pen slot on the back; pull out and extend for easy usage. Replace the stylus after use to prevent
it from being misplaced.
Functions of the stylus:
Selection:
Use the stylus point to select items and functions onscreen. On
the map display, select the street or indicators on the map for
details of building or road names.
Drag:
Touch the stylus point on the screen and drag to scroll around the
map for a specific location or landmarks.
Select and hold:
Select the item/icon and hold for a second to show the floating
context menu, and then select the item to be executed.
Main Menu Items
Setting
The setting function gives you the ability to adjust the basic system options, including time
settings, volume control, screen calibration, startup message, backlight setting, version info, and
GPS reset, etc. You can modify these settings according to personal preferences.
Select “Setting” from the main screen to go into the System Settings window.
Operation
Setting menu
selected
20
Whistler WGPX-545/550
Main Menu Items—Continued
Syste Settings - Time
1. Select either 12 or 24 hour clock setting (12 hr default) format.
2. Select from the “Hour” pull down menu and choose the correct number.
3. Select from the “Minute” pull down menu and choose the correct number.
4. Select to confirm, or select to keep original settings. Unit will then return to the main
menu.
Syste Settings - Volume
Control the volume directly with the scroll bar or tap the (+) or (-) speaker icons. There are six
levels of volume options.
Operation
Time adjustment
Volume adjustment

Other manuals for WGPX-545

1

This manual suits for next models

1

Other Whistler GPS manuals

Whistler Whistler WGPX-635 Instructions for use

Whistler

Whistler Whistler WGPX-635 Instructions for use

Whistler GolfDigest GLF-125 User manual

Whistler

Whistler GolfDigest GLF-125 User manual

Whistler GPS User manual

Whistler

Whistler GPS User manual

Whistler GolfDigest GLF-100 User manual

Whistler

Whistler GolfDigest GLF-100 User manual

Whistler WGPX-545 Instructions for use

Whistler

Whistler WGPX-545 Instructions for use

Whistler Whistler WGPX-635 User manual

Whistler

Whistler Whistler WGPX-635 User manual

Whistler GPS100 Troubleshooting guide

Whistler

Whistler GPS100 Troubleshooting guide

Whistler Whistler WGPX-635 Instructions for use

Whistler

Whistler Whistler WGPX-635 Instructions for use

Whistler GPSMOD2 User manual

Whistler

Whistler GPSMOD2 User manual

Popular GPS manuals by other brands

GoPass AVL-901 Package Contents

GoPass

GoPass AVL-901 Package Contents

Seeworld S117 user manual

Seeworld

Seeworld S117 user manual

TRACKR bravo Reviewer's guide

TRACKR

TRACKR bravo Reviewer's guide

NAL RESEARCH CORPORATION SHOUT mcc quick start guide

NAL RESEARCH CORPORATION

NAL RESEARCH CORPORATION SHOUT mcc quick start guide

Vizualogic RoadTrip RT-043A manual 

Vizualogic

Vizualogic RoadTrip RT-043A manual 

Magnadyne M1-NAV Operation and installation manual

Magnadyne

Magnadyne M1-NAV Operation and installation manual

Cobra GPSM2500 Getting started guide

Cobra

Cobra GPSM2500 Getting started guide

3M Opticom installation instructions

3M

3M Opticom installation instructions

Fugro OmniSTAR 3200LR12 user manual

Fugro

Fugro OmniSTAR 3200LR12 user manual

PFO tech Bracelet quick start guide

PFO tech

PFO tech Bracelet quick start guide

Spireon Flex2-L user manual

Spireon

Spireon Flex2-L user manual

Digital Matter Oyster Sigfox Getting started guide

Digital Matter

Digital Matter Oyster Sigfox Getting started guide

SinoCastel T229L user manual

SinoCastel

SinoCastel T229L user manual

Leica MX400 operating instructions

Leica

Leica MX400 operating instructions

Gemini Gemtek PT300 user manual

Gemini

Gemini Gemtek PT300 user manual

RightWay Trine XL Version 1.0 user manual

RightWay

RightWay Trine XL Version 1.0 user manual

Bushnell Hybrid Laser GPS quick start guide

Bushnell

Bushnell Hybrid Laser GPS quick start guide

Zte Charm Ring R1 Operation manual

Zte

Zte Charm Ring R1 Operation manual

manuals.online logo
manuals.online logoBrands
  • About & Mission
  • Contact us
  • Privacy Policy
  • Terms and Conditions

Copyright 2025 Manuals.Online. All Rights Reserved.