White Formula Whisper User manual

User Manual
By

Index
1. Trampoline
2. Main Foils
3. Spinnaker Pole
4. Mast Setup
5. Mast Rigging
6. Rig Tension
7. Trapeze Lines
8. Rudders
9. Boom
10. Main Sheet and Traveler
11. Main Sail
12. Downhaul
13. Hosting the Jib
14. Jib Sheets
15. Spinnaker Setup
16. Spinnaker Sheets
17. Foil Setup
18. Capsize
19. Do’s & Don’ts
20. Damage Reduction

•Feed front bolt rope though the track under the main beam (1)
• Place the trampoline rod though the back of the trampoline (this will be used to help tighten the trampoline) (2)
• Feed both side bolt ropes down the side tracks, pulling each side a few inches at a time. (3)
• Feed the trampoline lacing strip though the track under the rear beam (5)
• Use trampoline line to tighten the two together (7)
•Feed rope though the eye around the rod (use a fid to help with this) and back though the same eye and move along to the next eyelet (6)
• The tighter the better, this will help to create a stiffer platform.
Trampoline
1
1 2
765
43
8

• This can be done with the mast down or up (but you may find it a little easier
without the mast up)
• When inserting the main foils it has to be done before the rudders are attached
• Take off the cleat and ride height adjuster
• Make sure that the stern of the boat is sitting on a padded ground
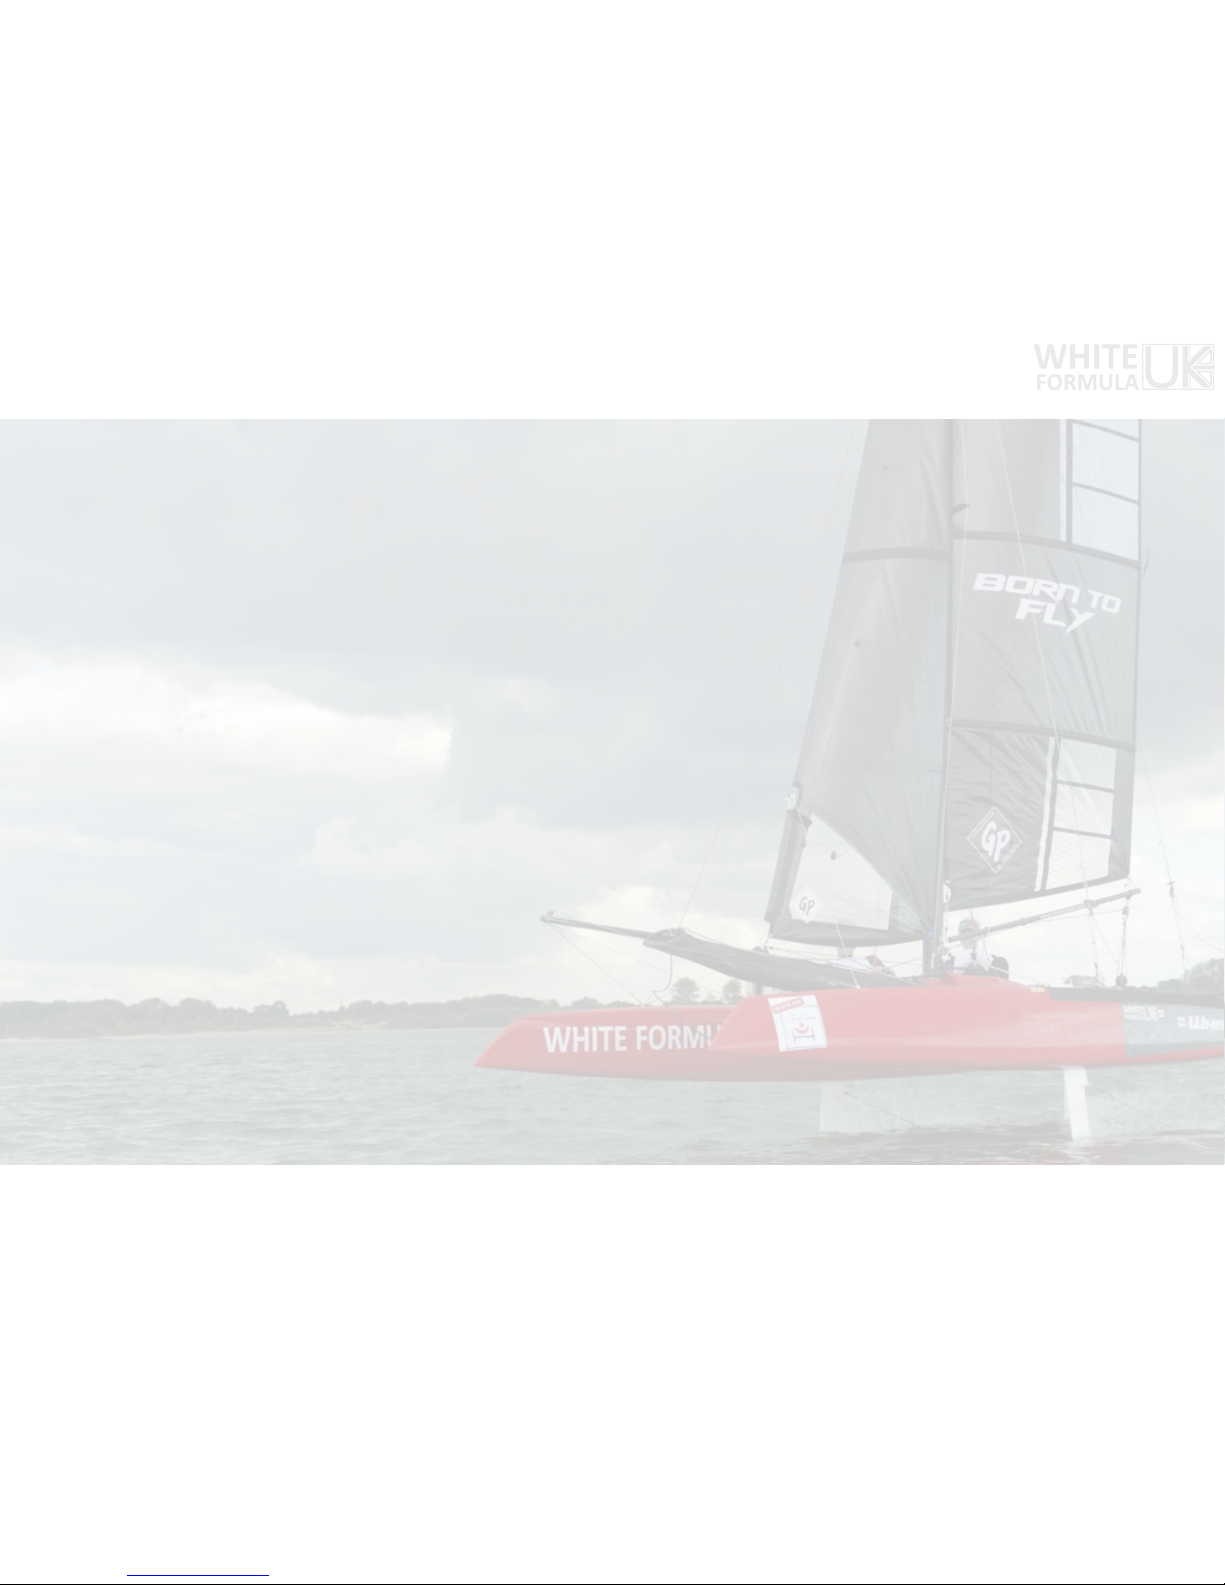
• Lift the bow of the boat high enough to slide in one foil from underneath, make
sure that the inspection hole in the side of the foil is facing inboard (1)
• If doing this with only two people put the opposite foil to the bow that’s being lifted,
this will help with stability
• Bring the bow back down put the cleat and ride height adjuster back on
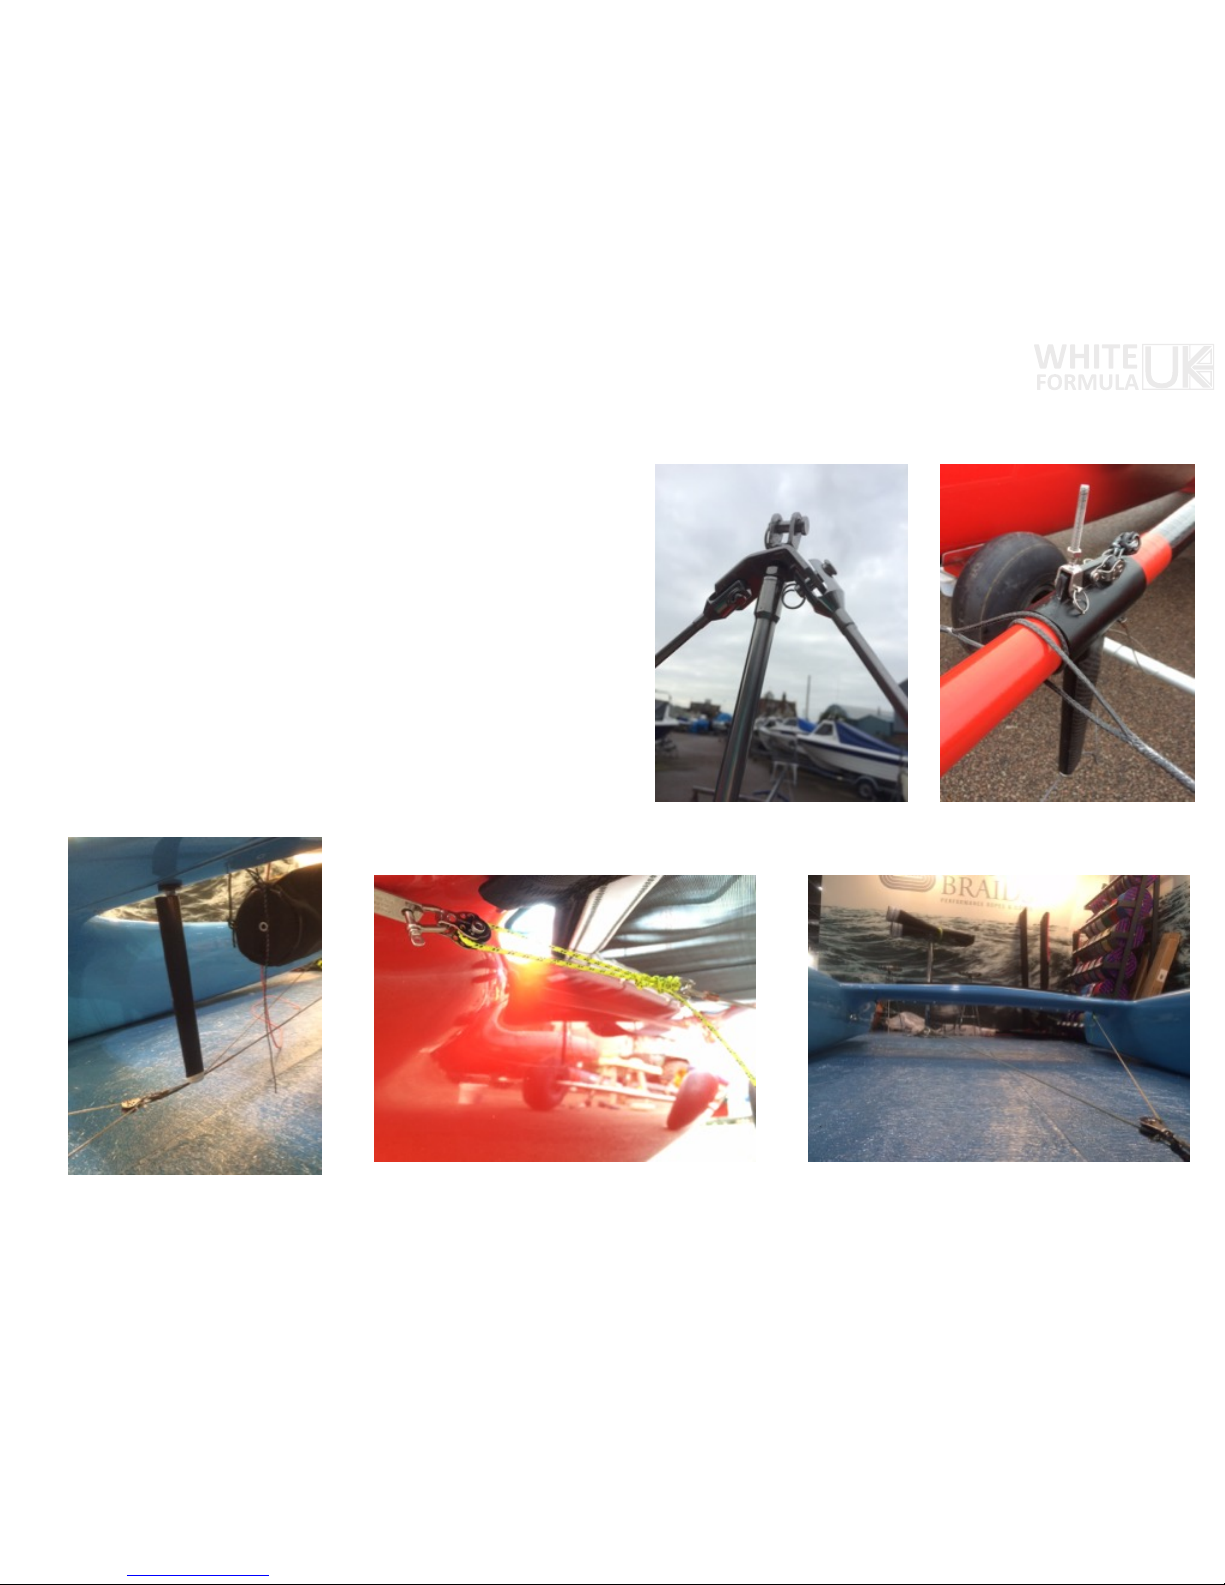
• Feed the ride height adjuster line through the fitting as shown in photo (4)
• Tie the foil in place, wrap some rope around the main beam and around the T
section of the foil (this will stop the foil dropping down when you lift up the other
side)
• If doing this with the mast already up you can just run the foil strop though the eye
on the trapeze and though the cleat on the foil, this will hold the foil up
• Repeat this process with the other foil (5)
Main Foils
2
1
2345

• Slot both ends of the spinnaker pole together (1)
• Place the pin into the pole mount on the main beam (2)
• Attach the whisker lines to the bridle wire and shackle to the eyelets on the bow (3)
• Use the velcro to attach the bag to the pole (4)
• Tie on the spinnaker bag using the eyelets under the pole and main beam (5)
• Its worth keeping the tension lines and striker in the spinnaker bag until you need them, this will help
to keep things neater (7)
Spinnaker Pole
3
1 2
3 4 5 6 7

• Place the trapeze lines on each side of the mast (one red and one green on each side)
• Make sure the trapeze line with the stainless eye just above the handle is the front one, this will be
used to hold the foil up when on land.
• Place the forestay, both shrouds and jib block on the lower shackle make sure that the shrouds are
on the out side and the jib halyard and forestay are in the middle (see photo).
• Run the jib halyard through the loose block with the shackle attached, then run the halyard back up
though the top block, and tie the sacrificial jib halyard on, as it wont have enough length by its self
(see diagram)
• Run the kite halyard down the mast, make sure the end which will attach to the kite head is in front
of everything with the other end behind everything then running thought the cleat at bottom.
• It is better if you tie off everything at the bottom of the mast to stop the lines getting tangled when
erecting the mast Shroud
Trapeze
Forestay
Jib Halyard
Mast
Block
Jib halyard
Sacrificial
halyard
Jib shackle
Hounds
Mast Setup
4

•When attaching the shroud to the platform use the bow shackle to attach though the eye with the
spinnaker sheet block facing forward (1)
•To make the erection of the mast easier place the shrouds on the top hole on the shroud plate and
adjust afterwards accordingly
•Screw on the stainless striker to the top plate, put just enough to hold the mast as you want this to be
as long as possible (2)
•Place the foot of the mast on the ball on the main beam, with the mast rotated at 90 degrees. This will
help stop the mast jumping off the ball when erecting it (3)
•Take one trapeze handle and stand in front of the mast, this will be used to help pull up the mast
•The second person will stand at the top end of the mast and walk the mast up keeping it a 90
degrees, the person at the bottom of the mast should make sure that the mast doesn't want to
jump of the ball until there is a suitable amount of downward force to stop that (only when the
mast is between 90 - 50 degrees)
•When erecting the mast place the eye of the forestay though the top pin on the stainless striker. (5)
Rigging the Mast
5
1 2
3 4 5 6

•To attach the spinnaker pole to the forestay take the stainless striker and screw it to the
thread on the bottom of the forestay and put a couple of turns on, this will work as a
bottle screw so it will tighten up from both top and bottom as you screw it up
•Keep screwing until you are happy with the mast rake
•Take the second (loose) carbon striker and place it over the long threaded rod coming
out of the bottom of the main beam (3)
•Split the wire behind the carbon striker and shackle the starboard end to the starboard
plate under the rear beam (this is under the trampoline) (5)
•Then lash the port end through the pull on the port side and tighten up accordingly to
how much rig and pole tension is required (4)
•Noted it is very important to have a solid amount of tension on this as its the
only thing supporting the main beam, it is not advisable to go sailing with loose
striker tension. We suggest a minimal reading of 17 on the loos gage.
Stainless Striker & Rig Tension
6
1 2
354

•Feed the trapeze bungee through the eyes on the trampoline, pulling it under the
tramp and poke it though the eye on the opposite side of the boat (1)
•Place a bowline in each end of the bungee
•Feed the trapeze line through the bottom hole of the trapeze handle with a stopper
knot in the other end (2)
•Feed the trapeze line though the block on the stainless loop (3)
•Take the trapeze rope back up to the trapeze handle and feed it through the cleat (4)
•Place a stopper knot in the end of the rope but leave enough of a tail so you still
have some rope to pull your self up with
•Pull the bungee bowline though the small gap between the pulley and the stainless
loop and hook it over the stainless loop (5)
•Make sure that trapeze with the metal eye above the handle are the forward ones
this will be used in keeping the foils up when on land (7)
•Repeat on the other trapezes
Trapeze
7
1
76543
2

•Take off the rope at the top of the rudder and slide the rudder stock over the rudder, this should be a nice tight fit (1)
•Make sure the bungee loops around the foil as this will help keep the foil up when sailing in shallow water
•Put the rope back in, this will be used as a handle to pull up the rudders on the water
•Loop the bungee over the bottom of the rudder and back thought the bobble this will hold the rudder up when on land (2)
• Drop the rudder stock over the top pintle and slide the bolt thought the bottom pintle (make sure the tiller arm is bending inwards)
• Tighten up, tight enough to stop any play in the stock but not so that is gives friction when steering
• Clip the connecter bar to the two rudder stocks (3)
•Clip on the tiller extension
Rudders
8
1 32

•Unscrew the flat shackle on the bottom of the mast and insert eye on the end of the
boom though the shackle and tighten up (1)
•Feed the mast rotator line though the pulley on the stainless spanner (the bracket on
the bottom of the mast) and back though the original cleat (2)
•To attach to the the boom to the main sail run the out-hull through the eye of the clue of
the main sail and with a stopper knot in the end place it in the grove, this is adjustable
from the cleat under the boom (3)
•Then feed main strop though the eye of the clue and loop the splice of the bobble
Boom
9
1 432

•Run the traveller line through the traveller block and cleat (1)
•Feed the split line through the trampoline holes under the rear beam, leaving one hole
in the middle (2)
•Put the bobbles on each end and tie off with a stopper knot, you want the split of the
line to meet just before the cleat when it is centred this will help stop play in the
traveller
•Shackle the bottom set of blocks to the traveller car (3)
•Tie each end of the traveller and main sheet together
Main Sheet & Traveller
10
32
1

•Firstly make sure you battens are tightened up correctly according to the wind and your settings (1)
•To hoist the main sail put the main shackle on the head of the main sail with the stopper knot facing forward (2)
•Hoist the main with one person feeding the bolt rope of the main sail and the other pulling the main halyard from the very bottom
pulley on the mast
•To ensure the mast hooks on the top make sure you keep the straight inline with the sail
•When its hooked on just feed bottom part of the sail down the rest of the track
•Coil the main halyard and place in the trampoline pocket
•When unhooking the main sail you will need to pull the sail off the hook then rotate the mast in the opposite direction to the sail and
pull it down before releasing the mast
Main Sail
11
321

•Setting up the downhaul, run the down hall rope thought the blocks at the bottom of
the mast (1)
•Run the downhaul rope back a forth though the pulleys and out of the opposite block
attached to the mast (2)
•Run the downhaul rope thought the front eye in the trampoline (3)
•Connect the rope to the bungee underneath the trampoline (4)
•Tie the bungee to the shackles at on the back corners underneath the rear beam (5)
Downhaul
12
1 2
3 4 5

•Take the head of the jib and attach the shackle which has the pulley attached to it
•Take the sacrificial jib halyard and put until the beginning of the zip is just above the stainless striker
•Close the zip around the forestay with the halyard inside
•As the jib is hoisted keep closing the zip until its at the top
•Close the zip bellow the forestay with the halyard inside
•Un-tie the sacrificial jib halyard and coil it place it in the trampoline pocket (do this after the jib is secure)
•Feed the halyard through the middle block on the carbon pole striker and loop the jib downhaul line through the halyard and
back into its cleat
•Take the jib strop and feed it through the eye of the tack of the jib and though the eye on the carbon pole striker and loop the
splice over the bobble
•Put the jib downhaul to the appropriate settings
Hoisting the Jib
13
1 2

•Run the jib sheet through the cleat and block in the middle of the main beam (1)
•Pass the sheet through under the jib track whilst going through the port eye on the
spinnaker mount (2)
•Feed the sheet through the very back pulley on the spinnaker striker (3)
•Run the sheet through the block on the jib track
•Pass the sheet through the pulley that will be shackled onto the jib
•Feeding the sheet back to the previous block and tie it off
Jib Sheet
14
1 2 3 4

•Tie the free end of the spinnaker halyard to the stainless bridle wire
•With the other end of the halyard run it thought the cleat about 1m from the bottom of
the mast, then feed that though the eye in the front middle of the trampoline(1,2)
•Pass it though the spinnaker shoot and tie it off at the mouth of the chute (3,4,5)
•Take the tack line and pass it though the cleat on the starboard side of the mast on the
main beam, feed the other end through the eye on the pole mount and along the
spinnaker pole passing it up through the block on the end of the pole. Make sure its
above the whisker lines. (6,7,8)
•Tie a bowline to the tack of the spinnaker with tack line
•Tie a bowline on the head of the spinnaker with the free end of the spinnaker halyard
(the end tied to the striker)
•With the other end of the spinnaker halyard you need to pass it though bottom rope
loop on the spinnaker then up to the top one and tie it off with a bowline, its best to
have these rope loops facing inwards as it easier to set up (starboard tack). If they are
facing outward you will need to take the halyard under the foot of the spinnaker and
then up through the rope loops.
Spinnaker Setup
15
8
76
543
21

•Place one end of the spinnaker sheet through the tack of the the spinnaker and tie off
with a stopper knot
•With the other end of the sheet run it around the out side of the stainless bridle wire
and then feeding it though the spinnaker block. Make sure it follows the arrows on the
block this shows the direction of the ratchet
•Run the sheet across the boat and though the opposite spinnaker block and back to
the spinnaker clew
•Make sure that the sheets are set up inside the spinnaker luff to make sure the kite will
jibe inwards
Spinnaker Sheet
16

Rake control
settings
Foil Lockdown
Rope
Rake
control
Ride Hight Adjuster
Foil Lockdown Cleat
•Ride hight adjuster is their to help adjust the high in which the foils stop lifting (how high you fly) the lower the pin on the top the higher you will fly
•The rake adjuster is their to adjust how much lift the foil gives, so the lighter the wind the higher the number, remember the higher the number the more
drag so ideally you want to sail on the lowest number possible.
•When setting up the foils we suggest that you start with the following and adjust accordingly
•A 3mm gap with the trim tap pointing upwards when the wand is all the way down, this should give you lift to about 45 degrees angle on the wand
•Rake adjuster set between 2 and 4
Foil Setup
17
Wand
Spade /
Skimmer
Trim tab

•The first thing to do in the event
of a capsize is to spin the bows
of the boat to windward. This is
done by holding on to the bow
with your body in the water,
using your body like an anchor.
•Then climb onboard the hull but
be careful not to step to forward
of the main beam as there are
no bulkheads in the bows of the
boat (see photo)
•Un-cleat the jib and mainsail but
keep the traveler centred
•Then throw the capsize line over
the hull of the boat (yellow line
in picture). If you don't have one
already tied on you can use the
spinnaker sheets. You must tie it
from the base of the mast.
•With your body lean out while
holding on to the rope. Do not
stand on the foil as it is not
designed to take your weight
•This will bring the boat back
upright.
Capsize Protocol
18
NO STEP
Table of contents
Popular Boat manuals by other brands

Intex
Intex Challenger K2 owner's manual

Nortik
Nortik Packraft TrekRaft Assembling Instruction

Jeanneau
Jeanneau LEADER 8 owner's manual

Horizon Yacht Charters
Horizon Yacht Charters Bavaria 32 2012 Information & operation manual

Bavaria
Bavaria VIRTESS 420 owner's manual

orangemarine
orangemarine OMA-P5080-040401 Handbook

Aquaglide
Aquaglide BLACKFOOT HB ANGLER SL owner's manual

Boston Whaler
Boston Whaler 235 Conquest manual

Aquaglide
Aquaglide Blackfoot HB 2 owner's manual

Bavaria Yachts
Bavaria Yachts BAVARIA 44 - 3 cabins Manual for owners and skippers

Sea Ray Boats
Sea Ray Boats SDX 290 manual

Hunter Marine
Hunter Marine 410 Operator's manual