Wieland podis CON User guide

Wieland podissystem
Manual V 1.03 / ref. no. 00.000.0059.0 / 28.03.2001
podissystem manual
Part 1: podisCON - Energy bus
Part 2: podisDRIVE – Distributed motor control units
Ref. no: 00.000.0059.0
Version: 1.03
Issue date: 08.01.2001
Last modified: 28.03.2001

Wieland podissystem
Manual V 1.03 / ref. no. 00.000.0059.0 / 28.03.2001
I About this manual
This system manual is directed at qualified staff with
training in PLC programming, electrical engineers or staff
instructed by electrical engineers who are authorised to
commission, earth and label devices, systems and
circuits according to safety standards.
This system manual describes the components,
installation, commissioning and maintenance of the
podissystem. The total system is composed of the
energy bus podisCON and the motor control units
podisDRIVE. As an energy bus system, podisCON
is an independent system which supplies all types of
installations with both primary and control voltage.
The motor control units podisDRIVE require the use of
podisCON components. They are specially geared to
the properties of podisCON components and enable
the control of connected loads via the field bus coupler
which is integrated in the motor control units.
The two parts of the podissystem are described
separately in this manual. If you have purchased podis
CON components, you will receive the first section of the
manual. You require both sections of the manual to
operate podisDRIVE.
At WIELAND ELECTRIC GmbH, your satisfaction with
our products is of primary importance. If you have any
ideas or suggested improvements for this manual, we
would be happy to receive them.
If you have any queries about the manual or parts of the
podis
system, please direct your questions to the
following address:
Wieland Electric GmbH
Brennerstraße 10-14
96052 Bamberg
Tel.: 0951 9324 0
Fax : 0951 9324 198
Email: info@wieland-electric.com
If you have any technical queries, please contact our
hotline on 0951 9324 358.
Who is the manual intended for?
What is the scope of the manual?
User-friendly
Contact address
Hotline

Wieland podissystem
Manual V 1.03 / ref. no. 00.000.0059.0 / 28.03.2001
II Using this manual
Before reading the manual, please familiarise yourself with the
table of contents. This will provide you with an immediate
overview of the manual.
Please note the warnings and safety notes in particular. These
are denoted by the following symbols.
Means that death, serious risk to health or
considerable damage to property will occur if
the appropriate warning is disregarded or not
sufficiently heeded.
Means that risk to health or considerable
damage to property will occur if the appropriate
warning is disregarded or not sufficiently
heeded.
Means that damage to property will occur if the
appropriate warning is disregarded or not
sufficiently heeded.
Means that death, risk to health or damage to
property may occur if the appropriate warning
is disregarded or not sufficiently heeded.
Emphasises an important piece of information
which affects the handling of the devices or the
respective section of the manual.
DANGER
WARNING
CARE
CAUTION
i
NOTE

Wieland podissystem
Manual V 1.03 / ref. no. 00.000.0059.0 / 28.03.2001
Part 1:
podis
CON – Energy bus
Proofing status of podis
system manual, part 1
Date Publication Version Proofing
status
Proofing
status (old)
Edited
(new)
08.01.2001 podis manual part 1 1 (draft) 00 - TK
18.01.2001 podis manual part 1 1 (draft) 01 00 TK
12.03.2001 podis manual part 1 1 (draft) 02 01 TK
28.03.2001 podis manual part 1 1 03 02 TK

Wieland podissystem
Manual V 1.03 / ref. no. 00.000.0059.0 / 28.03.2001
All rights are reserved. This publication including the
diagrams is copyrighted. Any use of this publication
that deviates from these conditions is not permitted.
No reproduction, translation, electronic or
photographic archiving or modification can be carried
out without written permission from WIELAND
ELECTRIC GmbH. Any violations incur a claim for
compensation.
WIELAND ELECTRIC GmbH reserves the right to
make changes for technical progress. WIELAND
ELECTRIC GmbH reserves all rights regarding the
issue and protection of patents and designs. Products
from other manufacturers are always named without
patent rights. The existence of these rights cannot
therefore be ruled out.
WIELAND ELECTRIC GmbH does not accept any
liability for mishandling and damage caused to
Wieland products, third-party products or persons
when the notes in this manual are disregarded.
Changes of any type to Wieland products as regards
hardware or software are excluded from liability on the
part of WIELAND ELECTRIC GmbH.

Wieland podissystem
Manual V 1.03 / ref. no. 00.000.0059.0 / 28.03.2001
Overview of the contents
System manual, part 1
I About this manual
II Using the manual
Proofing status of podis
system manual, part 1
1 Structure and use of the energy bus system
1.1 General structure
1.2 Areas of application
1.3 Performance data for flat cable
1.4 Permitted use
1.5 Additional devices
1.5.1 Monitoring and protective devices
1.5.2 Loads (three-phase asynchronous motors)
1.6 Flat cable outlet
1.7 Sealing ends
2 Fixing and exchange
2.1 Wiring instructions
2.2 Cable clips
2.3 Flat cable outlets
2.3.1 Round cable outlet
2.3.2 Outlet for connectors
2.3.3 Attachment and connection
2.3.4 Dismantling
2.4 Loads
2.5 Sealing ends
3 Commissioning and maintenance
3.1 Safety notes and measures
3.1.1 Staff selection and qualification
3.1.2 Conditions for operation
3.1.3 General notes
3.1.4 Specific notes
3.1.5 Disconnection and emergency stop
3.1.6 Maintenance and service
Appendix: podis
CON components
Part 2: podis
DRIVE motor control units

Wieland podissystem
Manual V 1.03 / ref. no. 00.000.0059.0 / 28.03.2001
1 Structure and use of the energy bus
system
This chapter describes the general structure of the podis
system. It includes the electrical configuration of podis
and the
factors that must be considered when designing a podis
installation. You can find an overview of the system
components and their technical data in the appendix under
”podis
components” and ”Technical data”.
1.1 General structure
The podis
system has a distributed configuration. This applies
to the distribution of energy, automation and the inputs/outputs.
The basic framework of podis
is composed of a flexible flat
cable. It contains five high-capacity cores (∅2.5 mm2) as the
main circuit and two cores for the 24 V control electronics.
Energy can be supplied and drawn via supply terminals at any
point on the flat cable (three-phase asynchronous motors). This
system also enables the installation to be retrofitted according
to the user’s requirements.
Since the energy and the control voltage are drawn at the point
of the flat cable which is nearest to the load, the
electromagnetic susceptibility of the installation and the
applications is considerably reduced. The complete installation
thus has a clearer overview for both planning and maintenance.
Programmable controllers
PLC
RC
NC
IPC
PROFIBUS DP
Devices from other manufacturers
with PROFIBUS DP capability
DP slave: ricos
DP slave: podis
Distributed configuration
The general field bus configuration
of the podis
CON system with
connected loads

Wieland podissystem
Manual V 1.03 / ref. no. 00.000.0059.0 / 28.03.2001
1.2 Areas of application
The podis
system can be used in all installations where
three-phase asynchronous motors must be supplied with
energy and control voltage e.g. for conveyor belts. A
prerequisite for the operation of podis
CON is the
availability of a three-phase system with an earthed
infeed and separate N and PE conductor (TN-S system).
Intended use

Wieland podissystem
Manual V 1.03 / ref. no. 00.000.0059.0 / 28.03.2001
1.3 Performance data for flat cable
podis
CON is connected to an earthed infeed.
General data
Rated voltage VDE 450/750 V AC
UL 600 V AC
Nominal frequency 50 Hz
Rated current (at 50°C) 16 A
Rated voltage of auxiliary circuit
(L+)
50 V DC
Sheath PVC according to CENELEC HD 21.1
S3, TM5, oil-resistant, LBS-free,
silicone-free
Dimensions mm (H x W) 35 x 6.1 with single-sided coding lug
Cu number (kg/km) 168
Cable weight (kg/km) 402
Ambient temperature (operating) -15°C to +50°C
Connection temperature
(piercing contact)
+10°C to +50°C
Behaviour in the event of a fire Self-extinguishing according to
DIN VDE 0472 section 804 B,
IEC 60332-1
Approval (in preparation) VDE, SEV and UL
Main circuit (colour coding: yellow/green, blue, brown, black)
Fuse 16 A with tripping characteristic C
Number of cores x cross section 5 x 2.5 mm2based on HD 359 and DIN
VDE 0281 section 404
Conductor Bare copper, highly flexible according to
DIN VDE 0295 class 6, corresponds to
CENELEC HD 383 S2 class 6
Conductor insulation PVC according to CENELEC HD 21.1
S3, TI2, silicone-free
Auxiliary circuit (colour coding: red, white)
Fuse 16 A with tripping characteristic C
Number of cores x cross section 2 x 2.5 mm2based on HD 359 and DIN
VDE 0281 section 404
Conductor Bare copper, highly flexible according to
DIN VDE 0295 class 6, corresponds to
CENELEC HD 383 S2 class 6
Conductor insulation PVC according to CENELEC HD 21.1
S3, TI2
1.4 Permitted use
podis
CON may only be operated in networks with an earthed
infeed (TN-S system). A non-earthed configuration of podis
systems is not permitted.
The sheath of the flat cable should not show any signs of
damage. Any holes left by the piercing contact should be
sealed. An approved sealing strip (Scotch VM from 3M) may be
used for this purpose.
It is not permitted to operate podis
CON with
open flat cable outlets.
The flat cable must be de-energized at the
relevant outlets during installation and
maintenance.
During operation, unused flat cable outlets should either be
sealed using a cover (order no. 07.409.7256.0 for connectors)
or using a cover and a dummy screwed gland at the round
cable outlet.
Specification of the flat cable
Cross section with colour coding
M White
L+ Red
PE Yellow/green
N Blue
L3 Black
L2 Brown
L1 Black
WARNING

Wieland podissystem
Manual V 1.03 / ref. no. 00.000.0059.0 / 28.03.2001
When laying the flat cable in cable trunking, you must
take the derating into consideration according to VDE
0660 section 507 as well as the ambient temperature of
50°C.
1.5 Additional devices
This section describes devices which can or must be
operated in connection with podis
CON but which are
not part of the podis
CON system.
1.5.1 Monitoring and protective devices
Depending on the application, various components and
protective measures are stipulated for the installation of a
complete system. The type of components and the level
of protective measures required is dependent on the VDE
regulations that apply to your installation. Please also
read section 1.8.
Fuse
The allocation of protective equipment for the short-circuit
protection of cables and lines in main or auxiliary circuits
outside switchgear assembly must be carried out under
consideration of the loop impedance. DIN VDE 0100
section 430 should be applied.
The 2.5 mm2flat cable must be fused to prevent overload
and short circuits using a three-phase miniature circuit-
breaker 16 A (Inom) with tripping characteristic C. The
tripping current is 8 to 10 Inom (EN 60898, DIN VDE 0641
section 11 and IEC 898).
You must fuse the auxiliary circuit with a single-phase
miniature circuit-breaker 16 A (Inom) with tripping
characteristic C.
Emergency stop devices
Emergency stop devices (according to IEC 204,
corresponds to DIN VDE 113) must be present. Their
function may not be limited in any way.
Earthing
The infeed must be earthed (TN-S system). The
installation in which podis
systems are integrated
should have a connection to protective earth (neutral
point of the network transformer). If this is not the case,
you must link each of the loads connected to podis
CON separately to the neutral point of the network
transformer via a PE conductor. The minimum diameter
of the PE conductor must be 4 mm2. The PE conductor
may not be looped through via the loads.
Tripping characteristic C for
100/400 V supply
Tripping characteristic C for
auxiliary circuit

Wieland podissystem
Manual V 1.03 / ref. no. 00.000.0059.0 / 28.03.2001
Effective lightning protection measures must be provided in the
installation to prevent damage to electronic devices.
Electrical separation
Safety separation between main and auxiliary circuits is
required for the motor starters.
The main and auxiliary circuits in the podis
system are
designed to be electrically isolated. When connecting motor
contactor combinations from third parties, ensure that they are
electrically separated (min. isolation voltage 2.5 k V AC).
1.5.2 Loads (three-phase asynchronous motors)
In principle, all three-phase asynchronous motors can be used
as loads. Please read section 2.4 when designing the system
(number of loads, power consumption etc.).
Wieland supplies podis
DRIVE motor control units which are
specially tailored to podis
CON. Further information about
podis
DRIVE can be found in part 2 of the manual.
Contactor 1 Contactor n
Example of motor contactor
connections

Wieland podissystem
Manual V 1.03 / ref. no. 00.000.0059.0 / 28.03.2001
1.6 Flat cable outlet
The flat cable is supplied with primary and auxiliary
voltage via flat cable outlets. A branch circuit for loads
can also be created via these outlets.
Current may only be supplied via the flat
cable outlets for round cables.
The flat cable outlets make contact at any point on the
flat cable without needing to remove the sheath or strip
the insulation from the cable. The current transfer from
the flat cable to the outlet is produced by piercing
contacts. These are special screws (contact screws)
which penetrate the sheath once the cable outlet has
been installed and are pushed forwards until the core is
reached.
The energy supply for the connected loads must likewise
be carried out via the flat cable outlets provided.
Variants
For round cable
For connectors
Corresponds to IEC 999 VDE 0600
T1535
Piercing contact
according to
IEC 998-3
Mechanical endurance Vibration test IEC 68 section 2-6
Impulse voltage test IEC 68 section 2-27
Types of round cable Oil-resistant, mechanical endurance
similar to H05W5-F,
alternatively halogen-free
Type of protection IP 65
Rated voltage 5 x 480/277 V AC, 2 x 50 V DC
Rated current 16 A
Operating temperature 0 - 50°C
Installation temperature
(for piercing contact)
+10 …+50°C
Relative humidity Stress level 2 (IEC 1131-2)
Degree of pollution II (for surface)
Screwed gland Metric M25x1.5
For conductor cross sections 9-16 mm
and 13-18 mm
Opening in terminal
compartment
Test with gauge plug according to
IEC 947-1, insulated wire ends
Nominal cross section 2.5 mm2
Mounting position As required
Approvals (in
preparation)
UL, CSA, VDE, SEV
Current supplied via flat cable
outlets
CARE
Piercing contact
Specifications

Wieland podissystem
Manual V 1.03 / ref. no. 00.000.0059.0 / 28.03.2001
There are two variants of podis
CON flat cable outlets:
- for round cables (with screw connection)
- for connectors
The terminal assignment/polarity can be found in section 2.3.
The notes regarding sealing in section 1.4 should also be taken
into account.
1.7 Sealing ends
The sealing ends (order no. 05.562.7450.0) are used for the
reliable termination and sealing of open cable ends according to
IP 65.
Due to the required creepage distances and
clearances, podis
flat cables must always be
terminated at both ends with sealing ends.
WARNING

Wieland podissystem
Manual V 1.03 / ref. no. 00.000.0059.0 / 28.03.2001
2 Fixing and exchange
2.1 Wiring instructions
Installation
Bend radius > 100 m
Processing temperature +10°C … +50°C
Type of installation Cable trunking, rack, with cable clip
(see section ”Cable clips”)
Fuse
380 V supply 3-phase miniature circuit-breaker 16 A,
tripping characteristic C
24 V supply 3-phase miniature circuit-breaker 16 A,
tripping characteristic C
The flat cable is not suitable for retraction.
The flat cable is protected against polarity reversal using
coding. One edge of the flat cable is wedge-shaped. The cable
locator in all podis
components (flat cable outlets, motor
starter) is shaped accordingly. You must insert the flat cable so
that the wedge-shaped side lies opposite the hinge of the
opened cable locator.
2.2 Cable clips
The cable clips are attached to fixed sub-floors with a screwed
connection. The flat cable is suspended in the mounted cable
clips (see sketch below, variant A).
If you wish to prevent the flat cable from being removed, you
should install two cable clips right next to each other so that
they are attached to opposite sides of the flat cable (see sketch,
variant B).
Data for the installation of flat
cable
CAUTION
Flat cable with coding
Securing against removal

Wieland podissystem
Manual V 1.03 / ref. no. 00.000.0059.0 / 28.03.2001
This type of fixing can also be selected when the flat
cable is laid vertically. In this case, it is however also
sufficient to attach the cable via staggered cable clips
with a two-way end stop.
2.3 Flat cable outlets
It is not permitted to carry out any
mounting or dismantling procedures
when the flat cable is live.
2.3.1 Round cable outlet
Please also note the specification of the flat cable outlet
in section 1.7.
2.3.2 Outlet for connectors
Please also note the specification of the flat cable outlet
in section 1.7.
2.3.3 Attachment and connection
The attachment is demonstrated using the flat cable
outlet for round cables. The installation of the outlet for
connectors is carried out in the same way.
1 Screw the module in position on the sub-floor
using suitable screws. Only use the slots provided.
2 Open up the top and insert the flat cable.
Vertical installation
DANGER
Dimensions and polarity

Wieland podissystem
Manual V 1.03 / ref. no. 00.000.0059.0 / 28.03.2001
3 Close the top again and screw shut. The top is thus
sealed in accordance with IP 65.
4 Turn the contact screws. The conductors of the flat cable
are thus bonded.
The contact screws must be turned until they
reach the stop.
The maximum tightening torque may not
exceed 1 Nm.
We recommend the use of a torque screwdriver.
Note the permitted torque.
You have now completed the installation of the flat cable outlet
for connectors. You only need to attach the integrally moulded
plug or a cover and secure in position with the clips.
The plug may never be inserted or removed
under load.
5 You can now connect the cables for the flat cable outlet
for round cables. The connection is carried out via screw
terminals. In accordance with VDE 0611, all types of
conductors (finely stranded, stranded or single-core) can
be connected.
If you are using finely stranded conductors, we
recommend the attachment of connector sleeves.
6 Screw down the cap plug.
If you are not connecting a round cable, you
must seal the round cable outlet for operation
with a blanking plug.
7 You can then clip on the trimming strip to cover the
screws.
WARNING
CARE
i
NOTE
WARNING
i
NOTE
CARE

Wieland podissystem
Manual V 1.03 / ref. no. 00.000.0059.0 / 28.03.2001
If a contact screw arcs, you must replace the
flat cable outlet with a new one and reinstall it at
least 200 mm away from the original position.
Seal the damaged section of the flat cable with
an approved sealing strip (Scotch VM from 3M).
2.3.4 Dismantling
To dismantle the outlets, carry out the same procedure
as described under section 2.2.2 but in the reverse order.
The appropriate safety instructions should be taken into
account.
Note in particular that work cannot be carried out with live
voltage.
2.4 Loads
The basic conditions for the number of motors that can
be connected to a flat cable for operation are the current
carrying capacity of 16 A (at 50°C) of the flat cable as
well as characteristic C of the characteristic curve for the
fuse. With the help of these parameters, you can
determine the permitted start-up configuration and
operating methods.
This also applies to the connection of podis
motor control units. Further information can be
found in part 2 of this manual.
When connecting third party devices, you should note all
the instructions in their respective device descriptions.
The loads should be earthed. The earthed cable may not
be looped through to other loads on the same circuit.
i
NOTE
i
NOTE

Wieland podissystem
Manual V 1.03 / ref. no. 00.000.0059.0 / 28.03.2001
2.5 Sealing ends
If the flat cable has been laid, all the free cable ends must be
reliably terminated and sealed in accordance with IP 65. The
sealing ends can be used for this. They consist of a shorter
lower section and a longer upper section which contains the
seal and the insulation ducts. Both the following diagrams
indicate the termination of the flat cable.
1 Cut the cable to the required length.
2 Remove approx. 19 mm of the sheath from the flat cable.
We recommend the Wieland flat cable stripper for
removing the sheath (further information can be
found in the appendix under ”Components”). It has
an end stop that has been specially designed for
Wieland flat cable and enables the process to be
carried out cleanly.
If you do not wish to remove the sheath using the
Wieland flat cable stripper, you must ensure that
the insulation of the individual conductors is not
damaged.
3 Slide the lower (shorter) section of the sealing end onto
the prepared flat cable. Push the individual conductors
until they reach the stop in the insulation ducts of the
sealing end. Finally, screw the top and base together.
The flat cable is thus sealed according to IP 65.
i
NOTE
i
NOTE

Wieland podissystem
Manual V 1.03 / ref. no. 00.000.0059.0 / 28.03.2001
3 Commissioning and maintenance
3.1 Safety notes and measures
3.1.1 Staff selection and qualification
All project design, programming, installation,
commissioning, operational and maintenance
tasks connected with the automation system
should only be carried out by trained personnel
(e.g. electrical engineers).
The project design and programming staff
must be familiar with the safety concepts of
automation technology.
The operational staff must be instructed in the
control system and know the operating
instructions.
The installation, commissioning and
maintenance staff must have the necessary
training to access the automation system.
3.1.2 Conditions for operation
The energy bus systems have been designed according to the
latest technology and the recognised safety regulations.
However, risk of death or personal injury to the user or a third
party or damage to machines, installations or other property
may occur during usage.
The implementation of the energy bus systems must be
technically correct according to the stipulated conditions. The
operating instructions must be followed with awareness of the
safety issues and risk factors. The correct and safe operation of
the control system requires proper transport, storage and
installation as well as careful operation and maintenance. Any
faults that can interfere with safety must be rectified
immediately.
The energy bus systems are only intended for the supply of
control systems, machines and installations. If they are used for
any other purpose, they do not meet the specified conditions. In
this case, the manufacturer is not liable for any resulting
damages.
In order to use the energy bus system as stipulated, please
observe the instructions regarding the mechanical and electrical
configuration, commissioning and operation as described in this
manual.
WARNING
Use of specialist staff is
required
Prerequisites for proper
use

Wieland podissystem
Manual V 1.03 / ref. no. 00.000.0059.0 / 28.03.2001
3.1.3 General notes
If the systems form part of the electrical equipment of a
machine, they must be included by the machine
manufacturer in the procedure to assess conformity. The
norm DIN EN 60204-1 should be observed (machine
safety, general requirements for the electrical equipment
of machines).
If the energy bus systems themselves are used and
maintained correctly, there is normally no risk as regards
property or health. Danger may arise however if actuators
such as motors, hydraulic mechanisms etc. are
connected; if the project design, installation, maintenance
and operation of the complete installation or the machine
is not carried out properly; if the instructions in this
manual are not observed and if personnel without
sufficient training operate the system.
3.1.4 Specific notes
During the project design, installation and commissioning
of energy bus systems in connection with the supply of
machines and their controllers, the safety conditions
stipulated in the machine guideline 89/392/EEC must be
observed by the manufacturer and user of the machine.
In specific cases, national accident regulations apply
such as VBG 4.0.
The relevant safety and accident regulations that apply to
the respective application e.g. machine protection
guidelines must be taken into account.
All safety-related devices of the controlled machine
should be designed so that they can function
independently of the control system. Emergency stop
devices must remain effective according to IEC 204
(corresponds to DIN VDE 113) in all operating modes of
the system. In an emergency, the supply voltage of all the
controlled switching elements must be disconnected.
Uncontrolled and undefined initialisation processes such
as:
- start-up after deactivation of the emergency stop
device
- start-up of the control system without the DP slave
being addressed by the DP master
may not occur.
Possible risks
Other manuals for podis CON
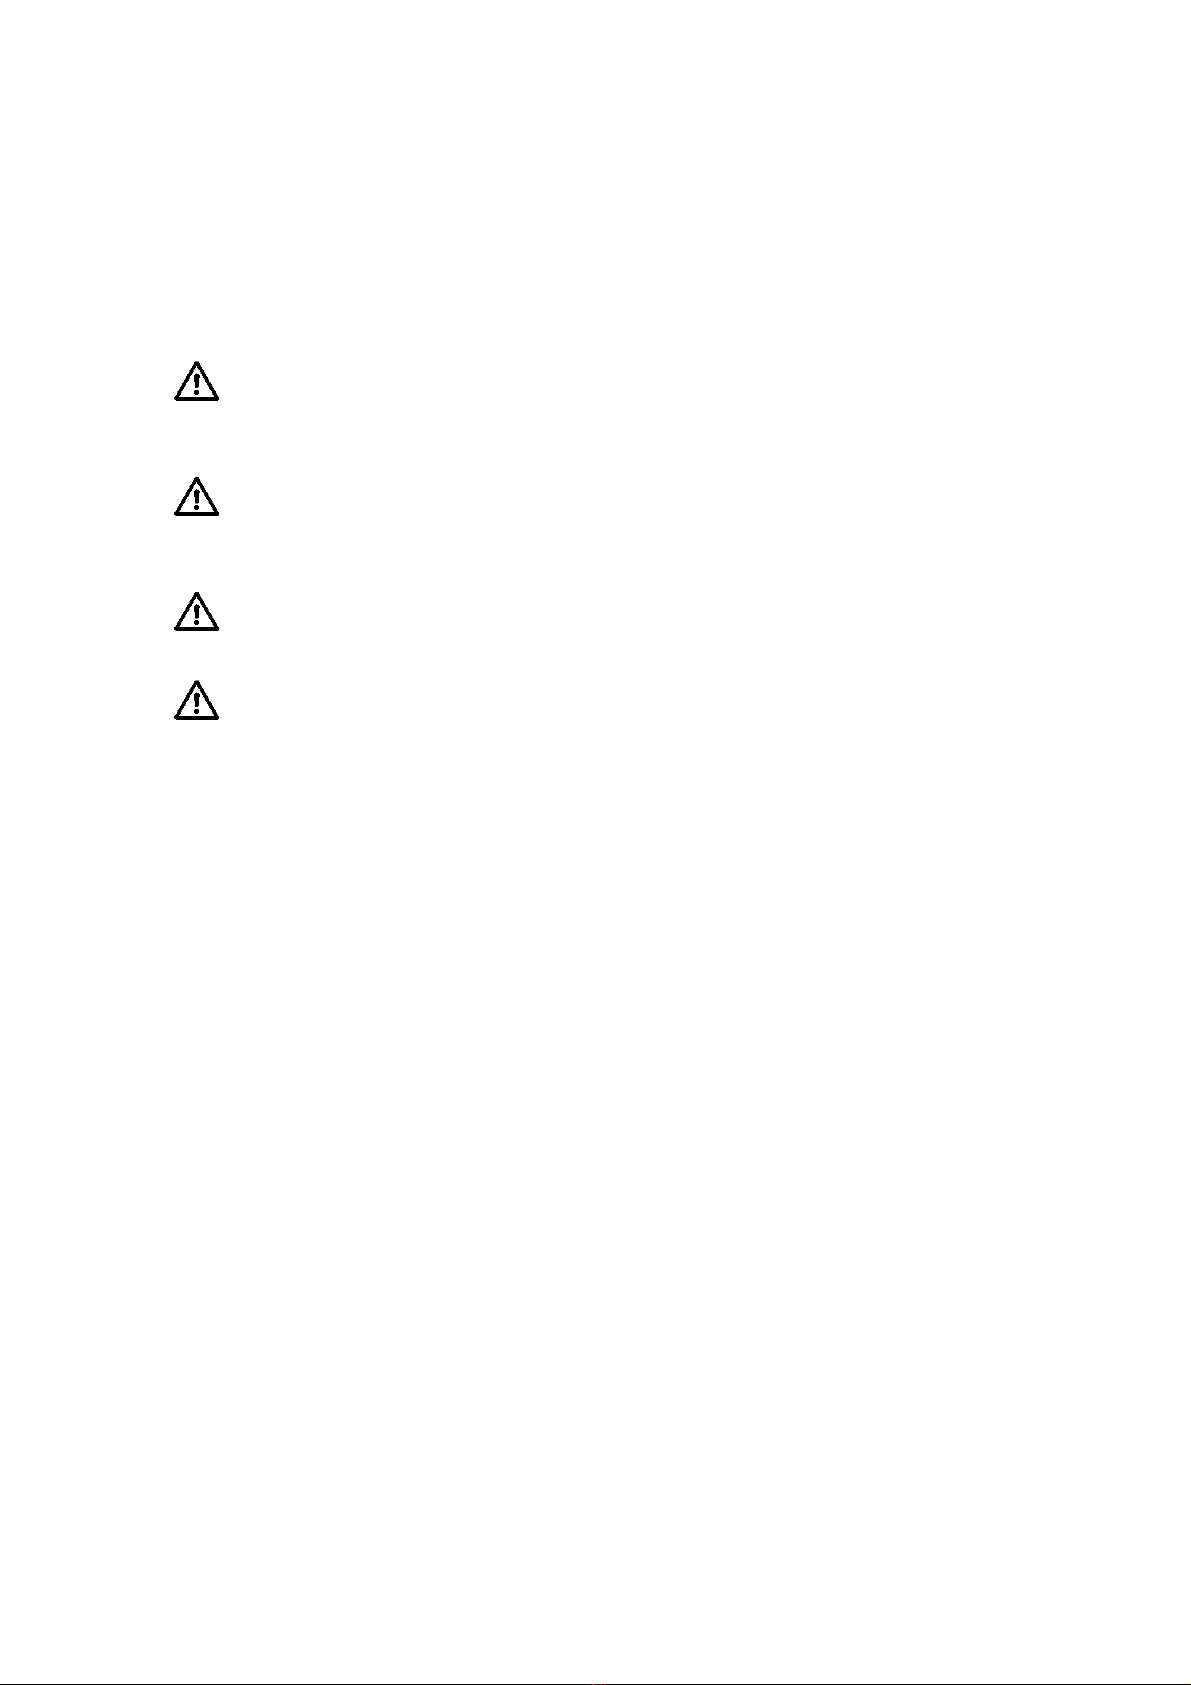
1
This manual suits for next models
1
Table of contents
Other Wieland Industrial Electrical manuals
Popular Industrial Electrical manuals by other brands

Danfoss
Danfoss AK-CC 210A instructions

HEIDENHAIN
HEIDENHAIN VT 121 operating instructions

PCB Piezotronics
PCB Piezotronics IMI SENSORS M635A01 Installation and operating manual

Murata
Murata GRM219R71E684KA88 Series Reference sheet

ABB
ABB 6AGC085345 installation manual

THORLABS
THORLABS IO-L-1064 user guide

hager
hager univers N UE21E2B Mounting instructions

Eaton
Eaton Crouse-Hinds FSQ Series Installation & maintenance information

Omega
Omega iDRN-ACV Start here

Murata
Murata GRM033R60J104ME19 Series Reference sheet

Murata
Murata GRM155R71C472KA01 Series Reference sheet

Murata
Murata GRM32DR60J226KA01 Series Reference sheet