Generex BACS System User manual

GENEREX SYSTEMS Computervertriebsgesellschaft mbH - www generex de - 1
GENEREX Systems Inc - www generex us
Quickstart
BACS Installation
Version: 2020-06-26
BACS System
Hardware Components:
BACS Measuring Cable
BACS Bus Cable
BACS Module
BACS WEBMANAGER
CS141 SNMP Adapter Professional
+ BACS Bus Converter
BACSKIT_BSC4 - Slot Version
BACSKIT_LB4 - External Box
CS141 SNMP Adapter MODBUS/RS485
+ BACS Bus Converter
BACSKIT_SCMB4 - Slot Version
BACSKIT_LMB4 - External Box
BACS WEBMANAGER BUDGET_4
(with integrated BACS Bus Converter)
BACSKIT_B4
BACS SPLITTING BOX

GENEREX SYSTEMS Computervertriebsgesellschaft mbH - www generex de - 2
GENEREX Systems Inc - www generex us
General Safet Precautions - Working with Batteries
For further information refer to the battery makers instructions for installation, maintenance, and operation of their
battery products
Improper use of the products described in this manual may lead to personal injury and/or
property damage GENEREX is not liable for injuries or damages that result from improper
handling these products
Risks associated with improper use include: explosion, fire, and short circuits Attention!
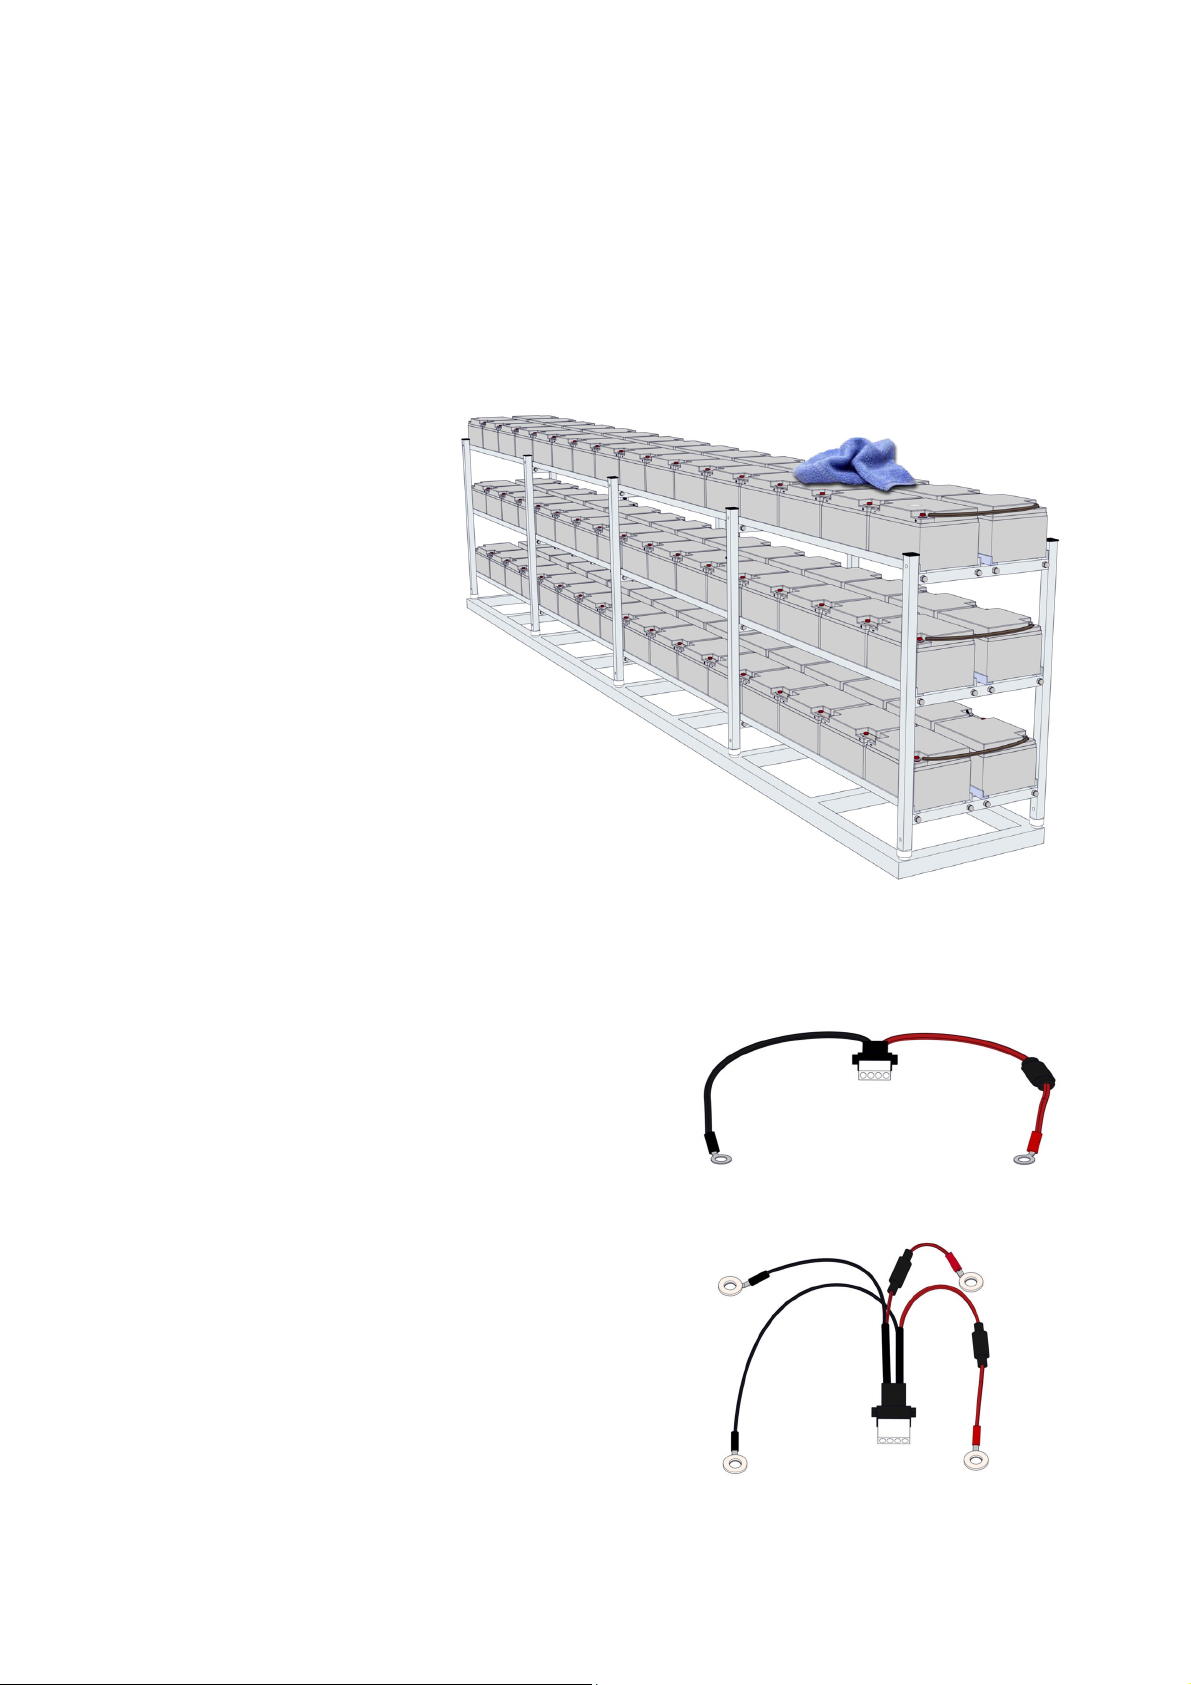
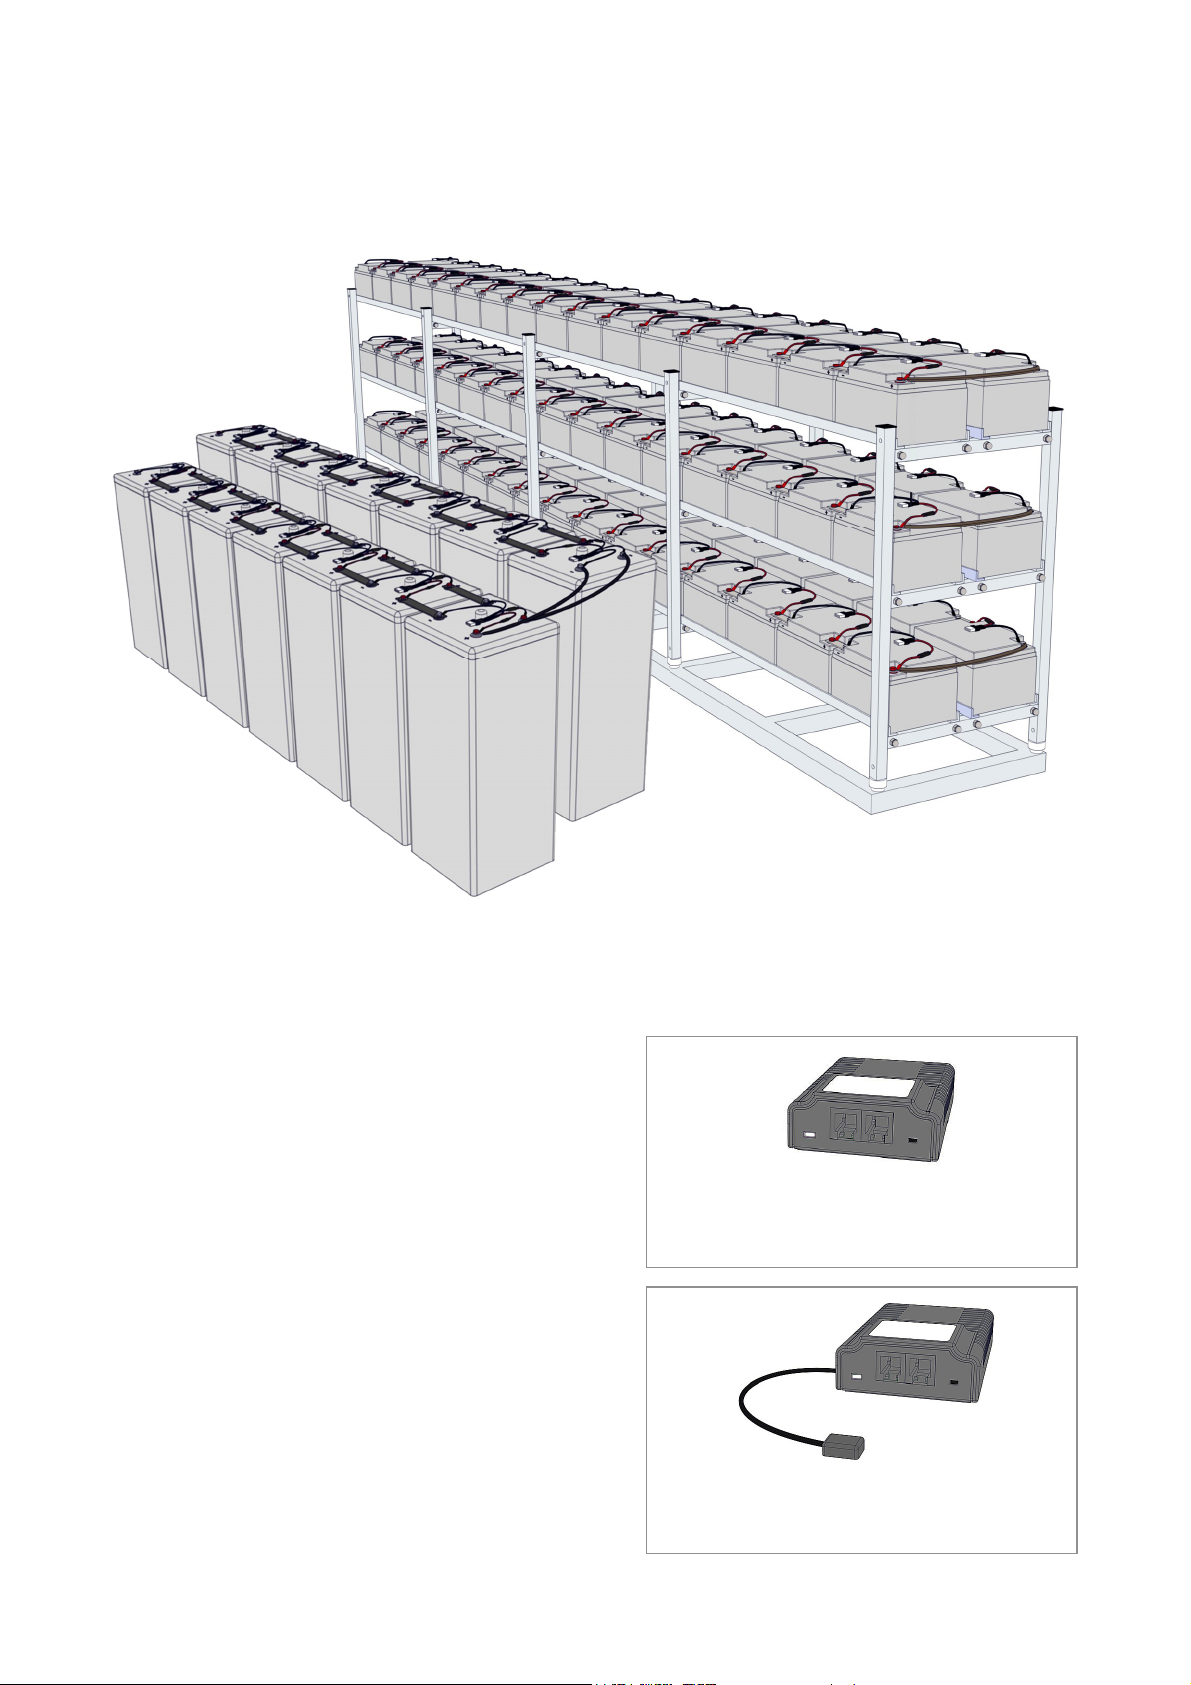
Battery terminals are always live, so never place metal objects or tools on top of the batter-
ies Battery electrolyte solutions are highly corrosive Should you observe leaks of electro-
lyte from a battery, be aware that these fluids are harmful to both eyes and skin
Installation, maintenance, and repair of batteries and battery equipment should be per-
formed only by trained specialists (or personnel authorized by battery manufacturers to
perform such services) Persons who have not been trained in battery safety or the proper
handling of batteries (or who have not been authorized to work on them) must not handle
batteries
Observe the following regulations (IEEE standards USA onl ):
ZVEI publication "Instructions for the Safe Handling of Electrolyte for Lead-acid Ac-
cumulators "
ZVEI publication "Safety Data Sheet on Accumulator Acid (Diluted Sulfu-ric Acid) "
VDE 0510 Part 2: 2001-12, in accordance with EN 50272-2:2001: "Safety Re-
quirements for Secondary Batteries and Battery Installations - Part 2: Stationary
Batteries"
IEEE Standard 450-2002: "Recommended Practice for Maintenance, Testing and
Replacement of Vented Lead Acid Batteries for Stationary Application "
IEEE Standard 1188-2005: “Recommended Practice for Maintenance, Testing and
Replacement of Valve Regulated Lead Acid Batteries for Stationary Application "
IEEE Standard 1375-1998: "Guide for Protection of Stationary Battery Systems
Observe also the following safety rules:
1. Ensure that all electrical loads and power supplies/charging devices
(including separators, fuses, and switches) are switched off. This must be car-
ried out b qualified personnel.
2 Remove all wrist watches, rings, chains, jewelry and other metal objects before
working with batteries
3 Use insulated tools only
4 Wear insulating rubber gloves and rubber shoes
5 Never place tools or metal components on top of the batteries
6 Make sure that the battery or batteries are not mistakenly grounded (The conse-
quences of an accidental or incorrect connec-tion can be mitigated reduced by ter-
minating the ground connection ) If the system is grounded, terminate the connec-
tion Touching a grounded batter b mistake can result in severe electric
shock.
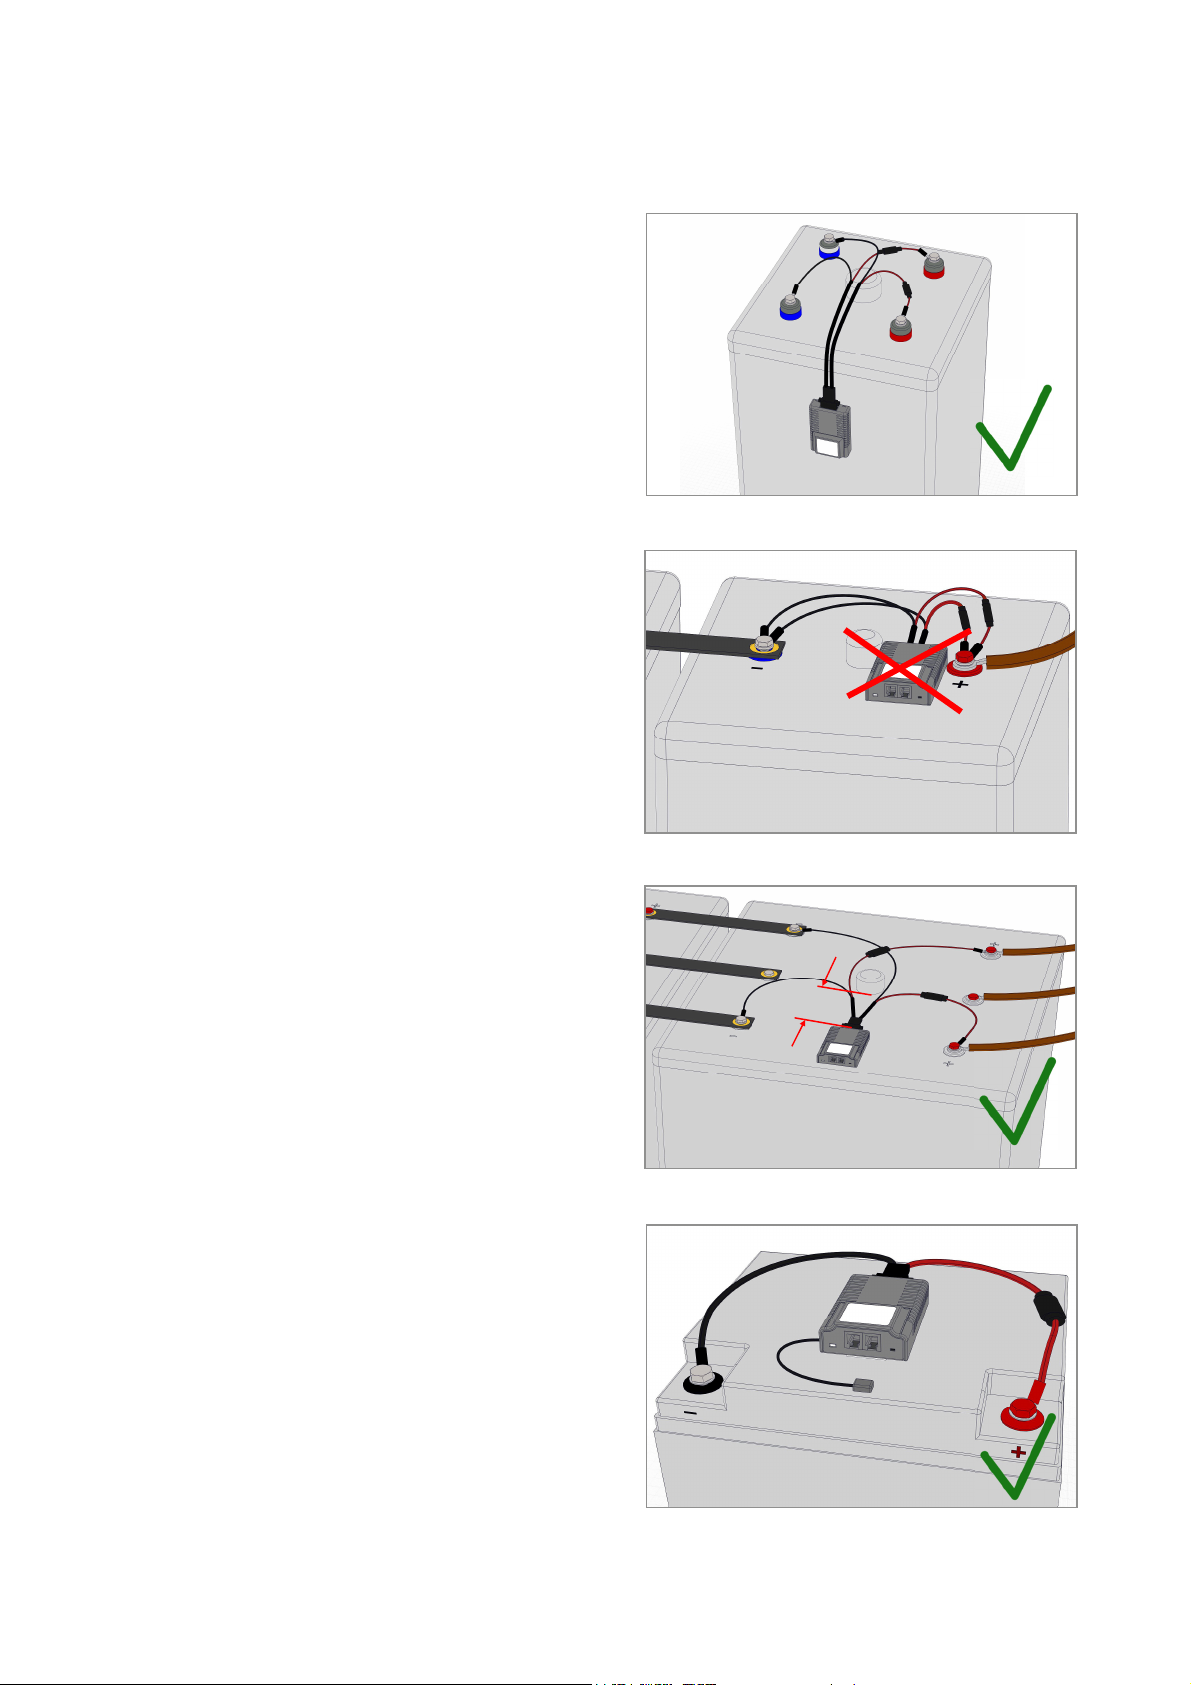
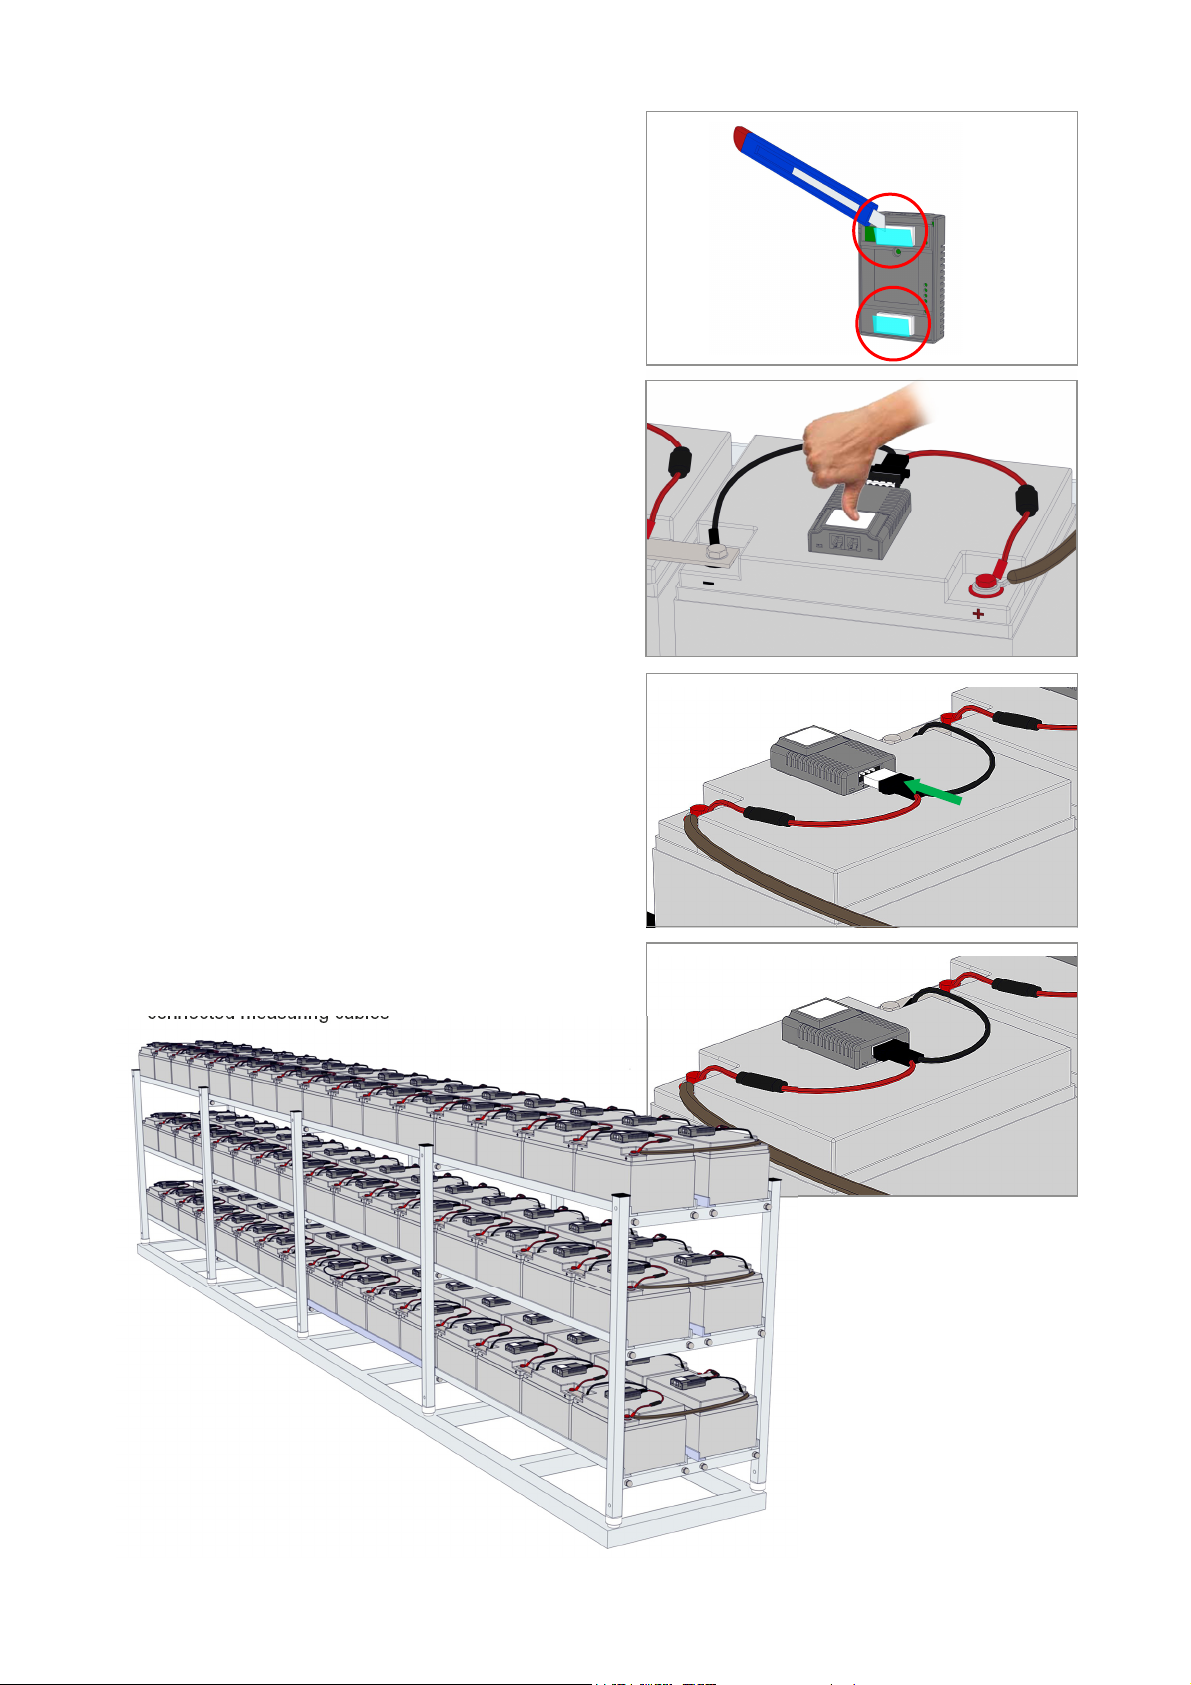
7 Before establishing connections, make sure to verify polarity (Better one too many
times than one too few )
8 Filled lead-acid batteries contain highly explosive gas (hydrogen/air mixture) Never
smoke, handle open flames or create sparks near the batteries. Always avoid
electrostatic discharge; wear cotton clothing and ground yourself if necessary
9 Wear the appropriate safety clothing and equipment

GENEREX SYSTEMS Computervertriebsgesellschaft mbH - www generex de - 3
GENEREX Systems Inc - www generex us
Warning and Safet Indication – BACS Safet Precautions
Attention
HIGH
VOLTAGE
WARNING
Do not open the BACS® sensor modules Do not attach any kind
of objects to the battery or the BACS® modules itself apart from
the connecting cables! The BACS® modules and cables could
be live!
MAGNETIC
EMISSIONS
Do not put any materials or equipment sensitive to magnetic
emissions near the BACS® WEBMANAGER (For example, moni-
tors, disk drives, memory chips or magnetic tapes )
INSTALLATION BY
QUALIFIED
PERSONNEL
ONLY! !
The BACS® installation should only be installed by qualified per-
sonnel BACS® is installed on batteries where high voltages
could cause injuries or even death if not handled properly! The
BACS® connection cables (temperature cable, bus cable, meas-
uring cable) could be live! To avoid short circuits, do not touch,
replace, or cut BACS® cables, before having disconnected the
system from the batteries!
WARNING!
CHECK
MODULES
DURING
INSTALLATION
AND INITIAL
CHARGING
Observe battery
temperature for up
to 12 hours after a
discharge period
BACS® modules must NOT be mounted on a damaged battery! If
a battery is damaged and its internal resistance is high, charging
current (or current being discharged) may follow the path of least
resistance and flow through the BACS® module, not the battery
Overheating and destruction of the BACS® module can result
from this. For this reason, never use batteries that are damaged
or show high internal resistances
The GENEREX service technician should monitor the BACS®
modules and the initial charge during the installation Excessive
heat created by the BACS® may be indication of a damaged bat-
tery or incorrectly mounted cables The installer should not leave
the installation site before installation of the BACS® system is
complete and the battery has had 60 minutes to charge Once
this has taken place, if the BACS® system shows stable voltages
and normal internal resistance values, it may be considered safe
and can be monitored remotely
Observe battery temperature for up to 12 hours after a discharge
period! For VRLA batteries, the risk of thermal runaways is great-
ly elevated during the 12 hours following discharge Rising tem-
peratures in damaged battery cells and blocs can cause fire
React immediately if battery cell or bloc temperatures rise after a
discharge phase

GENEREX SYSTEMS Computervertriebsgesellschaft mbH - www generex de - 4
GENEREX Systems Inc - www generex us
Safet – BACS® Configuration and Installation
AVOID INSTALLATIONS IN CERTAIN AREAS
Do not install BACS® in the following areas:
Wet or dusty places, or rooms that are not protected from water or high humidity
Areas with a constantly high concentration of salted or oxidizing gases
Areas close to sources of extreme heat, open flames, or sparks, or having high variations in
temperature
Areas prone to physical vibrations
Areas with high gas concentration or flammable materials
MONITORING SYSTEM - MONITORING AND ALARMS
BACS® is a monitoring s stem and should be used accordingl . Ensure proper setting of
the alarm threshold and proper time frame for reaction to alarms!
BACS® is a tool designed to increase the durability of accumulators, but its most important
function is to monitor the battery in order to avoid breakdowns For this reason, it is recom-
mended that situations that trigger alarms be attended to within two hours of alarm notifica-
tion BACS® may not be able to eliminate altogether the risk of battery or charger failures,
but through its advance warning system and patented Equalization process, it gives the user
the ability to prevent the issues that can result from such failures
Never mix and match different BACS® C Module versions or BACS® Measuring cable
t pes! (For example: using BACS® C Modules with REV 2 and 3 on the same battery sys-
tem, using BACS® BC2 and BC5 cables in the same battery system ) This practice can
damage modules/cables and lead to inaccurate measurements
For questions and comments refer to:
www generex de or support@generex de

GENEREX SYSTEMS Computervertriebsgesellschaft mbH - www generex de - 5
GENEREX Systems Inc - www generex us
1. Installation of BACS
1.1 Preparation of the Batteries
In order to ensure optimum support of the BACS
Velcro straps, the surface of the accumulators
should be dr and free of impurities and grease
residues.
Please note that you only use
cleaning products recommended
by your battery manufacturer
If you are unsure, only use soapy
water for cleaning After cleaning
carefully dry the surface of the ac-
cumulator with an antistatic fabric
1. Installation
BACS Measuring Cables
Please follow the installation diagrams on the next
pages to mount the cables correctly to the batteries
The cables should be placed as close as possible
to the batter poles, but above the batter connec-
tors.
The measuring cables are color coded:
black: Negative polarity (-) of the battery
red: Positive polarity (+) of the battery
Please refer the operating instructions of your batte-
ries Use manufacturer's torque values for tightening
pole bolts
Please note that a polarity reversal of the measuring
cables can damage the integrated fuse of the cable
Order No : BC5xx
Order No : BC4Bxx

GENEREX SYSTEMS Computervertriebsgesellschaft mbH - www generex de - 6
GENEREX Systems Inc - www generex us
1.2V-2V Batteries with 2 poles + BC4B measuring cable
4V – 16V Batter + BC5 - measuring cable
1.2V-2V Batteries with 4 or more poles + BC4B measuring cable
For batteries with four poles, connect the BACS test lead to all poles
Note: If the battery has more than 4 poles, it is sufficient to connect the BACS cable to four battery poles (Use
the same poles at each battery)
Note: Please refer to the battery manufacturers connection guidelines for resistance/impedance measure-
ments The connection stated in the quick start guide provides a high precision value any will not typically
match up to the published battery manufacturing data sheets
Connecting BACS BCx Measuring Cable to the Battery

GENEREX SYSTEMS Computervertriebsgesellschaft mbH - www generex de - 7
GENEREX Systems Inc - www generex us
1.3 Installation BACS Modules
This installation guide refers to the modules of the
series:
Order No : BACSC20
Order No : BACSC23
Order No : BACSC30
Order No : BACSC40
Order No : BACSC41
Order No : BACSC50
As standards, BACS modules are equipped with
integrated temperature
Optional you can get the Module with an external
temperature sensor
BACS Module REV 3
with internal temperature sensor
(standard)
BACS Module REV 3
with external temperature sensor
(optional)
Installation example
BC5xx measuring cables
BC4Bxx measuring cables

GENEREX SYSTEMS Computervertriebsgesellschaft mbH - www generex de - 8
GENEREX Systems Inc - www generex us
10 cm
Please read before placing BACS modules!
General instructions
If there is not enough space on the top of the bat-
tery, place the BACS module at the front panel of
the battery
Do not install modules on any cooling ribs or plugs
Wet cells
For wet cells and low-maintenance batteries, ensure
a clearance to the breather of at least 10 cm
(3 94in )
BACS Modules with
external temperature sensors
Instead of the internal temperature sensor
(standard), there are also BACS REV 3 modules
with already pre-assembled external temperature
sensor available
This external temperature sensor is attached at the
end of a 23 cm (9 06in ) or 90 cm (35 43in ) long
cable
Please ensure that each sensor is at the same posi-
tion of the batteries

GENEREX SYSTEMS Computervertriebsgesellschaft mbH - www generex de - 9
GENEREX Systems Inc - www generex us
Preparing the BACS Modules
Mounting the modules
1 There are two Velcro or pressure strips on the backside
of the BACS module Remove the adhesive film from the
Velcro strips
2 Mounting the BACS module:
Position the BACS module, press it firmly with your
thumb under high pressure and hold the pressure for
about 5-10 seconds
Connecting BCx Measuring Cable
to the BACS Module
The BCx measuring cable is equipped with a mecha-
nical protection against accidental polarity reversal
Connect plug of the measuring cable to the socket at
the back of the module
Installation example
BACS Modules with
connected measuring cables

GENEREX SYSTEMS Computervertriebsgesellschaft mbH - www generex de - 10
GENEREX Systems Inc - www generex us
The BACS bus cables are components specially
designed for BACS system usage By using substi-
tute cables, the overall function of the system can
not be guaranteed In order to avoid unnecessary
cable length, the bus cables are available in various
length
Installation instructions
Cable length
The maximum distance between the last module
and the BACS WEBMANAGER is 60 m (2364 in-
ches) A splitting box will not increase distances
Number of modules per line
A BACS bus cable can hold a maximum of 50
connected modules The modules can be connected
to the bus in any order It is not necessary to
connect the modules of the addresses in sequence
Connection to the BACS WEBMA-
NAGER/BACS Bus Converter
For operation, the nearest module must be connec-
ted to the BACS Bus Converter or the BACS WEB
MANAGER via a bus connection
Increasing fail-safety
For increased failure safety, the bus line should be
installed as a ring bus system If a connection is
interrupted at a single point, the operation ability of
the installation is ensured
Installation of the
BACS Bus Cables
Insert the plugs of the Bus cables into the sockets of
the BACS modules (see illustration to the right)
1b
2b
“side by side“:
“behind“:
“among each other“:
1a
3
2a
Order No : B4BCRJXX
1.4. Installation BACS Bus Cables

GENEREX SYSTEMS Computervertriebsgesellschaft mbH - www generex de - 11
GENEREX Systems Inc - www generex us
General BACS BUS Cable length wiring notes
Ensure not to exceed the specified cable lengths. Since the cable lengths can be partiall customized,
the following diagram is a general aid for calculating the respective cable lengths within our installa-
tion.
CS141 modular BACS Kit B4
1 Max cable length 15m/590in to COM1/RS232
device (UPS, Genset, Transfer Switch, Charger
or other battery-powered device) managed by
BACS
2 Max cable length 15m/590in to COM2/RS232
for Environmental sensors (SM_T_COM,
SM_TH_COM) or 3rd Party Sensors with SEN-
SORMANAGER
3 Power Supply 12V/2A (UPS protected) For mo-
re than 300 BACS Modules a 12V/3A Power
Supply is required
4 Max cable length from BACS WEBMANAGER
to BACS SPLITTING BOX should not exceed
10m/395in (Otherwise it will reduce the max
length of 6 )
5 The cable length of the connection between the BACS SPLITTING BOX will reduce the max length of 6
6 Total Length of a BACS bus must not exceed 60m/2360in (4 + 6 ), measured from the BACSBUSCONVER-
TER Don‘t connect more than 50 BACS Modules at on BACS bus string
7 BACS bus cable length between BACS modules for the interconnection, in this example 40cm/16in Shorter
interconnecting cables would increase the distance of 50m/1970in accordingly, longer interconnecting cables
would shorten the distance of 50m/1970in
8 Max number of BACS Modules is 512
9 Max distance from BACS WEBMANAGER to BACS CURRENT SENSORs should not exceed 10m/395in
10 Max distance between the BACS_GX_R_AUX and the dry-contacts should not exceed 50m/1970in in total
11 Max distance from CS141 to BACS Bus Converter should not exceed 2m/79 in

GENEREX SYSTEMS Computervertriebsgesellschaft mbH - www generex de - 12
GENEREX Systems Inc - www generex us
5 The cable length of the connection between the BACS SPLITTING BOX will reduce the max length of 6
6 Total Length of a BACS bus must not exceed 60m/2360in (4 + 6 ), measured from the BACSWEBMANAGER
Don‘t connect more than 50 BACS Modules at on BACS bus string
7 BACS bus cable length between BACS modules for the interconnection, in this example 40cm/16in Shorter
interconnecting cables would increase the distance of 50m/1970in accordingly, longer interconnecting cables
would shorten the distance of 50m/1970in
8 Max number of BACS Modules is 512
9 Max distance from BACS WEBMANAGER to BACS CURRENT SENSORs should not exceed 10m/395in
10 Max distance between the BACS_GX_R_AUX and the dry-contacts should not exceed 50m/1970in in total
1 Max cable length 15m/590in to
COM1/RS232 device (UPS, Gen-
set, Transfer Switch, Charger or
other battery-powered device)
managed by BACS
2 Max cable length 15m/590in to
COM2/RS232 for Environmental
sensors (SM_T_COM,
SM_TH_COM) or 3rd Party Sen-
sors with SENSORMANAGER
3 Power Supply 12V/2A (UPS pro-
tected) For more than 300 BACS
Modules a 12V/3A Power Supply
is required
4 Max cable length from BACS
WEBMANAGER to BACS SPLIT-
TING BOX should not exceed
10m/395in (Otherwise it will re-
duce the max length of 6 )
BACS WEBMANAGER BUDGET

GENEREX SYSTEMS Computervertriebsgesellschaft mbH - www generex de - 13
GENEREX Systems Inc - www generex us
1.5. Connection cable between
BACS WEBMANAGER & BACS Bus Converter
6-pole special cable RJ12
(ca 1m = 39 in )
BACS WEBMANAGER BUDGET,
COM3/AUX Port Warning Label
Available BACS WEBMANAGER
BACS WEBMANAGER BUDGET_4
with integrated BACS Bus Converter
Order No : BACSKIT_B4
SNMP/WEB MANAGER Professional
CS141SC Slot
+ external BACS Bus Converter
Order No : BACSKIT_BSC4
SNMP/WEB MANAGER Professional
CS141L external
+ external BACS Bus Converter
Order No : BACSKIT_LB4
SNMP/WEB MANAGER MODBUS-RS485
CS141SCM Slot
+ external BACS Bus Converter
Order No : BACSKIT_SCMB4
SNMP/WEB MANAGER MODBUS-RS485
CS141LM external
+ external BACS Bus Converter
Order No : BACSKIT_LMB4
The BACS Bus Converter
The BACS BUS converter galvanically separates
the BACS bus from BACS WEBMANAGER
Furthermore it converters BACS bus protocol to
RS232 protocol
In addition, active EMI filtering is performed to pro-
tect the current measurement results from inter-
ferences
Order No : BUS_CONV_V
Attention:
If the spring contacts inside of the COM / AUX of the
BACS WEBMANAGER are mechanically damaged
by a wrong cable, addressing and communication
problems occur between the BACS WEBMANAGER
and the connected modules
Use only the 6-pin original RJ12 cable included with
the BACS WEBMANAGER

GENEREX SYSTEMS Computervertriebsgesellschaft mbH - www generex de - 14
GENEREX Systems Inc - www generex us
Wiring instruction: BACS WEBMANAGER
BACS WEBMANAGER BACS Kit Box
with external BACS Bus Converter
BACS Bus cables
Power Supply
BACS BUS
Special cable RJ12
BACS BUS
Power Supply Power Supply
COM3/AUX COM3/AUX
BACS WEBMANAGER Budget
with integrated BACS Bus Converter
BACS Bus cable

GENEREX SYSTEMS Computervertriebsgesellschaft mbH - www generex de - 15
GENEREX Systems Inc - www generex us
BACS Bus cable
Die BACS SPLITTING BOX
For battery systems with more than 50 batteries, it is
recommend to use a BACS SPLITTING BOX
It serves the reduction of total bus cable length and
allows an optimized star-shaped bus cabling instal-
lation It is possible to connect more BACS SPLIT-
TING BOX at one BACS System
Distribute all BACS modules equall to the ports
of the SPLITTING BOX. Ensure that each port
can manage up to 50 BACS modules. Order No : BCII_SPLITT
BACS WEBMANAGER BACS Kit Slot
with external BACS Bus Converter
For use in addition to your UPS, inverter, rectifier or other devices with a suitable slot
Special cable RJ12
Power Supply BACS BUS
COM3/AUX COM3/AUX

GENEREX SYSTEMS Computervertriebsgesellschaft mbH - www generex de - 16
GENEREX Systems Inc - www generex us
BACS WEBMANAGER BACS Kit Box
with BACS SPLITTING BOX and Bus Converter
BACS Buskabel
BACS Bus cable
BACS WEBMANAGER Budget
with BACS SPLITTING BOX
Installation of the BACS hardware complete
For operational mode, the BACS modules need to be configured!
BACS Bus cable
BACS Bus cable
Power Supply BACS BUS
BACS BUS BACS BUS
Special cable
RJ12
Power Supply BACS BUS
COM3/AUX
BACS Bus cable
BACS BUS
COM3/AUX
Power Supply
BACS BUS

GENEREX SYSTEMS Computervertriebsgesellschaft mbH - www generex de - 17
GENEREX Systems Inc - www generex us
. BACS WEBMANAGER Configuration
5
3
2 6
7
1
7
4
3
2 6
5
1
7
11
12
2 6 9 8 10 Alarm
Contact
4
Slot Version External Version
External Version
with integrated
BACS Bus Converter
12
BACSKIT_BSC4
BACSKIT_SCMB4
BACSKIT_LB4
BACSKIT_LMB4 BACSKIT_B4
3
Description Function
1 COM1 Port Connection with an UPS or another end device via the original RS232-cable
2 COM2 Port Connection for optional devices like a modem, multi sensor SENSORMANAGER,
temperature sensor, humidity, field busses (MODBUS, RS232, Profibus, LONBus, etc )
3 LAN Port Ethernet 10/100 Mbit interface with integrated LEDs
(green LED: connection to the network established, yellow LED: network-activity)
4 DC Input Power supply 12VDC/1A stabilized through external power supply,
DC-connector inside (-) minus, outside (+) plus
5 COM3/AUX For the connection to the BACS® Bus Converter (at BUDGET 4 internal),
max 1m Rj12/6pole cable
6 LEDs (red/green)
Operation Status WEBMANAGER Red LED Green LED
No Power OFF OFF
Booting ON OFF
Update in progress flashing slowly OFF
Update failure flashing fast OFF
UPS Communication lost ON OFF
Operating OFF flashing slowly
7 Slide Switch
8 Alarm LED BACS-Alarm LED (green / red / yellow)
9 MUTE Button Button for the acknowledgement and mute of the horn Alarm LED changes to yellow
10 BACS Bus 2 x Rj10 interface to connect
BACS C-Module / SPLITTINGBOX / BACS_CSXXX / GX_R_AUX
11 BACS Service Port For connection to a PC/Laptop RS232-port, for addressing or readout the BACS modules via
BACS_Programmer or BACS_Reader Software directly (provided RS232 cable - DSub9 -> Mini-
Din8)
12 RS485 Interface MODBUS variants: BACSKIT_SCMB4 and BACSKIT_LMB4
Toggles configuration and operation mode
Slide Switch middle position: Sets the BACS® WEBMANAGER BUD-
GET to the configuration mode After cold boot/reboot the default IP ad-
dress 10 10 10 10 is active
Slide Switch right position: DHCP is activated and an IP address is set
automatically Check MAC address of your BACS WEBMANAGER to
locate according IP Address
Slide Switch left position: Sets operational mode

GENEREX SYSTEMS Computervertriebsgesellschaft mbH - www generex de - 18
GENEREX Systems Inc - www generex us
.1. Installation / network integration of a BACS Webmanager
Initial configuration
On delivery, the IP address is 10 10 10 10 and the
Wewbmanager is in manual mode As soon as you
assign an IP address, the Webmanager will take
over the new settings without reboot:
1 Leave the „sliding switch in the left position“
2 Connect the Webmanager to the „LAN port“ of your
workstation via, either directly or via a switch
When the IP address is wrong, it is possible to fall
back to the hard coded IP address 10 10 10 10 by
setting the sliding switch to center position and re-
booting the device
Connecting the UPS
... when using an external CS141 or a
BACS WEBMANAGER BUDGET
If necessary, connect the UPS with the original serial
UPS cable to the "COM port" of the web manager
Connecting the BACS WEBMANAGER directl with
a UPS s stem is an additional feature. BACS will
run without it, too.
... when using a BACS WEBMANAGER
Slot card version
Insert the Webmanager directly into the „according
card slot“ of the UPS You do not need to depower
the UPS
Powering up the manager
... when using an external Webmanager
Connect the power adapter coming with the Web
manager device As soon as power is available, the
Webmanager will start booting
... when using a slot card version
The CS141 slot card will be powered by the internal
connectors of the slot provided by your UP As soon
as you plug in the slot card, it will power up and start
booting
Ethernet
Cable
Connect the UPS
Slider to left position,
Switch
EU: 230V AC / 12 V DC
US: 120V AC / 12V DC
External BACS Kit / Webmanager Budget
Connect power adapter
Initial IP address: 10 10 10 10
Slot card
External BACS Kit / Webmanager Budget
Hard coded IP address 10 10 10 10:
Slider to CENTER position
Insert card into the slot

GENEREX SYSTEMS Computervertriebsgesellschaft mbH - www generex de - 19
GENEREX Systems Inc - www generex us
Add a route to your local
computer
1 Run the windows build-in command prompt with
the option „run as administrator“ via the windows
context menu
2 Enter the following command:
route add 0. 0. 0. 0 <local IP address>
(Example: “route add 10 10 10 10 192 168 1 54”)
3 Windows will give the feedback „OK“
.3 Access the Webmanager
via HTTP/HTTPS
1 Open a common web browser
2 Enter „https:// 0. 0. 0. 0“
3 Enter the default access data:
Name: admin
Password: cs 4 -snmp
.4 Run the Setup Wizard
On very first login, the Webmanager will start a tool
that will help you with the basic configuration:
"System Setup Wizard"
The Setup Wizard will guide you through the most
important configuration steps
Note:
In case of the wizard will not start automatically, you
may launch it by clicking:
- „System“
- „Wizard“
.5 If you use the DHCP mode
The GENEREX Netfinder is a small freeware tool
that can help you in case of using DHCP and you
need to know the IP address of your Webmanager
The Netfinder will search for all Webmanager de-
vices inside your network and display them accord-
ingly
Download this little helper directly from our webside:
www.generex.de
. Using the setup wizard for the
BACS Webmanager basic settings

GENEREX SYSTEMS Computervertriebsgesellschaft mbH - www generex de - 20
GENEREX Systems Inc - www generex us
3. Basic configuration
Select your language
1 On the drop-down menu, select
- „System“
- „General“
2 Select your preferred system „language“
3 With „Apply“, settings will be saved
Choose your UPS
1 Choose in the menu
- „Devices“
- „UPS“
- „Setup“
2 At „Model“, select the UPS you want to connect to
the Webmanager Setting up a UPS is not necessa-
ry: If you want to use BACS only, select "No UPS
model defined"
3
4 Press „Apply“ to save your settings
Configure the local system time
The time is important for accurate event logging
1 Under „System“ go to „Date & Time“
2 For the quick configuration, just press:
- „Set System Time“
Note:
The Webmanager provides a preset of time servers
- feel free to customize them to fit to your network
Enter a valid IP address
When dealing with large network infrastructures,
a static IP address is recommended
1 Under „System“, select „Network“
2 Enter valid IP address data:
- „IP-Address“
- „Subnet Mask“
- „Default Gateway“
- „DNS Server“
3 Press „Apply“ to save your settings
This manual suits for next models
5
Table of contents
Popular Industrial Electrical manuals by other brands

Optical Systems
Optical Systems OSD1250 Operator's manual

Keysight Technologies
Keysight Technologies PNA N5224B Installation note

Murata
Murata GRM1555C1H751JA01 Series Reference sheet

Eaton
Eaton DILM17-21 Series Instruction leaflet

Murata
Murata GRM033R61C223ME84 Series Reference sheet

Murata
Murata GRM033C81C104KE14 Series Reference sheet

Murata
Murata GRM31CC81C226ME15 Series Reference sheet

Murata
Murata GRM21BR71E335KA73 Series Reference sheet

Ace
Ace PWM400 quick start guide

Murata
Murata GRM033R61A682MA01 Series Reference sheet

Eaton
Eaton SL800 Classic Instructions for installation, operation and maintenance

Eaton
Eaton MSC-D Series Instruction leaflet