WifiTrax Model Science WDMI-35 User manual
WDMI-35 Wi-Fi/DCC Loco Interface Module Getting Started
WifiTrax Model Science
www.wifitrax.com
WDMI-35 Installation
This document is online at http://www.wifitrax.com/appNotes/quickStart/WDMI-35-Quick-Start.pdf. Please
see our website for information on our limited warranty.
Package Contents
1 x WDMI-35 Module in Static Shielding Bag
Getting Started: WDMI-35 Installation (this document)
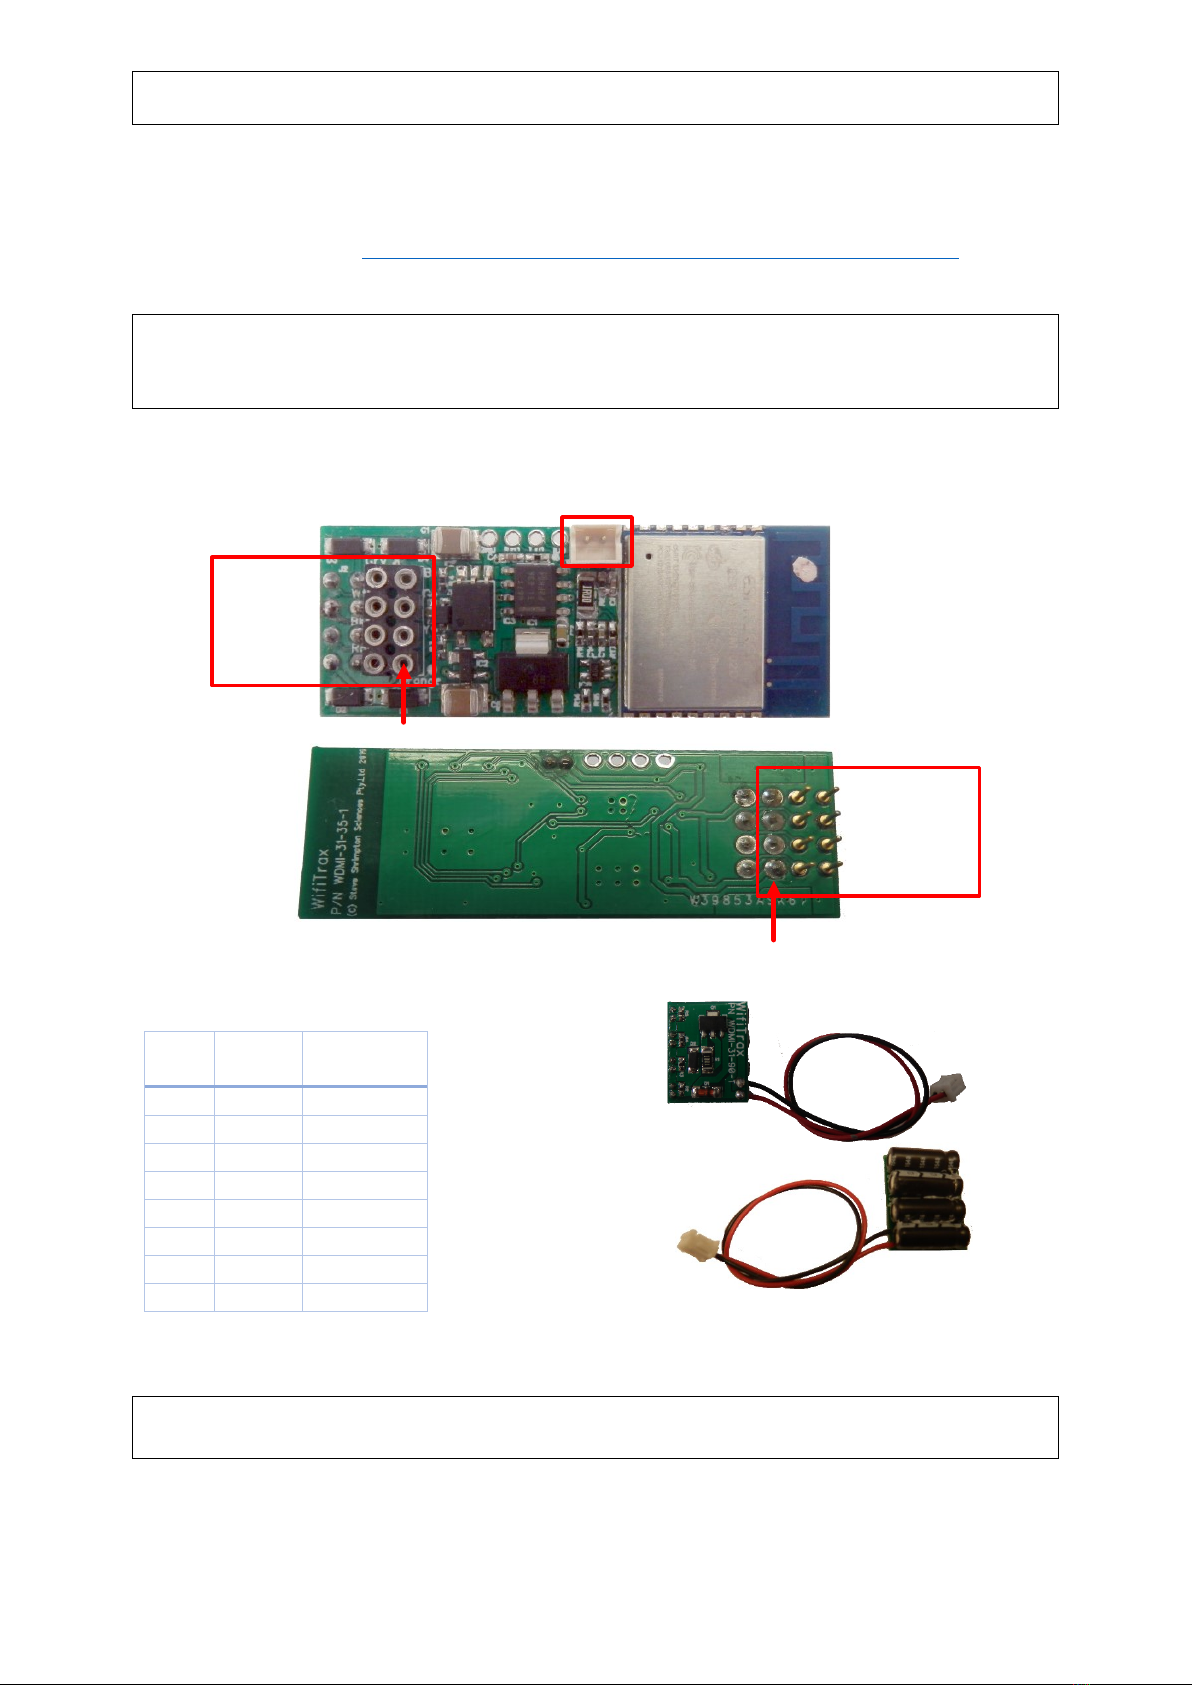
8-Pin
NMRA
DCC
Socket
Capacitive Power
Maintenance Module
(CPM Module)
Pin 1 Orange
4
3
2
1
5
6
7
8
8-Pin
NMRA
DCC
Plug
4
3
2
1
5
6
7
8
Pin 1 Orange
Figure 1. WDMI-35 Connections
Pin
Wire
Color
Function
1
Orange
Motor +
2
Yellow
Rear Light
3
Green
Unused
4
Black
Track -
5
Gray
Motor -
6
White
Head Light
7
Blue
Common
8
Red
Track +
Table 1 Standard NMRA 8-pin Connector Pin Definitions Figure 2 CPM-10 Optional Power Maintenance Module
This product is not a toy. Keep away from children. It is not suitable for use by persons under 14
years of age.
WDMI-35 Wi-Fi/DCC Loco Interface Module Getting Started
WifiTrax Model Science
www.wifitrax.com
Installation Instructions
The WDMI-35 should be mounted within a locomotive with the 8-Pin NMRA DCC plug inserted into
the corresponding DCC-Ready 8-pin socket on the locomotive’s circuit board. Any DCC decoder with
an NMRA 8-pin plug may then be inserted into the 8-Pin NMRA Socket on the WDMI-35. For
smoother running you can insert the 2-pin plug of our CPM-10 (sold separately) into the 2-pin CPM
Socket on the WDMI-35. The CPM-10 will provide up to 5 seconds of running over dirty track, dead
frogs etc.
(1) Remove the shell from your locomotive and carefully check the location of everything inside
the locomotive including where the optional CPM-10 module will be placed.
(2) Insert the plug on the base of your WDMI-35 module into the 8-pin DCC-Ready socket on
your locomotive’s circuit board. Be sure to insert the module such that pin 1 goes into the
pin-1 socket. See Figure 1. Be sure the underside of the WDMI-35 does not touch any metal
objects on the locomotive circuit board. If necessary use a layer of electrical tape under the
WDMI-35 between it and the locomotive circuit board or any protruding components.
(3) Insert the 8-pin plug of your DCC decoder into the 8-pin NMRA DCC Socket on the WDMI-35.
Be sure that the orange lead of the harness or pin 1 goes into the pin-1 socket. See Figure 1.
(4) If required, insert the 2-pin plug of your CPM-10 module into the CPM Module 2-pin socket
on the WDMI-35. The plug and socket are designed to only be inserted the correct way
around. Do not force the plug into the socket the wrong way around!
(5) Ensure that all modules are in their place and nothing is shorting. You can mount the CPM-
10 with blue-tack or adhesive mounting tape. Any loose wires can be fixed in tidy positions
with blue tack or similar to avoid getting pinched when you replace the plastic shell.
Setup and Operating Instructions
The WDMI-35 can be set up and operated from our free Loco Operator App for Windows and
Android. Loco Operator Version 3.2 (Beta 2) or greater is required.
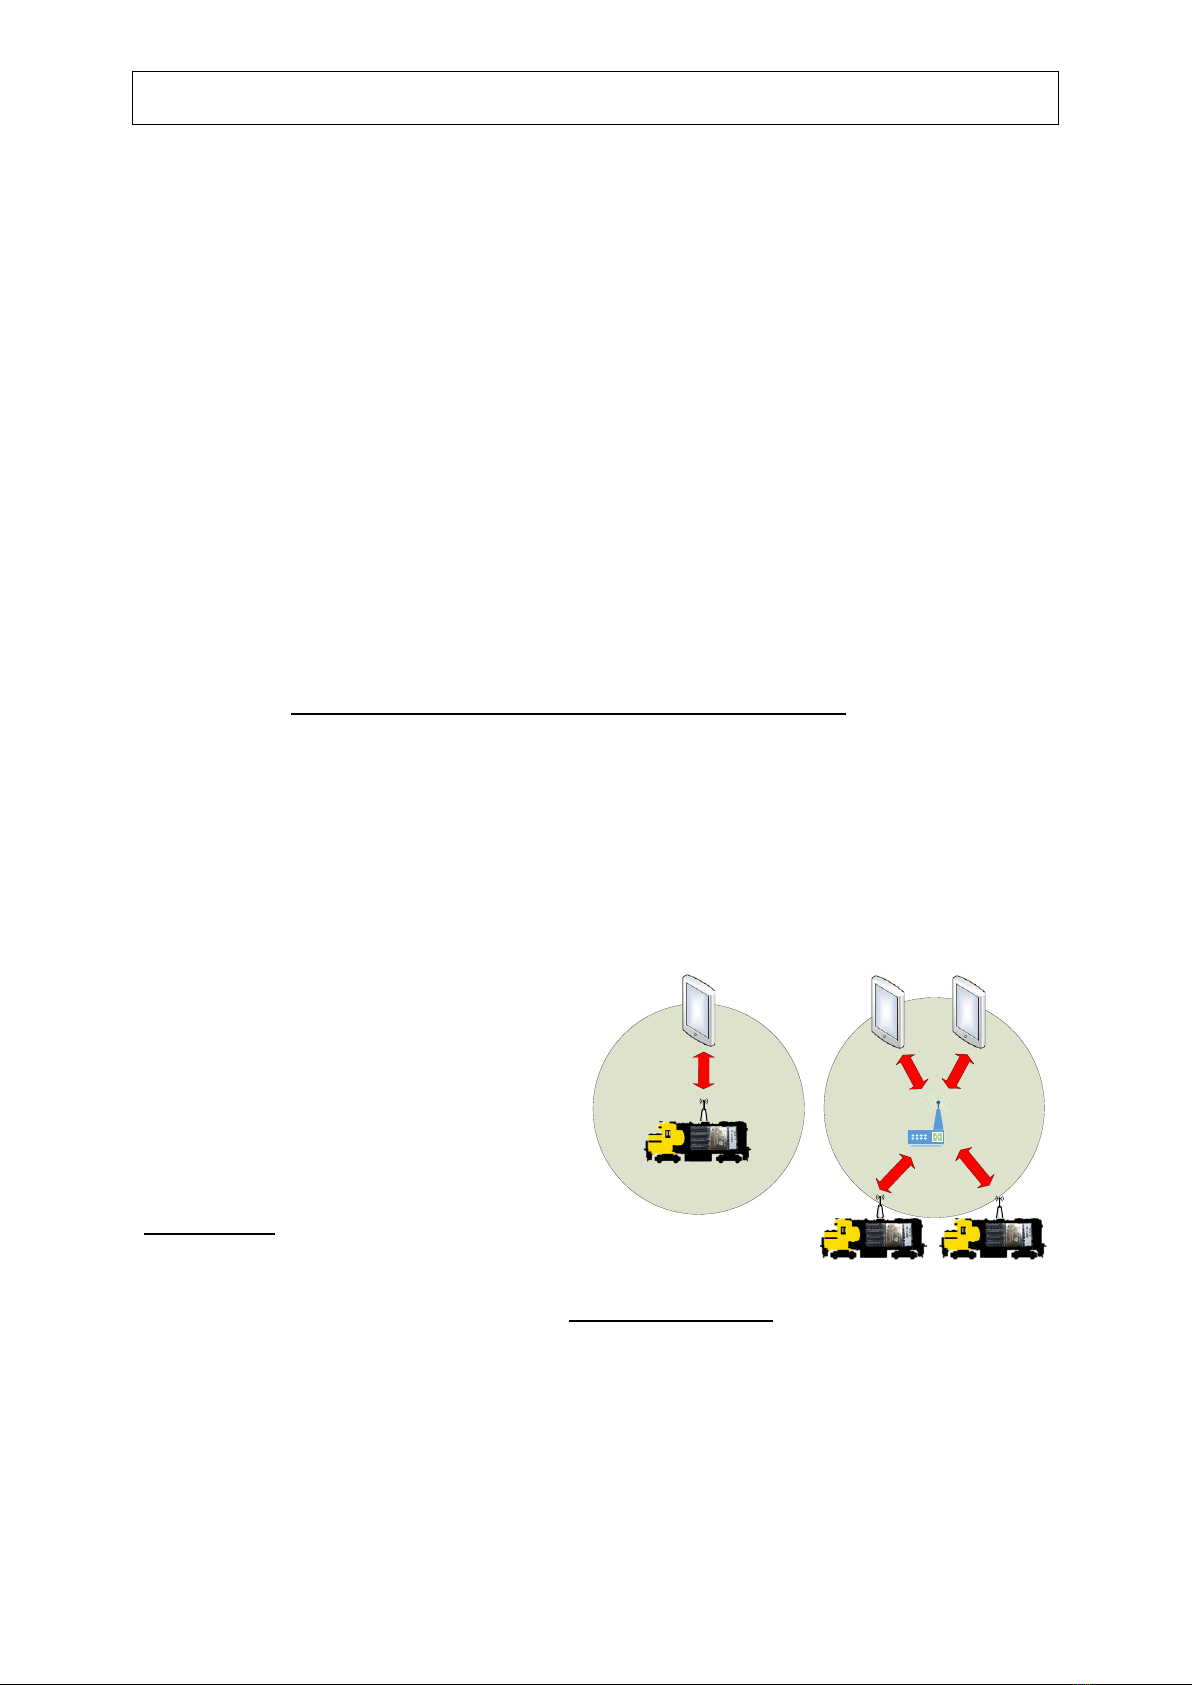
Wi-Fi - Direct and Infrastructure Modes
There are two ways of driving your loco over Wi-Fi:
Direct Mode and Infrastructure Mode.
When you set up your first installation of
WDMI-35 the Install Wizard gives you two
choices in the way that you configure your Wi-
Fi operation of locomotives, Direct Mode or
Infrastructure Mode.
In direct mode, your computer, tablet or phone
must be connected to the Wi-Fi Access Point within the loco’s installed
WDMI-35. In this mode, you can only operate one locomotive controller with each installation of
Loco Operator on a computer, tablet or phone. In Infrastructure Mode, the locomotive and your
computer, tablet or phone all connect as Wi-Fi Stations to your Home Network Router –your Home
Net. You can then build a full model railroad network with many locos, switch machines, computers,
tablets and phones. You can drive two locos with each installation of Loco Operator, you can run
multi-unit consists and you can control switch machines and power. If you start in Direct Mode, you
can later use the Loco Operator Install Wizard to convert to Infrastructure Mode which generally
works best. Sometimes you may not want to use a router –such as in a Garden Railway –and stay in
Direct Mode.
Direct Wi-Fi Mode Infrastructure Wi-Fi Mode
Network
Router
WDMI-35 Wi-Fi/DCC Loco Interface Module Getting Started
WifiTrax Model Science
www.wifitrax.com
Installing Loco Operator - Loco Operator 3
These instructions cover both Windows 10 and Android. Follow the steps below according to your
device.
(1) Go to either the Windows Store or the Google Play Store according to whether you have a
Windows or Android computer or tablet. Search for Loco Operator 3. Alternatively go to our
website, use the Products menu to go to the Loco Operator page, find Loco Operator 3 and
click on “DOWNLOAD FROM WINDOWS APP STORE” or “DOWNLOAD FROM GOOGLE PLAY
STORE” according to your device.
(2) Follow the instructions on the Store Page to get and install the app on your device.
Running Loco Operator for the First Time
(1) For easy set-up, have your first WifiTrax-controller, whether in a locomotive or mounted
trackside, powered up on your layout before you run Loco Operator for the first time.
(2) Android Only: When the app starts for the first time you may be asked to accept that the
app will access files and the device location. You must accept these, then the screen goes
black for a few seconds. Wait for the Install Wizard to appear.
This is standard Android behavior.Be advised that Loco Operator absolutely does not access your pictures, any personal files or
any files other than those it generates and no data is uploaded to the internet. Also, the need to access your location is
required to work with Wi-Fi. Loco operator does automatically connect your computer to the Wi-Fi access points of WifiTrax
modules that you have installed and to your Home Network transparently, without prompting. When you have finished driving
trains, you may have to reconnect to your home network to access the internet or other devices such as your printer.
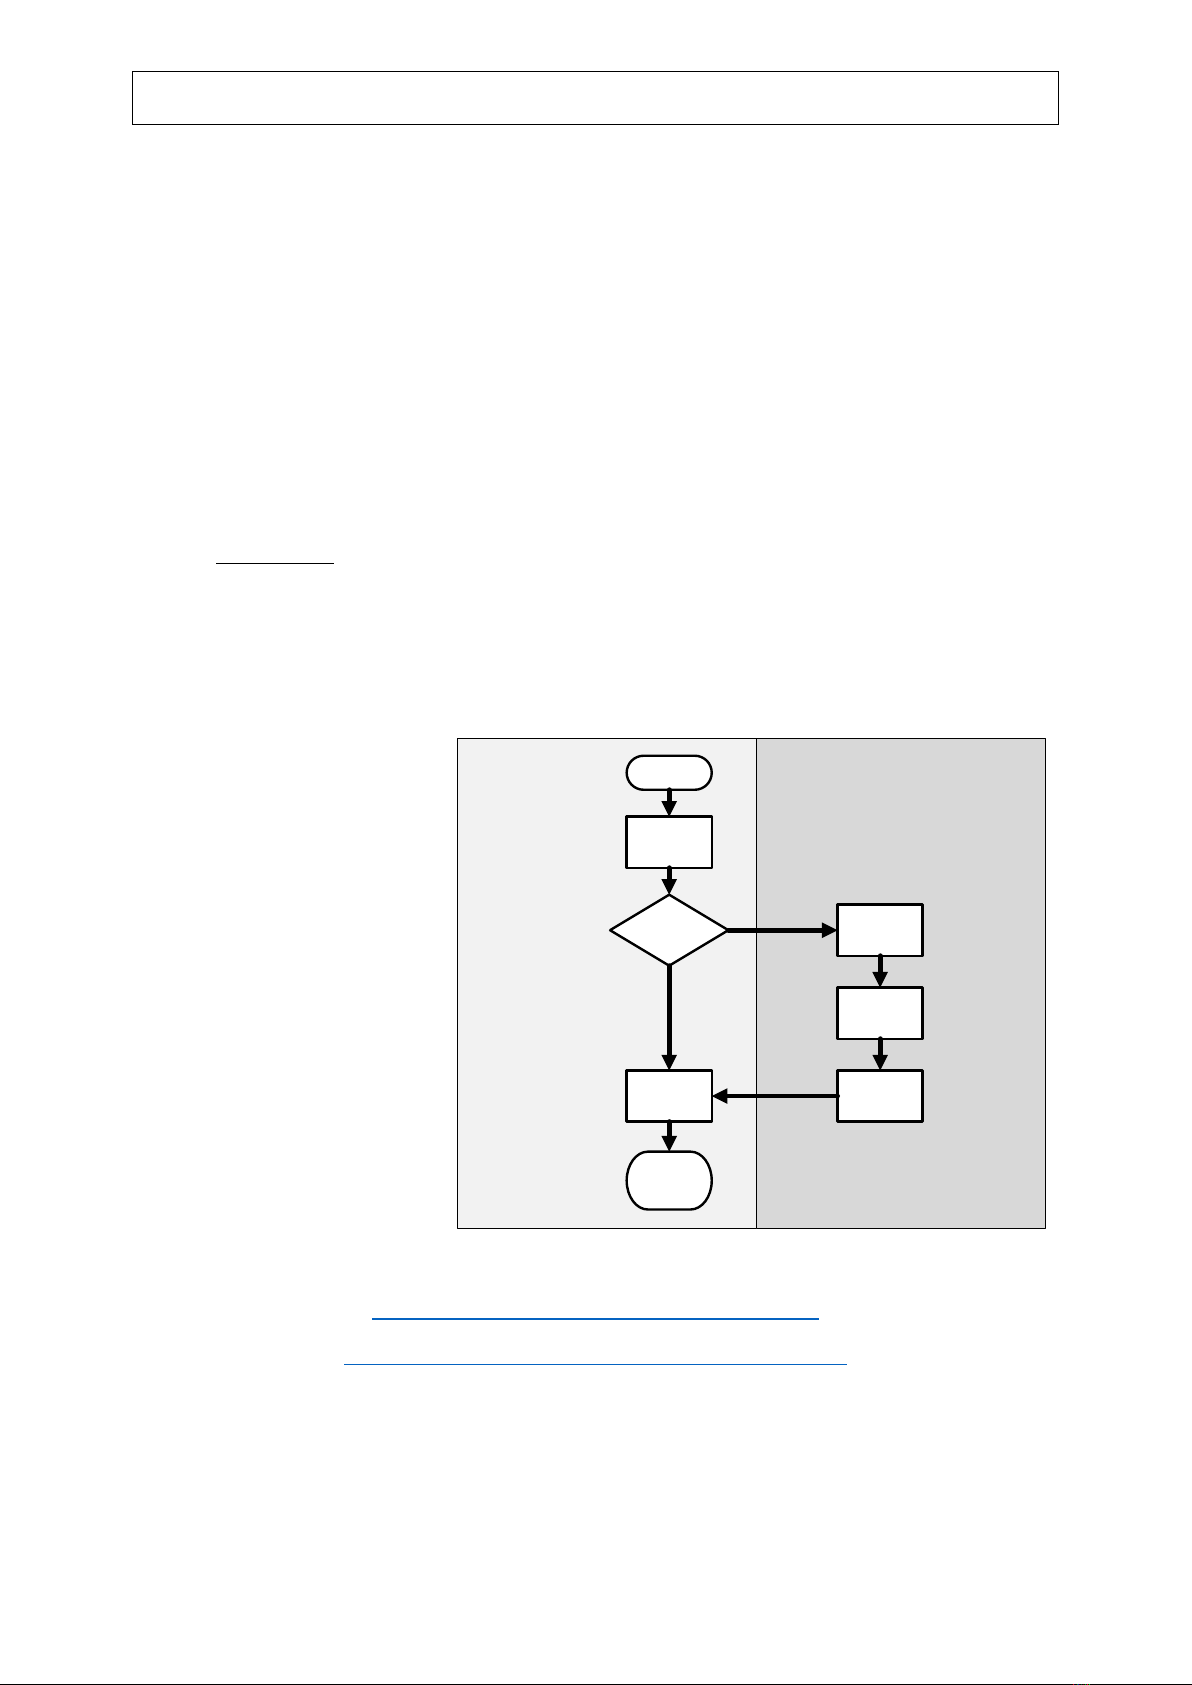
(3) If this is the first time
you have run Loco
Operator, you will
automatically be taken
to the Settings page and
the Install Wizard will
run.
(4) The steps in the Wizard
are explained on each
screen. The flow chart
here should be helpful.
It is much easier to start
in Direct Mode by
saying No to the Home
Net option. You can
convert to
Infrastructure mode
later using the Wizard.
More Information
http://www.wifitrax.com/appNotes/WiFi-DCC.pdf
http://www.wifitrax.com/appNotes/howToArticles.html
Designed and made in Australia from globally sourced components
Infrastructure Mode
Setup
Direct Mode
Setup
Create a Home
Net?
Start
Scan for Visible
Networks
Wizard Page 1
Select Router
Wizard Page 2
Setup Home
Net
Find and Install
Locos on Home
Net
Wizard Page 3
Wizard Page 4
Scan for
Locomotives
Start
Driving
Wizard Page 5
Yes
No
Other WifiTrax Model Science Wireless Router manuals


