Wilbur Curtis Company STBA48026 User manual
Page 1
SETUP STEPS
NOTE: Some type of water ltration device must be used to maintain trouble-free operation.
In areas with extremely hard water, we suggest that a sedimentary, taste and odor lter be
installed. This will prolong the life of your brewing system and enhance tea quality.
1. Locate the brewer on a secure surface. Level it left to right and
front to back by rotating the feet on the 4 corners.
2. Connect a water line from the water lter to the brewer.
Plumb water lines. A 1/2” hose barb has been supplied for water
line connections. See page 3 for location.
Use tubing sized sufcient to provide a minimum of 3.0 gpm for the ambient INLET WATER
(2 places) and CHILLED WATER connections.
3. Connect the CO2 or compressed air line.
4. Connect the brewer to an electrical outlet with the appropriate
amperage rating (see serial tag on brewer).
continued...
Symbols:
WARNING/CAUTION – To advise about conditions that my result in property damage,
personal injury or death
IMPORTANT – Notes about proper operation
Sanitation requirements
Models covered
• STBA48026
Important Safeguards/Symbols
This appliance is designed for commercial use. Any servicing other than cleaning and routine
maintenance should be performed by an authorized Wilbur Curtis Co., Inc. service technician.
• DO NOT immerse the brewer in water or any other liquid.
• To reduce the risk of re or electric shock, DO NOT open service panels. There are no user
serviceable parts inside.
• Keep hands and other items away from hot areas of the brewer during operation.
• Never clean with scouring powders or harsh chemicals.
Following are the factory settings for the STBA48026 Iced Tea Brewing System:
• Brew Temperature = 200°F
• Brew Volume = Set to dispensing vessel requirements (2.2 liters)
Usually, there will never be a reason to change the programming on the system’s G3 series
controller. However, should you need to make slight adjustments to meet your brewing needs,
programming instructions are provided later in this manual.
System Requirements:
• Water source: 50 – 90 psi (minimum ow rate of 3.0 gpm)
• CO2/compressed air source: 50 psig max.
• Electrical: See schematic in this manual
ISO 9001:2008 REGISTERED
WILBUR CURTIS CO., INC.
6913 Acco Street
Montebello, CA 90640
For the latest information go to
www.wilburcurtis.com
Phone: 800-421-6150
WARNING: Equipment
must be installed to
comply with applicable
federal, state, and local plumbing/
electrical codes having jurisdiction.
WARNING: Follow this
setup procedure before
attempting to use this
brewer. Failure to follow these
instructions can result in injury
and/or void of warranty.
IMPORTANT: After
setup, run a FULL
brew cycle. Place a
tea container to catch both hot
water from the brew basket and
dilution water from spout on the
front cover.
CAUTION: DO NOT
connect the brewer
to hot water. The inlet
valve is not rated for hot water.
WARNING: Use the
leveling legs to level the
brewer only. Do not use
them to adjust brewer height. Do not
extend them higher than necessary.
WARNING: The CO2/
compressed air input
pressure must not
exceed 50 psig.
Wilbur Curtis Co., inC.
Service Manual – McDonald’s Sweet Tea Brewer
NSF International requires the following water connection:
1. A quick disconnect or additional coiled tubing (at least 2x the depth of the brewer) is required so
that the brewer can be moved for cleaning underneath.
2. This equipment is to be installed with adequate back-ow protection to comply with applicable
federal, state and local codes.
3. Water pipe connections and xtures directly connected to a potable water supply shall be sized,
installed and maintained in accordance with federal, state and local codes.

Page 2
Wilbur Curtis Co., Inc.
SETUP STEPS (CONT.)
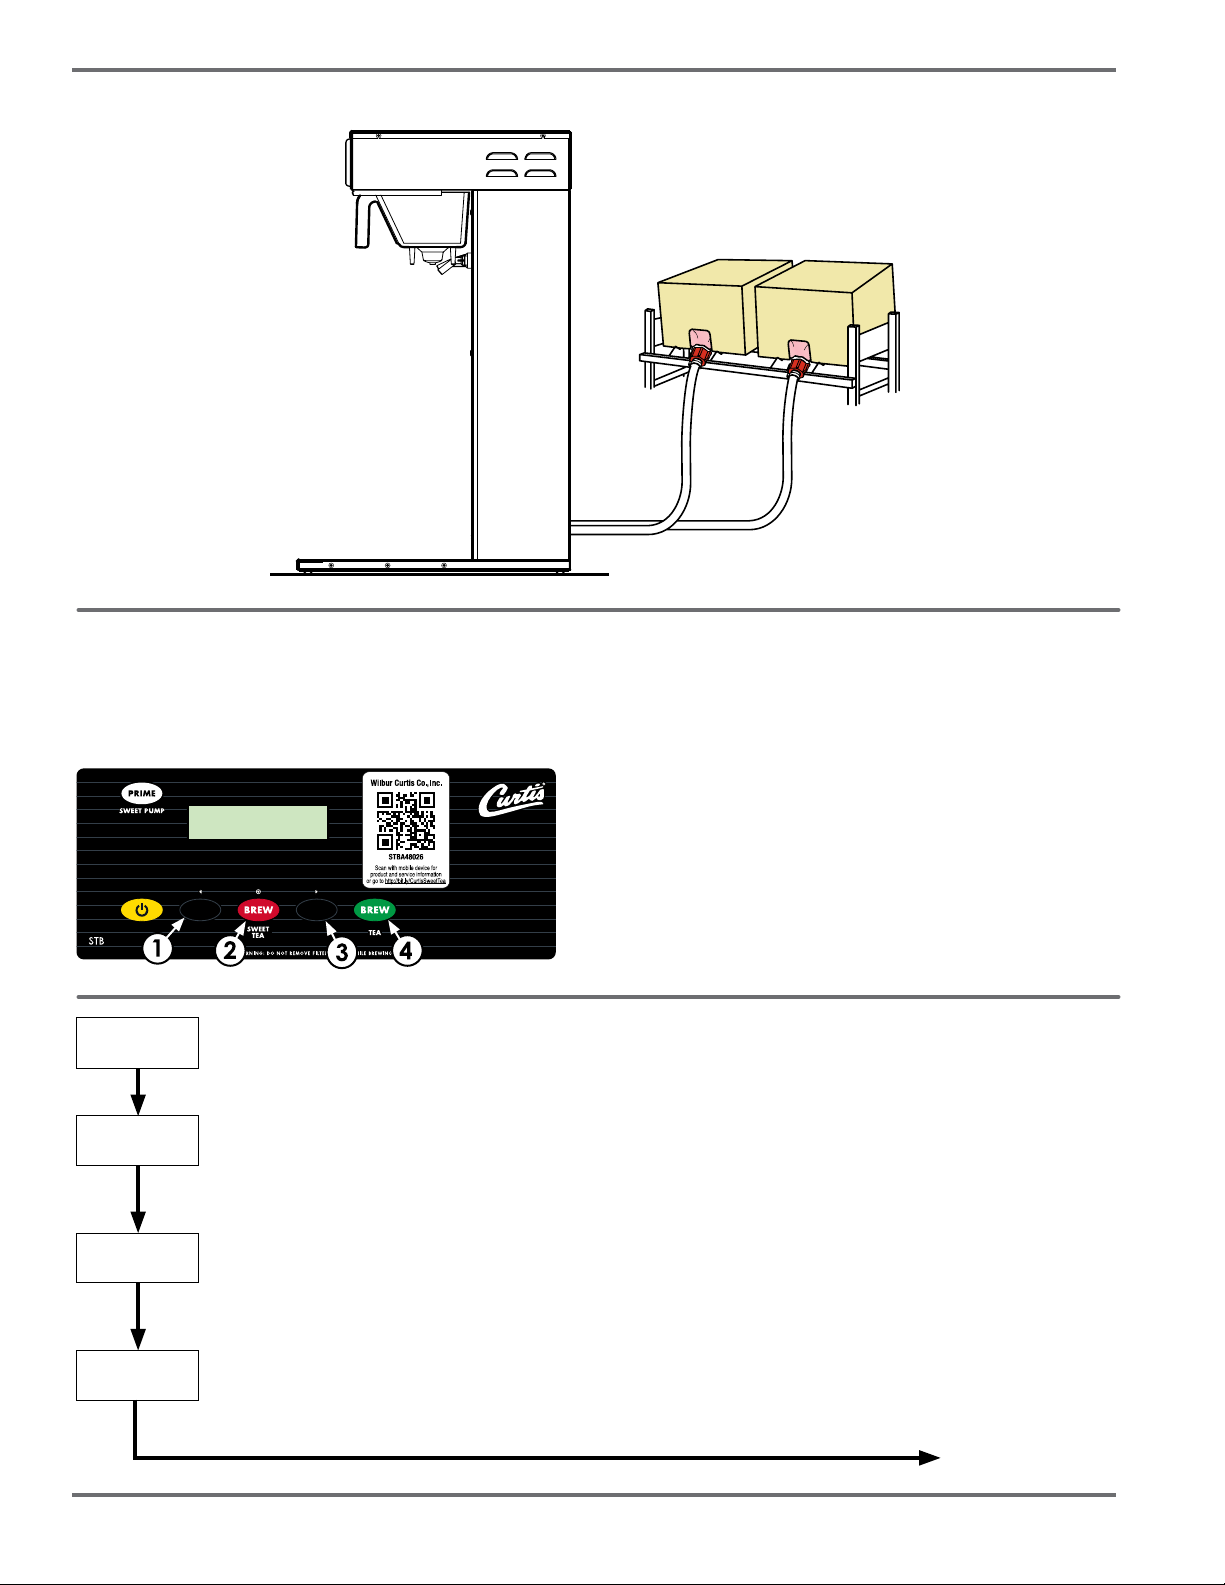
5. Connect two Bag-in-Box (BIB) sweeteners to the brewer sweetener supply hoses as instructed
on page 5. Connecting two bags allows the brewer to continue operating if one bag runs out.
6. Turn on the main power switch (toggle switch, behind the brewer). The heating tank will start to
ll. When the water level in the tank rises to the correct volume, the heating element will start
automatically. This eliminates the possibility of element burnout caused by heating with an empty tank.
7. Place a quart or larger container under the spout assembly. Press and hold the PRIME button
to draw the sweetener through the system. Release the PRIME button when sweetener begins
to ow out of the spout without any air bubbles (about 20 ounces).
8. The heating tank will require 20 to 30 minutes to reach operating temperature (200°F) indicated by Ready to Brew on the
display.
9. Enter programming mode on the universal control module (UCM) to choose the brewer operation mode (Model Select).
Turn off power at the ON/OFF (yellow) button. Press and hold the green BREW button (button 4, see diagram below). While
holding down the BREW button, press and release the ON/OFF button. Continue to hold the BREW button, until Entering
Programming Mode appears on the screen. Enter the access code when prompted (Enter Code). The default code is 1-2-3-4.
< Program Menus > will appear on the display.
10. Press button 3 (►) repeatedly until Model Select appears on the display. Press button 2 () to enter the Model Select sub-
menu. Press button 3 (►) repeatedly until the desired model appears on the display*. Press button 2 () to save and exit. The
UCM will reset.
* For iced coffee models, a different UCM label is required. Order Curtis kit # WC3423K.
IMPORTANT: The
sweetener must be
between 50°F and 120°F
(10°C and 49°C) for proper operation.
IMPORTANT: For proper
operation, the sweetener
pumps must be primed
before using for the rst time. After
initial priming, the pumps prime
automatically when sweetener bags
are replaced.
TEA BREWER
CONTAINER
TO CATCH
SWEETENER
SPOUT
ASSEMBLY
PRIME
BUTTON
Programming Buttons
<Program Menus >
Select

Page 3
Service Manual - STBA48026 Tea Brewer
11. Center an empty tea dispenser under the brew basket. Press the SWEET TEA BREW button to run one full brew cycle with the
brew basket empty (Ready to Brew must be on the display). This process will purge the hoses and valves of any remaining air.
Sweet Tea Brix Measurement Procedure
1. Brew a batch of sweet teat into a tea dispenser according to the brewing instructions on the following page.
2. Wait for Brewing to disappear from the display. Allow the tea to cool to room temperature.
3. Dispense a full cup of cooled tea from the dispenser into a clean, empty 16 ounce cup.
4. Use a refractometer to test the Brix level of the tea according to the refractometer manufacturer’s instructions. The reading
should be between 9.8 and 12.8 for regular sweet tea and between 11.8 and 14.8 for southern sweet tea.
5. Dispense a second full cup of tea into a separate, clean, empty 16 ounce cup from the same dispenser. Run the refractometer
test a second time to validate the results. The reading is considered accurate when the test is run twice on the two cups of tea
and the results are approximately the same. If the results vary, try running the two tests again.
6. If the Brix level is outside of specications, check the following:
A. Check to make sure that the sweetener BIB feed system is properly primed. Air bubbles in the system will affect the Brix
level.
B. Was a full brew cycle run to remove any additional air from the system?
C. Check to make sure that the tea dilution time is properly set for the model selected, 1:10 for regular sweet tea, 1:05 for
southern sweet tea.
D. Did you run the refractometer test twice to validate the results?
E. Does the water supply meet specications (3.0 gpm with a water pressure between 50 and 90 psi)?
All the above factors can affect the Brix measurement. If all of the above conditions have been met, and the Brix
measurement is out of specications, call technical support.
REAR PANEL CONNECTIONS
BACK PANEL
OF BREWER
MAIN POWER
SWITCH CO2/
COMPRESSED AIR
CONNECTION
CHILLED
WATER INLET
(DILUTION)
POWER CORD SWEETENER
SUPPLY HOSE
SWEETENER
SUPPLY HOSE
AMBIENT
WATER INLET
(TANK)
AMBIENT
WATER INLET
(BLEND)

Page 4
Wilbur Curtis Co., Inc.
IMPORTANT: The ow of tea may pause for up to 10 seconds during brewing. This is normal.
BREWING INSTRUCTIONS
WARNING: HOT LIQUID - TO AVOID SCALDING, AVOID SPLASHING. DO NOT REMOVE BREW BASKET WHILE “BREWING”
APPEARS ON THE DISPLAY.
1. If it is not on, make sure that the toggle switch on the back of the brewer is in the ON position, then press the ON/OFF (yellow)
button on the front panel. Ready to Brew must appear on the display.
2. Place a tea pouch in the brew
basket. 3. Slide the brew basket into the brew
rails. Push it all the way in until it
stops.
4. Place a tea container on the brew
deck. Select a BREW button and
press to start a brew cycle.
TEA TIPS
• Store tea bags in a dark, cool and dry place away from strong odors and moisture. Do not
refrigerate.
• Do not hold brewed tea overnight.
• Make sure your equipment is clean at all times. Clean tea brewing equipment at least once per
day.
• Sanitize equipment at least once per week.
• Do not let fresh-brewed iced tea sit at room temperature for more than 8 hours.
As with other food products, if you adhere to proper preparation, holding and sanitation procedures, fresh-brewed iced tea is a safe
beverage. The primary cause for high bacteria counts found in tea from food service businesses is related to excessive holding
times and/or poor cleaning and sanitizing procedures.
WARNING DO NOT
refrigerate unused
tea overnight for later
consumption.
STBA48026 - SWEET TEA
Your Curtis Sweet Tea Brewer is Factory Pre‑Set for Optimum Performance.
After connection to water and power; the rear toggle switch must be on. You will hear a beep sound, indicating power is available to the controller.
The control displays . Press ON/OFF (yellow) button and the screen will display . After three seconds, is
displayed.
Water will ll the tank (approximately 2-3 minutes depending on water ow rate). When the proper level is reached will appear on the
screen. It takes approximately 20 minutes to reach the set point temperature of 200°F.
The display will show when the temperature reaches the set point (200°F). The brewer is now ready to brew.
MCDONALD’S
Ready to Brew
MCDONALD’S MCDONALD’S
WC786108 REV. B
MCDONALD’S
Filling...
MCDONALD’S
Heating...

Page 5
Service Manual - STBA48026 Tea Brewer
The PRIME button is used to ll the sweetener hoses when the unit is rst installed or after servicing. The system
automatically rells the hoses when the BIB is changed.
When one of the boxes runs out of sweetener, the Change Sweetener message appears on the display. Replace the empty box as
soon as possible, as instructed below. After the Change Sweetener message appears, the brewer will allow for eight more batches
of sweet tea to be brewed before the Sweet Tea Lockout message appears. When this message appears, the brewer will not
allow sweet tea to be brewed (only unsweetened tea). Replace the BIB, then press PRIME to unlock the sweet tea function.
SWEETENER REPLACEMENT/CONNECTION PROCEDURE - BAG-IN-BOX (BIB)
Disconnecting an Empty BIB
1. Locate the empty BIB sweetener container (the lightest one).
2. Remove the QDC at the end of the brewer sweetener hose from
the empty BIB container.
Connecting a New BIB
3. Place the new BIB container on the rack and remove the
cardboard cover labeled OPEN HERE.
4. Twist and remove the shipping cap that covers the spout.
5. Thread the QDC on the brewer sweetener supply hose onto
the bag spout. During operation, make sure that the BIB is
in an inverted position, with the spout and connector pointed
downward. This allows for more complete use of the product
while the bag empties. See the Sweetener Schematic on page
6 for an example of proper sweetener connection.
6. Press PRIME to clear the Change Sweetener message.
Page 6
Wilbur Curtis Co., Inc.
All programming selections are performed with the three center
buttons. The symbols above the buttons are:
To exit: Pressing when Exit is displayed, exits program
mode and returns brewer to normal operation.
PROGRAMMING
ENTER PROGRAMMING MODE: Turn off power at the ON/OFF (yellow) button. Press and hold button 4 (see below), while you
press and release the ON/OFF button. Continue to hold button 4. First Entering Programming Mode will appear on the display,
then Enter Code will appear. Release button 4 and enter the 4-digit access code, the digits 1-4 correspond to the buttons in the
diagram below. The default code set at the factory is 1-2-3-4. < Program Menus > will be displayed.
Program Menus
Tea By Time
Tea By Volume
Tea Dilut. Delay
◄Scroll left (button 1)
SELECTION or ENTER to save new parameter (button 2)
►Scroll right (button 3)
Program Menus screen. Press ►button to show the next menu item.
Tea by Volume - Press to select. The display will read “Select Brew Button!”. Press the BREW button for which the
brew volume needs to be changed. “Press BREW to Start” will appear on the display. Press BREW again and hot water
will start dispensing. When the desired volume is reached, press the brew button again to stop the ow. The brew volume
has now been set.
Tea by Time - (factory defaults: SWEET TEA = 4 min. - 36 sec., SOUTHERN SWEET TEA = 4 min. - 36 sec.,
REGULAR TEA = 3 min. - 35 sec., ICED COFFEE = 4 min. - 43 sec.) Press to select. The display will read
“Select Brew Button!”. Press the BREW button for which the brew time needs to be changed. Press the ◄or ►
buttons to select minutes or seconds. Press to change the number of minutes or seconds (when ashing). To exit,
press ►until ex (exit) is ashing, then press .
Tea Dilution Delay - (factory defaults: SWEET TEA = 5 min., SOUTHERN SWEET TEA = 5 min., REGULAR TEA
= 30 sec., ICED COFFEE = 1 min.). Press to select. The display will read “Select Brew Button”. Press the BREW
button for which the dilution delay needs to be changed. Press the ◄or ►buttons to add or decrease time. Press
to set.
continued on next page
SWEETENER SCHEMATIC
TEA BREWER
(SIDE VIEW)
BAG IN BOX (BIB)
SWEETENERS
(2 PER BREWER)
SWEETENER
HOSES

Page 7
Service Manual - STBA48026 Tea Brewer
PROGRAM MENUS (CONT.)
Energy Save Mode
Brew Count Odom.
Brew Count Total
Cold Brew Lock
Tea Dilution Volume - Press to select. The display will read “Select Brew Button!”. The display will read “Press
BREW to Start”. Press the BREW button for which the dilution volume needs to be changed. Press BREW again and
hot water will start dispensing. When the desired volume is reached, press the brew button again to stop the ow. The
tea dilution volume has now been set.
Tea Dilution Time - (factory defaults*: SWEET TEA = 1 min. - 10 sec., SOUTHERN SWEET TEA = 1 min. - 05
sec., REGULAR TEA = 1 min. - 56 sec., ICED COFFEE = 1 min. - 18 sec.) Press to select. The display will
read “Select Brew Button!”. Press the BREW button for which the dilution time needs to be changed. Press the ◄or
►buttons to select minutes or seconds. Press to change the number of minutes or seconds (when ashing). To
exit, press ►until ex (exit) is ashing, then press .
Tea Drip Out - (factory defaults: SWEET TEA = 4 min., SOUTHERN SWEET TEA = 4 min., REGULAR TEA = 3
min., ICED COFFEE = 3 min.) Press to select. The display will read “Select Brew Button!”. Press the BREW
button for which the Drip-Out needs to be changed. Press the ◄or ►buttons to add or decrease time. Press
to set.
Sweetener Count - (factory default: SWEET TEA = 42, SOUTHERN SWEET TEA = 50) Press to select. Press
the SWEET TEA BREW button. Press the ◄or ►buttons to increase or decrease the count. Press to set.
Blend Time - (factory default: 13 sec.) Press to select. Press the SWEET TEA BREW button. Press the ◄or
►buttons to select seconds. Press to change the number of seconds (when ashing). To exit, press ►until
ex (exit) is ashing, then press . NOTE: Minutes are not programmable.
Prime Sweetener Pump - Performs the same function as the PRIME button on the front of the control panel. Press
and hold to prime both sweetener pumps. Turns each sweetener pump on for 3 seconds alternately. Alternates
back and fourth between both pumps until is released. Be sure to have a quart or larger container under the
spout during the priming process.
Prime On/Off - (factory default: On) Press to select. Press ◄or ►to change between On and Off, then
press to set. Enables/disables the PRIME button.
Temperature - (factory default: 200ºF) Press to select. Press ◄or ►to increase or decrease the
temperature, then press to set.
Energy Save Mode - (factory default: Off) Press to select. Press ◄or ►to change between On, Off or On-
140ºF, then press to set. When set to On, the brewer will automatically shut off 4 hours from the last brew. When
the feature is Off, the brewer does not use the energy saving feature. In the On-140ºF position, the temperature goes
down to 140ºF if the brewer has not brewed in 4 hours. This saves energy by lowering the tank temperature during
periods of non-operation.
Brew Count Odometer -(resettable) Press to display the total brew cycles. Press to reset, or press the
button below ex to exit without resetting.
Brew Count Total - (not resettable)
Press to select (display returns to previous display after 5 seconds). Shows the total gallons and total number of
brew cycles on the brewer.
Cold Brew Lock - (factory default: 5ºF) Press to select. Press ◄or ►to select the desired setting (5ºF,
15ºF or Off). Press to set. The cold brew lock feature allows the brewer to brew at three different temperature
levels from the actual set point. The rst setting is within 5 degrees of the set point, next is within 15 degrees of the
set point, Off is within 30 degrees of the set point for the Ready to Brew message, however the brewer will brew at
any temperature.
* Sweet tea and southern sweet tea only.
Prime On/Off
Temperature
Tea Dilut. Time
Tea Dilut. Volume
Tea Drip-Out
Sweetener
Count*
Blend Time*
Prime Sweet
Pump*
continued on next page

Page 8
Wilbur Curtis Co., Inc.
PROGRAM MENUS (CONT.)
Model Select
Displ. Brew Time
Exit
Master Reset Press to display Are You Sure? Then press ◄for yes, or ►for no. When master reset is
used, all of the menu selections in the control module are reset to the factory defaults.
Service Call (phone number factory set to [800] 000-0000) Press to display the phone number. Press ◄or ►
to select each number to change, then press to change the number. To exit, press ►until ex is ashing, then
press . The phone number entered will be displayed during a heating system Sensor Erroror during a Water
Error.
Access Code (factory default is 1-2-3-4) Press ◄or ►to select each number to change, then press to
change the number. Each number can be changed from 1 to 4. To exit, press ►until ex is ashing, then press .
Banner Name (factory default: MCDONALD’S) Press to display the letters. Press ◄or ►to select each
letter to change, then press to change the letter. Up to 14 letters may be programmed. If all blanks are selected,
no banner name will be displayed. The banner name is displayed 5 seconds on and off. To exit, press ►until ex is
ashing, then press .
P-Maintenance (factory default: Off) Sets the number of gallons brewed before P-Maintenance is indicated.
Press to select. Press ◄or ►to adjust from Off to 3000 gallons. Press to exit and save setting.
Beeper On/Off (factory default: On) Press to display the current setting. Pressing either ◄or ►switches
between on and off. Press to set.
Display Brew Time (factory default: On)
Press to display the current setting. Press ◄or ►to toggle between On and Off. When On, the brew time
is displayed and counts down during the brew cycle. When Off, only the word Brewing is displayed during brewing.
Press to exit and save.
Model Select (factory default: STANDARD SWT TEA)
Press to select. Press ◄or ►to choose from STANDARD SWT TEA, SOUTHERN SWT TEA, ICE COF/
SWT TEA, ICE COF/STHN TEA. Press to set. IMPORTANT:
Exit
Press to select, exits program mode and returns the brewer to normal operation.
Beeper On/Off
Master Reset
Service Call
Access Code
Banner Name
P-Maintenance
Page 9
Service Manual - STBA48026 Tea Brewer
ELECTRICAL SCHEMATIC
PIN ASSIGNMENTS (16-PIN) PIN ASSIGNMENTS (5-PIN)
tsriFnoitacinumoC_ataD:10NIPEVLAVDNELB:10NIP
desUtoN:20NIPDESUTON:20NIP
PIN 03: CHILLED DILUTI ON VALVE PIN 03: Not Used
PIN 04: INLET VALVE / TANK PIN 04: Vdd +5Vdc
)nommoC_cigoL(-ssV:50NIPEVLAVWERB:50NIP
PIN 06: TRIAC GATE
PIN 07: TRIAC A2
PIN 08: 120Vac HOT
PIN 09: TEMP SENSOR
PIN 10: TEMP SENSOR
PIN 11: UCM GROUND
PIN 12: WATER LEVEL PROBE
PIN 13: NOT USED
PIN 14: NOT USED
PIN 15: NOT USED
PIN 16: 120Vac NEUTRAL
PIN ASSIGNMENTS (8-PIN) PIN ASSIGNMENTS (4-PIN)
cdV5+ddV:10NIPDESUTON:10NIP
)nommoC_cigoL(-ssV:20NIPDESUTON:20NIP
PIN 03: SWEETENER VALVE LEFT PIN 03: Data_Comunication First
PIN 04: SWEETENER VALVE RIGHT PIN 04: Data_Comunication Next
PIN 05: NOT USED
PIN 06: NOT USED
PIN 07: 120Vac INPUT LEFT
PIN 08: 120Vac INPUT RIGHT
PIN ASSIGNMENTS (8-PIN) PIN ASSIGNMENTS (4-PIN)
cdV5+ddV:10NIPDES
UTON:10NIP
)nommoC_cigoL(-ssV:20NIPDESUTON:20NIP
PIN 03: PRESSURE SWITCH LEFT (N.O.) PIN 03: Data_Comunication First
PIN 04: PRESSURE SWITCH RIGHT (N.O.) PIN 04: Data_Comunication Next
PIN 05: NOT USED PIN ASSIGNMENTS (2-PIN)
)nommoC_cigoL(-ssV:10NIPDESUTON:60NIP
PIN 07: PRESSURE SWITCH RI GHT (COM) PIN 02: Vdd +5Vdc
PIN 08: PRESSURE SWIT CH RIGHT (COM)
CONTROL MODULE UCM
CONTROL MODULE SWEETENER VALVES
CONTROL MODULE PRESSURE SWITCHES
Page 10
Wilbur Curtis Co., Inc.
CAUTION: DO NOT
use undiluted bleach
or chlorine.
WARNING: Electric
Shock Hazard
Disconnect electrical
power before removing
access panels.
WARNING: Scald
and Burn Hazard
Allow water and
brewer to cool before
disassembly.
Daily Cleaning
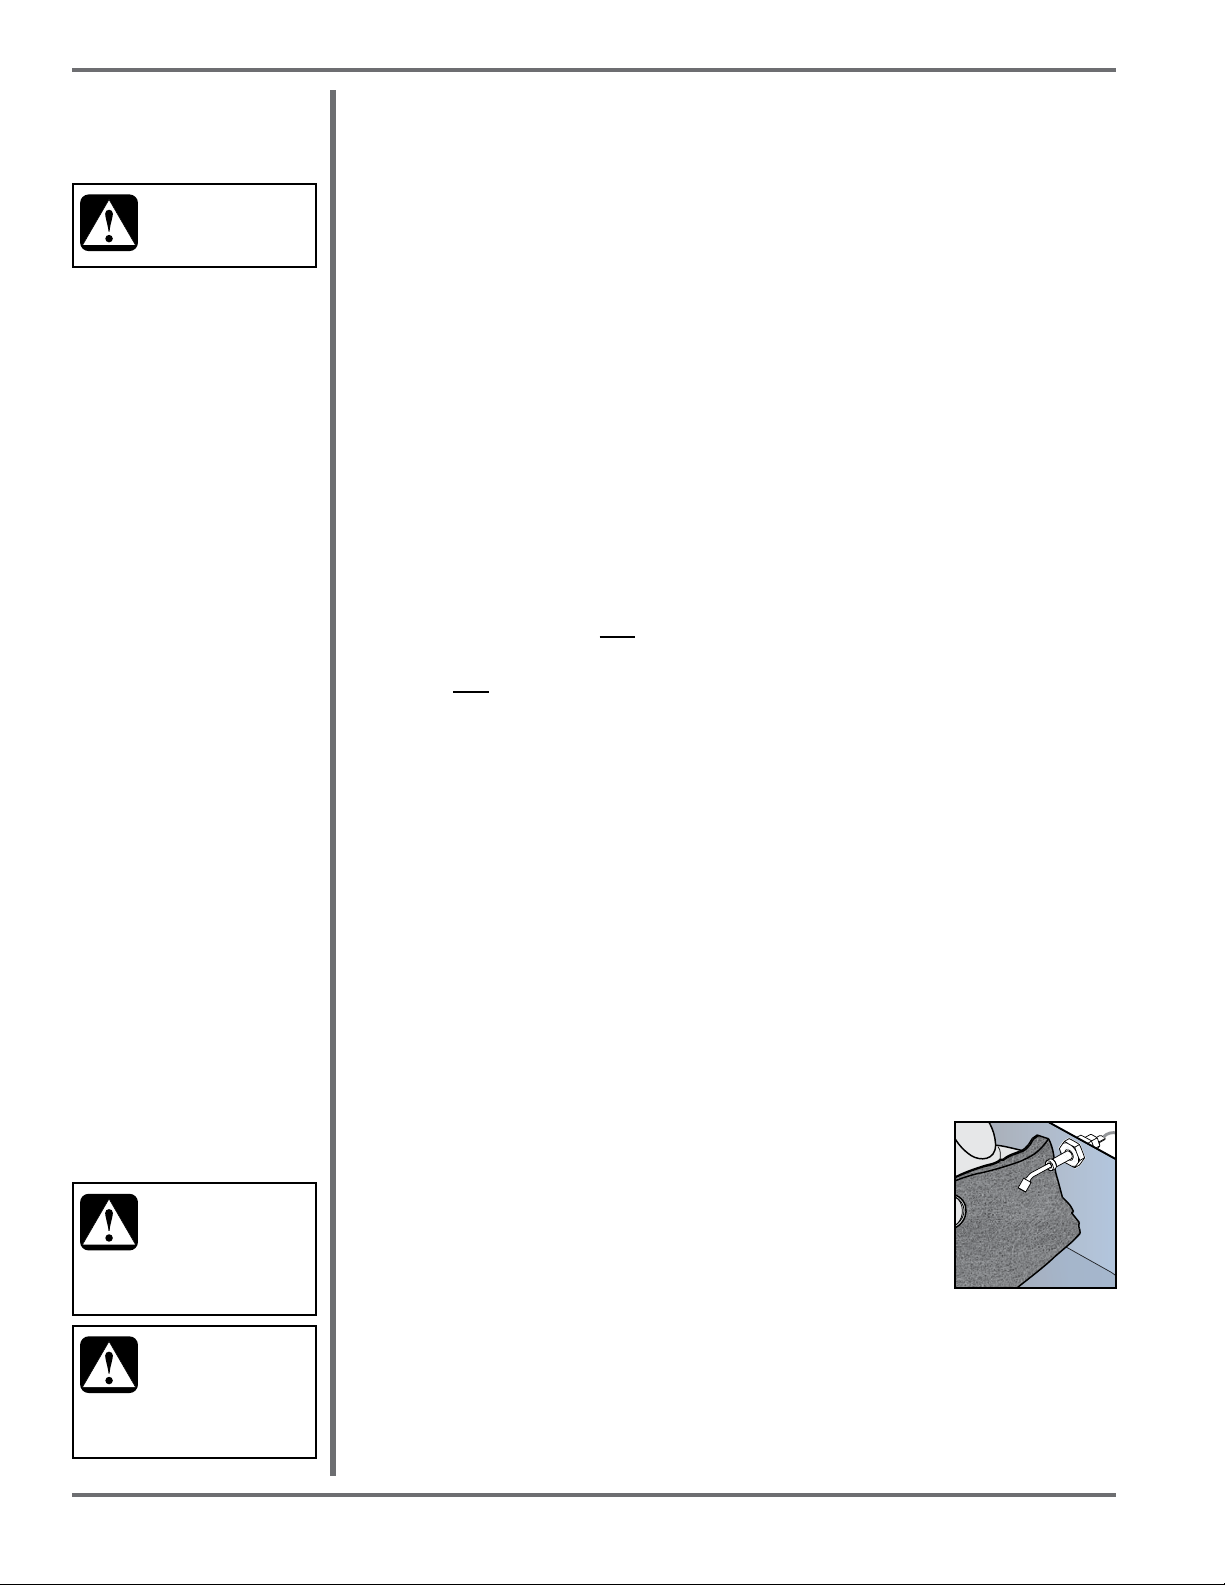
1. Wipe any spills, dust or debris from the exterior surfaces with a damp cloth. The outside
surfaces of the brewer should be cleaned with stainless steel polish only, to prevent
scratches.
2. Clean the spray head and domed area around the spray head with a mild detergent and
warm water solution. Scrub well to remove residue. Rinse with clear water. Dry with a clean
cloth.
3. Remove and thoroughly clean and sanitize the entire plastic brew basket, the four legs and
the basket orice using a mild detergent solution and hot water. Dry it before use or put it
through a dishwasher cleaning cycle, then dry before use.
4. Wash the tea container. Clean the container and the top cover with a detergent solution.
TEA BREWER
CLEANING
SWEET TEA MIXING
SYSTEM CLEANING
AND SANITIZING
LIQUID LEVEL
PROBE
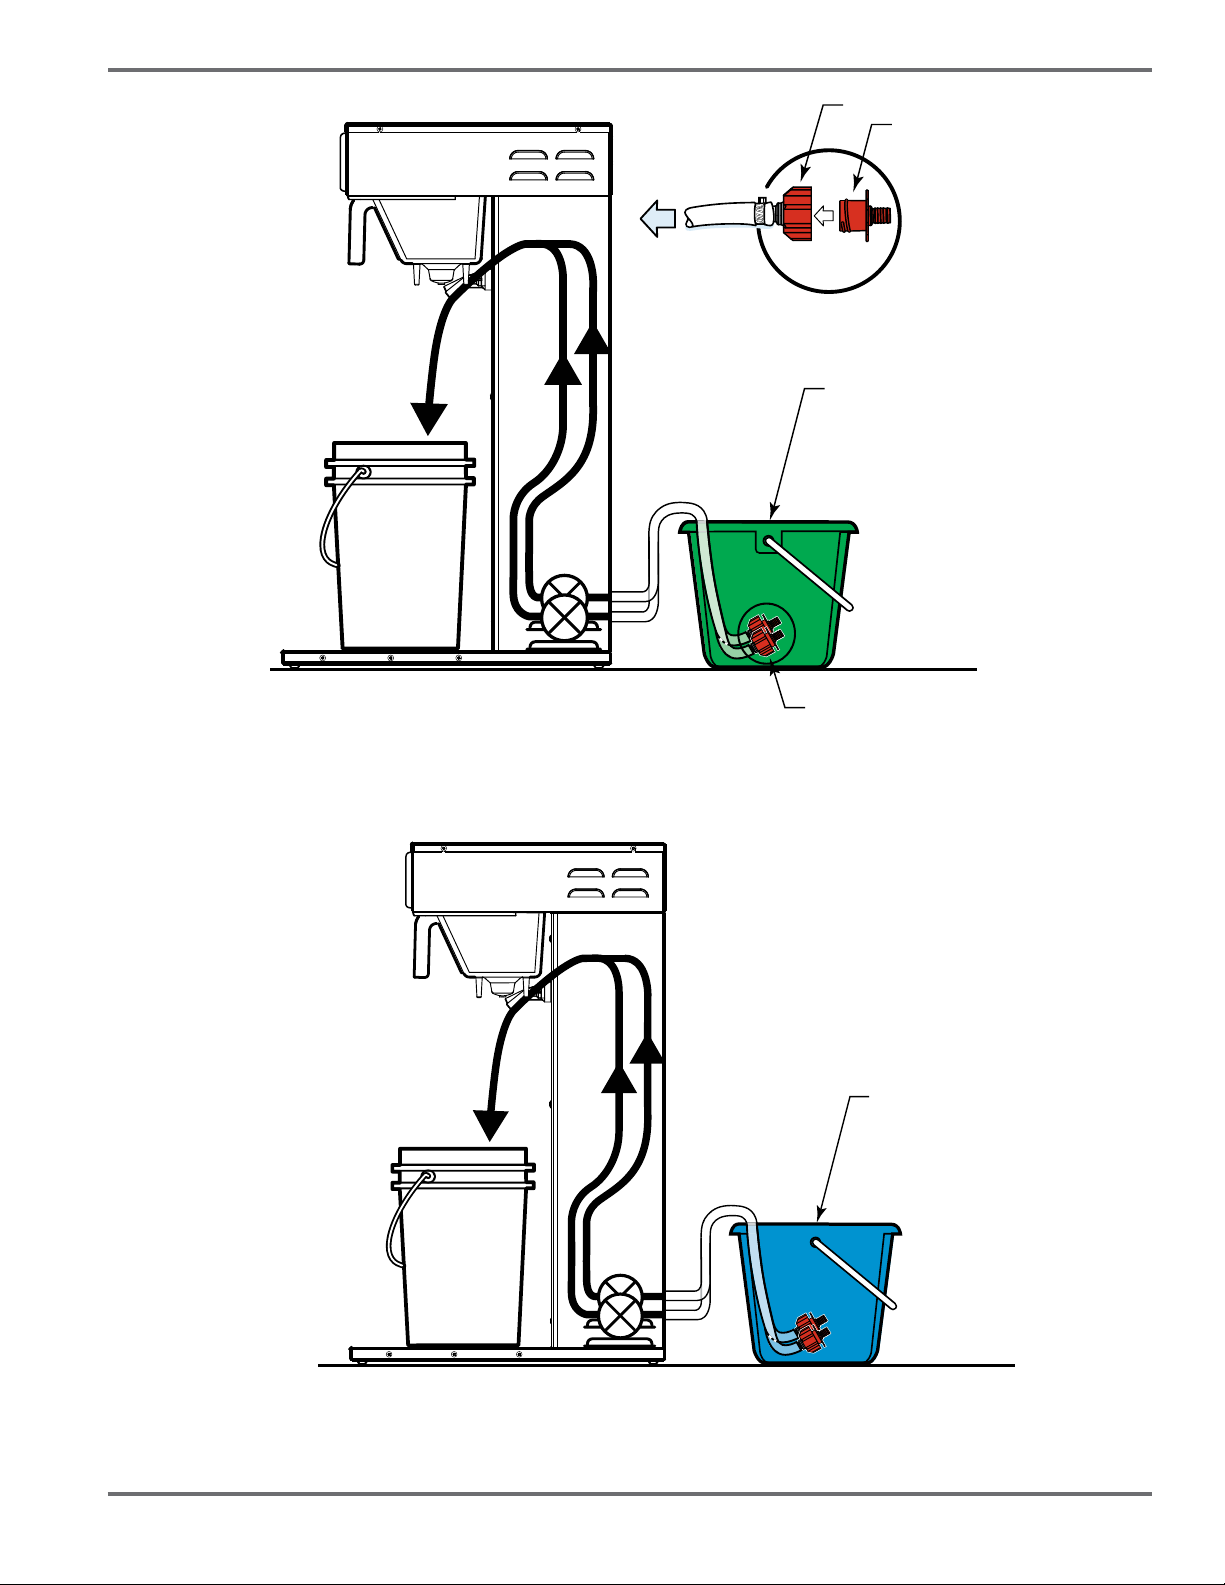
Weekly Cleaning and Sanitizing
Use a concentrated cleaning solution to simplify the cleaning procedure. This procedure requires
a one gallon bucket of cleaning solution of warm water and a granulated concentrated sanitizer/
cleaner, diluted as specied by the manufacturer in a one gallon bucket of clean warm water
(maximum 120ºF).
1. Make sure the brewer is on and the water supply is hooked up.
2. Remove both quick disconnect connectors (QDCs) from the tea sweetener bag-in-box
(BIB) product bags.
3. Attach male hose ttings to both QDCs. IMPORTANT: The cleaning process will not work
without both male hose ttings attached. See the diagram on the following page.
4. Immerse both QDCs, with male hose ttings attached in the bucket of cleaning solution.
5. Place an empty tea container on the brew deck and an empty brew basket below the spray
head.
6. Press and hold the PRIME button to draw the cleaner through the system. Release the
PRIME button when there is about 2 inches of cleaning solution in the bottom of the bucket
under the brew basket.
7. Allow the brewer to sit for the amount of time specied by the sanitizer/cleaner manufacturer
with the cleaning solution in the sweetener hoses/lines before ushing the cleaning solution.
8. Flush the system by lling a one gallon container with clean hot water (no cleaning solution).
Immerse BOTH quick disconnect connectors, with male hose ttings attached, in the bucket
of hot water. Press and hold the PRIME button to draw the hot water through hoses until all
the cleaning solution has been ushed from the system.
9. Discard solution that poured into the container under the brew basket.
10. Remove the QDCs from the hot water and remove the male hose ttings.
11. Reconnect both QDCs to the BIB sweetener bags.
12. Use the PRIME button to prime both sweetener lines.
The cleaning interval for the probe is determined by the user or the service
technician, based on water conditions. Use of a water lter and the type
of water lter used impacts the service interval. The service interval can
be from one month to several years, based on water conditions. However,
replacing the probe is preferred to cleaning it.
1. Unplug the power cord and shut off the water supply.
2. Remove the top cover of the brewer. Locate the water tank and
remove the top cover. Make sure the tank and water inside have
cooled before proceeding to the following steps.
3. Drain the tank to a level about 3” below the tip of the probe.
4. Clean the tip of the probe using a Scotch-Brite™ scuff pad.
5. If a white residue is still visible on the probe, remove the probe and soak it in vinegar or a
scale removing chemical. Repeat this step until the probe is clean.
Page 11
Service Manual - STBA48026 Tea Brewer
WEEKLY CLEANING AND SANITIZING - DIAGRAM 1
WEEKLY CLEANING AND SANITIZING - DIAGRAM 2
TEA BREWER
TO
SWEETENER
PUMP
MALE HOSE
FITTING
QDC
SWEETENER
PUMPS
FIGURE 1
SEE FIGURE 1
CONTAINER
TO CATCH
USED
CLEANER
MIX CLEANER
IN 1 GAL HOT
WATER
BREW
BASKET
SWEETENER
PUMPS
HOT RINSE
WATER
TEA BREWER
CONTAINER
TO CATCH
USED
CLEANER
BREW
BASKET

Page 12
Wilbur Curtis Co., Inc.
12
14
5
13
16
7
6
6
9
8
24
10
15
15
2
21
2x
3x
3
28
418 19 20
25
27
26
17
22
1
23
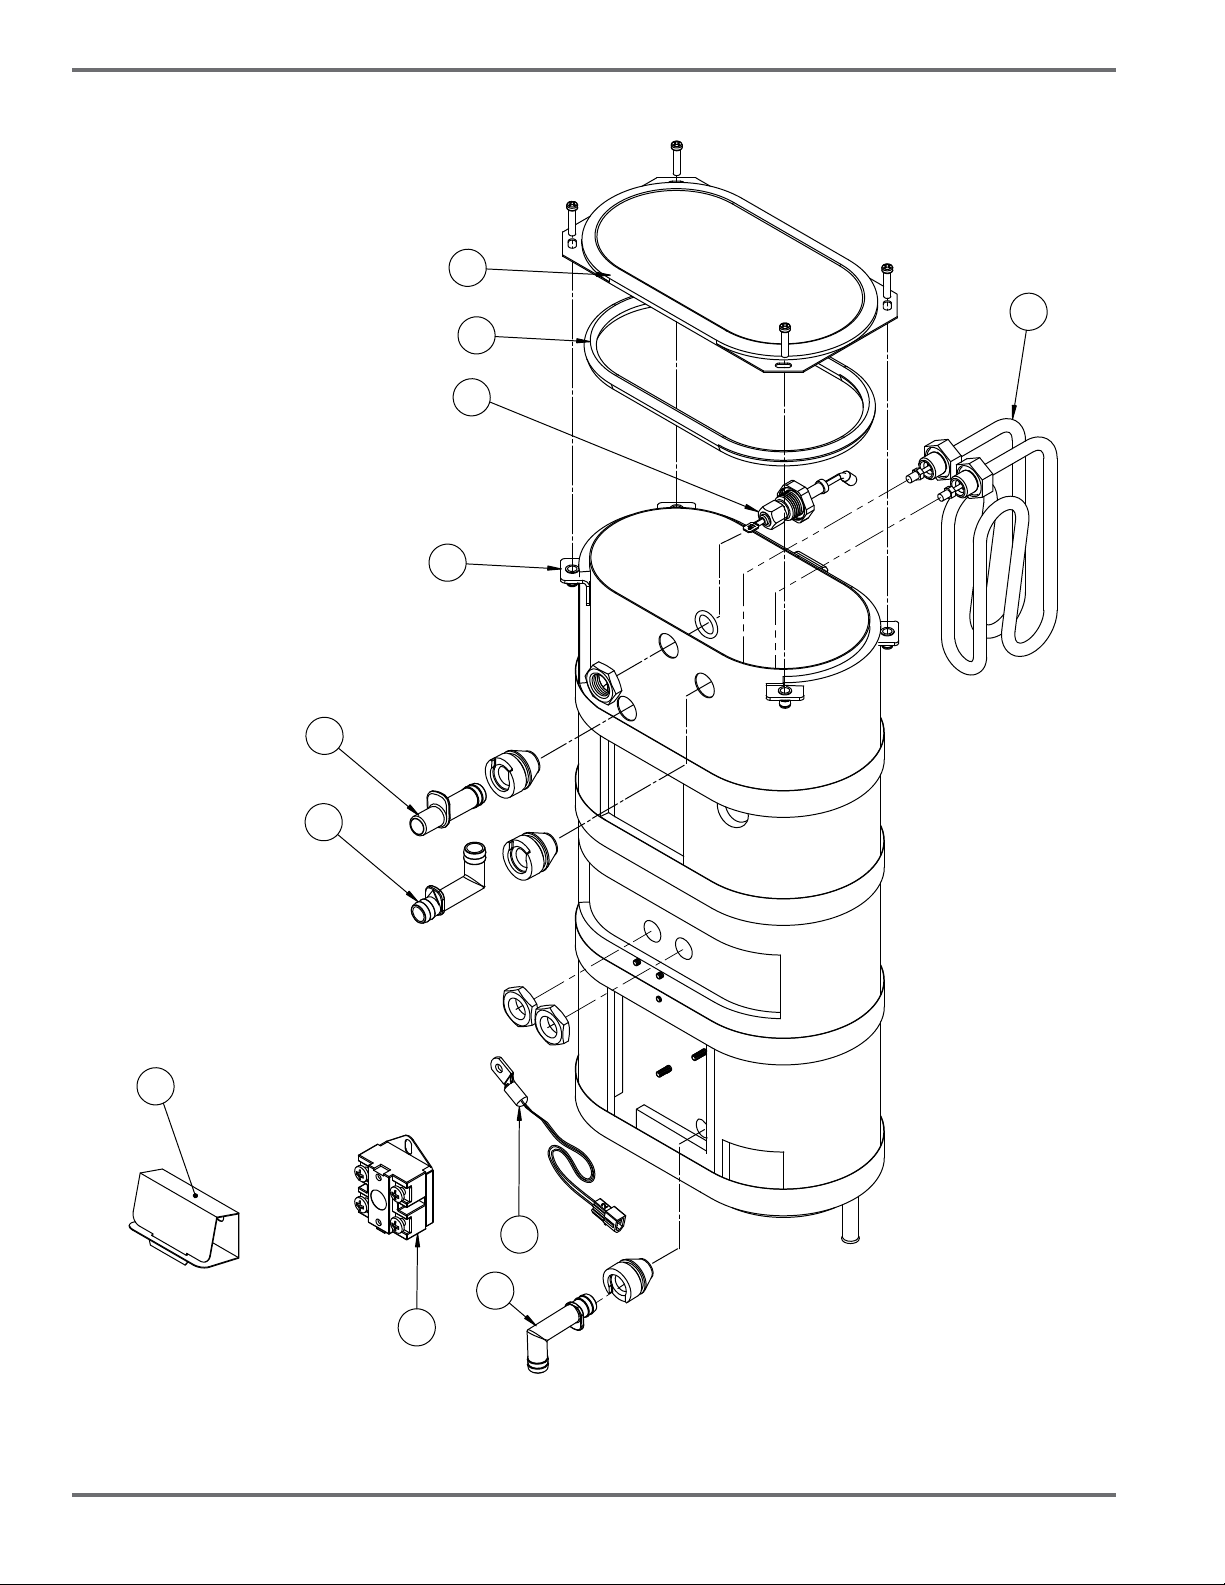
EXPLODED VIEW - MAIN CHASSIS
Page 13
Service Manual - STBA48026 Tea Brewer
PARTS LIST - MAIN CHASSIS
ITEM PART # DESCRIPTION
1aWC-61702 RISER ASSY, SHORT TEA DISEPNSR STBA48026
2 WC-66100 SPOUT ASSY, DILUTION/SWEETENER PLASTIC
3 WC-889 VALVE, DUMP LEFT 120V 12W ALPHA’S/D1000/GEM-12/TLP
4 WC-2977-01 FITTING ASSY, SPRAYHEAD W/O-RING (INCLUDES NUT)
5bWC-29025 SPRAYHEAD, PURPLE ADVANCE FLOW (INCLUDES O-RING AND NUT)
6bWC-826L VALVE, INLET 1 GPM 120V 10W ALP/AP/TLP GREY BODY
7bWC-847 VALVE, INLET 2 GPM 120V-10W GEN USE BROWN BODY
8 WC-29117 FITTING, STRAIGHT 1/2” BARB X 3/8” NPT MALE ST./STL.
9 WC-8661 CONNECTOR, LANCER RED 3/8” BARB 1/4” I.D. SWEETENER BAG
10 WC-10024K KIT, CONTROL MODULE, SWEETENER VALVES
11 WC-10025K KIT, CONTROL MODULE, PRESSURE SWITCHES
12bWC-8556 HEATSINK, ASSY DV ALPDS/D500AP TCTD/PTTD
13 WC-103 SWITCH, TOGGLE NON-LIT DPST 25A 125/250VAC RESISTIVE
14 WC-1226 CORD, 600V 12/4, 6’ W/NEMA PLUG LOCKING L14-20P
15 WC-43059 CLAMP, HOSE SNAP NYLON .616/.707
16 WC-3503 LEG, 3/8”-16 STUD SCREW BUMPER
17 WC-3518 LEG, GLIDE 3/8”-16 STUD SCREW
18bWC-5310 TUBE, 5/16 ID X 1/8W SILICONE GEN USE
19bWC-53145 TUBING, .25” ID X .438” OD BRAIDED PVC STBA48026
20bWC-53114 TUBING, .375” ID X .625” OD BRAIDED SILICONE 60 DUROMETER
21a, b WC-5231 COMPOUND SILICONE, 5 OZ
22 WC-61979K KIT, BOTTOM COVER W/INSERTS
23 WC-58017-106 COVER, FRONT STB MCD
24 WC-43134 O’RING, .426 X 9/16 O.D X .07 0 WALL EDPM TCTS
25 WC-43113 WASHER, .5 ID X .88 OD INTERNAL LOCK STL
26 WC-29118 FITTING, STRAIGHT 1/4” BARB X 1/4” MALE FLARE BRASS
27 WC-2712 ADAPTER, ¼ FLARE FEMALE X 1/4 NPT MALE
28 WC-4320 O’RING, ½” I.D.
aItem sold separately
bRecommended parts to stock

Page 14
Wilbur Curtis Co., Inc.
EXPLODED VIEW - CONTROL PANEL
PARTS LIST - CONTROL PANEL
ITEM PART # DESCRIPTION
1 WC-67101 BRACKET, UCM MOUNT ALPHA-GT D500GT/GTH/D1000GT, GEMINI GT
2 WC-29044 SLEEVE, OVERFLOW ASSY GEN USE
3 WC-786-108 CONTROL MODULE, UCM 120V MCD SWEET TEA BREWER
4 WC-13486 HARNESS, ASSY COMPLETE MCD SWEET TEA
5A WC-390274 LABEL, UCM OVERLAY STB MCDONALD’S
5B WC-390275 LABEL, UCM OVERLAY STB ICED COFFEE MCDONALD’S
6 14287 BREW CONE, NON-METAL McDONALDS
7 WC-58117 COVER, TOP ALPGT/D500GT/D60GT TLP/TCTS/CBS/GEMSS
8 WC-3423 BREW CONE ASSY,MCD ICED COFFEE W/SPLASH POCKET/IC CLIP
9 WC-3423K KIT, (1) WC-3423, (1)WC-390275 (1 ) Bx GEM-6-101 (INCLUDES ITEMS 5B AND 8)
10 WC-3423K-101 KIT,(1)WC-3423,(1)BX GEM-6-101 (INCLUDES ITEM 8 AND 500 FILTERS [NOT SHOWN])
1
3
2
4
5A 5B
7
6
8

Page 15
Service Manual - STBA48026 Tea Brewer
EXPLODED VIEW - SYRUP PUMPS
PARTS LIST - SYRUP PUMPS
ITEM PART # DESCRIPTION
1A WC-1067K-L KIT, PUMP ASSY LEFT STBA48026
1B WC-1067K-R KIT, PUMP ASSY RIGHT STBA48026 (NOT SHOWN)
2 WC-29107 FITTING, Y-BARB 3/8” x 3/8” x 3/8” KYNAR (NOT SHOWN)
3 WC-29100 FITTING, ELBOW 1/4” BARB X 1/8 “ NPT W/ 1/6” BLEED HOLE BRSS
4 WC-29106 FITTING, TEE 1/4” BARB X 1/4” BARB X 1/4” BARB BRASS (NOT SHOWN)
5 WC-1070 SWITCH, PRESSURE (TEC MARK #TBS3000A)
6 WC-1071K KIT, VALVE ASSY SWEETENER W/CONNECTORS & FITTINGS
7 WC-43036 CLAMP, TUBING 10.3-12.8mm SS OETIKER STBA48026
8 WC-43059 CLAMP, HOSE SNAP NYLON .616/.707
9 WC-29099 FITTING, 3/8” BARB X 1/8”NPT STRAIGHT SS
10 WC-29097 FITTING, 1/8” NPT X 1.29” LG. STRAIGHT SS PUMP OUTLET
11 WC-43154 O’RING, .362” I.D. X .103” C.S BUNA-N (2-1110)
6
1A
3
9
11
10
5
7
8
Page 16
Wilbur Curtis Co., Inc.
EXPLODED VIEW - TANK ASSEMBLY
6
5
9
10
8
7
11
1
2
3
4
Page 17
Service Manual - STBA48026 Tea Brewer
PARTS LIST - TANK ASSEMBLY
ITEM PART # DESCRIPTION
1 WC-62108-35 TANK ASSY, COMPLETE 2500 WATT-220VAC 1.63 GAL
2 WC-5527K KIT, PROBE WATER LEVEL O-RING & NUT
3 WC-37266 KIT, FITTING TANK OVERFLOW (INCLUDES BUSHING)
4 WC-37317 KIT, STRAIGHT FITTING & BUSHNG 8mm GEN USE
5 WC-43062 GASKET, TANK LID
6 WC-5853-102 COVER, TOP HEATING TANK GEN USE
7 WC-522 THERMOSTAT, HI LIMIT HEATER CONTROL DPST 277V 40A
8 WC-1438-101 SENSOR, TEMPERATURE TANK
9 WC-4394 GUARD, SHOCK/HEATING ELEMENT FOR SINGLE HEATING ELEMENT
10 WC-37365 KIT, FITTING TANK INLET (INCLUDES BUSHING)
11 WC-934-04 KIT, ELEMENT HEATING 2.5KW 220V W/JAM NUT & SILICONE WASHERS
ERROR CODES - STOPS BREWING
ERROR MESSAGE DESCRIPTION CAUSE
Water Level Error
1-(800)-000-0000 Fill run error/
Overow
The water inlet valve has either been open for more
than 10 minutes on the initial tank ll or has been
open for more than 30 seconds in normal
operation.
Sensor Error
1-(800)-000-0000 Open Probe Break in the temperature thermistor circuit.
Over Temp. Error
1-(800)-000-0000 Excess Temperature The sensor is reading that temperature in the
heating tank has risen above 210ºF.
SweetTea Lockout
Change Sweetener
Press Prime Aftr
Changing Sweetnr
Sweetener BIBs were
not changed
The sweetener BIBs were not changed when the
“Change Sweetener” message appeared and eight
brews were performed. Change the sweetener
BIBs, press PRIME and message clears. Each
message displays for about four seconds.
NOTIFICATIONS - ALLOWS BREWING
MESSAGE DESCRIPTION CAUSE
MCDONALD’S
Change Sweetener
Press Prime Aftr
Changing Sweetnr
One of the
Sweetener BIBs is
empty
One of the sweetener BIBs is empty and has run
out of product. With this message on, you are
able to make only eight brews before changing the
BIB. Once it is changed and PRIME is pressed,
message clears. If you don’t change the
BIB, after eight brews brewer is locked out for
sweet tea. Each message displays for about four
seconds.
L-“L” in lower left hand corner of the LCD display
represents the left side sweetener bag is active,
displayed during brewing.
R - “R” in lower right hand corner of the LCD display
represents the right side sweetener bag is active,
displayed during brewing.
ERROR CODES/NOTIFICATIONS - CONTROL PANEL

Page 18
Wilbur Curtis Co., Inc.
This page intentionally left blank

Page 19
Service Manual - STBA48026 Tea Brewer
This page intentionally left blank

FOR THE LATEST SPECIFICATION INFORMATION GO TO WWW.WILBURCURTIS.COM
Printed in U.S.A. 07/2016 F-4026 Rev E
Wilbur Curtis Co., Inc.
6913 Acco Street, Montebello, CA 90640-5403 U.S.A.
Phone: 800-421-6150 │ Fax: 323-837-2410 │ Technical Support Phone: 800-995-0417 (M-F 5:30 a.m. - 4:00 p.m. PST) │ Email: [email protected] │ www.wilburcurtis.com
ECN 17458 RevE 07/13/16 @ 11.6
Table of contents
Other Wilbur Curtis Company Kitchen Appliance manuals


