WILDSPY AC-863NRG-S User manual

InstructionManual (Ref. 863NRG-S; rev.20151029)
WildSpy Camera OutdoorProducts
No RedGlowInfra-RedBlackFlashScouting Camera
ModelNo: AC-863NRG-S
Thank youforpurchasingthe WildSpyCamera product. ThisNo RedGlowInfra-RedBlackFlash WildSpyCam hasbeendesignedfor widerange
applications suchas Animaltrail, Hunting trial, Homesecurity, Warehousemonitoring asasurveillancedevice. It providesgreatilluminationup to50 feet
with internal true blackflash w/ovisible grow toavoid spookinganimals orthief.The Rapid-PulsingInfraredTechnology helpstobrightenforhigher
qualitypicturesandvideos with lowerpowerconsumption. It will betriggeredbyany movement ofliveanimalsorhumanin a location,detectedbya sensitive
PassiveInfra-Red(PIR) motionsensor, and takeacaptureinstantlywithin almosta second. Itis built-in with a 8M pixelshigh-resolution digitalcamera with
manybenefits ofadvancedfeaturesand newest technologyfor maximize yourscoutingeffortsand more easily operation. To helpachievethis, thecontrols are
dividedintotwosections, DigitalCamera Control sectionand MotionSensorControl section. Settingand operating with theupperportion forthedigital
camera issimilar to be operated asmanytraditionaldigitalcamerasthatyouarealreadyfamiliarwith.. The2.4 colorscreenontopallowsyou to program for
manycamera options and viewpicturesinthefield. Anothersmall LCDonthelowerdisplaysall scoutingsettings directlyand monitor thecurrent scouting
status, eventcounts, aswell as batterylife. The buttons in lowerportionareusedcorrespondingto eachscouting options changeindividually. Itis also support
external wireless NRG-IRboosters(referredtoourIRbooster series IRX-22BW)toincrease much illumination depend onanumberofboosterstobe
configured.. Theproductis specially designedforoutdoor application and isresistant againstwaterand snow.
1Features:
•Built-in Rapid-Pulsing HighPower Black (Invisible) IR-flasher foragreatillumination within 50 feet
•TakingUp to 8 Mphighqualitypictures and upto90 seconds 720PHD videoclip
•All videoclips with naturalaudiosound.
•1second FastCapturingTimewhenamotionis sensedatFASTmode.
•HuntingDiary/ Voice Diary Memorecording
•Dateand Time Stamp oneachpicture and video
•Built-In 2.4inch Color Screenforfieldviewing
•ProgrammableTimeLapseCapturing
•Two modes for extending longbatterylife and Turbosnapmode(Fastshot)
•CardSlotsupport 32G SDHCSDcard
•AutoswitchingIR- cut filterfor taking truecolorofdaytimepicturesand videos
•Motiondetect activity selection: DAY –NIGHT –24 HOUR
•Videolength option:3~ 90 seconds.
•TVoutput supportNTSC and PAL TV
•USB portfor downloadingimagesto computer and firmwareupgrade
•External Solar Poweredport support externalSolar PowerPacksystem (Model:SO6-6W-9V)
•Separated LCDscreensand keys tosimplifysettingfor cameraand motionsensorcontrols
•Pausesetting options: 0,1,3,5,10,20,30,60,90 minutes
•QuickShotmodeallowfor moredetections up to 3 pictures.
•Burst Mode forup to5rapidshots inone event
•MotionSensor Radar Animation forSensorON- activity status
•MemoryFull Indicator
•Video mode Indicator
•Walk-Testlight for Distanceand setupmode
•Dialforadjustingsensitivityofmotionsensor
•Backlight forscoutingLCDviewing.
•BatteryPowered:Dcell x6pcs (Internalbatterieswill workasbackup source whileusingexternalSolar PowerPack:Model:SO6-6W-9V)
1-1 Accessory Included
•USB Cable x1pc
•AV Cable x1pc
•Beltx1pc
•LensHoodx1pc
•Main unit x1set
1-2 Optional Accessory
MetalMount Bracket x1pc
Ubar x1
2QUICKVIEW
Carefullyreadthisinstructionmanual before operatingdevice.
2-1Preparation
1. Pushthe Main Power Switchto OFF(Center). See Fig.1
2. Install6pc D type Alkaline batteriestothecompartment. Itisnotrequiredifyou
justprefertoworkunder non-batterymodeafterusinganExternalSolar PW
system.
3. Install a SDcard and becarefulto insert the SDcardaccordingtodirection
shown onthecard and theprintingontheinnerpanel. beforereplacingaSDcard,
besurethePWswitchis already atOFF positionin ordertoavoid thedatain the
cardmight beflushed. accidentally.
4. Removetheprotective PE sheetsfromtheIRlens;Camera lensand PIR
(motionsensor )fresnellens.

2-2 QuickStart Fig.2
Aneasywaybelowtotell youstepbystep for getting aquickstart
with the WildSpy Camera, it willrun underthe factory default if
youdonotchange anyparameters. Whenthe devicedoes quit from
settingmode orno key-in sincePWON, it will goesto the scouting
operationmode automaticallyafter 30 seconds. Thatmeans whenan
animalorhumanisdetected, aneventwill berecordedandthe
camera will shotimmediately. Theevent counterwill berenewed
instantly too.
1. Unit will workonlysinceaSDto beinserted. Regardinga
SDcardusage, skip totheparagraph belowfor Usinga
SDCard”to viewfurtherdescription
2. Pushthemainpowerswitchwhichisallocatedin the
bottomofcabinettoON
3. Setdateand time toupdatetheCurrent time. Enterto
systemsetup and choose “Dateandtime
4. Optionaltosetotherparametersofscouting ifyouexpect
todo. And then, exitfrom thesettingmode. (Seemore
paragraphs about the settingof 3. ADVANCED
OPERATION withUser’sSetting )
5. Turnthesensorgain(sensitivity) control totheMax.
usually.
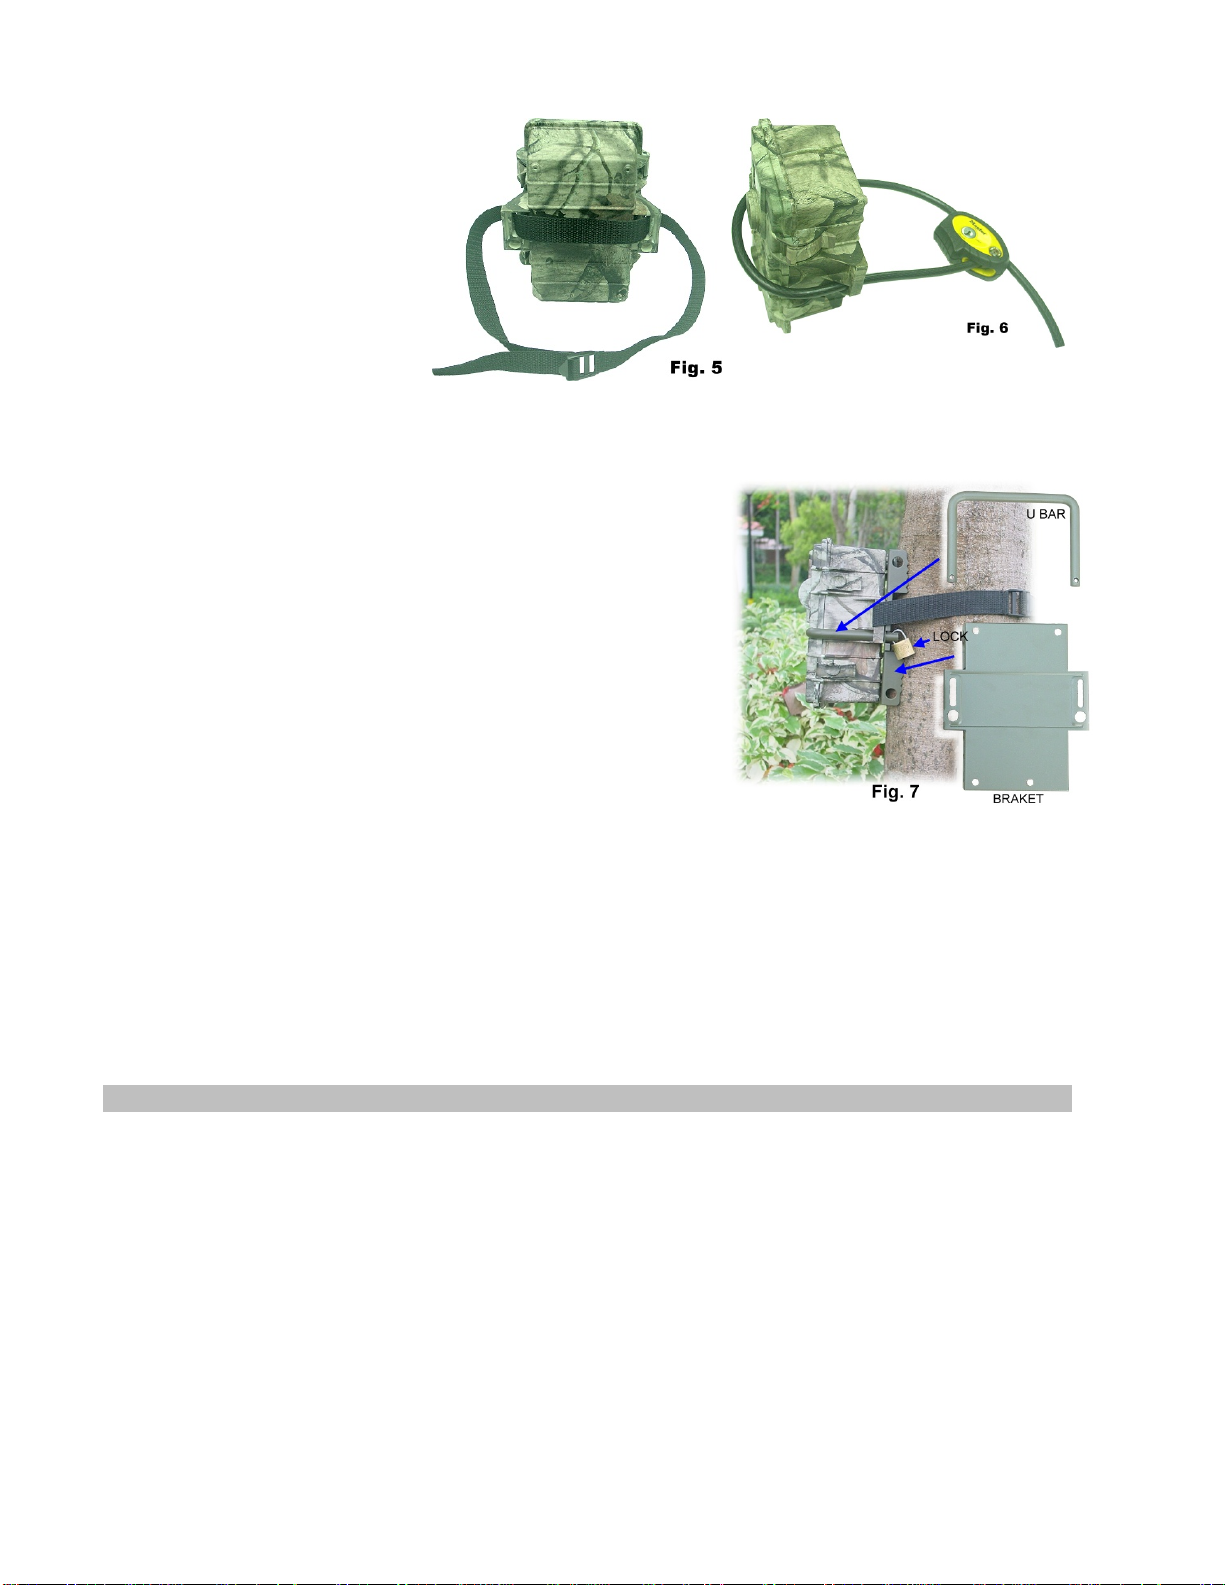
6. Mount the uniton a steadytree around 0.5-1meter height that point tothezone whichyouwish to trail.
7. Pushthe mainPW switchto TESTand walkinfront ofmotionsensor in order toverifyhow longa distance and azone youwill bedetected
accordingto the blinking walk-testlight .
8. Push PW back toON and leave. Nowthe scouting camera will bereadyto work after 30 seconds of warm-up time.
CAUTION: Beforeleft, besure to doublecheckthelatchesifthedoorisclosedcompletelyand the Ext-SolarPower portiscoveredbeforeleft.
2-3 Factory DefaultSettings:
ForCamera: Capture = Single Picture /AutoExposure/ 3M pixelsresolution/ BurstMode=Off /Shutter Speed =Auto/ Quality =Normal /Stamp =ON /
Language=English /TV=NTSC/Download =MSDC / Video Resolution=VGA640x480 /Framerate=15 F/S
ForMotiondetection: Pause=1minute/Quick-Shot=1/Turbo=PW-Save/Work Duty =24 HRs /3secondsVideo length
Itissuggestedto customize yoursettings ifyouarean experience user.
3ADVANCEDOPERATION withUser’sSetting
Everytimesyouwanttochangeforanewsettingduringanormalscoutingoperation, youmustswitchOFF themain Powerand backON. Whileswitch the
main PWtoON, the lower LCDshows the current settings and theuppercolorscreenisalways OFF. WhenyouwanttoturnON thecameraforsetup orview
picture, Just press CAM-ON andthenpress DISPLAYkeyenablethescreenatLIVE- VIEW mode.
Caution: All keysarenofunctiontemporarilyifa capture event isbeingprocessing. IfyouswitchOFF with themain PWatthis moment, theWildSpyCam
will still waitforthecurrent event tobedoneand goestoOFFlater.
Settingfor MotionSensorOperation(PIR Sensor) Fig 3
3-1 Select ON DUTY for Day, Nightor 24 hours period
The WORK button is pressed once to enterthe 24 HOUR >
NIGHT > DAYoptions, the 24 Hrs(Clockicon) icons will
remain blinking. Pressagaintomovetheblinkingiconto the
SUN, oncemorewillmoveittotheMoon. Pressthe
OK/DEL key on the right toaccept thedesiredicon and then
it become stable. The Clock iconisrepresentedformotion
detectionwill be activedayand night. The SUN is
representedfordayworkingonly. The MOON is
representedforNight workingonly. Duringthesensordoes
active period, (ON Dutyis effective), aRadar iconwill run
with animation toshowthedevicecansenseanymotionin
this time.
3-2SelectforQuickShot
QuickShotoptionallowsformore imagestobetakenif
additional motions may be detected afterthe1st imageand
thecamera will notshut downto be readyformore instant
shots. Youcanchoose1~3imagesin ordertotake agroup animals passing-by.“1”is thedefaultthat onlyonepicturetobetakenand thengoestoPAUSE
time.“2”or “3”willre-arm thesensorfortakingthesecond and thirdpictureifmoreanimals are following. (Exampleofuse: Onatrail whenyouwant to
takeone more picturewhatis followingthe firstyoungdeer. Likeasmart buck, italwayswalkatthe last). Atime-out ofeachshotisaround 20
seconds. Thesystemwill goestoPausemodeafteratotalnumberofeventsaccordingtoQuick-Shotsettingaredoneortime-out.
3-3 Pause Time
Thisisa time lapsebetweenthemotionsensordoesabletodetectevent again after thepreviousevent. Thesensorwill notworkwithin thetimelapse. You
canselect 00 ,01, 03, 05, 10, 20, 30, 45, 60 minutes fora PAUSE option.PressthePAUSE buttononce to enterforsetting, Thedefault01 will beblinking.
Pressagain tochange it untilthe desired choiceappears. PressOK/DEL onright to accept it.
3-4 ChangeMovieLength
ThePAUSEkeyissharedfortwofunctions. Oneisexplainedasabove. Thesecond optionwill letyoudefine howlong totake eachvideo. Thereare3, 5,
10, 20, 30, 45, 60, 90 secondsofvideolength tobeselected. Todothis, pressand hold the PAUSEkeyfor3seconds, a blinking videocameraicon will
appear and enterforvideolength setting. Thenpress PAUSErepeatedlyuntilyourdesired Length appears. Confirm the updated changebytheOK/DEL key.
Caution: Youmust also selectVIDEO optionin thecamerasettingwhenyouwishto enable video takingmode. Otherwise, thedevicestill doestake
pictures.
3-5 OK/DEL
Itisakeyforshared with twofunctions. Anytimeyouhavedone for programmingof theWORK, Q-SHOTand PAUSE/VideoLength, just pressthe
OK/DELkeytoaccept a newchange. Ontheotherhand, press and holdit with 3seconds, it perform the CLEAR functionthat all event counts onthelower

LCD will be renewed for[000]. But itis not effecttoany imageorvideo contentsin thecamera memory
3-6 EventCounter
Theeventcounter are includedthreedigits inthecenterofthelowerLCD to letyouknowhow many motionrecords thatup to 999 events foratrailhistory.
Ifyouwant torenewthecounter anytime, simplytopressand holdtheOK/DELbuttonuntil LCD become blinking, thenitwill resumeto[000]
Caution: Thecamera will keepgoing tocapture continuallyeventhescoutingevent counter is alreadyreachto[999] full. Ontheotherhands, theevent
counterwill keepgoingtorenewincasethememoryoncameraarefull.
3-7Battery Icon
TheBat-iconontheupper and loweron right are representedformotionsensor and camera power. AllBat-icons will indicatethreestatus asbelow:
GOOD: BatteryIconshow with solid.
LOW: BatteryIcon is halfblank.
BAD: Batteryicon istotallyblank. Inthiscase, theLightingFlash iconwillalso disappear. Itdoesalertthatyoumust replacethemwith newbatteries
immediately. Camera will notworkatnight ifbatteryis badand still will workatdaytimetill tocamerawillnotbewakeup anymore..
Caution: Ifyounotice batteriesare bad, youhavetoreplaceall batteries with brand new completely. Do Nottrytoreplacesomeofthemonly. After
replacement, rememberto re-bootthedevice by themain PWswitch.
Important: Sincethisunit detectsbatteriesbecomingtoo weakand anblank batteryiconappear, theunit will stop working atnight but will still takes day
timepicturesorvideo continually.
MAIN UNIT OPERATIONMODES
Thisis amode switchin thebottomofcabinet. Thereare three modestobeselectedunderdifferenceoperation.
3-8 PW-ON Mode
TheWildSpyCam will bealwaysrequiredworkingunderthis mode. Since thePW-SWis pushedtoON mode, the motionsensor will begin towarmsup for
1minute, thenstarttodetectmotionfortakingpictures/Video.
3-9PW-OFF Mode
SlidethePWtothecenterposition to turnthesystem powerOFF. Allpicturesand current settingswill beretainedatthismode and internal realtimeclock
will still run.
Caution: Rememberto removeall batteriesin caseyouwill nolonger to use it in ordertoavoid themetalterminals tobeoxidizedduetotheleakagecurrent
frombatteryitself todamagetheterminalcontacts.
3-10 WALK-TEST Mode/ SensitivityAdjustment
Walk-Test Mode isusedtoverifythedetectionrangeand pointing zone beforeplacingit in thefield. After mountedtheunit onatree, pushthePWswitch
to Walk-TEST. TheWalk-TestLEDwilllight up last1minutetowarm up. Aradar animation iconwith TESTalertisremainingblinkingduringWalk-Test
mode. Then, Walk-TestLight will goesoff and will alertwith3timesflashing onceyouwill bedetectedin front ofthedevice. Nowyoutrytogo farawayto
checkhowlongthePIRmotionsensorwill still see you. Thecamera doesnottakeanypictureduringthistest process.
Note:Thesystemwill resume to normal Scouting ON DUTY modeautomaticallyafter3minutes(Time-Out)since nolonger detection ofwalk-test to be
triggeredin orderto avoid usermayforgettopushthePWswitchbacktoON before heleft.
SensitivityAdjustment
The DISTANCE dialoninnerpanelis usedforadjustingsensitivityofthemotionsensor (Gain Control). Byturningthedialtotheright, sensorsensitivityis
settotheMaxtodetectanimalover 50feetaway. Youmayreduce thedetection distance fortakingpicturewith alargeranimaltarget.
Caution: Itisrecommendedtoset MAX in warmerenvironment likeinthesummertime.
3-11 Walk-Test LED+DC In-Use Indicator
Bothlightswill beON during the first minuteof Walk-Testmode warm-up and Camerasettingmode. Theywill blink for3timesonceawalk-test motion is
detected.
Inthe PIR scoutingsettingmode, an instant flashisresponsetoeachvalid keyinput.
3-12 Turbo Shot
Thereisswitchknobontheright ofthescoutingLCD. Slide the TriggerTime switchto FAST mode, theDCwill besetforthefastest speedfor shooting. In
thismode, capturespeedwillbe1 second thatdoublefasterthanthesettingintheBAT-Savewhileamotionis detected. SettingofBAT_SAVEwill beideal
forextending longer batterylife. IncaseyouexpecttoresumetheFASTmodeto beBat-Save, slidetheknobforBAT-SAVEand thenreboottheDevice.
Caution:DuringtheFASTmodeisactivated, youwill notbeabletoturnonthecamera bypressingCAM-PWkeyexcept rebootingthedevice.
3-13 Day/NightExchangeStatus
Asensorwill senseanenvironmentofDay/Night exchangetocontrol thecamera totakeacolorful picture atdayand monochrome pictureatnight time
automatically.Atamoment ofexchanging, ananimation “F”ismovingin thescoutingLCD. Themotionsensorwill notbetriggeredatthis period.Whenit
senseanight time, theinhibitedsymbol oftheIRFlashicononthescoutingLCDwill disappear.
SettingforCAMERA /Operation
DescriptionforCamera OperationKeys which areinthe upperportionofthe innerpanel. See Fig. 4
SHOT
PREVIEW
DISPLAY
MENU (OK Key in Center) Fig.4
NAVIGATOR KEYS
UP/DOWN/LEFT/RIGHT
SOUND
3-14 CAM-PW (Camera PowerButton)
Thisbuttonis located ontheleftofthelowerportion. See Fig. 3
Before a programmingforthecamera, besure the Main PowerswitchatON
position. Therearetwomodesthatcalled LIVE VIEWand PREVIEW for
camera OPERATION. OnceyoupressCAM-PWtoturnontheCamera, it works
atthedefaultoftheLIVEVIEW. Then, boththeIN-USEand Walk-Test LEDare
lighted. Thecamera status small LED ontheright topwill alerts with redlight for
2 seconds to showcamerais PWON already. Asadefault, camera screenis
always remaining blackuntil either DISPLAYorPREVIEWkeyis pressed. When

youdid finishusingthecamera, remembertoturnthecamera OFF bypressingthe toggle switch CAM-PW again.
Caution: Duringcamera is ON manually, motionsensor will stop sensinguntil CAM-PWis turnedtoOFF. Also, ifthereisaSDwhichhasbeenstoreda
thousand ofpicturesorvideosalready, it needtotakeafewseconds orlongerforinitialization, camera screen will notresponseduringthis periodevenyou
pressinganykeywhenyoujustattempt toturnON the screen. Youhaveto wait untilthe camerainternalprocessing finish shortly.
3-15 NavigatorKeys /MenuButton Usage:
Four directional keys represent forthe Left /Right/Up/Downkeys. Thecenterknobisthe MENU button. All camera settingswillbeprogrammed with
them. Press theMENU todisplaythe optiontitleof modes. Select a titlethatyouwish to changebypressingtheleftorrightnavigatorkey. Highlight your
choice fromapull downlistof the displaying titlebytheUporDownKey. Press theMENU toaccept thechange and exit.
3-16 CameraSettingMenu
NavigatorDisk/FunctionKeys/Menu Button:
MenuKey
Thekeyin thecentreis bringup themodes /system- menu underCAMERAisON manually. Itisalsousedforaccept achangeaftermodification.
NavigatorDisk
Foursidesofdisk represent forthe Left/Right/Up/Downkeys. Thecenterknobis the MENU button. All camera settings will beprogrammedwiththem.
PresstheMENU todisplaythe2titlesofsettingmodes. Selectatitlethatyouwish to changebypressingtheleftorright navigatorkey.Highlight yourchoice
fromanitem list under thedisplayingtitlebytheUporDownKey. PresstheMENU toentertheoptionand changeit with UP/DOWNkeys. And pressOKto
confirm. Afterfinishasetting, quit tothemain screenbypushingLEFTkey.
More FunctionKeys
Shotkey:ItisusedfortakingpictureorvideomamaullyinLIVE modeand Play-Backmediafilesin PREVIEWmode. Push it totakeapictureatany
timewhilecamera startup manuallyevenTFTscreenstill isremainingOFF (screenis alwaysOFFbydefault). Fortakingavideoclip manually, your1st
pressSHOT to starttaking, astopwatchcounterwill workand pressagain tostop.
Previewkey:(Play-Back)
PressPREVIEWkey, camera will beswitchedtoPlay-Backmodeand show thelastimage. Itisalsoaspringboardtoskip betweenLiveViewand Play-Back
mode. Duringin Play-Backmode, theDISPLAY keybecome asaspringboardforEnlargeViewanimagevs Thumbnail pictures/videos. So, youhavetwo
waystoenjoyand searchentireimages/videos.
Display key:(Live)
Pressit toturnonthescreenforLIVE mode, thenpressit repeatedlytochangeformorestatus liketurnON screen>CleanUpScreen>Resumeinformation
onscreen.
Soundkey:
ItisaKEY thatyouwanttorecordadiaryvoicememooncameramanually, pushthistogglekeytoswitchbetweencamera and sound recordermode
instantly.
MenuTitle(2Tabs)forCameraOperatingModes
Therearetwomain menus. OncecameraisON manually, pressMENU keytoaccessthesettingmenu thatconsist2titles: A. SystemSetup Mode;B.
WorkingOptionMode. Both LiveViewand Play-Backmenus areincludingtheirrelatedtitleswhichdescribedasbelow:
A. SystemSetupMode
B. WorkingOptionMode
A. SystemSetup Mode
PressMENU toentertoWorkingOptionModefirstly, and thenpressthe RIGHT key, youwillentertoSystemSetup Mode, seetheitemsbelowby
pressingDOWNkey. Then, enterto furtheroptions changebypressingtheRIGHT key, pushtheMENUkeytoconfirm achange. Finally, pressLEFTtoquit
themenu. Ifyouwant toskip tothe CurrentWorking Mode, presstheUPkeytothetopofmenu, then, pressLEFTto highlight the WorkingMode Tab.
Seetheoptions on SystemSetup Tab asbelow:
1. VideoSound >On/Off
2. Camera Mode>IR/StrobeFlasher (Notsupportastrobeflasher with thismodel)
3. Date&Time:a. 2013/01/01 12:00 /b.YYYY /MM /DD(Calendar DisplayFormat)
4. Language: a.English /b.French/c. Chinese
5. TVout: a.NTSC (Defaultsetting, Usedin North America) /b. PAL
6. USB
a. MSDC(DefaultforfrequentlyusedtodownloadfilestoPC underall Windowsplatform)
b. PCCAM(OnlyforupgradeFirmwarepurpose)
7. Format(EraseEvery thingsin entirestoragemedia)
8. ResetAll Yes=Proceed(Selectit torestoreall factorydefaultsettings)
9. TimeLapse>On/Off
a. TimeLapseInterval
b. Time LapseCapacity
A-1 VideoSound: DefaultisON.
Youcandisableasoundrecordingforallvideoclips whenanin-needforsecurityagainstalegalissuein yourcountry.
A-2CameraMode: DefaultisIRFlash. ThismodeldoesnotsupportStrobeFlash. So, alwaysignorethisoption.
A-3 DateandtimeSetting:
Beforeyouwouldplacethisunit in thefield, youarerecommendedtoupdatewith yourlocal time first. Afterenteringtothesetting, pressRightkeyto move
theHighlight forcalendar patternand changeit byUP orDOWNkey. PressMenutoaccept . NOTE: Thecalendaris shownin militaryfashionwith 24
hourformat.Example:2:00 pmwill beshownas14:00.00.(Hour:Minute:Second)
A-4Calendar Stamp:
ToggletheStampoptionON/OFF toshowwhateverthecalendar onall images and video ornot.
A-5TV-OUT
ItisusedtodefinewhatTVsystemis setformatchingyourTV- NTSC /PAL system.
Caution:IncaseyourTV isout ofoptions oftheWildSpyCamlisting, youhavetochangeyourTV setforNTSC beforeconnecting acabletoTV set.
A-6 USB
ThisoptionisdefinedwhichinterfaceforapurposeofdownloadingfilestoPCorworkingunderPCCAM. Thedefault “MSDC”is alreadycompatiblefor

all usersw/odriverinstallationrequired
Caution: Thiscamera under PCCAMfunction mode isreservedforupgradetheFWpurpose. Whileyouwant tousethisfunction, aproperdriverwill be
required. YouneedtodownloadtheDRIVERfrom See theparagraph below: “5- Installing Driver
A-7 FORMAT
Afterproceedthisfunction, all filesin theentirecardand internalflash memorywill beremoved completely. BecarefultosavethefilestoPC beforeyou
trytodoit.
A-8 ResetAll
Selectthis optiontoresetall settings tothefactorydefaultinstantly. All datain theentiredisksaresafeaftertheResetevent will bedone.
A-9 Time LapseOperation:
YoucanactivatetheTimelapsefunctionduringanyscoutingperiod. Itwill workfinedayand night byslidingtheTurboswitchtoTimeLapseONand
enabletheTime Lapseoptionin thecamera menu setting. Camera will takeshots automaticallyaccordingtothefurtherprogrammingin theTimeLapse
settings. TheTimeLapseevent will starttorun sinceonescoutingimagetobetaken. Therefore, besureyouhaveto triggerthe1st shotbyyourselfbefore
leavingfromthesite. Otherwiseit willbetriggeredtostartup byanimal.
A-10 FurthersettingsforTimeLapse:
OnceyouenabletheTimeLapsesetting, youwill havetwofurtheroptionsforconfiguration asbelow:
A-10 -1 Interval: Adjust thedefault5seconds foryourdesiredperiodictime. Thecamera will takeshots repeatedlyaccordingtoyourupdate. Anadjustable
intervalsetwill befrom1second to23:59:59
Important: Timelapse captureevent will bealwaysinterruptedduringday/night transitionand will beresumedafterthe1st onescoutingeventis triggered
duringeachtransition.
A-10 -2 Capacity: Youcanlimit aMaximumtotalshotsforamission. MoreshotswillbecreatedforalongerTimeLapseVideo. AMax. capturecapacity
will be99,999 shots.
A-11 Research QTYofTimeLapsecaptured:
TurnonCamera manually, entertotheCapacitySettingofTimeLapseoption. Thefirstdatalineisshowinghowmanyimagesare captured. This resultwill
beerasedonceyouturntheTimeLapsefunctiontoOFF in thesystemmenu. Otherwise,thiscounterwill continuewhenthecameraresumefortheTime
Lapsemission.
A-12 ViewImagesfromTimeLapsemission:
TouchthePREVIEWkeyafterturnonCamera manually, youwill see thelast scoutingimageusually. PressRIGHTkeyonce, thepreviewmodewill be
changedforviewingthelastimageoftime lapsemission. Incaseyouwant toviewbackthescoutingimageorvideo, youhave to quit and turnonthecamera
again. TouchtheLEFTkeytoreviewallscoutingimageswhenyouarealreadyatPREVIEWmode.
A-13 CreateATimeLapseVideo:
Allofimagesarerequiredtoimporttoatimelapsesoftwareforconvertingavideo. Therearemany choicesfromweb-sitesoryoucandownloadfromour
recommendedwebforafreeware.Youcantrytogetthesoftware “Videomach”from www.computechnic.com/download.html
B. Setup under WorkingOptions Mode
There are three mainmenus for following modes:
1. Live View Mode
2. Preview Mode
3. Voice MemoMode
Those menus under LiveView / Play-Back /Voice areincludingdifferencetitleswhich are describedasbelow:
Youhavetwowaysentering to either workingoptionmode. WhenyoupressMENU key after turnONthecamera manually, oryou are in SystemSetting
Menu w/ohighlightanyoptionaltitle, justpresstheLEFT to skip to theWorkingOptionMode. Inthis mode, youwill find differenceoptions depend onyou
are currentlyatPICTURE orVIDEO orVoice status
B-1-1 Single(Picture) Mode (Default)
Thereareseveralitemsbelow by pressingDOWN key:
1. SwitchTo Video
2. Resolution:a. 3264 x2448 (8Mp)/b. 2592 x1944 (5Mp)/c. 2048 x1536 (3Mp)/d. 1024x768 (1.3Mp)
3. Quality:a. SuperFine/b. Fine/c.Normal(AdjustImagequality, it will affectcapturespeedtoslowdown)
4.Exposure: - /+Adjust(Adjustingforbrightnessofimageinsteadoffactorydefault)
5.BurstMode :OFF >2>3>4(Off =1shot foranevent; 4=4 imageswill becapturedrepeatedlyin anevent )
6.Shutter/ISO
a AUTO (ISO100~ISO400, Itisthedefault formostofeventsandrecommended)
b.Fast(FixedatISO-200 (Usedtotakeaclear imageagainst amovinganimal. Sometimesforveryshortdistancecapturing settingatnightto
avoid imagesto beoverexposure.)
7. DateStampa. Off/b. On( Calendar stampON/OFF optiontoshowwhateverthecalendar onall imagesand videos.)
B-1-2 Items1~4; 5~ 7
Theyarethegeneralfunctionsasmanyofdigitalcameraswhichyoudid alreadyfamiliar asusual.
B-1-3 BurstMode
It isashootingmodeforshootingaseveralpicturesbyoneevent triggeredwhenthesubjectis insuccessive motion. Youcan select2~4shootatime.
B-1-4 Shutter/ISO
Camera Shutterisset ISO-200. Itisnormallyto applyatnight for expectingto capture within a veryshortdistance to avoidimages overexposureorless
blureffectagainstafast movement object
Caution: Duringcamera issettingatFASTMode, brightnessonpictureswill bealwaysdarkerthanAUTO duetoafastershutterspeed. So, it is
recommendedtouseoneormoreexternalinvisibleboosterstoincreaseilluminationaround thescene.
B-2-1 VideoMode
While VIDEO modeis selected, theunitwilltakevideoclipsdayornight. Since a1st event isrecorded, avideo-cam iconwill appear in thelowerscouting
LCDshowingyouare workingat videomode. Each video clip length will bedefinedin thePIRsetup chapter. RefertotheChapterabove(3-4ChangeMovie
Length)
IncaseyouwouldswitchbackforSinglePicturemode, justneedtoturnON camera tochangetheCapture Mode manually. Then, re-boottheunit byturn
off themain PWand backON. Youwill see theVideo-camicontodisappear. Otherwise, thecamera will notworkproperly.

There are the optional itemsbelow bypressingDOWNkey tohighline atVideomode:
1. SwitchTo Single
2. MovieSize:a. 1280 x720 (HD)/b.720 x480 /c. 640 x480 (VGA)
3. FrameRate:a.High(30f/s)/b.Low (15f/s)
Caution: InhibitAudio RecordinginVideoClips
Against alaw related tothe privateprotectionpolicy in somecountries, youmayneedtostopaudiorecordingin avideoclip whenthecamerawillbeused
forsecuritypurpose. Youcaninhibit theaudiosound recordingfunction on eachvideoclips in settingofVIDEOMICin theSYSTEMSETUP MENU.
B-2-2 Preview(Play-Back)Imageandvideos
1.ViewImage/Videoby Built-in Screen
SincepressPreview towatchimage, screenwill alwaysshowafullscreenofthelastshot. Usetheleftorright keyto viewother previous ornext image. If
youexpecttoviewmorepicturesatime, pressDisplay Key forathumbnailscreen. See moreimagesbypressingLeft/Rightkey. Thenenlargeitby
pressingDisplayagain. Inathumbnailscreen, simplyto pressSHOTkeyforSlide Show images. Ifyouwant towatchvideoclip, PressSHOTtoplay-backa
video atfull screen orslideshowvideos atathumbnailscreen.
2.ViewImage/Videowith TV
Theunit isequippedwith aTV-outportthatallowed youtoconnecttoTV with anattachedcable. Be sure two RCAends are pluggedintheTV
Video-In (Yellow);Audio-In(White)properly. Aftercamera is workingat Play-Backmode, displayingcontents will bemovedtoTV screen. Ifyoupull
out theTV cable, theinternalviewingscreen will be switched backto displayautomatically.
NOTE:Thelastpicturetakenwill bethefirsttoappear and will includeadisplayofthetotalnumber ofpicturesstoredand thenumberofthispicture.
Example:0024/0036 isthe24th picture ofatotalof36 pictures.
B-3. VOICEMEMOMode
Thecamera provideagoodfeatureforusers whowouldliketorecordavoice messageatanytime, anywhereagainstsomething to recordbyvoice likeatrail
scenewith adetailsdescription; ahuntingexperience;areminderforhunting;adiaryforeveryday etc.
To doforarecording, youmustturnONthecamera, then, entertothe Voice RECMode bypressingSOUND key. Afterfinishedoperationwith any
voiceoptions, just switchbacktothepreviouscamera stagebypressingSOUNDagain.
B-3-1.ToRecord: PressSHOTkeyonceforstartingavoicerecording. Then, astop-watchstarttocount atime ofthecurrent recording.PressSHOT
againtostopthis recordingand arest ofmemoryonthetop leftcornerwill renewimmediately.
B-3-2.Play-back: PressPREVIEWkeytothePlay-Backmode, thelast messageisselected. Youcanrewind toapreviousdesiredvoice memobyLEFT
and useRIGHT keyforthenewervoice. PressSHOTkeyto playbackthedesiredmessage.PresstheLIVE keyformorevoicefiles, you canlistenall voice
clipsonebyone automaticallyafterpressingtheSHOT key.
B-3-3. DeleteONE: PressMENU keytobringup the EraseTitle. Highlight theoption “Delete One”thenpressMENU todeleteit. PressLEFTor
RIGHT toselectanothervoiceclip and pressMENU todeleteforonemore. Finallyyoucanquit fromthemenu bypressLEFTkey.
B-3-4 DeleteALL: InthePlay-Back page, press MENUkeyand highlightfor “DeletingALL”. Press MENUkeytoremoveall voicememoriesatonce.
Caution: Aplay-back eitherwith internalscreenorTV will onlydisplaytheimageorvideofilescorrespondingtothecurrent setting. Youhavetochangethe
settingonceifyouwant toviewotherkind ofmediafiles.
B-4 MoreOperationSettingatPREVIEW
Whenyouarein Previewmode forviewingPicture orVideo, presstheMENU keytodisplaytheOperatingMenu with itemsbelow:
1. Lock
a. Lock/UnlockOne
b. LockAll (Protectallsamemediafilesin thememoryand theywill notbedeleted)
c. UnlockAll (Unprotectallofprotectedfiles)
2. Delete
a. One(DeleteOnephoto)
b.. All (DeleteAll itemsexcept protecteditems)
3. Rotate
a. Rotate
b. Save
c. Back
4. Resize
a. Showingallavailableresolutionthatyoumaychange
B-4-1 DigitalZoom for Still Image
Whenin thePreviewtoviewafullsize picture, presstheUPkeytoZoomInand theDOWN keytoZoomOutforacloser shootorsee moredetailswhen
enjoyinganimage.
B-4-2 DeletingPhotos
PressMENU keyunderthepreviewmode, thenhighlight DeleteforSingleorallphotostoerase. PressMENU keytoconfirmdeletion.
B-4-3ProtectanImageorVideo
Duringviewinganimageorvideowhichyouwouldliketoretain in thememorywithoutwash-out bydeleteprocessing, pressMENU and highlighttheLOCK
optiononce. Thenaniconwith small lockonthelefttopcornerofthis imagetoshowit isprotected. Repeatthesameprocessingtounlockit.
All ofprotecteditemswill notbedeletedexcept youtrytoformatthememoryortheSDcard.
5 UsingaSDcard
Itdoessupportup to32GSDHCSDcardto getalargestoragecapacitythatallowmorethantenthousandsofpicturestobesaved.
Note: Be sure theMainPWSwitchis OFF beforereplacingaSDcard inorder tominimize arisktodamageyour card orloss datapartially. Avoid
tohotplugorretract your card duringthe Camerapower is ON.
Important: IfaSDcard cannotbeinsertedsmoothly, youmust retractit and checkifthedirectionofcardiscorrectornot. Neverforce topush hardlywith
thecard. Mostofcase with aproblem on cardusage was found tobe causedbyanimproperinsertion.
Warning: Beforeusingabrand newSDcard, oreverbeenusedin othercameras, it issuggestedto transferall datatoPC and formatitbefore tryingtoapply
it toentirecamera. Otherwise, thesystemmaynotrecognize themediaonthisSDand camera will notwork properly.
Caution: Incase youhaveaSDwhich are already storedwith alargequantityofimages or videos and attempt to turnoncamera screen manually eachtime,
youwill find all camera keyswill notresponse forafewsecondswhile just turnon CAM-PW until tosysteminitializethememory ofSD card completely.
Morecontentsin thememorycardwill takemuchlongerforinitialization. So, in ordertoavoid thiscase, it ishighlytorecommend to movethefilestoPCas
soonaswhenyouretractthecardfrom thefieldand cleanup thecard toreservemoreroomforthespace ifpossible.
6. InstallingDriverforUpgradeFWinyourcamera
Ifyoujustwant todownloadoruploadfilesbetweenPCand thiscamera, thereis nodrivertoberequired. Incaseyouwant toupgradetheFWin future,

youhavetoinstall thedriver firstly whichwill beavailabledownloadingfromthedealer sweb-site. Thefirsttime after installed thedriver, connectthecamera
toyourcomputer, thecomputerwilldetectanewUSBdevicehasbeenconnectedand trytolookingforadriver. Afteradriverinstallationis done, the
PC-Camfunctionwill beavailablewhich youcanreadytoupgradethe existingonboardFW. Pleasereferthefurtherinstructionwhichwillbeprovidedyour
dealer to finishtheFWupdateprocessing.
7. Downloadingphotos/ Moviestoyour
computer
PressCAM-PWto turnthecamera ONmanually
attheLIVEmode.
- Connectyourcomputerand thecamerawith
USBcable.
-Apopup toshowthemobileharddisk
whichis assignedforthe camera
device.
-Forexample: “H”or
“I”:\DCIM\100MEDIA
-Clickintotheproperdirectorytosee all
filesinside.
8. MOUNTING DEVICE
Beforestartingtoput thiscamerainthefieldforscoutinggame, thecameramust bemountedinacertain placeproperlyoronatreewhosediameterwill
notbeless than6inch(15cm) and locatednothigherthan1Mwith yourdesiredmountingmethod thatfollowingtheinstallationmethodasshownasbelow.
Thedesignisreservedtofit fortwoways ofmounting.
8-1Belt Mount: Thisbeltis attachedin thepacking. See Fig.5
8-2PythonAdjustableLockingCable(Not includinginthispacking): See Fig. 6
YoucanabletouseaPythonadjustablelockingcabletoprovidemoresecuritytoyourWildSpy
Cam. The “Master Lock”brandis agoodchoice.
8-3 Belt Mount withMetal BracketandUlocked : (Optional Accessory ) See Fig. 7
With anoptionalchoice, asteelmountingbracketand Utypesecurity barcanbeusedto
providestrongersecurityability. Youcan buythisaccessoryfromyourlocaldealer.
9. CONNECTAn External wirelessInvisibleIR Booster
Foranexperienceduser, youalwayswouldexpectto getextreme quality picturesand videos by
manyskills. WldSpyCam provideanoptionthatthe wireless boosterlike IRX-22BW will enhance
the camera simply. Thus, youwill get severaltimes higherillumination depend onanumberof
boosterstobeconfigured.
Referto theuserguideand snapthetransmittertothebeltorPython easily. SettheIRtrigger
SensoragainsttheIRlight sourceonthecamera. Justneedasingle transmitter tocontrolunlimited
wireless boosters whichtheywill besetwith same frequency around 100 feet.
9 . USE LENSHOOD
Thislens hoodiscomewith thepackingthatis usedforinstallingonthecamera lenstoprevent sun light reflectiontoo muchinto thecamera sensor
andsnow aswell as rain orsnow-fall stackedin front ofthelens.
10. SolarPowerPackConnection:
If you also havebought aSolar PowerPack(Model: SO6-6W-9V), plug theSolar packcontrollercabletotheSolarPWportonthecameraunit simply.
TouchthePWbuttononthecontrollertosupplythesolar powertothecamera. Thesolarpoweredpackwill alwayssupplyenergyin 24/7 and will becharged
undersun light automatically. Itisn tamattertherearesomedays with cloudybecauseahighcapacitystoragepowerpackwillsupportthiscamera towork
formorethan10 daysorafewthousand shotsafteronetimeoffullycharged ontheSolar Pack.
11. PowerManagement:
It isanoptionalbut highlyrecommendedtoinstall all Alkalinebatteriesintothecamera compartmentevenyouprefertoalwaysuseasolarsystem. The
backup batterydosestand byonlywhilethesolarpackenergystill beenoughtosupportCameraoperationasusual. Batterieswill bedrainedsince the
powerpackgoestotheOFF w/oanychargingforalongtime. Itisidealforremainingthescouting settings evennomoresupplyfromSolar pack.
Troubleshooting Guide /Useful Skills
12-1 No animal showingin some pictures:
- Checkiftheunit ispointed thedirection wherethesun is risingor sunset thatthesensormight be triggered.
- ThePIRsensormaydetect an animalsthroughvegetationout ofview from thecamera.
- Iftheanimalwasmovingquickly, camera may notcapture it in timewhileananimalstill staying in thezone.
- Makesurethattheunit wasmountedon asteady tree orother place thatdoesnot wobble.
12-2 The Camera In-Uselightis remaining ON, butthe cameradoesnot respond:
- Thecamera may be time-out and shut down automatically. RepeattopresstheCAM-PWto resumethecamera ON.
- Batterymaybetoo lower thatcouldnotsupportthecamera operation. Checkthebatteryiconforthelevel.
- TheTriggerTime issetontheFASTmode. YouhavetoswitchOFFthemainPWand backON.
12-3 The CAM-PWswitchdoesnot respond:
Attempt to turnthe camera ON too quicklyafterthe main powerON. Wait forabout10 seconds until thebacklight ofscoutingLCDgoestoOFF. Then try
again.
12-4 Don’tsatisfyabrightnessonnightPictures. Itseemstoo dark
-Youmight settheShutter/ISOtobeFAST, trytochangeforAUTO oradd anexternalbooster.
-Batteriesmaytoo lowerorqualityis not goodortheyarenotAlkalinetypethatthe batterysetcouldnotaffordahighcurrentconsumptionmomentwhen
theinternalIRlight wasON. Needtoreplace with agoodquality brand new battery set.

12-5 Don’tsatisfyablurnightPictures. Itseemsnot soclearto view amovinganimal.
Simply tosettheShutter/ISOtoFAST. To a getbetterresult, it ishighlyrecommendedtoapplymoreexternalIRboosters.
12-6 The Light in the frontofthe housing does always remainON:
-Theunit just is setforWalk-Test mode.Thelight remainsON steady within 60s warmingup period.
-The CAM-PWis notOFF. Remembertoturn camera OFF afterfinishingforcamera usage.
12-7 HowcanIgetmorepicturesagainst asmall animal likeraccoon;hare?
Trytomount thecameraat0.5~0.7meter height onatree.
12-8 Itseemscamera didnot captureany imageorvideoatnight, itcanstill captureat day:
Checkthecamerabatteriesiftheyarebadalready. Trytoreplace withnewbatteriestotestagain
12-9 Why areeverythingsdisplayedonTVmodewithout color?
Itmight becausedby improper settingofTVsignalformat. Trytochangeforanother settinglikeTV-PAL<> TV-NTSC. Ifit is still fail, youhaveto
changeyourTV set tobetheNTSCtomatchthesignalprotocolwith thecamera.
12-10 Why does thebatteryiconstill showBLANKafterreplacedwithnew batteriesalready?
Youmustre-bootthedevice bythemain PWswitcheverytimesyoudid replace forbatteries.
12-11 Why doesthememoryfull iconstill blinkingrapidlyafterdeletedfilesfromSDcard already?
Youmustre-bootthedevice bythemain PWswitcheverytimesyoudid clear memoryorreplacewithanewSDcard.
Important Note:
12-12 Why can’t I wakeupthe camerascreen ON andseemsNo response whilepressinganykeys?
-You forgetto presstheCAM-PWfirstlybeforetryingtooperatethecamera.
-Youhavetowait foraperformingevent tobefinisheditselfand then, presstheCAM-PW.
-Checkifthere is SDcardwith hugeamount ofimagesstoredin theslot. IfYES, youhavetowait forafewsecondsuntil thecardinitializingtobedone
since CAM-PWis ON. And, it is highlytorecommend youtosavethefiletoPC frequently and cleanup thecard in order to getmore emptyspace.
12-13 Iexpecttosee the scoutcounterto startfrom000 whileresumeanew trail.. HowcanIdo?
PresstheOK/DELand holdfor3secondsto eliminatetheoldrecords. Nowyouwillsee 000.
12-14. What aredifference between the FeatureQUICKShots vsBURSTShots?
TheQUICKshots is definedhow manytimes tobeallowedtotakeshots onceanevent will bedetected. Additionalshotswill be triggered byfurther
movementsup to3times. Ifnomore movement will bedetected, it means you will just getonlyoneimageevenyouhadsetfor3quickshots. Otherthan
QUICKShot, youcanenabletheBURSTmodetotakemore shotsduringeachevent. Camera will takeaseveralshotsautomaticallyonce amoment will be
detected. Thereisnoneedfurther detections requiredand youwill getanuserdefinedquantityofimageswithin oneevent.
12-15. Why Icouldnot seetheVideosor Pictureswhich I justtokepreviously?
Youneedtoknowthescreenwillonlydisplaytheimageorvideofilescorrespondingtothecurrent setting. Youhavetochangethesettingonceifyouwant
toviewotherkind ofmediafiles.
12-16. CameraseemsNOT writeany pictureinto my “Empty SD card anddisplayedwithMemoryFull:
1. Youmust formatthe SD cardwhichwaseverusedintheotherdevice beforeapplyingit in thiscamera.
2. Checkthecurrent SD cardand trytouse abrand NewSD cardinsteadofyourcurrent SD.
12-17. ResettheUnitoutofSystemHalt:
Incasetheevent counterstopped torespond foranysensing, oryounoticetheLCDisalwaysblank eventhePowerswitchisON, thesystemmayhalt
alreadytocausetheproblem. Removeall batteriesout ofcompartment formorethan10 minutesin ordertoresettheunit. All pictureswill beretainedand the
unit will resumetothefactorydefaultsettings. Youwillneedtoreprogram with yourdesiredparametersbeforeuse.
Pleaseconsultyourdealerifyouhaveanytechnicalquestions orproblemwhileyouusethe
productbeforeyourequesttosendbackforrepairing.Mostofproblemissuesmay easily besolved
withhelpfromthetelephonesupport.
Table of contents