Window Shade BW28000 User manual

1 | P a g e
BW28000 Retractable Awning Installation
Manual
WARNING! THIS INSTRUCTION MANUAL MUST BE READ BEFORE THE USE AND
INSTALLATION OF THE PRODUCT.
WARNING! IT IS IMPORTANT FOR SAFETY OF THE CUSTOMER/PURCHASER TO
FOLLOW THESE INSTRUCTIONS. PLEASE SAVE THESE INSTRUCTIONS FOR FUTURE
REFERENCE.
GROUND FLOOR INSTALLATION ONLY!!
CONTENTS
•Specifications/Precautions and safety warnings for installation and
operation
•Accessories and required tools
•Installation procedure
•Operation instructions
•Maintenance
•Name list of parts

2 | P a g e
Recommended installation for surface installation to be brick or concrete only.
PRECAUTIONS AND SAFETY WARNING
FOR INSTALLATION AND OPERATION
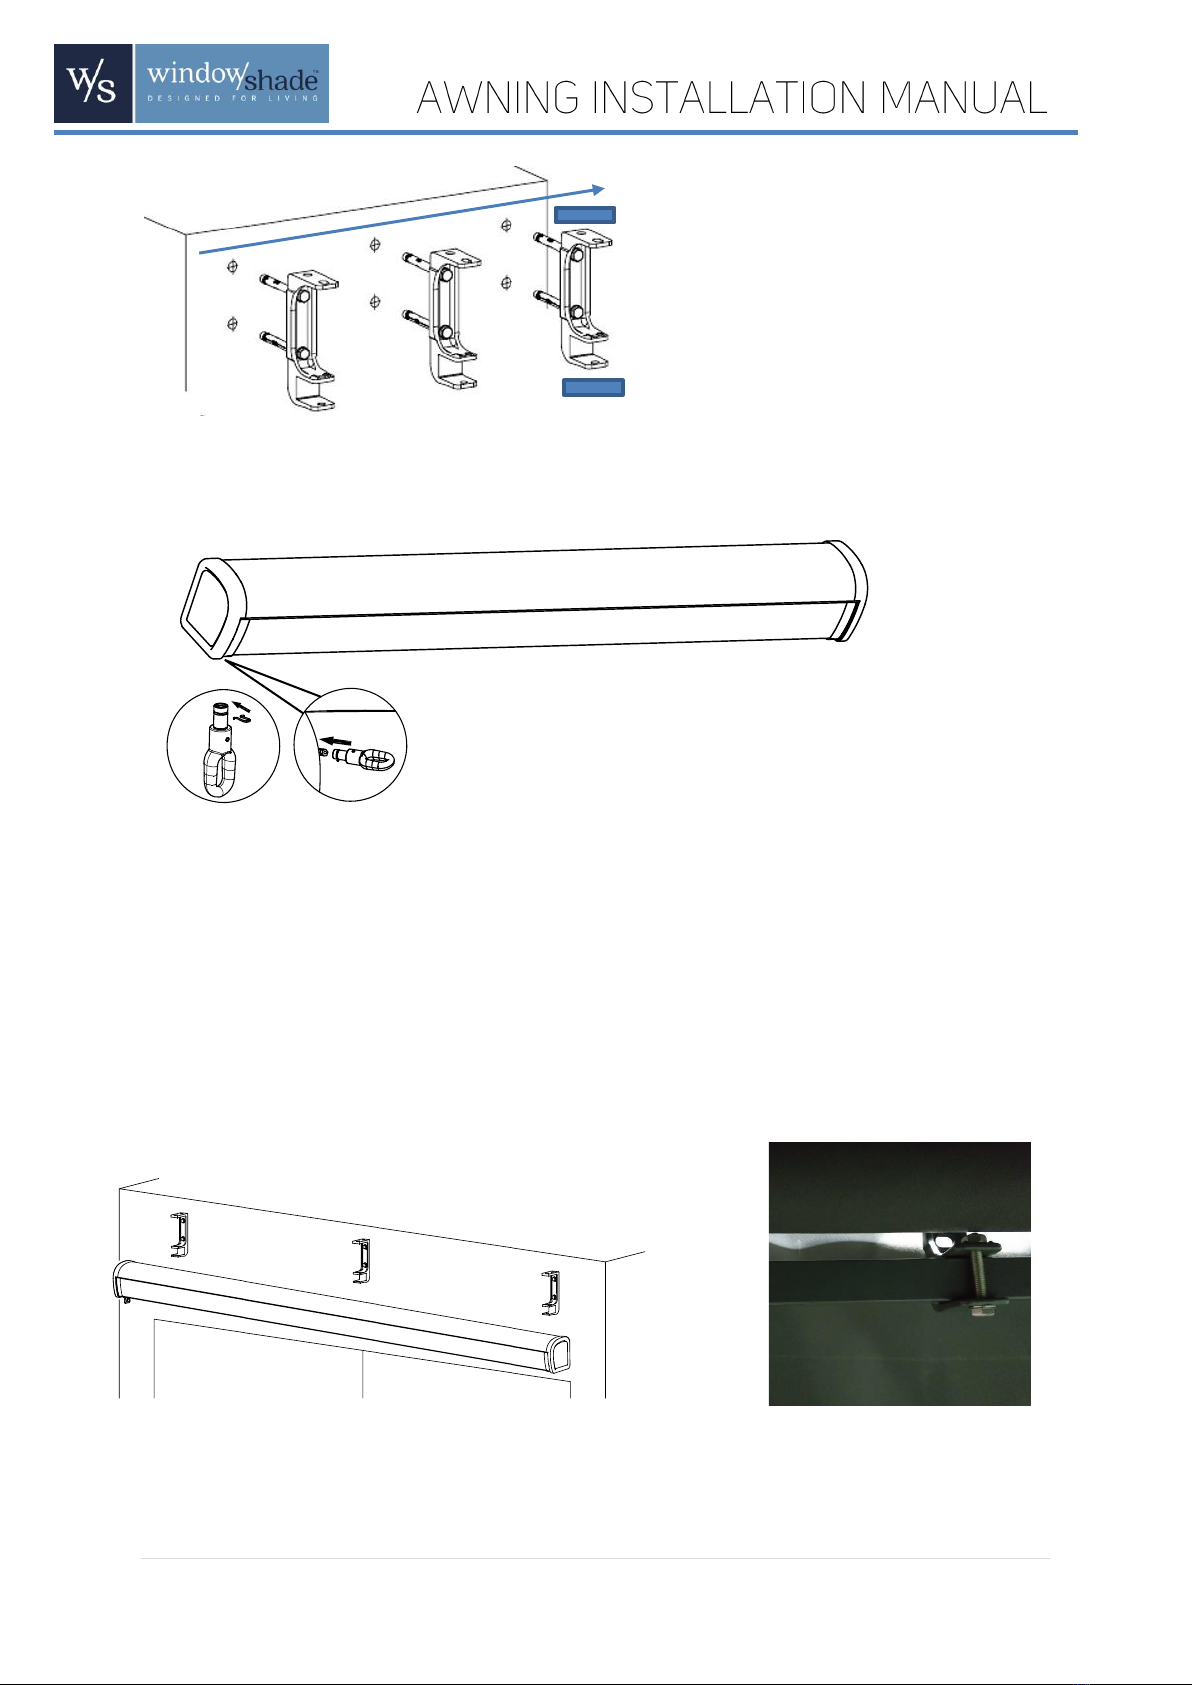
1.Before opening the awning, make sure all of the fixing bolts are properly
installed and tightened.
2. Always close the awning during rainy or windy days or when the awning is not
in use.
3.The folding arms of the awning are under tension and can cause damage or
injury when they are opened up suddenly.
4. Never try to repair the awning by yourself. Consult a qualified tradesman for
help.
5.Failure to observe these instructions may lead to material and constructional
damage of the awning.
PLEASE PAY CLOSE ATTENTION TO THIS IMPORTANT AWNING
INSTALLATION INFORMATION
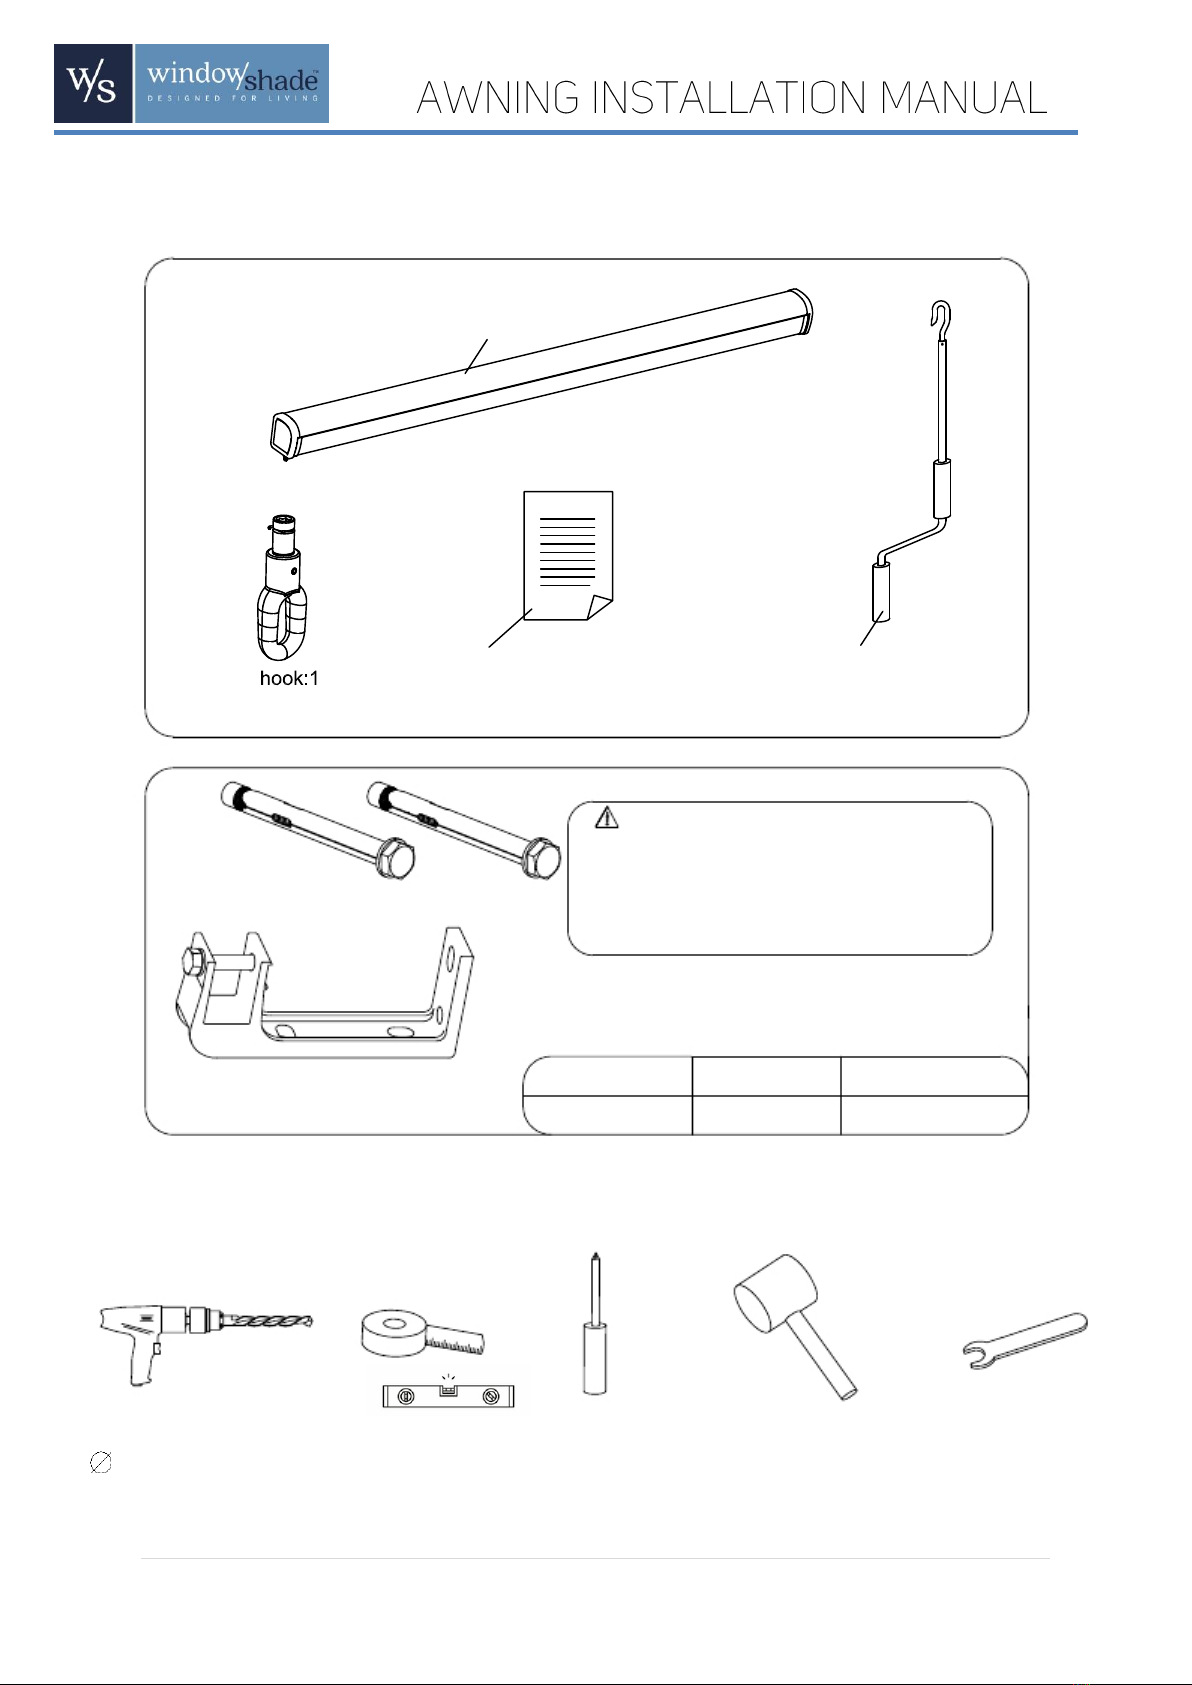
•When you are ready to unpack and assemble the awning, make sure that you have the
appropriate tools, sufficient operators (2 persons are suggested) and space, and a clean
and dry area to perform the installation.
•The installation can be made by non-professionals assuming the instructions are
followed correctly. Should you have any trouble during assembly, please consult the
place of purchase.
•Save enough free space around the awning while rolling or unrolling.
•Check the awning every 3 –6 months to ensure all fixings are tightened and no damage
has occurred to the product.
•Frequently examine the installation for imbalance and signs of wear or damage to the
springs. Do not use if repair or adjustment is necessary.
•Take care when operating the manual release with the external blind retracted.

3 | P a g e
PLEASE DO NOT DO THE FOLLOWING:
•Do not barbeque underneath the awning or ignite a fire near to the awning.
•Do not use the awning in places of high temperature such as walls near fire places or
any other heat sources.
•Do not allow children to play with the awning or hang on the awning.
•Never use the awning in rainy or windy days.
•Never use the awning for other purposes.
•Operation in frosty conditions may damage the awning.
•Ensure you do not make any modifications to the awning of any kind.
•Never install the awning too high or/and in windy places, as the awning may drop and
injure someone.
•Do not use it in a place that has vibrations or impulsions.
•Do not use on a balcony, second storey or above levels. This awning must be fixed on
ground level only.
•Don’t hang anything on the frame or on the folding arms as the awning may fall down
and cause damage or personal injury.
•The awning is not intended for use by persons (including children) with lack of
experience, knowledge, unless they have been given supervision or instructions
concerning the use of the awning by a person responsibility for their safety.

4 | P a g e
ACCESSORIES AND TOOLS REQUIRED
Swing hand hook/Crank
handle :1
Set Screws
Wall Base Brackets
Attention!
The expansion bolts provided in the product are for concrete or
brick wall. If you are installing the awning on surface other than
for concrete or brick wall, please ensure the wall is of sufficient
support and use the correct hardware to secure the awning on
the support. We do not recommend installing the awning on
surfaces other than concrete or brick.
Product Model No. of wall base brkts No. of set screws
2.5 x 2m 3 6
Power drill with drilling bit of Tape Measure & Screwdriver Mallet Wrench (wrenches of
12 Spirit Level M10 and M12)
Awning :1
Instruction Manual:1

5 | P a g e
INSTALLATION PROCEDURE
Prior to Installation
Carefully unpack and release the bindings. You will need minimum two people to assist with the
installation.
Remove and store the hardware in a safe place to avoid losing parts enclosed.
Beware of the sudden unfolding of any parts, especially the folding arms.
Read the assembly instructions carefully before installation.
Check for missing components or damaged parts. Do not install the product if any parts are missing or
damaged. Return to the store.
Never modify the construction or the design of the awning. Failure to follow the instructions can lead
to personal injury or death.
Ensure the wall is strong enough and is suitable for the installation of the awning –must be a brick or
concrete surface. DO NOT INSTALL INTO THE MORTAR (AROUND BRICKS). The place of purchase will
not be responsible for any damage to the property and the awning due to the weak support of the
installation wall.
The brick or surface must be in a suitable condition to install this product. If unsure if this surface is
suitable, please check with a professional tradesman.
*Please note that the awning pitch is set at 80 degrees –alteration of the pitch is not recommended.
DO NOT INSTALL
INTO MORTAR

6 | P a g e
Installation of Wall Brackets
The holes of each group must be on the same line in horizontal direction and vertical direction.
Mark the height on the wall (we recommend a minimum of 3 metres from the ground) and locate the
drill hole positions for the wall brackets –see below.
POSITIONING THE BRACKETS
1. You will need to position the middle bracket in the centre position.
2. Once the middle bracket is fixed, measure from the middle of the centre bracket 1182 mm to
the left
(see diagram 1).
3. Next, measure from the middle of the centre bracket 1182 mm to the right .
Drill the holes with a masonry drill, the depth of the hole needs to be a minimum of 110mm.
Please note that the depth of the holes drilled will leave the threaded part of the central bolt extruding
from the wall. This is necessary to fit the brackets.
Note: If the nut and washer have separated from the expansion
bolt, put them back together as per diagram before fixing them
into the brick or concrete surface.
Put the expansion bolts through the wall bracket, then plug the expansion bolts into the above-
mentioned hole, check and ensure all wall base brackets are aligned on the same horizontal line and
vertical line before tightening all nuts.
Measurement has been taken from
inside edge of wall base bar bracket
as shown on image
Wall
base
bracket
position
Wall base
bracket position

7 | P a g e
Installation of Awning to Wall Bases
(2 persons
minimum
for this process)
Remove the bolts from
the front of the wall base
brackets. Install the awning to the wall base
brackets
by positioning the square torsion bar to the wall base
bracket bottom C Section. We recommend you
manually wind the awning out using the swing hand hook/crank handles approx. 400mm so you can
position the bolts and nuts through the C Section on the wall base bracket. Lock the awning in place by
replacing the bolts and nuts on wall base
brackets (refer to photo below). Tighten the nuts to ensure
the awning is attached to wall base
brackets
securely.
Make sure all wall base brackets are on
the same horizontal line/vertical line
Top of wallbase bracket
Bottom of wallbase bracket with C Section
Bolt and nut on wall base
bracket
Please follow the below instruction to install the HOOK

8 | P a g e
Correct Operation
Note: The fabric must be taut during operation, otherwise this may result in water accumulating on the
fabric. Please operate in the correct method shown in the below diagram.
Correct Operation Incorrect Operation
Maintenance
•Always close the awning on windy days or heavy rain and when you are not using it.
•Please do not unpick and wash the fabric.
•Check the overall installation and all the fasteners regularly, especially at the beginning of a new
season to ensure fastners are tightened and in good condition.
Names of Parts
Cassette* Arm Shoulder*
End Cap*
Torsion Bar*
Swing Handle/Crank Handle
Roller*
*When these parts are damaged please don’t use the product until they are replaced.
Front bar
hook*
Table of contents
Popular Accessories manuals by other brands

SICK
SICK MLS operating instructions

OPHIR
OPHIR L50(300)A-IP Calibration manual

Sport-thieme
Sport-thieme 115 6603 Operating & assembly instructions

PCB Piezotronics
PCB Piezotronics 137B24B Installation and operating manual

Polytron
Polytron SPM 2000 LAN user manual

Stevens
Stevens Hydra Probe II Series manual

Cuisinart
Cuisinart CTG-00-SPI4 INSTRUCTION AND RECIPE BOOKLET

Rice Lake
Rice Lake 1280 Enterprise Series Installation guides

Peg-Perego
Peg-Perego kit pramette tak Instructions for use

KoamTac
KoamTac SMARTSLED KDC400 Series quick start guide

Nevco
Nevco MPCX2 Football Operator instructions

Steren
Steren ALA-034 manual