Información General Reuleaux RX75 Especificación & Características
Tamaño: 87*22,5*47mm
Tipo de rosca: Rosca de resorte 510
Tipo de batería: 18650 células de alta potencia (la corriente de descarga debe estar por encima
de los 25A)
Modo de salida: VW/Bypass/TC-Ni/TC-Ti/TC-SS/Modo TCR
Potencia de salida: 1-75W
Rango de resistencia: 0,05-1,5ohm para los modos TC
0,1-3,5ohm para modo VW/Bypass
Rango de temperatura: 100-315°C/200-600°F (modos TC)
Cómo utilizar:
1. Encendido / apagado: Desconecte la cubierta posterior magnética y ponga una célula 18650
dentro del cuerpo de la batería. Presione el botón de encendido 5 veces rápidamente para
Spanish
1Spanish 2
Spanish
3Spanish 4
Spanish
5Spanish 6
Spanish
7Spanish 8
Spanish
9Spanish 10
Spanish
11 Spanish 12
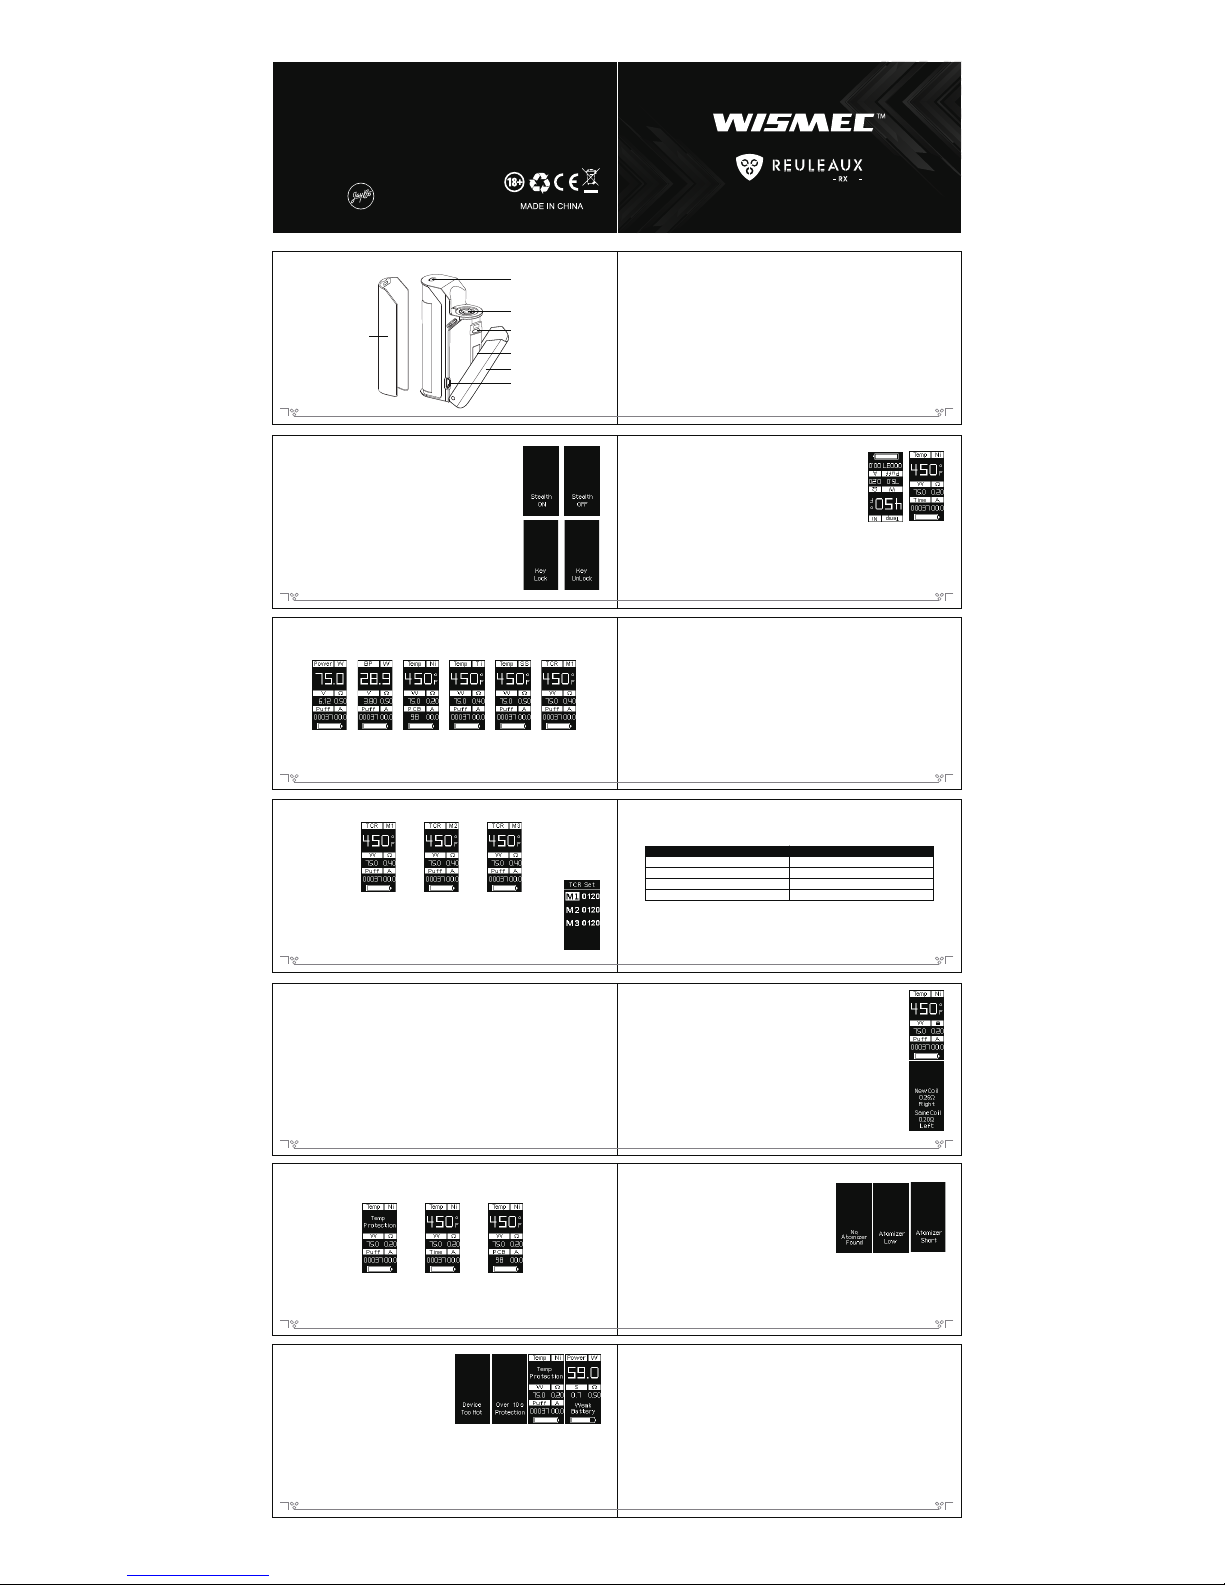
Interruptor para el
bloqueo de seguridad
Conector de resorte 510
Cubierta frontal
Pantalla OLED
Botón de encendido/
Cubierta posterior
Botón de regulación
Puerto micro USB
encender o apagar el dispositivo.
(Nota: Por favor, ajuste la potencia a un rango apropiado para que
coincida con el atomizador que se usa antes de empezar su uso.
Además tenga cuidado de no utilizar la batería con la carcasa dañada
por vuestra seguridad.).
2. El funcionamiento de los botones de regulación: Antes de realizar
cualquier operación de regulación, en primer lugar debe abrir la tapa
frontal.
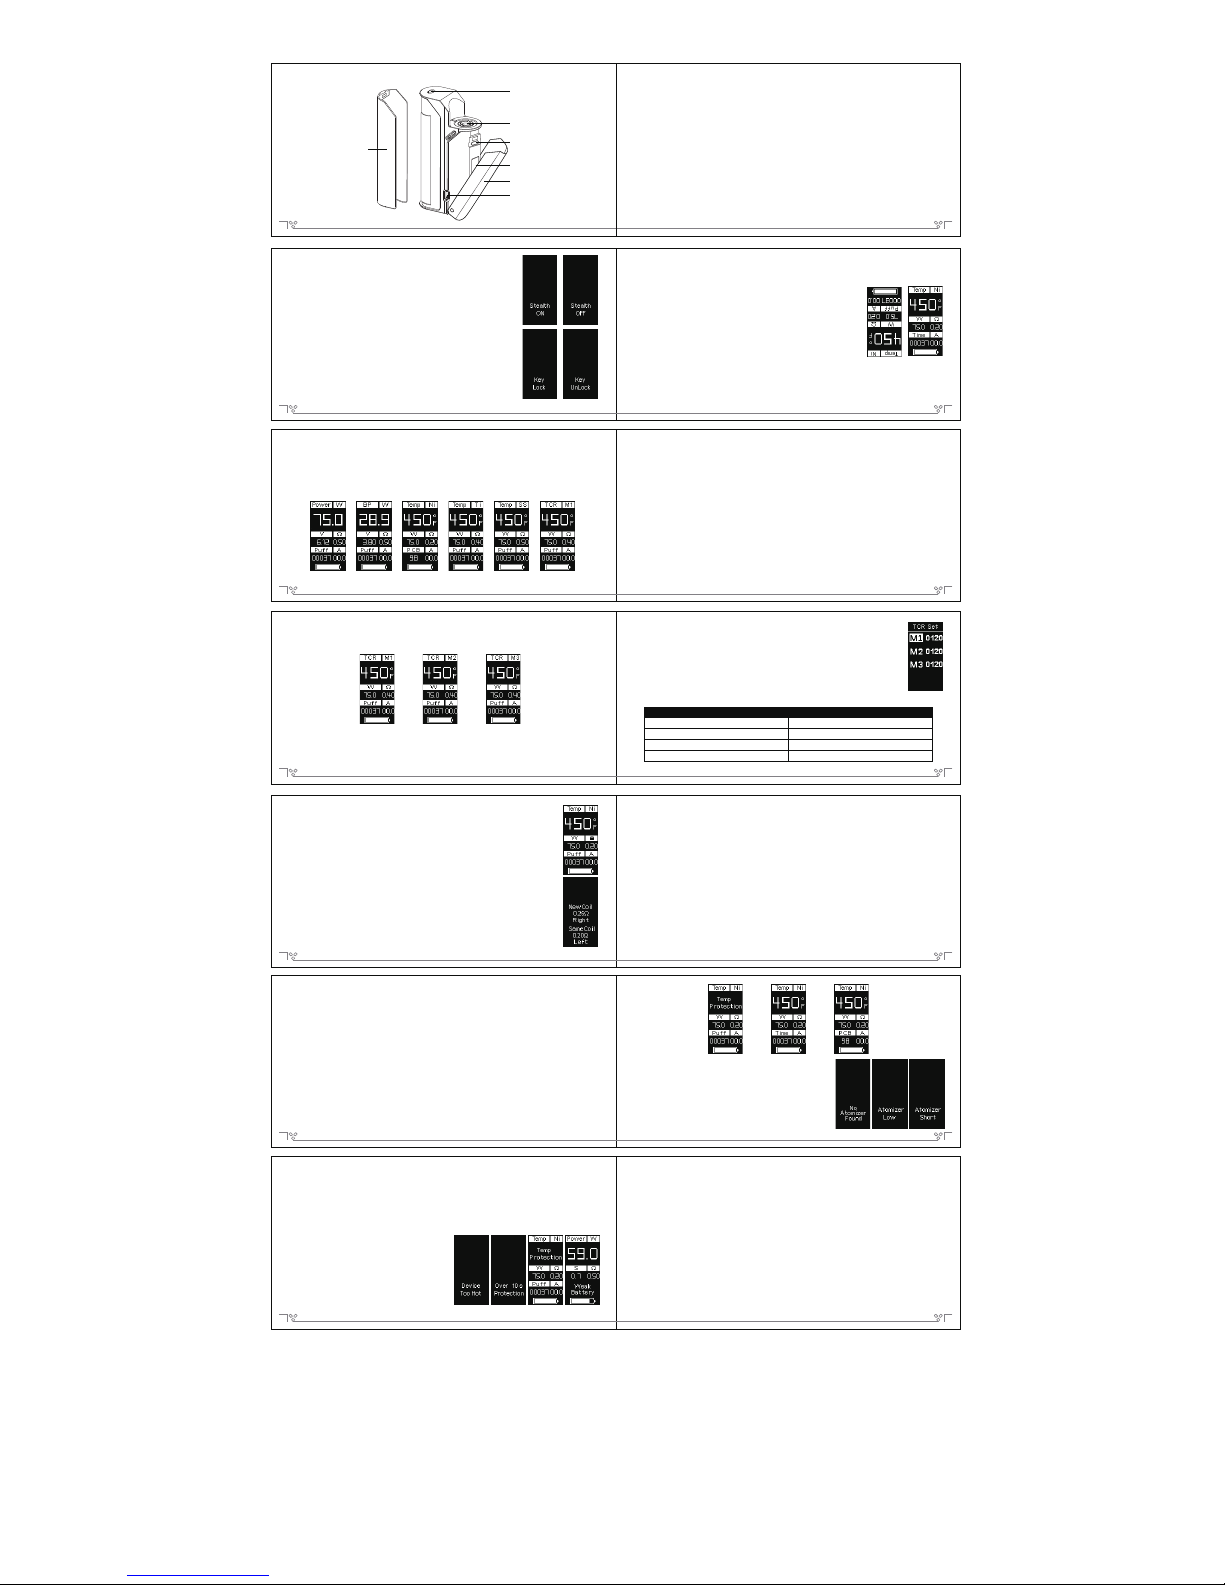
3. Función oculta: Cuando el dispositivo esté encendido, mantenga
pulsado el botón de encendido y el botón de regulación izquierdo. De
esta manera la visualización de la pantalla podrá encenderse o
apagarse.
4. Función para bloquear el teclado: Mientras el dispositivo esté encendido, presione
simultáneamente los dos botones de regulación. Con esta operación podrá realizar el bloqueo o
desbloqueo del teclado.
5. Interruptor de seguridad: Mueva el interruptor hacia derecha/izquierda para
bloquear/desbloquear el botón de encendido para evitar pulsar accidentalmente.
6. Función puerto micro USB: El puerto USB se puede utilizar para
cargar y actualizar el firmware. Es mejor sacar la célula y cargarla a
través de un cargador externo.
7. Cambiar el modo de pantalla: Cuando el dispositivo está apagado,
pulsando el botone de regulación izquierdo y derecho simultáneamente,
la pantalla girará 180 grados. A continuación, puede ver la pantalla
desde dos ángulos gracias a esta operación.
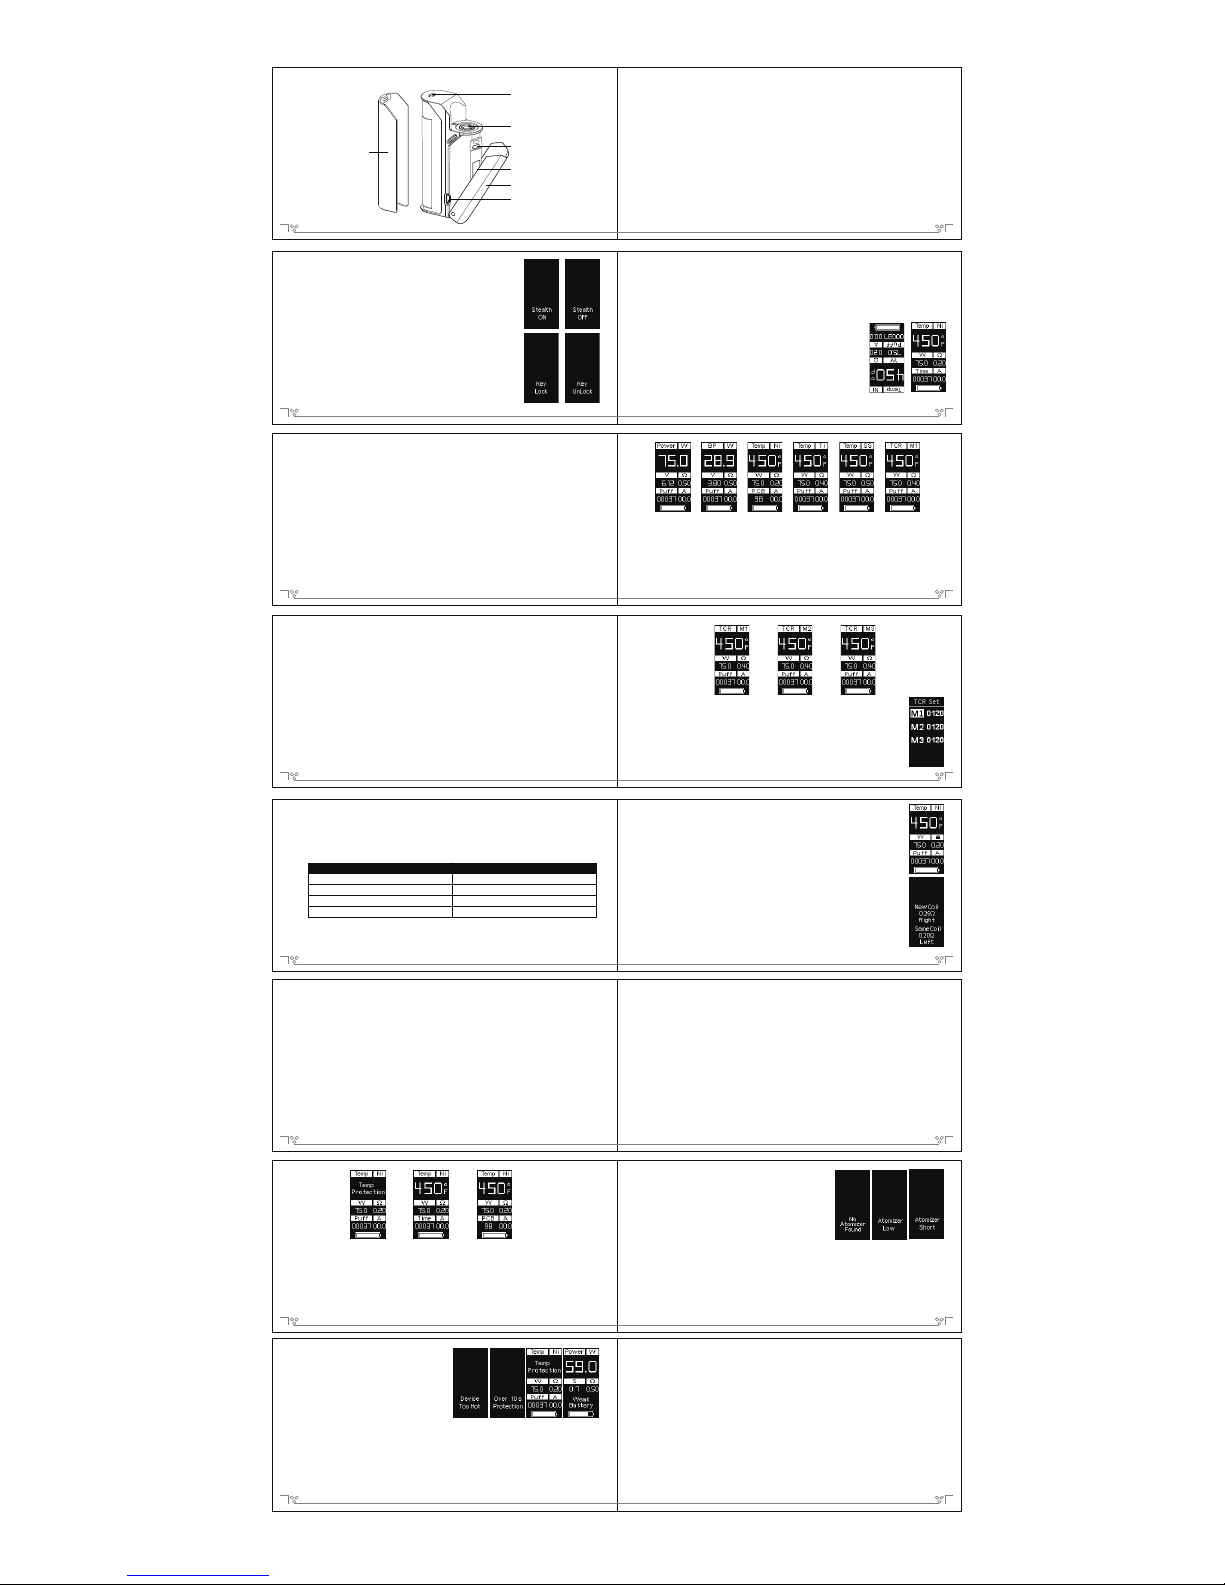
Cambiar entre los modos VW/Bypass/TC-Ni/TC-Ti/TC-SS/TCR
1. Pulse el botón de encendido 3 veces para entrar en el menú.
La pantalla OLED presenta 5 filas de información:
(1). Potencia (VW), BP (especial), Temp Ni (TC-Ni), Temp Ti (TC-Ti), Temp SS (TC-SS) y TCR.
(2). Temperatura: 100-315 °C/200-600 °F.
(3). Potencia de salida, y la resistencia en el modo TC, la Tensión y la Resistencia en el modo
VW/Bypass.
(4). Información para el usuario (Puff: total caladas al vapear, Time: el tiempo total de vapeo, PCB:
la temperatura de la placa de circuito impreso) y de la Corriente.
(5). Símbolo nivel de la batería.
2. Después de pulsar el botón de encendido 3 veces, la primera fila parpadeará para indicar que
accedió al menú. Presione el botón de regulación derecho para cambiar entre los modos VW,
Bypass, TC-Ni, Ti-TC, TC-SS y TCR. Presionar el botón de encendido, o dejar la pantalla
parpadear 10 veces en la configuración actual para confirmar y salir del menú.
Modo VW:
En este modo, la potencia de salida se puede ajustar entre 1W a 75W pulsando los botones de
regulación, el derecho para aumentar y el izquierdo para disminuir.
Modo Bypass:
El modo Bypass es un modo de salida directa de la tensión. En este modo, el chip interno es
"bypass" y la resistencia del atomizador soportable es 0,1-3,5ohm.
Modo TC-SS: El modo TC-SS es adecuado para la bobina SS316.
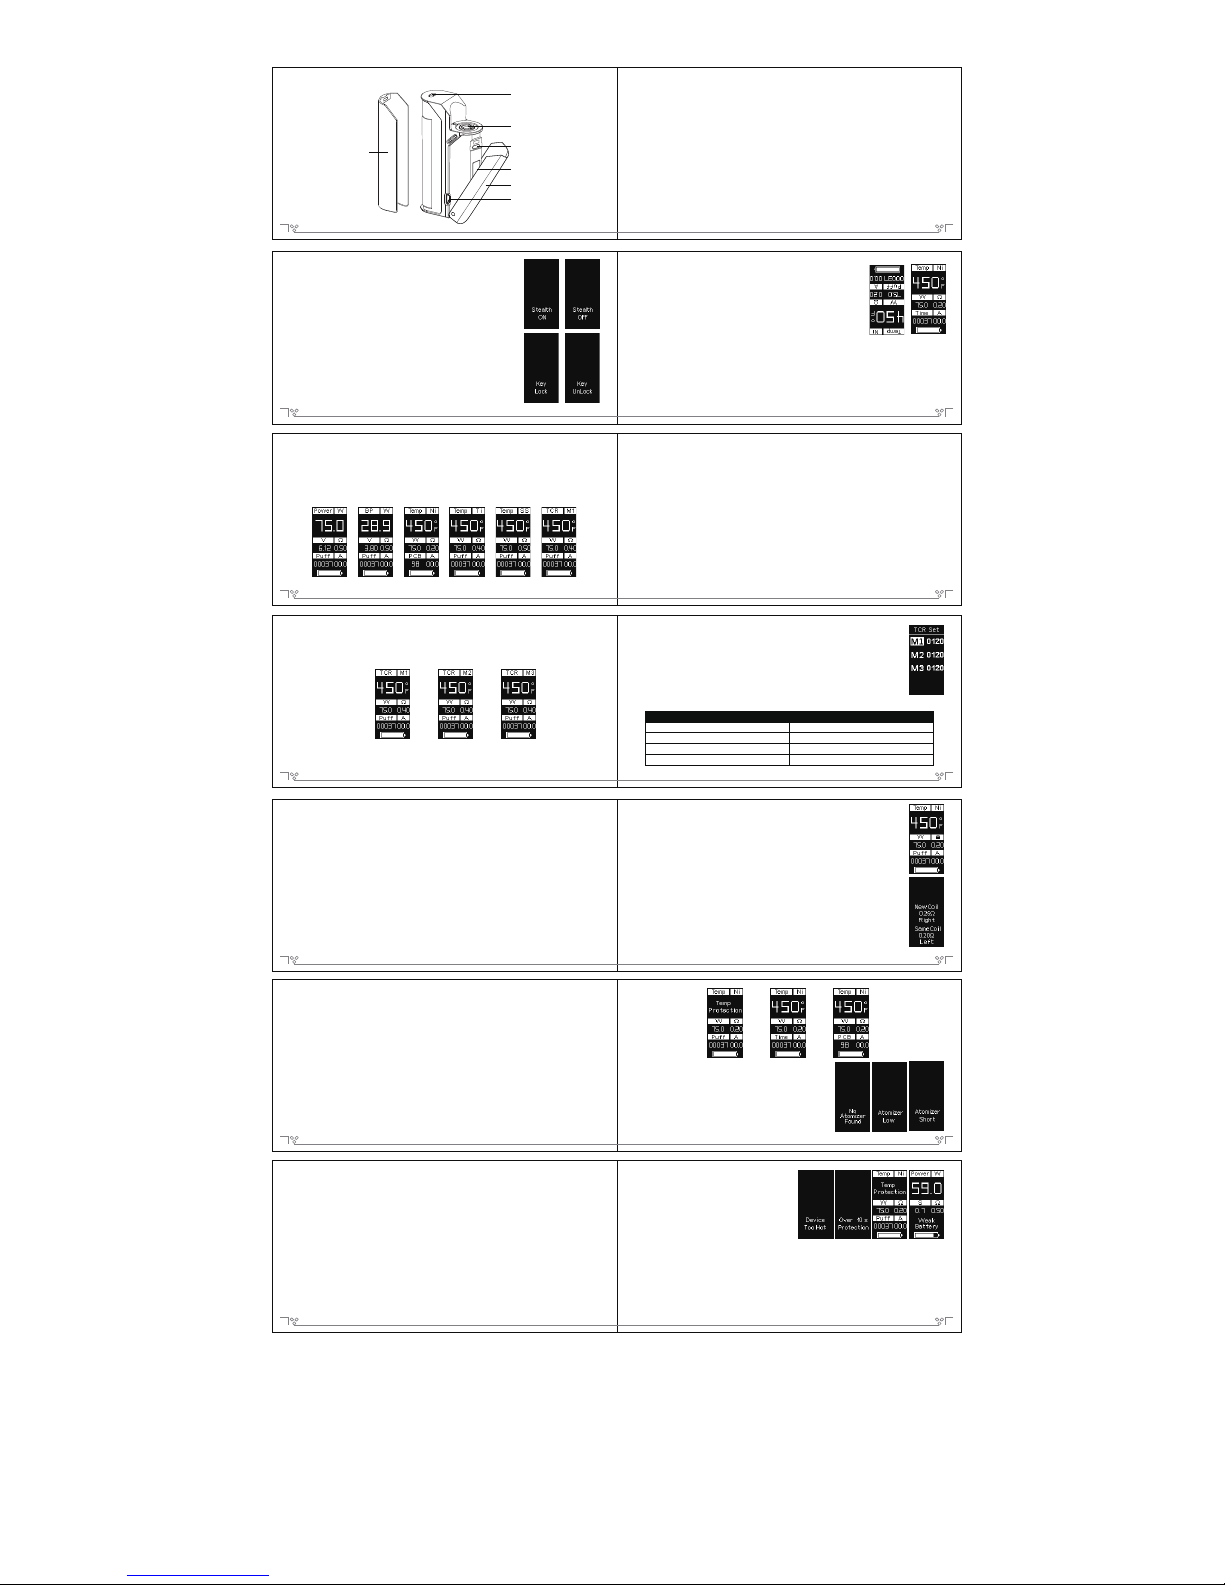
TCR (M1, M2, M3): En TCR (Coeficiente de Temperatura de Resistencia) modo, los usuarios
pueden ajustar los parámetros de acuerdo con el TCR de la bobina.
En el modo de TCR, cuando la indicación de modo parpadea, pulse el botón de regulación
izquierdo y luego las opciones del menú secundario (M1, M2, M3) parpadearán. Presione el botón
de regulación derecho para elegir entre M1, M2 y M3 y luego presione el botón de encendido para
confirmar.
valor TCR de acuerdo con el material de la bobina;
(4). Mantenga pulsado el botón de encendido o permanezca en la interfaz durante unos 10
segundos para confirmar el ajuste.
A continuación se presentan los diferentes rangos de los valores de TCR de Reuleaux RX75 para
su referencia:
Nota: 1. El valor de TCR en la hoja es de 10 multiplicado del TCR real.
2. El rango total del valor de TCR para Reuleaux RX75 es 1-1000.
Spanish
13 Spanish 14
Spanish
15 Spanish 16
Níquel
NiFe
Titanio
SS (303, 304, 316, 317)
600-700
300-400
300-400
80-200
Material Rangos de Valores de TCR
El ajuste del modo TCR: Cuando el dispositivo está apagado, mantenga pulsado el
botón de encendido y el botón de regulación derecho simultáneamente, usted va a
entrar en el menú de TCR:
(1). Pulse el botón de regulación izquierdo o derecho para elegir entre los modos TCR
M1, M2 y M3;
(2). Pulse el botón de encendido para confirmar el modo elegido;
(3). Pulse el botón de regulación izquierdo o derecho para aumentar o disminuir el
5
del botón de regulación derecho hará que el ajuste de potencia aumente rápidamente.
Función para bloquear la resistencia: Pulse el botón de encendido tres veces y acceda al menú.
Presione el botón de regulación izquierdo 2 veces, y el signo de resistencia parpadeará. Pulse el
botón de regulación derecho para bloquear o desbloquear la resistencia del atomizador. (Nota:
Esta operación debe hacer en temperatura ambiente.)
Instalación de nuevo atomizador: En el modo TC, tenga cuidado al instalar nuevos
atomizadores ya que deben enfriarse a temperatura ambiente. Si el atomizador nuevo no se ha
enfriado antes de ser instalado, la temperatura puede leerla y protegerse de forma incorrecta
hasta que el atomizador nuevo se enfríe.
Nota:
1. Cuando usted conecta un nuevo atomizador o desconecta y vuelve a conectar el atomizador
existente, el dispositivo le pedirá que confirme este cambio y un mensaje se mostrará "New Coil
Right, Same Coil Left". Pulse el botón de regulación derecho para confirmar que un nuevo
Funciones Suplementarias de TC Modos:
Ajuste de Temperatura: En los modos TC, la temperatura se puede ajustar entre
(100-315°C or 200-600˚F) con los dos botones de regulación, el derecho para
aumentar y el izquierdo disminuir.
Cambiar entre °C y ˚F: Si aumenta la temperatura a 315°C, y continúa pulsando el
botón de regulación derecho, las lecturas de temperatura cambiarán automática-
mente al grado más bajo Fahrenheit (200˚F). Igualmente, si la temperatura se
reduce por debajo del mínimo (100°C), la lectura cambiará de nuevo automática-
mente a ˚F, la temperatura comenzará a disminuir a partir de 600 ˚F.
Ajuste de potencia: Pulse el botón de encendido 3 veces en sucesión rápida para
entrar al menú. Presione el botón de regulación izquierdo, y el signo de potencia
parpadeará. A continuación, pulse el botón de regulación derecho para ajustar la
potencia, y presione el botón de encendido para confirmar. Una presión prolongada
atomizador se ha instalado. Presione el botón de regulación izquierdo para confirmar que el mismo
atomizador se ha vuelto a conectar.
2. Si al utilizar la bobina normal o la resistencia de la bobina es superior a 1,5ohm en los modos
TC, el dispositivo cambiará automáticamente al modo VW.
Cambio entre Puff, Tiempo y PCB:
Presione el botón de encendido 3 veces para entrar al menú. Presione el botón de regulación
izquierdo 3 veces, y la fila de información de usuario parpadeará. A continuación, pulse el botón de
regulación derecho para cambiar entre Puff, Tiempo y PCB (la temperatura de la placa de circuito
impreso). (Nota: La unidad de temperatura de PCB está con la temperatura que se ajuste en los
modos TC).
Visualización de la corriente: El signo muestra la corriente con la que opera mientras usted está
vapeando.
Multifunción de Indicación y Protección:
Alerta Sin Atomizador: Cuando el dispositivo no detecta un atomizador, la pantalla OLED mostrará
el mensaje "No Atomizer Found".
Alerta Atomizador Bajo: Cuando la resistencia de la bobina es menor a 0.1ohm en el modo
VW/Bypass o inferior a 0.05ohm en los modos de TC, la
pantalla mostrará "Atomizer Low ".
Protección de Atomizador de Cortocircuito: Cuando se
produce un cortocircuito en el atomizador, la pantalla
mostrará "Atomizer Short".
Alerta de Temperatura: Si la temperatura del dispositivo ha
superado los 70°C, la salida se desactivará automáticamente
Atención
1. Mantener fuera del alcance de los niños.
2. Este dispositivo no está recomendado para ser utilizado por personas jóvenes o no fumadores.
y la pantalla mostrará el mensaje "Device Too Hot".
Protección más de 10 Segundos: Cuando se pulsa el botón de encendido durante más de 10
segundos, la salida se apagará y la pantalla OLED mostrará "Over 10s protection".
Protección en la Temperatura: En los modos TC, cuando la temperatura real de la bobina
alcanza la temperatura establecida, la pantalla mostrará el mensaje "Temp Protection".
Alerta batería baja: En los modos VW/Bypass/TC,
cuando el dispositivo está funcionando con un
atomizador y el voltaje de la célula cae por debajo
de 2.9V, la pantalla mostrará el mensaje "Weak
Battery". Mientras tanto, la salida de potencia se
reducirá en consecuencia.
Alerta de Batería Baja: Si la batería es inferior al
10%, el símbolo de la batería en la pantalla
parpadeará.