Wisy GRS Guide

Deutsch
English
Einsatzbereich und Funktionsweise
Der WISY-Garten-Regensammler (GRS) ist für den Einbau im senkrechten
Fallrohr konstruiert. Dort sammelt er das vom Dach kommende Regenwasser
und leitet es zur Regentonne. Gleichzeitig dient er als Sicherheitsüberlauf für
Regentonnen.
Zum Abscheiden von Schmutz vor dem Zulauf der Regentonne kann der GRS
mit einem Filtereinsatz mit 0,44 mm Maschenweite (siehe Zubehör) ausgerü-
stet werden.
WISY-Garten-Regensammler sind komplett aus Edelstahl gefertigt. Es gibt
sie passend zu den Nennweiten handelsüblicher Regenfallrohre aus Metall
oder Kunststoff:
– für Metall-Rohre: DN 76, DN 80, DN 87, DN 100,
– für Kunststoff-Rohre: DN 70 mit Außen-Ø 75 m,
DN 100 mit Außen-Ø 110 mm
Was ist was?
*) DN = Diameter Nominal, Kurzzeichen für die Nennweite = ca. Innendurchmesser eines Rohres (mm)
Gehäuseoberteil
Stauraum
Auslaufstutzen DN 50
Gehäusetopf
Überlaufmarkierung
*
Anleitung
zum Einbau des Garten-Regensammlers (GRS)
Mit oder ohne Filtereinsatz
Zubehör

min. 20 cm
23 cm
min. 20 cm
falsch richtig
max. 3 cm
Gehäuseoberteil
ankommendes Fallrohr
gut abrunden
2
Der Einbau
Überprüfen Sie den Abstand des Regenfallrohres zur Wand, dieser sollte
mindestens 2 cm betragen.
In der gewünschten Einbauhöhe des Gartenregensammlers ein 23 cm
langes Stück aus dem Regenfallrohr heraussägen.
Wichtig: Besonders am oberen Schnitt ist die innere Kante des von oben
kommenden Fallrohres gut abzurunden, damit das Wasser am Übergang
problemfrei fließen kann. Gegebenenfalls ist das Fallrohrende durch
Bördeln zu weiten.
Bei richtiger Montage sollte das Regenfallrohr höchstens 3 cm in das Ge-
häuseoberteil hineinragen.

Kanal/Versickerung
Überlaufhöhe
3
Achten Sie beim Aussägen des Regenfallrohres auf die Einbauhöhe des
Garten-Regensammlers gegenüber der Regentonne.
Die beiden abgeschnittenen Rohrenden etwa 20 cm oberhalb und
unterhalb des Garten-Regensammlers mit Rohrschellen an der Hauswand
befestigen.
Das Gehäuseoberteil über das von oben ankommende Fallrohr nach
oben schieben.
Jetzt den Gehäusetopf in das nach unten führende Fallrohr einsetzen.
Das Oberteil herunterschieben und damit das Gehäuse verschließen.
Anschlüsse an die Regentonne herstellen.
!Um Regtentonnen frostfest zu machen, sollte im Winter der Zulauf zur
Regentonne im GRS mittels Blindeinsatz (siehe Zubehör) abgesperrt
werden.
Automatische Entwässerungs-
sicherheit: Die Überlaufmarkie-
rung am Gehäusetopf (= WISY-
Schriftzug) muss sich in Höhe
des gewünschten, maximalen
Wasserspiegels der Regenton-
ne befinden. Dadurch wird bei
gefüllter Tonne überschüssiges
Wasser in den Kanal oder zur
Versickerung geleitet.

15801
15803
15802
4
Zubehör
Filtereinsatz, Maschenweite 0,44 mm
Der Filtereinsatz wird einfach in das Basisgerät
eingesetzt.
Durch den Filtereinsatz wird das Dachablauf-
wasser von Verunreinigungen größer als 0,44
mm gereinigt. Die Regentonne erhält somit nur
noch gefiltertes Wasser.
Die einzigartige WISY-Konstruktion trennt den
Schmutz vom Wasser ab und spült ihn automa-
tisch in den Kanal.
Dank des patentierten Filterprinzips ist der Fil-
tereinsatz wartungsarm, jedoch nicht gänzlich
wartungsfrei. Er bedarf bei starker Verschmut-
zung der Dachflächen kürzerer Reinigungsinter-
valle (in der Spülmaschine oder mit Bürste und
Spülmittel).
Zum nachträglichen Einbau und zur Inspektion und Wartung des
Filtereinsatzes wird das Gehäuseoberteil nach oben geschoben und der
Gehäusetopf herausgenommen. Der Filtereinsatz kann dann problemlos
eingesetzt bzw. entnommen werden.
Art.-Nr. 15801 (Passt in alle Nennweiten)
Blindeinsatz
Bei Einsetzen des Blindeinsatzes wird die Zulei-
tung des Regenwassers zur Regentonne unter-
bunden. Das Wasser fließt dann vollständig in
den Kanal oder zur Versickerung.
Der Blindeinsatz wird anstelle des Filtereinsatzes eingesetzt.
Art.-Nr. 15802 (Passt in alle Nennweiten)
Regentonnen-Anschlußschlauch
Verbindet Garten-Regensammler mit Regenton-
ne, UV-beständiger Kunststoff-Spiralschlauch,
32 cm lang, mit Spannring.
Art.-Nr. 15803

15804
Anwendungsbeispiel
15807
15805 15806
Anwendungsbeispiel
15808
15810
15809
5
Regentonnen-Verbindungsschlauch
Verbindet zwei Regentonnen miteinander, UV-
beständiger Kunststoff-Spiralschlauch, 32 cm lang.
Art.-Nr. 15804
Regentonnen-Behälterverschraubung
Zum direkten Schlauchanschluß.
gerade Art.-Nr. 15805
90° gewinkelt Art.-Nr. 15806
Regentonnen-Behälterverschraubung, 1¼"
Für dickwandige Behälter.
Zum Anschluß von geradem oder
gewinkeltem Stutzen.
Art.-Nr. 15808
Stutzen, 1¼"
Für Regentonnen-Behälterverschraubung 15808.
gerade Art.-Nr. 15809
90° gewinkelt Art.-Nr. 15810
Schlauchkupplung
Zum Verbinden zweier Schläuche.
Art.-Nr. 15807

Hinweise zur Regenwasserversickerung
Bei geeigneten Bodenverhältnissen wird eine Versickerung des überschüs-
sigen Wassers oder die Einleitung in einen Teich o.ä. empfohlen. Die geeig-
nete Methode hierfür ist je nach Geländeverhältnissen, Durchlässigkeit des
Bodens und Grundwasserstand individuell zu auszuwählen.
Das hier gezeigte Beispiel
zeigt eine Möglichkeit,
überschüssiges Wasser mit
handelsüblichen Bauteilen zur
Versickerung zu leiten. Hier-
bei ist darauf zu achten, daß
das Wasser in ausreichender
Entfernung von der Hauswand
unbedenklich versickern
kann.
WISY AG Haustechniksysteme, Filtertechnik
D-63699 Kefenrod, Oberdorfstraße 26
Telefon +49(0)6054-9121-0, Fax +49 (0) 6054-9121-29
Garten-Regenbirne
Dekorative Regentonne aus umweltverträglichem
und physiologisch unbedenklichem Polyethylen
(PE). Wasserentnahme mit Gießkanne oder durch
vormontierten Entnahmeschlauch möglich. Ovale
Form für leichtes Entleeren bei Reinigungsarbeiten.
Wintersicher, entleeren nicht notwendig. Formstabil
bis ca. -20°.
Volumen: ca. 420 Liter, Höhe 112 cm, Ø 95 cm,
Leergewicht 15 kg, Entnahmeschlauch 1,70 m
Art.-Nr. RB 1010

Deutsch
English
Function and application
The WISY-Garden Rainwater Collector is designed for the installation in
round vertical rainwater downpipes at high quality construction. There it coll-
ects the rainwater from the roof and feeds it to the rainwater barrel. Additio-
nally it functions as the security overflow of the barrel.
For the elimination of all kinds of debris in front of the barrel the GRS can be
equipped with a self-cleaning filter-insert of 0.44 mm (see accessories).
All WISY-GRS are made of stainless-steel in all parts. They are available for all
nominal sizes of standard rainwater downpipes:
– for metal downpipes: DN 76, DN 80, DN 87, DN 100,
– for plastic downpipes: DN 70 with external diameter Ø 75 mm (2,95 inch),
DN 100 with external diameter Ø 110 mm (4,33 inch)
Adaptions for UK- an US-sizes or others are available by request.
What is what?
Upper housing
Collecting space
Outlet DN 50 (1,97 inch)
Housing
Overflow-mark
Instruction
for installation of the Garden Rainwater Collector (GRS)
With or without filtering
Accessories
*
(sizes in mm)
*) DN = (Diameter Nominal), Nominal, internal diameter of a pipe (mm)

min. 20 cm/
7,87 inch
23 cm/
9,05 inch
min. 20 cm/
7,87 inch
wrong right
round off well
End of the downpipe
max. 3 cm/
1,18 inch
upper housing
8
Simple and easy installation
Check the distance between the downpipe and the wall. The distance
should not be less than 2 cm (0,79 inch).
In the desired installation height of the GRS cut out a section of 23 cm
(9,05 inch) of the downpipe (use appropriate saw blade).
Important: Especially at the uppermost cut the inner edge of the
downpipe’s end must be rounded well with a file so the water can flow
unobstructed onto the inner side of the upper housing. If necessary the
end of the downpipe must be widened by flanging.
If well installed the uppermost end of the downpipe is inserted into the
GRS max. 3 cm (1,18 inch).

drain
Infiltration
9
Concerning the removal of the 23 cm-section (9,05 inch) of the downpipe
pay attention to the installation height of the GRS according to the rain
barrel.
Fix both cut ends of the downpipe about 20 cm (7,87 inch) above and
below the garden collector with pipe-clips to the wall.
Slip the upper housing over the upper end of the downpipe.
Now install the GRS-housing onto the lower end of the downpipe.
Slide the upper housing down to connect with the GRS-housing.
Connect the GRS-outlet to the rainwater barrel.
!To winterize the rain barrel you should block its waterfeed inside the GRS
with the blind insert (see accessories).
Integrated security overflow: the
overflow-mark on the GRS-hou-
sing (= WISY-sign) has to be
levelled on the desired height of
the maximum water level of the
barrel. Thus the excess rainwa-
ter will automatically be diverted
to the infiltration or drain.

15802
15803
15801
10
Accessories
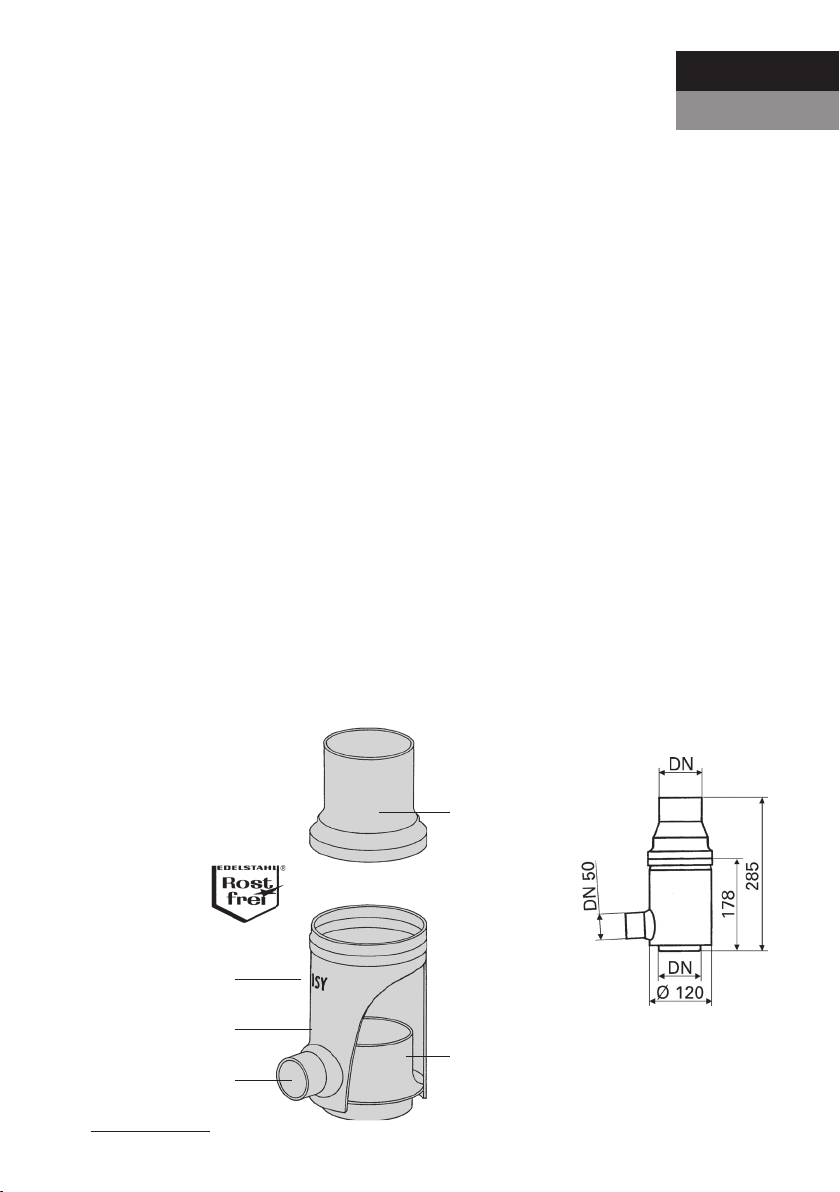
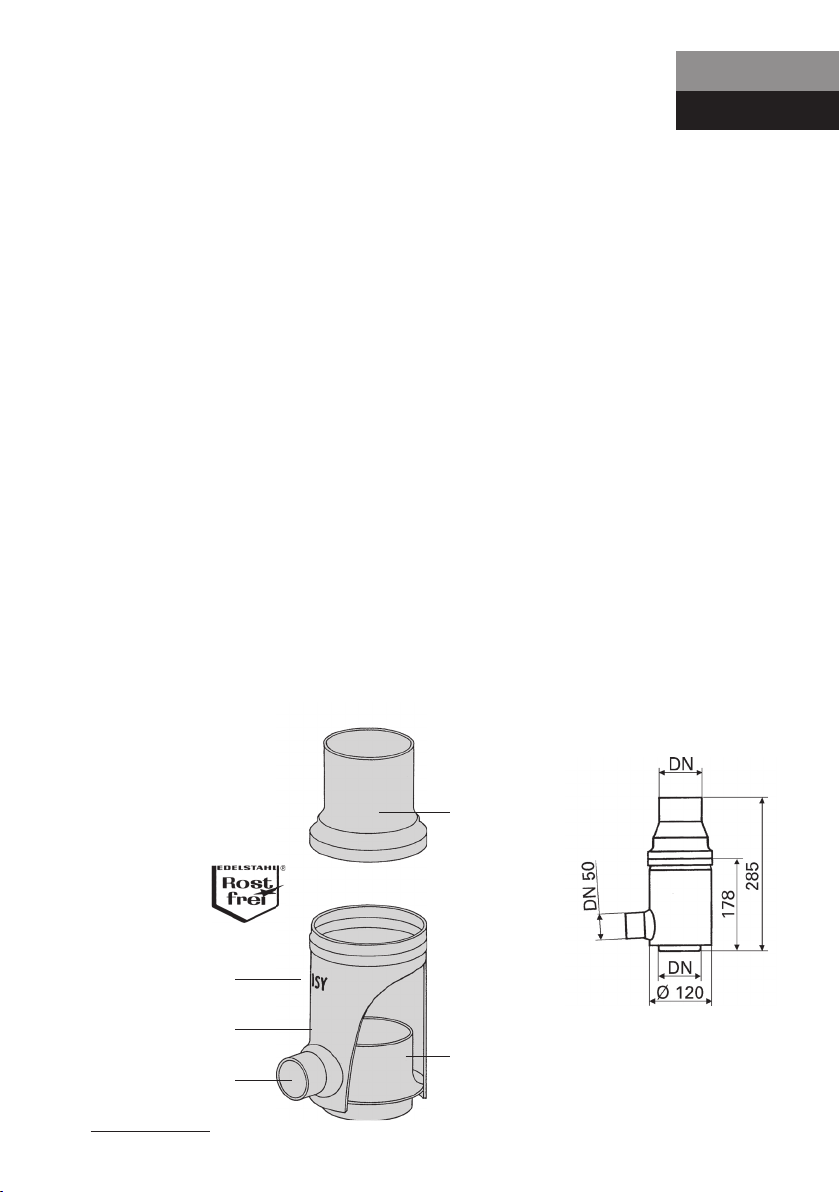
Filter insert, mesh size 0,44 mm
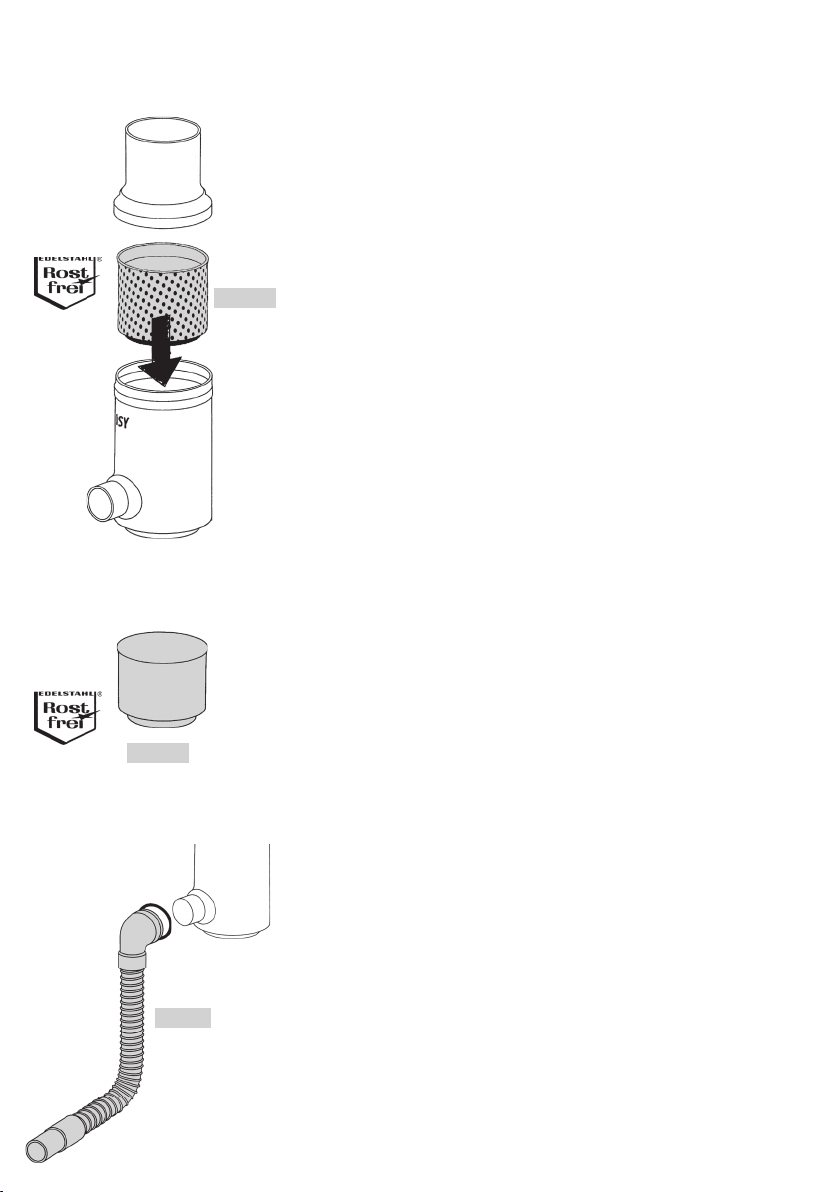
The self-cleaning filter insert can be easily placed
into the basic GRS.
Passing through the vertical filter insert the rain-
water from the roof will be cleaned in the GRS
from debris > 0,44 mm. The barrel only receives
filtered rainwater.
The unique WISY-construction will cause the dirt
to be washed away with a little amount of water
automatically to the infiltration or to the drain.
Because of the patented self-cleaning filter-
principle the filter insert is of a very low mainte-
nance, but not free of maintenance. In the case
of lots of pollution on the roof more cleaning is
demanded (dishwasher or brush and detergent).
For placing the filter insert into the GRS or for cleaning it slip the up-
per housing up and take the insert out of the housing. When cleaned
replace it in the same way.
Art. No 15801 (fits for all sizes of GRS)
Blind insert
The blind insert of stainless-steel stops the
rainwater flowing from the GRS into the barrel. If
you place the blind insert into the GRS-housing
the rainwater will be diverted completely to the
infiltration or to the drain.
The blind insert can easily be placed into the housing in the same
way as the filter insert. If the GRS is equipped with a filter insert
the blind insert will substitute it.
Art. No 15802 (fits for all sizes of GRS)
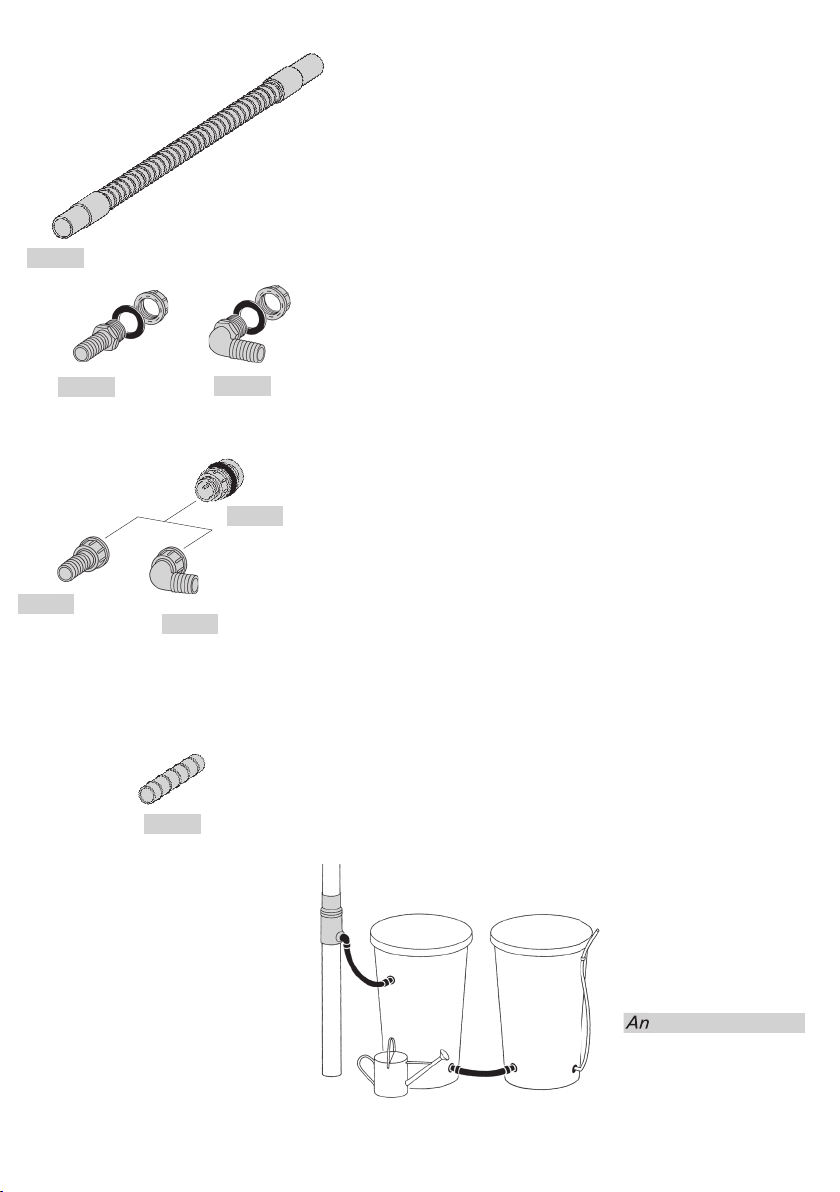
Connecting hose to the rain barrel
For connecting the GRS-outlet directly to a
rainwater barrel. UV resistant, plastic spiral hose,
total length 32 cm (9 inch) with tension ring.
Art. No 15803

15804
Example in practice
15808
15810
15809
15807
15805 15806
Example in practice
11
Link hose for several barrels
For joining one water barrel to another, UV resistant
plastic spiral hose, total length 32 cm (9 inch).
Art. No 15804
Tank connectors
For the direct connection of hoses at barrels.
Straight version Art. No 15805
90 ° version Art. No 15806
Tank connector, 1 ¼"
For thick-walled barrels.
For connection of straight or angled connectors.
Art. No 15808
Connectores, 1¼"
For tank connector 15808.
Straight version Art. No 15809
90 ° version Art. No 15810
Hose coupling
For connecting two hoses.
Art. No 15807

21000-10 Technische Änderungen vorbehalten / Technical changes reserved / Stand: 16.11.2006
WISY AG Haustechniksysteme, Filtertechnik
D-63699 Kefenrod, Oberdorfstraße 26
Telefon +49(0)6054-9121-0, Fax +49 (0) 6054-9121-29
Remarks on the rainwater infiltration
In case of an appropriate soil it is recommended to infiltrate the surplus of
water into the underground or to evaporate it by a pond instead of diverting
it to the public drain. For guarding the underground the water should be infilt-
rated through the surface if possible. The best practice of infiltration has to be
chosen individually by the characteristics of the terrain, the amount of water,
the permeability of the soil and by the groundwater regime.
The example shown here
demonstrates a possibility
to divert the excess water
to a surface infiltration with
commercial components. Im-
portant: the water should be
infiltrated a secure distance
from buildings.
Garden Rainwater pear
Decorative rainwater barrel made of ecologically
and physiologically harmless polyethylene (PE). It is
possible to withdraw water with a watering can or
the preassempled outlet tube. Oval form for an easy
emptying for maintenance. Frost-proof, not necessa-
ry to empty in winter. Stable in shape down to -20°C.
Volume: approx 420 litres, height of the rainwater
pear 112 cm (44,09 inch), diameter of the rainwater
pear 95 cm (37,40 inch), net weight 15 kg, lenght of
outlet tube 1,70 m (66,92 inch)
Art. No RB 1010
Table of contents
Languages:
Popular Lawn And Garden Equipment manuals by other brands

Oypla GARDEN
Oypla GARDEN 4102 user manual

Land Pride
Land Pride Rotary Cutters RCB6010 parts manual

Autopot
Autopot AQUAvalve5 1Pot Simple care guidelines

Midwest grow kits
Midwest grow kits Ultimate Kit Setup guide

Southland
Southland S-RTT-196-E Operator's manual

Royal Well
Royal Well Plant Station Assembly instructions

Gronomics
Gronomics ECOGW 34-48 EXT Assembly instruction

Best Barns
Best Barns North Dakota II Assembly Book

Versa Jaya
Versa Jaya VERSATRAP user manual

Trac Vac
Trac Vac 452-DIC/DH Operating and assembly manual

DS Produkte
DS Produkte RUWI Important instructions for use

Einhell Royal
Einhell Royal TF 1900 operating instructions