WMF kuchenminis User manual

Johgurtbereiter
Gebrauchsanweisung 4
Operating Manual 10
Mode d’emploi 16
Istruzioni per l’uso 22
Instrucciones de uso 28
Gebruiksaanwijzing 34
Brugsanvisning 40
Användarguide 46
Käyttöohje 52
Bruksanvisning 58
nl
da
sv
fi
no
de
en
fr
it
es

Aufbau Joghurtbereiter
1 Abdeckung
2 Joghurtbecher à 150 ml
3 Beschreibbare Deckel-Oberfläche
4 Ein/Aus-Taste
5 LC-Display
6 Bedienungstasten
Assembling the yoghurt maker
1 Cover
2 Yoghurt mug - 150 ml
3 Writeable lid surface
4 On/off button
5 LC display
6 Operating buttons
Montage Yaourtière
1 Couvercle
2 Pots de yaourt de 150 ml
3 Surface du couvercle pouvant être marquée
4 Touche marche/arrêt
5 Écran LCD
6 Boutons de commande
Composizione del prodotto
1 Copertura
2 Vasetti da 150 ml
3 Coperchio con superficie scrivibile
4 Tasto ON/OFF
5 Display LCD
6 Tasti di comando
Estructura de la yogurtera
1 Cubierta
2 Tarro de yogur de 150 ml
3 Superficie de tapa sobre la que se puede escribir
4 Tecla de encendido y apagado
5 Pantalla de cristal líquido
6 Teclas de manejo
Onderdelen yoghurtbereider
1 Afdekkap
2 Yoghurtbeker à 150 ml
3 Beschrijfbaar deksel
4 Aan/Uit-knop
5 LC-display
6 Bedieningstoetsen
Opbygning yoghurtfremstiller
1 Afdækning
2 Yoghurtbægere a 150 ml
3 Låg med skrivemulighed
4 Tænd/slukknap
5 LC-display
6 Betjeningstaster
Yoghurtmaskinens delar
1 Lock
2 Yoghurtbägare à 150 ml
3 Skrivbar lockyta
4 På/Av-knapp
5 LCD-skärm
6 Funktionsknappar
Jogurttikoneen osat
1 Kupu
2 Jogurttipikarit, 150 ml / kpl
3 Kirjoitettava kannen pinta
4 Virtapainike
5 LC-näyttö
6 Käyttöpainikkeet
Yoghurtmaskinens oppbygning
1 Deksel
2 Yoghurtbegre à 150 ml
3 Overflate til lokk som kan påskrives
4 Av/på-knapp
5 Display
6 Betjeningsknapper
2
3
5 6
4
1

4 5
dede
Gebrauchsanweisung
Wichtige Sicherheitshinweise
▪ Das Gerät kann von Personen mit reduzierten physischen,
sensorischen oder mentalen Fähigkeiten oder Mangel an
Erfahrung und/oder Wissen benutzt werden, wenn sie
beaufsichtigt oder bezüglich des sicheren Gebrauchs des
Gerätes unterwiesen wurden und die daraus resultierenden
Gefahren verstanden haben.
▪ Dieses Gerät kann von Kindern ab 3 Jahren und darüber
benutzt werden, wenn sie beaufsichtigt werden oder
bezüglich des sicheren Gebrauchs des Gerätes unterwiesen
wurden und die daraus resultierenden Gefahren verstanden
haben. Reinigung und eine Wartung durch den Benutzer
dürfen nicht durch Kinder vorgenommen werden, es sei
denn, sie sind 8 Jahre und älter und werden beaufsichtigt.
▪ Das Gerät und seine Anschlussleitung sind von Kindern
jünger als 3 Jahre fernzuhalten.
▪ Kinder dürfen nicht mit dem Gerät spielen.
▪ Verpackungsmaterial von Kindern fernhalten. Es besteht
unter anderem Erstickungsgefahr!
▪ Schalten Sie das Gerät aus und ziehen Sie immer den
Netzstecker bevor Sie Zubehörteile wechseln.
▪ Das Gerät nicht ins Wasser tauchen.
▪ Wenn die Anschlussleitung dieses Gerätes beschädigt ist, das
Gerät nicht in Betrieb nehmen.
▪ Dieses Gerät ist dafür bestimmt, im Haushalt und ähnlichen
Anwendungen verwendet zu werden, wie beispielsweise:
⋅in Küchen für Mitarbeiter, in Läden, Büros und anderen
gewerblichen Bereichen;
⋅in landwirtschaftlichen Anwesen;
⋅von Kunden in Hotels, Motels und anderen
Wohneinrichtungen;
⋅in Frühstückspensionen.
Das Gerät ist nicht für den rein gewerblichen Gebrauch
bestimmt.
▪ Das Gerät nur gemäß dieser Anleitung verwenden.
Unsachgemäßer Gebrauch kann Stromschlag oder andere
Gefahrenmomente zur Folge haben.
Vor dem Benutzen
Das Gerät darf nur für den vorgesehenen Zweck gemäß dieser Gebrauchsanweisung
verwendet werden. Lesen Sie die Gebrauchsanweisung deshalb vor der Inbetriebnahme
sorgfältig. Sie gibt Anweisungen für den Gebrauch, die Reinigung und die Pflege des
Gerätes. Bei Nichtbeachtung übernehmen wir keine Haftung für eventuelle Schäden.
Bewahren Sie die Gebrauchsanweisung sorgfältig auf und geben Sie diese gemeinsam mit
dem Gerät an Nachbenutzer weiter. Beachten Sie auch die Garantiehinweise am Ende. Das
Gerät ist nicht für den gewerblichen Gebrauch bestimmt, sondern nur für die Zubereitung
von Lebensmitteln in haushaltsüblichen Mengen.
Beim Gebrauch die Sicherheitshinweise beachten.
Technische Daten
Nennspannung: 220-240 V~ 50-60 Hz
Leistungsaufnahme: 15 W
Schutzklasse: II
Weitere Sicherheitshinweise
▪ Gerät nur an eine vorschriftsmäßig installierte Steckdose anschließen. Zuleitung und
Stecker müssen trocken sein.
▪ Das Gerät nie in den Kühlschrank stellen.
▪ Die Anschlussleitung nicht über scharfe Kanten ziehen oder einklemmen, nicht
herunterhängen lassen sowie vor Hitze und Öl schützen.
▪ Den Netzstecker nicht an der Leitung oder mit nassen Händen aus der Steckdose ziehen.
▪ Das Gerät nicht auf heiße Oberflächen wie Herdplatten oder Ähnliches stellen und nicht
in der Nähe offener Flammen betreiben.
▪ Das Gerät nicht auf wasserempfindliche Oberflächen abstellen. Feuchtigkeit könnte diese
beschädigen.
▪ Das Gerät während des Betriebes nicht verrücken und nicht am Netzkabel ziehen.
▪ Das Gerät nicht in Betrieb nehmen bzw. sofort Netzstecker ziehen, wenn:
⋅Gerät oder Netzkabel beschädigt ist;
⋅das Gerät undicht ist;
⋅der Verdacht auf einen Defekt nach einem Sturz o. Ä. besteht.
In diesen Fällen das Gerät zur Reparatur geben.
▪ Der Netzstecker ist zu ziehen:
⋅bei Störungen während des Betriebes,
⋅vor jeder Reinigung und Pflege,
⋅nach dem Gebrauch.
▪ Bei Zweckentfremdung, falscher Bedienung oder nicht fachgerechter Reparatur wird
keine Haftung für eventuelle Schäden übernommen.
Ebenso sind Garantieleistungen in solchen Fällen ausgeschlossen.

6 7
de
Inbetriebnahme
▪ Reinigen Sie das Gerät vor der ersten Verwendung wie im Kapitel „Reinigung und Pflege“
beschrieben. Die Joghurtbecher (2) müssen vor der Benutzung des Geräts trocken sein.
▪ Für ein optimales Zubereitungsergebnis stellen Sie das Gerät auf eine rutschfeste,
vibrationsfreie und wasserunempfindliche Fläche.
▪ Für die Joghurt-Zubereitung benötigen Sie Milch und Joghurtferment bzw. frischen
Naturjoghurt. Bei der Verwendung von Joghurtferment ist es wichtig, die genauen
Angaben des Herstellers zu berücksichtigen. Für die Herstellung von Joghurt
aus Naturjoghurt muss die verwendete Milch zunächst auf ca. 90° C erhitzt und
anschließend auf ca. 40° C abgekühlt werden. Falls H-Milch verwendet wird, muss diese
nicht zuerst erhitzt werden, aber mindestens Zimmertemperatur haben.
▪ Mischen Sie die Milch (350 ml) und das Joghurtferment bzw. den Naturjoghurt (100 g)
und füllen Sie die Mischung in die Joghurtbecher (2).
▪ Stellen Sie die Joghurtbecher (2) mit verschlossenen Deckeln in den Joghurtbereiter.
▪ Setzen Sie die Abdeckung (1) auf den Joghurtbereiter und verbinden Sie den Netzstecker
mit der Steckdose.
▪ Drücken Sie die Ein/Aus-Taste (4) um das Gerät in Betrieb zu nehmen.
▪ Die voreingestellte Zubereitungszeit (10 Stunden) erscheint auf dem LC-Display (5).
▪ Verändern Sie die Zubereitungszeit je nach Rezept durch Drücken der Bedienungstasten (6)
« + » (bis auf 19 Stunden) oder « - ».
▪ Drücken Sie die Ein/Aus-Taste erneut (4) um den Zubereitungsprozess zu starten.
▪ Nach der Inbetriebnahme zählt das Gerät die Stunden rückwärts. Am Ende der
Zubereitungszeit ertönt ein Signalton und das Gerät schaltet automatisch ab.
▪ Anmerkung: Um den Joghurtbereiter vorzeitig auszuschalten drücken Sie die Ein/Aus-
Taste (4) länger als 3 Sekunden.
▪ Kühlen Sie den fertigen Joghurt im Kühlschrank, bevor Sie den Joghurt verzehren.
▪ Bei Zubereitung von Fruchtjoghurt fügen Sie die Früchte gleich dem warmen Joghurt
bei und stellen Sie diesen anschließend kalt.
▪ Nach Bedarf kann die Deckel-Oberfläche (3) mit einem flüssigen Kreidestift beschrieben
werden um die Joghurtbecher mit dem Haltbarkeitsdatum und der Joghurtsorte zu
versehen.
▪ Bewahren Sie den fertigen Joghurt nicht länger als 10 Tage im Kühlschrank auf.
▪ Die Joghurtbecher aus bruchfestem Tritan® eignen sie sich sehr gut für den Transport
des fertigen Joghurts.
Verwendung
Mit dem WMF KÜCHENminis® Joghurtbereiter können bis zu drei Joghurts gleichzeitig
zubereitet werden. Außerdem ist ein Zubehörset bestehend aus weiteren 3 Joghurtbechern
(à 150 ml) erhältlich. Diese können auf der dafür vorgesehenen Stellfläche auf der
Abdeckung (1) abgestellt werden.
Joghurt entsteht durch einen Fermentationsprozess der Milch. Grundsätzlich lässt sich jede
Milch verwenden: volle oder teilentrahmte pasteurisierte Milch, volle oder teilentrahmte
UHT-sterilisierte Milch, Rohmilch, Sojamilch, Mandelmilch oder Milchpulver. Am Besten für
den Fermentationsprozess eignet sich homogenisierte Milch (H-Milch). Jede andere Milch
sollte kurzzeitig auf ca. 90° C (kurz vor dem Kochen) erhitzt und wieder auf 40° C abgekühlt
werden.
Der Joghurtbereiter verfügt über eine elektronisch gesteuerte Temperaturregelung, sodass
der Fermentationsprozess ablaufen kann.
Empfohlene Zubereitungszeiten:
Vollmilch: 10 bis 12 Stunden
Teilentrahmte Milch: 12 Stunden
Sojamilch: 10 bis 12 Stunden
Abgekochte Rohmilch: 10 Stunden
Diese Zeiten gelten für Milch auf Zimmertemperatur. Je kälter die Milch zu Beginn ist, desto
länger muss die Zubereitungszeit eingestellt werden.
Sie können mehrere Arten von Fermentierstoffen verwenden:
⋅ein trockenes oder gefriergetrocknetes Joghurtferment (Fermentiermittel u.a. im
Reformhaus erhältlich)
⋅ein Naturjoghurt
⋅ein Joghurt aus dem vorherigen Zubereitungszyklus
Empfohlene Rezepte:
Vanille Joghurt:
Zutaten:
350 ml Milch
100 g Naturjoghurt
0,5 EL Magermilchpulver
0,5 TL Vanillezucker
0,5 TL Vollrohrzucker
Zubereitung: Mischen Sie die zimmerwarme Milch mit Vanillezucker und Vollrohrzucker.
Verrühren Sie den Naturjoghurt und das Milchpulver miteinander und rühren es mit
einem Schneebesen unter die Milchmischung. Füllen Sie die Mischung in die Joghurtbecher
und stellen diese für 10 Stunden in den Joghurtbereiter. Testen Sie mit einem Löffel ob
die gewünschte Konsistenz erreicht ist und entnehmen den Joghurt bzw. verlängern die
Zubereitungszeit um eine weitere Stunde. Lassen Sie den Joghurt im Kühlschrank abkühlen
und bewahren diesen bis zum Verzehr im Kühlschrank auf.
Veganer Joghurt aus Kokos- und Mandelmilch:
Zutaten:
2 g Joghurtferment
175 ml Kokosmilch
275 ml Mandelmilch
0,5 TL Agar-Agar
Zubereitung: Bringen Sie zunächst alle Milchsorten auf Zimmertemperatur. Lösen Sie das
Joghurtferment in etwa 100 ml Mandelmilch auf und verrühren es gut. Die Mandelmilch
muss nicht erhitzt werden. Öffnen Sie nun die Kokosmilch und rühren diese gut um. Messen
Sie 100 ml Kokosmilch ab und kochen Sie diese mit dem Agar-Agar für 2 Minuten auf.
Geben Sie die restliche Kokosmilch und die Mandelmilch in den Topf und vermischen alles
gründlich. Lassen Sie die Mischung abkühlen bis sie lauwarm ist. Die lauwarme Mischung
mit dem Joghurt-Ferment anrühren und diese in den Joghurtbechern verteilen. Stellen Sie
die Joghurtbecher für ca. 10 Stunden in den Joghurtbereiter. Testen Sie mit einem Löffel
ob die gewünschte Konsistenz erreicht ist und entnehmen den Joghurt bzw. verlängern die
Zubereitungszeit um eine weitere Stunde. Lassen Sie den Joghurt im Kühlschrank abkühlen
und bewahren diesen bis zum Verzehr im Kühlschrank auf.

8 9
de
Reinigung und Pflege
▪ Vor der Reinigung den Netzstecker ziehen. Das Gerät nicht in Wasser
tauchen, sondern mit einem feuchten Tuch, dem etwas Spülmittel
beigegeben wird, abwischen und anschließend trockenreiben. Keine
scharfen und scheuernden Reinigungsmittel verwenden.
▪ Die Abdeckung (1) und die Joghurtbecher mit Deckel (2) können in der
Spülmaschine gereinigt werden.
Garantie-Information
Für unsere Geräte übernehmen wir gegenüber dem Endkunden eine
24-monatige Haltbarkeitsgarantie. Sie beginnt mit dem Kauf des Gerätes
durch den Endkunden und gilt im Gebiet der Bundesrepublik Deutschland.
Ansprüche aus dieser Garantie sind unter Vorlage des Kaufbelegs direkt
gegenüber unserem zentralen Kundendienst geltend zu machen.
Von der Garantie ausgeschlossen sind Schäden durch normalen Verschleiß,
unsachgemäßen Gebrauch sowie unterbliebene Pflege.
Der Endkunde besitzt zusätzlich zu den Ansprüchen aus dieser Garantie
gesetzliche Ansprüche wegen Mängeln des Gerätes gegenüber seinem
direkten Verkäufer/ Händler, die durch diese Garantie nicht eingeschränkt
werden.
Das Gerät entspricht den Europäischen Richtlinien 2014/35/EG, 2014/30/EG
und 2009/125/EG.
Dieses Produkt darf am Ende seiner Lebensdauer nicht über den normalen
Haushaltsabfall entsorgt werden, sondern muss an einem Sammelpunkt
für das Recycling von elektrischen und elektronischen Geräten abgegeben
werden.
Die Werkstoffe sind gemäß ihrer Kennzeichnung wiederverwertbar. Mit der
Wiederverwendung, der stofflichen Verwertung oder anderen Formen der
Verwertung von Altgeräten leisten Sie einen wichtigen Beitrag zum Schutze
unserer Umwelt.
Bitte erfragen Sie bei der Gemeindeverwaltung die zuständige
Entsorgungsstelle.
Änderungen vorbehalten

10 11
enen
Operating Manual
Important safety information
▪ The appliance can be used by persons with reduced physical,
sensory or mental capabilities or lack of experience and/or
knowledge if they are supervised or have been instructed on
how to use the appliance in a safe way and understand the
hazards involved.
▪ This appliance can be used by children aged 3 years and
upwards if they are supervised or have been instructed on
how to use the appliance in a safe way and understand the
hazards involved. Cleaning and user maintenance must not
be carried out by children under the age of 8 or without
supervision. Keep the appliance and its cord out of reach of
children under the age of 3.
▪ Children must not play with the appliance.
▪ Keep packaging out of the reach of children. There is a risk
of suffocation!
▪ Switch off the appliance and always disconnect from the
power supply before you replace accessories.
▪ Do not immerse the appliance in water.
▪ If the connection cable for this appliance is damaged, do
not use the appliance.
▪ This appliance is suitable for use in the home and in similar
applications, for example:
⋅Staff kitchen areas in shops, offices and other working
environments;
⋅Farm houses;
⋅By guests at hotels, motels or other residential facilities;
⋅Bed-and-breakfast establishments.
▪ The appliance is not intended for purely commercial use.
▪ Always use the appliance in accordance with these instructions.
Improper use can result in electric shocks and other hazard
Prior to use
The appliance may only be used for the intended purpose according to these instructions
for use. Therefore, you are advised to read the instructions for use carefully before opera-
ting the appliance. There are instructions for using, cleaning and caring for the appliance.
We accept no liability for any damage caused if the instructions in this manual are not
followed.
Keep this instruction manual in a safe place and pass it on to any subsequent user together
with the appliance. Please also note the warranty information at the end. The appliance is
not intended for commercial use, but only for the preparation of household quantities of
food.
Observe the safety information when using the appliance
Technical data
Rated voltage: 220–240 V ~ 50–60 Hz
Power consumption: 15 W
Protection class: II
Additional safety instructions
▪ Only connect the appliance to sockets that have been installed pursuant to regulations.
The supply cable and plug must be dry.
▪ Never place the appliance in the refrigerator.▪ Do not pull or clamp the connection cable
over sharp edges, do not leave it dangling and keep it away from heat and oil.
▪ Never pull the mains plug out of the socket by the cable or with wet hands.
▪ Do not place the appliance on hot surfaces such as hotplates or similar and do not
operate near naked flames.
▪ Do not place the appliance on water-sensitive surfaces. Moisture can damage the
appliance.
▪ Do not move the appliance during operation and do not pull on the mains cable.
▪ Stop using the appliance and/or pull the mains plug out of the socket immediately if:
⋅the appliance or mains cable is damaged;
⋅the appliance is leaking;
⋅you suspect the appliance is faulty after dropping it, for example.
In such cases, arrange for the appliance to be repaired.
▪ Pull the mains plug:
⋅if the appliance malfunctions during use;
⋅before cleaning and care;
⋅after use.
▪ We accept no liability for damage caused as a result of misuse, incorrect operation,
improper repair or non-observance of the descaling instructions.
Claims under warranty are likewise excluded in such cases.

12 13
en
Starting up the appliance
▪ Clean the appliance before using it for the first time, as described in the chapter
“Cleaning and Care”. The yoghurt mug (2) must be dry before the appliance is used.
▪ For ideal results, place the appliance on a non-slip, vibration-free and water-resistant
surface.
▪ To prepare the yoghurt, you need milk and yoghurt cultures or fresh natural yoghurt.
When using yoghurt cultures it is important to take into account the specific
instructions of the manufacturer. To manufacture yoghurt from natural yoghurt, the
milk must first be heated to approx. 90° C and then cooled to approx. 40° C. If UHT milk
is used, it does not need to be heated first, but at least at room temperature.
▪ Mix the milk (350 ml) with the yoghurt cultures or the natural yoghurt (100 g) and pour
the mixture into the yoghurt mugs (2).
▪ Place the yoghurt mugs (2) with closed lids in the yoghurt maker.
▪ Place the cover (1) on the yoghurt maker and connect the plug to the mains supply.
▪ Press the On/Off button (4) to operate the appliance.
▪ The preset preparation time (10 hours) is displayed on the LC Display (5).
▪ Change the preparation time according to the recipe by pressing the operation buttons (6)
« + » (up to 19 hours) or « - ».
▪ Press the On/Off button (4) again to start the preparation process.
▪ After starting, the appliance counts down the hours. At the end of the preparation time,
an acoustic signal is emitted and the device switches off automatically.
▪ Note: To switch off the yoghurt maker early, press the On/Off button (4) for longer than
3 seconds.
▪ Cool the prepared yoghurt in the refrigerator before eating it.
▪ When preparing fruit yoghurt, add the fruit to the warm yoghurt and then let it cool.
▪ If required, you can write on the surface of the lid (3) to
▪ record the best before date and the type of yoghurt.
▪ Do not keep the prepared yoghurt in the refrigerator for more than 10 days.
▪ The break-proof Tritan® yoghurt mug is particularly well suited for transporting
prepared yoghurt.
Use
Up to three yoghurts can be prepared at one time with the WMF KÜCHENminis® yoghurt
maker. An accessories set with an additional 3 yoghurt mugs (150 ml) is also available.
They can be stored in the storage area on the lid (1) intended for this purpose.
Yoghurt is created through a fermentation process with milk. In principle, any type of
milk can be used: full or skimmed pasteurised milk, full or skimmed UHT-sterilised milk,
raw milk, soya milk, almond milk or powdered milk. Homogenised milk (UHT milk) is best
suited to the fermentation process. Any other type of milk should briefly be heated to 90° C
(just short of boiling) and then cooled to 40° C.
The yoghurt maker has an electronically controlled temperature regulator so that the
fermentation process can progress.
Recommended preparation times:
Whole milk: 10 or 12 hours
Skimmed milk: 12 hours
Soya milk: 10 or 12 hours
Boiled raw milk: 10 hours
These times apply to milk at room temperature. The colder the milk is at the start, the
longer the preparation time.
You can use several types of fermentation product:
⋅a dry or freeze-dried yoghurt culture
⋅a natural yoghurt
⋅a yoghurt from a previous preparation cycle
Recommended recipes:
Vanilla yoghurt:
Ingredients:
350 ml milk
100 g natural yoghurt
0.5 tbsp. skimmed milk powder
0.5 tsp vanilla sugar
0.5 tsp whole cane sugar
Preparation: Mix together the milk at room temperature with the vanilla sugar and full
cane sugar. Stir the natural yoghurt with the milk powder and mix into the milk mixture
with a whisk. Pour the mixture into the yoghurt mug and place this in the yoghurt maker
for 10 hours. Use a spoon to test whether the required consistency has been achieved,
and either remove the yoghurt or extend the preparation time by an additional hour. Let
the yoghurt cool in the refrigerator and store in the refrigerator until consumption.
Vegan yoghurt with coconut and almond milk:
Ingredients:
2 g yoghurt culture
175 ml coconut milk
275 ml almond milk
0.5 tsp agar-agar
Preparation: First bring all types of milk to room temperature. Dissolve the yoghurt
culture in roughly 100 ml of almond milk and stir well. The almond milk does not need to
be heated. Now open the coconut milk and stir well. Measure 100 ml of coconut milk and
heat up with the agar agar for 2 minutes. Add the rest of the coconut milk and almond
milk to the pan and stir thoroughly. Let the mixture cool down until it is lukewarm. Stir
the luke-warm mixture with the yoghurt culture and divide into the yoghurt mugs. Place
the yoghurt mugs in the yoghurt maker for about 13 hours. Use a spoon to test whether
the required consistency has been achieved, and either remove the yoghurt or extend the
preparation time by an additional hour. Let the yoghurt cool in the refrigerator and store
in the refrigerator until consumption.

14 15
en
Cleaning and care
▪ Before cleaning, unplug the mains plug. Do not immerse the appliance in water. Instead,
wipe with a damp cloth and a small amount of washing-up liquid. Then dry with a cloth.
Do not use harsh or abrasive cleaning agents.
▪ The cover (1) and the yoghurt mug and lid (2) can be cleaned in the dishwasher.
For UK use only
▪ This product is supplied with a 13 A plug conforming to BS 1363 fitted to the mains
lead. If the plug is unsuitable for your socket outlets or needs to be replaced, please
note the following. If the plug is a non-rewireable one, cut it from the mains lead and
immediately dispose of it. Never insert it into a socket outlet as there is a very great risk
of an electric shock.
▪ The replacement of the plug at the mains lead has to be done according to the
following instructions:
Warning - This appliance must be earthed!
Important: The wires in this mains lead are coloured in accordance with the following
code:
green/yellow Earth
blue Neutral
brown Live
As the colours of the wires in the mains lead of this appliance may not correspond with the
coloured markings identifying the terminals in your plug, proceed as follows:
⋅the wire which is coloured green and yellow must be connected to the terminal
which is marked with the letter E or by the earth symbol , or coloured green or
green and yellow,
⋅the wire which is coloured blue must be connected to the terminal which is marked
with the letter N or coloured black,
⋅the wire which is coloured brown must be connected to the terminal which is
marked with the letter L or coloured red.
▪ If a 13 A (BS 1363) plug is used it must be fitted with a 3 A fuse conforming to BS
1362 and be ASTA approved. If any other type of plug is used, the appliance must be
protected by a 5 A fuse either in the plug or adapter or at the distribution board. If in
doubt - consult a qualified electrician.
▪ Never use the plug without closing the fuse cover.
The appliance complies with the European directives 2014/35/EC, 2014/30/EC
and 2009/125/EC.
At the end of its lifetime this product must not be disposed of through the
normal domestic waste, but it should be handed to an assembly point for
the recycling of electrical and electronical appliances. You can inquire about
details at the local administration.
Subject to technical changes.

16 17
frfr
Mode d’emploi
Consignes de sécurité importantes
▪ Les personnes ayant des capacités physiques, sensorielles ou
mentales restreintes ou ayant un manque d’expérience et/
ou de connaissances peuvent utiliser cet appareil si elles sont
surveillées, si elles ont été formées à l’utilisation sécurisée
de cet appareil et si elles ont compris les dangers pouvant
résulter de l’usage de l’appareil.
▪ Cet appareil peut être utilisé par des enfants de 3 ans et
plus, s’ils sont surveillés et s’ils ont été instruits pour utiliser
cet appareil en toute sécurité et s’ils ont compris les dangers
pouvant résulter de l’usage de l’appareil. Ne pas laisser les
enfants effectuer le nettoyage et la maintenance, sauf
s’ils sont âgés de plus de 8 ans et sous surveillance. Gardez
l’appareil et son câble d’alimentation hors de la portée des
enfants de moins de 3 ans.
▪ Ne pas laisser les enfants jouer avec cet appareil.
▪ Tenir le matériau d’emballage hors de portée des enfants. Il
existe un risque de suffocation !
▪ Éteindre l’appareil et toujours débrancher la fiche
d’alimentation avant de remplacer les accessoires.
▪ Ne plongez pas l’appareil dans l’eau.
▪ Ne pas utiliser l’appareil lorsque le câble de raccordement de
l’appareil est endommagé.
▪ Cet appareil est conçu pour un usage domestique et des
applications semblables, comme par exemple ⋅dans des
cuisines réservées au personnel dans des boutiques, des
bureaux et d’autres secteurs professionnels ;
⋅dans des exploitations agricoles ;
⋅par des clients dans des hôtels, des motels et autres
établissements résidentiels ;
⋅dans des chambres d’hôtes.
L’appareil n’est pas conçu pour un usage purement commercial.
▪ N’utilisez l’appareil que conformément aux présentes
instructions. Une utilisation non conforme peut entraîner
une électrocution ou d’autres dangers.
Avant l‘utilisation
L’appareil ne doit être utilisé que pour l’usage prévu conformément à ce mode
. En conséquence, veuillez lire attentivement le manuel d’utilisation avant la mise en
service. Il contient des consignes importantes pour l’utilisation, le nettoyage et l’entretien
de l’appareil. Nous déclinons toute responsabilité en cas de dommage découlant du non-
respect des consignes.
Conservez soigneusement ce mode d’emploi et transmettez-le avec l’appareil en cas de
remise à une tierce personne. Consultez également les informations de garantie à la fin de
ce manuel d’utilisation. L’appareil ne doit pas faire l’objet d’un usage professionnel, car il se
prête uniquement à la préparation d’aliments dans des quantités domestiques.
Respectez les consignes de sécurité lors de l’utilisation.
Caractéristiques techniques
Tension du secteur : 220-240 V~ 50-60 Hz
Puissance : 15 W
Catégorie de protection : II
Consignes de sécurité supplémentaires
▪ Brancher l’appareil uniquement dans une prise de courant, installée conformément aux
prescriptions. Le câble d’alimentation et la prise doivent être secs.
▪ Ne jamais placer l‘appareil dans le réfrigérateur.
▪ Ne jamais coincer ni tirer le câble de raccordement sur des arêtes vives, ne pas le laisser
pendre et le protéger de la chaleur et de l‘huile.
▪ Ne pas débrancher l’appareil en tirant sur le câble ou avec les mains mouillées.
▪ Ne pas poser l‘appareil sur des surfaces chaudes comme des plaques de four ou des
▪ éléments semblables ni à proximité de flammes ouvertes.
▪ Ne pas déposer l‘appareil sur des surfaces à proximité d‘eau. L‘humidité pourrait
l‘endommager.
▪ Ne pas déplacer l‘appareil durant le fonctionnement et ne pas tirer sur le câble
d‘alimentation.
▪ Ne pas mettre l’appareil en marche ou le débrancher immédiatement si :
⋅l‘appareil ou le câble d‘alimentation sont endommagés ;
⋅l‘appareil fuit ;
⋅une défaillance est soupçonnée à la suite d‘une chute ou équivalent.
Dans ces cas, porter l’appareil en réparation.
▪ Il faut débrancher la fiche secteur :
⋅en cas de dysfonctionnements durant l‘utilisation,
⋅avant chaque nettoyage et entretien,
⋅après l‘utilisation.
▪ La société décline toute responsabilité en cas de dommage découlant d‘un
détournement, de mauvaise utilisation ou de réparation non conforme aux consignes.
Toute intervention sous garantie est également exclue dans de tels cas.

18 19
fr
Mise en service
▪ Nettoyez l‘appareil avant la première utilisation, comme décrit dans le chapitre «
Nettoyage et entretien ». Les pots de yaourt (2) doivent être secs avant d‘utiliser l‘appareil.
▪ Pour un résultat de préparation optimal, placez l‘appareil sur une surface antidérapante,
sans vibrations et insensible à l‘eau.
▪ Pour la préparation de yaourt, vous avez besoin de lait et de ferment de yaourt ou d‘un
yaourt nature frais. Lors de l‘utilisation de ferment de yaourt, il est important de tenir
compte des indications précises du fabricant. Pour la préparation de yaourt à partir
de yaourt nature, le lait utilisé doit d‘abord être chauffé à environ 90 °C puis refroidi
jusqu‘à une température d‘environ 40 °C. Si vous utilisez du lait longue conservation, il
doit d‘abord être chauffé.
▪ Mélangez le lait (350 ml) et le ferment de yaourt ou le yaourt nature (100 g) à
température ambiante, puis remplissez les pots à yaourt (2) avec le mélange.
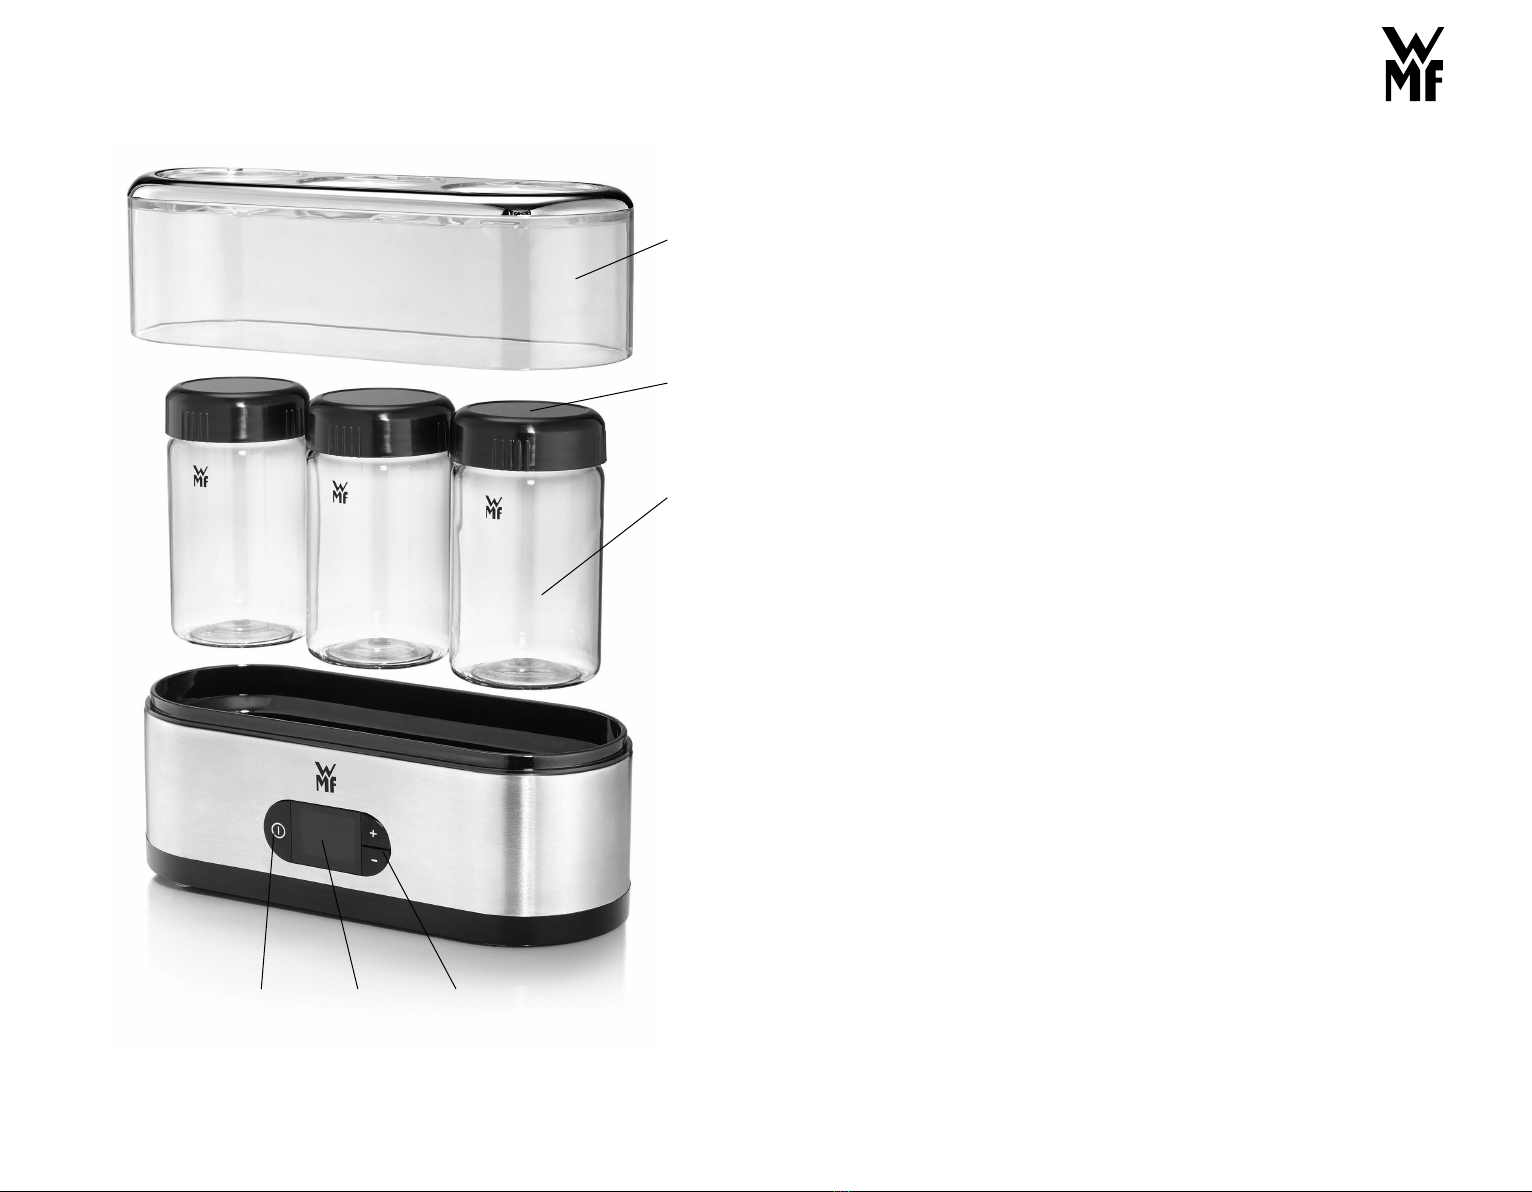
▪ Placez les pots à yaourt (2) avec le couvercle fermé dans la yaourtière.
▪ Placez le couvercle (1) sur la yaourtière et branchez la fiche dans la prise.
▪ Appuyez sur la touche marche/arrêt (4) pour mettre l‘appareil en service.
▪ Le temps de préparation (10 heures) prédéfini apparaît sur l‘écran LCD (5).
▪ Modifiez le temps de préparation selon la recette en appuyant sur les boutons de
commande (6) « + » (jusqu‘à 19 heures) ou « - ».
▪ Appuyez de nouveau sur la touche marche/arrêt (4) pour démarrer le processus de
préparation.
▪ Après la mise en service, l‘appareil effectue le compte à rebours des heures. À la fin
du temps de préparation, un signal acoustique se fait entendre et l‘appareil s‘éteint
automatiquement.
▪ Remarque : Pour éteindre la yaourtière à l‘avance, appuyez sur la touche marche/arrêt
(4) pendant plus de 3 secondes.
▪ Refroidissez les yaourts préparés dans le réfrigérateur avant de les consommer.
▪ Pour la préparation de yaourts aux fruits, insérez les fruits dans le yaourt tiède et
placez-les ensuite au frais.
▪ Selon les besoins, il est possible de marquer la surface du couvercle (3) avec une craie
liquide pour pouvoir inscrire sur les pots à yaourt la date limite de consommation et le
type de yaourt.
▪ Ne conservez pas les yaourts préparés plus de 10 jours au réfrigérateur.
▪ Les pots à yaourt en Tritan® résistant aux impacts sont idéalement adaptés au transport
des yaourts préparés.
Utilisation
Avec la yaourtière WMF miniCUISINE®, vous pouvez préparer en simultanément jusqu’à trois
yaourts. Il existe également un ensemble d’accessoires se composant de 3 pots à yaourts
supplémentaires (de 150 ml). Vous pouvez les déposer sur la surface d’appui prévue à cet effet
sur le couvercle (1).
Les yaourts sont formés par un processus de fermentation du lait. En règle générale, il est
possible d’utiliser n’importe quel type de lait : du lait entier ou demi écrémé pasteurisé, du lait
stérilisé UHT entier ou demi écrémé, du lait cru, du lait de soja, du lait d’amande ou du lait en
poudre. Le lait homogénéisé (lait longue conservation) est le mieux adapté pour le processus
de fermentation. Tous les laits doivent être brièvement chauffés à environ 90 °C (juste avant
ébullition) puis de nouveau refroidis à 40 °C.
La yaourtière dispose d’une régulation électronique de la température, pour que le processus de
fermentation puisse avoir lieu.
Durées de préparation recommandées:
Lait entier : 10 à 12 heures
Lait demi écrémé : 12 heures
Lait de soja : 10 à 12 heures
Lait cru bouilli : 10 heures
Ces durées sont valables pour du lait à température ambiante. Plus le lait est froid au début du
processus, plus la durée de préparation doit être longue.
Vous pouvez utiliser plusieurs sortes de substances de fermentation :
⋅un ferment de yaourt sec ou lyophilisé
⋅un yaourt nature
⋅un yaourt du cycle de préparation précédent
Recettes recommandées:
Yaourt à la vanille:
Ingrédients:
350 ml de lait
100 g de yaourt nature
0,5 c. à s. de lait écrémé en poudre
0,5 c. à café de sucre vanillé
0,5 c. à café de sucre de canne complet
Préparation : Mélangez le lait à température ambiante avec le sucre vanillé et le sucre de canne
complet. Mélangez le yaourt nature et le lait en poudre l’un avec l’autre et incorporez le tout
avec un fouet dans le mélange de lait. Remplissez les pots à yaourt du mélange et placez-les
pendant 10 heures dans la yaourtière. Testez avec une cuillère pour voir si vous avez obtenu la
consistance souhaitée et retirez les yaourts ou prolongez la durée de préparation d’une heure
supplémentaire. Laissez les yaourts refroidir au réfrigérateur et conservez-les au réfrigérateur
jusqu’à la consommation.
Yaourt végétalien au lait de noix de coco et d’amande:
Ingrédients:
2 g de ferment de yaourt
175 ml de lait de noix de coco
275 ml de lait d’amande
0,5 c. à café d’agar-agar
Préparation : Amenez d’abord toutes les sortes de lait à température ambiante. Dissolvez le
ferment de yaourt dans environ 100 ml de lait d’amande et mélangez bien. Le lait d’amande ne
doit pas être chauffé. Ouvrez maintenant le lait de noix de coco et remuez bien. Mesurez 100 ml
de lait de noix de coco et faites-les cuire avec l’agar-agar pendant 2 minutes. Ajoutez le reste
du lait de noix de coco au lait d’amande dans la casserole et mélangez bien le tout. Laissez le
mélange refroidir jusqu’à ce qu’il soit tiède. Mélangez le mélange tiède avec le ferment de yaourt
et répartissez-le dans les pots à yaourt. Placez les pots à yaourt pendant environ 13 heures dans
la yaourtière. Testez avec une cuillère pour voir si vous avez obtenu la consistance souhaitée et
retirez les yaourts ou prolongez la durée de préparation d’une heure supplémentaire. Laissez les
yaourts refroidir au réfrigérateur et conservez-les au réfrigérateur jusqu’à la consommation.

20 21
fr
Nettoyage et Entretien
▪ Débrancher l‘appareil avant le nettoyage.. Ne plongez pas l’appareil
dans l’eau, nettoyez-le plutôt avec un chiffon humide, sur lequel
vous avez ajouté un peu de produit nettoyant, essuyez puis séchez en
frottant. Ne pas utiliser de nettoyants corrosifs ou abrasifs.
▪ Le couvercle (1) et les pots à yaourt avec couvercle (2) peuvent être
lavés au lave-vaisselle.
Cet appareil est conforme auxdirectives européennes 2014/35/CE, 2014/30/CE
et 2009/125/CE.
Quand il n‘est plus utilisable (fin de vie),vous ne devez pas jeter ce produit
avecles ordures ménagères mais le remettreau point de recyclage des
appareilsélectriques et électroniques le plus proche (oudéchetterie). Si vous
avez besoin de détailssupplémentaires, vous pouvez également vousadresser à
la mairie de votre commune.
Sous réserve de changements techniques.

22 23
itit
Istruzioni per l’uso
Importanti indicazioni per la sicurezza
▪ Questo apparecchio può essere utilizzato da persone con
ridotte capacità fisiche, sensoriali o mentali o che mancano di
esperienza e/o di conoscenze, solo se sorvegliate o previamente
istruite riguardo all’utilizzo sicuro dell’apparecchio e se ne hanno
compreso i pericoli risultanti.
▪ Questo apparecchio può essere utilizzato da bambini a partire
dai 3 anni di età, solo se sorvegliati o se previamente istruiti
riguardo all’utilizzo sicuro dell’apparecchio e se ne hanno
compreso i pericoli risultanti. La pulizia e la manutenzione
a carico dell’utente non devono essere eseguite da bambini,
eccetto nel caso in cui essi abbiano più di 8 anni e siano
sorvegliati. Tenere l’apparecchio e i suoi cavi di collegamento
fuori dalla portata dei bambini con meno di 3 anni.
▪ I bambini non devono giocare con l’apparecchio.
▪ Tenere il materiale d’imballaggio fuori dalla portata dei bambini.
Fra i pericoli, vi è il rischio di soffocamento!
▪ Spegnere l’apparecchio e staccare sempre la spina prima di
sostituire gli accessori.
▪ Non immergere l’apparecchio in acqua.
▪ Non utilizzare l’apparecchio se il cavo di allacciamento alla rete è
danneggiato.
▪ Questo apparecchio è destinato all’uso domestico e ad impieghi
simili, come ad esempio:
⋅in cucine per i dipendenti di negozi, uffici e altri settori
commerciali;
⋅in tenute agricole;
⋅in hotel, motel e altre strutture ricettive da parte del cliente;
⋅in strutture Bed & Breakfast.
Questo apparecchio non è destinato ad un uso
puramentecommerciale.
▪ Usare l’apparecchio solo conformemente alle presenti istruzioni.
L’uso improprio può provocare shock elettrici o altri rischi.
Prima dell‘uso
L’apparecchio deve essere impiegato solo per l’uso previsto, nel rispetto delle presenti
istruzioni. A tal fine, leggere accuratamente le istruzioni per l’uso prima della messa in
servizio. Esse forniscono indicazioni per l’utilizzo, la pulizia e la cura dell’apparecchio. In
caso di inosservanza, decliniamo qualsiasi responsabilità per eventuali danni.
Conservare accuratamente le istruzioni per l’uso e, in caso di cessione dell’apparecchio,
consegnarle all’utente successivo insieme all’apparecchio. Rispettare anche le istruzioni di
garanzia riportate alla fine. Questo apparecchio non è concepito per un uso commerciale,
ma solo per la preparazione di alimenti in quantità consuete per un utilizzo in ambito
domestico.
Durante l’uso osservare scrupolosamente le istruzioni per la sicurezza.
Dati tecnici
Tensione nominale: 220-240 V~ 50-60 Hz
Potenza assorbita: 15 W
Classe di protezione: II
Ulteriori istruzioni di sicurezza
▪ Collegare l’apparecchio esclusivamente a una presa installata a norma. Il cavo di
alimentazione e la spina devono essere asciutti.
▪ Non mettere mai l’apparecchio in frigorifero.▪ Non fare mai passare il cavo di
alimentazione su spigoli vivi o incastrarlo,non lasciarlo sospeso e proteggerlo dal calore
e dall’olio.
▪ Non staccare la spina dalla presa tirandola per il cavo o con le mani bagnate.
▪ Non posizionare mai l’apparecchio su superfici calde come piastre di cottura o simili e
non metterlo in funzione in prossimità di fiamme libere.
▪ Non collocare l’apparecchio su superfici sensibili all’acqua. L’umidità potrebbe
danneggiarle.
▪ Non spostare l’apparecchio durante il funzionamento e non tirare il cavo di
alimentazione.
▪ Non mettere in funzione l’apparecchio e staccare subito la spina, se:
⋅l’apparecchio o il cavo di alimentazione sono danneggiati;
⋅l’apparecchio non è ermetico;
⋅si sospetta un difetto dopo una caduta o un evento simile.
In questi casi far riparare l’apparecchio.
▪ Staccare la spina:
⋅in caso di guasti nel funzionamento,
⋅prima di ogni pulizia e manutenzione,
⋅dopo l’uso.
▪ Decliniamo ogni responsabilità per eventuali danni causati da un utilizzo per scopi
diversi da quelli previsti, da un uso errato oppure da riparazione non adeguata. In questi
casi è inoltre esclusa la garanzia.

24 25
it
Messa in servizio
▪ Pulire l’apparecchio prima del primo utilizzo come descritto nel capitolo „Pulizia e
manutenzione“. Prima di utilizzare l’apparecchio accertarsi che i vasetti (2) siano asciutti.
▪ Per un risultato ottimale si consiglia di posizionare l’apparecchio su una superficie
antiscivolo, resistente all’acqua e priva di vibrazioni.
▪ Per la preparazione dello yogurt occorrono i seguenti ingredienti: latte, fermenti di
yogurt oppure dello yogurt fresco naturale. Se si utilizzano i fermenti di yogurt è
importante seguire esattamente le indicazioni del produttore. Per la produzione di
yogurt a partire da yogurt naturale è necessario riscaldare innanzitutto il latte a ca. 90
°C e lasciarlo quindi raffreddare a ca. 40 °C. L’operazione non è necessaria se si utilizza
del latte UHT.
▪ Mescolare il latte (350 ml) e i fermenti oppure lo yogurt naturale (100 g) a temperatura
ambiente e versare la miscela negli appositi vasetti (2).
▪ Posizionare i vasetti (2) con il coperchio chiuso nella yogurtiera.
▪ Posizionare la copertura (1) sulla yogurtiera e inserire la spina nella presa elettrica.
▪ Premere il tasto ON/OFF (4) per mettere in funzione l’apparecchio.
▪ Il tempo di preparazione preimpostato (10 ore) è visualizzato sul display LCD (5).
▪ A seconda della ricetta è possibile modificare il tempo di preparazione premendo i tasti
(6) « + » (fino a 19 ore) oppure « - ».
▪ Premere nuovamente il tasto ON/OFF (4) per avviare la procedura di preparazione.
▪ Dopo la messa in funzione l’apparecchio inizia il conto alla rovescia. Al termine della
preparazione emette un segnale acustico e si spegne automaticamente.
▪ Nota: per spegnere la yogurtiera prima del termine della preparazione tenere premuto il
tasto ON/OFF (4) per più di 3 secondi.
▪ Raffreddare lo yogurt in frigorifero prima del consumo.
▪ Per preparare dello yogurt alla frutta aggiungerla quando lo yogurt è ancora caldo e
metterlo poi in frigorifero a raffreddare.
▪ All’occorrenza, si può scrivere sulla superficie del coperchio (3) con un pennarello a gesso
liquido, indicando ad esempio il tipo di yogurt e la data di scadenza dei vasetti. Una
volta pronto, lo yogurt va conservato in frigorifero per un massimo di 10 giorni. I vasetti
in Tritan® infrangibile sono particolarmente adatti al trasporto dello yogurt pronto.
Utilizzo
Con la yogurtiera KÜCHENminis® WMF si possono preparare fino a tre yogurt contempora-
neamente. Inoltre è disponibile un set di accessori composto da altri 3 vasetti (da 150 ml).
Questi possono essere collocati sull’apposita superficie sopra la copertura (1).
Lo yogurt si forma grazie a un processo di fermentazione del latte. In linea di massima, si
può utilizzare qualsiasi tipo di latte: pastorizzato intero o parzialmente scremato, latte UHT
intero o parzialmente scremato, latte crudo, latte di soia, di mandorle o latte in polvere. Per
il processo di fermentazione si presta particolarmente bene il latte omogeneizzato (latte
UHT). Ogni altro tipo di latte dovrebbe essere riscaldato brevemente a ca. 90 °C (portato
quasi a bollore) e quindi lasciato raffreddare a 40 °C.
La yogurtiera dispone di una regolazione della temperatura controllata elettronicamente
per consentire il processo di fermentazione.
Prima messa in servizio
Con la yogurtiera KÜCHENminis® WMF si possono preparare fino a tre yogurt contempora-
neamente. Inoltre è disponibile un set di accessori composto da altri 3 vasetti (da 150 ml).
Questi possono essere collocati sull’apposita superficie sopra la copertura (1).
Lo yogurt si forma grazie a un processo di fermentazione del latte. In linea di massima, si
può utilizzare qualsiasi tipo di latte: pastorizzato intero o parzialmente scremato, latte UHT
intero o parzialmente scremato, latte crudo, latte di soia, di mandorle o latte in polvere. Per
il processo di fermentazione si presta particolarmente bene il latte omogeneizzato (latte
UHT). Ogni altro tipo di latte dovrebbe essere riscaldato brevemente a ca. 90 °C (portato
quasi a bollore) e quindi lasciato raffreddare a 40 °C.
La yogurtiera dispone di una regolazione della temperatura controllata elettronicamente
per consentire il processo di fermentazione.
Tempi di preparazione consigliati:
latte intero: da 10 a 12 ore
latte parzialmente scremato: 12 ore
latte di soia: da 10 a 12 ore
latte crudo bollito: 10 ore
I tempi sono indicativi per il latte a temperatura ambiente. Quanto più freddo è il latte
all’inizio, tanto più lungo dovrà essere il tempo impostato per la preparazione.
È possibile utilizzare diversi tipi di fermenti:
⋅fermenti di yogurt secchi o liofilizzati
⋅yogurt naturale
⋅yogurt proveniente da un precedente processo di preparazione
Ricette consigliate:
Yogurt alla vaniglia
Ingredienti:
350 ml di latte
100 g di yogurt naturale
0,5 cucchiai di latte magro in polvere
0,5 cucchiaini di zucchero vanigliato
0,5 cucchiaini di zucchero di canna integrale
Preparazione: Mescolare il latte a temperatura ambiente con lo zucchero vanigliato e lo
zucchero di canna integrale. Mescolare lo yogurt naturale con il latte in polvere e mescolare
il composto con la miscela di latte utilizzando una frusta. Versare il preparato nei vasetti e
lasciarli per 10 ore nella yogurtiera. Con un cucchiaio controllare se ha acquisito la consis-
tenza desiderata ed estrarre lo yogurt dall’apparecchio oppure proseguire la preparazione
per un’altra ora. Mettere a raffreddare in frigorifero e conservare in frigo fino al consumo.

26 27
it
Yogurt vegano di latte di cocco e di mandorla
Ingredienti:
2 g fermenti di yogurt
175 ml di latte di cocco
275 ml di latte di mandorla
0,5 cucchiaini di agar agar
Preparazione: Portare i diversi tipi di latte a temperatura ambiente. Sciogliere i fermenti
in circa 100 ml di latte di mandorla e mescolare accuratamente. Il latte di mandorla non
deve essere riscaldato. A questo punto, aprire la confezione di latte di cocco e mescolarlo
accuratamente. Misurare 100 ml di latte di cocco e farlo bollire con l’agar agar per 2
minuti. Aggiungere nella pentola il latte di cocco restante e il latte di mandorla e mescolare
accuratamente. Lasciare raffreddare fino a quando sarà tiepido. Mescolare il composto
tiepido con i fermenti e versarlo nei vasetti. Lasciare i vasetti nella yogurtiera per ca. 13 ore.
Con un cucchiaio controllare se ha acquisito la consistenza desiderata ed estrarre lo yogurt
dall’apparecchio oppure proseguire la preparazione per un’altra ora. Mettere a raffreddare
in frigorifero e conservare in frigo fino al consumo.
Pulizia e manutenzione
▪ Staccare la spina prima di procedere alla pulizia. Non immergere l’apparecchio in acqua,
ma pulirlo con un panno umido e con qualche goccia di detersivo per piatti, quindi
ripassare con un panno umido e asciugarlo. Non usare detergenti corrosivi e abrasivi.
▪ La copertura (1) e i vasetti con i coperchi (2) sono lavabili in lavastoviglie.
L’apparecchio è conforme alle direttiveeuropee 2014/35/CE, 2014/30/CE e
2009/125/CE.
Questo prodotto, quando non è piùusabile, non deve venire gettato nei
rifiuticasalinghi ma portato in un punto diraccolta di riciclaggio per
apparecchielettrici e elettronici. Informazioni dettagliate si possono ottenere
presso le relativeamministrazioni comunali.
Salvo cambiamenti tecnici.

28 29
eses
Instrucciones de uso
Advertencias de seguridad importantes
▪ Este aparato puede ser utilizado por personas con
discapacidades físicas, psíquicas o sensoriales o que carezcan
de la experiencia o los conocimientos necesarios para usarlo
solo si lo hacen bajo vigilancia o si reciben las instrucciones
necesarias para utilizarlo con seguridad y comprenden los
peligros relacionados con su uso.
▪ Este aparato puede ser utilizado por niños mayores de 3 años
si lo utilizan bajo vigilancia, o si reciben las instrucciones
necesarias para utilizarlo con seguridad y comprenden los
peligros relacionados con su uso. Los niños no deben realizar
la limpieza ni el mantenimiento del aparato a no ser que sean
mayores de 8 años y lo hagan bajo vigilancia. Mantenga el
aparato y los cables de conexión fuera del alcance de los niños
menores de 3 años.
▪ Los niños no deben jugar con el aparato.
▪ Manténgase el material de embalaje fuera del alcance de los
niños. ¡Entre otros riesgos, existe peligro de asfixia!
▪ Apague el aparato y desenchúfelo de la corriente eléctrica
antes de cambiar los accesorios.
▪ No sumerja el aparato en agua.
▪ Si el cable de conexión de este aparato está dañado, no ponga
en marcha el aparato.
▪ Este aparato está diseñado para uso doméstico y aplicaciones
⋅similares como, p. ej., en cocinas para el personal de tiendas,
oficinas y otros ámbitos comerciales;
⋅en fincas agrícolas;
⋅para clientes de hoteles, moteles y otros establecimientos de
hospedaje;
⋅en pensiones con desayuno.
No está diseñado para el uso meramente comercial.
▪ Utilice el aparato solo de conformidad con estas instrucciones
de uso. El uso incorrecto puede tener como consecuencia una
descarga eléctrica u otro tipo de peligros.
Antes de usar
Utilice el aparato solo para el fin para el que se ha diseñado y siempre siguiendo las
instrucciones de uso.
Lea atentamente estas instrucciones antes de poner el aparato en funcionamiento. En ellas
encontrará indicaciones para el uso, la limpieza y el mantenimiento correctos del mismo.
No nos responsabilizamos de los daños que puedan producirse por un uso no conforme al
previsto.
Guarde bien estas instrucciones y entréguelas al siguiente usuario junto con el aparato.
Tenga en cuenta también las advertencias de la garantía contenidas al final de las
instrucciones de uso. El aparato no es apto para el uso industrial, sino solo para preparar
alimentos en cantidades usuales en el hogar.
Respete siempre las indicaciones de seguridad durante el uso.
Datos técnicos
Tensión nominal: 220-240 V~ 50-60 Hz
Consumo de energía: 15 W
Clase de protección: II
Otras advertencias de seguridad
▪ Enchufe el aparato solamente a una toma de corriente que esté instalada correctamente
según las normativas correspondientes. El cable y el enchufe deben estar secos.
▪ No coloque el aparato dentro del frigorífico.
▪ No tire del cable de conexión cuando este se encuentre sobre bordes afilados ni lo
aprisione, no deje que cuelgue y protéjalo del calor y del aceite.
▪ No desenchufe nunca el aparato tirando del cable o con las manos mojadas.
▪ No ponga el aparato a funcionar sobre superficies calientes, como placas de cocina o
lugares similares, y manténgalo alejado de las llamas abiertas.
▪ No lo ponga sobre superficies sensibles al agua. La humedad podría dañar el aparato.
▪ No mueva el aparato mientras esté funcionando ni tire del cable de red.
▪ No ponga en funcionamiento el aparato y desconéctelo inmediatamente de la red si:
⋅el aparato o el cable de red está dañado;
⋅el aparato no es hermético;
⋅sospecha que se haya podido producir algún fallo después de una caída del aparato
o similar.
En estos casos, envíe el aparato para que sea reparado.
▪ Desenchufe el cable de red:
⋅si se ha producido un fallo durante el uso,
⋅antes de cada limpieza y cuidados,
⋅después de usar el aparato.
▪ No se aceptará ninguna responsabilidad por los daños debidos a un mal uso,
funcionamiento incorrecto, reparaciones inadecuadas. En esos casos están excluidas
también las prestaciones de garantía.

30 31
es
Puesta en funcionamiento
▪ Limpie el aparato antes del primer uso tal y como se describe en el capítulo “Limpieza y
cuidados”. Los tarros para yogur (2) deben estar secos antes de utilizar el aparato.
▪ Para un resultado óptimo, coloque el aparato sobre una superficie antideslizante, exenta
de vibraciones y no sensible al agua.
▪ Para la preparación del yogur necesitará leche y fermento de yogur o yogur natural
fresco. Si se utiliza fermento de yogur es importante tener en cuenta los datos
específicos del fabricante. Para la elaboración de yogur a partir de yogur natural se debe
calentar primero la leche que se vaya a utilizar a aprox. 90 °C y a continuación se debe
dejar enfriar a aprox. 40 °C. Si se utiliza leche UHT, no será necesario calentarla.
▪ Mezcle la leche (350 ml) y el fermento de yogur o el yogur natural (100 g) a temperatura
ambiente e introduzca la mezcla en los tarros para yogur (2).
▪ Coloque los tarros para yogur (2) con las tapas cerradas en la yogurtera.
▪ Coloque la cubierta (1) en la yogurtera y conecte el enchufe a la toma de corriente.
▪ Pulse la tecla de encendido y apagado (4) para poner en marcha el aparato.
▪ Aparece el tiempo de preparación (10 horas) preajustado en la pantalla de cristal líquido
(5).
▪ Modifique el tiempo de preparación según la receta presionando para ello las teclas de
manejo (6) « + » (hasta 19 horas) o « - ».
▪ Pulse la tecla de encendido y apagado (4) de nuevo para iniciar el proceso de
preparación.
▪ Tras la puesta en marcha, el aparato realiza una cuenta atrás del tiempo ajustado. Una
vez transcurrido el tiempo de preparación, se oye un aviso acústico y el aparato se
desconecta de forma automática.
▪ Observación: Para desconectar antes de tiempo la yogurtera, mantenga pulsada la tecla
de encendido y apagado (4) más de 3 segundos.
▪ Refrigere el yogur preparado en el frigorífico antes de consumirlo.
▪ Para preparar yogur de frutas añada las frutas justo al yogur caliente y deje a
continuación que se enfríe.
▪ Según la necesidad se puede rotular la superficie de la tapa (3) con un lápiz de tiza
líquida para marcar la fecha de caducidad y la ubicación del yogur.
▪ No conserve en el frigorífico los yogures preparados más de 10 días.
▪ Los tarros para yogur de Tritan® resistente a la rotura son aptos para transportar el
yogur preparado.
Utilización
La yogurtera WMF miniCOCINA® permite preparar simultáneamente hasta tres yogures.
Además está disponible un set de accesorios compuesto por otros 3 tarros para yogur (150
ml). Se pueden colocar sobre la superficie de apoyo prevista sobre la cubierta (1).
El yogur se forma a partir de un proceso de fermentación de la leche. Por regla general se
puede utilizar cualquier tipo de leche: leche entera o semidesnatada pasteurizada, leche
UHT entera o semidesnatada, leche cruda, leche de soja, leche de almendra o leche en polvo.
Para el proceso de fermentación es mejor utilizar leche homogeneizada (UHT). Cualquier
otra leche se debe calentar brevemente a aprox. 90 °C (justo antes de la cocción) y a conti-
nuación se debe dejar enfriar a 40 °C.
La yogurtera dispone de una regulación de temperatura por control electrónico para así
poder controlar el proceso de fermentación.
Tiempos de preparación recomendados:
Leche entera: 10 - 12 horas
Leche semidesnatada: 12 horas
Leche de soja: 10 - 12 horas
Leche cruda hervida: 10 horas
Estos tiempos son aplicables para leche a temperatura ambiente. Cuanto más fría esté la
leche al principio, mayor tiempo deberá ajustarse para el tiempo de preparación.
Puede utilizar varios tipos de agentes de fermentación:
⋅un fermento de yogur seco o liofilizado
⋅un yogur natural
⋅un yogur del anterior ciclo de preparación
Recetas recomendadas
Yogur de vainilla:
Ingredientes:
350 ml de leche
100 g de yogur natural
Media cucharada de leche en polvo desnatada
Media cucharadita de azúcar de vainilla
Media cucharadita de azúcar moreno de caña
Preparación: Mezcle la leche a temperatura ambiente con el azúcar de vainilla y el azúcar
moreno de caña. Remueva el yogur natural y la leche en polvo y agítelo con un batidor
debajo de la mezcla de leche. Vierta la mezcla en los tarros para yogur y déjelos 10 horas
en la yogurtera. Compruebe con una cuchara si se ha conseguido la consistencia deseada y
retire el yogur o amplíe el tiempo de preparación una hora más. Deje enfriar el yogur en el
frigorífico y consérvelo en el frigorífico hasta su consumo.
Yogur vegano de leche de coco y almendra:
Ingredientes:
2 g fermento de yogur
175 ml de leche de coco
275 ml de leche de almendra
Media cucharadita de agar
Preparación: Atempere primero todos los tipos de leche a temperatura ambiente. Disuelva
el fermento de yogur en unos 100 ml de leche de almendra y remueva bien la mezcla. La
leche de almendra no debe calentarse. Abra ahora la leche de coco y remuévala bien. Tome
100 ml de leche de coco y cocínela con agar 2 minutos. Añada el resto de leche de coco y
la leche de almendra a la olla y mézclelo todo muy bien. Deje enfriar la mezcla hasta que
esté tibia. Remueva la mezcla tibia con el fermento de yogur y distribúyalo en los tarros
para yogur. Coloque los tarros para yogur unas 13 h en la yogurtera. Compruebe con una
cuchara si se ha conseguido la consistencia deseada y retire el yogur o amplíe el tiempo
de preparación una hora más. Deje enfriar el yogur en el frigorífico y consérvelo en el
frigorífico hasta su consumo.

32 33
es
Limpieza y cuidados
▪ Antes de limpiar, desenchufe el aparato. No sumerja el aparato en
agua, límpielo con un paño húmedo y algo de detergente, enjuague y
seque bien. No utilice agentes de limpieza abrasivos o corrosivos.
▪ La cubierta (1) y los tarros para yogur junto con las tapas (2) se
pueden lavar en el lavavajillas.
Este aparato cumple con las directivasde la UE 2014/35/CE, 2014/30/CE y
2009/125/CE.
Este producto no puede desecharsejunto con los residuos domésticosnormales
al final de su vida útil, sino quedebe entregarse en un centro derecolección
para el reciclaje de aparatoseléctrico y electrónicos. Para obtener más
detallesal respecto consulte en su administracióncomunal.Bajo reserva de
modificaciones técnicas.

34 35
nlnl
Gebruiksaanwijzing
Belangrijke veiligheidsinstructies
▪ Het apparaat mag door personen met verminderde fysieke,
sensorische of mentale vaardigheden of gebrek aan ervaring
en/of kennis worden gebruikt, wanneer ze onder toezicht staan
of over het veilige gebruik van het apparaat zijn geïnstrueerd
en de daaruit resulterende risico’s hebben begrepen.
▪ Dit apparaat mag door kinderen vanaf 3 jaar worden gebruikt,
wanneer ze onder toezicht staan of over het veilige gebruik
van het apparaat zijn geïnstrueerd en de daaruit resulterende
risico’s hebben begrepen. De reiniging en het onderhoud
mogen niet door kinderen worden uitgevoerd, behalve
wanneer ze ouder zijn dan 8 jaar en onder toezicht staan. Het
apparaat en de stroomkabel moeten op een voor kinderen
jonger dan 3 jaar niet toegankelijke plaats worden bewaard.
▪ Kinderen mogen niet met het apparaat spelen.
▪ Verpakkingsmateriaal uit de buurt van kinderen houden. Er
bestaat onder andere verstikkingsgevaar!
▪ Het apparaat uitschakelen en de stekker altijd uit het
stopcontact trekken, voordat u de accessoires wisselt.
▪ Het apparaat niet in water onderdompelen.
▪ Wanneer de stroomkabel van dit apparaat beschadigd is, mag
het apparaat niet in gebruik worden genomen.
▪ Dit apparaat is bedoeld voor huishoudelijk en vergelijkbaar
gebruik, zoals:
⋅in keukens voor medewerkers van winkels, kantoren en
andere zakelijke omgevingen;
⋅bij agrarische bedrijven;
⋅door klanten van hotels, motels en andere
verblijfsaccomodaties;
⋅in bed andbreakfasts.
Het apparaat is niet bedoeld voor puur zakelijk gebruik.
▪ Het apparaat mag uitsluitend volgens deze handleiding
worden gebruikt. Ondeskundig gebruik kan een elektrische
schok of andere risicofactoren tot gevolg hebben.
Voor het gebruik
Het apparaat mag alleen voor het beoogde doel en overeenkomstig deze gebruiksaanwijzing
worden gebruikt. Lees deze gebruiksaanwijzing daarom zorgvuldig door voordat u het
apparaat in gebruik neemt. De gebruiksaanwijzing
bevat aanwijzingen voor het gebruik, de reiniging en het onderhoud van het apparaat.
Wanneer u de gebruiksaanwijzing niet in acht neemt,
zijn wij niet aansprakelijk voor eventuele schade.
Bewaar de gebruiksaanwijzing goed en geef deze samen met het apparaat aan een
volgende gebruiker. Let ook op de garantie-instructies aan het einde van dit document.
Het apparaat is niet bestemd voor commercieel gebruik, maar alleen voor de bereiding van
levensmiddelen in voor huishoudens gebruikelijke hoeveelheden.
Neem bij het gebruik de veiligheidsinstructies in acht.
Technische gegevens
Nominale spanning: 220-240 V~ 50-60 Hz
Vermogen: 15 W
Veiligheidsklasse: II
Aanvullende veiligheidstips
▪ U mag het apparaat alleen op een volgens de voorschriften geplaatst stopcontact
aansluiten. Kabel en stekker moeten droog zijn.
▪ Het apparaat nooit in de koelkast plaatsen.
▪ Zorg ervoor dat de stroomkabel niet langs scherpe randen loopt of beklemd raakt, laat
de kabel niet naar beneden hangen en bescherm de kabel tegen hitte en olie.
▪ U mag de stekker niet aan de kabel of met natte handen uit het stopcontact trekken.
▪ Plaats het apparaat niet op een heet oppervlak zoals een kookplaat en gebruik het niet
in de buurt van open vuur.
▪ Plaats het apparaat niet op oppervlakken die niet tegen water bestand zijn. Vochtigheid
kan het apparaat beschadigen.
▪ Trek tijdens het gebruik niet aan het apparaat en ook niet aan de stroomkabel.
▪ Neem het apparaat niet in gebruik of trek direct de stekker uit het stopcontact wanneer:
⋅het apparaat of de stroomkabel is beschadigd;
⋅het apparaat lekt;
⋅na een val of iets dergelijks het vermoeden bestaat dat het apparaat defect is.
In dat geval moet u het apparaat ter reparatie afgeven.
▪ U moet de stekker uit het stopcontact trekken:
⋅als er tijdens gebruik storingen optreden,
⋅vóór elke reiniging of vóór elk onderhoud,
⋅na het gebruik.
▪ Bij oneigenlijk gebruik, verkeerde bediening of onvakkundige reparatie accepteren
wij geen aansprakelijkheid voor eventuele schade. In dergelijke gevallen zijn
garantievergoedingen ook uitgesloten.

36 37
nl
In gebruik nemen
▪ Reinig het apparaat voor het eerste gebruik zoals is beschreven in het hoofdstuk
“Reiniging en onderhoud”. Voordat het apparaat in gebruik wordt genomen, moeten de
yoghurtbekers (2) droog zijn.
▪ Voor een optimaal resultaat plaatst u het apparaat op een oppervlak dat antislip is,
trilvrij en niet gevoelig voor water.
▪ Voor de bereiding van yoghurt hebt u melk en yoghurtferment of verse gewone yoghurt
nodig. Bij het gebruik van yoghurtferment is het belangrijk om de exacte aanwijzingen
van de fabrikant op te volgen. Voor het maken van yoghurt op basis van gewone
yoghurt moet de gebruikte melk eerst tot ca. 90 °C worden verwarmd en vervolgens
worden afgekoeld tot ca. 40 °C. Als UHT-melk wordt gebruikt, dient deze niet eerst
verwarmd te worden.
▪ Meng de melk (350 ml) met het yoghurtferment of de gewone yoghurt (100 g) op
kamertemperatuur en vul het mengsel in de yoghurtbekers (2).
▪ Plaats de yoghurtbekers (2) met gesloten deksel in de yoghurtbereider.
▪ Plaats de afdekkap (1) op de yoghurtbereider en steek de stekker in het stopcontact.
▪ Druk op de Aan/Uit-knop (4) om het apparaat in werking te stellen.
▪ De vooraf ingestelde bereidingstijd (10 uur) wordt op het LC-display (5) weergegeven.
▪ Wijzig de bereidingstijd op basis van het recept door te drukken op de bedieningstoetsen (6)
« + » (tot 19 uur) of « - ».
▪ Druk nogmaals op de Aan/Uit-knop (4) om het bereidingsproces te starten.
▪ Na het in werking stellen telt het apparaat de uren terug. Aan het einde van de
bereidingstijd wordt een signaal weergegeven en schakelt het apparaat zich automatisch
uit.
▪ Opmerking: Om de yoghurtbereider voortijdig uit te schakelen, drukt u langer dan 3
seconden op de Aan/Uit-knop (4).
▪ Koel de gemaakte yoghurt in de koelkast, voordat u de yoghurt eet.
▪ Bij de bereiding van vruchtenyoghurt voegt u de vruchten direct aan de warme yoghurt
toe en plaatst u het geheel in de koeling.
▪ Naar wens kunnen de deksels (3) met een krijtmarker worden beschreven om de
yoghurtbekers te voorzien van de houdbaarheidsdatum en de naam van het soort
yoghurt.
▪ De bereide yoghurt niet langer dan 10 dagen in de koelkast bewaren.
▪ De yoghurtbekers van breukvastTritan® zijn uitstekend geschikt voor het meenemen van
bereide yoghurt.
Gebruik
Met de WMF KÜCHENminis® yoghurtbereider kunnen tot drie yoghurtpotjes tegelijkertijd
worden bereid. Ook is er een accessoire-set beschikbaar, bestaande uit 3 extra
yoghurtbekers (à 150 ml). Deze kunnen in het daarvoor voorziene vak op de afdekkap (1)
worden bewaard.
Yoghurt ontstaat door een fermentatieproces van melk. In principe kan elk soort melk
worden gebruikt: volle of halfvolle gepasteuriseerde melk, volle of halfvolle UHT-
gesteriliseerde melk, rauwe melk, sojamelk, amandelmelk of melkpoeder. Voor het
fermentatieproces is gehomogeniseerde melk (UHT-melk) het beste. Elk ander soort melk
moet kort op ca. 90 °C (kort vóór het kookpunt) worden verwarmd en weer tot 40 °C
worden afgekoeld.
De yoghurtbereider is voorzien van een elektronisch bestuurde temperatuurregeling, zodat
het fermentatieproces kan plaatsvinden.
Aanbevolen bereidingstijden:
Volle melk: 10 tot 12 uur
Halfvolle melk: 12 uur
Sojamelk: 10 tot 12 uur
Gekookte rauwe melk: 10 uur
Deze tijden zijn van toepassing op melk op kamertemperatuur. Hoe kouder de melk bij het
begin is, des te langer de bereidingstijd moet worden ingesteld.
U kunt meerdere soorten fermenteerstoffen gebruiken:
⋅een gedroogd of gevriesdroogd yoghurtferment
⋅gewone yoghurt
⋅yoghurt van de vorige bereidingscyclus
Aanbevolen recepten:
Vanilleyoghurt:
Ingrediënten:
350 ml melk
100 g gewone yoghurt
0,5 eetlepel mageremelkpoeder
0,5 theelepel vanillesuiker
0,5 theelepel ruwe rietsuiker
Bereiding: Meng de melk op kamertemperatuur met de vanillesuiker en de ruwe rietsuiker.
Roer de gewone yoghurt en de melkpoeder door elkaar en meng dit met een garde door
het melkmengsel. Vul het mengsel in de yoghurtbekers en plaats deze gedurende 10 uur in
de yoghurtbereider. Test met een lepel of de gewenste consistentie is bereikt en neem de
yoghurt uit het apparaat of verleng de bereidingstijd met een extra uur. Laat de yoghurt in
de koelkast afkoelen en laat hem tot het moment van consumptie in de koelkast staan.
Plantaardige yoghurt van kokos- en amandelmelk:
Ingrediënten:
2 g yoghurtferment
175 ml kokosmelk
275 ml amandelmelk
0,5 theelepel agaragar
Bereiding: Breng eerst alle melkvarianten op kamertemperatuur. Los het yoghurtferment
op in ca. 100 ml amandelmelk en roer goed dooreen. De amandelmelk hoeft niet verwarmd
te worden. Open nu de kokosmelk en roer deze goed door. Meet 100 ml kokosmelk af en
laat deze met de agaragar gedurende ca. 2 minuten koken. Giet de resterende kokosmelk
en de amandelmelk in de kookpot en meng alles goed dooreen. Laat het mengsel afkoelen
tot het lauwwarm is. Het yoghurtferment door het lauwwarme mengsel roeren en het
geheel verdelen over de yoghurtbekers. Plaats de yoghurtbekers gedurende ca. 13 uur in
de yoghurtbereider. Test met een lepel of de gewenste consistentie is bereikt en neem de
yoghurt uit het apparaat of verleng de bereidingstijd met een extra uur. Laat de yoghurt in
de koelkast afkoelen en laat hem tot het moment van consumptie in de koelkast staan.

38 39
nl
Reiniging en onderhoud
▪ Trek voor het reinigen de stekker uit het stopcontact. U mag het apparaat niet in water
onderdompelen, maar u kunt het met een vochtige doek met wat afwasmiddel afnemen
en aansluitend droogwrijven. Gebruik geen bijtende en schurende schoonmaakmiddelen.
▪ De afdekkap (1) en de yoghurtbekers met deksel (2) kunnen in de vaatwasmachine
worden afgewassen.
Het apparaat voldoet aan de Europeserichtlijnen 2014/35/EG, 2014/30/EG en
2009/125/EG.
Dit product mag na afloop van zijn levensduur niet met het
normalehuishoudafval verwijderd worden, maarmoet bij een verzamelplaats
voor elektrische en elektronische apparaten worden afgegeven. Details zijn bij
uw gemeentebestuur te verkrijgen.
Technische veranderingen voorbehouden.
Other manuals for kuchenminis
4
Table of contents
Languages: