WNQ 7318 LB User manual

7318 LB
USER’S MANUAL

1
1. Assembly Instructions - - - - - - - - - - - - - - - - - - - - - - - - - - - - - 2
1.1 For your safety - - - - - - - - - - - - - - - - - - - - - - - - - - - - - - - 2
1.2 Handling the equipment - - - - - - - - - - - - - - - - - - - - - - - 3
1.3 Instructions of assembly - - - - - - - - - - - - - - - - - - - - - - - 3
1.4 Order of spare parts - - - - - - - - - - - - - - - - - - - - - - - - - - 4
1.5 Checklist hardware - - - - - - - - - - - - - - - - - - - - - - - - - - 4
1.6 Checklist parts - - - - - - - - - - - - - - - - - - - - - - - - - - - - - - 5
1.7 Assembly drawing - - - - - - - - - - - - - - - - - - - - - - - - - - - 6
2. General - - - - - - - - - - - - - - - - - - - - - - - - - - - - - - - - - - - - - - - - - 6
2.1 Packing - - - - - - - - - - - - - - - - - - - - - - - - - - - - - - - - - - - 7
2.2 Disposal - - - - - - - - - - - - - - - - - - - - - - - - - - - - - - - - - - - 7
2.3 Explanation of symbols - - - - - - - - - - - - - - - - - - - - - - - - 7
3. Assembly - - - - - - - - - - - - - - - - - - - - - - - - - - - - - - - - - - - - - - - 7
3.1 Remove all parts from the carton - - - - - - - - - - - - - - - - - 7
3.2 Take the exercise bike out of the carton - - - - - - - - - - - - 7
3.3 Assembly steps - - - - - - - - - - - - - - - - - - - - - - - - - - - - - 8
3.4 Adjusting the saddle position - - - - - - - - - - - - - - - - - - - - 15
4. Placing the exercise bike - - - - - - - - - - - - - - - - - - - - - - - - - - - 15
4.1 Aligning the exercise bike - - - - - - - - - - - - - - - - - - - - - - - 15
4.2 Power supply - - - - - - - - - - - - - - - - - - - - - - - - - - - - - - - 15
4.3 Moving the exercise bike - - - - - - - - - - - - - - - - - - - - - - - 15
4.4 Store the exercise bike - - - - - - - - - - - - - - - - - - - - - - - - - 16
5. Preparing the start - - - - - - - - - - - - - - - - - - - - - - - - - - - - - - - - 16
5.1 Power supply - - - - - - - - - - - - - - - - - - - - - - - - - - - - - - - 16
5.2 Enter and leave the exercise bike - - - - - - - - - - - - - - - - 16
6. Computer handling
6.1 Computer display and functions - - - - - - - - - - - - - - - - - - 16
6.2 Assembly batteries - - - - - - - - - - - - - - - - - - - - - - - - - - - 23
7. Training manual - - - - - - - - - - - - - - - - - - - - - - - - - - - - - - - - - - 23
7.1 Types of training - - - - - - - - - - - - - - - - - - - - - - - - - - - - - 23
7.2 Training frequency - - - - - - - - - - - - - - - - - - - - - - - - - - - 23
7.3 Training intensity - - - - - - - - - - - - - - - - - - - - - - - - - - - - 24
7.4 Heart rate training - - - - - - - - - - - - - - - - - - - - - - - - - - - 24
7.5 Training control - - - - - - - - - - - - - - - - - - - - - - - - - - - - - 25
7.6 Warm up and cool down - - - - - - - - - - - - - - - - - - - - - - - 26
8. Maintenance - - - - - - - - - - - - - - - - - - - - - - - - - - - - - - - - - - - - 26
8.1 Maintenance - - - - - - - - - - - - - - - - - - - - - - - - - - - - - - - 26
8.2 Care - - - - - - - - - - - - - - - - - - - - - - - - - - - - - - - - - - - - 27
9. Troubleshooting - - - - - - - - - - - - - - - - - - - - - - - - - - - - - - - - 27
10. Explosion drawing - - - - - - - - - - - - - - - - - - - - - - - - - - - - - - 28
11. Parts list - - - - - - - - - - - - - - - - - - - - - - - - - - - - - - - - - - - - - 30
Index Page

2
1.1 For your safety
-Before beginning your program of exercise, consult your doctor to ensure that you
are fit enough to use this equipment. Base your program of exercise on the
advice given by your doctor. Incorrect or excessive exercise may damage
your health.
-The exercise bike should be used only for its intended purpose, i.e. for physical
exercise by adult persons.
-Any other use of the equipment is prohibited and may be dangerous. The
manufacturer cannot be held liable for damage or injury caused by improper use
of the equipment.
-This exercise bike has been designed in accordance with the latest standards of
safety. Any features which may have been a possible cause of injury have been
avoided or made as safe as possible.
-Incorrect repairs and structural modifications (e.g. removal or replacement of
original parts) may endanger the safety of the user.
-Damaged components may endanger your safety or reduce the lifetime of the
equipment. For this reason, worn or damaged parts should be replaced
immediately and the equipment taken out of use until this has been done. Use
only original spare parts.
-If the equipment is in regular use, check all its components thoroughly every
1 – 2 months. Pay particular attention to the tightness of bolts and nuts. This
is particularly true for all attached parts.
-To ensure that the safety level is kept to the highest possible standard, determined
by its construction, this product should be serviced regularly (once a year) by
specialist retailers.
-Instruct persons using the equipment (in particular children) on possible sources of
danger during exercise.
-Any interference with parts of the product that are not described within the
manual may cause damage or endanger the person using this machine.
Extensive repair must only be carried out by specialist retailers or qualified
personnel trained by manufacturer.
-Use only the supplied power cord.
-Your exercise bike is an electric product. Therefore it must be guaranteed during
use that it is grounded. Please make sure that the power cord is connected with a
suitable power outlet. This guarantees a reduced risk of electric shock caused by
malfunction.
-
-A malfunction can cause an electric shock if the grounding has an
-improper connection. If you are not sure if your power outlet is
suitable, please contact a qualified electrician.
-Never leave your exercise bike without supervision. If you leave the room, please
disconnect the power cord from the power outlet.
1. Assembly Instructions
Before assembling or using this exercise bike, please read the following
instructions carefully. They contain important information for use and
maintenance of the equipment as well as for your personal safety. Keep these
instructions in a safe place for maintenance purposes or for orderin
g
spare parts.

3
-Never use the exercise bike if it is standing on a wet surface, if the
-power cord is defect or a 100% function of the exercise bike cannot
-be guaranteed.
-Pay attention on enough distance of the power cord or the exercise bike from hot
sources.
-In case of enquiry, please contact your dealer.
1.2 Handling the equipment
-Before using the equipment for exercise, check carefully to ensure that it has been
correctly assembled.
-Before beginning with your first session, familiarize yourself thoroughly with all the
functions and settings of the unit.
-It is not recommended to use or to store the unit in a damp room as this may
cause it to rust.
-This machine is designed for use by adults and children should not be allowed to
play with it. Children at play behave unpredictably and dangerous situations may
occur for which the manufacturer cannot be held liable. If, in spite of this, children
are allowed to use the equipment, ensure that they are instructed in its proper use
and supervised accordingly.
-The exercise bike complies with the DIN EN 957 – 1/5, class HB. It is therefore not
suitable for therapeutic use.
-The maximum user weight is 130 kg.
-A slight production of noise on the belt or brake system is due to the construction
and has no negative effects upon operation.
-Do not use corrosive or abrasive materials to clean the equipment. Ensure that
such materials are not allowed to pollute the environment.
-Please ensure that liquids or perspiration never enter the machine or the
electronics.
-Before use, always check all screws and plug-in connections fit correctly.
-Always wear suitable shoes and clothes when using the equipment.
-All electric appliances emit electromagnetic radiation when in operation. Please do
not leave especially radiation – intensive appliances (e.g. mobile telephones)
directly next to the cockpit or the electronic control system as otherwise values
displayed might be distorted (e.g. pulse measurement).
-The equipment requires sufficient free space in all directions (at least 1.5 m)
-Make certain that no other persons are in the area of your exercise bike, because
they may be injured by the moving parts.
-The treadmill requires regularly lubrication (see 8.4). If this is not done the
treadmill / motor may be damaged due to the high friction and thereby the lost of
the warranty.
1.3 Instructions for assembly
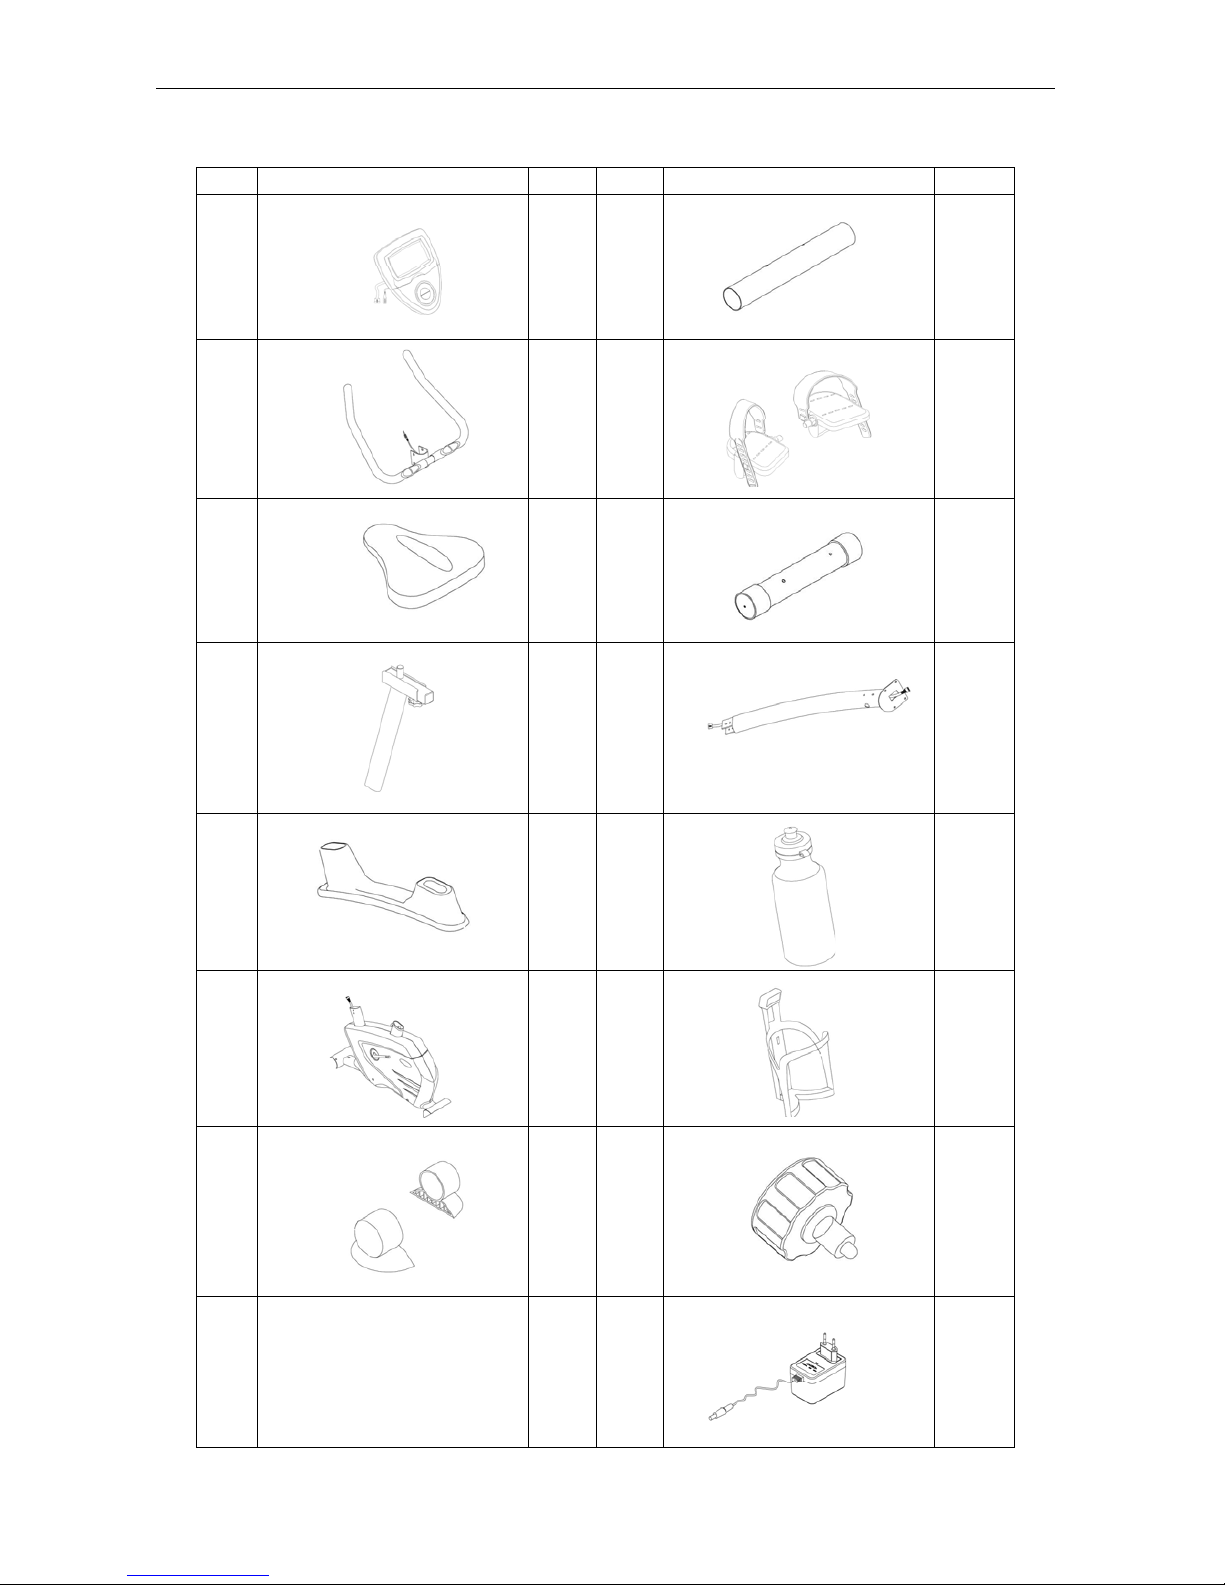
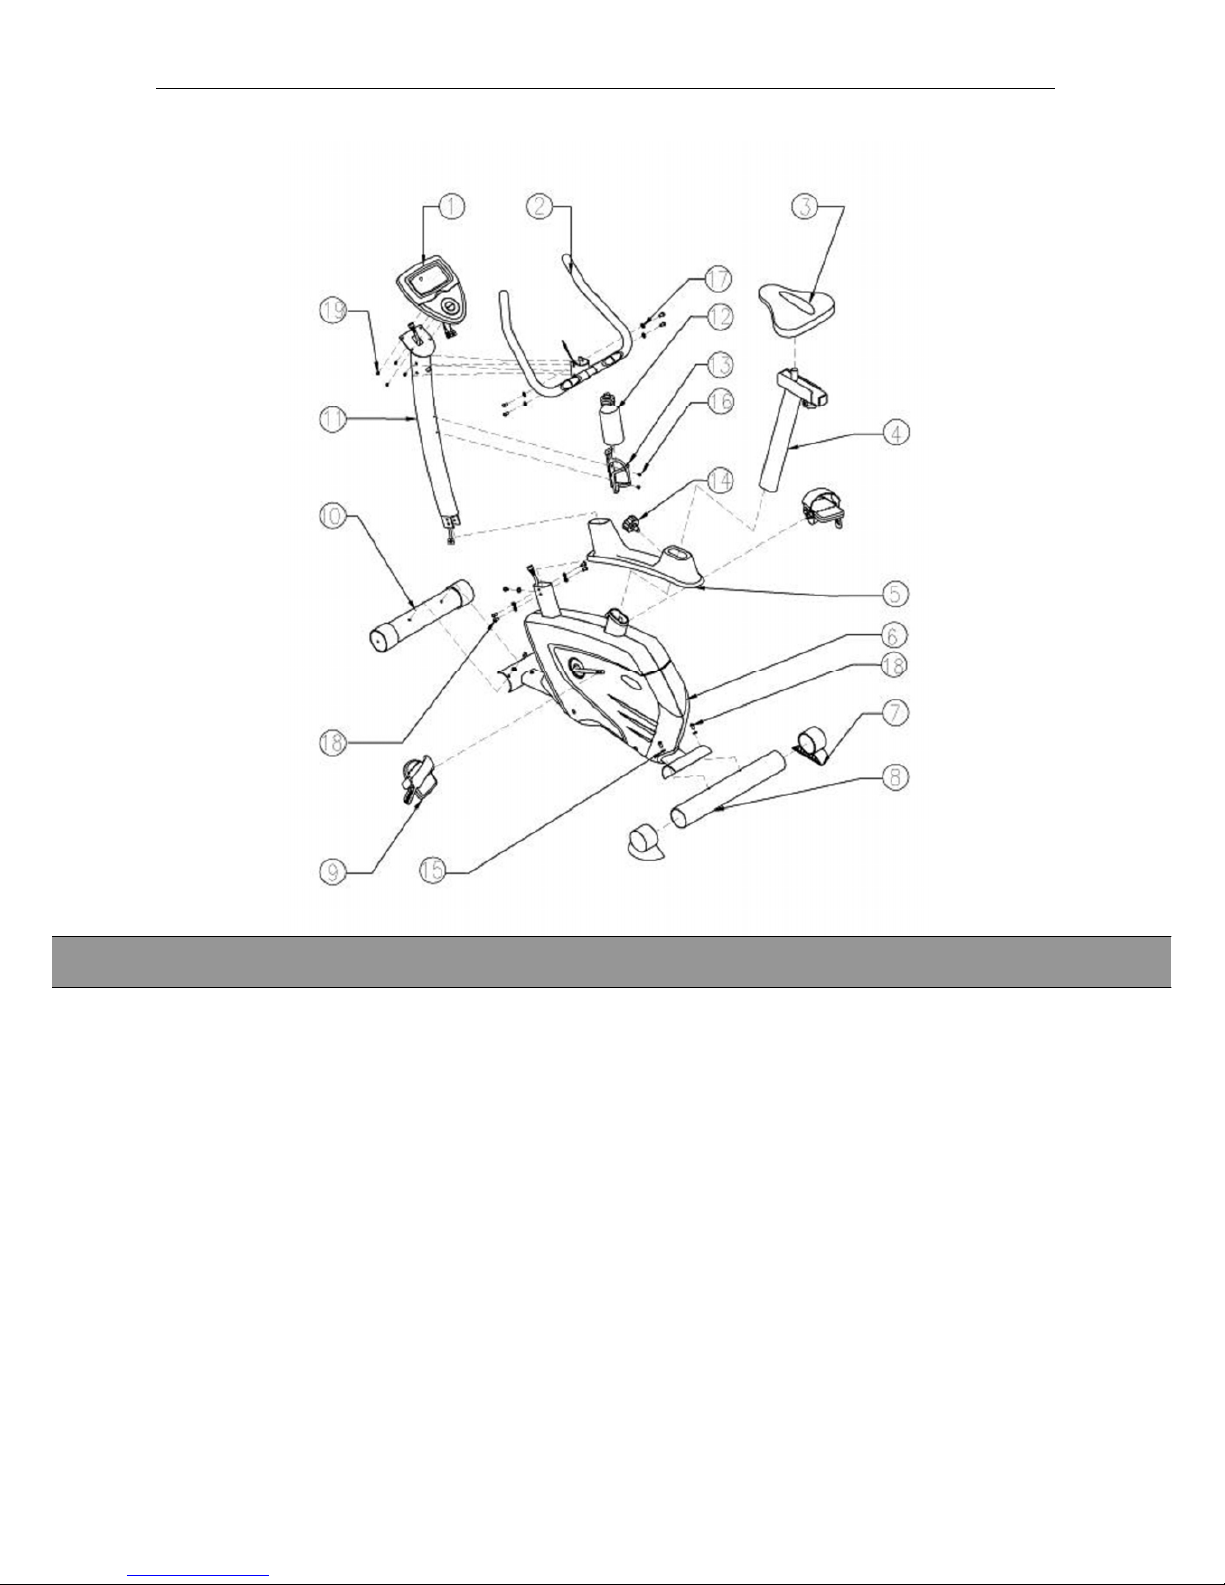
-Ensure that you have received all the parts (see check list) and that they are
undamaged. Should you have any cause for complaint, please contact your dealer.
-Unpack all individual parts and place them alongside each other on the floor. Be
sure to place them on carton or a pad to prevent scratches either on the parts or
on your floor.
-Make certain that you have adequate room for movement (at least 1 m) on all
sides during assembly.
-Place the equipment (for assembly and use later) on a solid and flat surface.

4
-Before assembling the equipment, study the drawings carefully and carry out the
operations in the order shown by the diagrams. The correct sequence is given in
capital letters if necessary.
-The equipment must be assembled with due care by an adult person. If in doubt
call upon help of a second person, if possible technically talented.
-Please note that there is always a danger of injury when working with tools or
doing manual work. Therefore please be careful when assembling this machine.
-Ensure that your working area is free of possible sources of danger, for example
don’t leave any tools lying around. Always dispose packing material in such a way
that it may not cause any danger. There is always a risk of suffocation if children
play with plastic bags!
-The fastening material required for each assembly step is shown on the diagram
inset. Use the fastening material exactly as instructed. The required tools are
supplied with the equipment.
-Bolt all the parts together loosely at first, and check that they have been
assembled correctly.
-Then use the Allen wrench to finally tighten the bolts completely. Then check
that all screw connections have been tightened firmly.
-For technical reasons, we reserve the right to carry out preliminary assembly work
(e.g. addition of tubing plugs)
-Please keep original packing of this article, so that it may be used for transport at
a later date, if necessary.
1.4 Order of spare parts se
-When ordering spare parts, always state the full article number, spare part number,
description and quantity required.
-Example order: Art. No. 7318 LB / spare part no. 12 / description / 2 pieces.
-Important: spare part prices do not include fastening material ; if fastening
material (bolts, nuts, washers etc.) is required, this should be clearly stated on the
order by adding the words “with fastening material”
1.5 Checklist hardware
No. Hardware Spec.
QT
Y
No
. Hardware Spec.
QT
Y
15
Φ10
(arc)6 18
M8X15 14
16
M5x10 2
19
M5X10
(supplied by
computer)
4
17
φ8 8 20
S5 wrench 1

5
1.6 Checklist parts
No. Parts QTY No. Parts QTY
1
1 8
1
2
1 9
1
pair
3
1 10
1
4
1 11
1
5
1 12
1
6
1 13
1
7
2 14
1
1

6
1.7 Assembly drawing
This training equipment is for use at home only. The equipment complies with the
requirements of
DIN EN 957 – 1/5 Class HB. The CE marking refers to the EU Directive 89/336/EEC and
73/23/EEC.
Damage to health cannot be ruled out if this equipment is not used as intended (for
example, excessive training, incorrect settings, etc.)
Before starting your training, you should have a complete physical examination by your
doctor, in order to rule out any existing health risks.
Make the training on your new exercise bike an essential part of a healthy lifestyle, which
also includes a healthy diet and motion training. Strictly adherence of this will have
following effects from your training:
-Muscle development and tightened thighs.
-Improvement of the mobility.
-Higher calorie consumption means reduced weight.
-Improvement of your body shape.
2. General

7
-Invigoration of heart and lungs.
-Reduced stress and ageing.
-Increased stamina
-Increased capability
-Fortification of body’s defenses
2.1 Packing
The packing consists out of environment – friendly and recyclable materials:
-External packing made of cardboard
-Protection layers inside made of cardboard
-Moulded parts made from CFS – free polystyrol (PS)
-Sheeting and bags made of polyethylene (PE)
-Wrapping straps made of polypropylene (PE)
2.2 Disposal
Please be sure to keep the packing for the event of repairs / warranty
matters.
At the end of the life cycle of the item it should not be disposed of in
the normal household rubbish, it must be delivered to a special place
for the recycling of electric and electronic items. All the parts are
recyclable according their markings. Please ask your municipal
administration where to deliver in such case.
2.3 Explanation of symbols
Contains important information for prevention of serious injuries or
damage to the equipment.
Before you start assembling, the exercise bike must have room
temperature.
For assembling please pay attention to the following steps.
3.1 Remove all parts from the carton except the exercise bike.
Unpack all individual parts and place them alongside each other on the floor. Be sure to
place them on carton or a pad to prevent scratches either on the parts or on your floor.
3.2 Take the mainframe out of the carton
The mainframe is very heavy, so don’t try it alone to take it out of the carton. Please ask
one person to help to move it out of the carton. Then place the mainframe on a pad to
protect the floor, as without assembled foot tubes it can damage/scratch your floor. The
pad should be flat and not very think, so the mainframe has a stable stand.
3. Assembly

8
3.3 Assembly steps.

9

10

11

12

13

14

15
3.4 Adjusting the saddle position
3.4.1 Height of the saddle:
Most important is the correct height of the saddle. Please fix the saddle in such a height,
that, during sitting on the bike and holding the handlebar, both toes can touch the floor.
The saddle tube may only be pulled out to the max. position as indicated! If
you pull it out higher, the saddle tube cannot be fixed safe and you risk
injuries when pedaling.
3.4.2 Horizontal saddle adjustment
Adjust the height of the saddle first as described in 3.4.1. Unfasten the adjusting knob
under the saddle and move the saddle slider forward or backward. Adjust it to a position,
that when the pedals are in the horizontal position, your knees should be at a 90 degree
angle.
3.4.3 Saddle incline adjustment
Open the 2 nuts at the saddle frame work until the saddle can be turned easily. Push or
pull the saddle on the tip until you reach a comfortable position. Tight both nuts again.
For a pleasant feeling during exercise we recommend to place the exercise bike on a
comfortable and attractive place.
-Never use the exercise bike outdoors
-Never place the exercise bike near open water or in rooms with high humidity.
-Ensure that the power cables don’t cross walkways. If there is some carpet in your
chosen room, please make sure that there is enough space between the carpet
and the exercise bike. In case not then please use some pad.
-Place the exercise bike with a distance of at least 1.5 m to each wall.
-After long time of use you will probably find some black abrasion under your
exercise bike. This is a normal wear out and doesn’t mean there is a defect. This
abrasion can be removed with every standard vacuum cleaner. To prevent dirt on
your carpet, please use a pad.
4.1 Aligning the exercise bike
-Please take care that the floor, on which you place the equipment, must be flat
and solid and should have no unevenness.
-If the exercise bike doesn’t stand safe try to adjust the bike with the rear height
adjustments. If the height adjustment cannot equal the floor unevenness, please
position it to a different place.
4.2 Power supply
-Please take care not to use a multiple power outlet in which already other
appliances are connected
4.3 Moving the exercise bike
To move the exercise bike to a different location please do as following
-Disconnect the power cord from the power outlet.
-Stand in front of the exercise bike and hold the handlebar.
-Tip over the exercise bike carefully in your direction and move it on the transport
rollers to your desired new location.
4. Placing the exercise bike

16
4.4 Store the exercise bike
As safety measures, especially when you have children, you should take care on the
following points.
-Disconnect the power cord from the power outlet.
-If the equipment will be long-term stored, please take off the batteries from the
batteries box.
5.1 Power supply
You can drive your system from 2 power sources: External power or batteries.
For external power:
-Connect the power cord with the proper power outlet.
oVoltage : 220V ±10% (50 Hz or 60 Hz)
The standard of voltage and the power supply are different in different
countries. For your safety, please use the appropriate power adapters
according standards in your country.
For batteries:
-Insert 4 batteries in the battery case on the back side of the computer.
oPlease use following type: R14C(B) Size C/1.5V
Please don’t use both power supplies at once. Use either the external power
supply or the batteries.
5.2 Enter and leave the exercise bike
-To prevent injuries due to unbalance, please always hold the fixed handlebar
when enter or leaving the exercise bike. Never step on the cover, please only use
the pedals.
6.1 Computer display and functions
The monitor is designed for programmable magnetic bikes and introduced with the
following categories:
-Key Functions
-About Displays
5. Preparing the start
6. Computer handling

17
-Operating Ranges
-Things You Should Know Before Exercising
-Operation Instructions
-
AUTO ON /OFF:
The monitor will wake up automatically if the exercise machine is in motion or you press
one of the button ENTER 、START/STOP and MODE ‧If stop exercising over 256
seconds, monitor will turn off ‧
zKey Functions
There are total 6 keys including START/STOP, ENTER, MODE, UP, DOWN, and
RECOVERY.
A. START/STOP: Starts or stops the program chosen. And, resets the monitor by
pressing and holding for 2 seconds.
B. ENTER: Chooses the functions from PROGRAMS, GENDER, TIME, HEIGHT,
WEIGHT, DISTANCE, TARGET HEART RATE, AGE, and 10 columns. The
chosen function shall flash. Please note that not all the functions can be selected
in every program according to the types of each program.
C. MODE: Changes the displays of the values between RPM or SPEED, and
KJOULE/CAL or WATT. The values of RPM show at the same time, or the values
of SPEED and KJOULE/CAL do by pressing it.
D. UP (▲): Selects or increases the values of PROGRAMS, GENDER, TIME,
HEIGHT, WEIGHT, DISTANCE, TARGET HEART RATE, AGE, and 10 columns.
E. DOWN (▼): Selects or decreases the values of PROGRAMS, GENDER, TIME,
HEIGHT, WEIGHT, DISTANCE, WATT, TARGET HEART RATE, AGE, and 10
columns.
F. RECOVERY: Starts the function of PULSE RECOVERY.
zAbout Display
A. START: Indicates the program selected has started.
B. STOP: Indicates the program selected has stopped. And, users are free to
change the programs and the value of functions applied.
C. PROGRAM n: Indicates the programs selected from PROGRAM 1 to PROGRAM
15 (or 17).
D. LEVELn: Indicates the level of loading selected from LEVEL 1 to LEVEL 16.
E. GENDER: Indicates the gender (Male or Female) selected.
F. TIME/HEIGHT/WEIGHT Display: Indicates only 1 value of TIME, HEIGHT, or
WEIGHT displayed depending on the programs.

18
G. RPM/SPEED/KMH (MPH) Display: Indicates only 1 value of RPM, SPEED, or
KMH (MPH) displayed depending on the programs.
H. DISTANCE/FAT% Display: Indicates only 1 value of DISTANCE or FAT%
displayed depending on the programs.
I. CAL/BMR Display: Indicates only one value of CAL, or BMR displayed depending
on the programs.
J. TARGET H.R./BMI/AGE Display: Indicates only one value of TARGET HEART
RATE, BMI, or AGE displayed depending on the programs.
K. HEART RATE/BODY TYPE Display: Indicates only one value of HEART RATE or
BODY TYPE displayed depending on the programs.
L. LOADING Profiles: There are 10 columns of loading bars, and 8 bars in each
column. Each column represents 3 minutes workout (without the change of TIME
value), and each bar represents 2 levels of loading.

19
zOperating Ranges
Values Range (Count
up)
Count down Preset Increment
(Decrement)
PROGRAM 1 ~ 17 17 ~ 1 1 1
LEVEL 1 ~ 16 16 ~ 1 N/A 1
GENDER Male, Female N/A Male N/A
TIME 0:00 ~ 99:59 99:00 ~ 5:00 0:00 1:00
HEIGHT (cm) 110.0 ~ 199.5 199.5 ~ 110.0 175.0 0.5
WEIGHT (kg) 10.0 ~ 199.8 199.8 ~ 10.0 70.0 0.2
DISTANCE 0.0 ~ 999.0 999.0 ~ 1.0 0.0 1.0
TARGET H.R. 60 ~ 220 220 ~ 60 90 1
AGE 10 ~ 99 99 ~ 10 30 1
zThings You Should Know Before Exercising
A. The values calculated or measured by the computer are for exercise purpose only,
not for medical purpose.
B. The Variables May Need To Change In The Programs:
Programs Variables
P1 ~ P7 TIME, DISTANCE, AGE
P8 GENDER, HEIGHT, WEIGHT, AGE
P9 TIME, DISTANCE, TARGET H.R.
P10 ~ P12 TIME, DISTANCE, AGE
P13 ~ P16 TIME, DISTANCE, AGE, 10 Intervals
Please note that only 1 value of TIME or DISTANCE can be adjusted. Both
adjustments do not exist at the same time. For example, the value of DISTANCE
is “0.0” while the value of TIME is adjusted to be any number except “00:00”.
C. Programs Selection:
There are 16 programs with 1 Recovery including 1 Manual Program, 6 Preset
Programs, 1 Body Fat Program, 4 Heart Rate Control Programs, 4 User Setting
Programs, 1 Speed Independent Program, and 1 Pulse Recovery Measuring.
D. Program Graph:
Each graph shown is the profile of the loading in each interval (column). With the
value of TIME counting up, each interval is 3 minutes that all the columns make up
30 minutes. With the value of TIME counting down, each interval is the value of
setup TIME divided by 10. For example, if the time value is setup to 40 minutes,
Table of contents
Other WNQ Exercise Bike manuals