Wolfgang Puck Bistro BECR0010 User manual

E
spresso/
Cappuccino
Maker
HOUSEHOLD USE ONLY Model BECR0010
BECR0010 - September 2001 Printed in China
W. P. APPLIANCES, INC.
Toll Free (800) 275-8273
Website: www.wolfgangpuck-kitchenware.com
All trademarks, service marks, and trade names (collectively the "Marks") are
proprietary to Wolfgang Puck Inc. or other respective owners that have granted
Wolfgang Puck Inc. the right and license to use such Marks.
IIMMPPOORRTTAANNTTNNOOTTIICCEE
PPLLEEAASSEEDDOONNOOTTRREETTUURRNNTTOOSSTTOORREE..
IIffyyoouuhhaavveeaannyypprroobblleemmsswwiitthhtthhiissuunniitt,,
ccoonnttaaccttCCoonnssuummeerrRReellaattiioonnssffoorrsseerrvviiccee
PPHHOONNEE::11--880000--227755--88227733..
PPlleeaasseerreeaaddooppeerraattiinnggiinnssttrruuccttiioonnss
bbeeffoorreeuussiinnggtthhiisspprroodduucctt..
PPlleeaasseekkeeeeppoorriiggiinnaallbbooxxaannddppaacckkiinngg
mmaatteerriiaallssiinntthheeeevveenntttthhaatt
sseerrvviicceeiissrreeqquuiirreedd..

3
This appliance is equipped with a polarized plug (one blade is wider
than the other). To reduce the risk of electric shock, this plug must fit
into a polarized outlet only one way. If plug does not fully fit into the
outlet, reverse the plug. If does not fit, contact a qualified electrician.
Do not attempt to defeat this safety feature.
Ashort cord is provided to reduce the hazard resulting from becoming
entangled in or tripping over a longer cord. An extension cord may
be used if you are careful in its use:
1. The electrical rating of the extension cord should be at least as
great as the electrical rating of the appliance.
2. An extension cord with the power cord must be arranged so that
it will not drape over the countertop or tabletop where they can
be pulled on by children or tripped over accidentally.
2
IMPORTANT SAFEGUARDS
When using electrical appliances, basic safety precautions should
always be followed, including the following:
1. Read all instructions.
2. Do not touch hot surfaces. Use handles or knobs.
3. To protect against electric shock, do not immerse this appliance,
the cord or plug in water or other liquid.
4. Close supervision is necessary when any appliance is used by or
near children.
5. Unplug from outlet when not in use and before cleaning. Allow
to cool before putting on or taking off parts, and before cleaning
the appliance.
6. Do not operate any appliance with a damaged cord or plug or
after the appliance malfunctions, or has been damaged in any
manner. Return appliance to the nearest authorized service facility
for examination, repair or adjustment.
7. The use of accessory attachments not recommended by the
appliance manufacturer may cause injuries.
8. Do not let cord hang over the edge of table or counter, or touch
hot surfaces.
9. Do not place on or near a hot gas or electric burner, or in a heated
oven.
10.Extreme caution must be used when moving an appliance
containing hot oil or other hot liquids.
11. To disconnect, turn switch to the OFF position, then remove plug
from wall outlet.
12. Do not use appliance for other than intended use.
13. Use extreme caution when dispensing hot steam.
14. This appliance is for HOUSEHOLD USE ONLY.
SAVE THESE INSTRUCTIONS

5
Before Your First Use
Read all instructions. Carefully unpack espresso maker and remove all packaging
materials. Place your espresso maker on a level surface such as a countertop or
table.
Wipe the exterior surfaces with a clean, damp cloth or sponge and dry with another
cloth. Wash all accessories in hot, sudsy water. Rinse and dry thoroughly. Caution:
Do not immerse the cord in water or any other liquid.
We recommend preparing several cups of water (without any coffee) to rinse the
system thoroughly and remove any dust or small particles. Follow the steps below
before initial use and after a long period of non-use.
1. Be sure that the selector knob is in the vertical, or stand-by, position. Plug the
cord into a 120 volt, AC outlet. Press the On/Off switch to turn on the machine.
Both lights will illuminate. Preheat 3 minutes before initial use.
2. Remove the water container and the filter holder. Fill the water container with
fresh, cold water and insert into the machine. When inserted correctly, push
the water container slightly down to open the valve. The water container lid
will close properly only if the container is properly inserted and the valve is
opened.
3. Insert one of the filters without coffee into the filter holder. When inserting the
filter holder, the handle points approximately 45 degrees to the left. When
properly aligned, pull the filter holder to the right. The filter holder is inserted
properly when the handle points to the front of the machine or slightly to the
right.
Caution: If you do not insert a filter into the filter holder, it is not possible to
tighten the filter holder. The filter holder could then come out of the machine
while hot water runs through it.
4. Place a large cup underneath the filter holder. When the thermostat light goes
out, turn the selector knob to the right and the steam/espresso button to the
espresso position. Hot water will run through the filter holder into the cup. The
pump will make noise. Stay with the machine as long as water runs through it.
When the cup is full, turn the selector knob to the vertical, or stand-by, position.
This will stop the pump. Empty and replace the cup and repeat process until
the water container is empty.
Caution: When the water container is empty and the pump is running, the noise
will increase considerably. Do not let the pump run with an empty water
container. This can damage the pump permanently.
Know Your Espresso Maker
Control Panel
4
On/Off Switch
Steam/Espresso
Selector
Thermostat Light
On/Off Indicator
Light
3-Way Selector
Knob
Removable
Cup Warmer
Removable
Water
Container
One- and
Two-Cup
Filters
Measuring
Spoon
and
Tamper
Filter
Holder
Overflow
Grid
Water Level
Window
Lid to Removable
Water Container
Steam
Nozzle
Removable
Drip Tray

7
Tips For Great Espresso
•Espresso coffee is stronger than normal coffee and is made in small espresso
cups. Very hot water passes under pressure through the ground coffee to obtain
strong, black coffee.
•Crema, the bittersweet golden foam that tops an espresso, is the sign of a
perfectly brewed cup of espresso.
•Espresso cups are also called demitasse cups and usually hold 2 to 2 1/2
ounces.
•Always warm your espresso cups before use by using the built-in cup warmer.
Place the cups on the warmer (located on top of the espresso maker) while the
unit is preheating.
•Great espresso is only achieved by using great espresso coffee, which has been
well roasted and correctly ground. If ground espresso coffee is not available to
you, use a coffee grinder to grind beans to the correct fineness.
•Espresso coffee should not be ground too fine but should contain small
granules. If the grounds feel like flour, it is too fine; it should feel more like salt.
Coffee ground too fine will block the filter and prevent water from passing
through. Conversely, water will flow too fast through coffee that is too coarse
and the full body of the coffee won’t be extracted
•If you are having your coffee ground at a retailer, specify that you would like it
ground slightly more coarse than normal fineness for espresso.
•Use filtered or bottled water, if desired.
Using the Steam Nozzle
As long as your espresso maker is turned on and the filled water container is
properly inserted, you can use the steam feature. There is no need to prepare
espresso before using the steam feature (for example, if you want to use steamed
milk in a hot cocoa drink). As soon as the temperature light goes out, first make
sure the Steam/Espresso button is in the steam position. Then, turn the selector knob
to the left steam position.
From now on, you will hear a knocking sound. The pump releases small drops of
water into the heating system very quickly. The droplets are them immediately trans-
formed into steam. As the knocking begins, a few drops of water might come out of
the nozzle (place a sponge or empty cup underneath the steam nozzle to catch
these water drops). After that, it will be all steam.
Making Espresso
1. Be sure that the selector knob is in the vertical, or stand-by, position. Plug the
cord into a 120 volt, AC outlet. Press the On/Off switch to turn on the machine.
Both lights will illuminate. Press the Steam/Espresso button to the Espresso
position. Preheat 3 minutes before use.
2. Remove the water container and the filter holder. Fill the water container with
fresh, cold water and insert into the machine. Push the water container slightly
down to open the valve. The water container lid will close properly only if the
container is properly inserted and the valve is opened.
3. Insert one of the filters into the filter holder. Use the measuring spoon to fill the
filter with ground coffee (one flat spoon per cup). Tamp the coffee down very
slightly with tamper and clear any excess coffee grounds from the rim of the
filter holder to assure proper fit of the filter holder into the machine. Level the
coffee; do not tightly pack it. When inserting the filter holder, the handle points
approximately 45 degrees to the left. When properly aligned, pull the filter
holder to the right. The filter holder is inserted properly when the handle points
to the front of the machine or slightly to the right.
Caution: If you do not insert a filter into the filter holder, it is not possible to
tighten the filter holder. The filter holder could then come out of the machine
while hot water runs through it.
4. Place one or two warm espresso cups underneath the two spouts of the filter
holder. When the temperature light goes out, first make sure the
Steam/Espresso button is in the espresso position. Then, turn the selector knob
to the right brew position. If the ground coffee has the right fineness and is
tamped correctly, it should take approximately 30 seconds to get dark espresso
with crema on it.
5. Turn the selector knob to the vertical, or stand-by, position and remove the
cup(s). Release the filter holder by turning it to the left.
Caution: When removing the filter holder there can still be hot water floating
on top of the filter. Therefore, hold the filter holder steady as the metal parts
are hot.
Push the thumbguard of the filter holder over the filter and knock out the coffee
grounds. Rinse filter holder and filter under cold water to cool off any hot parts.
6. Repeat process for additional cups of espresso.
6
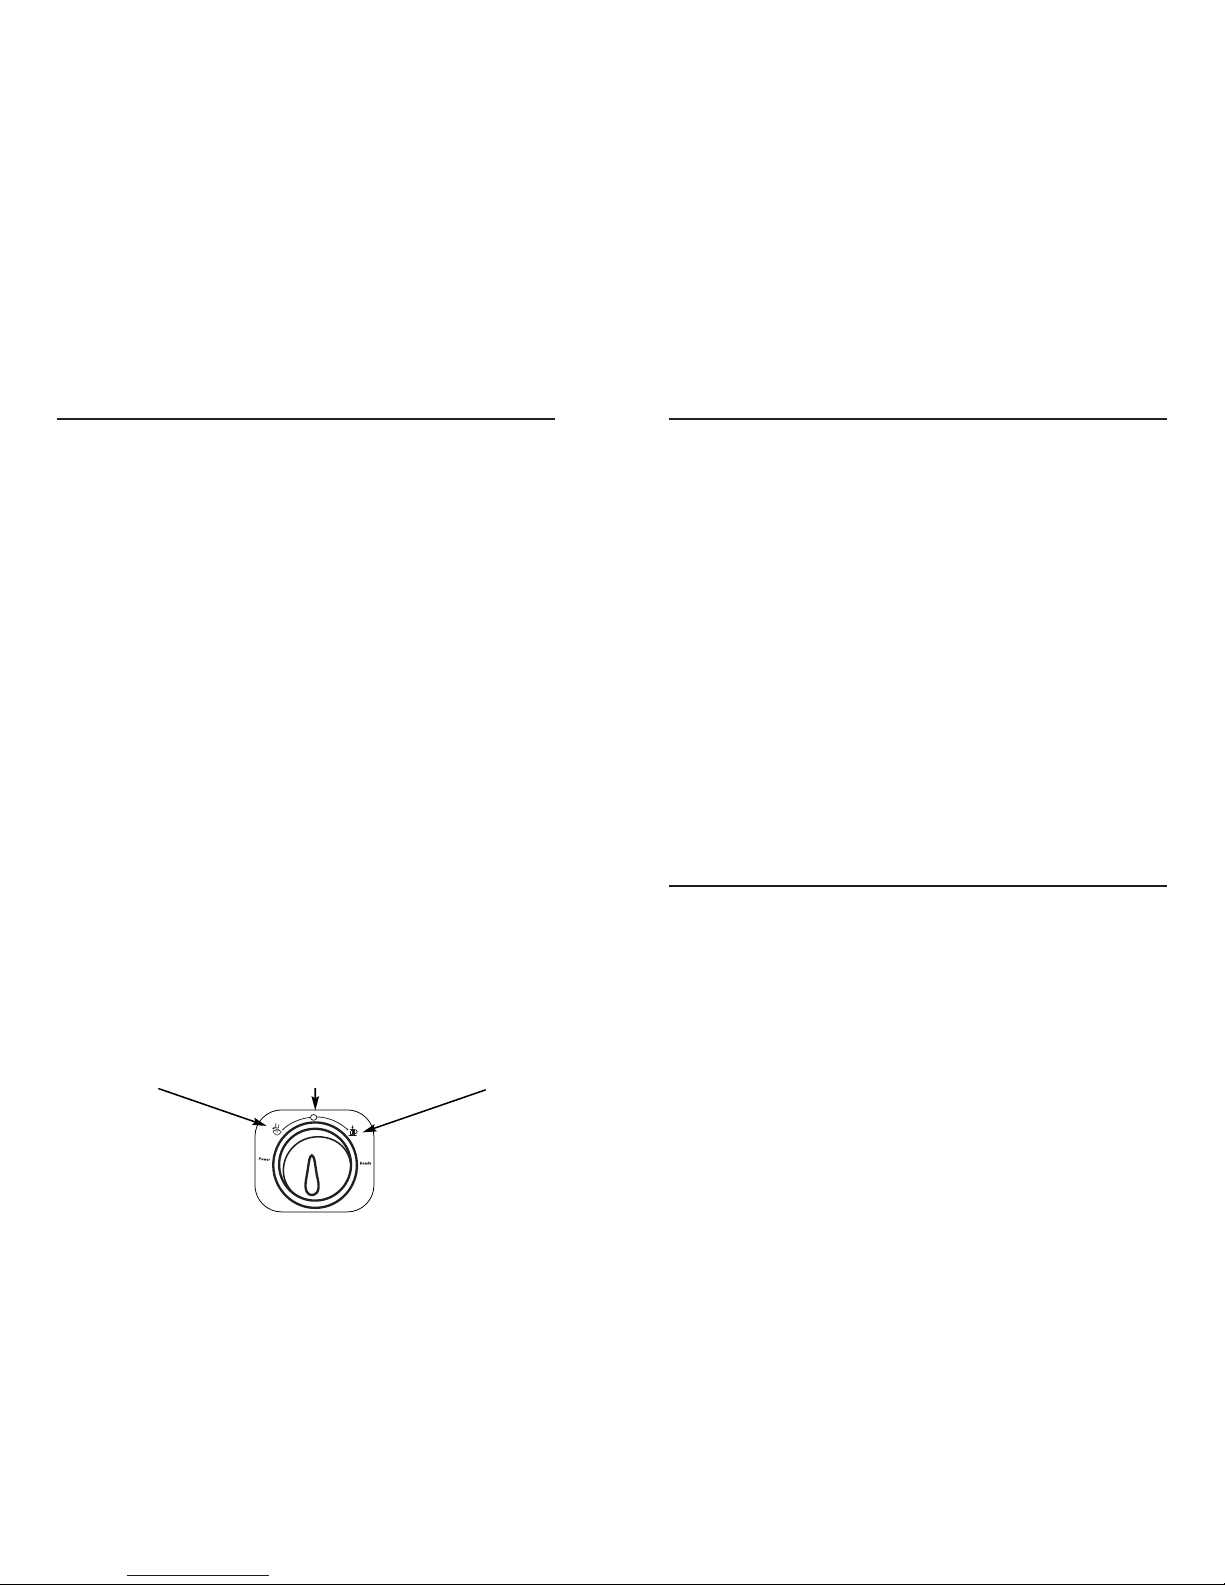
Steam Position Stand-by Position Brew Position
Detail of Selector Knob

Making Cappuccino
Cappuccino is made by using a large (5-ounce) preheated cup. Cappuccino is
espresso coffee topped with steamed milk and froth.
When preparing cappuccino we recommend having all the ingredients at hand.
For best results, use very cold low fat or nonfat milk in a chilled frothing pitcher.
Fill the pitcher only 1/3 to 1/2 full. Prepare espresso coffee first and let cups sit
underneath the filter holder. Then froth milk immediately, using a frothing pitcher.
Hold back the froth with a spoon and pour the steamed milk into the hot espresso.
Top with froth. (The amount of steamed milk and froth should be about equal.) If
desired, sprinkle with powdered cocoa or another flavoring.
Making Latté
Latté is made by using large, 9-ounce cups or glasses with handles. Prepare espresso
coffee first and pour one serving into each latté cup. Then froth milk immediately,
using a frothing pitcher. Hold back the froth with a spoon and pour the steamed
milk into the hot espresso. Fill the cup mostly with steamed milk. Top with a thin
layer of froth. If desired, sprinkle with powdered cocoa or another flavoring.
98
Frothing Milk
Frothing milk is a process that heats milk to create a head of froth, or foam. Frothed
milk is used with espresso to make cappuccino. Before frothing, make sure the
rubber steam nozzle cover is firmly snapped up into place.
Pour 3 or 4 ounces of cold milk or half and half into a small pitcher. The pitcher
should fit underneath the steam nozzle.
As soon as the temperature light goes out, make sure the Steam/Espresso button is
in the steam position. Turn the selector knob to the left, steam position. Hold the
pitcher under the steam nozzle. After the first ten to twelve knocks, the steam
nozzle will start to produce froth. Hold the pitcher steady and move the pitcher
down slightly when the froth begins to rise, keeping the black rubber piece just
below the surface. Once you have enough foam, turn the selector knob back into
the vertical, stand-by, position. Keep the nozzle immersed for one to two seconds,
then remove. The bottom of the pitcher will be very warm.
Important: Clean the steam nozzle each time you have immersed it in milk.
Otherwise, the inside of the nozzle will become clogged and milk deposits on the
outside will harden and become difficult to remove. Let the steam escape into a
wet cloth for one or two seconds. Any milk residues will then be cleaned out.
Attention: Immediately after using the steam nozzle, the heating system is at its
highest temperature since steaming or frothing requires a higher temperature than
making espresso. If you want to prepare more espresso after using the steam
nozzle, allow the heating system to cool down first or your espresso will have a
“burnt” taste. Insert an empty filter into the filter holder; insert and secure the filter
holder in the machine; place a cup underneath the machine; and turn the selector
knob to the right to release some hot water. When the temperature light turns on
again, turn the selector knob back to the vertical, stand-by position. The machine
is now at the perfect temperature to make espresso.
Frothing Tips
•For best results, use a chilled, 10- to 20-ounce metal pitcher and store it in
the refrigerator or freezer to keep it chilled.
•Very cold milk froths the best.
•Lowfat milk will froth more easily.
•Do not overheat the milk or this will destroy the froth. The bottom of the
pitcher will have steamed milk; not all of the milk will be froth.
Table of contents
Other Wolfgang Puck Coffee Maker manuals

Wolfgang Puck
Wolfgang Puck BDCM0010 Bistro collection User manual

Wolfgang Puck
Wolfgang Puck BCM00015 User manual

Wolfgang Puck
Wolfgang Puck BRCCM1000 Installation instructions

Wolfgang Puck
Wolfgang Puck CCDCM030 Installation instructions

Wolfgang Puck
Wolfgang Puck BIFCM010 User manual

Wolfgang Puck
Wolfgang Puck BCM00020 User manual
Popular Coffee Maker manuals by other brands

Bunn
Bunn LCA-1 Installation & operating guide

Chris Coffee Service
Chris Coffee Service Silvano owner's manual

Black & Decker
Black & Decker BLACK DECKER HOME DE790 Use and care book

Saeco
Saeco Vienna Plus Sup 018M operating instructions

INCAPTO
INCAPTO BXCO1470E Instructions for use

Bosch
Bosch TASSIMO finesse TAS16B Series user manual