WolfVision VZ-9 Manual

R
BEDIENUNGSANLEITUNG
VZ-9
Check out our Internet Homepage for additional information
English / Deutsch
www.wolfvision.com/support
INSTRUCTIONS

LASER RADIATION
DO NOT STARE INTO BEAM
CLASS 2 LASER PRODUCT
OUTPUT POWER <1mW
WAVELENGTH 650nm
EN 60825-1 March 1997
AVOID EXPOSURE -
Laser radiation is emitted
from this aperture. FDA accession
number:
9912688-00
This device
complies with
21 CFR 1040.10
and 1040.11
LASER RADIATION - DO NOT
STARE INTO BEAM
650nm, P<1mW
CLASS II LASER PRODUCT
Precautions for built-in laser pointer:
USE THIS MACHINE ONLY WITH THE CORRECT VOLTAGE AS SHOWN ON THE TYPE LABEL !
DO NOT EXPOSE THE UNIT TO EXTREME HEAT OR MOISTURE !
DURING TRANSPORTATION PROTECT THE UNIT FROM EXCESSIVE SHOCKS !
Make sure that sufficient air circulation for cooling the unit is possible (ventilation slots on the lighting
unit)!
If there is any abnormality (abnormal noise, smell, smoke etc.) disconnect the unit from mains immediately
and contact your Visualizer dealer!
Do not use a damaged power cord / power supply.
This may cause short circuits or electrical shocks!
Do not modify the Visualizer or operate it without the cover panel firmly in place, to prevent danger!
Do not expose the Visualizer to water, metallic objects or any flammable material.
Avoid installing the Visualizer in environments where there is radiation.
Avoid installing the Visualizer in locations exposed to strong magnetic fields or electrical currents. This
could cause monitor image distortion or damage to the CCD camera.
If the Visualizer is not used for a long time, disconnect it from mains!
The external Power Supply has to be approved by CSA or UL in accordance to CSA 22.2-60950 or UL 1950.
The outputs have to be LPS (limited power source) rated!
Please follow these precautions: Risk of electric shock
Dangerous voltage inside
WARNING!
Precautions
The WolfVision Visualizer VZ-9 was developed and designed by WolfVision Austria.
Patents:
The units are "MADE IN AUSTRIA”
DE 202 03 785.1, PCT/EP03/01654, PCT/EP03/01653
Printed in Austria, February 2006 Design and specifications subject to change!
1
This equipment has been tested and found to comply with the limits for a Class B digital device, pursuant to Part
15 of the FCC Rules. These limits are designed to provide reasonable protection against harmful interference when
the equipment is operated in a commercial environment. This equipment generates, uses, and can radiate radio
frequency energy and, if not installed and used in accordance with the instruction manual, may cause harmful
interference to radio communications. Operation of this equipment in a residential area is likely to cause harmful
interference in which case the user will be required to correct the interference at his own expense.
This product is built according to Directive EMC and to Directive electrical equipment.
Inspections, tests and evaluation according to UL 60950. CSA22.22-60950
US
C
L
I
S
T
E
D
Inspections, tests and evaluation according the CB-Scheme

Connectors (#8):
1 Camera head
2 Light
3 IR-receiver
4 Camera keys, zoom wheel (see page 3)
5
6
7
8
9 Light field for slides
10 Preview monitor
11
12 Pad to rotate the VZ-9 (see page 7)
13 IR-remote control
Close up lens for camera
Pull pad to lift the arm up/down
Power and light on/off key (see page 3)
Connectors
(on the back as shown below)
Working surface
Setting up
Power-on preset:
The power-on preset is automatically activated when switching on the unit.
The settings are: Zoom size approx. 20 x 15 cm (A5), Autofocus on, Autoiris on.
14 Serial control input RS232 (see page 12)
15 External input for computers (see page 8)
16 PAL/NTSC Y/C (S-Video) output (see page 6)
17 DVI output (see page 5 and 12)
18 RGB output (see page 5)
19
20
21
22
USB-port (see page 12)
LAN-port (see page 12)
Power connection 12V
DC-output for lightbox (see page 7)
1. Connect the power pack to the power-input (#21).
2. Connect your display device (projector, monitor, video
conferencing unit etc.) to the appropriate output of the
Visualizer (#16, #17, #18, #19 or #20).
IMPORTANT:
For choosing the right output please read the detailed
description on page 5!
3. Pull the arm upwards using the pull pad (#6).
Camera head and light automatically move into the
working position. The VZ-9 is switched on
automatically.
ENGLISH
114
22
89
10
12
6
5
7
11
13
3
3
12
2
7POWER LB
S-VIDEO
EXTERN IN USB
RS 232 DVI LAN
15 1816 19 21 22
17 20
14
RGB

Keys on the Visualizer
LIGHT POWER
#23 LIGHT key
Switches between top light, slide light field and light off. If
a separate light box is connected, the LIGHT switch (#23)
toggles between top light, external light box, slide light
field and light off. The LIGHT key also works as One Push
White Balance key if pressed for 2 seconds (see page 9).
#24 POWER key
Switches the unit on and off. When switching on the unit
the Visualizer runs the power-on preset.
#25 ZOOM WHEEL
The ZOOM WHEEL can be found on the camera head.
Turn the wheel down to zoom in (TELE), and up to zoom
out (WIDE). The more you turn the ZOOM WHEEL, the
faster the zooming works.
#26 Manual FOCUS
When the Manual FOCUS keys are pressed the
Visualizer switches off the autofocus function. Using the
AF-key switches the autofocus function on again.
#27 AUTO FOCUS (AF) key
Switches the auto focus on and off. The AF light indicates if theAF is switched on.
#29 EXT/INT key
Switches between Visualizer image and external input (for more details - see page 8).
The EXT IN light indicates that a signal from the external input is shown.
#28 FREEZE key
To freeze the current image. The FREEZE light indicates if the FREEZE-mode is activated.
The FREEZE key also works as image memory key if pressed for 2 seconds (see page10).
The behavior of the freeze function can be changed in the on-screen menu (see page 10).
Infrared remote control
Please note that an infrared remote control can only be
used up to a certain distance from the unit. Objects
situated between the Visualizer and the infrared remote
control, and weak batteries, interfere with the reception.
If the Visualizer can only be controlled from a close
distance, or if it cannot be controlled at all with the infrared
remote control, you may have to change the batteries.
Open the cover on the back of the remote control by hand
and replace the two 1.5 V AA batteries with new ones.
Check the polarity of the batteries!
23 24
One of the great features of WolfVision's Portable Visualizers is that only the most
necessary keys are on the unit itself. Therefore anyone can use it without instructions.
For more experienced users there are some additional functions on the remote control:
ZOOM
FOCUS
MAN
AUTO
FREEZE
EXT / INT
25
2626
2727
2828
2929
3
front back (open)
-
+
-
+
XX

31
30
32 33
34 35
36 38
37 39
41
40
42 43
To change the IR-code, enter the "Misc. Settings" and set the "IR
Code" to A, B, C or D (code A is default). To change the IR-code on the remote control,
simultaneously press PRESET 1, PRESET 2 and ZOOM TELE
ress PRESET 1, PRESET 2 and ZOOM WIDE
on-screen menu, go to
(#32) (#30) - each time this
key combination is used, the code switches from A to B, C, D ... A...etc. For resetting the
remote control to code A simultaneously p .
The LED shows the selected code (it flashes one-time for code A, two-times for code B, three-
times for code C and four-times for code D).
#30 ZOOM
The ZOOM keys work like the ZOOM WHEEL on the camera
head of the Visualizer. Using the ZOOM keys (wheel) also
switches auto iris on again.
#31 LASER POINTER key
Important: Do not stare directly into the beam.
This would be bad for your eyes!
#32 PRESETS (programmable settings)
For storing a preset, press one of the PRESET keys for more
Than 2 seconds. For recalling a preset, press the PRESET key
Quickly (see page 9).
#33 IMAGE TURN Mode
For picking up vertical (portrait) pages with higher resolution
(see page 10).
#34 Manual FOCUS
When the FOCUS keys are pressed the Visualizer switches off
the autofocus function. The next time theAF-key is pressed the
autofocus is switched on again.
#35 Manual IRIS (brightness adjustment)
When the IRIS keys are pressed, the Visualizer switches off the
Auto iris function. The next time the ZOOM keys/wheel are used
the auto iris is switched on again.
For specialists: The overall iris level can be changed in the on-screen menu (see page 10).
#36 AUTO FOCUS (AF) key
Switches the auto focus on and off.
#37 TEXT ENHANCEMENT
Improves the contrast for better readability (especially with text - see page 9).
#38 EXT/INT key
Switches between Visualizer image and external input (see page 8).
#39 ALL key
For displaying all 9 pictures of the memory as split image (see page 10).
#40 MEMORY keys 1 - 9
For saving and recalling pictures (see page 10).
#41 SELECT keys (Double function of MEMORY keys 2, 4, 6 and 8)
For navigating through the on-screen menu (see page 10).
#42 HELP/RESET key for on-screen menu (double function of MEMORY key 5)
While you are in the on-screen menu you can activate the on-screen help by pressing the
Number 5 key. Pressing this key for 2 seconds resets the selected menu item (see page 10).
#43 MENU
Pressing this key for 1 second activates the on-screen menu (see page 10).
If you want to work with more than one Visualizer in the same room, the units should be set to
different infrared codes, in order to control them all individually.
4

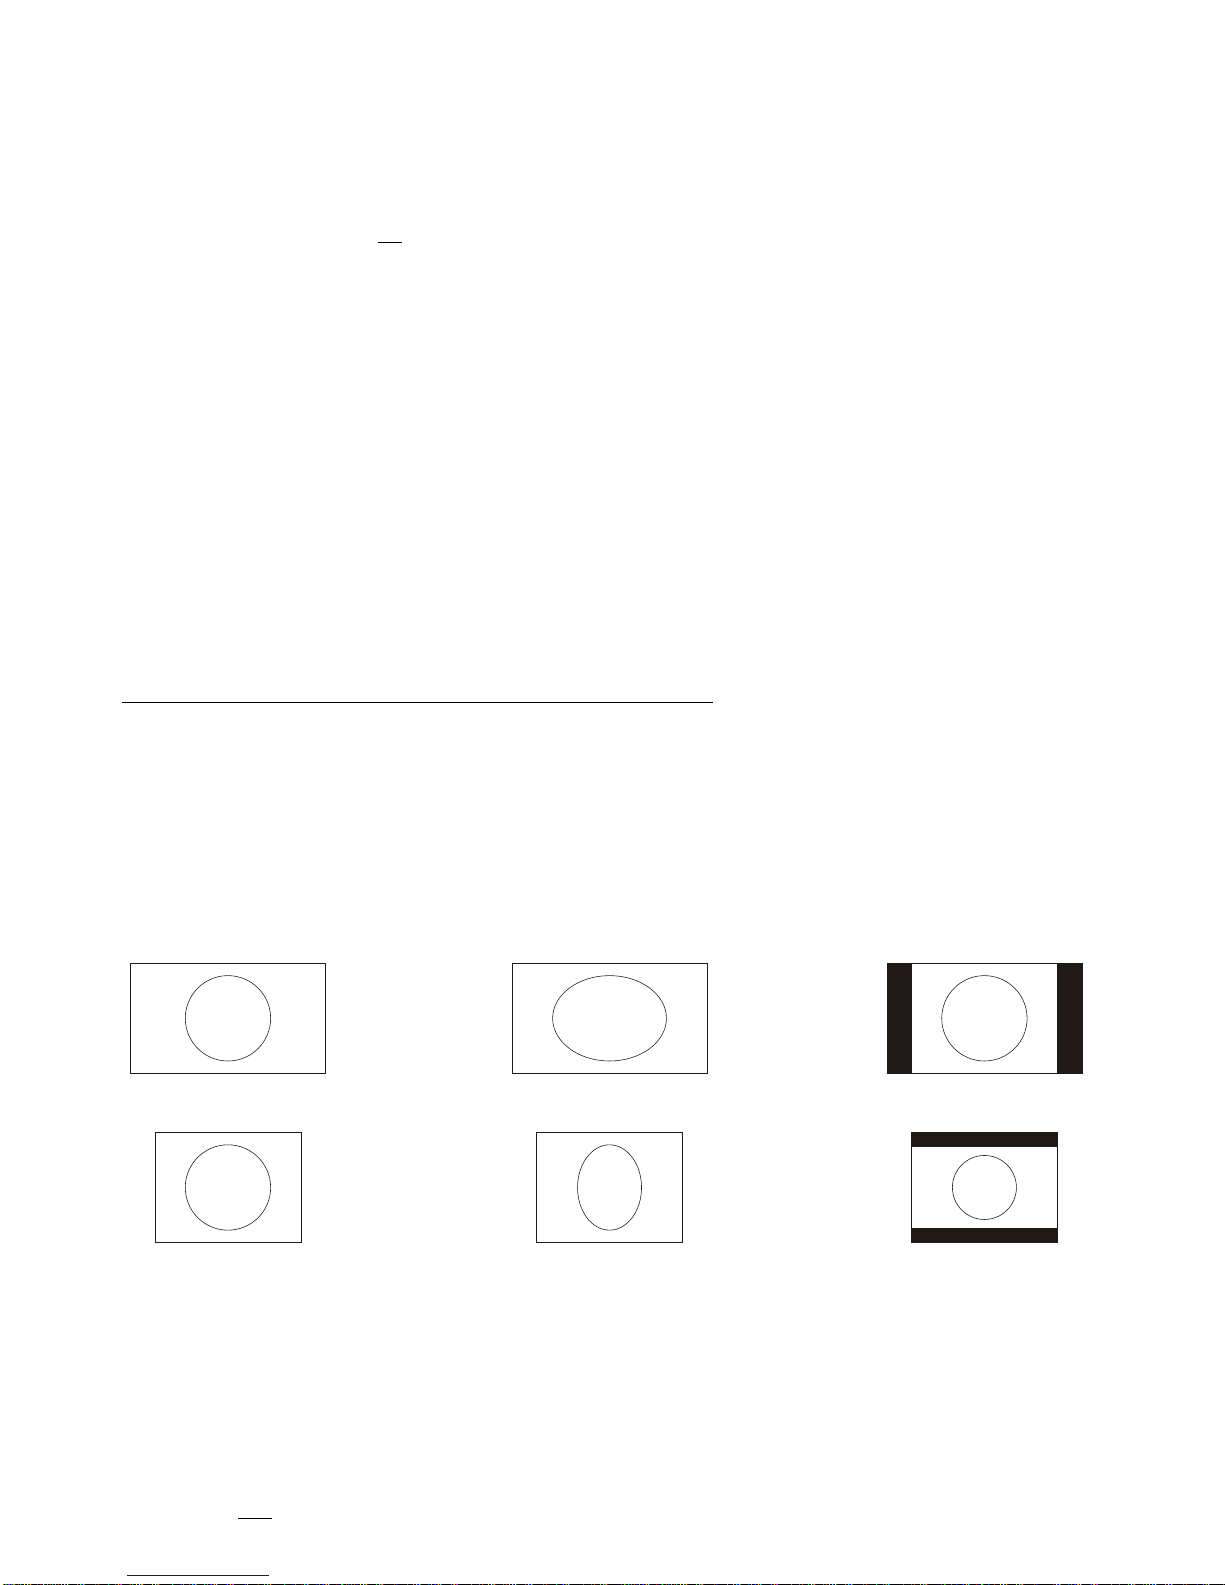
Choosing the right output mode
5
The RGB- and DVI-output (#18 and #17) can output signals in the following formats:
- VGA / 60 (4:3 - 640x480 Pixel) at 60Hz
- SVGA (4:3 - 800x600 Pixel) at 60Hz, 75Hz or 85Hz
- XGA (4:3 - 1024x768 Pixel) at 60Hz, 75Hz or 85Hz - native image
- SXGA- (4:3 - 1280x960) at 60Hz or 85Hz
- SXGA (4:3 - 1280x1024) at 60Hz, 75Hz or 85Hz
- SXGA+ (4:3 - 1360x1024) at 60Hz or 75Hz
- UXGA (4:3 - 1600x1200 Pixel) at 60Hz
- XGA 16:9 at 60Hz (special format for not HDTV-capable 16:9-Plasma displays)
- WXGA/60 (16:9 Widescreen - 1366x768 Pixel at 60Hz)
- WSXGA+/60 (16:10 Widescreen - 1680x1050 Pixel at 60Hz)
- 720p/50 (16:9 Widescreen HD/HDTV - 1280x720 Pixel at 50Hz)
- 720p/60 (16:9 Widescreen HD/HDTV - 1280x720 Pixel at 60Hz)
- 1080p/50 (16:9 Widescreen HD/HDTV - 1920x1080 Pixel at 50Hz)
- 1080p/60 (16:9 Widescreen HD/HDTV - 1920x1080 Pixel at 60Hz)
Please note that the Visualizer can not check the possible resolution, if the connected units
or the cables* are not "Plug and Play" compatible. If the Visualizer can not detect the
resolution of the connected device, the output is set to the default of XGA (1024x768)/60Hz.
(*Cables with plug and play compatibility must have a 15-pin plug on both ends with all pins connected, pin 9 is not used).
If you can not use the "Auto resolution" function, you can select the output mode manually
in the on-screen menu of the Visualizer. Resolution and refresh rate can be adjusted
separately for both outputs.
(the on-screen menu is visible on the built-in LCD monitor - see page 10).
In order to achieve the best picture quality you must set the outputs of the Visualizer to
match the native resolution of your display unit (e.g. LCD or DLP projector or monitor).
Important: What matters is the native resolution of the projector or monitor, not the
maximum resolution that it can display (in compressed mode). The native resolution is the
actual number of pixels of the built in LCD display or DLP chip of a projector or monitor.
Most LCD or DLP projectors can also display higher resolutions than their native resolution,
but only in compressed mode and with inferior picture quality. Do NOT set the output of
the Visualizer to a higher standard than the native resolution of your display unit!
If you output the Visualizer image on a CRT-monitor or CRT-projector, use an output mode
with 75 or 85Hz, because 60Hz may show a slight image flickering. For LCD/DLP projectors
or monitors and video conferencing units 60Hz is the best choice. If you are unsure what
the best mode is, read the user manual of the connected units.
Do not set a higher refresh rate than your monitor or projector can display, otherwise
the monitor or projector can be damaged!
Follow the instructions in the user manual of the connected units.
.
The "Auto resolution" function is activated by default. In this mode the Visualizer
constantly checks which devices are connected to the RGB- (#18) and DVI-output (#17)
and automatically sets the optimal output mode for each connected device separately.

Widescreen is supported since Firmware Version 1.20a (Older units may need a Firmware
update for Widescreen support).
Please note that WolfVision added widescreen support to the Visualizers in order to assure
100% compatibility with all display units on the market. However the native image ratio of
the Visualizer camera is 4:3. Therefore 25% of the picture (4:3) is cut off when the
Visualizer outputs in 16:9 or 16:10 widescreen format, while the resolution of the image
stays the same.
Upscaling to HD/HDTV does not bring any improvement in resolution. However if you are
using a display device with an aspect ratio of 16:9 or 16:10, the picture quality usually is
better, when the Visualizer scales the image to the widescreen format, and not the display
device. This is because the Visualizer scales the picture at the image source with high end
electronics.
HDTV is developed for digital television. For compatibility, the image can be also output on
the analogue RGB-output (#18) in HD/HDTV format. The DVI-output (#17) is HDMI-
compatible (A DVI-HDMI adapter or a DVI-HDMI cable can be used).
Please note, if a 4:3 and a 16:9 or 16:10 display is used simultaneously, the 4:3 display
shows black bars on top and bottom (the black bars are also visible on the built-in preview
display). This is necessary to ensure that all displays show the same image content.
Display modes of monitors or projectors (Overview)
(for details please read the user manual of your display unit)
- "Aspect" keeps the original aspect ratio of the picture and will display black bars when
the not-native ratio of the display device is used.
- "Fill" always fills the screen of the display unit and will show a horizontally or vertically
stretched image on display units of the "wrong" format.
- "1:1" the display unit shows the image in the original number of pixels.
Parts which can not be displayed are cut off.
Special information for Widescreen Support
6
You can switch the Y/C (S-video) (#16) video output between the video standards PAL and
NTSC in the units on-screen menu (see page 10). Switching can also be done by pressing
both FOCUS keys on the camera head (#26) together with the Preset 1 (for PAL) or Preset
2 (for NTSC) (#32) key on the remote control.
Please note that the picture quality of the video output is NOTAS GOOD as the picture
quality of the data outputs (#17 and #18). This is because of the limitations of the PAL/
NTSC video system and because of the fact that this is just a converted Progressive Scan
signal and not an original video signal.
PAL/NTSC video output
16:9 image on 16:9 display 4:3 image on 16:9 display
with "Fill"display setting 4:3 image on 16:9 display
with display setting "Aspect"
4:3 image on 4:3 display 16:9 image on 4:3 display
with "Fill"display setting 16:9 4:3
isplay setting "Aspect"
image on display
with d

Autofocus
External Wolfvision lightboxes (optional)
Other external lightboxes (optional)
Please note that objects with a very low contrast (like a blank sheet of paper) are difficult to
focus. If the autofocus does not work just move the object slightly.
For special applications the autofocus can also be switched off using the on/off switch
.The autofocus is also switched off when the manual FOCUS keys are
used.
.(#27
or #36) (#26 or #34)
Digital Zoom
Please note that the VZ-9 has an optical 12x zoom. The digital 4x zoom increases the
overall zoom range to a 48x zoom. The smallest pickup size on the working surface without
(!) digital zoom is 23 x 31mm (0.91" x 1.22"). When you zoom in further the digital zoom is
automatically activated and the smallest pickup size is ver
please be aware that when the digital zoom is used the resolution of the picture is not as
good as before. The default setting is that a message appears on-screen when you are in
the digital zoom mode.
Still pictures in the memory can also be digitally zoomed
You can change the behavior of the Visualizer in the digital zoom mode in the on-screen menu (see page 10).
6 x 8mm (0.24" x 0.31"). Howe
.
.
Turntable
Turntable lock
The turntable is unlocked
when the unit is delivered.
To lock the turntable, remove
the screw from position 2,
turn the plate until the thread
(position 1) is visible and set
the screw into this hole.
(See page 14 for more details
about the turntable)
The turntable of the VZ-9
alternately
work with the unit.
allows for horizontal pan
shots when using the
Visualizer as a camera to
record outside of the working
surface. It is also very useful
when two people, sitting on
the same table,
Connect the power cord of the light box to the light box connector (#22) on the back of the
Visualizer. The LIGHT key (#23) of the Visualizer can now be used to switch between the
light of the Visualizer and the light of the lightbox.
In order to prevent reflections the light of the Visualizer always has to be switched
off when working with lightboxes.
Shooting area on
the working surface
Eliminating reflections
In order to eliminate reflections
(on high gloss photographs etc.)
just turn the light up-/down wards
slightly.
Please note that reflections can
also be caused by general room
lighting conditions.
21
7

Close-up adaptor lens
For shooting an object outside of the working surface, the close up lens (#5) has to be
removed. In this case just hinge the lens away from the camera head. It is impossible to
remove the lens completely from the unit, therefore it can not get lost. When using the
Visualizer again to record on the working surface, put the close up lens back to its original
position.
to infinity
Shooting area outside of the working surface
Turning the light upwards
In order to enable recordings with
illumination outside of the working
surface, the light of the Visualizer
can be turned vertically.
Flexible Viewing Angle
In order to record at a lower viewing angle
than the normal working position, just fold the
arm of the VZ-9 as much as required.
Built-in LCD Monitor
The built-in LCD monitor makes positioning of
objects very easy and it eliminates the need
for an additional control monitor. This monitor
can show different signals, like “external in”-
image, stored-image or life-image (selectable
in the on-screen menu see page 10). The on-
screen menu is also visible on this LCD
monitor. The brightness of the LCD-monitor is
adjustable in the on-screen menu.
Image Flip
By turning the camera head to record
in front of the Visualizer, the image is
automatically turned around 180
degrees (”image flip”). This feature is
very useful for recording the face of
the presenter or objects hanging on
the wall behind the unit.
EXTERNAL INPUT
A computer can be connected to the External RGB input (#15) of the Visualizer.
By pressing the Ext/Int switch (#29 or #37) you can switch between the Visualizer image
and the image of the external input to be displayed to the audience. The extern mode can
also be used for only one output. The behavior can be changed in the on-screen menu
(see page 10). The VZ-9 has a built-inA/D-converter in order to digitize the analog RGB
signal from the computer and output it on all outputs in the selected signal format (allowed
input signals: from VGA to SXGA/75Hz).
8

Light field for Slides
Preset Function
Text Enhancement
The VZ-9 offers the possibility to store the current settings as a Preset and recall them by
just pressing one of the three PRESET keys (#32) on the remote control. For storing a
Preset just adjust every function as required and then keep one of the PRESET keys
pressed for more than 2 seconds. An on-screen message informs you, when the Preset is
stored.
When Presets are stored as mentioned above, all current settings like zoom, focus, iris etc.
are stored. Contrary to this, a user also has the opportunity to assign only specific functions
such as "Negative", "Negative/Blue", "Black/White" etc. to a PRESET key. This can be done
in the on-screen menu of the Visualizer (see page 10).
For improving the readability of text, sketches or x-rays press the TEXT-key (#37). This
mode enhances the contrast of the picture. Please note that the colors are now darker than
usual. To switch off the Text Enhancement mode, press the TEXT-key again. While the Text
Enhancement mode is on, the message "TEXT MODE" is permanently displayed on the
built-in LCD monitor.
This should remind the user to switch off the text mode when it is not needed anymore. It
should also prevent that users try to correct dark colors by opening the iris. This would
produce a misadjusted picture.
White balance
Correct white balance adjustment is important for a exact color reproduction! This means
that the white balance is continuously adjusted automatically.
For an exact white balance, 10% of the recorded image should be white (measurement
area is in the center of the image).
For a precise fixed white balance adjustment use the "One Push" white balance. This can
be done by completely zooming in on a white sheet of paper on the working surface and
pressing the LIGHT-key (#23) for 2 seconds. When the white balance is stored an on-
screen message appears. Setting a "One Push" white balance switches off the "Auto
Tracking" mode (When the unit is switched off and on again the
When the lighting conditions change (e.g. light box, sunlight or different
room light) the white balance should be readjusted!
For specialists: If you work with negative transparencies and a light box, use a blank (black in
the image) piece of the negative film for white balance adjustment!
The “One Push” white balance will be separately adjusted and stored for top light, slide light field and external light
box.
"Auto Tracking" is the default white balance setting when the VZ-9 is shipped.
"Auto Tracking" mode will
be reactivated).
The VZ-9 can be switched between "Auto Tracking", "One Push" and "Manual" white balance mode
in the on-screen menu (see page 10)
Place the slide onto the built-in light field, turn the camera
head until the slide is in the middle of the recorded image
and switch it on using the LIGHT key (#23). The camera
zooms the slide automatically in. The camera automatically
focuses on the slide.
Slide
9

9-IMAGE MEMORY
Split image of 9 picture memory
When pressing the ALL key (#39) for 4 seconds, a menu appears on the screen asking if
you would like to erase all stored pictures (black picture) or if you would like to fill the
memory with “snapshots”. When choosing “snapshot” the Visualizer stores a new image
every second until the 9 memory locations are full. The VZ-9 is equipped with a memory
backup battery. It stores the pictures in the memory when the power supply is disconnected
for 1-4 weeks. Images can also be stored by pressing the FREEZE-key (#28) for 2 seconds.
The image will be stored in the next available memory (1-9). If the memory is full, an on-
screen message will appear.
The functional settings of the memory feature can be changed in the on-screen menu.
IMAGE TURN MODE (for higher resolution)
For standard use of the WolfVision Visualizer it is not necessary to go into the Visualizer's
menu and change settings. Inexperienced users should not make any adjustments here.
To enter the on-screen menu press the MENU-key (#43) for one second. Settings of the
Visualizer's basic functions and the built-in camera can be made here using the 4 select
keys (=the numerical keys with red arrows - #41). Please note that some basic settings in
the menu can only be changed if you set the menu item "Format protect" to "OFF" first.
If more information on a function in the on-screen menu is required just set the cursor in the
respective line and press the HELP key (#42, This is a double function of the Number 5
key). A detailed description of this function appears on the screen. If you want to reset the
selected item to the default setting, just press the Number 5 key (#42) for 2 seconds!
The functions of the on-screen menu are not described in detail in this user manual as the
help menu is an integrated part of the Visualizer's software (firmware). The information you
see on your screen always belongs to the current Visualizer firmware.
ON-SCREEN MENU / ON-SCREEN HELP
The following chapters are for experienced users only:
Picking up a complete vertical (portrait)
document or A4 page has always been a
critical issue for a Visualizer, because the
image is always picked up in a horizontal
(landscape) format.
The camera could only use 50% of its pixels to
pick up a vertical (portrait) page. WolfVision's
new "Image turn" mode solves this problem.
Just place your document (or other vertical object)
º
on the working surface horizontally and
zoom in on it completely, so that about 90% of the pixels of the built-in camera are used to
pick up the document. Then press the IMAGE TURN key (#33). The Visualizer turns the
picture electronically 90 and outputs it the right way up with a much higher resolution
than in normal mode. The left and right margins are black.
A
A
AA
Working surface: Output picture:
Normal mode:
Image turn mode:
Only 50% of the
pixels are used to
pick up the document
90% of the pixels
are used to pick
up the document
You can store 9 images and recall them by just pressing
one of the numerical keys (#40) on the infrared remote control:
Storing an image: Press one of the MEMORY keys (#40)
for more than 2 seconds
Recalling an image: Press one of the MEMORY keys (#40)
quickly
By pressing the "All" key (#39) a split image with all 9 pictures
of the memory can be displayed.
10

Built-in LCD Monitor
The built-in LCD monitor can show different images like live image, external image,
frozen/stored image and the on-screen menu. The displayed image can be selected in the
on-screen menu.
The brightness of the LCD monitor is also adjustable in the on-screen menu.
SWITCHING TO NEGATIVE, NEGATIVE/BLUE and
BLACK/WHITE
The output image of the Visualizers can be switched from positive to negative in the
on-screen menu. In addition, the background of a negative image can be switched to
blue for better readability of text. You can also switch between color and black and white
in the on-screen menu.
TIP: If you often switch to negative, negative/blue or black/white images you can
assign this function to one of the Preset keys (see page 9) in the on-screen menu.
Auto Power off
In the "Power control" settings of the on-screen menu you can select that the Visualizer will
be automatically switched off, if it is not to be used for a certain amount time.
Changing the standard contrast (color) settings
If the picture or the colors on your screen appear to be too dark, you can lower the overall
contrast of the picture in the "Color settings" menu of the on-screen menu. The settings can
be made separately for the normal mode and the text-mode.
Firmware Upgrades
The software (firmware) of your Visualizer (including the o ) can easily be
upgraded to the latest version.
Firmware update files can be downloaded for free at .
Updates via USB can be made with the WolfVision USB Software, updates via
Ethernet/LAN require the WolfVision Ethernet Software and updates via RS232 can be
made with WolfVision's Firmware Update Utility. All 3 programs can also be found on our
homepage.
n-screen HELP
The firmware update can be done via USB, Ethernet (LAN)
or RS232.
www.wolfvision.com/support
For RS232 connection, use a crossed serial RS232 cable (Nullmodem-cable).
RESET OF ON-SCREEN MENU SETTINGS
All settings in the on-screen menu can be set back to the factory defaults. "Reset" is one
item in the on-screen menu. In case you can not read the menu on a screen you can also
set the unit back to the factory defaults by simultaneously pressing both FOCUS-keys on
the camera head (#26) and the Number 4 (back-arrow) key (#41) on the remote control.
If you only want to reset the item that is currently selected to the default setting, press the
Number 5 (#42) key for 2 seconds!
11

DVI PORT
Serial control input, RS 232
9-pin D-Sub connector
on unit; male
(front side)
5
9
2
7
34
8
1
6
USB-PORT The USB 2.0 output of the VZ-9 can be used to capture and
transfer Visualizer images onto a computer in a fraction of a
second. No additional computer hardware (like a grabber card)
is required. In this way the Visualizer can be used as a 3-D
scanner for your computer. Just connect the USB port (#19) of
the Visualizer and the USB port of your computer, using the
supplied USB cable. The software is fully twain compatible. The
USB 2.0 output is fully USB 1.1 compatible (less speed).
The WolfVision USB-software can be found on the supplied CD-ROM. Please check our
Internet homepage at: www.wolfvision.com/support if an update of this software is available
as a free-download. The software works under Windows 98/ME/2000/XP. Windows 95 and NT
will not work, because they do not support USB.
Ethernet / LAN
The LAN connection (10BASE-T/100BASE-TX) can be used for controlling the VZ-9 over a
computer network. Image transfers, firmware updates and displaying status information is
possible. In addition units with serial numbers largen then 095501 can send out e-mail
notifications.
The following protocols are supported: TCP/IP, ICMP and ARP.
:Supportet Browsers are Internet Internet Explorer, Netscape Navigator and Mozilla.
By default, DHCP is activated to receive all settings automatically.
Image Transfer Resolution: Still Image: 1024x768 (or 512x384), Live Image: 160x120
Please check the separate ETHERNET / LAN description on our internet homepage at:
www.wolfvision.com/support (or on the supplied CD-Rom).
The complete serial protocol can be found on our internet homepage: www.wolfvision.com/support
The serial port can be used to control the Visualizer through an external device, like a remote
control system for a complete conference room.
Pins: 2: RX, 3: TX, 5: GND, 7: RTS, 8: CTS
Baud rate: 9200, 19200, 38400, 57600 or 115200 (selectable)
databits: 8, stopbit: 1, parity: no
Please note that DecimaI-Codes (=ASCII-Codes or Hex-Codes)
must be sent as one single byte (e.g. 199 and not: 1 + 1 + 9) !
1. Remove the power cord of the Visualizer.
2. Remove the safety screw by using the supplied Allen key. (if available)
3. Remove the lamp cover itself by turning the case.
4. Change the lamp (lift the safety ring before). Place the new lamp very carefully into the socket.
CAUTION: LAMP CAN BE HOT!
5. Mount the lamp cover in reverse order (3. to 1.) and set the safety screw.
Lamp type: 4642 halogen lamp 12V/35W incl. heat shield and mounting ring.
4000 h average burning life
Changing the lamp of the Visualizer
12
Pin 24
Pin 8
Pin 1
Pin 9
Pin 17 C4
C1 C2
C3 C5
1- T.M.D.S. Data2- 9 -T.M.D.S. Data1- 17 - T.M.D.S. Data0-
2- T.M.D.S. Data2+ 10 -T.M.D.S. Data1+ 18 - T.M.D.S. Data0+
3- T.M.D.S. Data2/4 Shield 11 -T.M.D.S. Data1/3 Shield 18 - T.M.D.S. Data0+
4- T.M.D.S. Data4- (*) 12 - T.M.D.S. Data3- (*) 19 - T.M.D.S. Data0/5 Shield
5- T.M.D.S. Data4+(*) 13 - T.M.D.S. Data3+ (*) 20 - T.M.D.S. Data5- (*)
6- DDC Clock 14 - +5V Power 21 - T.M.D.S. Data5+ (*)
7- DDC Data 15 - Ground (return for +5V, 22 - T.M.D.S. Clock+
8- Analog Vertical Sync (**) HSync and Vsync) 23 - T.M.D.S. Clock-
C1 - Analog Red (**) 16 - Hot Plug Detect 24 - Analog Vertical Sync (**)
C4 - Analog Horizontal Sync (**) C2 - Analog Green (**) C3 - Analog Blue (**)
C5 - Analog Ground (**) *...not used
(analog R, G & B return) **...not available on units with serial number lower than 095500

Technical data
Specifications and availability subject to change!
Technology / Camera 1-CCD 1/3" Progressive Scan camera
Output signals
Pictures per second (as picked up by the camera) 30 frames (=full pictures)
Horizontal resolution 640 lines
Vertical resolution (as measured with a testcard somewhere in the
picture) 640 lines (820 lines in Image Turn mode)
Image Turn mode (for increased resolution when picking up complete
portrait pages) plus image rotation 90, 180 and 270 degrees yes (for large pages up to US-legal size)
Effective Pixel (=pixels actually used for image information) 1024 x 768
Total pixels of CCD: 850,000
Vertical image-frequency Progressive Scan: 85Hz, 75 Hz, 60Hz or 50 Hz (switchable)
PAL: 50 Hz / NTSC: 60 Hz
Horizontal image-frequency Progressive Scan: 29.820 – 91.375 kHz, PAL/NTSC: 15.7 kHz
Signal format non-interlaced and interlaced
Iris automatic and manual
White balance adjustment automatic and manual
Autofocus yes (continuously working or one-push)
Manual focus yes
Built-in LCD preview monitor 70 x 45mm (2.7" x 1.8")
Text enhancement function (in color) yes
On screen menu and on-screen help yes
Upgradeable firmware (through software downloads from internet) through serial (RS232), USB or Ethernet (LAN) port
Lens / Zoom 48 x zoom (12 x optical + 4 x digital), individual speed zoom wheel
Max object height on working surface 230mm (9.6") in tele position, 370mm (15") in wide position
Max. pick-up area on working surface 384mm x 283mm (15.1" x 11.1")
Max. pick-up area on working surface in Image Turn mode 283mm x 384mm (11.1" x 15.1")
Min. pick-up area on working surface (in full resolution, with
optical zoom) 31mm x 23mm (1.22" x 0.91")
Min. pick-up area on working surface (with digital zoom) 8mm x 6mm (0.31" x 0.24")
Max. pick-up area outside of working surface unlimited
Depth of focus on small object (42 x 33 mm) 10mm (0.4")
Depth of focus on large object (360 x 270 mm) 260mm (10.2")
Disturbing stray light or blinding of audience or speaker none
Light source halogen spot light with diffuser lens, 270 degrees- vertical rotation, lamp
lifetime 4000 hours 35W, 12V
USB software for image capture and controlling included, for Windows 98/2000/ME/XP, Twain compatible, allows for
scanning images in a fraction of a second
Reflection free area on working surface whole working surface, 320mm x 300mm (12.6" x 11.8")
Recordings outside of the working surface yes (behind and in front of the unit)
Image flip yes (for recordings in front of the unit)
Turntable mounted (with table lock bolt, to attach the unit to a table) yes (for horizontal pan shots outside of the working surface)
Intelligent folding system articulated arm, 1-step set up
User programmable presets 3 (plus 8 fixed presets trough RS232)
Special working surface for transparencies yes, 320mm x 300mm (2.6" x 11.8")
Slide pick-up through integrated slide lightfield
Computer input / Input switch yes (15-pin D-Sub plug), can also be outputthrough DVI
Image memory 9 pictures (with battery backup, for loss of power)
"Show all" function yes (displays all 9 pictures of current memory as one split image)
Alternative Image display: negative image / negative-blue image / black and white image
PAL / NTSC video output S-video (Y/C) converted Progressive Scan, 4-pin plug
RGB (=data RGB) output 15-pin D-Sub-plug
DVI output (for SXGA, XGA and SVGA signals) DVI-I (digital and analogue), with integrated A/D converter to output
images from external input on DVI output
USB port / standard USB 2.0 (also compatible with USB 1.1)
Ethernet (LAN) port yes, IP-addressable, 10/100 Mbps
RS232 port and serial protocol with absolute positioning and
status report 9-pin Sub-D plug
12V output for external lightbox
Dimensions in operation (L x W x H) 395mm x 320mm x 631mm (15.6" x 12.6" x 24.9")
Dimensions folded (L x W x H) 395mm x 320mm x 145mm (15.6" x 12.6" x 5.7")
Weight / Portability 5.8kg (12.8lb) / portable
Infrared remote control yes (with laserpointer)
Power (external power pack on portable units) LPS (limited power source)-multi range 100-240 V, weight: 0.3kg (0.6lbs)-
Carrying case included (soft case)
Patent numbers / patent pending DE 202 03 785.1, PCT/EP03/01654, PCT/EPEP03/01653
Made in Austria (European Union)
13
PAL / NTSC (switchable), USB 2.0, DVI
HD/HDTV 1080p / HD/HDTV 720p / WSXGA+ / WXGA / UXGA /
SXGA+ / SXGA / SXGA- / XGA / SVGA / VGA (switchable)
(DVI-D on units with serial number lower then 095500)

Antitheft Device - T-bar lock
Table Lock Bolt slot for lock
The VZ-9 can also be fixed onto a table with the supplied Table
Lock Bolt, so that it can not be stolen. The thread to fix the bolt
is in the middle of the turntable.
Supplied accessories for anti-theft device (part number):
Socket head cap wrench 5mm (E 27400)
Socket head cap wrench 2,5mm (E 27410)
Screw DIN 7984, M8x35 Zn (D 25120)
Screw DIN 7984, M8x50 Zn (D 25130)
Washer DIN 125A 8.4/16x1.6 (D 13030)
Assembly instructions VZ 9 (E 27300)
turntable
Fixing for table
lock bolt
168mm (6.6”)
160mm (6.3”)
21
table
(sectional view)
washer 8.4/16x1.6
screw M8x35 oder
screw M8x50
Dimensions
closed
395mm (15.6”)
145mm (5.7”)
[+5mm (0.2”)]
145mm (5.7”)
320mm (12.6”)
[+5mm (0.2”)]
14
631mm (24.8”)
395mm (15.6”)
The turntable can be locked. Remove the screw
from the hole position 2 and insert it into the
specific hole position 1 (maybe the turntable has
to be turned until the thread is visible).
Use supplied tool:
1x socket head cap wrench 2,5mm
(E 27410)
The Visualizer can be fixed with a , so that it can not be
stolen. Follow the instructions from the cable lock manual.
®
security cable T-bar lock (Kensington Lock)

CODES
R
Remote Control
31
30
32 33
34 35
36 38
37 39
41
40
42 43
Storing Presets:
Press one of the PRESET keys (#32) for 2 sec.
Storing Images:
Press one of the MEMORY keys (#40) for 2 sec.
By pressing the FREEZE-key (#28) for 2 seconds, the image is
stored in the next free memory (1-9). If the memory is full, a
message appears on the screen.
Activating the on-screen menu:
Press the MENU-key (#43) for 1 sec.
If the ir-remote control is not available, press the EXT/INT-key (#29)
on the camera head for 2 second to activate the on-screen menu.
Use the ZOOM-wheel (#25) and the FOCUS-keys (#26) to navigate.
For the help function, press the AF-key (#27).
Switching the output mode:
Higher mode: Simultaneously press both FOCUS-keys (#26) on the
camera head and the Number 2 (arrow-up) (#41) key on the remote
control Lower mode: Simultaneously press both FOCUS-keys (#26)
on the camera head and the Number 8 (arrow-down) (#41) key on
the remote control.
Resetting the output mode to the default of "auto resolution":
Simultaneously press both FOCUS-keys (#26) on the camera head
and the Number 5key (the middle of the number keys) (#42) on the
remote control.
Resetting the Visualizer's menu:
For resetting the whole menu simultaneously press both FOCUS-
keys (#26) on the camera head and the Number 4key (back arrow)
(#41) on the remote control.
For resetting only the selected item press the Number 5 key (#42) on
the remote control for 2 seconds.
Video output (PAL or NTSC):
PAL: Simultaneously press both FOCUS-keys (#26) on the camera
head and the Preset 1 (#32) key on the remote control
NTSC: Simultaneously press both FOCUS-keys (#26)
on the camera head and the Preset 2 (#32) key on
the remote control.
Filling the memory quickly:
Press the ALL-key (#39) for more than 4 sec. Then follow the
instructions of the on-screen menu (Press MEMORY 1 (#40) for
snapshot or MEMORY 3 (#40) to erase the memory).
Change ir-code:
Change the ir-code in the "Misc. Settings" (code A
is default). Simultaneously press PRESET 1, PRESET 2 and
ZOOM TELE ress
PRESET 1, PRESET 2 and ZOOM WIDE
on-screen menu (#32)
(#30) to switch from code A to B, C, D ... A ...etc. For
resetting the remote control to code A simultaneously p
(#32) (#30).
15

LASER RADIATION
DO NOT STARE INTO BEAM
CLASS 2 LASER PRODUCT
OUTPUT POWER <1mW
WAVELENGTH 650nm
EN 60825-1 March 1997
AVOID EXPOSURE -
Laser radiation is emitted
from this aperture. FDA accession
number:
9912688-00
This device
complies with
21 CFR 1040.10
and 1040.11
LASER RADIATION - DO NOT
STARE INTO BEAM
650nm, P<1mW
CLASS II LASER PRODUCT
Vorsichtsmassnahmen für den eingebauten Laserpointer:
DAS GERÄT NUR MIT DER AUF DEM TYPENSCHILD ANGEGEBENEN SPANNUNG BETREIBEN !
DAS GERÄT VOR FEUCHTIGKEIT SCHÜTZEN !
BEIM TRANSPORT DAS GERÄT VOR ERSCHÜTTERUNG SCHÜTZEN !
Es ist darauf zu achten, dass eine ausreichende Luftzirkulation zur Kühlung des Gerätes möglich ist
(Kühlungsschlitze am Lampengehäuse)!
Bei jeder Art von Störungsanzeichen (abnormale Geräusche, Geruch, Rauchentwicklung etc.) Das Gerät
abschalten. Setzen Sie sich bitte in solchen Fällen umgehend mit Ihrem Visualizer-Händler in Verbindung!
Niemals ein beschädigtes Netzkabel verwenden. Andernfalls kann es zu Kurzschlüssen und zu elektrischen
Schlägen kommen!
Am Gerät keinerlei Umbauten vornehmen und das Gerät niemals ohne Gehäusedeckel in Betrieb nehmen!
Keine entflammbare oder metallische Gegenstände oder Flüssigkeiten in das Geräteinnere dringen lassen!
Das Gerät nicht im Bereich von starken Magnetfeldern und elektrischen Feldern in Betrieb nehmen!
Das Gerät nicht im Wirkungsbereich von Röntgenstrahlung betreiben. Dadurch können Teile der Kamera
beschädigt werden.
Wird das Gerät längere Zeit nicht benutzt, so ziehen Sie bitte den Netzstecker!
Das verwendete Netzteil benötigt eine europäische Zertifizierung nach EN 60950 oder von CSA/UL nach
UL60950 oder Ul1950. Das Netzteil muss LPS (Limited Power Source - mit begrenzter Leistung) einhalten!
Angeführte Vorsichtsmassnahmen
unbedingt beachten:
WARNUNG!
Vorsichtsmassnahmen
Der WolfVision Visualizer VZ-9 ist eine Eigenentwicklung von WolfVision Österreich.
Patente:
Die Geräte sind "MADE IN AUSTRIA"
DE 202 03 785.1, PCT/EP03/01654, PCT/EP03/01653
Gedruckt in Österreich, Februar 2006 Technische Änderungen vorbehalten
Elektroschockrisiko
gefährliche Spannungen
im Geräteinneren
1
This equipment has been tested and found to comply with the limits for a Class B digital device, pursuant to Part
15 of the FCC Rules. These limits are designed to provide reasonable protection against harmful interference when
the equipment is operated in a commercial environment. This equipment generates, uses, and can radiate radio
frequency energy and, if not installed and used in accordance with the instruction manual, may cause harmful
interference to radio communications. Operation of this equipment in a residential area is likely to cause harmful
interference in which case the user will be required to correct the interference at his own expense.
This product is built according to Directive EMC and to Directive electrical equipment.
Inspections, tests and evaluation according to UL 60950. CSA 22.22-60950
US
C
L
I
S
T
E
D
Inspections, tests and evaluation according the CB-Scheme

Anschlüsse (#8):
1 Kamerakopf
2 Licht
3 IR-Empfänger
4 Kameratasten, Zoomrad (siehe Seite 3)
5 Nahlinse für Kamera
6 Ziehvorrichtung für Arm
7 Power und Licht ein/aus Taste
(siehe Seite 3)
8 Anschlüsse
(auf Geräterückseite, siehe unten)
9 Leuchtfeld für Dias
10 Vorschaumonitor
11 Arbeitsplatte
12 Griffleiste um den VZ-9 zu drehen
(siehe Seite 7)
13 IR-Fernbedienung
DEUTSCH
14 Serielle Schnittstelle RS232 (siehe Seite 12)
15 Externer Eingang für Computer (siehe Seite 8)
16 PAL/NTSC Y/C (S-Video) Ausgang (s. Seite 6)
17 DVI Ausgang (siehe Seite 5 und 12)
18 RGB Ausgang (siehe Seite 5)
19
20
21
22
USB-Anschluss (siehe Seite 12)
LAN-Anschluss (siehe Seite 12)
DC Eingang 12V
DC Ausgang für externe Lichtbox
(siehe Seite 7)
Aufstellen des Visualizers
Power-on Preset:
Mit Einschalten des Visualizers werden automatisch folgende Einstellungen hergestellt:
Aufnahmefläche ca. 20 x 15cm (A5), Autofokus an, Autoiris an.
1. Netzgerät am Power-Eingang (#21) anschließen.
2. Ausgabegerät (Projektor, Monitor, Videokonferenz-
anlage etc.) an den passenden Ausgang des
Visualizers (#16, #17, #18, #19 oder #20) anschließen
.
Wichtig:
Lesen Sie bitte unbedingt die Hinweise zur Auswahl
des richtigen Ausganges auf Seite 5!
3. Arm mit der Ziehvorrichtung (#6) nach oben ziehen.
Die Kamera und das Licht bewegen sich automatisch
in die richtige Arbeitsposition. Der VZ-9 schaltet sich
beim Aufstellen des Armes automatisch ein.
114
22
89
10
12
6
5
7
11
13
3
3
12
2
SVGA/XGA/SXGA
7POWER LB
RGB
EXTERN IN USB
RS 232 DVI LAN
15 1816 19 21 22
17 20
14
S-VIDEO

Tasten am Visualizer
LIGHT POWER
#23 LICHT Taste
Die LICHT-Taste schaltet zwischen Oberlicht, Dia-Leucht-
feld und Licht aus. Falls eine externe Lichtbox ange-
schlossen ist, schaltet die LICHT-Taste zwischen
Oberlicht, externer Lichtbox, Dia-Leuchtfeld und Licht aus.
Durch Drücken der LICHT-Taste für 2 Sekunden, wird ein
One Push Weißabgleich durchgeführt (siehe Seite 9).
#24 POWER Taste
Schaltet das Gerät ein und aus. Beim Einschalten wird
der Power-on Preset ausgeführt.
Infrarot Fernbedienung
Bitte beachten Sie, dass eine IR-Fernbedienung nur bis zu
einer gewissen Distanz zum Gerät einsetzbar ist.
Gegenstände, welche die Sichtverbindung zwischen
Fernbedienung und Visualizer verstellen, sowie schwache
Batterien beeinträchtigen die Steuerung.
Wenn der Visualizer nur noch aus nächster Nähe bzw.
überhaupt nicht mehr mit der Fernbedienung zu steuern ist,
müssen meist nur die Batterien ersetzt werden.
Öffnen Sie händisch dieAbdeckung der Fernbedienung auf
der Rückseite und ersetzen Sie beide 1,5V AA Batterien
durch neue. Auf richtige Polung der Batterien achten!
23 24
25
ZOOM
FOCUS
MAN
AUTO
FREEZE
EXT / INT
2626
2727
2828
2929
#25 ZOOM-Rad
Das ZOOM-Rad befindet sich am Kamerakopf. Nach
unten zoomt der VZ-9 in Richtung Tele-Position, nach
oben in Richtung Weitwinkel-Position. Je weiter das
ZOOM-Rad gedreht wird, umso schneller zoomt der
Visualizer.
#26 FOKUS Tasten (manuelle Schärfeeinstellung)
Sobald die FOKUS-Tasten gedrückt werden, schaltet der
Visualizer denAutofokus ab. Beim nächsten Betätigen der
AF-Taste wird der AF wieder eingeschaltet.
#27 AUTOFOKUS (AF) Taste
Schaltet den Autofokus ein und aus. Die AF-LED zeigt ob der AF eingeschaltet ist.
#29 EXT/INT Taste
Zum Umschalten zwischen Visualizer-Bild und externem Eingang (siehe Seite 8).
Die EXT INAnzeige leuchtet wenn ein Bild vom externen Eingang gezeigt wird.
#28 FREEZE Taste
Friert das aktuelle Bild ein. Die FREEZE-Leuchte zeigt ob der FREEZE-Modus aktiv ist.
Durch Drücken der FREEZE Taste für 2 Sekunden wird das aktuelle Bild im Bildspeicher
abgelegt (siehe Seite 10). Details zur Freeze-Funktion können im On-Screen Menü
eingestellt werden (siehe Seite 10).
Das Bedienkonzept der portablen WolfVision Visualizer sieht vor, dass sich am Gerät selbst
nur die wichtigsten Tasten befinden. Dadurch kann jedermann den Visualizer auch ohne
Einschulung sofort bedienen. Für erfahrene Anwender gibt es zusätzliche Funktionen auf
der Fernbedienung:
3
vorne hinten (offen)
-
+
-
+
XX

31
30
32 33
34 35
36 38
37 39
41
40
42 43
4
#30 ZOOM Tasten
Die ZOOM-Tasten arbeiten wie das ZOOM-Rad am Kamerakopf
des Visualizers. Durch Drücken einer der ZOOM Tasten wird
die Autoiris wieder aktiviert.
#31 LASER POINTER Taste
Wichtig: Blicken Sie nicht direkt in den Laserstrahl!
Dies wäre schlecht für Ihre Augen!
#32 PRESETS (programmierbare Einstellung)
Kurzes Drücken = Preset abrufen
Mehr als 2 Sekunden drücken = Preset speichern (siehe Seite 9).
#33 IMAGE TURN Mode
Um hochformatige Dokumente mit höherer Auflösung
darzustellen (siehe Seite 10).
#34 Manueller FOKUS
Sobald die FOKUS-Tasten gedrückt werden, schaltet der VZ-9
die Autofokus-Funktion ab. Beim nächsten Betätigen der AF-Taste
wird der Autofokus wieder eingeschaltet.
#35 Manuelle IRIS (manuelle Blende)
Wenn die IRIS-Tasten gedrückt werden, schaltet das Gerät die
Autoiris-Funktion ab. Beim nächsten Betätigen von Zoom-Tasten
oder Zoom-Rad wird die Autoiris-Funktion wieder eingeschaltet.
Für Spezialisten: Das Basis-Iris-Level kann im On-Screen Menü geändert werden (siehe Seite 10)
#36 AUTOFOKUS (AF) Taste
Schaltet den Autofokus ein und aus.
#37 TEXT ENHANCEMENT
Erhöht den Kontrast für bessere Lesbarkeit (speziell für Texte - siehe Seite 9).
#38 EXT/INT Taste
Zum Umschalten zwischen Visualizer-Bild und externem Eingang (siehe Seite 8).
#39 ALL Taste
Zur gleichzeitigen Darstellung aller im Speicher befindlichen Bilder (siehe Seite 10).
#40 MEMORY Tasten 1 - 9
Zum Speichern und Aufrufen von Bildern (siehe Seite 10).
#41 MENÜ NAVIGATIONS Tasten (Doppelfunktion der Memory-Tasten 2, 4, 6 und 8)
Zum Navigieren innerhalb des On-Screen Menüs (siehe Seite 10).
#42 HELP/RESET Taste für das ON-SCREEN Menü (Doppelfunktion der Memory-Taste 5)
Im On-Screen Menü Modus erhält man bei Betätigen der HELP-Taste eine Erklärung zum
gerade aktiven Menü-Punkt (auf Englisch). Wenn diese Taste 2 Sekunden gedrückt wird, stellt
sich der ausgewählte Menüpunkt auf den Standardwert zurück (siehe Seite 10).
#43 MENÜ Taste
1 Sekunde lang drücken aktiviert das On-Screen Menü (siehe Seite 10).
Wenn Sie mit mehreren Visualizern im selben Raum arbeiten möchten, dann sollten die
Geräte auf unterschiedliche IR-Codes gestellt werden, um die Geräte einzeln ansteuern zu
können.
Um den IR-Code zu ändern, muss im On-Screen Menü unter “Misc. Settings” der neue Code
angewählt werden. Auf der Fernbedienung selbst ändern Sie den Code durch gleichzeitiges
Drücken von PRESET 1, PRESET 2 nd ZOOM TELE
PRESET 1, PRESET 2 und ZOOM WIDE
Die LED zeigt den gewählten Code durch Blinken an (einmal
Blinken für Code A, zweimal für Code B, dreimal für Code C und viermal für Code D).
(#32) u (#30). Jedes Mal wenn diese
Tastenkombination gedrückt wird, wechselt der Code von A zu B, C, D und A, usw. Mit der
Tastenkombination wird die Fernbedienung wieder
auf Code A zurückgesetzt.
4
Other manuals for VZ-9
1
Table of contents
Languages:
Other WolfVision Projector Accessories manuals