manuals.online logo
Brands
  1. Home
  2. •
  3. Brands
  4. •
  5. Navitar
  6. •
  7. Projector Accessories
  8. •
  9. Navitar PSD-1 User manual

Navitar PSD-1 User manual

Other Navitar Projector Accessories manuals

Navitar 368MCZ125 User manual

Navitar

Navitar 368MCZ125 User manual

Navitar SSC125 Guide

Navitar

Navitar SSC125 Guide

Navitar EXW-J User manual

Navitar

Navitar EXW-J User manual

Navitar 370MCZ125 User manual

Navitar

Navitar 370MCZ125 User manual

Navitar 487MCZ500 User manual

Navitar

Navitar 487MCZ500 User manual

Navitar 376MCZ151 User manual

Navitar

Navitar 376MCZ151 User manual

Navitar 645MCL1028 User manual

Navitar

Navitar 645MCL1028 User manual

Navitar 594DLP151 User manual

Navitar

Navitar 594DLP151 User manual

Navitar 671MCL012 User manual

Navitar

Navitar 671MCL012 User manual

Navitar HDSSW065 Guide

Navitar

Navitar HDSSW065 Guide

Navitar SCREENSTAR SST120 User manual

Navitar

Navitar SCREENSTAR SST120 User manual

Navitar 606MCZ087 User manual

Navitar

Navitar 606MCZ087 User manual

Navitar 373MCZ125 User manual

Navitar

Navitar 373MCZ125 User manual

Navitar 582MCL047 User manual

Navitar

Navitar 582MCL047 User manual

Navitar SSW08 Guide

Navitar

Navitar SSW08 Guide

Navitar 572DLP151 User manual

Navitar

Navitar 572DLP151 User manual

Navitar GNK-3828 User manual

Navitar

Navitar GNK-3828 User manual

Navitar 374MCZ125 User manual

Navitar

Navitar 374MCZ125 User manual

Navitar 649MCL1028 User manual

Navitar

Navitar 649MCL1028 User manual

Navitar 377MCZ125 User manual

Navitar

Navitar 377MCZ125 User manual

Navitar 585MCZ500 User manual

Navitar

Navitar 585MCZ500 User manual

Navitar 583MCL047 User manual

Navitar

Navitar 583MCL047 User manual

Navitar HDSSW05 Guide

Navitar

Navitar HDSSW05 Guide

Navitar 881MCZ123 User manual

Navitar

Navitar 881MCZ123 User manual

Popular Projector Accessories manuals by other brands

Optoma BX-AL133B datasheet

Optoma

Optoma BX-AL133B datasheet

PEERLESS PE 1120 Installation and assembly

PEERLESS

PEERLESS PE 1120 Installation and assembly

Osram SIRIUS HRI Series Directions for use

Osram

Osram SIRIUS HRI Series Directions for use

Presentation Switchers PS111 quick start

Presentation Switchers

Presentation Switchers PS111 quick start

Kramer VIA GO user manual

Kramer

Kramer VIA GO user manual

Yamaha PJL-112 Replacement guide

Yamaha

Yamaha PJL-112 Replacement guide

Mitsubishi Electric 236CB Features

Mitsubishi Electric

Mitsubishi Electric 236CB Features

Epson BrightLink 475Wi user guide

Epson

Epson BrightLink 475Wi user guide

Acer WP100 quick guide

Acer

Acer WP100 quick guide

Biamp Modena Hub Network administrator's guide

Biamp

Biamp Modena Hub Network administrator's guide

Panamorph DCR-S3 installation guide

Panamorph

Panamorph DCR-S3 installation guide

Exact solutions FRAME-EVO-P10 manual

Exact solutions

Exact solutions FRAME-EVO-P10 manual

i3 i3board user manual

i3

i3 i3board user manual

CHIEF VCM103S installation instructions

CHIEF

CHIEF VCM103S installation instructions

InFocus LP70+ Replacement instructions

InFocus

InFocus LP70+ Replacement instructions

Sharp AN-PH20EZ Operation manual

Sharp

Sharp AN-PH20EZ Operation manual

PDR UPM51 product manual

PDR

PDR UPM51 product manual

CHIEF HB-43E installation instructions

CHIEF

CHIEF HB-43E installation instructions

manuals.online logo
manuals.online logoBrands
  • About & Mission
  • Contact us
  • Privacy Policy
  • Terms and Conditions

Copyright 2025 Manuals.Online. All Rights Reserved.

Projector Security Box Introduction
Thank you for purchasing a Navitar Projector Security Box.
Designed to deter theft of ceiling-mounted LCD and DLP digital
projectors, the PSD-1 is a triple deterrent security device to
better protect your investment.
Five-Year Warranty
The Navitar PSD-1 Projector Security Box is warranted to be
free from defects in material and workmanship for a period of
ve years from the date of invoice to the original purchaser.
If during the warranty period the product is found to be defec-
tive, it will be repaired or replaced at the facilities of Navitar.
However, Navitar reserves the right to refund the purchase
price if the replacement or repair is not commercially
practical or timely. Parts not manufactured by Navitar carry
only the warranty of their manufacturer. Lamps and fuses carry
no warranty.
This warranty does not cover damage caused in transit; dam-
age caused by misuse, neglect or carelessness; or damage
resulting from either improper servicing or modication by
someone other than Navitar. Further, this warranty does not
cover any routine maintenance work that is reasonably
expected to be performed by the purchaser.
No responsibility is assumed for unsatisfactory operating
performance due to environmental conditions such as
humidity, dust, corrosive chemicals, deposition or oil or other
foreign matter, spillage or other conditions beyond the control
of Navitar.
For service, repair or return procedures under this warranty,
contact your distributor, your local Navitar dealer or Navitar
directly at (585) 359-4000 or (800) 828-6778 in the United
States. Except as stated herein, Navitar makes no other war-
ranties, expressed or implied by law, whether of merchantability,
tness for a particular purpose or otherwise. Further, Navitar
shall not, under any circumstances, be liable for incidental,
consequential or other damages.
Register Online
To register your product online, go to:
www.presentation.navitar.com/warranty.cfm
Projector Security Box
Installation Instructions
Navitar, Inc.
200 Commerce Dr., Rochester, NY 14623 USA
Phone (585) 359-4000 Fax (585) 359-4999
www.presentation.navitar.com Email: [email protected]
Navitar, Inc.
200 Commerce Drive
Rochester, NY 14623
Phone 585-359-4000
Toll-Free 1-800-828-6778
Fax 585-359-4999
Email [email protected]
www.presentation.navitar.com
PSD-1 (Part no. 1-16927)
Requirements
In order to install the Navitar PSD-1 Projector Security Box you
must have a projector ceiling mount system with:
1 ½” to 2” diameter column and;
a minimum length of 6.5” between the ceiling and pro-
jector mount.
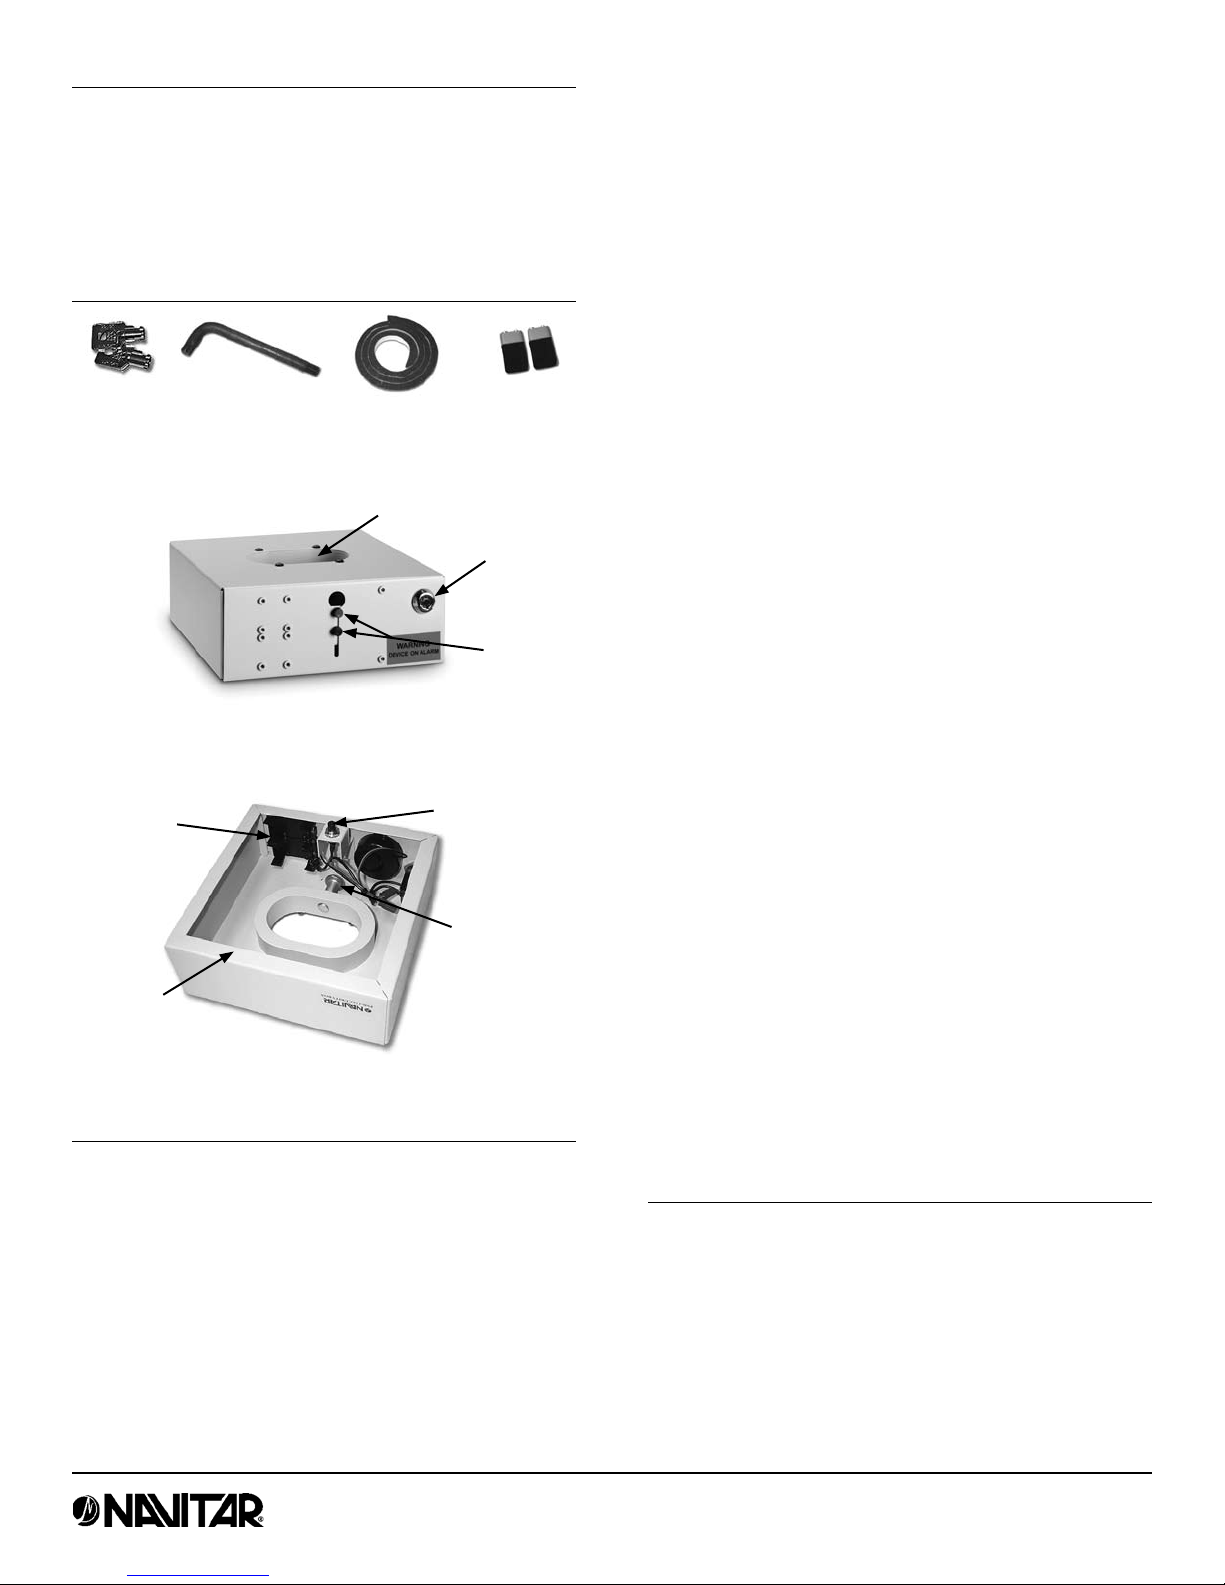
Items Required for Installation
Installation Instructions
The PSD-1 Projector Security Box attaches to your
ceiling mount projector system quickly and easily.
Unpack the PSD-1 and set aside the Torx wrench,
tubular activation key, and weather stripping.
Install two (2) 9-volt batteries (purchased separately) by
pressing them into slots.
Adhere included weather stripping to the entire ½” wide
lip of the PSD-1. The weather stripping will provide a
tight seal and keep dirt and dust particles away from
the unit.
•
•
1.
2.
3.
Use the Torx wrench to unscrew the large mounting
screw in the center opening to allow the PSD-1 to easily
slide up the column of the ceiling mounting plate.
With the open side (bottom) of the PSD-1 facing down,
slide the unit as far up the column of the ceiling
mounting plate as possible.
Use the enclosed Torx wrench to lock down the
mounting screw and secure the PSD-1 in place allowing
you to assemble your projector ceiling mount unit per
the manufacturer’s specications.
Once the projector ceiling mount unit is properly and
securely installed, use the Torx wrench to loosen the
mounting screw of the PSD-1 and lower the unit slowly
until the weather stripping is in full contact with the
projector mounting plate or universal mount thus
completely enclosing the mounting hardware. Tighten
the mounting screw to secure the PSD-1 in place.
With your ngers, loosen the two thumb screws on the
back of the unit allowing the impact switch to slide down
and come into contact with the projector.
Place enough pressure on the security box enclosure
to fully compress the impact switch button against the
projector. Tighten the two thumb screws to secure the
impact switch in place.
Insert the tubular activation key into the alarm activation
keyway and turn clockwise to activate the alarm.
Test the unit by slightly raising the security box away
from the projector. If alarm sounds, the internal trip
alarm has been triggered and the security box has been
installed correctly.
Disarm the alarm by inserting the tubular activation key
and turning counter-clockwise*. Lower the enclosure
back into position. Repeat steps 8-10 to secure and
activate unit.
Changing the Batteries
Navitar recommends testing your PSD-1 unit frequently
(step 11) and changing the two 9-volt batteries based on the
manufacturer’s recommended lifespan.
To change the batteries, disarm the unit, loosen the mounting
screw and raise the PSD-1 unit away from the projector. Insert
new batteries into the battery slots. Always replace both
batteries at the same time.
Reinstall the unit as specied in steps 7-11.
4.
5.
6.
7.
8.
9.
10.
11.
12.
Navitar, Inc.200 Commerce Dr., Rochester, NY 14623 USA
Phone (585) 359-4000 Fax (585) 359-4999
www.presentation.navitar.com E-mail [email protected]
Tubular
activation keys
Torx wrench Weather stripping
Back View
Alarm
activation
keyway
Thumb
screws
Center opening
Impact switch
Battery
slots
Mounting
screw
1/2” lip
Bottom View
Two 9-volt
batteries
(not included)
rev 062006
Installation Instructions - continued
* The alarm will sound continuously for over an hour if
not disarmed properly.