Wonder Core Cycle WCC-53 User manual

Catalog
Safety Instructions.......................................................... 1~2
Accessories..................................................................... 3
Assembly......................................................................... 4~7
Getting Started................................................................ 8
How To Use...................................................................... 9
Storage & Maintenance.................................................... 10
USER GUIDE
◆Before you use the equipment, make sure you read the
"Safety Instructions" carefully to ensure proper use.
◆After reading, keep it in a safe place, so you can refer to it
at any time.
◆If you transfer the product to others, the user guide must
be transferred together.

● Please read "Safety Instructions" before using the equipment.
● The cautionary notes listed here refer to importance of safety for
which you must read.
● This equipment is in compliance with EN ISO 20957-1, EN 957-2,
EN ISO 20957-5, DIN 32935, Class HC (H= Home Use)
Safety Instructions
Must
be
followed
Warning
This product is suitable and has been designed for use by persons
in good health.
You must consult your doctor before using this product.
Warning: for your own safety, inspect your Wonder Core Cycle for
damage and wear regularly and before each use especially on
seat, screws, lock pin and knob, pulley, and rowing bands. If you
find any missing or damaged parts, nicks, cuts, scratches or
gouges in Wonder Core Cycle, discontinue use.
Warning: Incorrect posture can cause injury. To avoid injury, follow
the safety instructions in this user guide. If you are new to Wonder
Core Cycle, we suggest you use 30 minutes a day at maximum.
Excessive training might cause muscle pain.
Please stop immediately if there is strange feeling or discomfort in
the body during exercise. Possible harm to health.
Do not use the equipment after drinking alcohol as accidents or
injury may occur.
Do not use the equipment immediately after a meal (allow one hour
after eating before exercising) as accidents or injury may occur.
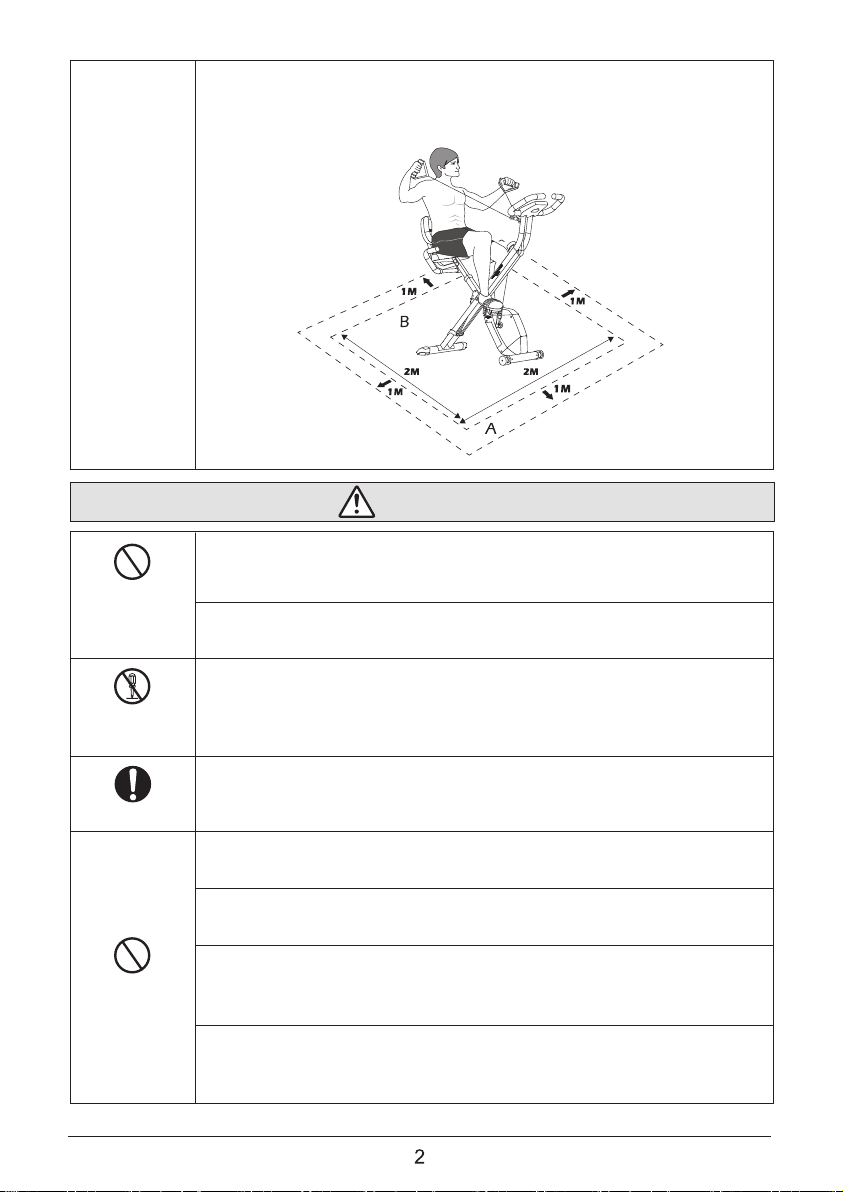
Set up the equipment in a place suitable for exercise. If the place
is inappropriate, it may make you fall backwards or cause injury.
Please use the equipment on level and hard grounds. If the place
is inappropriate, it may make you fall backwards or cause injury.
Appropriate and well-fitting sportswear must be worn during use.
Otherwise, it may lead to injury or accident.
Ensure you complete a warm-up before exercising. Exercising
before warming up the body puts stress on the body.
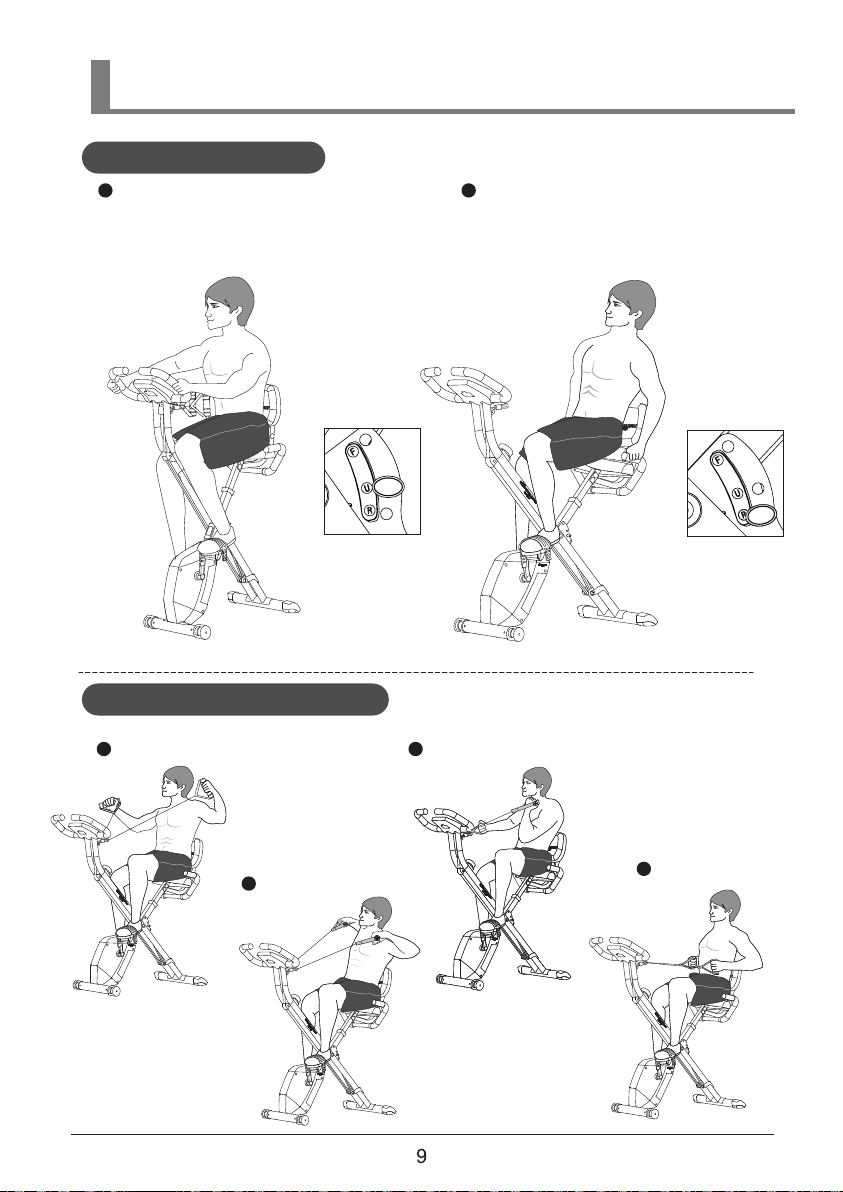
Please refer to instructions for "How To Use" to mount on Wonder
Core Cycle properly and operate the rowing bands as shown the
diagram.
The pedal crank training equipment of class C is not suitable for
therapeutic purpose.
Always fold and store the equipment after each use to avoid
children using the equipment unattended.
WARNING: This stationary training equipment is not suitable for
high accuracy purposes.
This equipment is speed independent.

Use by
Children
Forbidden
Do not
disassemble
Confirmation
Forbidden
Warning
Never allow children to use the equipment unattended as this may
result in an injury.
Do not allow young children or pets to stay near you when the
equipment is in use.
Never repair or modify the equipment by yourself. This may lead to
abnormal movement
or cause an accident. Contact the original dealer in case of a
failure or damage.
Before using the equipment, make sure the screws and knobs are
secured properly. Improper use may lead to accidents like toppling
backwards or may cause damage.
Only use this equipment for its intended purpose. Improper use
may result in a fall, damage, equipment malfunction or injury.
Do not attempt any exercises that have not been listed in this user
guide. Otherwise, an injury or accident may occur.
Do not allow 2 persons to use the equipment at the same time. The
equipment is designed for use by individuals. Improper use may
result in an accident or injury.
Do not use the product for business purposes or allow a large
number of individuals to use it. This product is limited to general
household use. Improper use may cause an accidental injury.
When using the Wonder Core Cycle, allow an area of 1 m (Free area: A)
around all sides of the equipment (Training Area: B), so it is clear of all
obstructions and positioned far enough away from children, bystanders
and pets.

*
*
Accessories
(2) Front foot set
(w/ wheel) (3) Rear foot set (4) Seat adjustment
support
(5) Seat
(5-1) Ø 8 washer (OD: 16 mm) x 3
(5-2) M8 Nylon nut x 3
(6) Back support (7) Back Cushion (8) Seat handle (9-1) 9/16 Nylon nut-L
(9) Pedal-L
(14) Carriage bolt
M8 x 50L x 2 (15) Screw M8 x 40L x 4 (16) Screw M6 x 12L x 6
(17) Ø 8 Arc washer x 6
* Pre-assembled
(18) Ø 8 Washer
(OD: 25 mm) x 2
(19) Ø 6 Spring
washer x 6
(20) Ø 8 Washer
(OD: 20 mm) x 2
(21) M8 Cap nut x 4 (22) M8 Nylon nut x 2 (S-1) M5 Allen wrench (S-2) Wrench
(10) Pedal-R
(10-1) 9/16 Nylon nut-R
(11) Front handle set
(12) Handle for rowing
bands x 2
(13) Seat adjustment
knob
(1-1) Lock pin
(1) Main frame
Parts
*
*
*
*
*
*
Hardware and tool kit

Assembly
Please confirm the accessories on the previous page to make sure there is no shortage.
Note: Lock pin position instruc-
tion
Lock pin at hole F: Folding mode
Lock pin at hole U: Upright bike mode
Lock pin at hole R: Recumbent bike
mode
Step 1: Unfold the main frame
-Remove (1-1) Lock pin from hole F, as
shown on Fig. A.
-Unfold the main frame and insert the
lock pin at hole U, as shown on Fig. B.
Warning:
Do not assemble or disassemble the
parts, while lock pin is at hole F. It will
result in the product falling down and
causing injury.
Step 2: Assemble the foot sets
-Attach (2) Front foot set to Main
frame. Tighten (17) Ø 8 Arc washer
and (21) M8 Cap nut with (S-2)
Wrench.
-Attach (3) Rear foot set to main
frame. Tighten (17) Ø 8 Arc washer
and (21) M8 Cap nut with (S-2)
Wrench.
Note: Make sure the
wheel on the front foot
set is facing forward.
Fig. BFig. A

Step 3: Assemble the seat set
-Remove (5-1) Washer & (5-2) Nylon
nut from (5) Seat.
-Attach seat to (4) Seat adjustment
support and tighten washers and nylon
nut with S-2 wrench.
-Attach the seat set to main frame.
Tighten the seat with (13) Seat
adjustment knob.
Step 4: Assemble the back
support set
-Attach (7) Back Cushion to (6) Back
support and tighten (15) Screw & (20)
Ø 8 washer with S-1 Allen wrench.
-Attach the back support set to seat
adjustment support. Tighten (14)
Carriage bolt, (18) Ø 8 Washer, & (22)
M8 Nylon nut with S-2 Wrench.

Step 5: Assemble the seat
handle & pedals
-Attach (8) Seat handle under back
support set.
Tighten (15) Screw & (17) Ø 8 Arc
washer with S-1 Allen wrench.
-Remove (9-1) Nylon nut-L from (9)
Pedal-L.
Attach Pedal-L to the crank at left side
and tighten it counter-clockwise.
Tighten nylon nut-L clockwise with S-2
wrench.
-Remove (10-1) Nylon nut-R from (10)
Pedal-R.
Attach Pedal-R to the crank at right
side and tighten it clockwise. Tighten
nylon nut-R counter-clockwise with
S-2 wrench.
Note: While assembling the pedals,
please make sure the "L" and "R"
marking on pedals match that on the
cranks. Please follow the direction
instruction to tighten the pedals and
nuts.
Step 6: Assemble the front
handle set
-Attach (11) Front handle set to the
front of the main frame. Tighten (16)
Screw & (19) Ø 6 Spring Washer with
S-1 Allen wrench.
-Insert the sensor wire into the hole on
the back of counter set.
-Attach (12) Handle for rowing bands
to the hook.

AAA battery x2
Step 7: Battery installation for the
counter set
Specifications: AAA battery x2
Note: Zinc-Carbon battery is recommended.
Note:
Before operation, please remove the battery
cover and install AAA battery x2. Then put the
battery cover back. If the LCD doesn't display,
please replace new batteries.
Step 8: Instruction for the counter
display and operation
-Display
SPEED 00.0-99.9 (km/h)
TIME 0:00-99:59 (min. : sec.)
DISTANCE 0.00-99.99 (km)
CALORIES 0-9999 (kcal)
ODO (odometer) 0-999 (km)
-Operation
Press the function button, the "SCAN" icon will
appear on the LCD. The main figure will change
in the following order every 4 sec. automatically:
SPEED-> TIME-> DISTANCE-> CALORIES->
ODO. If you press the function button again and
choose the desired main figure. For example, if
you fix main figure to "DISTANCE", the "SCAN"
icon will disappear and "DISTANCE" icon will
blink, then the main figure will be fixed for
"DISTANCE".
-Automatic sleep mode
If there is no use for more than 4 minutes, the counter will enter sleep mode automatically.
You can press the function button to awake the counter. The counter will continue the
previous exercise record. For quick zero rest, please press and hold the button for more
than 3 sec., except ODO.
* To reset ODO, please remove the batteries and install the batteries again.
Function button

Getting Started
Seat height adjustment
Remove (13) Seat adjustment knob.
Adjust the required seat height to meet your body
height. Then, tighten the seat with seat adjust-
ment knob.
Note: Don't adjust the height of the seat adjust-
ment support over the "STOP" marking shown on
the seat post, as it is already Max. seat height
position.
Paddle resistance adjustment
You could setup the required paddle resistance by
rotating resistance adjustment knob on the main
frame. Turn clockwise to increase resistance.
Turn counter-clockwise to decrease. There are 8
resistance levels for adjustment.
"1" is lightest paddle resistance setting.
"8" is heaviest paddle resistance setting.
Exercise mode setting
Remove (1-1) Lock pin and unfold the main frame
outward. Insert lock pin at hole R to fix the main
frame for Recumbent bike mode. To convert to
Upright bike mode, please reverse the above
steps.
Rowing bands resistance adjustment
Step 1. Pull down rowing bands with one hand.
Step 2. Meanwhile, release rowing adjustment
with the other hand. There are 3
resistance level for adjustment: 1 (Light)/
2 (Middle)/ 3 (Heavy), from top to bottom.
Step 3. Pull down the rowing adjustment to setup
required resistance level and make sure it
clips properly. Then you could release the
rowing bands to complete the adjustment.
Max. seat height position

Upright bike riding mode
Lock pin at hole U
Please hold the front handle set
Recumbent bike riding mode
Lock pin at hole R
Please hold the seat handle
Bike exercise mode
Full body exercise mode
Chest training
Triceps training
Forearm &
Waist training
Forearm and Biceps training
How To Use

Storage & Maintenance
Maintenance
1. When the product is dirty, please dilute some neutral cleansing detergents and wet a cloth
with it to clean. After that, wipe it dry with a dry cloth.
2. Alkaline cleaning agent or solvents like dilute solvents, volatile oil etc. may damage this
product. Please do not use them.
Maintenance/Inspection
1. Please avoid high temperatures, moisture and direct sunlight. Keep the equipment in a
clean place with good ventilation.
2. Fold up the product, when it is not in use. Put it in a place out of reach of the children.
3. If the product is used, after it has been lying idle for a period of time, please make sure that
the product is fine and it can be used safely.
4. If the product gets wet carelessly, please use a dry cloth to wipe it dry to avoid making it
slippery.
5. In the event of failure or abnormal occurrences, or if there is anything about the product
that you do not understand, please contact the customer service center.
Waste Disposal
Due to the different recycling regulations between each country, please refer to these
regulations before disposing this product.
Fold up main frame
Remove (1-1) Lock pin from hole U or R.
Then fold up the main frame and insert
the lock pin at hole F to fix the main frame.
Storage
To store the product securely, please fold and
store it horizontally. It is not allowed to store in
upright position.
Transportation
After folding up the product, you could tilt it
and transport it with the wheel on the front
foot easily.

Specifications:
Wonder Core Cycle WCC-53
In Use: Upright bike mode- 100 x 53 x 128 cm
Recumbent bike mode- 124 x 53 x113 cm
Folded Up: 58 x 53 x 147 cm
About 19 kg
Steel - ABS - TPR - PP - POM - Sponge
115 kg
China
Model #
Dimension
(L x W x H)
Weight
Material
Maximum User Weight
Country of Origin
Max. bands pull length: 110 cm.
Bands length and pull force:
Level 1 (Light)
Level 2 (Middle)
Level 3 (Heavy)
46 N
48 N
50 N
Pull the bands to 110 cm,
Tolerance:+/- 2 N
BODYORBIT CO.,LTD.
No.17, Ln. 301, Nanyang Rd.,
Fengyuan Dist., Taichung City
420, Taiwan
Distributed by:
Orange Planet
De Els 3A, 5107 RK Dongen
The Netherlands
Table of contents