Woodfire Passiv User manual

Passiv Operation &
Installation
Manual
Applies to the: Woodfire Passiv Boiler Stove
Manual Version 1.4, August
2020

Woodfire Passiv, Manual Rev: 1.3
Contents
Handling
2
Disposal of packaging
2
Introduction
2
1. Description
3
2. General
3
3. Installation of the stove
4
3.1. Flue pipe connection
4
3.2. Safety rules
5
3.3. Minimum distances to combustibles
5
4. Technical specifications
5
5. Plumbing
6
5.1. Connections
6
5.2. Typical system schematics
6
6. General information about the working of the stove
7
6.1. Starting the stove
8
6.2. Layout and usage of air regulators
9
6.3. Suitable materials for lighting
9
6.4. Emptying the ashpan
10
6.5 Cleaning and maintenance
10
6.6 Instructions on how to access the flue through the stove
11
7. Malfunction and service
11
8. Common fault finding
12
9 Warranty
13
Woodfire commissioning checklist
14

Attention
Check the stove before installation to ensure that there has been no damage to the
functional parts (air regulators, seals, door, chimney connector, etc.) during transportation.
If you have noticed damage, please contact our customer service. The stove must not be
modified in any way.
Handling
The Woodfire Passiv is an insulated boiler stove and so has a thin outer skin to retain the
insulation.
The stove should never be moved by pushing or
lifting by that outer skin.
Before removing the stove from the pallet and
commencing installation, it is recommended that
the fire bricks and the front plinth are removed
from the stove. The front plinth can be removed
by opening the combustion chamber door, and
removing the two screws holding it in place.
The stove is supplied with a spigot lift kit. Place
the lower metal bar down through the flue spigot
so that the two ends bear on either side below
the spigot. The upper metal bar rests on the top
of the spigot. Make sure that the adjustable flue damper is not fouled by the lifting rope.
Feed a suitable lifting pole though the strap, looping the rope around the pole until the
correct length is achieved. The rope is at the correct length when, with the pole on their
shoulders and the rope taut, the knees of the people lifting it are slightly bent. The stove
can now be raised off the pallet by straightening their
legs and then moved to position.
The spigot lift can also be used, with the rope shorter to
do a hand lift but the shoulder lift is both easier and
safer.
Once on suitable terrain, the stove can be moved by
carefully placing a sack truck at the rear of the stove, and tilting onto the loading bed
(ensuring that the loading bed is no greater than 380mm wide, and at least 400mm deep).
Disposal of packaging
The packaging protects the stove from damage during transportation. The packaging
materials can be recycled. The wooden parts of the packaging can be used as firewood.
Introduction

Congratulations on your purchase of this Woodfire stove.
This manual will introduce you to the functions and correct operation of the stove. It is
important that your installer takes you through the operation of this stove during their
handover.
Our guarantee is valid only if the guidelines in this manual are carefully followed.
Please keep this manual, in order to remind yourself how to operate the stove before the
winter months.
1. Description
The stove is constructed of welded steel. In the centre is the firebox which is lined with
firebricks.
Beneath the cast iron grate is an ashpan.
2. General
National and European standards, local construction regulations, fire protection law and
regulations must be observed.
It must be ensured that the installation room is adequately supplied with fresh air.
If extractor fans are present in the same, or connecting rooms as the stove, additional
ventilation should be given to allow for this.

3. Installation of the Stove
Your stove can be equipped with a connection for the external air
supply. The required direct air kit is available. In a room with
controlled ventilation, the stove can be a connected to an air supply
from the outside. In that case additional pressure monitoring in the
room is required.
If the combustion air is being supplied from the outside, the duct size will need to be
increased for any duct over two metres long or any run containing 90 degree bends. The
duct length should not be longer than 6 metres with no more than three 90 degree bends.
The chimney must be able to overcome the additional resistance of the air intake ducting.
3.1. Flue pipe connection
It is essential that the chimney draw must be a minimum of 12 Pascal’s.
Condensation and cold plugs caused by cold external air in the flue can be minimised by
insulating the flue pipe.
Your chimney significantly contributes to the proper working of your stove.
Recommendations:
Working level of chimney: min. 5 meters
Maximum diameter of flue 160 mm
Any existing chimney should be examined by an expert
All flue pipe that is used to connect the stove to the chimney must comply with national
regulations. All connections from the stove into the chimney must be firm and tightly
connected.
Be careful that flue pipe does not enter into the free section of the chimney.
Maintain the correct distances specified by building regulations between the flue pipe and
combustible material.
This appliance must never be connected to a shared flue system.
Attention: if the chimney pressure is too low or too high this may cause problems with the
working of the stove.
Outdoor air supply: if the deviation from the required pressure (section 4) is over 25%,
suitable changes to the chimney will need to be made before you can use and outdoor air
supply.
Direct air connection (Ø100mm
OD)

3.2. Safety rules
The appliance shall be installed on floors with an adequate load-bearing capacity. If an
existing construction doesn't meet these prerequisites, suitable measures (e.g. load
distribution plate) should be taken to achieve it.
The Woodfire Passiv requires a constructional hearth.
3.3 Minimum distances to combustibles
A
1000mm
To the front of the stove
B
700mm
Back space between the
wall and stove
C
700mm
Side space between wall
and stove
4. Technical specifications
Stove Model
Passiv
Nominal Output
10 kW
Output to water
7 kW
Output to room
3 kW
Efficiency
85.8% (net)
Weight
195kg
Mean flue gas temperature
270ºC
Flue gas mass flow
15 g/s
Minimum flue pressure
0,12 - 0,19 mbar
Diameter of flue pipe
150 mm
Diameter of the connection to the outdoor air supply
100mm
Fuel
Wood
Average refuelling interval at nominal output
40 minutes
5. Plumbing
The Woodfire Passiv has been designed and built for both open vent and pressurised
heating and hot water systems and incorporates an over-heat quench coil connected to a
quench valve to prevent the boiler from over heating.

If the installation is pressurised then the Passiv must be pumped.
If the installation is open vented then the Passiv can be pumped or work on a thermo-
syphon circuit.
The use of an LK810 Thermomat load unit (or similar) is strongly recommended.
For optimum performance, it is recommended that the Passiv is piped to a thermal store.
5.1 Connections
5.2 Typical system schematics
Open vented circuit on thermal store.
A
1” BSPF
Primary flow
B
1” BSPF
Primary return
C
15mm
BSPF
Quench coil connections
D
Thermistor dry pocket
E
¾” BSPM
Port for overheat valve
F
100mm
Direct air connection

Unvented circuit on thermal store –PRV can be installed on pipe work behind stove, there
must be no restrictions between PRV and stove.
6. General information about the working of the stove
When the stove is not in use for any period (i.e. during the summer months) the primary air
control should be left partially open to keep an airflow through the stove and chimney to
prevent any build up of damp.
However, it can be advantageous to open the air controls, stove door and flue damper for
a while before lighting the stove to allow warmer air to begin going up the chimney.
Do not use any flammable liquid fluids for lighting the fire. The door of the firebox should
be opened only when adding fuel, apart from leaving the door slightly ajar during the
lighting phase.
Use only suitable fuels (see section 5.2.).
Check that there is enough fresh air coming into the room.
Stoves should only be used by adults. All parts of the appliance, especially the external
surfaces, will be hot to touch when in operation and due care will need to be taken. Always
use the heat resistant glove provided when the stove is in operation.
Make sure that children are never alone near the stove. Never leave the stove for a long
period of time without surveillance.
The stove should be used only according to the instructions in this manual.

6.1. Starting the stove
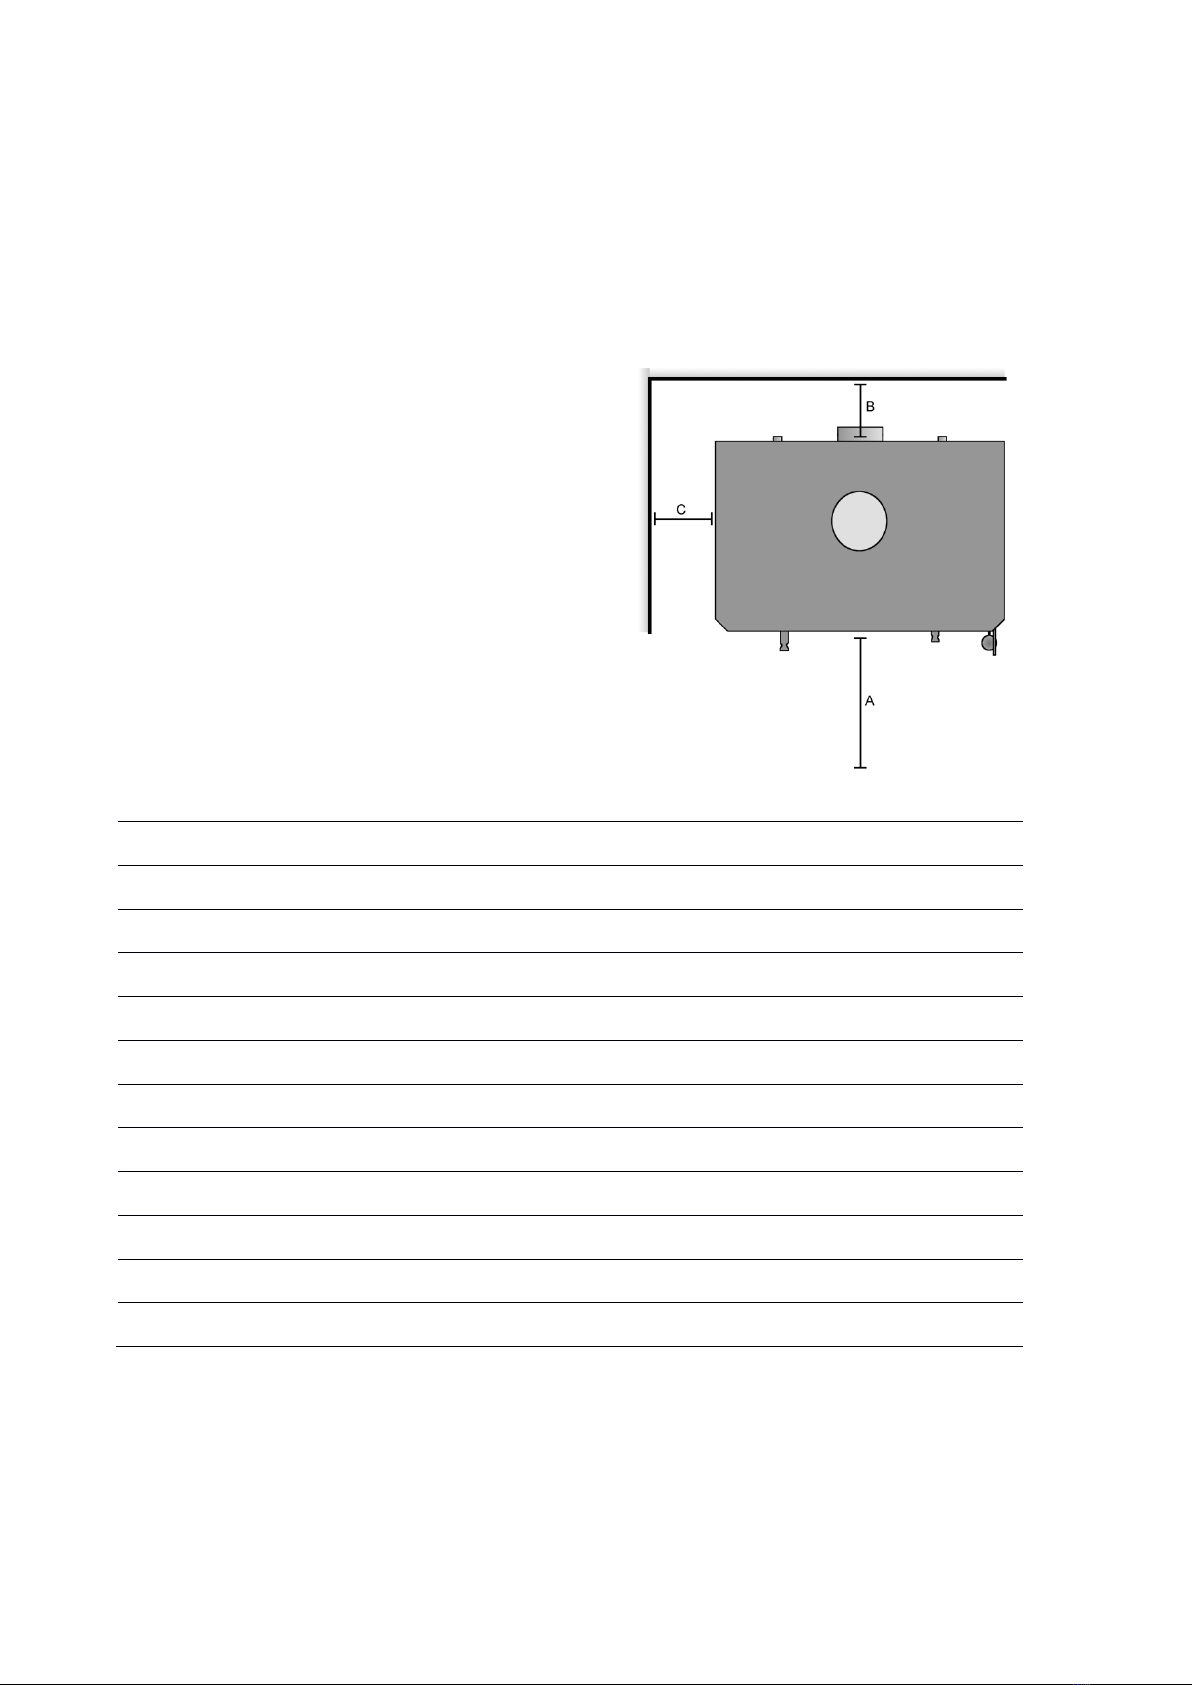
Please pay attention to the minimum space between the stove and flammable objects
when lighting a fire.
1. Primary, secondary/tertiary air controls and the flue damper should be fully open.
2. Remove enough ash from the grate to let air through but leave some of the ash there.
Put 2 - 3 medium sized logs in the centre of the firebox, put some smaller logs on top of
them and then kindling on top. Finally put 2-3 firelighters on top of the kindling.
3. Light the firelighters and leave the door slightly open as it prevents condensation on the
cold glass. Do not leave the stove unattended when the door is ajar.
4. When all the fuel is properly burning, and the working temperature of the stove is
achieved (after approximately 20-30 minutes), gradually move the primary air regulator
backwards, but ensure that there is still a visible flame.
5. When the stove and flue are up to temperature, and the fire burning well, then the
primary regulator can be completely closed.
6. The door should only be opened again when the fuel has burned down and you want to
put new fuel in. When opening the door, ensure that the flue damper is fully open. Re-
fuelling must be carried out onto a sufficient quantity of glowing embers so that the new
fuel will ignite in a reasonable period. If there are too few embers in the fire bed, add
suitable kindling to prevent excessive smoke.
It is good practice to put in a couple of smaller bits first as the larger logs then light faster,
so producing less smoke. When adding wood, the primary air control and flue damper
must always be open, and left open until the new logs have caught fire. At that point close
the primary control and leave the secondary air and flue damper to facilitate the
combustion.
7. It is recommended that the secondary air regulator is kept fully open in order for the
“glass cleaning” to be most efficient, and to avoid the glass “fogging”.
Use the amount of fuel you place in the stove to regulate the temperature.
To burn at the nominal output, the stove requires refuelling every 45-50mins with
approximately 2.5kg of wood logs.
8. When adding larger wood it is good practice to put in a couple of smaller bits first as the
larger logs then light faster, so producing less smoke. When adding wood, the primary air
control and flue damper must always be open, and left open until the new logs have
caught fire. At that point close the primary control and leave the secondary air and flue
damper to facilitate the combustion.

THE STOVE SHOULD NEVER BE FILLED EXCESSIVELY. EXCESSIVE AMOUNTS OF
WOOD OR AIR FOR COMBUSTION CAN CAUSE OVERHEATING AND DAMAGE THE
STOVE.
During the first few times the stove is used, it is possible that it can produce a slight smell
while the paint is curing. This will disappear after a short while. If the smell appears, open
the windows of the room for ventilation.
6.2 Layout and usage of air regulators
6.3 Suitable materials for lighting
The stove should be used for the combustion of natural wood logs only.
Some of the best wood for the stove is beech and birch. These types of wood have the
highest burn temperature, and they burn the cleanest, as long as they have been stored in
a dry place for a sufficient length of time.
If the glass window blackens excessively during burning it is usually an indication that the
moisture content of the firewood is too high.
Do not use any of the following:
1
Primary air control
2
Secondary & tertiary air control
3
Flue damper
All controls:
Pull out to close
Push in to open

Damp wood or treated wood
Cardboard
Bark or plywood
Plastic or other waste
Fresh wood should be cut up and stored 12 to 18 months in open storage, but protected
from rain. Any wood used should have a maximum humidity of 20%.
6.4 Emptying the ashpan
It is recommended to clean out the ash every day.
Be careful that too much ash is not accumulated otherwise there is the danger that, if the
ash reaches up to the grate, it will not cool sufficiently and may get damaged.
Before emptying the ashpan, check if there are any embers left in the ashtray.
Even though the ash is cold from the outside, it is possible that there are embers within the
ash which can lead to a fire in the waste bin.
6.5 Cleaning and maintenance
The stove can be cleaned only when it is cold. Pay attention while cleaning your stove not
to damage, scratch or break essential parts.
For cleaning steel parts use non-abrasive detergents and a soft rag and, after cleaning,
clean it damp rag to avoid the deposit of detergent which can damage material. Dry off the
stove afterwards
After washing, wipe over with clean water and if there are condensates, do not wait until
they are dried, rather wipe them immediately.
Attention, the stove paint only achieves its ultimate strength after reaching its rated
temperature a few times. To avoid damaging the paint, it is recommended to clean the
stove surface only when the paint achieves its ultimate hardness.
Cleaning the glass should be done when the stove is cold, using normal detergent for
washing the glass. In the case of solid deposits that should be removed, we recommend
using a stove glass cleaner.
It is important to have the chimney regularly checked and cleaned by a qualified chimney
sweep.
Chimney fires

If the wrong or unseasoned wood is used, it is possible that a chimney fire can occur due
to the accumulation of deposits inside the chimney.
Immediately close all air regulators on the stove and call the fire brigade.
If a chimney fire was to occur, an experienced professional should be employed to check
the entire flue system.
6.6 Instructions on how to access the flue through the stove
The throat plate can simply be pushed left or right along the heat exchangers at the top of
the combustion chamber, then using a soft headed 7” brush, the flue can be swept
through.
Once the flue has been swept, please remember to slide the throat plate back into the
center of the heat exchangers.
7. Malfunction and service
In the event of a product malfunction please contact your supplier. If the stove is under
warranty your supplier will take care of the warranty claim.
Regular maintenance of the stove and flue should be carried out by a competent engineer.
Use only replacement parts as recommended by the manufacturer.

8. Common fault finding
Please be aware that in the event of your stove not performing properly, you should
always consult your installer first or a qualified professional. Below is a list of potential
problems and possible causes:
Problem
Possible cause
Kindling problems
Burning does not start
Bad quality or wet wood
Too thick wood log
Insufficient primary air
Cold flue pipe
Fire gets choked
Insufficient draft
Obstructed chimney or pipes
Flue damper is closed
Burning problems
Too slow fire progression
Bad quality or wet wood
Insufficient primary air
Insufficient draft, low pressure
No ember layer produced
Too thick wood or log
Improper placement of the wood
Fire extinguishes
Too strong or too weak draught
Too brisk flame –not possible
to regulate
Too much combustion air
Too small wood pieces
Ash pan not properly closed
Ash build up behind the ash pan
Sooting
Bad quality or wet wood
Cold flue pipe
Slow burning for longer period
Too long chimney section in cold zone
Chimney fire
Extensive sooting of flue pipe
Insufficient heating
Fresh or too wet wood
Too strong air flow
Improper firebox installation
Stove smoking
Wet wood
Flue pipe obstructed
Flue damper is closed
Operating of closed firebox with door in open position
Chimney not according to requirement
Effect of the wind to the top opening

Insufficient air exchange in the room or interference
from mechanical ventilation interferes (such as kitchen
extractor)
Extensively contaminated glass
window
Bad quality or wet wood
Not suitable or prohibited fuel
Excessive slow burning
Insufficient flue draw
Weather conditions may affect your stove causing smoke spillage into the room when the
appliance door is opened. On windy days this maybe a result of downdraught, or on calm
days, this could be lack of natural flue draught. We recommend contacting your installer
for advice.
Always ensure use of good quality wood at 10-20% moisture content during light up, and
to maintain the fire.
9. Warranty
The warranty cover is effective from when the unit is handed over to the buyer.
In case the commissioning does not take place within 3 months from the date of purchase
then the warranty period starts on the day of purchase of the product, which must be
demonstrated by proof of purchase such as a sales receipt or paid invoice from the seller.
WOODFIRE declines all liability for any accidents due to failure to observe the
specifications contained in the use and maintenance manual accompanying the device.
Furthermore, WOODFIRE declines all liability deriving from improper use of the product by
the user (including heat-shock, overload or misuse of the firebox), unauthorised
modifications and/or repairs, and the use of non-original spare parts or spare parts not
designed for use on this product model.
Duration of warranty is two years on the firebox house, grate, throat baffle, moving parts
(hinges, handle, and fittings).
Please note that the warranty does not cover glues, seals, ceramic glass, and firebricks.
Firepower, Flightway, Dunkeswell, Honiton, Devon EX14 4RD
http://www.woodfirestoves.co.uk

Woodfire commissioning checklist
General information
Stove purchased from
Telephone number
Stove installed by
Telephone number
CPS registration with (e.g.
HETAS)
CPS registration number
Installation date
Stove model
Physical checks
Installation is in accordance with the design, including material specification, flue
length and diameter
The installation instructions have been followed
There is no damage to any components
Joints between the appliance and chimney and within the chimney system are secure
and in good condition
The separation of components from combustible materials conforms to this code of
practice
The appliance and chimney can be fully cleaned, once the installation is complete
Components for weatherproofing are installed correctly
Smoke spillage test has been carried out
CO Alarm fitted and tested
Handover
At handover all user instructions should be given to the user and an explanation of the appliance operation
and safety issues should be given.
Commissioning engineer’s signature*
*By signing this you confirm that all commissioning checks above have passed, and that operation and
maintenance of the appliance have been explained to the customer in full in line with this user manual.

Other manuals for Passiv
1
Table of contents
Other Woodfire Stove manuals
Popular Stove manuals by other brands

Arada
Arada Stratford Ecoboiler user guide

St. Croix
St. Croix Greenfield Installation & operation manual

WANDERS
WANDERS Lenga 500 Installation, servicing and user instructions

Palazzetti
Palazzetti ELSA NEW Installation and maintenance manual

FRANCO BELGE
FRANCO BELGE SAVOY MK2 ELEGANCE 134 08 09 Technical manual

Stanley
Stanley Fionn Installation and operating instructions

Pellet Fire Solutions
Pellet Fire Solutions RAVELLI Sofia Owners & installation manual

hotho
hotho INSERT Installation and operating instrictions

KEKAI
KEKAI KTL500 instruction manual

RIKA
RIKA TOPOII operating manual

Becken
Becken BFE4915WH instruction manual

Ferlux
Ferlux FORNO VISTO User and installation manual