Workzone 45151 User manual

6 GALLON WET
OR DRY VACUUM
ASPIRADORA EN SECO/
HÚMEDO DE 6 GALONES
User Manual
Manual
del usuario
ID: #07177
m
y
h
a
n
s
e
c
o
n
t
r
o
l
.
c
o
m
C
E
R
T
I
F
I
E
D
User-friendly
Manual
English........06
Español ...... 23

Dok./Rev.-Nr. 196260_20180412
Overview .............................................................................3
Use........................................................................................4
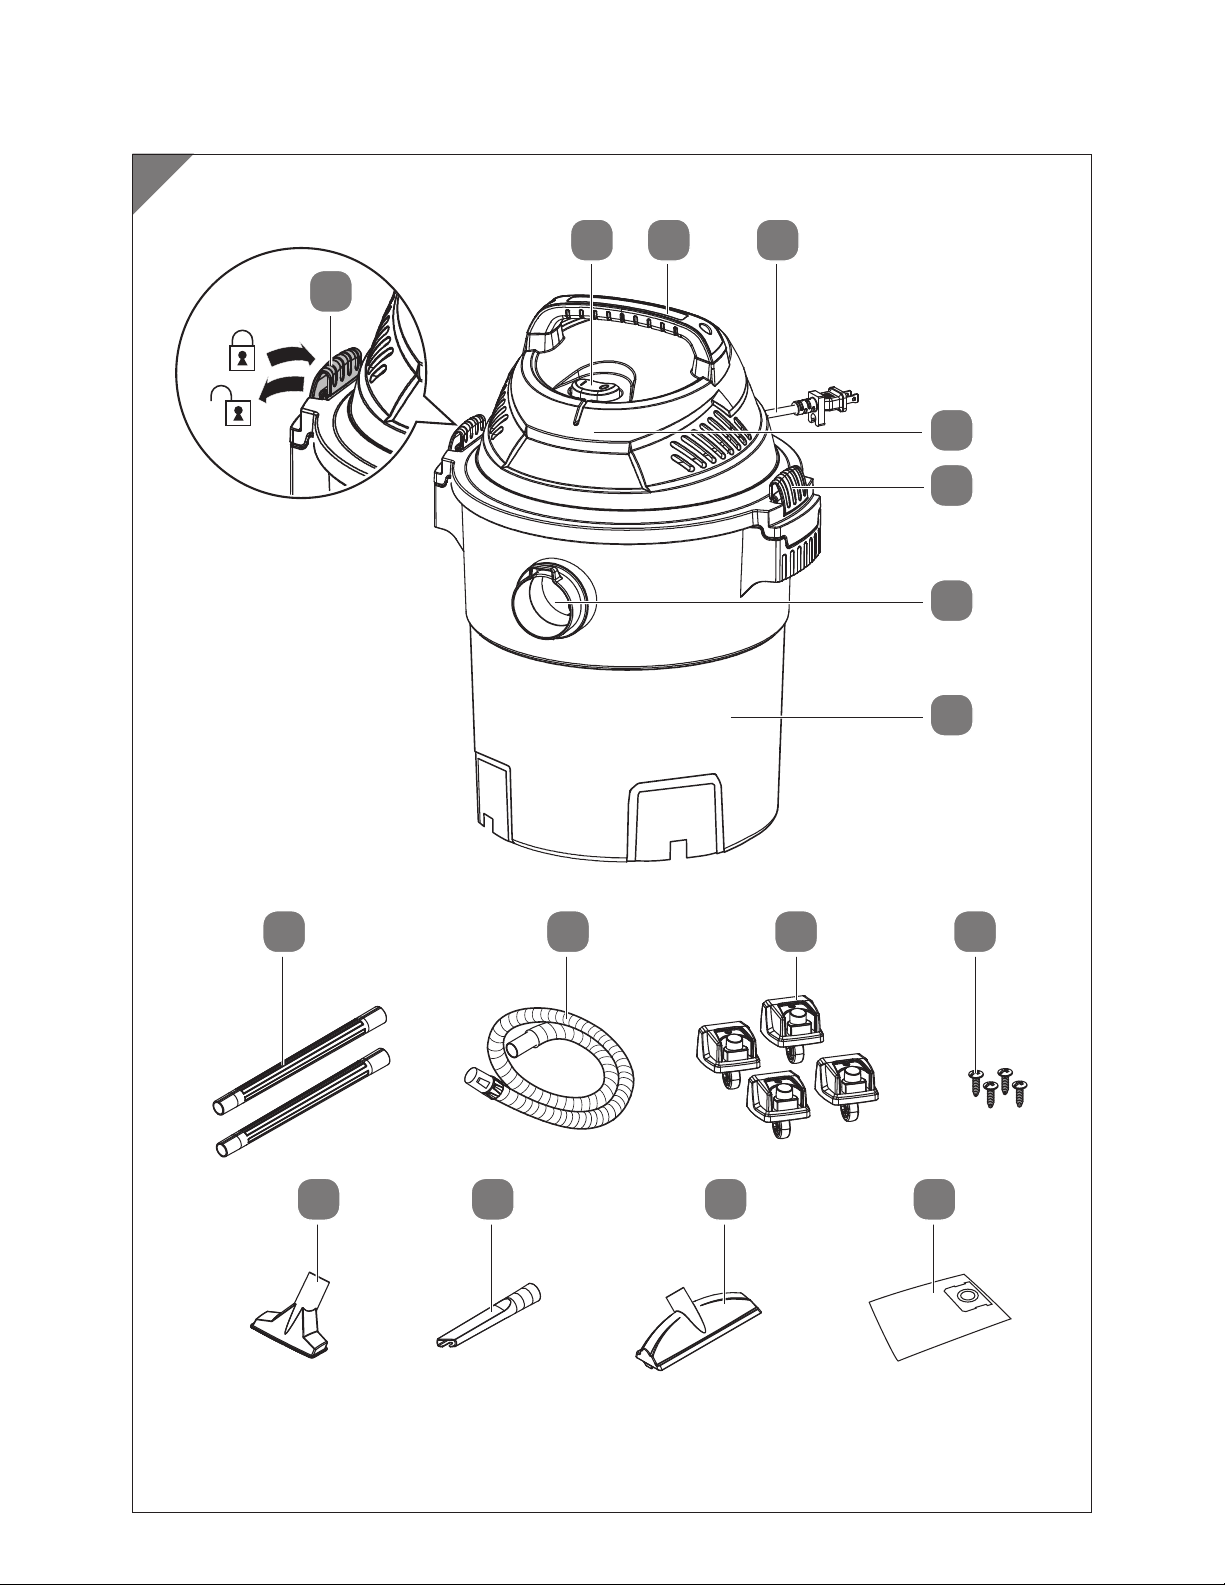
Pack contents/device parts ................................................6
General information............................................................7
Reading and storing the user manual ..................................7
Explanation of symbols ...........................................................7
Safety...................................................................................8
Proper use................................................................................. 8
Safety instructions................................................................... 8
Servicing double-insulated wet/dry vacuum ................... 12
Polarized plug instructions...................................................13
Extension cord instructions .................................................. 13
Checking the vacuum and package contents.................. 14
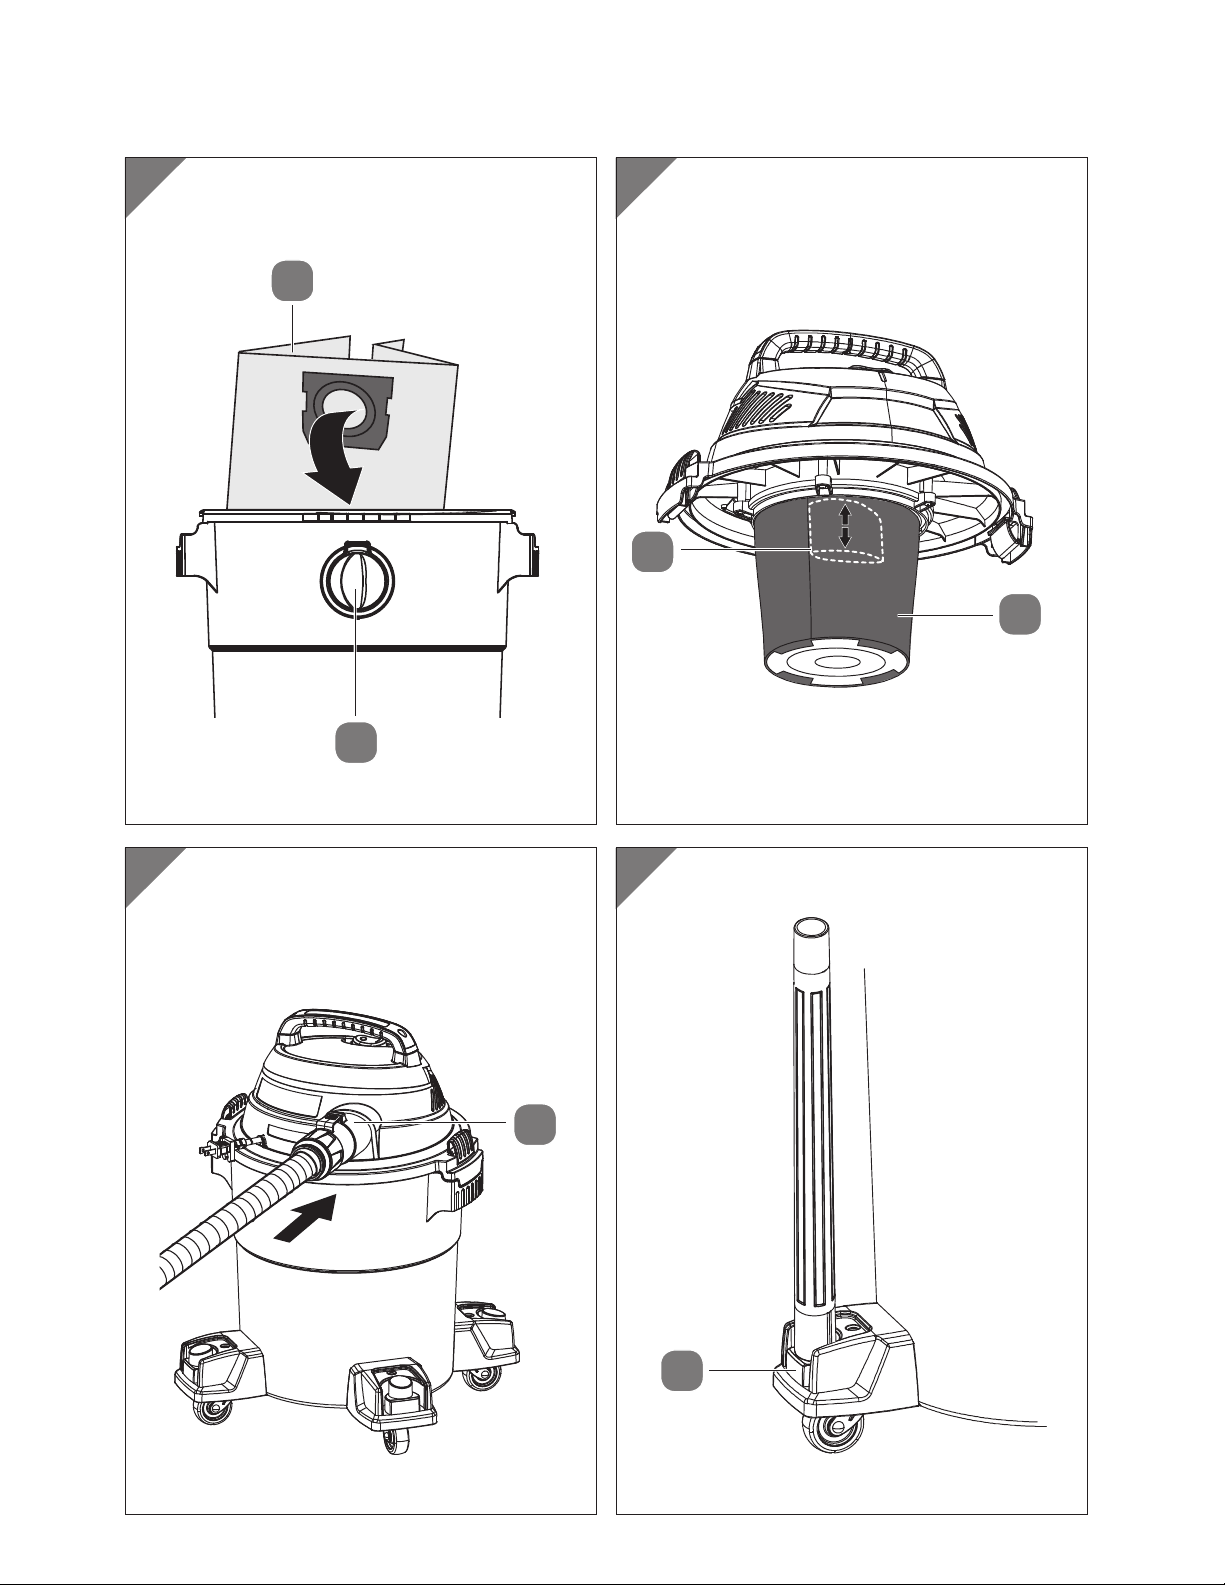
Assembly ........................................................................... 14
Assembling the castors..........................................................14
Assembling the hose, extension wands and nozzle.........15
Operation........................................................................... 15
Dry vacuuming........................................................................15
Wet vacuuming .......................................................................16
Blowing .................................................................................... 17
Cleaning and maintenance................................................17
Emptying the dust tank.........................................................18
Cleaning the vacuum.............................................................18
Cleaning the reusable cloth filter and foam filter..............18
Replacing filters .....................................................................19
Storage .............................................................................. 19
Troubleshooting................................................................20
Technical data ...................................................................20
Disposal...............................................................................21
Disposing of the packaging .................................................. 21
Disposing of the vacuum....................................................... 21
Contents

3
A
1 2 3
5
6
7
8
12 13 14 15
9 10 11
4
5

4
B C
ED
10
11
7
9
8
8
16
17
18
19
9
6
1.
2.
3.

5
F
H
G
I
15
6
18
20
22
21

6
Pack contents⁄device parts
1Power switch
2Handle
3Power cord
4Motor head
5Latch, 2×
6Vacuum port
7Dust tank
8Extension wand, 2×
9Hose
10 Castor, 4×
11 Screw, 4×
12 Gulper nozzle
13 Crevice nozzle
14 Floor nozzle
15 Disposable filter bag
16 Reusable cloth filter
17 Clamp ring
18 Foam filter
19 Filter cage
20 Float mechanism
21 Blowing port
22 Accessory holder

General information
7
General information
Reading and storing the user manual
This user manual accompanies this 6 gallon wet or dry vacuum
(hereafter referred to as the “vacuum”), and contains important
information on setup and handling.
Before using the vacuum, read the user manual carefully. This
particularly applies to the safety instructions. Failure to do so may result in personal
injury or damage to the vacuum.
Store the user manual for further use. Make sure to include this user manual when
passing the vacuum on to third parties.
Explanation of symbols
The following symbols and signal words are used in this user manual, on the vacuum
or on the packaging.
WARNING! This signal symbol/word designates a hazard
with moderate risk, which may result in death or
severe injury if not avoided.
NOTICE! This signal word warns of possible damage to
property.
This symbol provides you with useful additional information on
handling and use.
DOUBLE INSULATED.
GROUNDING NOT REQUIRED.

Safety
8
Safety
Proper use
The vacuum is exclusively designed for domestic wet and dry vacuuming, and can
also be used as a blower. It is only intended for private use and not suitable for
commercial purposes.
Only use the vacuum as described in this user manual. Any other use is considered
improper and may result in damage to property or persons.
The manufacturer or vendor cannot be held liable for damages or injury incurred
through improper or incorrect use.
Safety instructions
IMPORTANT SAFETY INSTRUCTIONS
READ ALL INSTRUCTIONS BEFORE
USING THIS VACUUM
SAVE THESE INSTRUCTIONS
WHEN USING AN ELECTRICAL APPLIANCE, BASIC PRECAUTIONS SHOULD
ALWAYS BE FOLLOWED, INCLUDING THE FOLLOWING.
FOR HOUSEHOLD USE ONLY.
WARNING!
To reduce the risk of fire, electric shock or injury:
−Do not leave the vacuum when plugged in. Unplug from the
outlet when not in use and before servicing.
−Do not expose the vacuum to rain. Store it indoors.
−Never operate the vacuum when flammable materials or
vapors are present because electrical devices produce arcs or
sparks that can cause a fire or explosion.
−Never leave an operating vacuum unattended.
−Always disconnect the plug from the wall outlet before
opening the dust tank.
−Do not allow the vacuum to be used as a toy. Close attention is

Safety
9
necessary when used by or near children.
−Do not use the vacuum with damaged cord or plug. If the
vacuum is not working as it should, has been dropped,
damaged, left outdoors or dropped into water, contact service
center for assistance.
−Do not pull or carry by the cord, use the cord as a handle, close
a door on the cord or pull the cord around sharp edges or
corners. Do not run the vacuum over the cord. Keep the cord
away from heated surfaces.
−Do not unplug the vacuum by pulling on the cord. To unplug,
grasp the plug, not the cord.
−Do not handle plug or appliance with wet hands.
−Do not put any object into the openings. Do not use with
any openings blocked; keep them free of dust, lint, hair and
anything that may reduce air flow.
−Keep hair, loose clothing, fingers and all parts of body away
from openings and moving parts.
−Do not use the vacuum to pick up anything that is burning or
smoking, such as cigarettes, matches or hot ashes.
−Do not use the vacuum without dust bag and/or filters in
place.
−Turn off all controls before unplugging the vacuum.
−Use extra care when cleaning on stairs.
−Do not use the vacuum to pick up flammable or combustible
liquids such as gasoline or use in areas where they may be
present.
−Do not use the vacuum to pick up toxic, carcinogenic,
combustible or other hazardous materials such as asbestos,
arsenic, barium, beryllium, lead, pesticides or other health
endangering materials.
−Do not use the vacuum to pick up soot, cement, plaster or
drywall dust without filter and dust bag in place. These are
very fine particles that may affect the performance of the
motor or be exhausted back into the air.

Safety
10
−Do not use the blower as a sprayer of flammable liquids such
as oil-based paint, lacquers, etc.
−Do not leave the power cord lying on the floor once you have
finished the cleaning job. It can become a tripping hazard.
−Use special care when emptying a heavily loaded dust tank.
−To avoid spontaneous combustion, empty the dust tank after
each use.
−Unplug the vacuum before connecting the hose, wand, nozzle
and the like.
−The operation of the blower can result in foreign objects being
blown into eyes, which can result in eye injury. Always wear
safety eyewear (complying with ANSI Z87.1) when operating
the vacuum.
−To reduce the risk of hearing damage, wear hearing protection
when using for extended periods or in noisy areas.
−Stay alert! Watch what you are doing and use common sense.
Do not use the vacuum when you are tired, distracted or
under the influence of drugs, alcohol or medication causing
diminished control.
−Use only as described in this user manual.
−Use only the manufacturer’s recommended attachments.
−This vacuum is provided with double insulation. Use only
identical replacement parts. See instructions for “Servicing
double-insulated wet/dry vacuum”.
−Only connect the vacuum if the line voltage of the outlet
corresponds to the data on the rating label.
−The vacuum must not be used to vacuum off people or animals.
−If the power cord is damaged, it must be replaced by the
manufacturer or its service agent or a similarly qualified
person in order to avoid a hazard.
−The vacuum or its power cord may contain chemicals,
including lead, known to the state of California to cause cancer
and birth defects or other reproductive harm. Wash hands
after handling.

Safety
11
WARNING!
Danger for children and persons with impaired physical, sen-
sory or mental capacities (e.g. partially disabled persons, older
persons with reduced physical and mental capacities), or lack
of experience and knowledge (e.g. older children).
−If they are supervised or have been instructed on how to safely
use the vacuum and have understood the risks associated
with operating it, this vacuum may be used by persons with
impaired physical, sensory or mental capacities, or those
lacking experience and knowledge. Children may not play
with the vacuum. Cleaning and user maintenance must not be
performed by children.
−Keep children away from the vacuum and power cord.
−Make sure that children do not play with the plastic wrapping.
They may get caught in it when playing and suffocate.
WARNING!
Health hazard!
Various dust particles created by power sanding, sawing, grinding,
drilling and other construction activities contains chemicals known
to the State of California and other authorities to cause cancer,
birth defects or other reproductive harm. Some examples of these
chemicals are:
• lead from lead-based paints,
• crystalline silica from bricks and cement and other masonry
products, and
• arsenic and chromium from chemically-treated lumber.
−If these or similar dusts are on the surfaces where you are
cleaning, small particles may become airborne as a result
of the vacuuming process. Control dust at the source where
possible. Use good work practices.
−When the inhalation of dust cannot be substantially controlled,
i.e., kept at or near the ambient (background) level, the

Safety
12
operator and any bystanders should wear a respirator
approved by NIOSH/MSHA for the type of dust encountered.
The risk from these exposures varies, depending on how
often you do this type of work. To reduce your exposure to
these chemicals: work in a well-ventilated area and work with
approved safety equipment, such as those dust masks that
are specially designed to filter out microscopic particles. Wash
hands after handling.
NOTICE!
Risk of damage!
Improper handling of the vacuum may result in damage to the
vacuum.
−Do not use the vacuum without the hoses, wands and filters in
place.
−Do not stand or sit on the vacuum.
−Ensure that the power cord does not come into contact with
hot parts.
−Never expose the vacuum to high temperatures (heaters etc.)
or to the effects of the weather (rain etc.).
−Never attempt to clean the vacuum by immersing it in water
and do not use a steam cleaner to clean it. Otherwise, you
could damage the vacuum.
−Stop using the vacuum if its plastic parts exhibit cracks or
breaks or are deformed. Only replace damaged parts with
corresponding original spare parts.
Servicing double-insulated wet/dry vacuum
−In a double-insulated wet/dry vacuum, two systems of
insulation are provided instead of grounding. No grounding
means is provided on a double-insulated appliance, nor
should a means for grounding be added. Servicing a
double-insulated wet/dry vacuum requires extreme care
and knowledge of the system and should be done only by

Safety
13
qualified service personnel. Replacement parts for a double-
insulated wet/dry vacuum must be identical to the parts they
replace. Your double-insulated wet/dry vacuum is marked
with the words “DOUBLE INSULATED” and the symbol (square
within a square) may also be marked on the appliance.
−To reduce the risk of injury from electrical shock, unplug the
power cord before servicing the electrical parts of the wet/dry
vacuum.
Polarized plug instructions
−This vacuum is equipped with a polarized plug (one blade is
wider than the other). To reduce the risk of electric shock, this
plug will fit into the polarized outlet only one way. If the plug
does not properly fit into the outlet at first, reverse it. If it still
does not fit, contact a qualified electrician. Do not attempt to
modify the plug in any way.
Extension cord instructions
−WARNING: Use only extension cords that are rated for outdoor
use. Extension cords in poor condition or that are too small in
wire size can pose fire and shock hazards. To reduce the risk
of these hazards when using an extension cord, be sure it is
in good condition and that the connection does not come into
contact with liquid. To keep power loss to a minimum, use the
following table to choose the minimum wire size extension
cord.
Extension Cord Length Gauge A.W.G.
0–50 ft 14
50–100 ft 12

Checking the vacuum and package contents
14
Checking the vacuum and package contents
NOTICE!
Risk of damage!
If you are not cautious when opening the packaging with a sharp
knife or other pointed object, you may quickly damage the vacuum.
−For this reason, be very careful when opening it.
1. Take the vacuum out of the packaging.
2. Check to make sure that all parts are included (see Fig. A).
Most of the accessories are stored inside the vacuum. To remove the accessories,
undo the latches 5and remove the motor head 4from the vacuum with the
handle 2.
3. Check whether the vacuum or individual parts are damaged. If this is the case, do
not use the vacuum. Contact the manufacturer via the service address indicated
on the warranty card.
Assembly
Assembling the castors
A crosshead screwdriver is required for assembling the castors.
1. Undo the latches 5and remove the motor head 4from the vacuum with the
handle 2(see Fig. A).
2. Place the dust tank 7upside down.
3. Insert the castors 10 into the slots on the dust tank and secure them with the
screws 11 (see Fig. B).
4. Turn the dust tank over.
5. Replace the motor head on the dust tank and engage the latches.
Make sure the latches snap tightly in place and are securely engaged.

Operation
15
Assembling the hose, extension wands and nozzle
1. Insert the larger end of the hose 9into the vacuum port 6until it securely
locks into place (see Fig. C).
2. Connect the smaller end of the hose to an extension wand 8(see step 1 in Fig. D).
3. Connect the two extension wands together (see step 2 in Fig. D).
4. Connect the end of the extension wand to a desired nozzle 12 , 13 or 14
(see step 3 in Fig. D).
Use the gulper nozzle 12 for tight spaces and picking up larger pieces.
Use the crevice nozzle 13 for hard-to-reach nooks and crannies.
Use the floor nozzle 14 for carpets or hard floors.
Operation
WARNING!
Risk of fire, explosion and health hazard!
If you do not use the vacuum properly, there is an increased risk of
fire, explosion and health hazard.
−Do not operate the vacuum in areas with flammable gases,
vapors or explosive dust in the air.
−Do not vacuum toxic materials.
−Do not use the vacuum as a sprayer of any flammable or
combustible liquid.
−Wear safety eyewear, ear protectors and dust mask for
protection.
Dry vacuuming
−The vacuum is supplied with the reusable cloth filter already fitted
for dry vacuuming.
−If you are using the vacuum to pick up very fine dust, it is
necessary to empty the dust tank and clean or replace the filters
more frequently for best performance.
1. Undo the latches 5and remove the motor head 4from the vacuum with the
handle 2(see Fig. A).
2. Make sure the reusable cloth filter 16 is properly installed.

Operation
16
To properly install the reusable cloth filter, fit it onto the filter cage 19 (covered
by the foam filter 18 ) and secure it with the clamp ring 17 (see Fig. E).
Make sure there is no gap between the reusable cloth filter and the base of
the filter cage. Any leaks will allow the picked up debris to be blown out of the
blowing port 21 and back into the surroundings.
3. Make sure the disposable filter bag 15 is properly installed.
To properly install the disposable filter bag, fit its opening onto the vacuum port 6
inside the dust tank 7(see Fig. F).
Position the bag so that it is distributed evenly around the inside of the dust tank.
4. Replace the motor head on the dust tank and engage the latches.
Make sure the latches snap tightly in place and are securely engaged.
5. Assemble the hose 9, extension wands 8and a desired nozzle 12 , 13 or 14
(see chapter “Assembling the hose, extension wands and nozzle”).
6. Connect the power cord 3to a wall outlet.
7. Press the power switch 1to set it to the “I” position to switch the vacuum on.
8. When done, press the power switch to set it to the “O” position to switch the
vacuum off and unplug the power cord.
Wet vacuuming
The reusable cloth filter, clamp ring and disposable filter bag must be
removed before wet vacuuming.
1. Undo the latches 5and remove the motor head 4from the vacuum with the
handle 2(see Fig. A).
2. Make sure the reusable cloth filter 16 and clamp ring 17 are removed.
To remove them, lift the clamp ring and then the reusable cloth filter off from the
filter cage 19 (see Fig. E).
3. Make sure the foam filter 18 is in place on the filter cage (see Fig. G).
4. Make sure the disposable filter bag 15 is removed.
To remove the filter bag, detach it from the vacuum port 6.
5. Replace the motor head on the dust tank and engage the latches.
Make sure the latches snap tightly in place and are securely engaged.
6. Assemble the hose 9, extension wands 8and a desired nozzle 12 , 13 or 14
(see chapter “Assembling the hose, extension wands and nozzle”).
7. Connect the power cord 3to a wall outlet.
8. Press the power switch 1to set it to the “I” position to switch the vacuum on.

Cleaning and maintenance
17
9. When done, press the power switch to set it to the “O” position to switch the
vacuum off and unplug the power cord.
The vacuum is equipped with a float mechanism 20 which will rise
automatically to cut off the airflow when the liquid in the dust tank
reaches a predetermined level (see Fig. G). You will know the airflow
is cut when the suction ceases and the motor noise becomes higher in
pitch due to increased motor speed. In this case, immediately switch
the vacuum off and empty the liquid in the dust tank to avoid damage
to the vacuum.
Blowing
The vacuum can be used as a blower to clean up dust or debris.
1. Insert the larger end of the hose 9into the blowing port 21 until it securely
locks into place (see Fig. H).
2. Connect the power cord 3to a wall outlet.
3. Press the power switch 1to set it to the “I” position to switch the vacuum on.
4. When done, press the power switch to set it to the “O” position to switch the
vacuum off and unplug the power cord.
Cleaning and maintenance
WARNING!
Risk of electric shock!
Improper handling of the vacuum may result in electric shock.
−Always switch the vacuum off and unplug the power cord
before cleaning.
NOTICE!
Risk of short circuit!
Water or other liquids that have penetrated the motor head may
cause a short circuit.
−Make sure that no water or other liquids penetrate the motor
head.
−Never immerse the motor head in water or other liquids.

Cleaning and maintenance
18
NOTICE!
Risk of damage!
Improper handling of the vacuum may result in damage to the
vacuum.
−Do not use any aggressive cleaners, brushes with metal or
nylon bristles, or sharp or metallic cleaning utensils such as
knives, hard scrapers and the like. They could damage the
surfaces.
−Do not open the filter cage for cleaning.
Emptying the dust tank
1. Switch the vacuum off, unplug the power cord 3and let the vacuum cool off
completely.
2. Undo the latches 5and remove the motor head 4from the vacuum with the
handle 2(see Fig. A).
3. Replace the disposable filter bag 15 when it is full (see chapter “Replacing
filters”).
4. Clear all dirt or debris from the dust tank 7.
5. Replace the motor head on the dust tank and engage the latches.
Make sure the latches snap tightly in place and are securely engaged.
Cleaning the vacuum
1. Switch the vacuum off, unplug the power cord 3and let the vacuum cool off
completely.
2. Use a damp cloth to wipe off the motor head 4, including its underside around
the filter cage 19 .
3. Clean the dust tank 7with warm water and mild soup. Rinse with clean water
and let all parts dry completely.
Cleaning the reusable cloth filter and foam filter
The reusable cloth filter 16 and foam filter 18 should be regularly cleaned for best
performance.
1. Switch the vacuum off, unplug the power cord 3and let the vacuum cool off
completely.

Storage
19
2. Undo the latches 5and remove the motor head 4from the vacuum with the
handle 2(see Fig. A).
3. Lift the clamp ring 17 and then the reusable cloth filter off from the filter cage 19
(see Fig. E).
4. Remove the foam filter from the filter cage.
5. Preliminarily clean both filters by gently tapping or brushing the dirt off. This
should NOT be done indoors in the living areas.
6. Use a mild soap and water solution to wash the filters and rinse with clean water.
7. Allow both filters to air dry thoroughly before installing them back on the filter
cage.
After cleaning, check the reusable cloth filter for tears and small holes.
Do not use a damaged filter. Even a small hole can cause a lot of dust
to come out from the vacuum. Replace a damaged filter immediately
(see chapter “Replacing filters”).
Replacing filters
−Replace the following filters when they are full or damaged, respectively.
Filter Part number
Disposable filter bag 15 19-3100
Reusable cloth filter 16 19-1500
−Contact the dealer for purchasing replacements.
Alton Industries Ltd.
Phone: 1-888-899-0146, 1-630-389-1032 or 1-855-782-6822
E-mail: info@altonindustries.com
Storage
All parts must be completely dry before being stored.
−Always store the vacuum in a dry area.
−Protect the vacuum from direct sunlight.
−Store the vacuum so that it is not accessible to children.
−The dust tank 7should be emptied and cleaned.
−The power cord 3should be wrapped and hung on the vacuum.
−The hose 9and nozzles 12 , 13 and 14 can be stored in the dust tank.
−Use the accessory holders 22 to store the extension wands 8and/or nozzles
(see Fig. I).

Troubleshooting
20
Troubleshooting
WARNING!
Risk of electric shock!
Improper handling of the vacuum may result in electric shock.
−Always switch the vacuum off and unplug the power cord
before performing troubleshooting checks.
Some problems may be caused by minor faults that you can fix yourself. To do so,
follow the instructions in the following table. If it is still not possible to resolve the
problem, contact customer service. Do not repair the vacuum yourself.
Problem Possible cause Solution
The vacuum
will not
operate.
There is no power supply. Check the power supply.
The power cord is faulty. Unplug and check the power
cord. If damaged, have it repaired
by a qualified professional.
Loss of suction. There is blockage in the
nozzle, hose, filter or vacuum
port.
Check for and clear the blockage.
Clean or replace the filters if
necessary.
The dust tank is full. Empty the dust tank.
Dust or dirt is
blown out.
The filter is missing or not
correctly installed.
Install the missing filter or check
the filter installation.
Technical data
Model: 45151
Supply voltage: 120 V~, 60 Hz
Power: 1,000 W
Tank capacity: 6 gallons
Air flow: 85 CFM
Noise level: 80 dB
Diameter of hose: 1 ¼"
Length of hose: 6 ft
Length of power cord: 10 ft
Product code: 45151
Table of contents
Languages:
Other Workzone Vacuum Cleaner manuals