WORLD TECH ELITE STRIKER-X User manual

ITEM NO. 33042

2
TABLE OF CONTENTS
INTRODUCTION
SAFETY & PRECAUTIONS
DRONE DIAGRAM
TRANSMITTER DIAGRAM
INSTALLING THE TRANSMITTER BATTERY
INSTALLING THE DRONE BATTERY
CHARGING THE DRONE BATTERY
SYNCING THE DRONE TO THE TRANSMITTER
TRANSMITTER LCD INTERFACE
FLIGHT CONTROLS
INSTALLING THE MEMORY CARD
USING THE DRONE CAMERA
CAMERA INDICATOR LIGHT
VIEWING VIDEO/PHOTO FILES ON THE COMPUTER
ADJUSTING THE TRIM
SPECIAL ACTIONS
POST FLIGHT
AUTOMATIC SHUTDOWN OVERRIDE FUNCTIONS
REPLACING THE ROTORS
REMOVING THE ROTOR GUARDS
TROUBLESHOOTING
FCC WARNINGS
3
3
4
4
5
5
6
7
7
8
9
ROTOR UNLOCK/LOCK - AUTO-TAKE OFF/LAND 7
9
9
10
11
12
13
12
13
14
15
16

3
INTRODUCTION
SAFETY & PRECAUTIONS
Thank you for purchasing this amazing World Tech Toys product. This drone is suitable for indoor and
outdoor flight. Please carefully read the entire manual before operating this drone and keep it for
reference in the future.
1. Important Instructions
2. Safety Instructions
3. Flight Environment
3. Attention Before Flying
1) This product is not a toy. It is a precision piece of equipment with integrated mechanical
technologies, electronic, aerodynamics and radio frequencies. To avoid accidents, the
operator must read these instructions carefully, prior to operation. If operated incorrectly,
serious physical injury and/or property loss may occur.
2) This product is suitable for operators with previous hobby flying experience, age 14 and up.
3) Only fly in a safe environment that is legal for remote control flying.
4) We are not responsible for the operation and control of this device and related safety
responsibilities.
1) The minimum recommended flying area is 25ft x 25ft x 15ft.
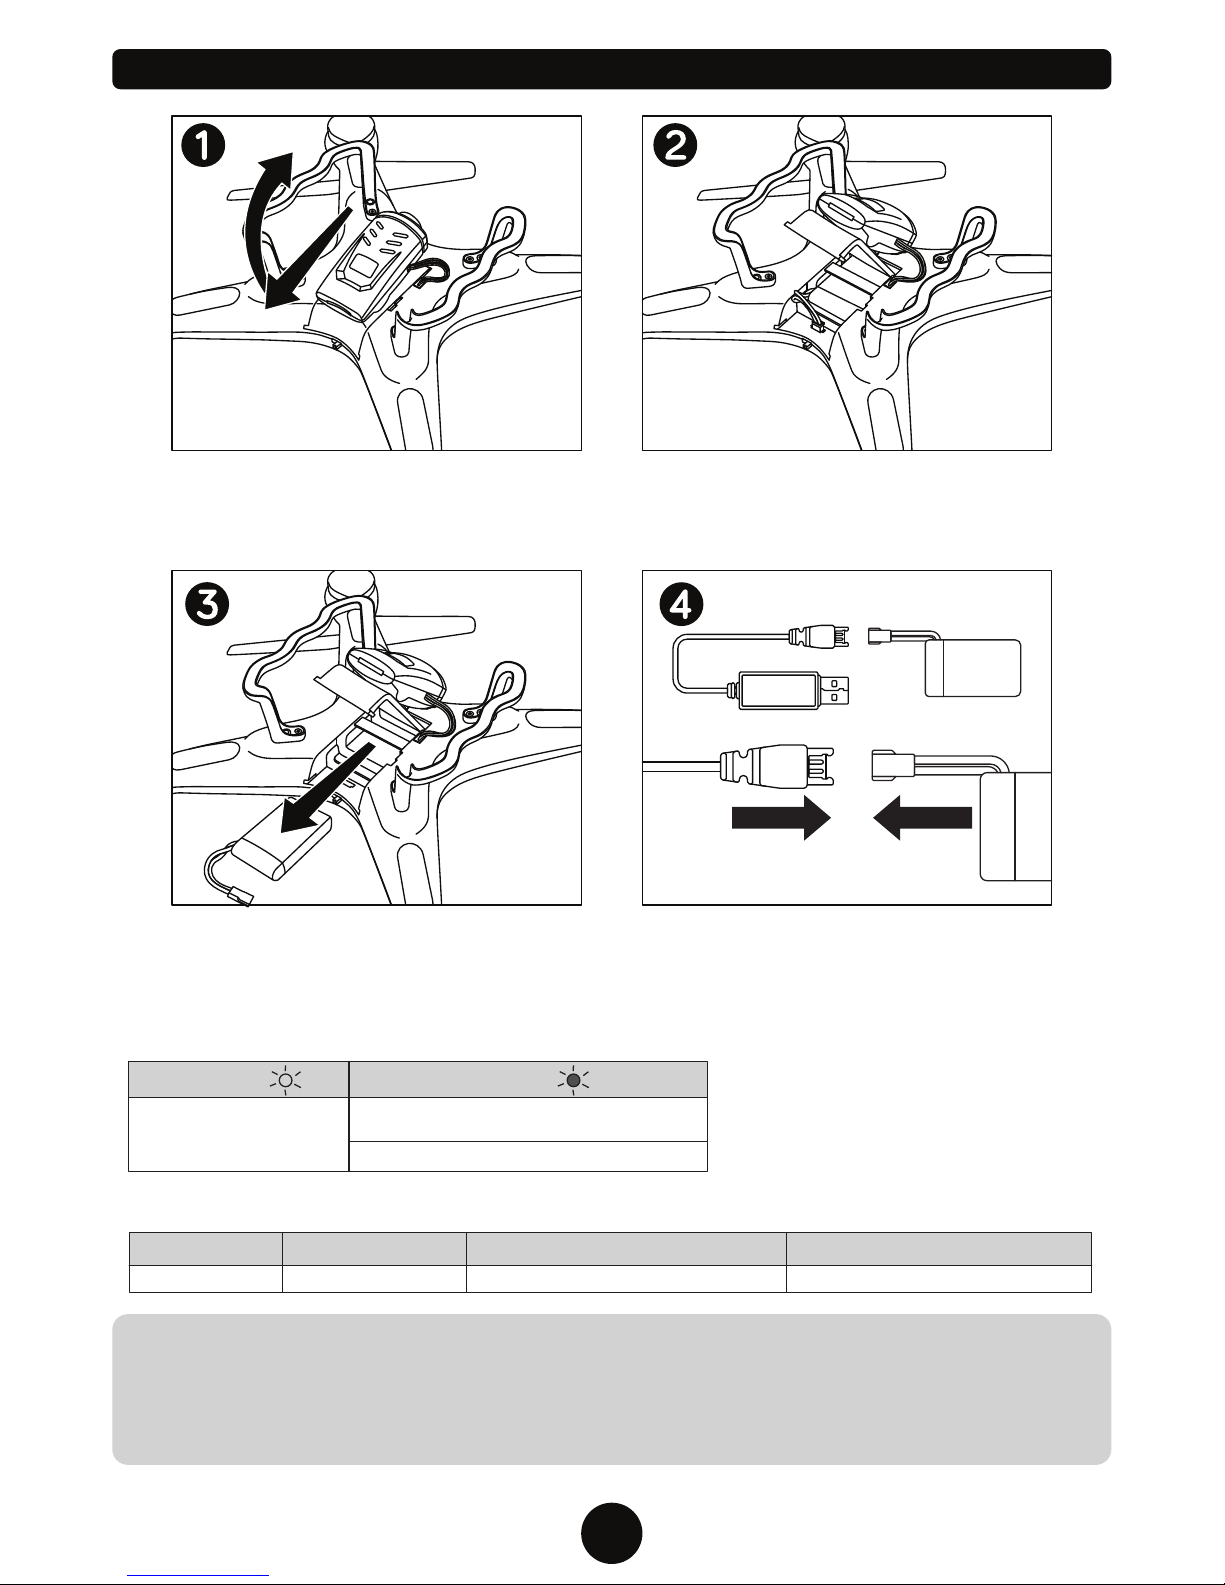
2) Be sure that the transmitter and drone batteries are fully charged.
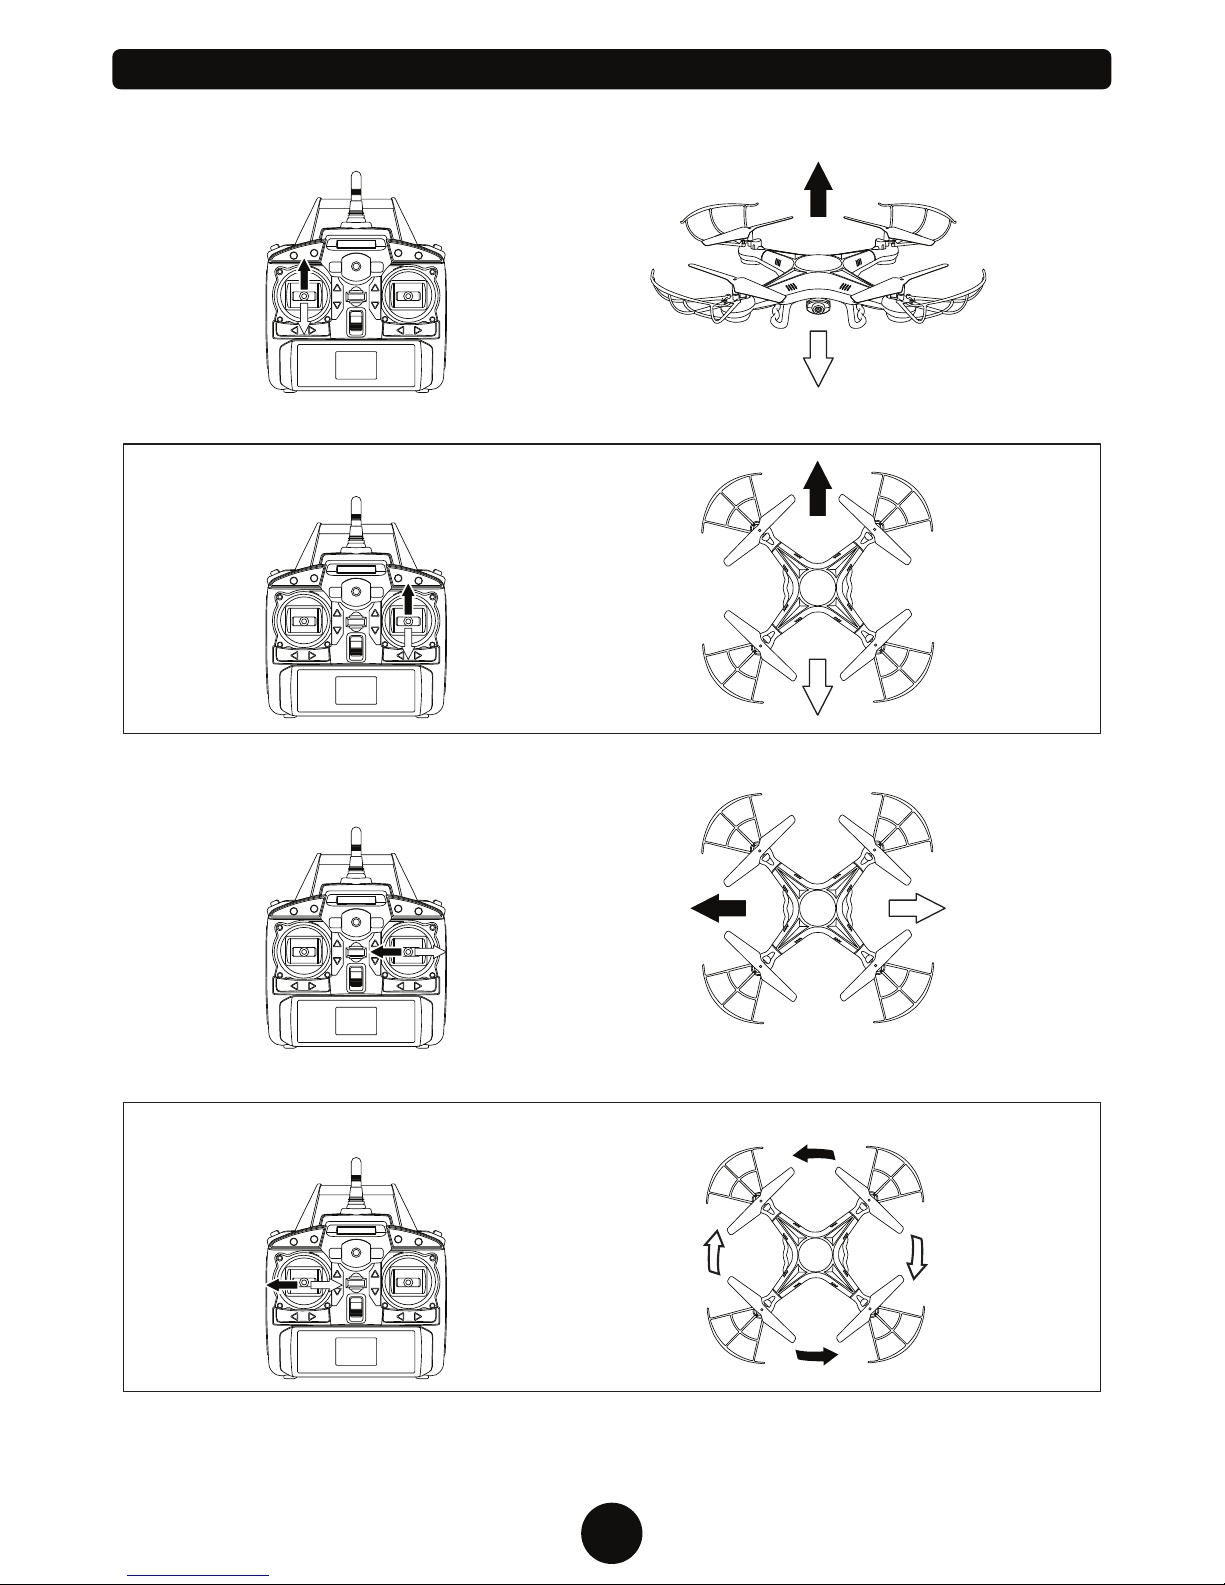
3) Be sure that the throttle is at its lowest position to avoid premature flight.
4) Always turn on the drone first, then turn on the transmitter. Incorrect operation may result in
failure and the possible influencing of other devices in area.
5) Ensure that all plugs and wires are secure and in place as they may loosen over time.
The inside of this drone is integrated with precision electronic and mechanical parts. Avoid
contact with water and wet environments as it may result in parts breakdowns and accidents
may occur.
1) Always operate far away from obstacles and crowds. This drone has uncertain flying speeds
and conditions which present potential danger. Fly away from people, animals, high buildings,
high voltage wiring, etc. To ensure a safe and fun flying environment avoid bad weather
conditions like wind, rain, and thunder.
2) Avoid high temperatures. This drone is made of metal, plastic, electronic components and
other materials. Keep away from any heat source and avoid using in high temperatures to
prevent transformation and broken parts resulting from the heat.

4
DRONE DIAGRAM
TRANSMITTER DIAGRAM
*Speed Control Modes:
• Low Speed: Transmitter beeps once.
• Medium Speed: Transmitter beeps twice.
• High Speed: Transmitter beeps three times.
Landing Skids
HD Picture/Video Camera
720p
Landing Skids
LED Lights
BOTTOM OF DRONE
Power
Switch
Battery
Compartment
Video Record ControlAutopilot
Antenna
Easy Mode
Speed Control*
Power Indicator
Ascend/Descend
Turn Left/Right
Turn Left/Right Trim
Power Switch
Photo Control
Flip Stunt Mode
Forward/Backward Trim
Forward/Backward
Move Left/Right
Move Left/Right Trim
LCD Screen
HD Picture/Video
Camera
Rotor
Rotor Guard

Battery Cover
4 AA Batteries
(NOT INCLUDED)
5
First remove the battery cover by pulling down on both
tabs at the top of the cover. Next install 4 AA batteries
with the correct polarity. Finally replace the battery cover
and make sure the two tabs are secure.
Make sure the drone power switch is in the
OFF position. Push the battery compartment
door away from the center of the drone and
swing it open.
Slide the battery pack into the battery
compartment.
Plug the battery pack into the drone then
close and snap the battery compartment
back into place. Switch on the drone’s power
switch when ready to fly.
CAUTION:
1. Make sure the batteries are
installed with the correct polarity.
2. Do not mix old and new batteries.
3. Do not mix different types
of batteries.
INSTALLING THE TRANSMITTER BATTERY
INSTALLING THE DRONE BATTERY

6
BATTERY PACK SPECIFICATIONS
CAUTION WHILE CHARGING:
Do not charge with batteries still installed. Do not charge battery unsupervised. Do not immediately charge after
use. Do not overcharge battery. Ideal charge time is 90-100 minutes. Overcharging can cause a catastrophic
failure. Always charge on dry and ventilated areas away from any heat source or flammable materials. Always
use the original USB charging cable provided. Promptly change and replace old or defective batteries.
Li-Po Battery 3.7V 500mAh Flight Duration 5.5 - 6.5 minutes Charging Time 90 -100 minutes
CHARGING THE DRONE BATTERY
USB CHARGER LED LIGHT INDICATOR
Please Note: The USB charger light will turn
on when plugged in to indicate there is
power running through the USB. Once the
battery is connected the light will turn off.
The Light will turn back on when charging is
complete.
Make sure the drone power switch is in the
OFF position. Push the battery compartment
door away from the center of the drone and
swing it open.
Slide the battery pack out of the drone.
Unplug the battery pack from the drone.
Connect the battery pack to the included
USB charger then plug the USB to any
powered USB port.
No Light
Charging
Red Light
Usage DurationBattery SpecificationBattery Type Charge Time
USB charger is connected to a powered USB
port without the battery attached.
Battery pack is fully charged.

SYNCING THE DRONE TO THE TRANSMITTER
TRANSMITTER LCD INTERFACE
Signal Icon Battery Level
Stick Mode
Display
Forward/Backward
Trim Display
Move Left/Right
Trim Display
Speed Display
Camera Indicator
Left/Right Turn
Trimming Display
Switch ON the drone and place it on a flat surface. The drone’s LED
lights will start flashing rapidly. Switch ON the transmitter, it will emit
a short beep and the power indicator light will start flashing, the
drone’s LED lights will begin to flash slowly. Push the
Ascend/Descend stick (left joystick) all the way up, then all the way
down. The transmitter will emit a single long beep when the joystick
is in the up and down position, the power indicator will stop flashing
and the drones lights will stay on. The transmitter has successfully
paired with the drone and control information will now appear on the
LCD screen.
1
2
7
ROTOR UNLOCK/LOCK - AUTO-TAKE OFF/LAND
LANDING
AUTOPILOT
When you are ready to land, press the AUTOPILOT button
again and the drone will slowly descend and land. The rotors
will eventually stop spinning.
Before flying your drone for the first time please read all the
instructions carefully and make sure you fully understand how
to control it. You will not be able to control your drone until
you unlock the rotors at the start of each flight.
UNLOCK/LOCK - AUTO-TAKE OFF
Once you’ve synced the drone and transmitter, you must unlock
the drone’s rotors. To unlock or lock the rotors you must pull
both transmitter joysticks down and inward as shown for a few
seconds. The rotors will begin to spin when unlocked. Repeat
the steps to lock the rotors. You can now slowly press up on the
Ascend/Descend stick (left joystick) and the drone will take off.
To Auto-Take Off press the AUTOPILOT button and the drone
will begin to ascend and hover in place.
Rotor Unlock/Lock

FLIGHT CONTROLS
Turn Left/Right
Turn Left
Turn Right
Move Right
Move Left
FRONT
BACK
FRONT
BACK
Ascend/Descend
Move Forward/Backward
Move Left/Right
8
FRONT
BACK

INSTALLING THE MEMORY CARD
USING THE DRONE CAMERA
CAMERA INDICATOR LIGHT
Flip the drone upside down. Take the included memory card and make sure the gold contact points are facing you. Insert the
memory card into the camera until it clicks into place. To remove the memory card, push it into the camera until you hear a
click and the memory card will pop out. If the drone is turned on and the memory card is properly installed, the light inside the
camera will turn solid blue. The light will flash red and blue when no memory card is installed.
Make sure the both the drone and transmitter are turned on, the memory card is properly installed and the transmitter is
synced with the drone.
NO LIGHT:
BLUE/RED LIGHT FLASHING:
SOLID BLUE LIGHT:
FLASHING RED LIGHT:
RED LIGHT FLASHES ONCE:
Drone is powered OFF
No memory card
Memory card is installed correctly, camera is ready.
Recording Video
Taking Photo
Recording Video: Press the VIDEO button once on the transmitter. The
camera indicator light located inside the camera will start flashing RED when
recording video. Press the VIDEO button again to stop recording video.
Taking a Photo: Press the PHOTO button once on the transmitter. The
camera indicator light located inside the camera will flash RED once when a
photo is taken.
NOTE: YOU CAN NOT TAKE A PHOTO WHILE RECORDING VIDEO
9

If you want to view your video or photo files from the drone on your computer, you’ll have to transfer them
over first. Remove the memory card from the drone’s camera and insert it into the memory card adaptor.
Then plug the memory card adaptor into the USB port on your computer.
Videos and photos can be viewed using media players. If you are having issues viewing your drone videos,
try downloading and viewing the video files with VLC media player.
VIEWING VIDEO/PHOTO FILES ON THE COMPUTER
Once the USB adaptor with the memory card is plugged into a USB port, Windows AutoPlay will
give you options to quickly access files. Select “Open folder to view files” to go directly to the files
location on the card.
Right click video files and select “Open with” to select VLC media player and open and view video
files.
To save time in the future select “Choose default program...” to select VLC as the program to open
the selected file type. Once set, files will automatically open in VLC media player when double
clicked to open.
Mac users should locate the memory card’s mounted image and open folder to access the saved
files.
Download the latest version for the operating system you are using and install the VLC program.
Restart your computer if necessary.
http://www.videolan.org/vlc/index.html
VLC media player
10

ADJUSTING THE TRIM
When the drone moves without transmitter input, adjust the trim controls until hovering is stable.
Drone is turning
to the right.
Move Right
Trim
Push the LEFT TRIM
button until the drone
stops turning.
Push the BACKWARD
TRIM button until the
drone stops.
Turn Left
Trim
Drone is moving
forward.
Drone is turning
to the left.
Push the RIGHT
TRIM button until the
drone stops turning.
Turn Right
Trim
FRONT
BACK
Push the FORWARD
TRIM button until the
drone stops.
Forward
Trim
Drone is moving
backward.
FRONT
BACK
Push the MOVE
RIGHT TRIM button
until the drone stops.
Drone is moving
to the left.
FRONT
BACK
Move Left
Trim
Push the MOVE
LEFT TRIM button
until the drone stops.
Drone is moving
to the right.
FRONT
BACK
Backward
Trim
11

12
SPECIAL ACTIONS
FLIP STUNT MODE
Hover the drone at least 10 feet off the ground. Press the Flip Stunt Button and push
the right joystick in the direction you want the drone to perform a flip.
LAUNCH TOSS
You can launch your drone by simply tossing it in the air and pushing the throttle joystick straight up.
The new 6-Axis Gyroscope technology allows the drone to automatically stabilize, level itself out and
hover smoothly while airborne.
EASY MODE
Simplifies drone controls by limiting command directions based on pilot direction.
Use Easy Mode when you are having difficulty telling which direction the drone is
pointing because of distance. Follow the instructions below to use Easy Mode.
PILOT
TAKING OFF
FRONT
BACK
PILOT
FLIGHT AREA
For Easy Mode to work properly you must launch the
drone with the front of the drone facing away from the pilot
as shown in the illustration to the left.
Easy Mode will not work if the button is pressed while the
drone is to the side or behind the pilot. The drone must
remain in front of the pilot, as shown in the illustration to
the right (flight area).
To activate Easy Mode, press the button once while the
drone is in flight. Once Easy Mode is activated, the drone
control will be relative to the direction of pilot, not the
direction of the drone. The drone will fly toward the pilot
when pressing down on the Forward/Backward stick (right
joystick) and away when pressing up. Press the Easy
Mode button again to deactivate it.
AUTOMATIC SHUTDOWN OVERRIDE FUNCTIONS
For safety precautions, the drone will automatically shut down when the following situations occur:
1. When the drone’s battery is running low.
2. When one or more of the drone’s propellers has resistance due to impact or any form of
entanglement.
Altitude Lock
Because both joysticks are spring loaded and will return to the middle position automatically, the drone
is always in Altitude Lock and will remain at its current altitude with no input. This feature makes flying
the drone easy for beginners. By not touching the left joystick you can keep the drone at its current
height and focus on moving the drone forward/backwards and side to side with the right joystick.
Hover Mode
No input from the pilot will put the drone in Hover Mode. The drone will stay stationary in the air while in
Hover Mode.

13
REPLACING THE ROTORS
The rotors may become damaged during a
collision. The drone comes with 4 spare rotors.
Please replace damaged rotors immediately.
The drone comes with 2 A rotors and 2 B rotors.
The A and B rotors must be installed on specific
locations on the drone for it to fly properly. Check
the bottom of each rotor to see if it’s labeled
either A or B. Use the illustration above to install
them in the correct location.
FRONT
BACK
B A
A B
Use the included screwdriver to
unscrew and remove the screw on the
rotor.
Remove the damaged rotor by lifting
upward. Be sure not to misplace the
screw.
Place the correct A or B rotor on top of
the peg.
Replace the screw on the rotor.
Repeat the process for any other
rotors that need replacing.
POST FLIGHT
After you are done flying the drone make sure the battery pack is disconnected and the transmitter
power is turned off. If you are not going to use the drone for a long period of time, please remove the AA
batteries from the transmitter to prevent them from draining or leaking.

14
REMOVING THE ROTOR GUARDS
Use the included screwdriver to
unscrew and remove the screw on the
rotor guard.
Screw the rotor guard screw into the
same spot without the rotor guard so
you don’t misplace it.
Remove the rotor guard by lifting
upward. Be sure not to misplace the
screw.
The drone comes with its 4 rotor guards already installed. It is recommended that you leave the rotor guards installed
at all times. If you need to remove or replace a rotor guard, just follow these easy steps.
NOTE: The rotor guards are all identical and can be installed anywhere on the drone.
FRONT
BACK

15
TROUBLESHOOTING
NOTES:
PROBLEM CAUSE SOLUTION
Drone is unresponsive. The
transmitter light keeps flashing.
Drone is unresponsive.
Both drone and transmitter are ON.
Drone is unresponsive.
Drone’s rotors spins but doesn’t take
off.
Drone is shaking when flying.
Drone still moves forward after
adjusting the trim.
Drone moves while hovering without
transmitter input. Trim needs to be adjusted. Adjust the trim.
Gyroscope midpoint is off. Turn off both transmitter and drone. Go
through power on process and make
sure you place the drone on a flat
surface before taking off.
Transmitter batteries are installed
incorrectly.
Transmitter and or drone is not
powered ON.
Turn both transmitter and drone ON.
Transmitter batteries are drained.
Drone’s battery pack is drained.
Autopilot isn’t activated.
Rotors are damaged. Replace the damaged rotors.
Drone is not on a flat surface. Place the drone on a flat surface before
attempting to take off.
Charge the drone’s battery pack.
Press the Autopilot button once and the
rotors will start spinning. You will now be
able to take off.
Drone’s battery pack is drained. Charge the drone’s battery pack.
Install fresh batteries in the transmitter.
Install the batteries with the correct
polarity.
Transmitter is not syncing with
drone.
Repeat the power up process.

16
NOTES:
Website: www.worldtechtoys.com
Email: [email protected]
Phone: (877) 498-8697
Monday - Friday / 8:00AM - 5:00PM / Pacific Time
WWW.WORLDTECHTOYS.COM
MADE IN CHINA
SPECIFICATIONS, COLORS AND CONTENT MAY VARY FROM ILLUSTRATIONS
FCC WARNINGS
1. Warning: Changes or modifications to this unit not expressly approved by the party responsible for
compliance could void the user’s authority to operate the equipment.
NOTE: This equipment has been tested and found to comply with the limits for a Class B digital device,
pursuant to Part 15 of the FCC Rules. These limits are designed to provide reasonable protection
against harmful interference in a residential installation. This equipment generates, uses and can
radiate radio frequency energy and, if not installed and used in accordance with the instructions,
may cause harmful interference to radio communications. However, there is no guarantee that
interference will not occur in a particular installation. If this equipment does cause harmful
interference to radio or television reception, which can be determined by turning the equipment off
and on, the user is encouraged to try to correct the interference by one or more of the following
measures:
Reorient or relocate the receiving antenna.
Increase the separation between the equipment and receiver.
Connect the equipment into an outlet on a circuit different from that to which the receiver is connected.
Consult the dealer or an experienced radio/TV technician for help.
2. This device complies with Part 15 of the FCC Rules. Operation is subject to the following two conditions:
(1) this device may not cause harmful interference, and (2) this device must accept any interference
received, including interference that may cause undesired operation.
3. FCC RF Radiation Exposure Statement Caution: To maintain compliance with the FCC’s RF exposure
guidelines, place the product at least 8in from nearby persons.
4. The device must not be co-located or operating in conjunction with any other antenna or transmitter.
Other manuals for STRIKER-X
1
Table of contents
Other WORLD TECH ELITE Quadcopter manuals
Popular Quadcopter manuals by other brands

Catalyst Machineworks
Catalyst Machineworks Speed Addict SuperLight owner's manual

GUANDALINI
GUANDALINI PPK DJI PHANTOM 4 ADV Assembly manual

DELTA-SPORT
DELTA-SPORT 345898 2004 operating instructions

Horizon Hobby
Horizon Hobby BLH8570 instruction manual

SkyHobbies
SkyHobbies RoboCat Assembly manual

NINCOAIR
NINCOAIR NH90108 User handbook