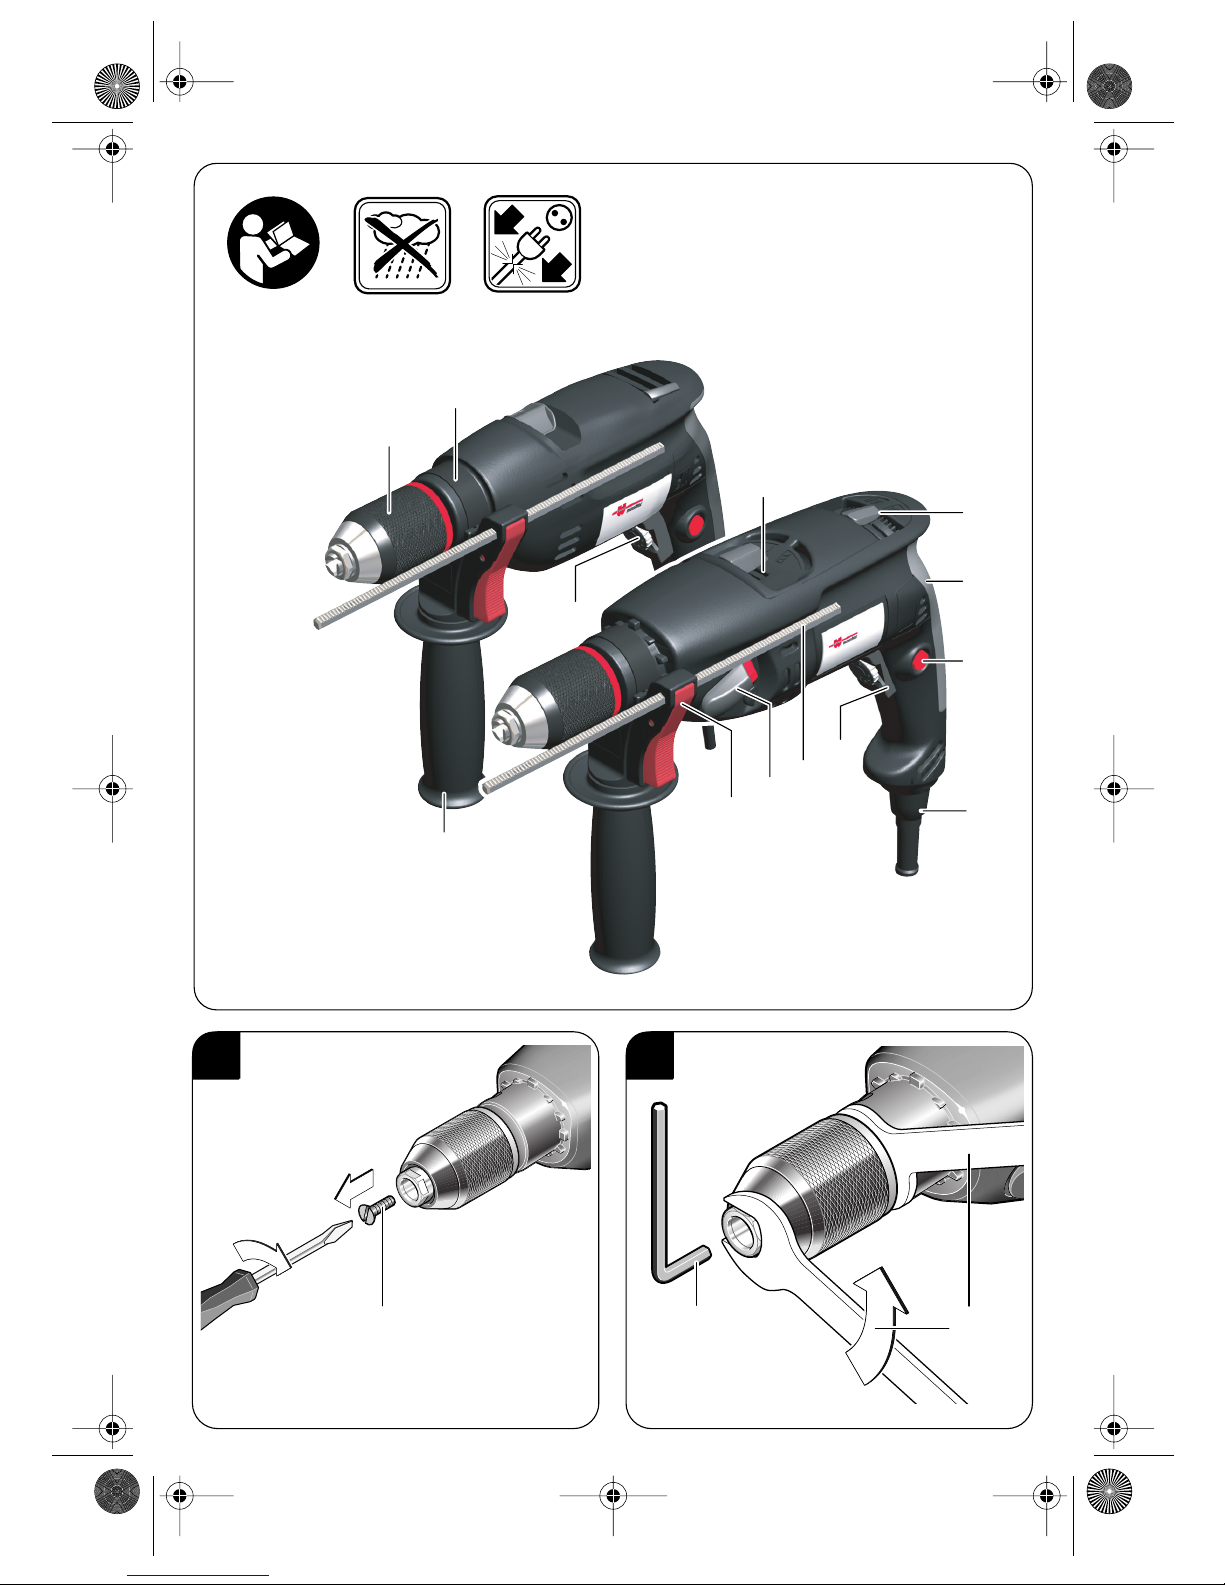
wurth BM 13-XE User manual

BM 13-XE
SB 13-XE
Originalbetriebsanleitung
Translation of the Original Instructions
Traduzione delle istruzioni originali
Traduction de la notice originale
Traducción del manual original
Tradução das instruções de serviço originais
Vertaling van de oorspronkelijke
gebruiksaanwijzing
Oversættelse af den originale driftsvejledning
Oversettelse av original driftsinstruks
Alkuperäisen käyttöohjeen käännös
Översättning av bruksanvisning i original
Μετάφραση των πρωττυπων οδηγιών χειρισµού
Orijinal iµletim talimat∂ tercümesi
T∆umaczenie oryginalnej instrukcji eksploatacji
Az eredeti kezelési útmutató fordítása
Pfieklad originálního návodu k provozu
Preklad originálneho Návodu na pouÏívanie
Traducerea instrucøiunilor de exploatare
originale
Prevod originalnega navodila za obratovanje
Превод на оригиналното ръководство за
експлоатация
Originaalkasutusjuhendi tõlge
Naudojimo instrukcijos originalo vertimas
Lietošanas pamācības oriināla tulkojums
Перевод оригинального руководства по
эксплуатации
BM_SB 13-XE.book Seite 1 Montag, 12. April 2010 3:27 15

PL
H
CZ
SK
RO
SLO
BG
EST
LT
LV
RUS
D
GB
I
F
E
P
NL
DK
N
FIN
S
GR
TR
............................. 4… 9
.............................. 10… 15
................................ 16… 21
................................ 22… 27
................................ 28… 33
................................ 34… 39
................................ 40… 45
................................ 46… 51
................................ 52… 57
................................ 58… 63
................................ 64… 69
................................ 70… 76
................................ 77… 82
................................ 83… 88
................................ 89… 94
................................ 95…100
.............................. 101…106
.............................. 107…112
.............................. 113…118
.............................. 119…125
.............................. 126…131
.............................. 132…137
.............................. 138…143
.............................. 144…150
BM_SB 13-XE.book Seite 2 Montag, 12. April 2010 3:27 15

A B
1
2
3
6
9
12
7
4
8
14 15 16
11
5
10
BM 13-XE
SB 13-XE
13
BM_SB 13-XE.book Seite 3 Montag, 12. April 2010 3:27 15

4
Geräteelemente
1
Schnellspannbohrfutter
2
Spindelhals
3
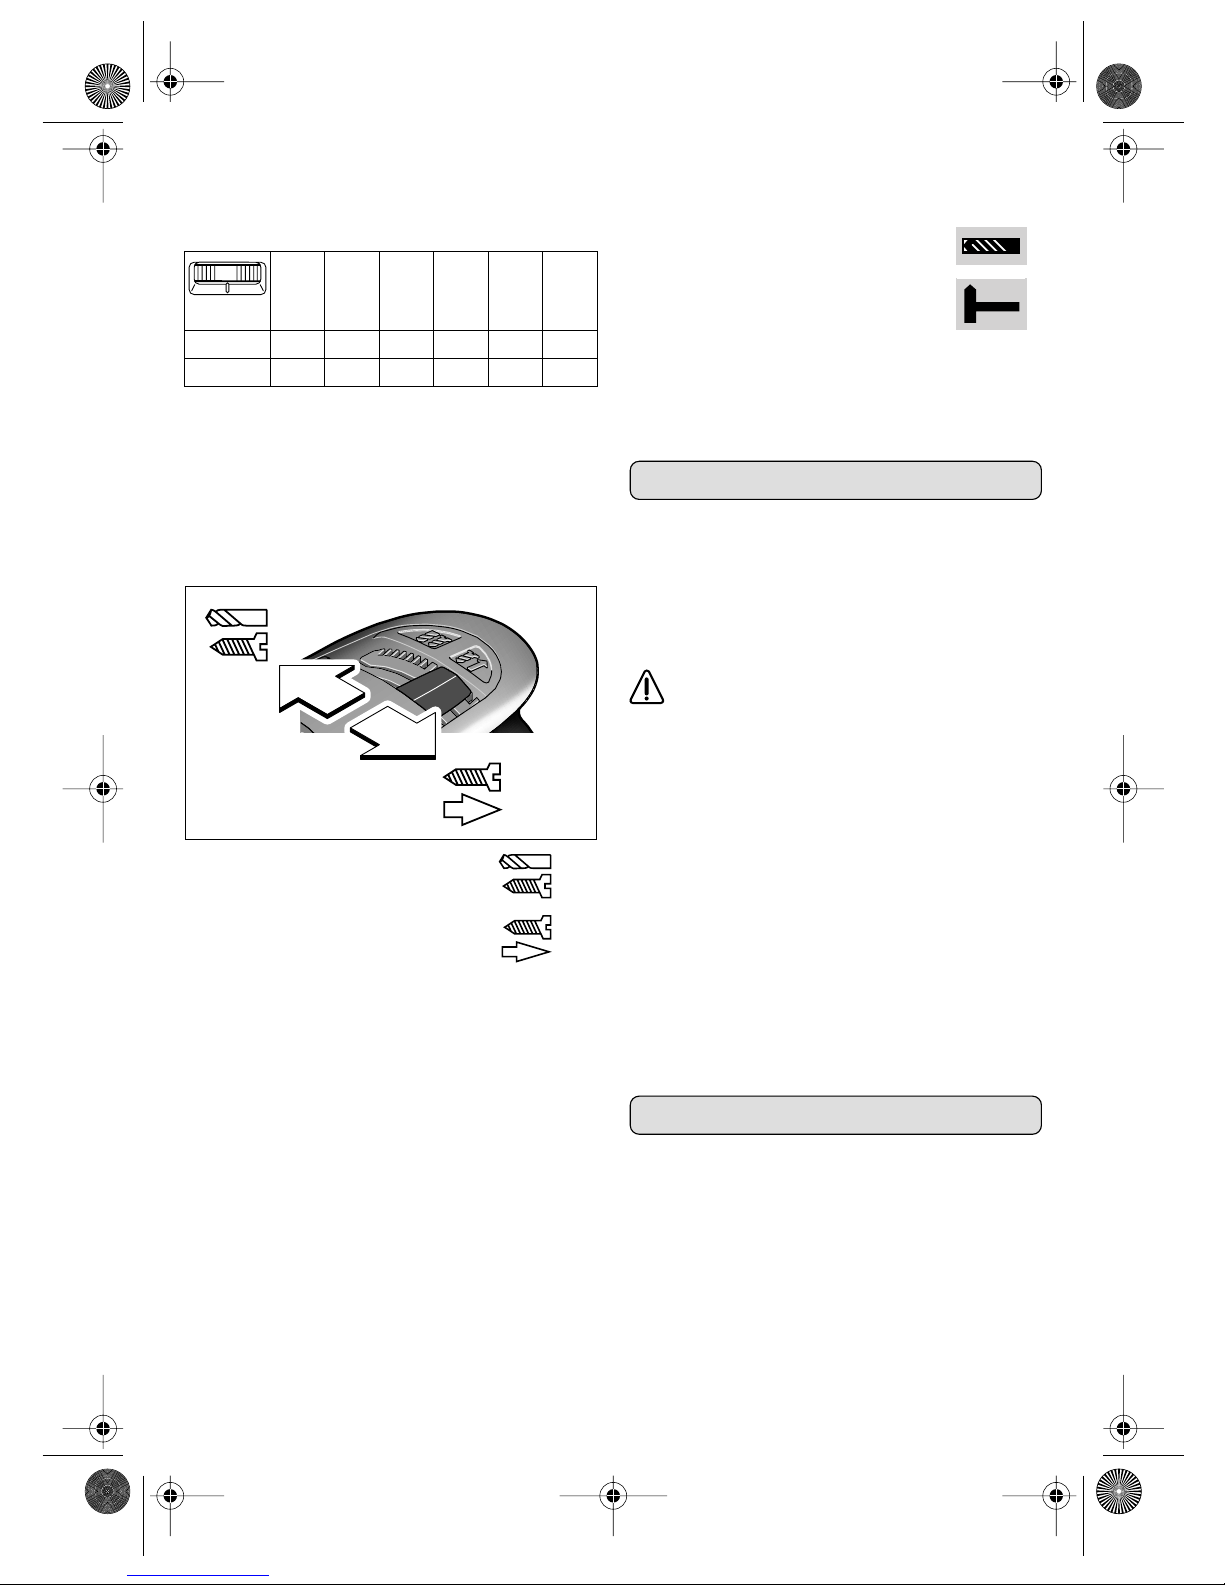
Umschalter „Bohren/Schlagbohren“
(SB 13-XE)
4
Drehrichtungsumschalter
5
Softgriff
6
Feststellknopf
7
Netzkabelmodul
8
Ein-/Ausschalter
9
Tiefenanschlag
10
Gangwahlschalter
11
Taste für Tiefenanschlagverstellung
12
Zusatzgriff
13
Stellrad Drehzahlvorwahl (BM 13-XE)
14
Sicherungsschraube
15
Innensechskantschlüssel
16
Gabelschlüssel
Abgebildetes oder beschriebenes Zubehör gehört teilweise
nicht zum Lieferumfang.
☞Weitere Sicherheitshinweise siehe Beilage
Lesen Sie alle Sicherheitshin-
weise und Anweisungen. Ver-
säumnisse bei der Einhaltung der Sicherheitshin-
weise und Anweisungen können elektrischen
Schlag, Brand und/oder schwere Verletzungen
verursachen.
Bewahren Sie alle Sicherheitshinweise und
Anweisungen für die Zukunft auf.
❏Tragen Sie Gehörschutz. Die Einwirkung von
Lärm kann Gehörverlust bewirken.
❏Benutzen Sie mit dem Gerät gelieferte Zusatz-
handgriffe. Der Verlust der Kontrolle kann zu
Verletzungen führen.
❏Halten Sie das Gerät nur an den isolierten
Griffflächen, wenn Sie Arbeiten ausführen,
bei denen das Einsatzwerkzeug verborgene
Stromleitungen treffen kann. Der Kontakt mit
einer spannungsführenden Leitung kann auch
metallene Geräteteile unter Spannung setzen
und zu einem elektrischen Schlag führen.
❏Halten Sie das Elektrowerkzeug beim Arbei-
ten fest mit beiden Händen und sorgen Sie für
einen sicheren Stand. Das Elektrowerkzeug
wird mit zwei Händen sicherer geführt.
❏Bearbeiten Sie kein asbesthaltiges Material.
Asbest gilt als krebserregend.
❏Warten Sie, bis das Elektrowerkzeug zum
Stillstand gekommen ist, bevor Sie es ablegen.
Das Einsatzwerkzeug kann sich verhaken und
zum Verlust der Kontrolle über das Elektrowerk-
zeug führen.
❏Halten Sie das Elektrowerkzeug gut fest. Beim
Festziehen und Lösen von Schrauben können
kurzzeitig hohe Reaktionsmomente auftreten.
❏Benutzen Sie das Elektrowerkzeug nicht mit
beschädigtem Kabel. Berühren Sie das be-
schädigte Kabel nicht und ziehen Sie den
Netzstecker, wenn das Kabel während dem
Arbeiten beschädigt wird. Beschädigte Kabel
erhöhen das Risiko eines elektrischen Schlages.
❏Schließen Sie Elektrowerkzeuge, die im Freien
verwendet werden, über einen Fehlerstrom-
(FI-) Schutzschalter an.
❏Verwenden Sie geeignete Suchgeräte, um ver-
borgene Versorgungsleitungen aufzuspüren,
oder ziehen Sie die örtliche Versorgungsge-
sellschaft hinzu.
Kontakt mit Elektroleitungen kann zu Feuer und
elektrischem Schlag führen. Beschädigung einer
Gasleitung kann zur Explosion führen. Eindrin-
gen in eine Wasserleitung verursacht Sachbe-
schädigung oder kann einen elektrischen Schlag
verursachen.
❏Nur Original Würth-Zubehör verwenden.
Gefahrloses Arbeiten mit dem Gerät ist
nur möglich, wenn Sie die Bedienungs-
anleitung und die Sicherheitshinweise
vollständig lesen und die darin enthalte-
nen Anweisungen strikt befolgen. Zusätzlich
müssen die allgemeinen Sicherheitshinweise im
beigefügten Heft befolgt werden. Lassen Sie sich
vor dem ersten Gebrauch praktisch einweisen.
Das Gerät darf nicht feucht sein und auch
nicht in feuchter Umgebung betrieben
werden.
Vor jeder Benutzung, Gerät, Kabel und
Stecker überprüfen. Lassen Sie Schäden
nur durch den Würth master-Service
oder einem autorisierten Fachmann beseitigen.
Stecker nur bei ausgeschalteter Maschine in die
Steckdose einstecken.
WARNUNG
DSicherheitshinweise für
Bohrmaschinen
BM_SB 13-XE.book Seite 4 Montag, 12. April 2010 3:27 15

5
Bestimmungsgemäßer Gebrauch
BM 13-XE:
Das Gerät ist bestimmt zum Bohren in Holz, Metall,
Keramik und Kunststoff.
SB 13-XE:
Das Gerät ist bestimmt zum Schlagbohren in Ziegel,
Beton und Gestein, sowie zum Bohren in Holz,
Metall, Keramik und Kunststoff.
Für Schäden bei nicht bestimmungsgemäßen
Gebrauch haftet der Benutzer.
Fragen zum Gerät und seiner Anwendung beant-
wortet Ihnen in Deutschland die Produkt- und
Anwendungsberatung unter Tel.: 01805-60 65 69
(12 Cent/min).
Gerätekennwerte
Werkzeug einsetzen
Bohrspindel-Arretierung
Das Gerät besitzt zum einfachen und schnellen
Wechsel von Einsatzwerkzeugen/Bohrfutter eine
Bohrspindel-Arretierung, wodurch ein Festhalten
der Bohrspindel von Hand bzw. mit Werkzeug ent-
fällt.
Werkzeug einsetzen
Bohrfutter öffnen, Werkzeug einsetzen und Schnell-
spannbohrfutter von Hand spannen. Sobald das
Werkzeug gehalten wird, muss die Hülse noch um
ca. 1/4 Umdrehung weitergedreht werden, damit
die Spannkraftsicherung einrasten kann (Pos.
➊
; 1x
klicken).
Bohrmaschine BM 13-XE Schlagbohrmaschine SB 13-XE
Bestellnummer 702 321 X 702 322 X
Nennaufnahme 600 W 750 W
Abgabeleistung 300 W 375 W
Leerlaufdrehzahl
- 1. Gang
- 2. Gang 0 – 900 min
–1
0 – 2500 min
–1
0 – 1200 min
–1
0 – 3400 min
–1
Lastdrehzahl
- 1. Gang
- 2. Gang 0 – 520 min
–1
0 – 1500 min
–1
0 – 750 min
–1
0 – 2100 min
–1
Leerlaufschlagzahl (max.) – 51000
Nennschlagzahl (max.) – 31500
Spindelarretierung
••
Kabelwechsel (Quik-Lok)
••
Rechts-Links-Lauf
••
Bohr-Ø in Beton – 20 mm
Bohr-Ø in Ziegel und Kalksand – 22 mm
Bohr-Ø in Stahl 13 mm 13 mm
Bohr-Ø in Weichholz 40 mm 35 mm
Bohrfutterspannbereich 1,5 –13 mm 1,5 –13 mm
Bohrspindelgewinde
1
/
2
"
×
20 UNF
1
/
2
"
×
20 UNF
Spannhals-Ø 43 mm 43 mm
Gewicht (ohne Kabel und Bohrfutter) 2,0 kg 2,0 kg
Schutzklasse /
II
/
II
BM_SB 13-XE.book Seite 5 Montag, 12. April 2010 3:27 15

6
Die eigentliche Werkzeugspannung erfolgt erst
anschließend durch kräftiges Drehen der Hülse in
Richtung „ GRIP, ZU“. Dabei muss das Bohrfutter
mehrmals nacheinander hörbar „klicken“ (Pos.
➋
).
Wenn das Bohrfutter mit einem starken Ruck
bis zum Anschlag geöffnet wurde, lässt es sich
unter Umständen nicht mehr schließen und es
ist statt dessen ein „Überrasten“ spürbar (als
wenn es überdreht wäre). In diesem Falle die
Hülse nochmals gegen Anschlag in Richtung
„AUF, RELEASE “ drehen; das Bohrfutter
lässt sich nun wieder schließen.
Werkzeug entnehmen
Bohrfutter durch Drehen der Hülse in Richtung „AUF,
RELEASE “ öffnen.
Durch die automatische Spindelarretierung kann
sich das Bohrfutter im Stillstand nicht verdrehen.
Somit kann das Bohrfutter mit nur einer Hand ohne
Gegenhalten geöffnet werden.
Zuerst wird durch das Verdrehen der Hülse die
Spannkraftsicherung gelöst, erst nach ca 1/4 Dre-
hung öffnen sich die Spannbacken und geben das
eingespannte Werkzeug frei.
Bei starker Spannung am Bohrfutterkopf mit einem
Gabelschlüssel
16
gegenhalten und dann Hülse mit
einem kräftigen Ruck von Hand lösen.
Inbetriebnahme
Netzspannung beachten:
Die Spannung der Strom-
quelle muss mit den Angaben auf dem Typschild des
Gerätes übereinstimmen.
Zusatzhandgriff und Netzkabelmodul
montieren
Bei großen Bohrerdurchmessern können hohe Reak-
tionsmomente auftreten. Hier bietet der Zusatzgriff
zusätzliche Sicherheit. Der Zusatzhandgriff
12
wird
am Spindelhals
2
befestigt.
Durch Drücken der Taste
11
und Verschieben des
Tiefenanschlages
9
kann die gewünschte Bohrtiefe
eingestellt werden.
Schließen Sie das Netzkabelmodul
7
an den Hand-
griff an. Der Stecker muss einrasten.
Ein-/Ausschalten
Momentschaltung:
Einschalten: Ein-/Ausschalter
8
drücken.
Ausschalten: Ein-/Ausschalter
8
loslassen.
Dauerschaltung:
Einschalten: Ein-/Ausschalter
8
drücken und
dann Arretierknopf
6
drücken, Ein-/
Ausschalter loslassen.
Ausschalten: Ein-/Ausschalter
8
drücken und los-
lassen.
Stufenlose Drehzahlsteuerung
Die Drehzahl kann je nach Druck auf den Ein-/Aus-
schalter
8
stufenlos geregelt werden.
click
click
click
click
➊
➋
➡
➡
➡
11
9
7
BM_SB 13-XE.book Seite 6 Montag, 12. April 2010 3:27 15

7
Drehzahlvorwahl (elektronisch - BM 13-XE)
Mit dem Stellrad 13 lässt sich die benötigte Dreh-
zahl* (auch während des Laufes) vorwählen:
*Angaben sind ca. Werte
Nach längerem Arbeiten mit kleiner Drehzahl die
Maschine zur Abkühlung ca. 3 Minuten lang mit
maximaler Drehzahl im Leerlauf drehen lassen.
Umschalten der Drehrichtung
Den Umschalter dem entsprechenden Symbol
gegenüberstellen:
Rechtslauf
Linkslauf
Durch eine Schaltsperre ist der Umschalter nur bei
nicht gedrücktem Ein-/Ausschalter schaltbar.
❏Den Umschalter erst nach Auslauf der Maschine
(bei stillstehendem Motor) betätigen.
Gangwahlschalter
Mit dem Gangwahlschalter 10 können zwei Dreh-
zahlbereiche vorgewählt werden:
1. Gang:
niedriger Drehzahlbereich
2. Gang:
hoher Drehzahlbereich
Die Umschaltung kann bei laufender Maschine
erfolgen, jedoch nicht bei voller Belastung.
Umschaltung Bohren, Schlagbohren
(SB 13-XE)
Zum Bohren und Schrauben den
Umschalter 3 nach links schieben.
Zum Schlagbohren den Umschalter 3
nach rechts schieben.
Der Umschalter 3 rastet spürbar ein und kann bei
laufender Maschine betätigt werden. Bei Arbeiten in
Beton, Gestein und Mauerwerk sind Hartmetallboh-
rer erforderlich.
Bohrfutter wechseln
Entfernen der Sicherungsschraube (Bild A)
Das Bohrfutter ist gegen Lösen von der Bohrspindel
mit Sicherungsschraube 14 gesichert.
Zum Entfernen des Bohrfutters muss dieses ganz
geöffnet und die Sicherungsschraube 14 vollständig
herausgeschraubt werden.
Sicherungsschraube hat Linksgewinde.
Sitzt die Sicherungsschraube fest, Schraubendreher
auf den Schraubenkopf ansetzen und durch einen
Schlag auf den Griff die Schraube lösen.
Bohrfutter abschrauben (Bild B)
Im Normalfall kann das Bohrfutter von Hand abge-
schraubt werden. Sollte das Bohrfutter sehr fest auf
der Bohrspindel sitzen, zwei Gabelschlüssel 16 an
den Schlüsselflächen des Bohrfutterkopfes ansetzen
oder einen Innensechskantschlüssel 15 in das Bohr-
futter einspannen.
Gegebenenfalls sind leichte Schläge mit einem
Hammer auf den Schlüsselschaft erforderlich.
Die Montage des Bohrfutters erfolgt in umgekehrter
Reihenfolge.
Arbeitshinweise
Bohrer schärfen
Für Metall nur einwandfreie geschärfte HSS-Bohrer
(HSS = Hochleistungs-Schnellschnitt-Stahl) verwen-
den. Entsprechende Qualität garantiert das Würth-
Programm.
min-1
ABCDEF
1. Gang 340 440 530 640 720 900
2. Gang 900 1220 1500 1760 2020 2500
1
BM_SB 13-XE.book Seite 7 Montag, 12. April 2010 3:27 15

8
Staubabsaugung
❏Stäube von Materialien wie bleihaltigem
Anstrich, einigen Holzarten, Mineralien und
Metall können gesundheitsschädlich sein. Berüh-
ren oder Einatmen der Stäube können allergische
Reaktionen und/oder Atemwegserkrankungen
des Benutzers oder in der Nähe befindlicher Per-
sonen hervorrufen.
Bestimmte Stäube wie Eichen- oder Buchenstaub
gelten als krebserzeugend, besonders in Verbin-
dung mit Zusatzstoffen zur Holzbehandlung
(Chromat, Holzschutzmittel). Asbesthaltiges Mate-
rial darf nur von Fachleuten bearbeitet werden.
- Sorgen Sie für gute Belüftung des Arbeitsplat-
zes.
- Es wird empfohlen, eine Atemschutzmaske mit
Filterklasse P2 zu tragen.
Beachten Sie in Ihrem Land gültige Vorschriften
für die zu bearbeitenden Materialien.
Wartung und Reinigung
❏Vor allen Arbeiten am Gerät Netzstecker zie-
hen.
❏Gerät und Lüftungsschlitze stets sauber halten, um
gut und sicher zu arbeiten.
Zum Erneuern verbrauchter Schleifkohlen sind im
Gerät Ersatzschleifkohlen integriert. Diese sind nach
Abnahme des Softgriffs 5 zugänglich. Ersatzschleif-
kohlen nur von einer autorisierten Kundendienststelle
für Würth-Elektrowerkzeuge auswechseln lassen.
Sollte das Gerät trotz sorgfältiger Herstell- und Prüfver-
fahren einmal ausfallen, ist die Reparatur von einem
Würth master-Service ausführen zu lassen. In Deutsch-
land erreichen Sie den Würth master-Service kostenlos
unter Tel. 0800-WMASTER (0800-9 62 78 37). In Ös-
terreich unter der Tel. 0800-20 30 13.
Bei allen Rückfragen und Ersatzteilbestellungen bitte
unbedingt die Artikelnummer laut Typenschild des
Gerätes angeben.
Die aktuelle Ersatzteilliste dieses Gerätes kann im
Internet unter „http://www.wuerth.com/partsma-
nager“ aufgerufen oder von der nächstgelegenen
Würth-Niederlassung angefordert werden.
Gewährleistung
Für dieses Würth-Gerät bieten wir eine Gewährleitung
gemäß den gesetzlichen/länderspezifischen Bestim-
mungen ab Kaufdatum (Nachweis durch Rechnung
oder Lieferschein). Entstandene Schäden werden durch
Ersatzlieferung oder Reparatur beseitigt.
Schäden, die auf natürliche Abnutzung, Überlas-
tung oder unsachgemäße Behandlung zurückzufüh-
ren sind, werden von der Garantie ausgeschlossen.
Beanstandungen können nur anerkannt werden,
wenn Sie das Gerät unzerlegt einer Würth-Nieder-
lassung, Ihrem Würth-Außendienstmitarbeiter oder
einer Würth-autorisierten Kundendienststelle für
Elektro- und Druckluftwerkzeuge übergeben.
Umweltschutz
Elektrowerkzeuge, Zubehör und Verpackungen sol-
len einer umweltgerechten Wiederverwertung zuge-
führt werden.
Nur für EU-Länder:
Werfen Sie Elektrowerkzeuge nicht
in den Hausmüll!
Gemäß der Europäischen Richtlinie
2002/96/EG über Elektro- und
Elektronik-Altgeräte und ihrer
Umsetzung in nationales Recht müssen nicht mehr
gebrauchsfähige Elektrowerkzeuge getrennt gesam-
melt und einer umweltgerechten Wiederverwertung
zugeführt werden.
Geräusch-/Vibrations-
information
Messwerte ermittelt entsprechend EN 60 745.
Der A-bewertete Geräuschpegel des Gerätes be-
trägt typischerweise:
BM 13-XE: SB 13-XE:
Schalldruckpegel
(LpA) 84 dB(A) 101 dB(A)
Schallleistungspegel
(LwA) 95 dB(A) 112 dB(A)
Messunsicherheit
K = 3 dB 3 dB
Gehörschutz tragen!
BM_SB 13-XE.book Seite 8 Montag, 12. April 2010 3:27 15

9
Vibration
Schwingungsgesamtwerte (Vektorsumme dreier Rich-
tungen) ermittelt entsprechend EN 60 745:
Der in diesen Anweisungen angegebene Schwingungs-
pegel ist entsprechend einem in EN 60745 genormten
Messverfahren gemessen worden und kann für den
Vergleich von Elektrowerkzeugen miteinander verwen-
det werden. Er eignet sich auch für eine vorläufige Ein-
schätzung der Schwingungsbelastung.
Der angegebene Schwingungspegel repräsentiert die
hauptsächlichen Anwendungen des Elektrowerkzeugs.
Wenn allerdings das Elektrowerkzeug für andere
Anwendungen, mit abweichenden Einsatzwerkzeugen
oder ungenügender Wartung eingesetzt wird, kann der
Schwingungspegel abweichen. Dies kann die Schwin-
gungsbelastung über den gesamten Arbeitszeitraum
deutlich erhöhen.
Für eine genaue Abschätzung der Schwingungsbelas-
tung sollten auch die Zeiten berücksichtigt werden, in
denen das Gerät abgeschaltet ist oder zwar läuft, aber
nicht tatsächlich im Einsatz ist. Dies kann die Schwin-
gungsbelastung über den gesamten Arbeitszeitraum
deutlich reduzieren.
Legen Sie zusätzliche Sicherheitsmaßnahmen zum
Schutz des Bedieners vor der Wirkung von Schwingun-
gen fest wie zum Beispiel: Wartung von Elektrowerk-
zeug und Einsatzwerkzeugen, Warmhalten der Hände,
Organisation der Arbeitsabläufe.
Konformitätserklärung
Wir erklären in alleiniger Verantwortung, dass die-
ses Produkt mit den folgenden Normen oder norma-
tiven Dokumenten übereinstimmt: EN 60 745-1,
EN 60 745-2-1, EN 55 014-1, EN 55 014-2,
EN 61 000-3-2, EN 61 000-3-3 gemäß den
Bestimmungen der Richtlinien 2006/42/EG,
2004/108/EG.
Technische Unterlagen bei:
Adolf Würth GmbH & Co. KG, Abt PFW
74650 Künzelsau
N. Heckmann A. Kräutle
Chairman of General Manager
Adolf Würth
GmbH & Co. KG
Künzelsau: 18.02.2010
BM 13-XE SB 13-XE
Schlagbohren in Beton:
Schwingungsemissions-
wert a h –12,5 m/s2
Messunsicherheit K = –1,5 m/s2
Bohren in Metall:
Schwingungsemissions-
wert a h 3,5 m/s23,5 m/s2
Messunsicherheit K = 1,5 m/s21,5 m/s2
Änderungen vorbehalten
BM_SB 13-XE.book Seite 9 Montag, 12. April 2010 3:27 15

10
☞For further notes on safety refer to enclosed Sheet
Safety warnings for drills
Read all safety warnings and all
instructions. Failure to follow the
warnings and instructions may result in electric
shock, fire and/or serious injury.
Save all warnings and instructions for future
reference.
❏Wear ear protectors with impact drills. Expos-
ure to noise can cause hearing loss.
❏Use auxiliary handles supplied with the tool.
Loss of control can cause personal injury.
❏Hold the power tool only by the insulated
gripping surfaces when performing an opera-
tion where the cutting tool may contact hidden
wiring. Contact with a “live” wire will also
make exposed metal parts of the power tool
“live” and shock the operator.
❏When working with the machine, always hold
it firmly with both hands and provide for a
secure stance. The power tool is guided more
secure with both hands.
❏Do not work materials containing asbestos.
Asbestos is considered carcinogenic.
❏Always wait until the machine has come to a
complete stop before placing it down. The tool
insert can jam and lead to loss of control over
the power tool.
❏Hold the machine with a firm grip. High reac-
tion torque can briefly occur while driving in
and loosening screws.
❏Do not use a machine with a damaged mains
cable. Do not touch the damaged cable and
pull the mains plug when the cable is dama-
ged while working. Damaged cables increase
the risk of an electric shock.
❏Connect machines that are used in the open
via a residual current device (RCD).
❏Use suitable detectors to determine if utility
lines are hidden in the work area or call the
local utility company for assistance.
Contact with electric lines can lead to fire and
electric shock. Damaging a gas line can lead to
explosion. Penetrating a water line causes pro-
perty damage or may cause an electric shock.
❏Use only original Würth parts and accesso-
ries.
Working safely with this machine is
possible only when the operating and
safety information are read completely
and the instructions contained therein
are strictly followed. In addition, the general
safety instructions in the enclosed booklet must
be followed. Before using for the first time, ask
for a practical demonstration.
The machine must not be damp and
must also not be operated in damp sur-
roundings.
Before each use of the machine, check
the machine, cable and plug. Have
repairs carried out only through the
Würth Master-Service or by a qualified
technician. Insert the plug into the
socket only when the machine is swit-
ched off.
GB
Operating Controls
1 Keyless drill chuck
2 Spindle collar
3 Selector switch “Drilling/impact drilling”
(SB 13-XE)
4 Rotational direction switch
5 Soft grip handle
6 Lock-on button
7 Mains cable module
8 On/Off switch
9 Depth stop rod
10 Gear selector switch
11 Button for depth-stop adjustment
12 Auxiliary handle
13 Thumbwheel for speed pre-selection (BM 13-XE)
14 Securing screw
15 Allen key
16 Open-end spanner
Not all of the accessories illustrated or described are included
as standard delivery.
BM_SB 13-XE.book Seite 10 Montag, 12. April 2010 3:27 15

11
BM 13-XE:
The drill is designed for drilling in wood, metal,
ceramic and plastic.
SB 13-XE:
The machine is intended for impact drilling in brick,
concrete and stone as well as for drilling in wood,
metal, ceramics and plastics.
The user is responsible for damage caused by usage
other then intended.
Drill Spindle Locking
For the easy and quick changing of the tools or the
drill chuck, the machine has a drill spindle locking
device which eliminates the need to hold the drill
spindle by hand or with a tool.
Inserting the tool
For this purpose, Open chuck, insert the selected bit
and tighten chuck. After the clamping jaws have
tightened around the tool shaft, turn the chuck a
further 1/4 in order to let the chucking power reten-
tion engage (pos.➊; 1x click).
Use as Intended
Tool Specifications
Drill BM 13-XE Impact drill SB 13-XE
Part number 702 321 X 702 322 X
Nominal power 600 W 750 W
Output power 300 W 375 W
No-load speed
- 1st gear
- 2nd gear 0 – 900 min-1
0 – 2500 min-1 0 – 1200 min-1
0 – 3400 min-1
Speed under load
- 1st gear
- 2nd gear 0 – 520 min-1
0 – 1500 min-1 0 – 750 min-1
0 – 2100 min-1
No-load impact frequency (max.) – 51000
Rated impact frequency (max.) – 31500
Spindle lock ••
Cable replacement (Quik-Lok) ••
Reversible ••
Drill dia. in concrete – 20 mm
Drill dia. in brick and lime sand – 22 mm
Drill dia. in steel 13 mm 13 mm
Drill dia. in softwood 40 mm 35 mm
Chuck clamping range 1.5 –13 mm 1.5 –13 mm
Drill spindle threads 1
/
2" ×20 UNF 1
/
2" ×20 UNF
Clamping collar 43 mm 43 mm
Weight (excl. mains cable and drill chuck) 2.0 kg 2.0 kg
Safety class /II /II
Inserting the Tool
BM_SB 13-XE.book Seite 11 Montag, 12. April 2010 3:27 15

12
Only than can the tool itself be chucked by vigo-
rously turning the sleeve in the “ GRIP,ZU” direc-
tion (it engages audibly with a grating noise (pos.
➋)).
When the chuck is opened with a strong jerk
as far as it will go, it is possible that it can’ t be
closed anymore. Instead, “grating” can be felt
(as if the chuck were overtightened). In this
case turn the sleeve once more in the “AUF,
RELEASE ” direction; now it can be closed
again.
Remove the tool
Open the chuck by turning the sleeve in the “AUF,
RELEASE ” direction.
Due to the automatic spindle lock the chuck cannot
be turned when the machine is idle.
Therefore the chuck can be opened with one hand
without steadying.
When turning the sleeve the chucking power reten-
tion is released, after 1/4 turn the clamping jaws
open and release the clamped tool.
In case of strong tension at the chuck steady the
chuck head with a fork wrench 16 and loosen the
sleeve by hand with a strong jerk.
Always use the correct supply voltage: The power
supply voltage must match the information quoted
on the tool identification plate.
Mounting the Auxiliary Handle and the
Mains Cable Module
Substantial torque reactions are possible when lar-
ger drill bits are being used. Here the auxiliary grip
provides extra safety. Auxiliary grip 12 is attached
to spindle collar 2.
By pressing button 11 and moving the depth stop 9,
the requested drilling depth can be adjusted.
Connect the mains cable module 7 to the handle.
The plug must latch.
Switching on and off
Intermittant use:
Switching on: Press trigger switch 8.
Switching off: Release trigger switch 8.
Continuous use:
Switching on: Press the on-off switch 8 and then
the locking button 6, after that
release on-off switch.
Switching off: Press the on-off switch 8 and then
release.
Continuously Variable Speed Control
The speed can be infinitely varied by pressure on the
on-off switch 8.
RPM Preselection (electronic - BM 13-XE)
The desired rotational speed* can be preselected
with the thumbwheel 13 (also possible during ope-
ration).
*Approximate values
click
click
click
click
➊
➋
➡
➡
➡
Initial Operation
min-1
ABCDEF
1st gear 340 440 530 640 720 900
2nd gear 900 1220 1500 1760 2020 2500
11
9
7
1
BM_SB 13-XE.book Seite 12 Montag, 12. April 2010 3:27 15

13
After long periods at low operating speed, run the
machine at high speed and without load for approx.
3 minutes.
Changing rotational direction
Move the lever to the required symbol:
Forward rotation
Reverse rotation
Due to a lockout mechanism, the reversing lever can
only be switched when the On-/off switch is not
depressed.
❏Only change direction of rotation when the
machine has stopped.
Gear Selector Switch
Two speed ranges can be pre-selected with the gear
selector switch 10:
1st gear:
Low speed range
2nd gear:
High speed range
The setting can be changed with the machine run-
ning, however, not under full load.
Mode Selection Drilling, Impact Drilling
(SB 13-XE)
For drilling, push selector switch 3 left-
ward to the stop.
For impact drilling push the selector
switch 3 to the right.
The selector switch 3 engages noticeably and can be
actuated with the machine running. Carbide tipped
drill bits are required for drilling jobs in concrete,
masonry and brickwall.
Removing securing screw (Figure A)
The chuck is secured against being loosened from
the spindle with securing screw 14.
The chuck must be opened completely for removal of
screw which has left hand thread with securing
screw 14 being removed completely.
Securing screw is reverse-threaded.
If the securing screw is frozen, apply screwdriver to
head of screw and loosen screw by hitting the scre-
wdriver handle.
Unscrewing chuck (Figure B)
Normally the drill chuck can be unscrewed by hand.
Should the drill chuck be seated very tight on the drill
spindle, attach two open-end spanners 16 to the
spanner flats of the drill chuck head or clamp an
Allen key 15 into the drill chuck.
If necessary, hit the key shaft lightly with a plastic
hammer.
Mount the chuck in reverse order.
Sharpening drill bits
Only HSS drill bits in perfect condition (HSS = high
speed steel) should be used for drilling metal. The
appropriate quality is guaranteed by Würth Acces-
sories Programme.
Dust Extraction
❏Dusts from materials such as lead-containing coa-
tings, some wood types, minerals and metal can
be harmful to one’s health. Touching or brea-
thing-in the dusts can cause allergic reactions
and/or lead to respiratory infections of the user
or bystanders.
Certain dusts, such as oak or beech dust, are con-
sidered as carcinogenic, especially in connection
with wood-treatment additives (chromate, wood
preservative). Materials containing asbestos may
only be worked by specialists.
- Provide for good ventilation of the working place.
- It is recommended to wear a P2 filter-class respira-
tor.
Observe the relevant regulations in your country
for the materials to be worked.
Chuck Replacement
Advices for Operation
BM_SB 13-XE.book Seite 13 Montag, 12. April 2010 3:27 15

14
❏Before any work on the machine itself, pull the
mains plug.
❏The ventilation slots of the machine must be kept
clear at all times.
For the replacement of worn out carbon brushes,
spare carbon brushes are stored in the machine.
These are accessible after removing the soft grip 5.
Have the spare carbon brushes replaced only by an
authorised customer service location for Würth elec-
tro-tools.
For all correspondence and spare parts orders,
always include the article number on the type plate
of the machine.
For the current spare parts list of this machine, log
into the Internet under “http://www.wuerth.com/
partsmanager” or ask for a copy at your nearest
Würth branch office.
For this Würth tool, we provide a warranty in accor-
dance with statutory/country-specific regulations
from the date of purchase (proof of purchase by
invoice or delivery note). Damage that has occurred
will be corrected by replacement or repair.
Damage caused by normal wear, overloading or
improper handling is excluded from the warranty.
Claims can be accepted only when the machine is
presented undisassembled to a Würth branch office,
your Würth sales representative or a customer ser-
vice agent for Würth pessure air and power tools.
Disposal
Power tools, accessories and packaging should be
sorted for environmental-friendly recycling.
Only for EC countries:
Do not dispose of power tools into
household waste!
According to the European Directive
2002/96/EC on waste electrical
and electronic equipment and its
incorporation into national law, power tools that are
no longer suitable for use must be separately collec-
ted and sent for recovery in an environmental-fri-
endly manner.
Measured values determined according to
EN 60 745.
Typically the A-weighted noise levels of the machine
are: sound pressure level:
Vibration
Overall vibrational value (vector sum of three direc-
tions) determined according to EN 60 745:
The vibration emission level given in this information
sheet has been measured in accordance with a stan-
dardised test given in EN 60745 and may be used
to compare one tool with another. It may be used for
a preliminary assessment of the vibrational impact.
The declared vibration emission level represents the
main applications of the power tool. However if the
power tool is used for other applications, with diffe-
rent accessories or poorly maintained, the vibration
emission may differ. This may significantly increase
the vibrational impact over the total working period.
An estimation of the level of exposure to vibration
should also take into account the times when the tool
is switched off or when it is running but not actually
doing the job. This may significantly reduce the
exposure level over the total working period.
Identify additional safety measures to protect the
operator from the effects of vibration such as:
Maintain the power tool and the accessories, keep
the hands warm, organisation of work patterns.
Maintenance and Cleaning
Warranty
BM 13-XE: SB 13-XE:
sound pressure level
(LpA) 84 dB(A) 101 dB(A)
sound power level
(LwA) 95 dB(A) 112 dB(A)
uncertainty
K = 3 dB 3 dB
Wear hearing protection!
BM 13-XE SB 13-XE
Impact drilling into con-
crete: Vibrational emis-
sion value a h –12.5 m/s2
uncertainty K = –1.5 m/s2
Drilling into metal: Vibra-
tional emission value a h 3.5 m/s23.5 m/s2
uncertainty K = 1.5 m/s21.5 m/s2
Noise/Vibration Information
BM_SB 13-XE.book Seite 14 Montag, 12. April 2010 3:27 15

15
We declare under our sole responsibility that this
product is in conformity with the following standards
or standardization documents: EN 60 745-1,
EN 60 745-2-1, EN 55 014-1, EN 55 014-2,
EN 61 000-3-2, EN 61 000-3-3 according to the
provisions of the regulations 2006/42/EC,
2004/108/EC.
Technical file at:
Adolf Würth GmbH & Co. KG, Abt PFW
74650 Künzelsau
N. Heckmann A. Kräutle
Chairman of General Manager
Adolf Würth
GmbH & Co. KG
Künzelsau: 18.02.2010
Declaration of Conformity
Subject to change without notice
BM_SB 13-XE - GB Seite 15 Mittwoch, 14. April 2010 3:11 15

16
☞Per altre istruzioni di sicurezza si veda il foglio allegato
Indicazioni di sicurezza per trapani elettrici
Leggere tutte le avvertenze di
pericolo e le istruzioni opera-
tive. In caso di mancato rispetto delle avvertenze di peri-
colo e delle istruzioni operative si potrà creare il peri-
colo di scosse elettriche, incendi e/o incidenti gravi.
Conservare tutte le avvertenze di pericolo e le istru-
zioni operative per ogni esigenza futura.
❏Impiegando trapani battenti usare la protezione
acustica. L’effetto del rumore può causare la per-
dita dell’udito.
❏Utilizzare le impugnature supplementari fornite
insieme all’apparecchio. La perdita del controllo
può comportare il pericolo di lesioni.
❏Quando si eseguono lavori nel corso dei quali
l’utensile accessorio potrebbe arrivare a toccare
linee elettriche non visibili, afferrare l’elettrouten-
sile soltanto alle superfici d’impugnatura. Un
contatto con un cavo elettrico mette sotto tensione
anche le parti in metallo dell’elettroutensile e pro-
voca quindi una scossa elettrica.
❏Durante le operazioni di lavoro è necessario
tenere l’elettroutensile sempre con entrambe le
mani ed adottare una posizione di lavoro sicura.
Per operare con sicurezza con l’elettroutensile è
necessario utilizzare entrambe le mani.
❏Non lavorare mai materiali contenenti amianto.
L’amianto è ritenuto materiale cancerogeno.
❏Prima si posarlo, attendere fino a quando l’elet-
troutensile si sarà fermato completamente. In
caso contrario vi è il pericolo che l’utensile acces-
sorio possa restare agganciato e provocare la
perdita di controllo sull’elettroutensile.
❏Tenere sempre ben saldo l’elettroutensile. Serrando
a fondo ed allentando le viti è possibile che per brevi
momenti si verifichini alti momenti di reazione.
❏Mai utilizzare l’elettroutensile con un cavo danneg-
giato. Non toccare il cavo danneggiato ed estrarre
la spina di rete in caso si dovesse danneggiare il
cavo mentre si lavora. Cavi danneggiati aumen-
tano il rischio di una scossa di corrente elettrica.
❏In caso di elettroutensili che vengono utilizzati
all’aperto, collegarli attraverso un interruttore di
protezione (FI) a corrente di apertura.
❏Al fine di rilevare linee di alimentazione nasco-
ste, utilizzare adatte apparecchiature di ricerca
oppure rivolgersi alla locale società erogatrice.
Un contatto con linee elettriche può provocare lo
sviluppo di incendi e di scosse elettriche. Danneg-
giando linee del gas si può creare il pericolo di
esplosioni. Penetrando una tubazione dell’acqua
si provocano seri danni materiali oppure vi è il
pericolo di provocare una scossa elettrica.
❏Impiegare solo accessori originali di Würth.
È possibile lavorare con la macchina senza
incorrere in pericoli soltanto dopo aver
letto completamente le istruzioni per l’uso
e l’opuscolo avvertenze per la sicurezza e
seguendo rigorosamente le istruzioni in essi conte-
nute. Attenersi inoltre rigorosamente alle indica-
zioni di sicurezza generali che si trovano nel
manuale allegato. Fatevi istruire praticamente
prima di passare all’operazione pratica.
La macchina non può essere umida né
può essere utilizzata in un ambiente
umido.
Prima di ogni impiego controllare la
macchina, il cavo e la spina. In caso di
danni, far intervenire esclusivamente il
Würth master-Service oppure personale
esperto. Inserire la spina nella presa della
corrente soltanto quando la macchina è
spenta.
AVVERTENZA
I
Elementi dell’apparecchio
1 Mandrino a serraggio rapido
2 Collare alberino
3 Selettore «Forare/foratura battente»(SB 13-XE)
4 Commutatore del senso di rotazione
5 Impugnatura morbida
6 Pulsante di arresto
7 Modulo del cavo di rete
8 Interruttore avvio/arresto
9 Asta di profondità
10 Commutatore di marcia
11 Tasto per regolazione dell’asta di profondità
12 Impugnatura supplementare
13 Rotellina di selezione numero giri (BM 13-XE)
14 Vite di serraggio
15 Chiave a brugola
16 Chiave a forcella
Gli accessori illustrati o descritti nelle istruzioni per l’uso
non sono sempre compresi nella fornitura.
BM_SB 13-XE.book Seite 16 Montag, 12. April 2010 3:27 15

17
Dati tecnici
Trapano elettrico
BM 13-XE Trapano battente
SB 13-XE
Numero di ordinazione 702 321 X 702 322 X
Potenza assorbita 600 W 750 W
Potenza resa 300 W 375 W
Num. di giri a vuoto
- 1a marcia
- 2a marcia 0 – 900 min-1
0 – 2500 min 0 – 1200 min-1
0 – 3400 min-1
Numero di giri sotto carico
- 1a marcia
- 2a marcia 0 – 520 min-1
0 – 1500 min-1 0 – 750 min-1
0 – 2100 min-1
Numero di percussioni a vuoto (mass.) – 51000
Num. di colpi nominale (mass.) – 31500
Blocco dell’alberino ••
Sostituzione del cavo (Quik-Lok) ••
Rotazione destrorsa-sinistrorsa ••
Foro Ø in calcestruzzo – 20 mm
Foro Ø in mattone e sabbia calcarea – 22 mm
Foro Ø in acciaio 13 mm 13 mm
Foro Ø in legno tenero 40 mm 35 mm
Apertura mandrino 1,5 –13 mm 1,5 –13 mm
Filetto dell’alberino 1
/
2" ×20 UNF 1
/
2" ×20 UNF
Diametro collare dell’alberino 43 mm 43 mm
Peso (senza cavo né mandrino portapunta) 2,0 kg 2,0 kg
Classe di protezione /II /II
BM 13-XE:
La macchina è ideale per forare nel legno, nel me-
tallo, nella ceramica e nella materia plastica.
SB 13-XE:
La macchina è idonea per l’esecuzione di forature
battenti in mattoni, nel calcestruzzo e nel materiale
minerale; essa è adatta anche per forare ed avvitare
nel legname, nel metallo, nella ceramica e nelle ma-
terie plastiche.
Per danni provocati da uso non conforme alle
norme, risponde esclusivamente l’Utente.
Uso conforme alle norme
BM_SB 13-XE.book Seite 17 Montag, 12. April 2010 3:27 15

18
Bloccaggio alberino filettato
Per una sostituzione semplice e veloce degli utensili
ad innesto/mandrino portapunta, la macchina è
munita di un bloccaggio dell’alberino filettato che
permette di evitare di dover bloccare il mandrino
manualmente opp. con un utensile.
Introdurre l’utensile
Per inserire, aprire il mandrino, inserire la punta o
la lama e serrare il mandrino. Dopo aver fissato la
chiave a cremagliera, girare il mandrino 1/4 volte
in modo tale da fissarlo (pos.➊; 1x „Click»).
Soltanto dopo inzia il bloccaggio dell’utensile conti-
nuando a ruotare con forza il manicotto in direzione
« GRIP,ZU». (Si può udire un rumore stridente
(pos.➋)).
Quando il mandrino viene aperto da un forte
colpo, è possibile che non si chiuda più. Invece
può essere udita una «grattata» (come se il
mandrino venisse fissato nuovamente). In que-
sto caso ruotare la boccola una volta nella di-
rezione di «AUF, RELEASE »; ora può es-
sere chiuso nuovamente.
Rimuovere l’utensile
Aprire il mandrino girando il manicotto in direzione
di «AUF, RELEASE ».
Attraverso l’arresto automatico del mandrino la
punta da trapano non si può torcere all’arresto.
In questo modo il mandrino portapunta può dunque
essere aperto utilizzando una sola mano senza
esercitare pressione contraria.
Durante la rotazione della boccola, dopo 1/4 giri le
ganasce si aprono lasciando libero l’utensile.
Nel caso di forte tensione del mandrino, usare una
chiave a forcella 16 e svitare la boccola con forza.
Osservare la tensione di rete: La tensione della rete
deve corrispondere a quella indicata sulla targhetta
della macchina.
Montaggio dell’impugnatura
supplementare e del modulo del cavo
di rete
In caso di grandi diametri delle punte possono pre-
sentarsi elevate coppie di reazione. In questo caso
l’impugnatura supplementare offre un’ulteriore sicu-
rezza. L’impugnatura supplementare 12 viene fissa-
ta al collare alberino 2.
Premendo il tasto 11 e spostando l’asta di profondi-
tà 9 può essere regolata la profondità di foratura
desiderata.
Collegare il modulo del cavo di rete 7 all’impugna-
tura. La spina deve innestarsi in posizione.
Inserimento-disinserimento
Inserimento momentaneo:
Accensione: Premere l’interruttore 8.
Spegnimento: Lasciare libero l’interruttore 8.
Introdurre l’utensile
click
click
click
click
➊
➋
➡
➡
➡
Messa in funzione
11
9
7
BM_SB 13-XE.book Seite 18 Montag, 12. April 2010 3:27 15

19
Funzionamento continuo:
Accensione: Premere l’interruttore 8 e successiva-
mente il blocco interruttore 6, poi la-
sciare libero l’interruttore.
Spegnimento: Premere e poi lasciare libero l’inter-
ruttore 8.
Regolazione continua del numero di giri
Il numero dei giri può essere regolato tramite la
pressione esercitata sull’interruttore 8.
Preselezione del numero di giri
(elettronica - BM 13-XE)
Con la manopola 13 può essere selezionato il nu-
mero di giri* necessario (anche durante il funziona-
mento).
*I valori indicati sono approssimativi
Dopo prolungati lavori con un numero di giri picco-
lo fare girare la macchina per il raffreddamento per
circa 3 minuti al massimo numero di giri nella velo-
cità a vuoto.
Commutazione del senso di rotazione
L’interruttore ha i seguenti simboli:
Rotazione destrorsa
Rotazione sinistrorsa
Grazie all’interruttore di sicurezza, il commutatore
del senso di marcia puó essere selezionato in posi-
zione di fermo.
❏Azionare il commutatore del senso di marcia solo
ad apparecchio fermo (motore fermo).
Commutatore di marcia
Attraverso il commutatore di marcia 10 è possibile
preselezionare due campi di velocità:
1a marcia:
bassa velocità
2a marcia:
alta velocità
La commutazione può avvenire mentre la macchina
è in azione ma non quando la macchina è sottopo-
sta al carico massimo.
Selettore foratura, foratura battente
(SB 13-XE)
Per la foratura spostare verso sinistra il
selettore 3.
Per eseguire una foratura battente,
spingere verso destra il selettore 3.
Il selettore 3 si incastra in maniera percepibile e può
essere azionato quando la macchina è in esercizio.
In caso di lavorazione del calcestruzzo, di materiali
minerali e di muratura è indispensabile utilizzare
punte in metallo duro.
Smontaggio della vite di sicurezza
(Figura A)
Il mandrino è protetto contro l’allentamento dall’al-
berino filettato con la vite di sicurezza 14.
Per smontare il mandrino esso deve essere comple-
tamente aperto e la vite di sicurezza 14 deve essere
completamente svitata.
La vite di sicurezza ha una filettatura sini-
strorsa.
Se la vite di sicurezza è bloccata, applicare il gira-
vite sulla testa della vite e allentare la vite con un col-
po sul-l’impugnatura.
Svitamento del mandrino (Figura B)
Normalmente il mandrino portapunta può essere
svitato manualmente. Se il mandrino portapunta do-
vesse essere bloccato molto forte sull’alberino filetta-
to, applicare due chiavi a bocca 16 sulle rispettive
superfici della testa del mandrino portapunta oppu-
re inserire una chiave a brugola 15 nel mandrino
portapunta.
Se necessario dare dei leggeri colpi con un martello
di plastica alla chiave.
Il montaggio avviene effettuando le stesse operazio-
ni in sequenza inversa.
min-1
AB C D E F
1a marcia 340 440 530 640 720 900
2a marcia 900 1220 1500 1760 2020 2500
1
Cambio del mandrino
BM_SB 13-XE.book Seite 19 Montag, 12. April 2010 3:27 15

20
Affilatura delle punte
Per il metallo impiegare solo punte HSS (HSS = ac-
ciaio superrapido) che presentano una affilatura
perfetta. Il programma Würth se garantisce la qua-
lità richiesta.
❏Polveri e materiali come vernici contenenti piom-
bo, alcuni tipi di legname, minerali e metalli pos-
sono essere dannosi per la salute. Il contatto op-
pure l’inalazione delle polveri possono causare
reazioni allergiche e/o malattie delle vie respira-
torie dell’operatore oppure delle persone che si
trovano nelle vicinanze.
Determinate polveri come polvere da legname di
faggio o di quercia sono considerate canceroge-
ne, in modo particolare insieme ad additivi per il
trattamento del legname (cromato, protezione per
legno). Materiale contenente amianto deve essere
lavorato esclusivamente da personale specializ-
zato.
- Provvedere per una buona aerazione del posto-
di lavoro.
- Si consiglia di portare una mascherina protet-
tiva con classe di filtraggio P2.
Osservare le norme in vigore nel Vostro paese
per i materiali da lavorare.
❏Prima di iniziare i lavori sulla macchina, sfilare
la spina dalla presa.
❏Tener sempre ben pulite le fessure di ventilazione
dell’apparecchio.
Per la sostituzione di spazzole di carbone consuma-
te, nella macchina si trovano integrate delle spazzo-
le di carbone di riserva. Queste sono accessibili to-
gliendo l’impugnatura morbida 5. Le spazzole di
carbone di riserva possono essere sostituite soltanto
da un Centro autorizzato per il Servizio Clienti per
Elettroutensili Würth.
Per ogni tipo di richiesta o di ordinazione di pezzi
di ricambio, è indispensabile comunicare sempre il
codice articolo riportato sulla targhetta di fabbrica-
zione della macchina.
L’attuale distinta dei pezzi di ricambio di questa mac-
china può essere consultata nel sito Internet «http://
www.wuerth.com/partsmanager» oppure è possibile
richiederla presso la più vicina filiale Würth.
Per questo prodotto Würth, la garanzia è conforme
alle disposizioni di legge vigenti nei singoli Paesi, a
partire dalla data di acquisto (faranno fede la fat-
tura o la bolla di consegna). I difetti subentrati ven-
gono eliminati attraverso una fornitura di ricambio
oppure provvedendo alle dovute riparazioni.
Si esclude ogni prestazione di garanzia in caso di
danni dovuti a normale usura, a sovraccarico, op-
pure a trattamento ed impiego inappropriato.
Reclami possono essere riconosciuti esclusivamente
se l’apparecchio viene consegnato non smontato ad
una filiale Würth, al Vostro rivenditore di fiducia
Würth oppure ad un Centro di Assistenza Clienti au-
torizzato Würth per utensili pneumatici ed elettrou-
tensili.
Avviare ad un riciclaggio rispettoso dell’ambiente
gli imballaggi, gli elettroutensili e gli accessori di-
smessi.
Solo per i Paesi della CE:
Non gettare elettroutensili dismessi
tra i rifiuti domestici!
Conformemente alla norma della
direttiva CE 2002/96 sui rifiuti di
apparecchiature elettriche ed elet-
troniche (RAEE) ed all’attuazione del recepimento
nel diritto nazionale, gli elettroutensili diventati in-
servibili devono essere raccolti separatamente ed
essere inviati ad una riutilizzazione ecologica.
Indicazioni pratiche
Aspirazione polvere
Cura e manutenzione
Garanzia legale
Avvertenze per la protezione
dell’ambiente
BM_SB 13-XE.book Seite 20 Montag, 12. April 2010 3:27 15
This manual suits for next models
1
Table of contents
Languages:
Other wurth Drill manuals