Wylie W2245 Use and care manual

SI 675
Issue B
EDI 8262
Telescopic cranes with derrick pressure sensors CALIBRATION W2245
1
Safety Instrumentation
Copyright 2001 The B & A Engineering Co Ltd
(Wylie Systems).
All rights reserved.
No part of these documents may be reproduced or transmitted in any form or by any means
including photocopy or any other information storage and retrieval system without permission
from Wylie Systems which will not normally be withheld assuming that the material is for
internal use only.
Ref: PAS May 2001
Wylie Systems Rayco Electronic Systems Wylie Systems
Rayco Technology Group Rayco Technology Group Rayco Technology Group
420 North Walnut Ave. 2440, Avenue Dalton. Drury Lane
Broken Arrow, OK SteFoy, P.Q. St Leonards-on-Sea,
USA 74012 Canada G1P 3X1 East Sussex,
England TN38 9XS
Tel.: (918)-252-1957 Tel.: (418)-266-6600 Tel.: (44)-1-424-421-235
Fax.: (918)-252-2048 Fax.: (418)-266-6610 Fax.: (44)-1-424-433-760
W2245
Rated Capacity Indicator
Installation and Calibration
For
Telescopic cranes with derrick pressure sensors
(Frame F45TH410 onward)
Crane Warning Systems Atlanta
1-877-672-2951 Phone
1-678-261-1438 Fax
www.cwsa.biz
55M2245CNE

SI 675
Issue B
EDI 8262
Telescopic cranes with derrick pressure sensors CALIBRATION W2245
2
Contents
1.0 INTRODUCTION............................................................... 3
1.1 System ............................................................................................................... 3
1.2 System Intelligence............................................................................................ 3
1.3 Adaptability ........................................................................................................ 3
2. HOW THE INDICATOR WORKS .......................................... 5
2.1 Pressure Sensor ................................................................................................ 5
2.2 Amplifier ............................................................................................................. 5
2.3 Angle sensor ...................................................................................................... 5
2.4 Anti-two-block switch.......................................................................................... 5
2.5 Length Sensor.................................................................................................... 5
2.6 Display box......................................................................................................... 5
3.0 INSTALLATION ................................................................ 9
3.1 Load (pressure) sensor...................................................................................... 9
3.2 Anti-Two-Block switch ........................................................................................ 9
3.3 Display ............................................................................................................... 9
3.4 Multi-channel Amplifier (optional)..................................................................... 13
4.0 CALIBRATION................................................................ 15
4.1 Keypad Operation ............................................................................................ 15
4.2 Calibration – menu Description........................................................................ 15
4.3 Calibration data................................................................................................ 29
4.4 Dimensions (crane constants).......................................................................... 33
4.5 System Configuration....................................................................................... 38

SI 675
Issue B
EDI 8262
Telescopic cranes with derrick pressure sensors CALIBRATION W2245
3
1.0 INTRODUCTION
1.1 System
The Wylie W2245 Rated Capacity Indicator is a Load, Angle, Radius, Lifting
capacity and Anti-Two-Block Indicator. A display near the operator gives
information to remove the need for guesswork when using the crane. The system
can also be set with limits by the operator to warn of an accidental manoeuvre into
an unwanted area.
1.2 System Intelligence
The system is “microprocessor based”, meaning that there is a computer inside
the box together with operating software. The software is divided into two parts,
each having a distinct mode, the normal operating mode and the calibration mode.
The normal mode is the normal operating status of the unit when turned on. It is
the only mode that the crane operator needs to know. In this mode the operator is
able to read the hook load, radius and angle. The operator is also able to set the
limits, select the hoist, parts of line and boom configuration.
The calibration mode, which allows calibration of the sensors, the radius and other
variables is accessed by a small slide switch located on the I/O board or by
pressing a group of keys on the keypad simultaneously. A password is required to
be entered before the calibration can be changed. No other equipment is
necessary to calibrate the system.
1.3 Adaptability
The system is designed to be fitted on any crane, lattice or telescopic boom, and
with 1 or 2 hoists. Thus its components can vary substantially from one machine
to another.
The software in this system is designed to work on telescopic cranes with derrick
cylinder pressure sensors, other software versions are available.
The heart of the W2245 is the display unit. This box contains all the electronic
components required to convert sensor signals into the meaningful information for
the operator.
The other components are the Load Sensors, Angle Sensor, Extension drum and
the Anti-Two-Block switches. All the above are connected to the display unit to
provide basic data. Junction boxes are also sometimes used to reduce the
amount of wiring going to the display box.

SI 675
Issue B
EDI 8262
Telescopic cranes with derrick pressure sensors CALIBRATION W2245
4

SI 675
Issue B
EDI 8262
Telescopic cranes with derrick pressure sensors CALIBRATION W2245
5
2. HOW THE INDICATOR WORKS
2.1 Pressure Sensor
A robust, high quality device designed for reliable and accurate performance over
the life of the system. It consists of a strain-gauged diaphragm to give an
electrical output proportional to the pressure applied.
2.2 Amplifier
An amplifier is used when the distance between the load cell and the control unit
is too high, generally more than 15m. Beyond this distance, radio waves and
internal resistance of the cable may noticeably affect performance. An amplifier is
also used when signal wires of other devices like angle and length sensors pass
through slip rings.
The amplifier not only amplifies the sensor signal, but also converts it from a
voltage to a current that is then no longer susceptible to external interference.
It is important that the following instructions are adhered to as failure to do so may
result in incorrect calibration of the system
2.3 Angle sensor
A pendulum driven, high precision potentiometer that constantly monitors boom
angle relative to true horizon.
2.4 Anti-two-block switch
The Anti-Two-Block switch is a spring-loaded switch. It is attached to the boom tip
on one end and to a chain leading to a weight assembled around the hoist line at
the other end. When the hook block lifts the weight, the switch becomes
disengaged and the signal is cut.
2.5 Length Sensor
The length sensor is a potentiometer which is located inside the extension drum
fitted to telescopic cranes. As the boom extends, the drum unwinds and the
potentiometer is driven via a gear train. The output is proportional to the boom
extension.
2.6 Display box
The display includes both the operator display panel and the processing unit
where the sensor signals are read and computed to determine the load. The
results are then displayed to the operator using a liquid crystal display screen and
indicator lights. The display is composed of two sections: the I/O board and the
CPU board.

SI 675
Issue B
EDI 8262
Telescopic cranes with derrick pressure sensors CALIBRATION W2245
6
2.6.1 The W2245 input/output board (I/O Board)
The input/output (I/O board) board includes all the wire connections. On this
board, signals are conditioned to be legible for the processor, and the power
supply voltage is conditioned from an input range of 11 to 28 VDC to 5 VDC
to supply both the processor and the sensors.
The reduced voltages and the processed signals from the sensors are
transmitted to the CPU board via a flat ribbon connector. This connector can
be unplugged when the power is OFF by pulling open the side clamps of the
connector on the board.
Also on this board are two fuses, F1 protects the supply voltage to the unit,
use a 2 amp 5x20mm to replace. Fuse F2 protects the VP terminals used to
drive external switches and amplifiers. Use a 1 amp 5x20mm to replace.
There is a dry contact relay for both lockout and external alarm. It has a 2
amp 24 VDC rating. It may be used to control a slave relay. The terminals
available are common (COM) , normally open (NO) and normally closed
(NC). One other relay output driver (OUT1) exists and is used in special
applications to drive additional external relays.
There is a serial communication port RS 232 on the terminal identified as
JP1. This port is for future use.

SI 675
Issue B
EDI 8262
Telescopic cranes with derrick pressure sensors CALIBRATION W2245
7
BATT+: Power Supply(+) (11-28VDC)
BATT- : Power Supply (-)
DR+ : Supply (+) for sensor
TXO+ : Positive Signal of load #1 sensor.
TX0- : Negative Signal of load #1 sensor.
TX1+ : Positive Signal of load #2 sensor.
TX1- : Negative Signal of load #2 sensor.
DR- : Supply (-) for Sensor
AIN0 : Signal from Boom Angle Sensor
AIN1 : Signal from extension sensor
SLEW: Signal from Slew Switch
ATB : Anti-Two-Block Signal
VP : Supply (+) to External Amplifier
0V : Ground for to VP
REL1 : Driver for External Relay
NC : Normally closed contact of relay
NO : Normally open contact of relay
COM Common contact of relay
CAL : Calibration slide switch
JP30 : Connection for Bypass Key
Connections Description

SI 675
Issue B
EDI 8262
Telescopic cranes with derrick pressure sensors CALIBRATION W2245
8
2.6.2 The W2245 CPU board
The Central Processing Unit board reads all the sensor signals delivered
from the I/O board. On the left of the board is situated a multiplexed amplifier
which conditions load cell input. This board can multiplex 2 load sensor
signals. Using the stored calibration data, the CPU converts the signals into
information for hook load. The CPU then compares the information with the
set limits entered by the operator, and the current duty. The CPU will finally
trigger the alarms if a limit is reached or lockout output if overload or Two-
Block situation is sensed.
This board is the operator interface. It carries the alpha-numerical Liquid
Crystal Display (LCD) which provides information such as hook load, boom
angle, preset limits, failure messages, hoist used and parts of lines, and also
the processing circuitry for the 8 button keypad.
The Gain setting is located on this
board, and are denoted JA,JB,JC. 3
small jumpers are used to configure it.
The default value is 333

SI 675
Issue B
EDI 8262
Telescopic cranes with derrick pressure sensors CALIBRATION W2245
9
3.0 INSTALLATION
3.1 Load (pressure) sensor
Refer to section 3.4.3.3 before installation. After installing, make sure that the
load sensor(s) operate properly at all boom angles by using the diagnostic menu
(Refer to operators manual).
3.2 Anti-Two-Block switch
If two switches are to be used at the same time, make sure the proper switch or
junction box is used at the boom tip.
If only one switch will be used and has to be moved from the main tip to the jib tip,
it can be done using an extension wire
No extra wiring is needed, since a standard connector is supplied for the switch. If
a junction box is used, wire according to the supplied drawing.
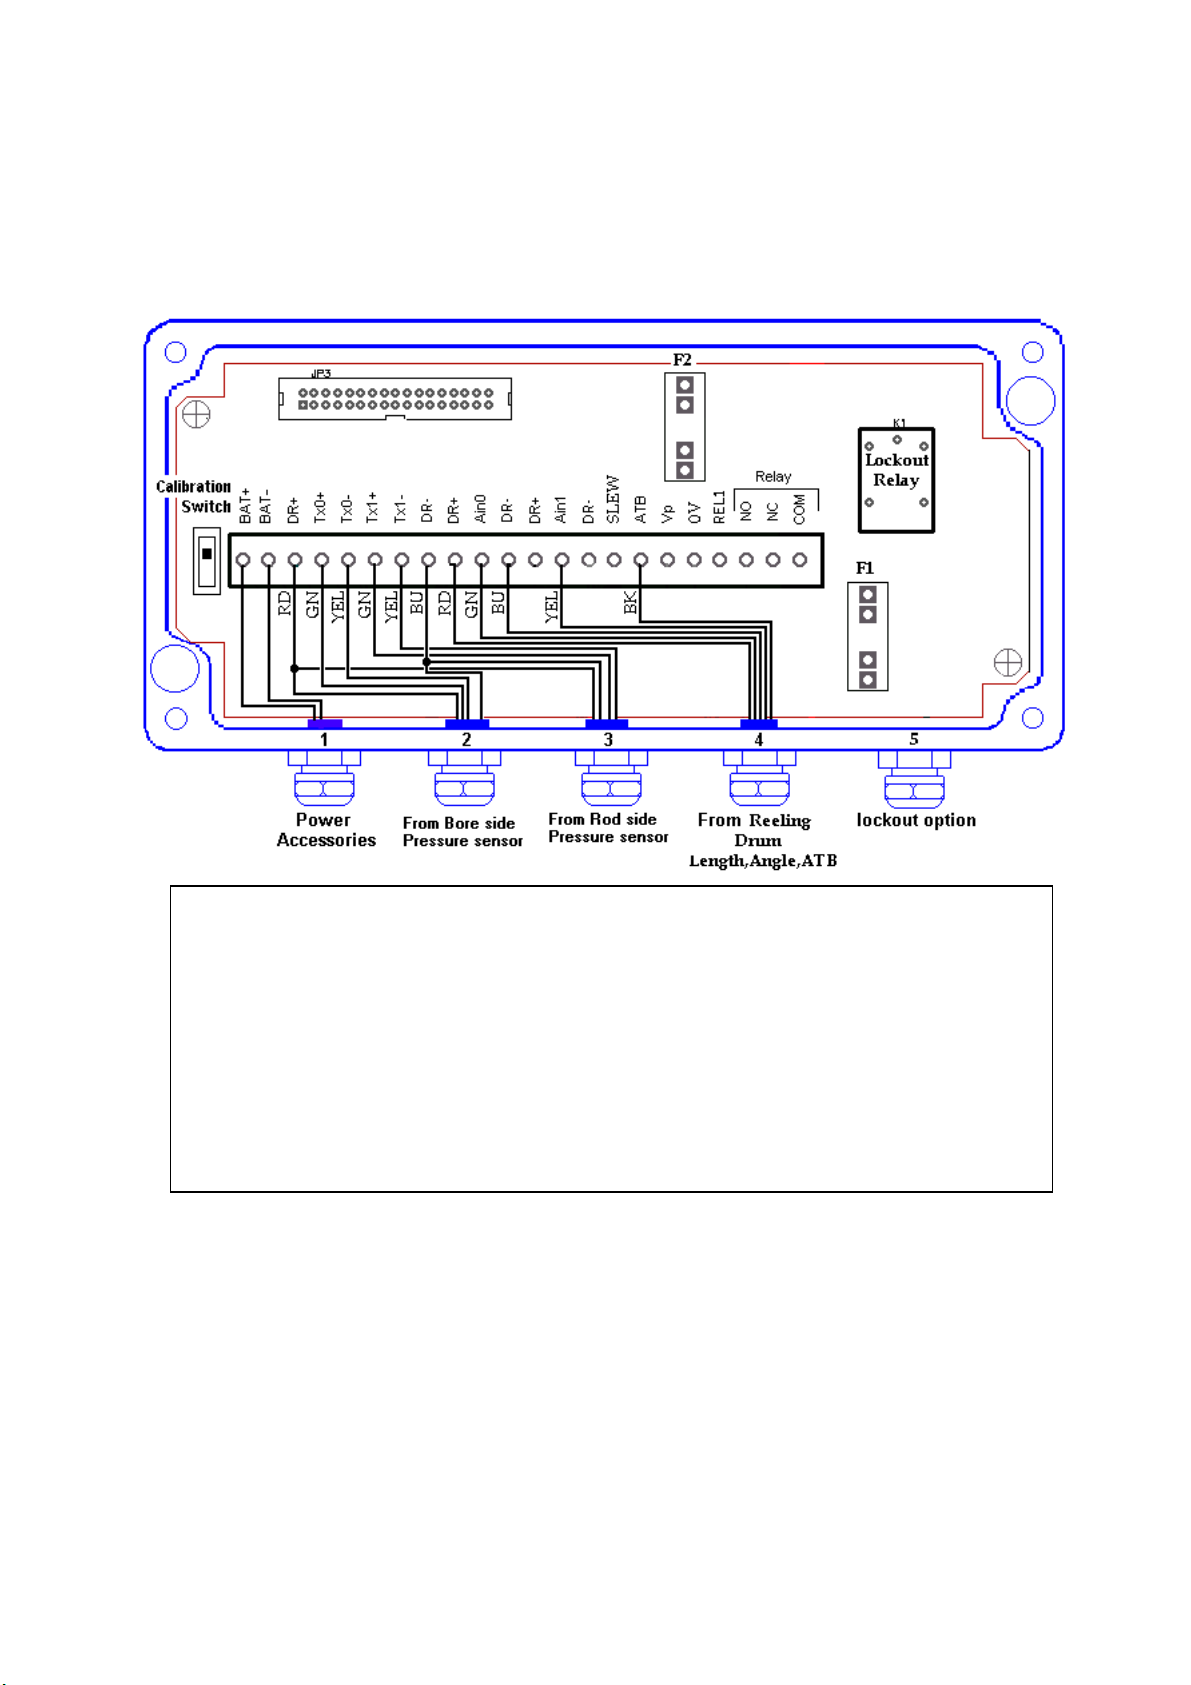
3.3 Display
The display should be located at the front of the cab, where it is readily visible
from the operator’s control position. Take care not to obscure any displays,
control levers, switches or the operator view of the load. Leave sufficient room for
the sensor wires to be fed to the bottom of the display.
If the unit is pre-wired with connectors, simply plug in the connectors. If the unit is
not pre-wired, use the following instructions.
Loosen the four top screws and flip the cover over the box. Proceed gently in
order not to damage the wires or the keypad.
Wire according to the supplied drawing on Figure 3.5. or Figure 3.6, depending if
you use a junction box. Make sure all connections are made properly and
completed before powering the system. When stripping wires, do not drop any
wire ends or debris into the box.
All cable screens should be grounded to the glands of the display box only. Fold
the screen over the rubber sleeve as shown in the diagram below. Use the brass
ring.
Power supply must be from 11 to 28 Volts DC only. If not available, an external
power supply to convert to 12 Volts DC is required. The power lead must be able
to sustain a minimum of 11 Volts with a current of 5 amps if the unit is connected
to a lockout device.

SI 675
Issue B
EDI 8262
Telescopic cranes with derrick pressure sensors CALIBRATION W2245
10
Lockout wires should not load more than 2 amps on the internal relay.
No wires should pass near a radio antenna. All wires must be shielded.
All wires must be fed away from mechanical parts, keep a minimum bending radii
of two inches when static and 4 inches when moving.
Wiring for non-amplified inputs
3.3.1 Internal Amplifier Setting
3.3.1.1
Enter the Diagnostic menu and select sub-section 5, load sensor output
(in bits). TX0 and TX1 represent the outputs from the bore and rod
side sensors respectively, out of a maximum of 1023 bits. Refer to the
Operator Manual for further details of diagnostics.
3.3.1.2
Inside the amplifier, short the two wires designated <CAL> (terminals 1
and 2) together, and note the ‘CAL’ value and the rated capacity value
The lockout connection is according to your lockout configuration. Safe
operation (without alarm) gives a relay status of COM-NO. When an ATB or
Overload condition is detected, the relay status will change to COM-NC.
The ATB signal is a Pull-Up signal During normal operation the signal
must be grounded. When an ATB condition occurs, the ground on ATB Signal
must be released. If the ATB is not used, a jumper must be installed between
ATB and 0V.
Wire colours are according to the Wylie standard cable.

SI 675
Issue B
EDI 8262
Telescopic cranes with derrick pressure sensors CALIBRATION W2245
11
engraved on the bore side sensor. NB. The sensors should not, at
this stage be fitted in the hydraulic circuit.
The displayed value of TX0 is required to be in the range 670 to 875 as
calculated by the formula:-
0TX875
)sensor(ityRatedCapac
CalValue ≅×
If the displayed value is outside the required range, then adjust the gain
settings on the CPU board according to the table below.
JA JB JC GAIN
1 111
2 1 1 100
2 2 1 125
2 4 1 137
2 4 3 188
3 1 1 200
3 3 1 250
3 2 1 333
3 1 2 375
4 1 1 500
4 1 2 624
4 4 2 688
4 1 3 831
4 3 3 1000
Note: While the transducer is not in the hydraulic line it is advisable to go to
section 4.2.8 and set the transducer zero(s) and span(s) as described, this
can be done out of sequence and will avoid having to disconnect and rewire
the transducer more than once.

SI 675
Issue B
EDI 8262
Telescopic cranes with derrick pressure sensors CALIBRATION W2245
12
Wiring for Amplified inputs
3.3.2 Amplified inputs
When amplified inputs are used, (usually in conjunction with slip-rings)
the gain of the display unit must be set to <1> and all gain adjustments
carried out in accordance with section 3.4

SI 675
Issue B
EDI 8262
Telescopic cranes with derrick pressure sensors CALIBRATION W2245
13
3.4 Multi-channel Amplifier (optional)
3.4.1 Installation
The amplifier must be installed on the upper works (slewing portion) of the
crane.
3.4.2 connections
Connections must be made as shown in the diagram below. (Refer also to
the customer connection drawing supplied with this equipment)
3.4.3 Gain Settings
3.4.3.1
Set the gain of the display unit to <1> (Refer to section 2.6.2)
3.4.3.2
Enter the Diagnostic menu and select sub-section 5, load sensor output
(in bits). TX0 and TX1 represent the outputs from the bore and rod
side sensors respectively, out of a maximum of 1023 bits. Refer to the
Operator Manual for further details of diagnostics.
3.4.3.3
Inside the amplifier, short the two wires designated <CAL> (terminals 1
and 2) together, and note the ‘CAL’ value and the rated capacity value
engraved on the bore side sensor. NB. The sensors should not, at
this stage be fitted in the hydraulic circuit.

SI 675
Issue B
EDI 8262
Telescopic cranes with derrick pressure sensors CALIBRATION W2245
14
3.4.3.4
The displayed value of TX0 is required to be in the range 670 to 875 as
calculated by the formula:-
0TX875
)sensor(ityRatedCapac
CalValue ≅×
If the displayed value is outside the required range, then adjust the gain
settings on board 1 according to the table below.
3.4.3.5 Amplifier Gain Setting Table
Ja Jb Jc Gain
11 1 2
2 1 1 200
2 2 1 250
2 4 1 274
2 4 3 372
3 1 1 400
3 3 1 500
3 2 1 666
3 1 2 750
4 1 1 1000
4 1 2 1248
4 4 2 1378
4 1 3 1882
4 3 3 2000
3.4.3.6
Repeat the whole of this section for TX1 (rod side sensor), adjusting the
gain settings on board 2 as necessary.

SI 675
Issue B
EDI 8262
Telescopic cranes with derrick pressure sensors CALIBRATION W2245
15
4.0 CALIBRATION
The calibration section guides the technician and explains the procedures to follow, in
order to calibrate the system rapidly and efficiently.
Before beginning calibration, it is important to verify that all the sensors are connected
properly, that the control unit receives a signal from each sensor, that the signal
received from each sensor is within the receiving limits from the minimum to the
maximum of the sensor’s working range and that each sensor’s signal is optimised to
improve resolution and accuracy.
The calibration of the sensors is performed using software by entering data using the
display’s keypad.
4.1 Keypad Operation
When changing a value in calibration mode using the UP (#2) and DOWN (#4)
buttons, it may take a while to go from, for example 300.0 bar to 250 bar in steps
of 0.1bar . While pressing on the UP (#2) or DOWN (#4) buttons, use a finger
from the other hand and press the ENTER button (#1) or ESC button (#3). The
value now steps in bars instead of tenths of bar. Release the ENTER or ESC
button while still pressing on the UP or DOWN button and the steps return to
tenths of bar. Do not release the Up or DOWN button before the ENTER button
otherwise the value will be entered instantly.
4.2 Calibration – menu Description
The calibration mode is a separate entity of the W2245 system. It is totally
independent of the regular operating mode as if it were a different system. The
purpose of the calibration mode is to adjust the angle, length and load sensor
inputs, to record the datum points of crane operation, and to set up the crane
dimensions.
The calibration mode is accessed by a slide switch located on the I/O Board or by
pressing predetermined buttons on the key pad. The exact procedures are
described in the following section.
+
= decrease x 10
+
= increase x 10

SI 675
Issue B
EDI 8262
Telescopic cranes with derrick pressure sensors CALIBRATION W2245
16
The calibration mode is organized into a logical sequence. A series of some 27
items or sections will appear. The ROLL UP (#2) or ROLL DOWN (#4) button
allows the technician to scroll through these items. Although once in the
calibration menu it is possible to scroll and access any stage of the calibration, it is
recommended to follow the progressive order as described in this manual. This
will prevent calibration of stages with non-calibrated pre-requisite stages.
The sequence for calibration is shown below
1 = Calibration enable/disable
2= ZeroAngle
3 = Span Angle
4 = Zero Extension
5 = Span Extension
6 = zero pres Bore
7 = zero pres Rod
8 = span pres bore
9 = span pres Rod
10 = Boom Cfg#1
11 = No Deduct
12 = No Rooster H
13 = Part Line : 3
14 = Tare Load : 0.0
15 = P1 : 20º retract
16 = P2 : 60º retract
17 = P3 : 60º 1/3 Ex
18 = P4 : 60º FullEx
19 = Boom Moment
20 = Cal Load : 0.0
21 = Load Bend Corr

SI 675
Issue B
EDI 8262
Telescopic cranes with derrick pressure sensors CALIBRATION W2245
17
22 = Load Adjust
23 = Backup
24 = Memory
25 = Calib. Data
26 = Dimensions
27 = Config Menu
4.2.1 Enquiry Mode:
It is possible to enter the calibration mode to look at the settings made
without having to open the display unit. Hold down button 1 and press
buttons 3 and 4 simultaneously, then release all three buttons at the same
time. The system will enter the calibration mode but no access will be
allowed to change anything. Exit by pressing buttons 7 and 8 simultaneously
(Reset).
4.2.2 Calibration Mode:
To enter calibration, turn the system on, wait until the system shows the
basic screen with load, angle, etc. Then move the calibration switch(on the
I/O board) to the CALIBRATION MODE position.
The display will show:-
The system is now in the calibration mode.
By pressing the buttons DOWN (#4) or UP (#2), it is possible to scroll
through the calibration menu.
4.2.3 Return to Normal Operating Mode
To leave the calibration mode and return to the normal operating mode,
simply move the calibration switch, on the I/O board, to the NORMAL MODE
position. The system will automatically reset and return to the normal
operating mode.
If the system was configured during calibration E.G.: Main winch, 4 falls,
Main boom only, it will not retain that configuration and will instead return to
the last configuration set during operating mode.
4.2.4 Password Access
Calib:#2↑- #4↓
1 – Calib Disable
Calib:#2↑- #4↓
1 – Calib Disable

SI 675
Issue B
EDI 8262
Telescopic cranes with derrick pressure sensors CALIBRATION W2245
18
It is possible to scroll through the entire calibration menu with the calibration
enabled or disabled. However, it is not possible to confirm a new calibration
or perform any re-calibration unless menu option 1 shows: CALIB ENABLE.
YOUR PASSWORD:
To enable calibration, scroll down to the CALIB DISABLE message. Press
button #1(ENTER). The system will ask for the password. The standard
password has four numbers, which correspond to the numbers found on the
upper left corner of each button.
The standard password is 2,3,4,5 and this is factory set but may be set to
other combinations if requested at the time of ordering. Enter the numbers
one after the other. If an error is made, start the sequence again or press
the ENTER button twice. Once the system receives the correct password, it
will automatically display CALIB ENABLE. Calibration of the system can now
be performed.
The CALIB ENABLE will remain activate on a permanent basis whether or
not the system is turned off and will be indicated by the letters CAL on the
display when in normal mode. The calibration MUST BE DISABLED once
completed to prevent accidental operator access.
To disable the calibration, scroll to CALIB ENABLE and press ENTER.
Press ENTER twice. The display will show: CALIB DISABLE.
4.2.5 System Configuration
Before beginning the system calibration, it is important to enter basic
information that the calibration function will have to use. This is done using
«25 – Calib. Data», «26 – Dimensions» and «27 –Config Menu». These
menus have been placed at the end because they are normally accessed
just once.
These menus are described in detail later in section 4.3
4.2.6 ANGLE CALIBRATION
4.2.6.1 Zero Angle
Scroll down to «2-ZERO ANGLE» and press ENTER (#1).
Boom down to zero degrees ( main boom parallel to ground ). The
display will show the signal in bits in the upper right-hand corner.
The important aspect of the display in bits is to verify that the signal is
variable through the entire working area of the boom angle, and that the
resolution is above 3 bits per degree.
Calib:#2↑- #4↓
2 – Zero Angle

SI 675
Issue B
EDI 8262
Telescopic cranes with derrick pressure sensors CALIBRATION W2245
19
Press ENTER (#1) to zero and press ENTER again to confirm.
4.2.6.2 Span Angle
Scroll down to «3 -SPAN ANGLE» and press ENTER (#1).
Boom up over 65 degrees (main boom referred to ground). The display
will show, the angle (in degrees) calculated by the system in the upper
right corner. On the bottom line the display will show the signal in bits.
Press ENTER to ‘free’ the angle value (it will flash) and use the set
buttons (#2 and #4 ) to adjust the displayed value. When correct, press
ENTER (#1) to request calibration, press ENTER again to confirm.
4.2.7 - LENGTH SENSOR CALIBRATION
4.2.7.1 Zero Extension
Scroll down to «4-Zero Extension» and press ENTER (#1).
Retract the boom fully. The display will show on the upper right corner
the signal in bits. This must be above 50 and around 100 bits.
Press ENTER (#1) to zero and ENTER again to confirm.
Measure the boom length from foot pin to head sheave pin. Keep this
measurement. You will need it for the span calibration.
4.2.7.2 Span Extension
Scroll down to «5-SPAN EXTENSION» and press ENTER (#1).
Extend fully and measure the boom length, subtract the retracted boom
length from the extended, the result is the extension. This is the value
you need to calibrate. The display will show the extension value
calculated by the system in the upper right corner and the signal in bits
on the bottom line. The system needs a minimum span of 150 bits
above the zero.
Calib:#2↑- #4↓
4 – Zero Extension
Calib:#2↑- #4↓
3 – Span Angle
Calib:#2↑- #4↓
5 – Span Extension

SI 675
Issue B
EDI 8262
Telescopic cranes with derrick pressure sensors CALIBRATION W2245
20
Press ENTER to ‘free’ the extension value (it will flash) and use the set
buttons (#2 and #4 ) to adjust the displayed value. When correct, press
ENTER (#1) to request calibration, press ENTER again to confirm. The
value should be set in metres or feet as defined on the display at start-
up.
4.2.8 - PRESSURE SENSOR CALIBRATION
4.2.8.1Pressure Sensor Zero Calibration (Steps 6 and 7)
To zero the pressure sensors, open the hydraulic lines to both sensors
in order to remove any residual pressure. Make sure the boom is
resting at its lowest point to prevent sudden fall when the line is
opened.
The pressure sensor must be connected according to the schematics
for normal operation.
Scroll to menu 6 ZERO PRES BORE. And press ENTER. The reading
on the upper right corner is in bits. The total scale is 1023. The display
should read between 20 and 50 bits, 235 and 325 when connected
through an amplifier. Press ENTER to zero and press ENTER again to
confirm.
With an amplifier, if the reading is above 325 and below 450, the
resolution of the system will be lower.
To zero the rod pressure sensor (annulus), Scroll down to 7-ZERO
PRES. ANN. Press ENTER. The value on the upper right corner will be
greater than the bore side pressure sensor
The expected reading should be between 100 to 200, or 300 to 400
when using an amplifier. If below these values, negative pressure may
cause the load reading to drop substantially when a load is left hanging
on the hook for an extended period of time. If the value is above 400,
the resolution will diminish.
4.2.8.2 Pressure Sensor Span (Bore Side)
Calib:#2↑- #4↓
6 – Zero Pres Bore
Calib:#2↑- #4↓
7 – Zero Pres Rod
Calib:#2↑- #4↓
8 – S
p
an Pres Bore
Table of contents